Dashboard
After a successful sign in, the application displays the accounts dashboard screen which is also the main page of the application. A user can see a customized dashboard based on the permissions assigned to the user to access the features and corresponding actions.
Based on the contract architecture, a user can belong to the following categories:
- User having access to only one Customer ID which could be business or retail, can see all own accounts on the dashboard.
- User having access to own personal accounts and multiple Customer ID, can see own personal, business, and retail accounts distinctly on the dashboard.
- User having access to multiple Customer IDs, can see the accounts grouped by customer name/ID and whether they belong to retail or business IDs distinctly on the dashboard.
A contract is a service instance that has one or more Customer IDs associated with it. The bank user can create a contract from the Spotlight application based on the permissions that the user can access. The bank user can then select the related companies from the list that must be part of the contract, or the user can also select an unrelated customer information file (CIF) to be part of the contract.
With the introduction of contract architecture of enrolling and maintaining customers, the surfacing of dashboard elements, widgets, charts, filters, and other options are altered such that all elements in the application are driven by permissions and not by user type as it used to be earlier.
An individual who is enrolled into online banking will have access to features and dashboard options and widgets based on the privileges conferred to the user by the contracts to which the user has access. There is no longer a strict classification of a user as a business or a retail user type. All the elements on the dashboard are maintained as features and therefore associated to service types (either retail or business). A user on signing in is presented with a version of the dashboard based on the sort of service defined for the user.
The contract construct also necessitates the need to extend some business only features to a Retail Service Type and in such cases as well it is taken care to surface those features based on user permissions and not the user type.
The icons and groupings across the application are displayed based on the contract(s) to which the user has been given access.
A service is built to extract the following information about the entitlements of a user:
- Number of contracts to which the user has access.
- Permissions contained in the contracts for the user.
- Number of customer information files (Customer ID) under each contract.
- Categorization of these Customer IDs into RETAIL and BUSINESS.
- If the user holds personal accounts under any one of the contracts to which the user has been given access, then the accounts and the Customer ID are flagged as PERSONAL. Additionally, if the user's customer ID and the primary Customer ID in the contract are same with accounts under the Customer ID, then those accounts are classified as personal accounts.
Multi Entity Support: Customers can view the dashboard, perform transfers, or view any request summary and submit requests against the entity associated with the customer during login. The feature is enhanced with Experience APIs to retrieve and post based on the Entity ID of the signed-in user.
- The Entity ID selected by the signed-in user flows through the application through the respective Experience API.
- For all fetch (GET) API calls, the system retrieves the results based on the Entity ID of the signed-in user.
- For all add/update/delete calls, the system passes and posts requests against the Entity ID of the signed-in user.
The feature supports the following modules:
| Authentication | Dashboard | Account Overview |
| Credit Card overview | Cheque Management | Card Management |
| Statements | Dispute Transactions | Service Requests |
| PFM | Savings Pot | Account Settings |
| Sign In Settings | Profile Settings | Consent Management |
| Unified Transfers | Manage Transfers | Manage Beneficiaries |
| Bulk Payments | Bill Payments | Foreign Exchange |
| Portfolio Management | WealthOrder | Approval Matrix |
UX Overview
The application displays a dashboard with a combined view of all business and personal financial assets that the user has been given access to and graphical representation of cash position and synopsis of approvals and requests among other associated sections that are relevant to the signed-in user. The user can switch easily between the retail and business accounts and can distinguish between the accounts. The accounts are segregated by  personal and
  business types at all relevant places in the application during transfers and other flows and icons against each account indicates the type of account. For mobile banking experience, see the mobile banking dashboard.
Additional filtering capabilities are provided to the user to create a tailored view of accounts on the dashboard. The first level of filters provides the user the ability to view a subset of accounts through, default and custom views. An interactive advanced filter  is available to group and sort the accounts.
Dashboard (Online Banking)

Dashboard (Mobile Banking)


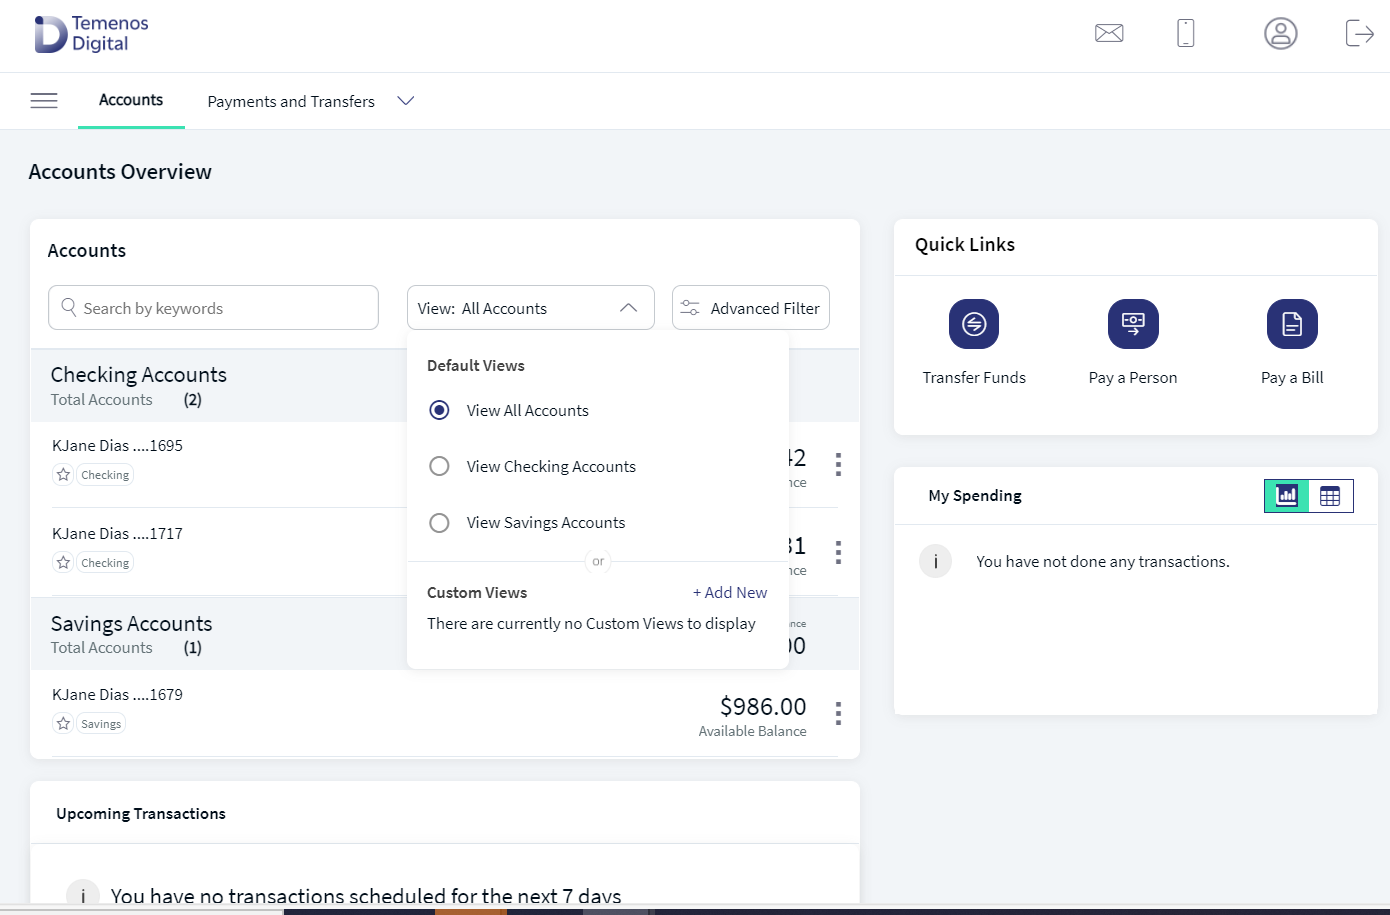
The following elements are available on the online banking dashboard based on the permissions or privileges conferred to the user by the contracts to which the user has access:
- Menus
- Accounts list and filter - default and custom views
- Search bar
- Quick actions (Contextual actions)
- Advanced accounts filter
- Marketing placeholder
- Widgets on dashboard - Approvals and requests, cash management, notifications, and upcoming transactions
- Other actions
- Cash position chart
For mobile banking experience, see the mobile banking dashboard.
Menus
The menu items are displayed depending on the user type and permissions.

Top menu or top bar
Do any of the following:
- Navigate to modules (Accounts, Payments and Transfers. The application displays the Accounts module by default.
- Open the
 hamburger or side menu.
 - Manage profile - profile settings, account settings, alert settings, approval matrix, and security settings.
- Manage alerts and messages.
- Sign out of the application.
Hamburger or side menu
Navigate to modules .
- Accounts
- Transfers
- My Bills
- ACH
- Bulk Payments
- Exchange Rates
- Approvals & Requests
- Wire Transfer
- User Management
- Messages
- Settings
- About Us.
See Menus for more information.
Accounts List and Filter (Default and Custom Views)
The application displays a list of accounts (represented as a row) to which the signed-in user has been given access, along with the balance amount. Different icons distinguish personal and business accounts. The application lists the accounts by their nicknames, if available. Otherwise, it displays the account name with the masked account number (X1234). The accounts list is integrated with Transact to pull the list of accounts to which the authorized user has access. The accounts list includes Savings, Checking, Deposits, Mortgage Facilities, and more. See integration for more information.
The display of the accounts depends on the permission given to the user, (a) for a user with access to only one Customer ID, the accounts are grouped by account type such as Savings, Checking and more, (b) for a user with access to personal accounts and multiple Customer IDs, the accounts are grouped by personal accounts followed by Customer ID names and their respective accounts, (c) for a user with access to multiple Customer IDs, the accounts are grouped by Customer IDs, and (d) if accounts belong to a Customer ID where the user is the account holder, an additional section at the top with the header "Personal Accounts" is shown.
Dual balance (Current Balance and Available Balance) is available for Checking and Savings accounts on the dashboard. A client app property set in Quantum Fabric drives this change. See Balance configuration settings for more information. For Deposits, Credit Card, and Mortgage accounts, single balance only is displayed.
If the available balance of an account is negative balance due to overdraw, the end user will see a label 'Overdrawn'. This option is applicable only for available balance.


To view more details, the user need to click on this account, user will navigate to Account Summary tab.
The personal accounts are represented by  icon and business accounts by
  icon, and the preferred accounts are represented by a blue star.
Click any account row (for example, Checking account) to view the account details and transactions.
Use the accounts list filter as required. The filtering capabilities are provided to the user to create a tailored view of accounts on the dashboard. The first level of view filters provides the user the ability to view a subset of accounts through,
- Default views The options are all accounts, personal accounts, preferred accounts, and view by customer ID.
- Custom views Available as a configurable feature that can be turned on or off from the Spotlight application. This is also controlled by the permissions available to the user.
The options in the accounts list filter are dynamic that only the options relevant to the user appear in the filter. For instance, if a user does not have any favorite accounts, the option is not displayed in the filter view. See Configuration section for more information on visibility of accounts list filter.
From the accounts list, do any of the following:
- Select the required accounts from the accounts filter list and use the custom views as required.
- Use the
 advanced accounts list filter.
 - Use the up or down arrow to collapse or expand the accounts list.
Search Bar on Dashboard
Use the search bar to look for a specific account within the dashboard. Search by account name, account number, or customer ID on the search bar.

See Configuration section for more information on the visibility of search bar.
Quick Actions (Contextual actions)
The quick actions menu  is available in the accounts list to perform actions based on the account type without having to drill down the account. The visibility of the contextual actions for every account is controlled by user permissions. A user must have the permission to perform certain actions on an account. Only then the associated actions are visible.
When a specific action on an account is selected from the contextual menu, the account selection on that page displays various accounts with grouping as personal, business, and within business – account grouping based on Companies (Customer ID).
The following table lists the account type and the corresponding actions that can be performed using the quick actions menu. The quick actions are shown based on the permissions of the user.
| Account type | Contextual Actions |
|---|---|
| Savings |
|
| Checking |
|
| Credit Card |
|
| Loan/Mortgage |
|
| Deposits, IRA, Certificate Share/Deposits |
|
- For any account, the View Statements action is available only when the e-statements option is enabled in the account settings for that account.
- The following actions are available only to those users who have permissions to perform these actions: Make a Transfer, Stop Check Payment, Pay a Bill, Send Money, and Pay Due Amount.
Advanced Accounts Filter
In addition to the accounts list filter, an interactive advanced filter is available to group and sort the accounts. Click the filter icon to open the advanced filter. The options in the filter are dynamic that only the options relevant to the user are displayed. See Configuration section for more information on visibility of advanced filter.

Use the following filter options and click Apply for the filter to take effect:
- Group By: Customer ID or Account Type. By default, Customer ID is selected. The Group By option is displayed only if there are multiple companies or customers.
- Sort By: Account Type, Account Name, or Balance. A user can sort the savings and checking accounts by available balance or current balance on the account dashboard filter. The sort by Balance works on Available Balance or Current Balance based on the configuration set in Quantum Fabric. See Balance configuration settings for more information.
By default, Account Type is selected if the accounts are grouped by Customer ID. The default sort order for group by Account Type is Account Name.
- Type of Accounts: An option each for the different types of accounts held by the user. For example, Checking, Savings, Loan and so on. Select multiple account types as required or select all accounts.
- Currency: An option for each unique currency in all the accounts held by the user, for example - USD. Select currencies as required or select all currencies. The Currency option is displayed only if multiple currencies are involved.
Click Apply to apply the filter.
- Condition for showing total account balances for groupings:
- The total account balance is shown when the Group By type is by Account Type (this is the only and default grouping for Single Customer ID. In multiple Customer ID scenario, the default grouping can be changed to Group by Account type).
- If the grouping is done by Customer ID wise, the Total Account Balances field is not shown.
- If there are multiple currencies within a group, the total account balances is not shown.
- If there is only one account under an account type section, the total account balances is not shown.
- Total balance header changes for each account type - "Total Available Balance" for credit card and term deposit, and "Total Outstanding Balance" for loan.
- The Group By and Sort By options are interconnected. When the Group By is chosen as Account Type, the Sort By Account Type option is not available to the user.
- The Currency and Type of Accounts filters are interconnected and work in conjunction. When a specific currency is chosen, the type of account filter options is then restricted to only those available for the selected currency/currencies. The other options in the account filter remain disabled.
- When a filter is applied other than using the default value, the application highlights with an indication
 . For example, if the accounts are grouped by Account Type or sorted by Account Name.
 - Reset enables the user to reset all the set filters.
- Click X to close the filter.
Marketing Placeholder
Displays promotional and informational content to educate or inform about new deals and offers. This content is in the form of multiple images and user can navigate between the images.
The images may or may not be linked to a page on the bank's website. If required, you can open the images in another tab; the functional flow in the application will not be interrupted.
Widgets on Dashboard
The following widgets are available on the dashboard and depends on the user type and user permissions (access to features and actions).
The widgets show static data.
Upcoming Transactions
Displays the upcoming transactions for the next seven days where the user has been given access to at least view the debit account. The list is sorted by date (closest date first) and displays the payee's name, payment description, and amount. In case any of these transactions cause an overdraft on the associated account, a banner with an associated message is displayed on top of the dashboard. See Account Details and Transactions for more information.
Cash Position Chart
The chart represents the credits and debits using two distinct bars and there is a line graph that shows the average available balance. This is for business users only.
Notifications
Displays notifications such as outage messages, overdraft notification and more. The notifications appear below the top bar and above the accounts list.

The user sees a pop-up message warning that the session is about to expire before the application actually logs out. This is applicable to web channel and mobile native. The user can then choose to either sign out or extend the session.

My Spending - Spending insights
A user who has access to the Personal Financial Management feature (user level permission at Customer ID level) can view the My Spending chart.
This widget shows an aggregate view of spending across all the accounts under the various Retail/Personal Customer IDs in a chart. Total expenditure for the current month across all accounts (checking, savings, and deposit accounts) for the current month is shown.
Other Actions
You can do the following actions:
- Locate the nearest ATM or branch based on your current location or call your banking service for any queries.
- View the privacy policy of the bank.
- View the terms and conditions to use the banking application.
- Access FAQ pages to use the application features.
Business Cash Position Chart
Use the feature to view the cumulative values of all the credits, debits, and available balance for the time frame of choice either for a specific contract or for all accounts across different contracts to which the user has access permissions.
The business cash position chart is applicable to users who has access to a contract which is of Business Service type.
The chart contains the time along its horizontal axis and the currency amount represented along its vertical axis. The three data components of the chart are:
- Credit: Represented by a continuous line graph (green) over the selected period.
- Debit: Represented by a continuous line graph over the selected period.
- Total Balance: Represented by bar graphs at specific points of significance in the selected period.
- The Credit, Debit, and Total Balance for a given data point are displayed on top of the graph.
- The user can hover over the graph to see the respective values for different data points along the graph.
- By default, the Credit component of the graph remains highlighted. The user can switch to a different highlight by tapping on Debit or Total Balance at the top of the graph.
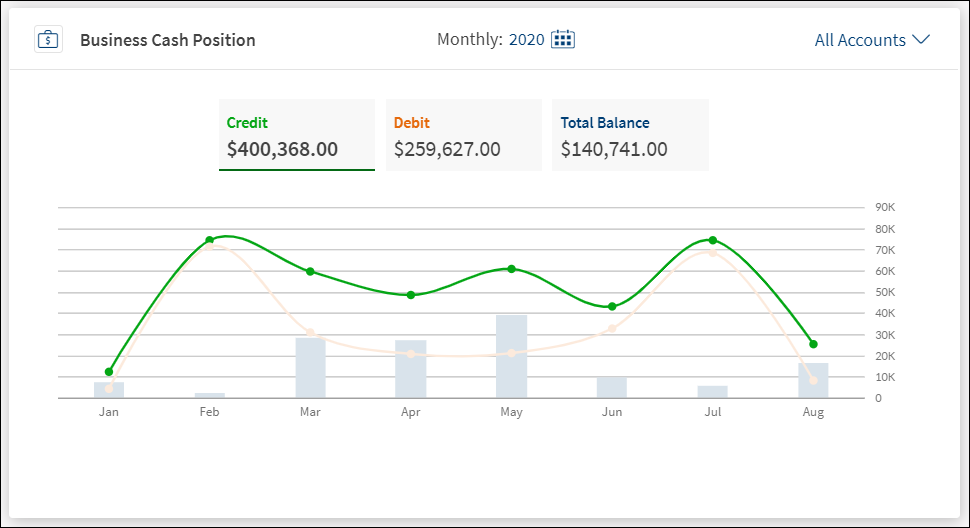
Two filters are provided - Account filter and time frame filter. The default view is a daily view or the current month for All Accounts.
Accounts filter
- All Accounts
- Company-specific accounts
Time frame filter
The user can switch between different views by clicking on the time filter. Use the calendar to specify the period and apply. By default, the graph of all days of the current month is displayed.
| Time Period | Parameter |
|---|---|
| Daily | All days in the selected month and year. The user can pick a particular month of a year from the calendar element and click Apply. The daily graph is shown for the selected month. The graph contains 30/31 data points, one for each day of the month. |
| Weekly | Weeks in the selected month and year. The user can pick a particular month of a year from the calendar element and click Apply. The weekly graph is shown for the selected month. The graph contains data points for each week of the month. |
| Monthly | Months in the selected year. The user can pick a particular year from the calendar element and click Apply. The monthly graph is shown for the selected year. The graph contains twelve data points, one for each month of the year. |
| Yearly | Selected year range. The user can pick a particular range of years from the calendar element and click Apply. The yearly graph is shown for the selected range. |
Dashboard - Mobile Banking
After successfully signing into the phone application, the user sees a customized dashboard based on the permissions assigned to the user to access the features and corresponding actions.
Based on the contract architecture, a user can fall into the following categories.
- User having access to only one Customer ID which could be business or retail, can see all own accounts on the dashboard.
- User having access to own personal accounts and multiple Customer ID, can see own personal, business, and retail accounts distinctly on the dashboard.
- User having access to multiple Customer IDs, can see the accounts grouped by customer name/ID and whether they belong to retail or business IDs distinctly on the dashboard.
The following sections are available on the dashboard depending on the permissions available to the user:
- Menus
- Approvals and requests
- Charts
- Pull-down charts
- Search
- Accounts list
- Accounts list filter
Hamburger or Side Menu
Tap the hamburger menu icon to view the menu. Tap to navigate to the required feature. See Menus for more information.


Approvals and Requests
For an authorized business with the necessary permissions, the application displays the Approvals and Requests section on top section of the dashboard screen. This chart summarizes the number of requests and approvals pending by limit groups – Single Transaction, Bulk Transactions, and Other Requests. All non-monetary requests are grouped as Other Requests. If the user has permission to approve transactions, then this section is displayed with the count in parenthesis. If there are no approval records pending, then the application displays zero records.
On tapping Approvals, the application displays the page with details of the approvals and the user can complete the action. If the user does not have access to approve requests, then the section is not displayed.
If the user has raised few requests, then this section is displayed with the count in parenthesis. If there are no requests raised, then the application displays zero records. On tapping Requests, the application displays the page with details of the requests. If the user does not have access to raise requests, then the section is not displayed.
The individual line items cannot be clicked and are for visual representation only.
Tap the down arrow to view the breakdown of the pending approvals or requests. Tap View All navigate to the Approvals and requests dashboard.
The chart can be expanded or opened by tapping the down chevron to view more details. Details of the recent transactions are present in the drop-down. Tap View All Transactions to navigate to the transactions list.
Pull-down Charts
On the dashboard, the application displays various personal finance management (PFM) pull-down charts applicable to personal and business accounts. The charts are represented as dots below the Approvals and Requests section. The charts cannot be clicked and are for visual representation only. The pull-down charts are an extension to the available charts. The charts can be expanded or opened by tapping the down chevron to see more details of each chart.
Swipe to view the various charts. The following graphs are available in combined view:
- Monthly Business Cash Position: An authorized business user or a combined access user can view a cash position chart with all credits, all debits, and available balance. This chart pertains to the business account position with data of last four months. Expand to view or do the following:
- Arrows on the header to switch the month. The user can switch until the month of the year where records exist.
- Details of credit, debit, and total balances across various companies.
- Net Worth Summary: A user with access to a single Customer ID (personal/retail/business) the dropdown shows the summary for individual accounts. If the user has multiple Customer IDs, the user can see the summary for the different Customer IDs for which the user has access. Expand to view or do the following:
- The total account balance split for the multiple customer IDs.
- Arrows on the header to switch the chart to reflect previous data.
- Monthly Spending: A business user with access to combined access or only retail accounts can view a summary of monthly spending. This chart gives a gives a pictorial summary of the spending for the month. It pertains to the personal account with data of latest month (one month). Expand to view or do the following:
- Split of the different areas of expenditure with percentage and the corresponding amount.
- An option to View All Transactions for that specific month.
- Arrow menus on the month header to navigate to monthly spending summary for previous month.
- Total Account Balance: A business user with access to combined access or only retail accounts can view the bar chart on the summary of personal account balances for the last 12 months. Expand to view or do the following:
- Month-wise account balances indicated against each month for the last 12 months.
- Arrow menus on header to view chart for data from previous year.


Search
Use the search option to find the specific accounts matching the search criteria. The following input parameter can be entered for search:
- Account name
- Account number
- Account type
Accounts List
The application displays a list of accounts (represented as a row) that the user has been given access with balance amount. Dual balance (Current Balance and Available Balance) is shown for Checking and Savings accounts. The personal and business accounts can be distinguished by different icons. The application lists the accounts by their nicknames, if available. Otherwise, displays the account name with the masked account number (X1234). The accounts list is integrated with Transact to pull the list of accounts the authorized user has access, which includes Savings, Checking, Loans, and Deposits. See integration for more information.
The display of the accounts depends on the permission given to the user, (a) for a user with access to only one Customer ID, the accounts are grouped by account type such as Savings, Checking and more, (b) for a user with access to personal accounts and multiple Customer IDs, the accounts are grouped by personal accounts followed by Customer ID names and their respective accounts, (c) for a user with access to multiple Customer IDs, the accounts are grouped by Customer IDs, and (d) if accounts belong to a Customer ID where the user is the account holder, an additional section at the top with the header "Personal Accounts" is shown.
Dual balance (Current Balance and Available Balance) is available for Checking and Savings accounts on the dashboard. A client app property set in Quantum Fabric drives this change. See Balance configuration settings for more information. For Deposits, Credit Card, and Loan accounts, single balance only is displayed.
Do any of the following:
- Select the required accounts from the filter list and use the custom views as required.
- Use the search option to look for a specific account within the dashboard.
- The personal accounts are represented by icon and business accounts by icon.
- The preferred accounts are represented by a blue star.
By default, maximum five accounts are displayed under each account group with the total number of accounts shown in parenthesis on the account group header. If the accounts exceed five, use the View All button to view all the accounts.
Tap any account row (for example, Checking account) to view the account details and transactions.


Accounts List Filter
Use the accounts list filter as required. Also see online banking accounts list filter and advanced filter for more information.
Additional filtering capabilities are provided to the user to create a tailored view of accounts on the dashboard. The first level of view filters provides the user the ability to view a subset of accounts through,
- Default views. The options are all accounts, preferred accounts, and view by company. Only the options relevant to the user appear in the list. Select the view and tap Apply Filter.
- Custom views. Available as a configurable feature that can be turned on or off from the Spotlight application. Select the view and tap Apply Filter.

In addition to the default and custom views, an interactive advanced filter is available to group and sort the accounts. Apply filters to view specific accounts.
Use the following options and click Apply for the filter to take effect:
- Group By: Customer or Account Type. By default, Customer is selected. The Group By option is displayed only if there are multiple companies or customers.
- Sort By: Account Name or Balance. A user can sort the savings and checking accounts by available balance or current balance on the account dashboard filter. The sort by Balance works on Available Balance or Current Balance based on the configuration set in Quantum Fabric. See Balance configuration settings for more information.
- Account Type: An option each for the different types of accounts held by the user. For example, Checking, Savings, Loan and so on. Select multiple account types as required or select all accounts.
- Currency: An option each for each unique currency in all the accounts held by the user, for example - USD. Select currencies as required or select all currencies. The Currency option is displayed only if multiple currencies are involved.
Tap Apply Filter to apply the filter.
- Condition for showing Total Account Balance for groupings:
- The total account balance is shown when the Group By type is by Account Type (this is the only and default grouping for Single Customer ID. In multi Customer ID scenario, the default grouping can be changed to Group by Account type).
- If the grouping is done by Customer ID wise, the Total Account Balances field is not shown.
- If there are multiple currencies within a group, the total account balances is not shown.
- If there is only one account under an account type section, the total account balance is not shown.
- Total balance header changes for each account type - "Total Available Balance" for credit card and term deposit, and "Total Outstanding Balance" for loan.
- The Group By and Sort By options are interconnected. When the Group By is chosen as Account Type, the Sort By Account Type option is not available to the user.
- The Currency and Type of Accounts filters are interconnected and work in conjunction. When a specific currency is chosen, the type of account filter options is then restricted to only those available for the selected currency/currencies. The other options in the account filter remain disabled.
- Reset enables the user to reset all the set filters.
- Click X to close the filter.
Configuration
Permissions
- The visibility of each feature is controlled through the permissions defined for the user.
- The elements on the dashboard are based on the permissions or privileges conferred to the user by the contracts to which the user has access.
- The capability to revoke or restore the features is available in the Spotlight application.
Display of Retail/Business indication for accounts based on access
- The display of the accounts in the drop-down list depends on the permission given to the user.
- The retail/personal or business icons against the accounts to indicate whether the accounts belong to a Retail or a Business Customer ID are shown at all relevant places in the application based on the contracts the logged-in user has been given access.
- When the user has access to only one Customer ID, no personal or business indication is shown at any place in the application.
- When the user has access to only one type of Customer ID (Business/Retail) - this may be through access to a single contract or a mix of contracts, then no personal or business indication is shown at any place in the application.
- A user having access to multiple Customer IDs either through a single contract or multiple contracts sees the icons representing retail/personal or business accounts against the accounts across the application.
- Person icon: Accounts belong to a Customer ID where the user is the account holder in core banking. This Customer ID is marked as the primary Customer ID in the contract.
- Person icon: Accounts belong to a Customer ID of type Retail. The user is not an account holder in the core Banking but has been given access through the contract.
- Business Icon: Accounts belong to a Customer ID of type Business.
Link Retail and Business Profiles option
The option to enable or disable the combined experience of viewing the retail and business profiles is configured in the Spotlight application - Configurations > Business Configurations > Business Banking Configurations.
Other configurations
- The Bank/CU can configure the details to be displayed for a particular account type. Account Nickname can be disabled, two types of balances can be displayed for the accounts; for example, available balance along with current balance; displaying account number can be disabled.
- The Bank/CU can disable a specific account type from being displayed in the account list. For example, loan accounts can be hidden in the account lists; external accounts can be enabled/disabled.
- The Bank/CU can disable/enable the marketing placeholder for the application. In case it is enabled, the content can be controlled by the admin at a user group level.
Extension hook
In case the Bank/CU allows users to add external savings/checking accounts, they can be listed on the account dashboard as External Accounts along with their available balances.
Integration with Transact using IRIS APIs
The list of accounts displayed on the dashboard is integrated with Transact using IRIS APIs to pull the list of accounts the authorized user has access, which includes savings, checking, loans, and deposits
- To show the account list on the dashboard, the list of accounts the user has access is checked. This information of the logged-in user is stored in DBX DB.
- On the dashboard only the accounts for the which the user has access is displayed.
- The account numbers are masked with last 4 digits displayed (XXXXX1234).
- The company name followed by the accounts are displayed.
- Based on the filter, the Available Balance or Current Balance is displayed.
- Online banking field names mapping in Transact:
- Account Name - GB SHORT TITLE(in account)
- Customer ID (CIF) - GB SHORT NAME(in customer)
- Account number - Account number(CUSTOMER.ACCOUNT)
- Account Type - Category
Balance configuration settings
A user can see the dual balance (Current Balance and Available Balance) for Checking and Savings accounts on the accounts dashboard and sort the savings and checking accounts by available balance or current balance on the accounts dashboard filter. A client app property set in Quantum Fabric drives this change.

Dual balance
Dual balance (Current Balance and Available Balance) is available for Checking and Savings accounts on the account dashboard. A client app property set in Quantum Fabric drives this change.
- Key: DUAL_BALANCE
- Value: { "isAvailableBalanceToBeDisplayed" : true, "isCurrentBalanceToBeDisplayed" : false }
Both to be true to display both balances. Otherwise, respective balance is displayed. If this configuration does not exist or both are false, then only Available Balance is displayed.
- For Deposits, Credit Card, and Loan accounts, single balance is displayed and the Sort By option works only on that single balance.
- Applicable to standalone, Transact, and Microservice environments.
- Applies to online banking (OLB), tablet and mobile responsive, and native mobile channels.
-
Applicable to all users - retail, business, and mixed users.
Sort By filter
A user can sort the savings and checking accounts by available balance or current balance on the account dashboard filter. The sort by Balance works on Available Balance or Current Balance based on a client app property set in Quantum Fabric.
- Key: DUAL_BALANCE
- Value: { "isAvailableBalanceToBeDisplayed" : true, "isCurrentBalanceToBeDisplayed" : false }
Sort works on Available Balance - Value: { "isAvailableBalanceToBeDisplayed" : false, "isCurrentBalanceToBeDisplayed" : false }
Sort works on Available Balance - Value: { "isAvailableBalanceToBeDisplayed" : true, "isCurrentBalanceToBeDisplayed" : true }
Sort works on Available Balance - Value: { "isAvailableBalanceToBeDisplayed" : false, "isCurrentBalanceToBeDisplayed" : true }
Sort works on Current Balance
- For Deposits, Credit Card, and Loan accounts, single balance is displayed and the Sort By option works only on that single balance.
- Applicable to standalone, Transact, and Microservice environments.
- Applies to online banking (OLB), tablet and mobile responsive, and native mobile channels.
-
Applicable to all users - retail, business, and mixed users.
Configuration for visibility of favorite icon/flag on accounts dashboard
A configuration is available in the Spotlight application to drive the visibility of favorite icon for accounts on the dashboard and Account Settings screen. This configuration is the number of accounts displayed on the dashboard.
Suppose the configuration is set as 4.
- When this configuration is enabled,
- The favorite icon is visible only when a minimum of 4 accounts are displayed on the dashboard for the user.
- The visibility of the icon is in sync across dashboard and Account Settings screens.
- The number of accounts to make the icon visible is editable in the Spotlight application. The count also includes the external accounts.
- Only one favorite icon configuration is maintained across all breakpoints and mobile app.
- If the configuration is disabled, the favorite icon is displayed at all times, irrespective of the number of accounts on the dashboard.
Scenarios for user with single and multiple customer ID:
| Suppose configuration is set as 4. | ||
| Scenario 1 | User with single customer ID and 1 account type | If the user has only one account type and has less than 4 accounts, then the favorite icon will be visible. |
| Scenario 2 | User with single customer ID and 1 account type | If the user has only one account type and has 4 or more accounts, thenthe favorite icon will be visible. |
| Scenario 3 | User with single customer ID and multiple account types | If the user has more than one account type and the total number of accounts is less than 4 across all groups, then the favorite icon will not be visible. |
| Scenario 4 | User with single customer ID and multiple account types | If the user has more than one account type and the total number of accounts is 4 or more across all groups, then the favorite icon will be visible. |
| Scenario 5 | User with multiple customer IDs | If the user has less than 4 accounts across all customer IDs and all account types, then the favorite icon will not be visible. |
| Scenario 6 | User with multiple customer IDs | If the user has 4 or more accounts across all customer IDs and all account types, then the favorite icon will be visible. |
Configuration for visibility of search bar on accounts dashboard
A configuration is available in the Spotlight application to drive visibility of search bar on the accounts dashboard. This configuration is the number of accounts displayed on the dashboard.
Suppose the configuration is set as 4.
- When this configuration is enabled,
- The search bar is visible only when a minimum of 4 accounts are displayed on the dashboard for the user.
- The visibility of the icon is in sync across dashboard and Account Settings screens.
- The number of accounts to make the icon visible is editable in the Spotlight application. The count also includes the external accounts.
- Only one dashboard search bar configuration is maintained across all breakpoints and mobile app.
- If the configuration is disabled, the search bar is displayed at all times, irrespective of the number of accounts on the dashboard.
Scenarios for user with single and multiple customer ID:
| Suppose configuration is set as 4. | ||
| Scenario 1 | User with single customer ID and 1 account type | If the user has only one account type and has less than 4 accounts, then the search bar will be visible. |
| Scenario 2 | User with single customer ID and 1 account type | If the user has only one account type and has 4 or more accounts, then the search bar will be visible. |
| Scenario 3 | User with single customer ID and multiple account types | If the user has more than one account type and the total number of accounts is less than 4 across all groups, then the search bar will not be visible. |
| Scenario 4 | User with single customer ID and multiple account types | If the user has more than one account type and the total number of accounts is 4 or more across all groups, then the search bar will be visible. |
| Scenario 5 | User with multiple customer IDs | If the user has less than 4 accounts across all customer IDs and all account types, then the search bar will not be visible. |
| Scenario 6 | User with multiple customer IDs | If the user has 4 or more accounts across all customer IDs and all account types, then the search bar will be visible. |
Configuration for visibility of view drop-down and advanced filter on accounts dashboard
For users with a single customer ID, a configuration is available in the Spotlight application to drive the visibility of views drop-down (including custom views listing) and advanced filter on the accounts dashboard. This configuration is the number of accounts displayed on the dashboard.
Suppose the configuration is set as 4.
- When this configuration is enabled,
- The view drop-down and advanced filter are visible only when a minimum of 4 accounts are displayed on the dashboard for the user.
- The number of accounts to make the icon visible is editable in the Spotlight application. The count also includes the external accounts.
- Only one configuration for view drop-down and advanced filter is maintained across all breakpoints and mobile app.
- If the configuration is disabled, the view drop-down and advanced filter are displayed at all times, irrespective of the number of accounts on the dashboard.
- For users with multiple customer IDs, the view drop-down and advanced filter are always visible.
Scenarios for user with single customer ID:
| Suppose configuration is set as 4. | ||
| Scenario 1 | User with 1 account type | If the user has less than 4 accounts, then the view drop-down and advanced filter will not be visible. |
| Scenario 2 | User with 1 account type | If the user has only 4 or more accounts, then the view drop-down and advanced filter will be visible. |
| Scenario 3 | User with multiple account types | If the user has more than one account type and the total number of accounts is less than 4 across all groups, then the view drop-down and advanced filter will not be visible. |
| Scenario 4 | User with multiple account types | If the user has more than one account type and the total number of accounts is 4 or more across all groups, then the view drop-down and advanced filter will be visible. |
Backend Integration - Transact/MS/Mock
Using the runtime configurable parameter (Arrangements_Backend server property) at the Micro App level, an implementation team can configure the backend integration endpoint as HMS/AMS/SRMS, Transact, or Mock as per customer needs for the following. The Arrangement Fabric MA supports the integration.
- The backend integration for all the APIs is mocked (DBX DB) or SRMS based on customer needs.
- The validations are avoided if the module is directly integrated with Transact endpoints.
- When records are created, use these options: Use the DBX DB table records that already exist, or use the Fabric Java layer to build a stubbed or JSON data response directly.
Follow these steps:
- Sign-in to your Fabric console.
- From the left pane, select Environments.
- For your Fabric run-time environment, click App Services.
- Navigate to Settings > Configurable Parameters.
- On the Server Properties tab, go to
Arrangements_BackendField Name and set the Field Value depending on the integration (for example, MOCK). - Click Save.
| Modules | Integration |
|---|---|
|
SRMS or Mock (DBX DB) |
| Pre-login accounts preview (Native) | Mock, AMS and HMS, or Direct Transact integration |
| Cheque Management | Transact via SRMS |
| Account Setting | Transact via SRMS |
| Service Request History | SRMS |
| Dispute Transaction | Mock (DBX DB) via SRMS |
| Remote Deposit Capture | Mock (DBX DB) |
| Cardless Cash Withdrawal | Mock (DBX DB) |
| Bill Pay Registration | Mock (DBX DB) |
| Person to Person Registration | Mock (DBX DB) |
APIs
For the complete list of APIs shipped as part of this feature, see Experience APIs documentation.
In this topic