Manage Requests - Request Overview
Use the functionality to view the complete view of a request and manage the request details. The feature applies to all the bank users to manage the requests assigned with the required permissions.
On the dashboard, from the list of requests, click any row. Alternatively, from the list of tasks, click any task name.
Product and the Product ID are specific to Retail throughout the document.
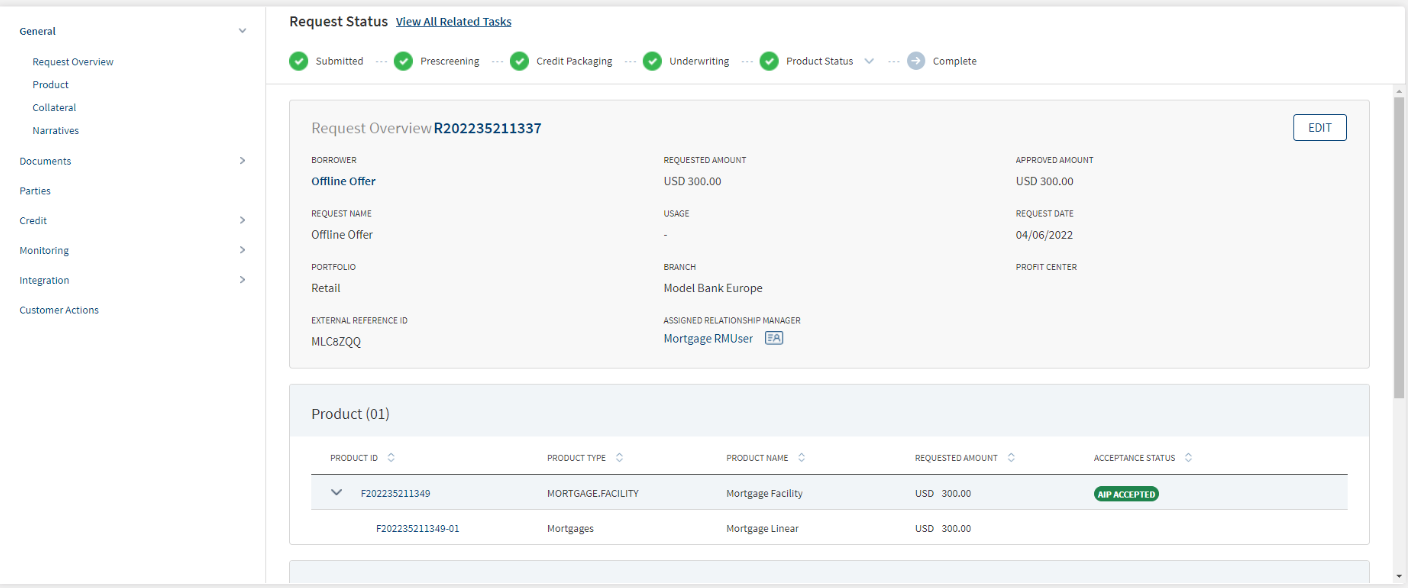
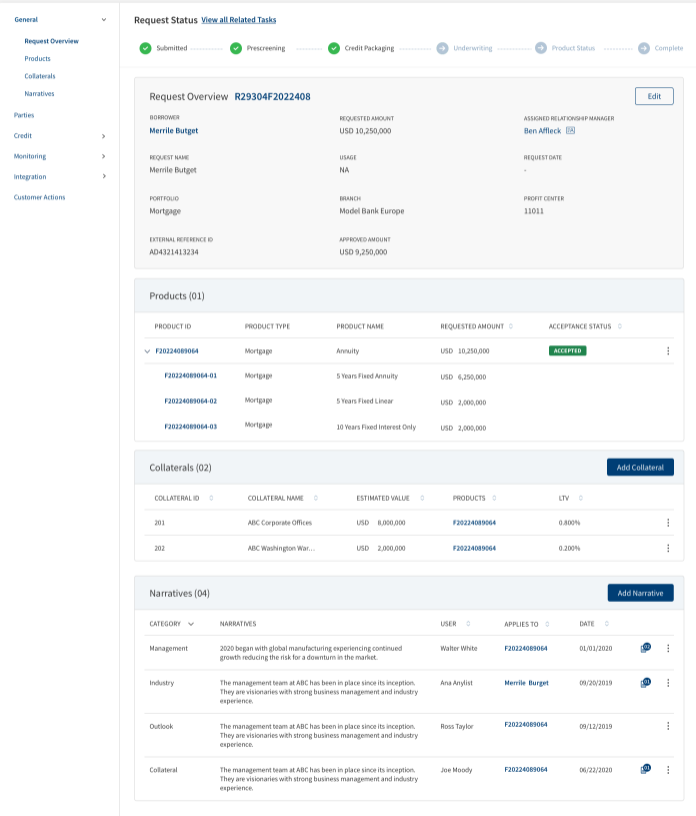
The application displays the request overview screen with the following details:
Left pane menu
The menu items displays on the left pane, and the corresponding details display on the right pane. Click any menu item on the left pane to view the corresponding details on the right pane.
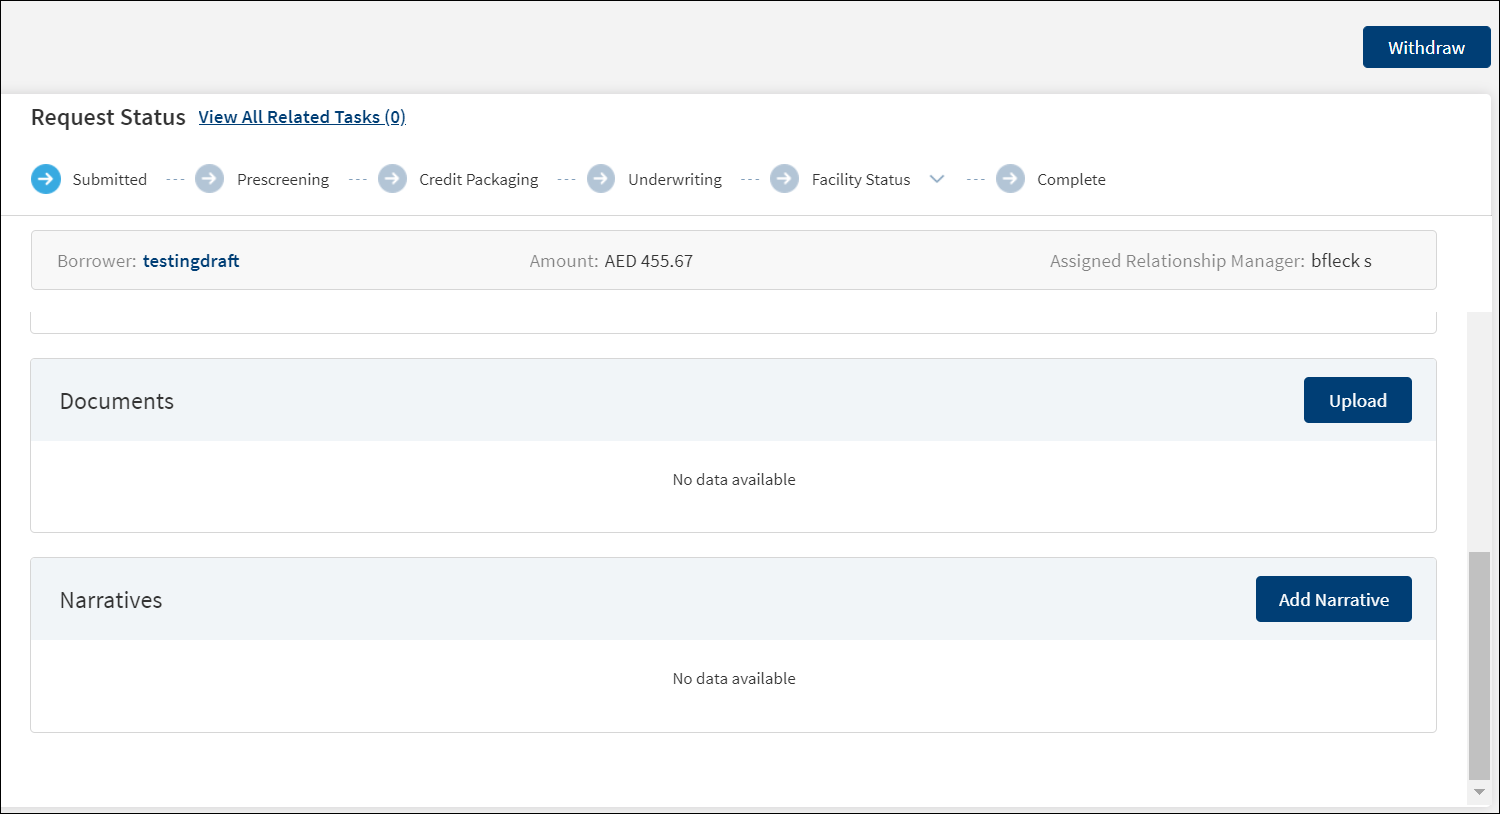
Stage Indicator
- The current stage displays on the stage indicator on top of the screen. The stages are standard for single and multi-facilities.
- These stages are different from the stages in the Facility overview. After the underwriting is done, every Facility will have its own stage and then the stage will be completed after all the facilities have completed the closing stage. The stage will move to Complete only after the underlying facilities are complete in all aspects.
- The sequence of the stages in the request overview are: Prescreening > Credit Packaging > Underwriting > Complete. Credit Packaging is applicable only for corporate lending requests. You can also refer to Retail lending, SME lending, and Corporate lending journeys for more information.
- The Facility status stage has a drop-down list which displays the list of facilities that are under process. After clicking any of the Facility name in the list, user is redirected to the Facility overview of that respective Facility.
- If the Request has been withdrawn by the user, the stage is updated as Withdrawn.
- The stage synchronizes everywhere in the solution such as the RM and Supervisor dashboards, on the stage indicator of the request overview screen, and task status (if applicable).
- When all the tasks in underwriting are complete, in the request overview dashboard, in the current stage, the stage shows underwriting in green.
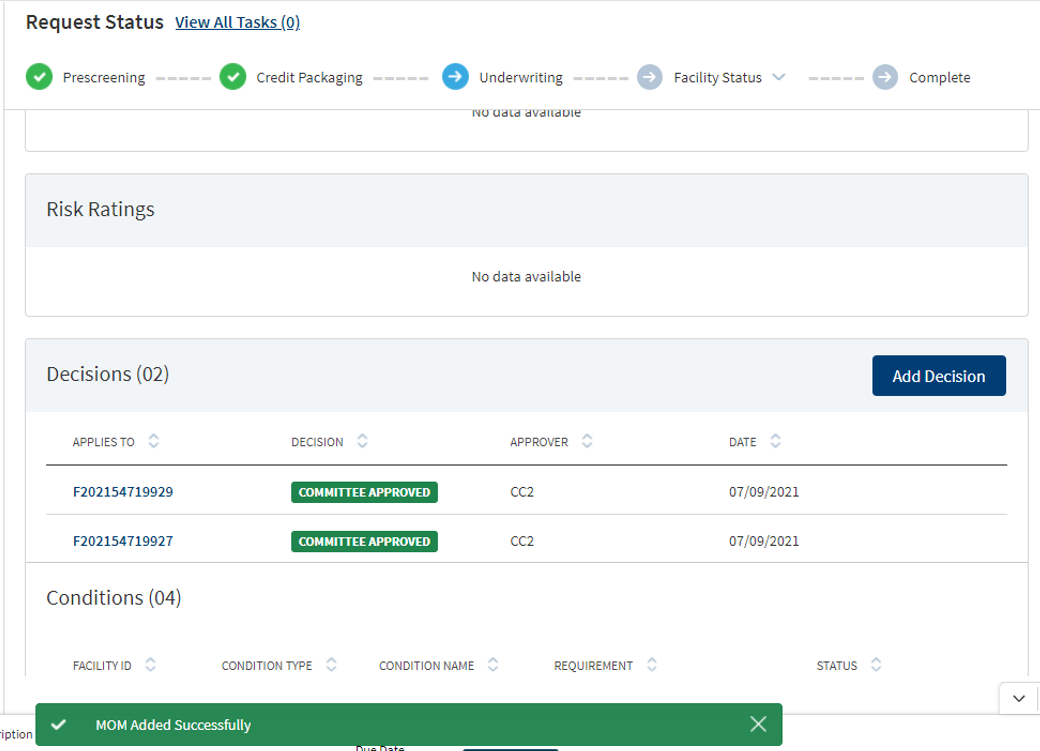
- A bank user can see the current stage of the request with status and view the tasks by clicking the View All Related Tasks link with the count of pending and completed tasks related to the request in parenthesis. In case of multi-facilities request, the number of tasks is the sum of all tasks pending + complete till underwriting and includes the pending + complete tasks generated for each Facility post underwriting.
- After all the task statuses under a stage are either waived or complete, the current stage is marked as completed and the request moves on to the next stage.
- The stage is yet to be visited.
- The tasks are in progress and one or more tasks are to be completed. The application is still in the stage.
- All tasks in the stage have been completed. The application is moved out of the stage.
Withdraw
Click to withdraw an ongoing lending request at any stage of the request.
Task sticky footer
The task sticky footer is displayed on the bottom of the screen. Applicable only if navigated to this screen from the tasks list screen.
Stick header
When the user scroll down the overview screen, the following request overview fields are frozen on top of the screen: Borrower name, Amount, and Assigned Relationship Manager.
General
The application displays the following menu items under the General menu on the left pane. By default, the request overview details are displayed on the right pane.
Request Overview
The application displays the information that were collected during the onboarding process (create request) and few information from the back-end system, for instance, the bank branch, portfolio, and profit center are mapped with the assigned relationship manager.

The following details are displayed:
- Name: Borrower or the main applicant's name.
- Requested Amount with Currency: Displays the total amount of all facilities that were requested in application.
- Approved Amount: Displays once the approval is given.
- Request Name : Displays the name of the borrower.
- Usage: Displays the purpose of the application that was captured during request creation.
- Request Date: The date the application was created.
- Portfolio: The request application - Retail/SME/Corporate that is mapped with the Line of Business attribute.
- Branch: The branch that is mapped to the Relationship Manager (RM).
- Profit Center : The profit center that is mapped to the Relationship Manager (RM).
- External Reference ID: Displays the Application ID. If the application originates from an other application or through another front-end application, then the Reference ID is mapped to this field. This field is generated by the system and cannot be updated by the user.
- Assigned Relationship Manager : This field is generated after the application is claimed. Otherwise, the field displays a hyphen.
- Any field which does not have a value or is blank, displays a hyphen.
After the origination of an overdraft account and a loan account, the details of the product are displayed on the request overview screen and the account number is displayed on the Facility overview screen after receiving from the core/backend on creation of the account.
Edit: Click Edit to modify the details.
- Make the changes as required.
- The following details can be edited: Request Name, Borrower, Usage, Portfolio, and Profit Center.
- When Portfolio field is edited, Profit Center is reset to blank. Select the values from the list.
- Updating the Request Borrower does not affect the Facility Borrower.
- Borrower is a mandatory field. The Borrower field lists all the Entities (with role Borrower and Co-Borrower) under the request (Individual, Business, Group) and the user can select one from the list.
- Click Update Request to save the details. The application displays a confirmation message that the details are updated.
Click Cancel to discard the changes. On the confirmation pop-up that appears, click Yes. The changes are not saved.
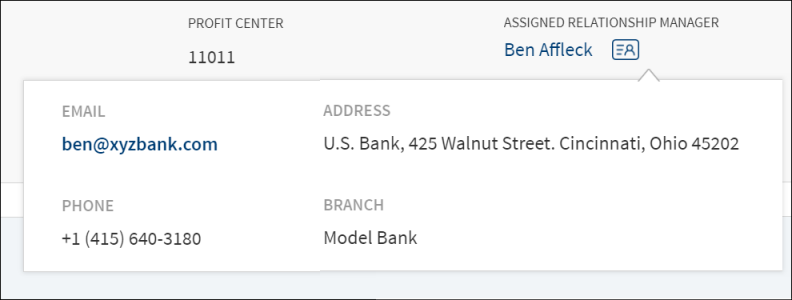
Contact card: Click the icon to view the relationship manager contact card - email, address, phone, and bank branch.
Facility/Product

The term Facility is specific to Corporate, and the term Product is specific to Retail.
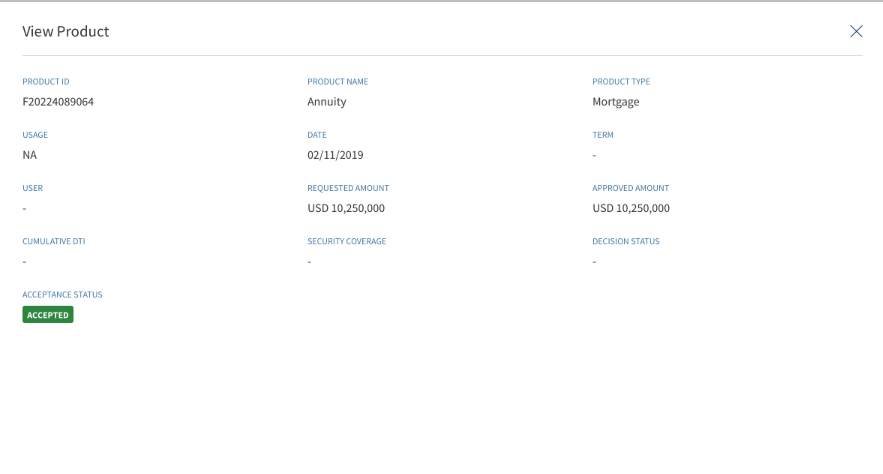
The Product section consists of the following tabs:
- Product ID: This is clickable and navigates to Product Overview.
- Product Name : It displays the name as per the Product in MCMS.
- Product Type: It displays the name as per the Product Group in MCMS.
- Request Amount : Sum of all the Requested Amount of the Drawings.
- Acceptance Status : It displays the Product acceptance.
If the Product has drawings within it , the accordion view on expanding display all the Drawings within the Product.
ODMS retention period for New Prospects
Bank user has the capability to configure different retention period with different status for new prospects depending on the application case.
If the Bank user rejects the application during customer verification, a new retention period is set for this case.
If the applicant withdraws the application before customer verification, a new retention period is set for this case.
If the applicant submits the application with or without co-applicant and if no action is taken on the application or completed or rejected, a new retention period is for this case.
Mortgage
In Mortgage, the end customer avails the loan in single/multiple parts. This single/multiple parts are still part of the main Mortgage loan Product which the customer applied. The multi parts are also called as Drawings. There is a clear distinction between Multi-Product and Drawings within a Product. The former are two different Products and have independent life cycle,whereas the later is part of Product and only the customer can avail the loan in multiple Drawings within the main Product.
Throughout the document, the following terms are used interchangeably: Facility and Product. The Term Product is applicable for Retail Journey. Drawing Section is specific only for Mortgage Flow.
Drawing Overview (Applicable only for Retail Mortgage)
In Mortgages , the end customer avails the loan in single/ multiple parts. This single/multiple parts are within the main Mortgage loan Product which the customer applied for. The multi parts are called as Drawings. There is a clear distinction between Multi-Product and Drawings within a Product. The two different Products have independent life cycle,whereas the later is part of Product and only customer can avail the loan in multiple Drawings within the main Product.
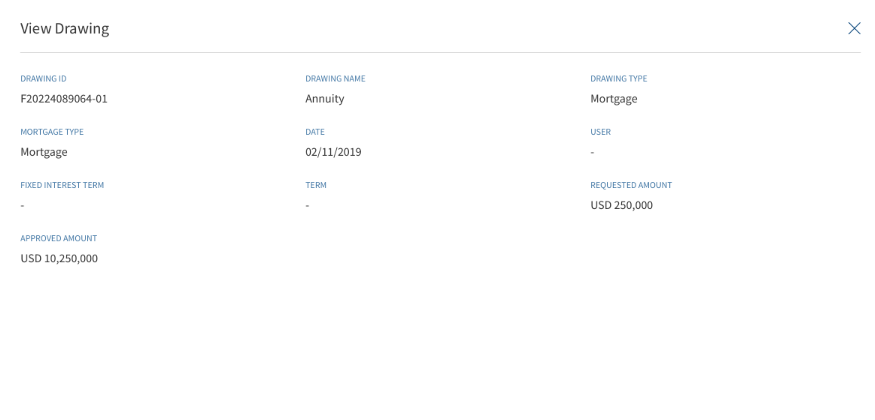
The accordion view displays the following fields:
- Drawing ID : Its click-able and navigates to the Drawing Overview
- Drawing Name: Display the name as per Product in MCMS
- Drawing Type : Display the name as per Product Group in MCMS
- Requested Amount: The drawing wise Requested Amount
- Acceptance Status- To be blank at Drawings level as customer give acceptance at Product level
When the Product row is clicked, the following fields display:
- Product ID
- Product Name
- Usage
- Product Type
- Requested Amount
- Term
- Acceptance Status
- Decision Status
- Approved Amount
- Cumulative DTI
- Security Coverage
- User
- Date
When the Drawing row is clicked, the following fields display:
- Drawing ID
- Drawing Name
- Drawing Type
- Mortgage Type
- Requested Amount
- Term
- Fixed Interest Term
- Approved Amount
- User
- Date
All the fields displayed in the row click in Product & Drawings are read only and not editable from the Request overview.
The application displays the Facility list.
- Click the row to view the Facility details.
- The Facility Summary Section contains both Modification Facility and New Facility depending on the purpose type selected by the user.
- The view Facility screen displays all the modifications made in the Facility. The Facility details section, collateral section and Party section are displayed depending on the selected modification type.
- It displays add & release icon before approval.
- Does not display add & release icon post approval.
- The details are not editable from the view Facility screen, it is only editable from the Facility Overview screen.
Collateral
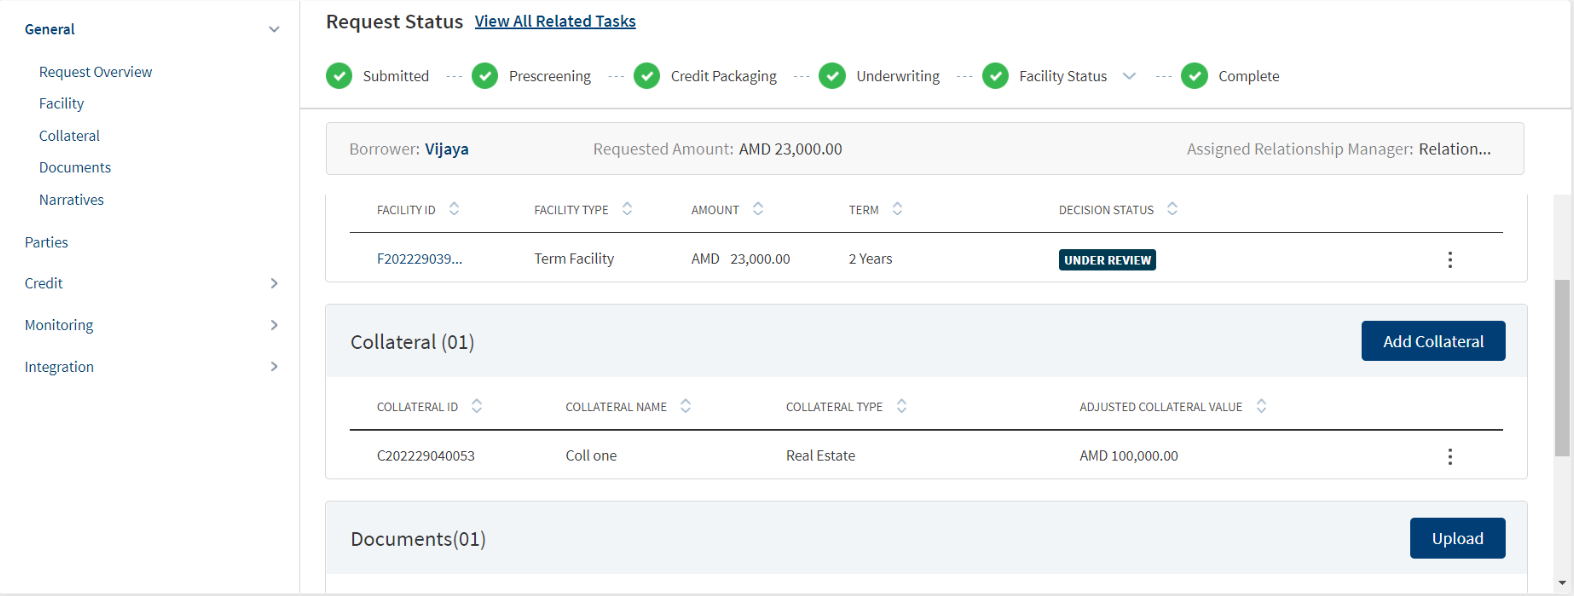
The application displays the list of collateral that is added for New and Modified facilities in support of the request with the following details:Collateral ID, Collateral Name, Collateral Type, Adjusted Collateral Value, Applies To.. Collateral that is linked to all the modification facilities are prepopulated in the summary if the purpose is selected as modification.
This feature is not applicable for SME lending requests and not visible to the bank user roles managing these requests.
If the collateral is linked to multiple facilities (new or modification), each of it is displayed in the Summary. The accordion view displays the Collateral details of the multiple Facilities linked to it, It shows only the Applies To Column in the sub rows. Only the Title Row displays the details of the other Columns, The Contextual Menu displays only in the Tile Row. Clicking the Title Row, navigates to the View Collateral screen and the other sub-rows are not click-able.
All the Collaterals linked to Modification facilities display along with the icon indication in the Collateral section. The Addition and Release collateral requested in Onboarding and Facility Overview is prepopulated along with Add/Release icon indication in the sub rows in collateral summary.
The User can view the request indication in Collateral summary section, Change request icon indication is displayed in sub rows. The icon indication is applicable only for the Modification Facilities. The Collateral sub rows with new facilities in Applies To column do not have any add or release icon. In the Collateral Summary, user sees newly generated modification ID (prefix m, current year and suffix _01,02) for the existing facilities in Applies To Column.
The User can view the approved Collaterals without change request icon indication in Request overview - Collateral section Post Approval of Facilities only for collaterals linked (add and release requested) with modification facilities.
- If the requested Add Collateral is Approved by the Underwriter, then the Collateral displays in the Request Overview - collateral section. The Modification Facility which was approved in add collateral request is displayed in the Applies To column. The Change request icon against the Facility sub row does not display.
- If the requested Release collateral is Declined by the Underwriter, then the Collateral displays in the Request Overview - collateral section. The Modification Facility which was approved in add collateral request is displayed in the Applies To column. The Change request icon against the Facility sub row does not display.
- If the requested Add Collateral is Declined by the Underwriter, and the collateral is linked with only the Modification Facility the collateral does not display in the Request overview - collateral section.
- If the requested Add Collateral is Declined by the Underwriter, and the collateral is linked with other facilities (new or modification), the Collateral displays in Request overview - collateral section. The Modification Facility which was approved in add collateral request does not display in the Applies To column.
- If the requested Release collateral is Approved by the Underwriter, and the collateral is linked with only the Modification Facility the collateral does not display in the Request overview - collateral section.
- If the requested Release collateral is Approved by the Underwriter, and the collateral is linked with other facilities (new or modification), the Collateral displays in Request overview - collateral section. The Modification Facility which was approved in add collateral request does not display in the Applies To Column.
- In the modification document if an add collateral modification is approved by the underwriter, the collateral modifications section displays in the document.
- If the add collateral modification is approved,only the Added Collateral section displays, similarly only if the release party is approved the Released Collateral section displays in the document.
- In the end of the terms and conditions the Primary borrower name gets populated dynamically.
Add Collateral Modification Document
Release Collateral Modification Document
If the selected Purpose is only Modification ,a User can view the Help text which redirects to Facility overview for any Request modification, the Add Collateral button and Contextual menu do not display.
Perform any of the following:
- Click Add Collateral to add a collateral to the request.
- Only the New Facilities are listed in the Applies To Column.
- Use the context menu as required.
- Click Edit to modify the details.
- In Edit Collateral screen only the Applies To section is editable.
- All the new and modification facilities are listed in edit collateral screen - Applies To section.
- Only the New Collaterals can be Selected/Deselected.
- If the Facilities are linked to the collateral ,user will see Modification Facilities along with new facilities in the Applies To column.
- User can view only edit option in contextual menu if collaterals are linked with only modification facilities.
- Edit and Delete options are displayed in contextual menu (Title row) if collaterals are linked only with New Facilities.
- User can view only edit option in contextual menu if collaterals are linked with both New and Modification Facilities.
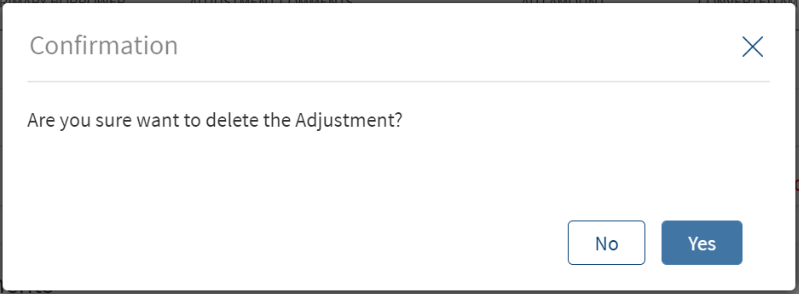
- Click Delete to remove the record. In the confirmation pop-up that appears, click Yes. The record is removed.
When the collateral is deleted from request overview, the collateral will be removed (delinked) from the request and the Facility attached to the collateral in the request. The collateral section is updated in the Facility overview section accordingly. When a collateral is deleted from request overview, the collateral will remain in the entity overview of the respective owner, but the Facility ID link field gets updated in the entity overview of the collateral owner. The Facility ID field in the Entity overview - collateral section is unmapped. Delete option is displayed only for OPS user and Supervisor user as per User Permissions.
- Click the row to view the details.
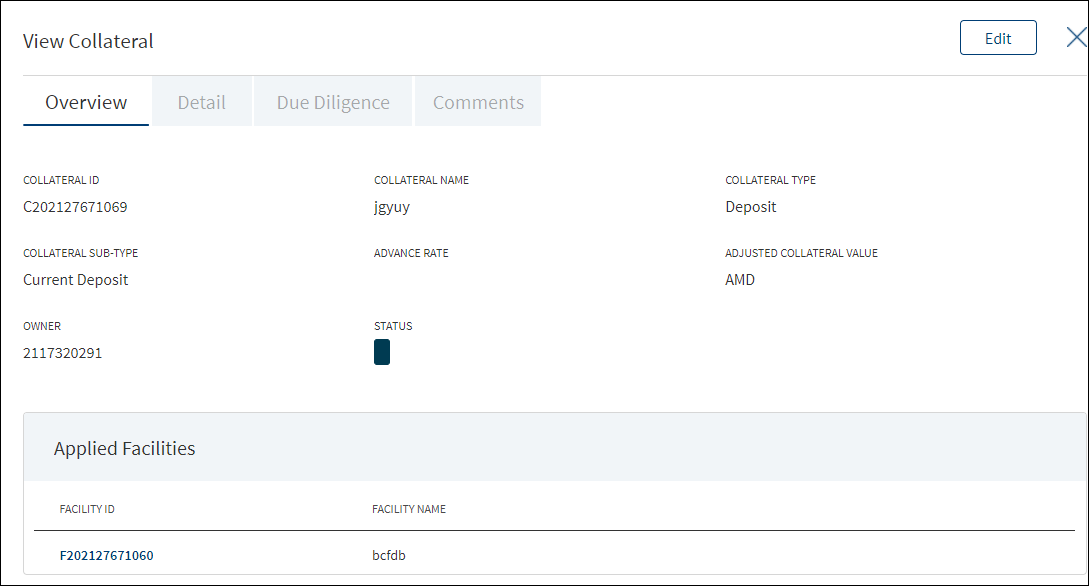
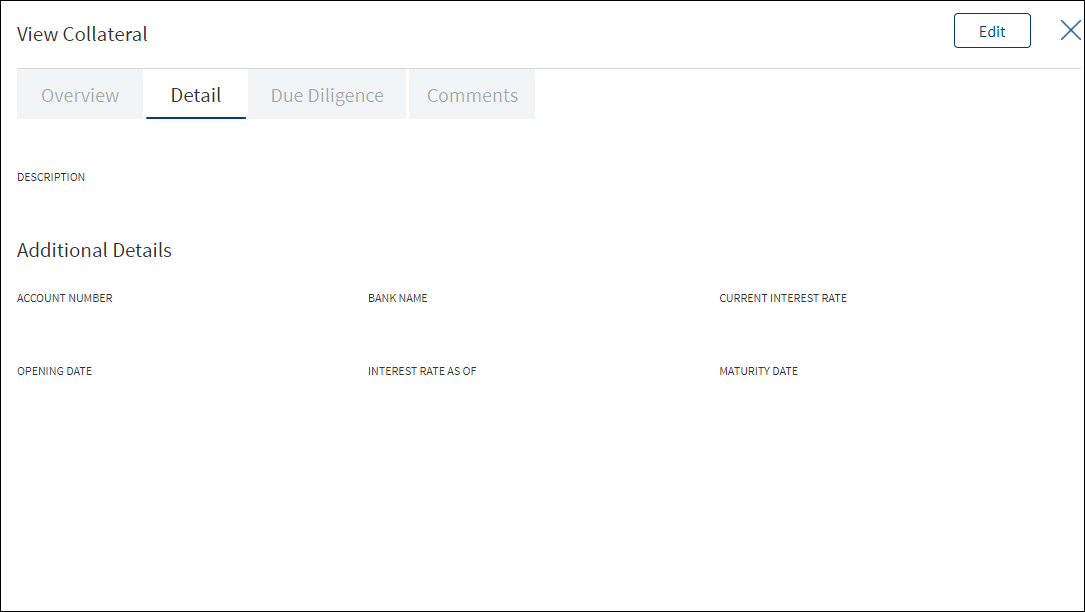
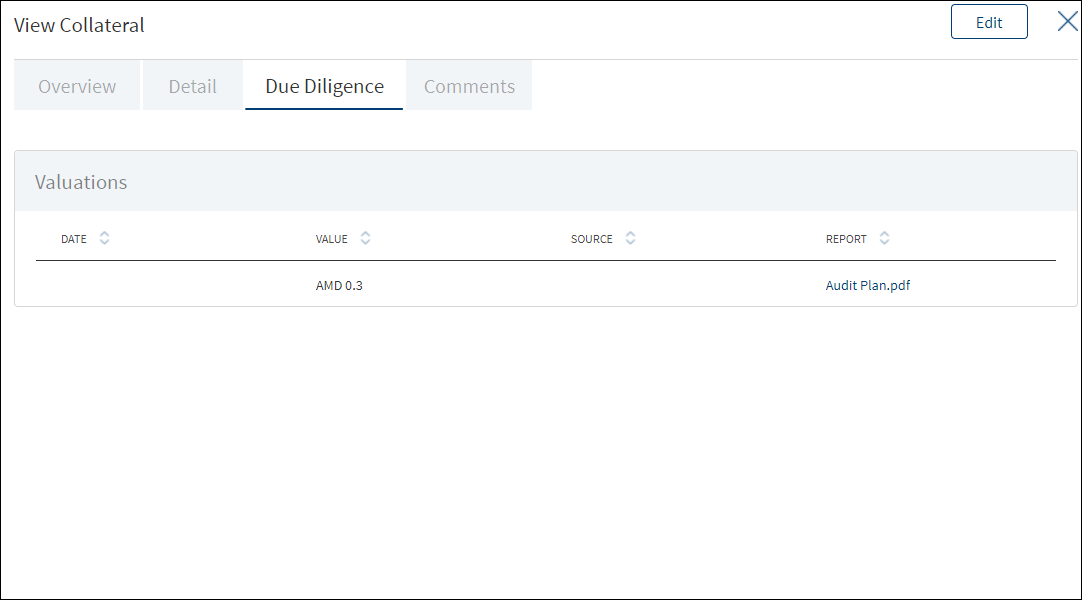
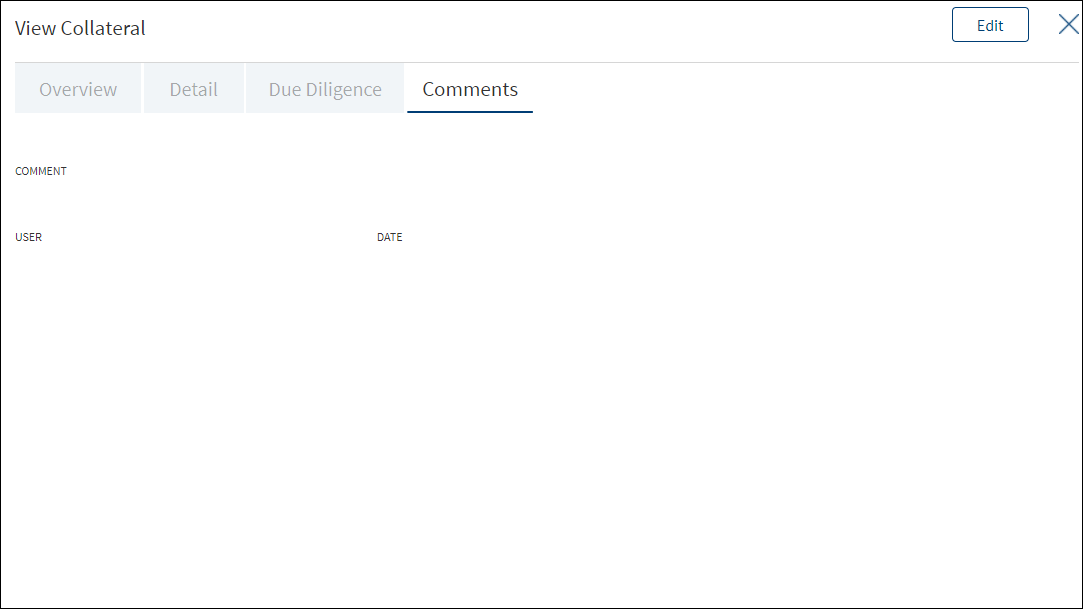
 Additional details based on the selected collateral type and collateral sub-type.
Collateral Type
Collateral Sub-Type
Tabs
Overview
Details
Due Diligence
Comments
Real Estate
- Agriculture
- Residential
- Commercial Industrial
- Mixed Use
- Special
Advance Rate
- Adjusted Value = Appraisal Value X Advance Rate (auto calculated)
- Is Insurance Required? (Yes/No)
Status
Linked Facilities
- Description
- Usage
- Usage Restriction
Usage Details
- Additional
Details
- Property Type
- Office space
- Industrial
- Multi-Family
- Retail
- Property Status
- Size (Sqft)
- Built up Area (Sqft)
- Under Lease
- Year of Construction
- Plot Number
- Section
- Plan
- Land Registry Number
- Land Registration Date
- Land Registry District
- Mortgage Registration number
- Mortgage Registration Date
- Mortgage Rank
- Pari Passu
- Pari Passu Percentage –(Displayed only when Pari Passu is checked.)
-
Occupancy
- Owner
- Occupied
- Investment
- Location
- Address name
- Country
- State/Province
- City
- Address 1
- Address2
- Postal Code
- Valuation
- Date
- Value
- Source
- Report
- Insurance (If Insurance required is yes)
- Insurance company
- Required coverage
- Actual Cash Value
- Extended replacement cost
- Full Replacement value
Agent name
Policy Number
Coverage Amount
Agent Phone
Policy Type
Deductible Amount
Agent Email
Expiration date
Additional Insured
Other Due Diligence
Date
Type
Status
Report - Environment, Report, Flood Report etc.
Comments
Deposits Savings
Current
Deposit
Fixed Deposit
Recurring Deposit
- Advance Rate
- Adjusted Value
- Status (Internal/ External)
- Linked Facilities
- Description
- Additional Details
- Account Number
- Bank Name
- Current Interest rate
- Opening date
- Interest rate as of
- Maturity date
- Valuation
- Date
- Value
- Source
- Report
Comments Equipment Machinery
Office
Other Equipment
- Advance rate - Numeric
- Adjusted value
- Salvage Value
- Insurance required?
- Additional owners
- Status (Internal/ External)
- Linked Facilities
- Description
- Usage
- Usage Restriction
- Usage Details
- Additional Detail
- New or Used
- Make
- Address name
- Country
- State/Province
- City
- Address 1
- Address
- Postal Code
- Model
- Manufacturer
- Year of Manufacture
- Useful Life
- Location
- Address name
- Country
- State/Province
- City
- Address 1
- Address
- Postal Code
- Valuation
- Date
- Value
- Source
- Report
- Insurance (If Insurance required is yes)
- Insurance company
- Required coverage
- Actual Cash Value
- Extended replacement cost
- Full Replacement value
Agent name
Policy Number
Coverage Amount
Agent Phone
Policy Type
Deductible Amount
Agent Email
Expiration date
Additional Insured
Comments Instruments - notes
- Letter of Credit
- Letter of Guarantee Assignment of Lease
- Other Instrument
- Advance Rate
- Adjusted Value
- Status (Internal/ External)
- Linked Facilities
- Description
- Additional Details
- Issuer name
- Document number
- Date of Issue
- Place of Issue
- Expiry date
- Valuation
- Date
- Value
- Source
- Report
- Insurance (If Insurance required is yes)
- Insurance company
- Required coverage
- Actual Cash Value
- Extended replacement cost
- Full Replacement value
Agent name
Policy Number
Coverage Amount
Agent Phone
Policy Type
Deductible Amount
Agent Email
Expiration date
Additional Insured
Comments Inventory Raw Materials
Finished Goods
MRO
- Advance Rate
- Adjusted Value
- Status (Internal/ External)
- Linked Facilities
- Description
- Additional Details
Stock Type
Stock Quantity
Debtor Outstanding
Creditor Outstanding
Location
- Address name
- Country
- State/Province
- City
- Address 1
- Address
- Postal Code
- Valuations
- Date
- Value
- Source
- Report
- Insurance (If Insurance required is yes)
- Insurance company
- Required coverage
- Actual Cash Value
- Extended replacement cost
- Full Replacement value
Agent name
Policy Number
Coverage Amount
Agent Phone
Policy Type
Deductible Amount
Agent Email
Expiration date
Additional Insured
Comments Securities - Stocks
- Bonds
- Mutual Funds
- Advance Rate
- Adjusted Value
- Status (Internal/ External)
- Linked Facilities
- Description
- Additional Details:
- Security Name
- Security ID
- Date of Issue
- ISIN/CUSIP
- Quantity
- Industry
- Country
Valuations
- Date
- Value
- Source
- Report
- Insurance (If Insurance required is yes)
- Insurance company
- Required coverage
- Actual Cash Value
- Extended replacement cost
- Full Replacement value
Agent name
Policy Number
Coverage Amount
Agent Phone
Policy Type
Deductible Amount
Agent Email
Expiration date
Additional Insured
Comments Vehicles Automobile
Truck
Trailer
Boat
Aircraft
Other Vehicle
- Advance rate
- Adjusted value
- Salvage value
- Insurance required?
- Additional owners
- Linked Facilities
- Description
- Usage
- Usage Restriction
- Usage Details
- Additional Details
- New or Used
- Year
- Manufacturer
- Make
- Useful Life
- Model
- Vehicle ID number
- Registration number - Appears only if the vehicle is used
- Registration Expiry - Appears only if the vehicle is used
- Location
- Address name
- Country
- State/Province
- City
- Address 1
- Addres
- Postal Code
Valuations
- Date
- Value
- Source
- Report
- Insurance (If Insurance required is yes)
- Insurance company
- Required coverage
- Actual Cash Value
- Extended replacement cost
- Full Replacement value
Agent name
Policy Number
Coverage Amount
Agent Phone
Policy Type
Deductible Amount
Agent Email
Expiration date
Additional Insured
Comments Insurance Life Insurance - Advance rate
- Adjusted value
- Beneficiary
- Status
- Linked Facilities
- Description
Additional
Insured Customer
Policy Number
Contract Start date
Contract Expiry date
Valuations
- Date
- Value
- Source
- Report
Comments - Click Edit to modify the details or click X to close the form.
This section only displays the list of New Facilities.
- Click Add Collateral in the Request Overview screen to add a collateral to the request.
Only existing collateral can be added from the Request Overview screen. A new collateral can be added only from the Entity Overview screen.
- The Add Collateral page is categorized into four tabs.
- Overview: The general details of the collateral are displayed on this screen such as:
- Collateral ID
- Collateral Name
- Collateral Type
- Collateral Sub-Type
- Advance Rate
- Adjusted Collateral Value
- Is Insurance Required
- Owner
- Source
- Status
- Facilities that are linked to the collateral. Click the Facility ID to view Facility overview details.
- Detail: The Detail tab displays the following sub-categories of the collateral. The sub-categories are displayed based on the selected collateral type.
- Description
- Usage
- Additional Details
- Location
- Due Diligence: The Due Diligence tab displays the following sub-categories of the collateral.
- Valuations
- Insurance
- Other Due Diligence
- Comments - Enter the comments if any for the collateral.
- Overview: The general details of the collateral are displayed on this screen such as:
- Click Add Collateral to add a new collateral to the list.

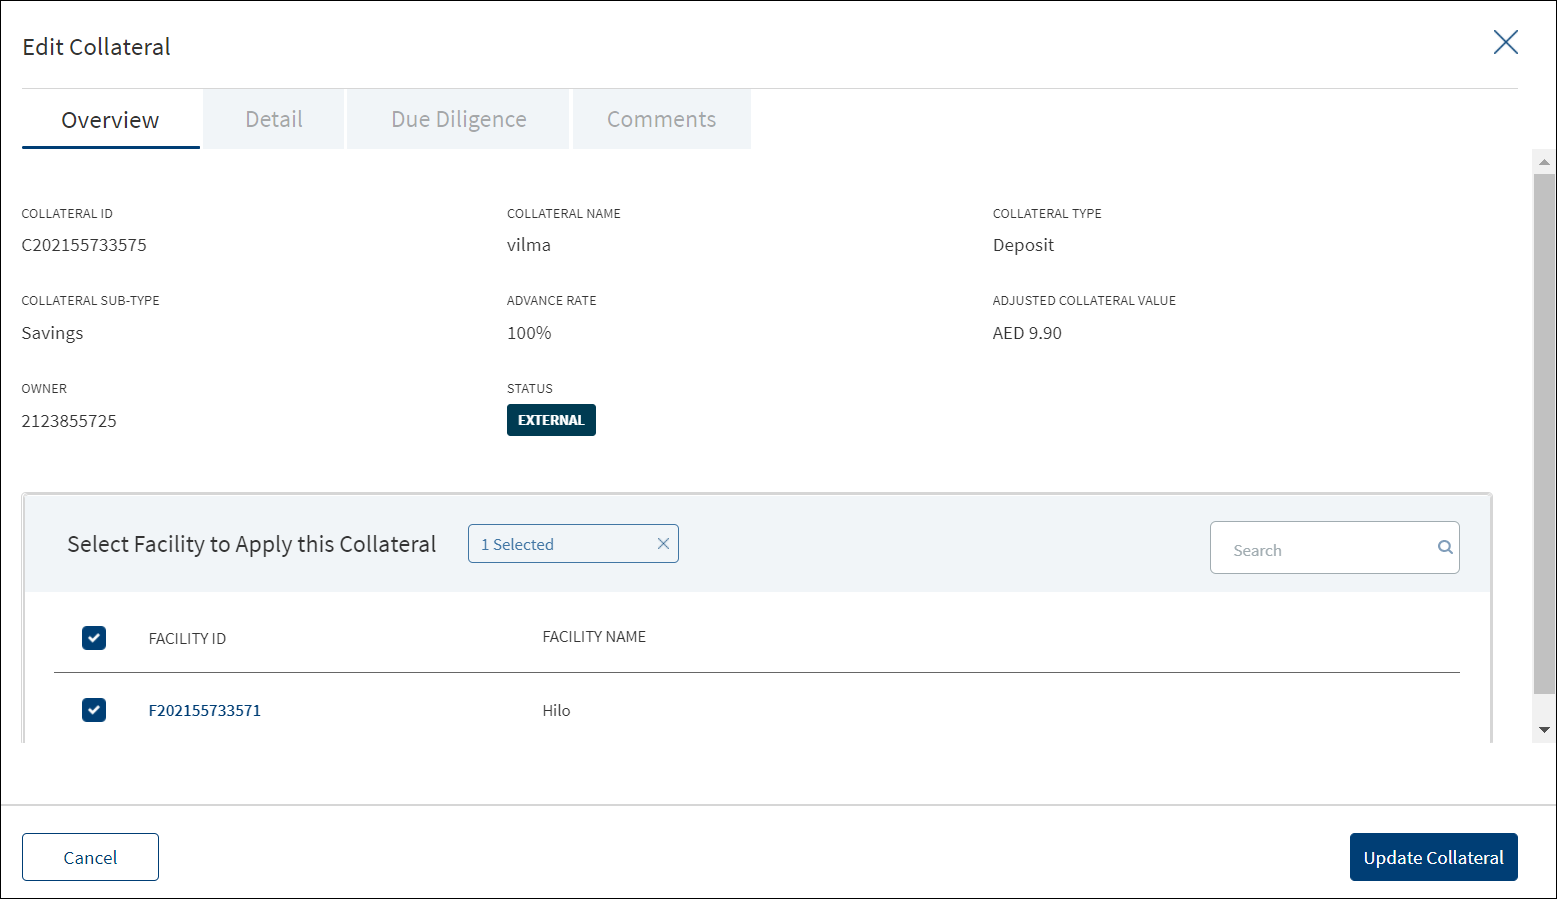
- Make the changes as required.
- The Edit Collateral button is not applicable if the request has only modification as the purpose.
- Only the facilities that are linked to the collateral can be edited.
All the other fields can be edited only from Entity Overview screen.
- In Valuation, all the fields can be edited. Delete the existing valuations if multiple valuations are available for a collateral, however, at least one valuation should exist.
- The facilities linked to the entity are not editable.
- Click Update Collateral to save the details.
- The application displays a confirmation message that the collateral is updated successfully.
Click Cancel to discard the changes. On the confirmation pop-up that appears, click Yes. The changes are not saved.
Narratives

The application displays the list of narrative that are added for both New Facility and Modification Facility or comments entered for a request with the following details: Category, Narratives, Username, Applies To, and Date of narration. The icon denotes that the narrative has document attachments. Click the icon to view the narrative details.
Perform any of the following actions:
- Click Add Narrative.
- • Select any of the following options from the context menu
- Click Edit to modify the details.
- Click Delete to remove the record. In the confirmation pop-up that appears, click Yes. The record is removed. On deleting the narrative, the attached documents are also deleted.
- View details: Click any row to view the narrative details.
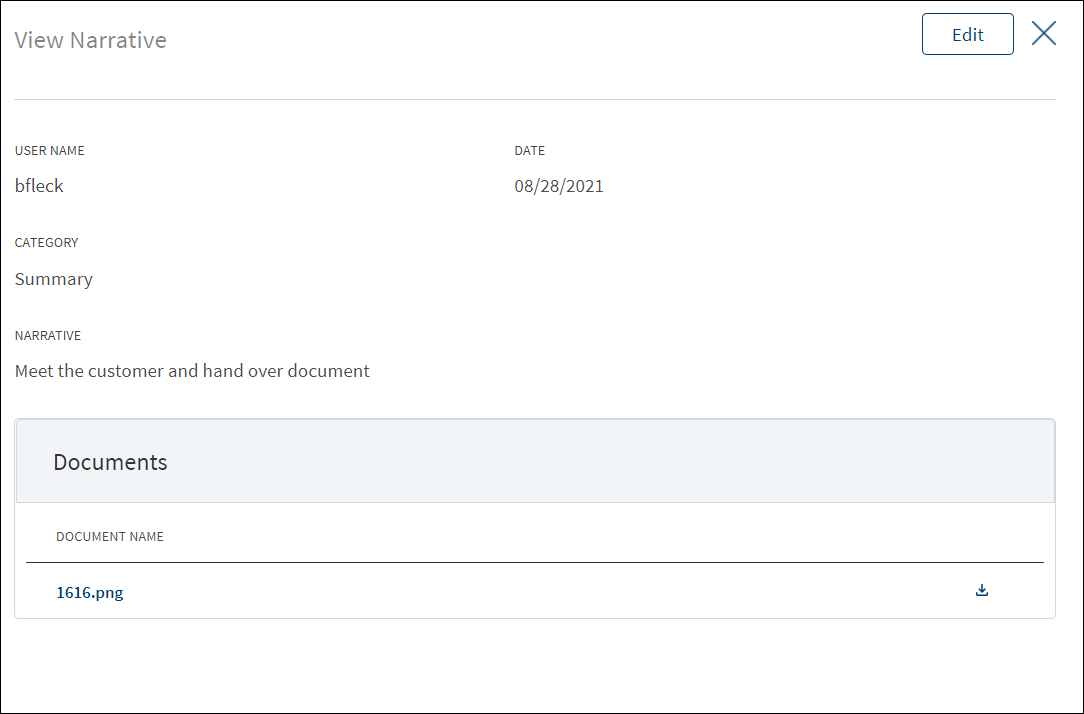
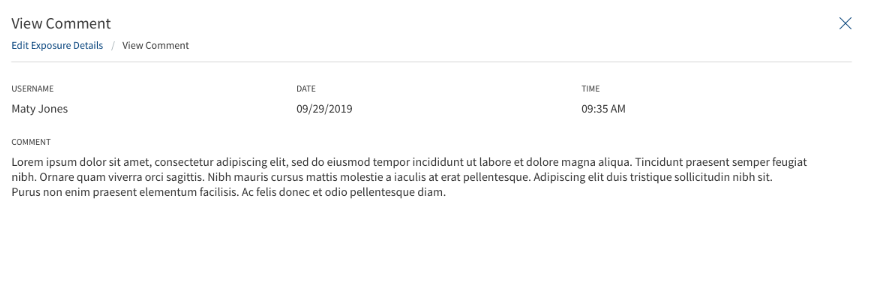
- Click Edit to modify the details or click X to close the form.
- Click the Document Name to view and download the document.
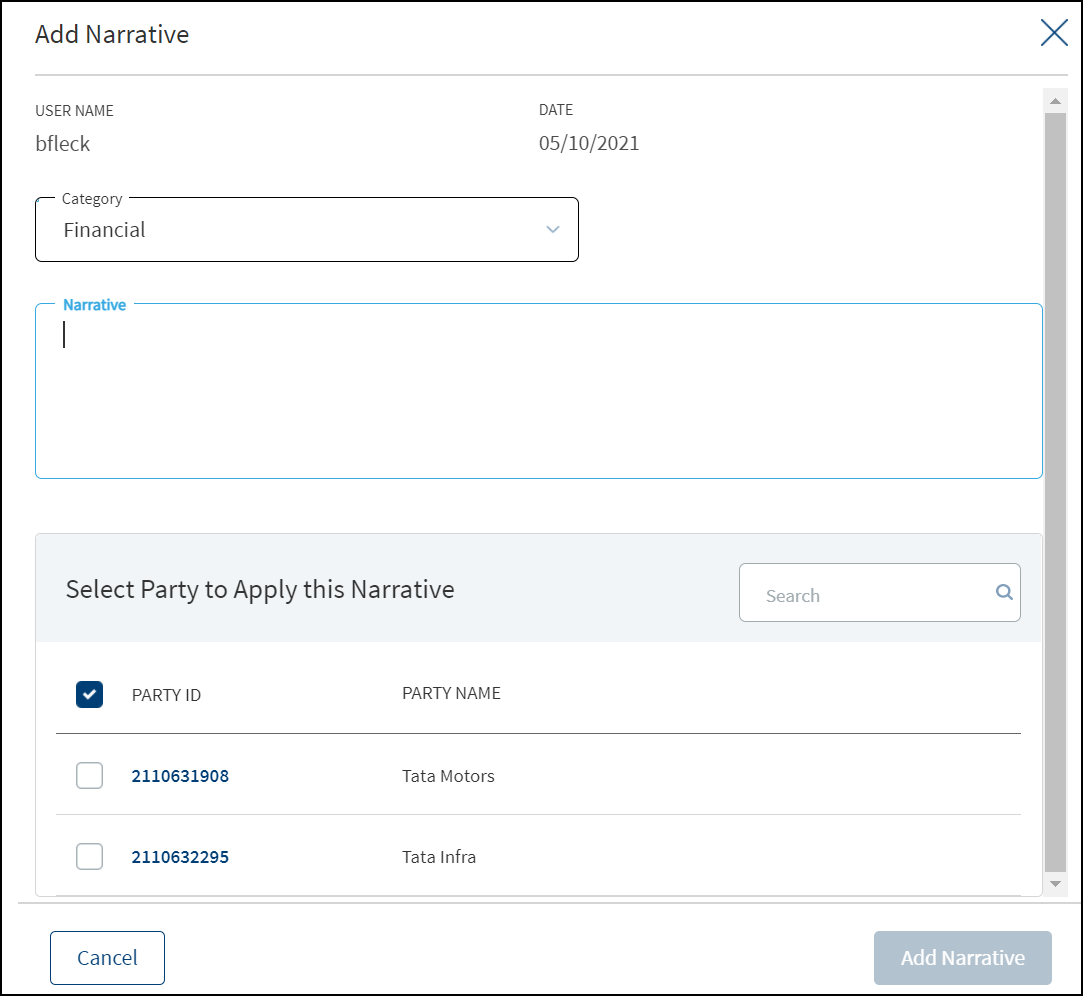
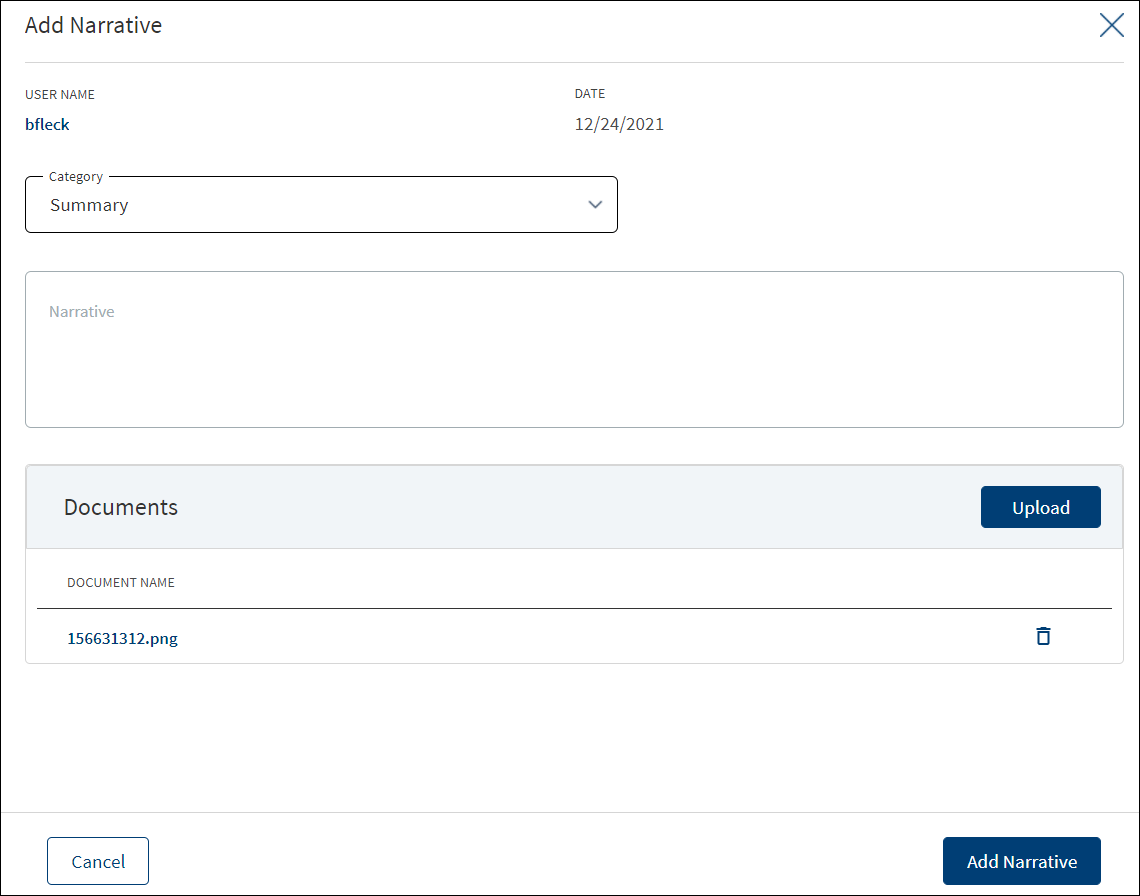
If both the Purpose options are selected initially, then both New and Modification facilities are listed on this screen. Otherwise, only one of the Facility is displayed based on the selected purpose.
The modification narrative appears in the request overview as a category only if the request has a modification Facility, once modification is selected as one of the category, only the modification facilities appear for the user to select in the Applies To section.
New facilities linked to the same request will not appear for selection. When the narratives are added in the request overview, it displays in both request overview and Facility overview respectively.
- Click Add Narrative to add a narrative.
- The application displays the signed-in user's username and date of narration.
- Select the Category from the list (for example, Summary, Financial, Pricing).
- Enter Narrative description. It is a mandatory field. When a lengthy comment or description is entered which does not fit the field, then the content moves to the next line of the field. The field accepts up to 1000 characters.
- The application displays the list of parties, facilities, or collateral under the
Select <object> Apply this Narrativesection depending on the selected Category. It is mandatory to select at least one item from the list. Selection can be one, many, or all the items. By default, no item is selected. The following is the narrative mapping to the selected category:- Party: On selecting Financial, Guarantor, Historical, Industry, Risks & Mitigation, Sources & Uses of Funds, or Management, the application displays the parties to which the narrative can be mapped. This is a multi-select option and can user select multiple parties to this narrative. By default, no party is selected. The party related narratives are displayed on request overview.
- Facility: After selecting Pricing, Payment History or Modification, the application displays the facilities related to the request to which the narrative can be mapped. This is a multi-select option and user can select multiple facilities to this narrative. By default, no Facility is selected. The Facility related narratives are displayed on request overview and Facility overview.
- Collateral: On selecting Collateral, the application displays all the collateral related to the request to which the narrative can be mapped. This is a multi-select option and user can select multiple collateral to this narrative. By default, no collateral is selected. The collateral narratives are displayed only on request overview.
- General: On selecting Summary, the apply this narrative section does not appear. The added narratives are displayed on the respective overview screens. For example, a summary narrative added on the request overview is displayed only on the request overview screen.
- Click Upload Document to upload files to a narrative. A confirmation pop-up appears with maximum size and file name conditions. Click Okay to browse and upload the file. The uploaded document appears. This field is optional.
- Click the bin icon displayed beside each uploaded file to delete the file before adding a narrative.
- The document name can be alphanumeric and cannot contain spaces, and the maximum file size can be up to 25 MB.
- The following document types can be uploaded: jpeg, pdf, jpg, png, txt.
- Click Add Narrative. The application displays a confirmation message that the narrative is added successfully and adds the record to the Narratives list.
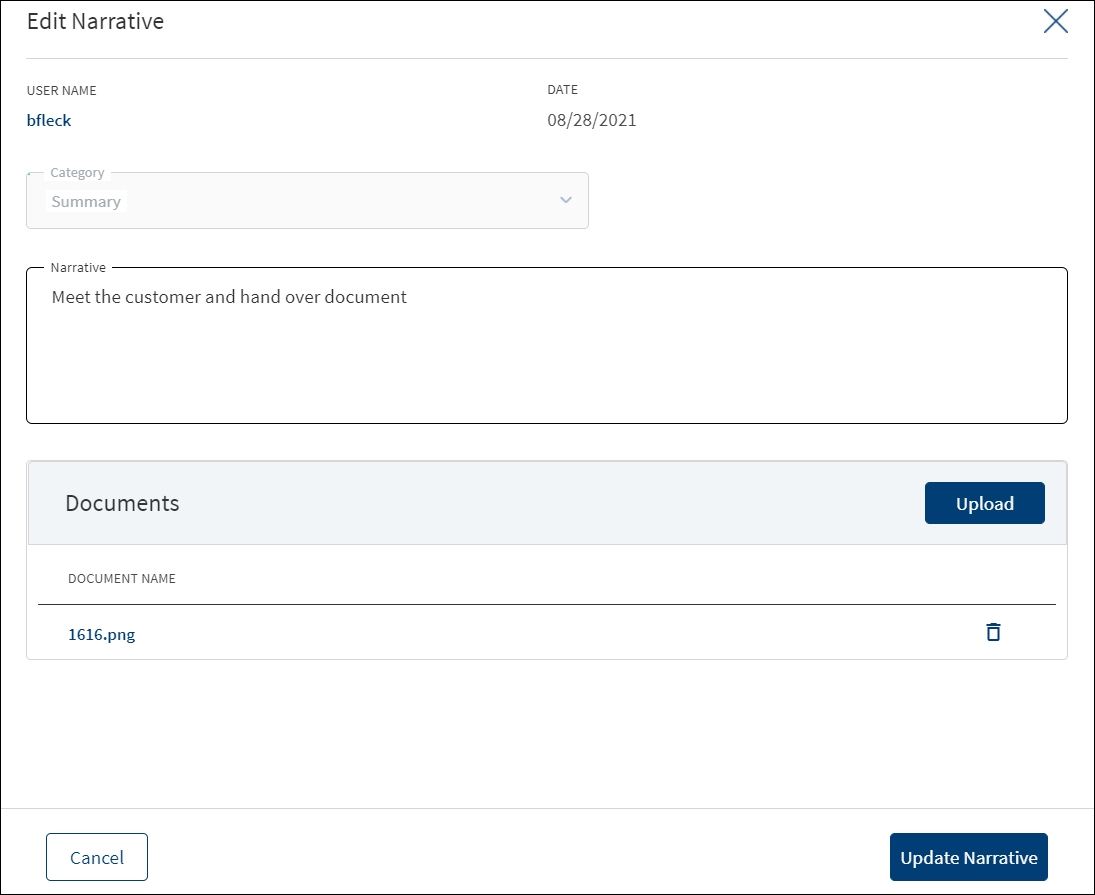
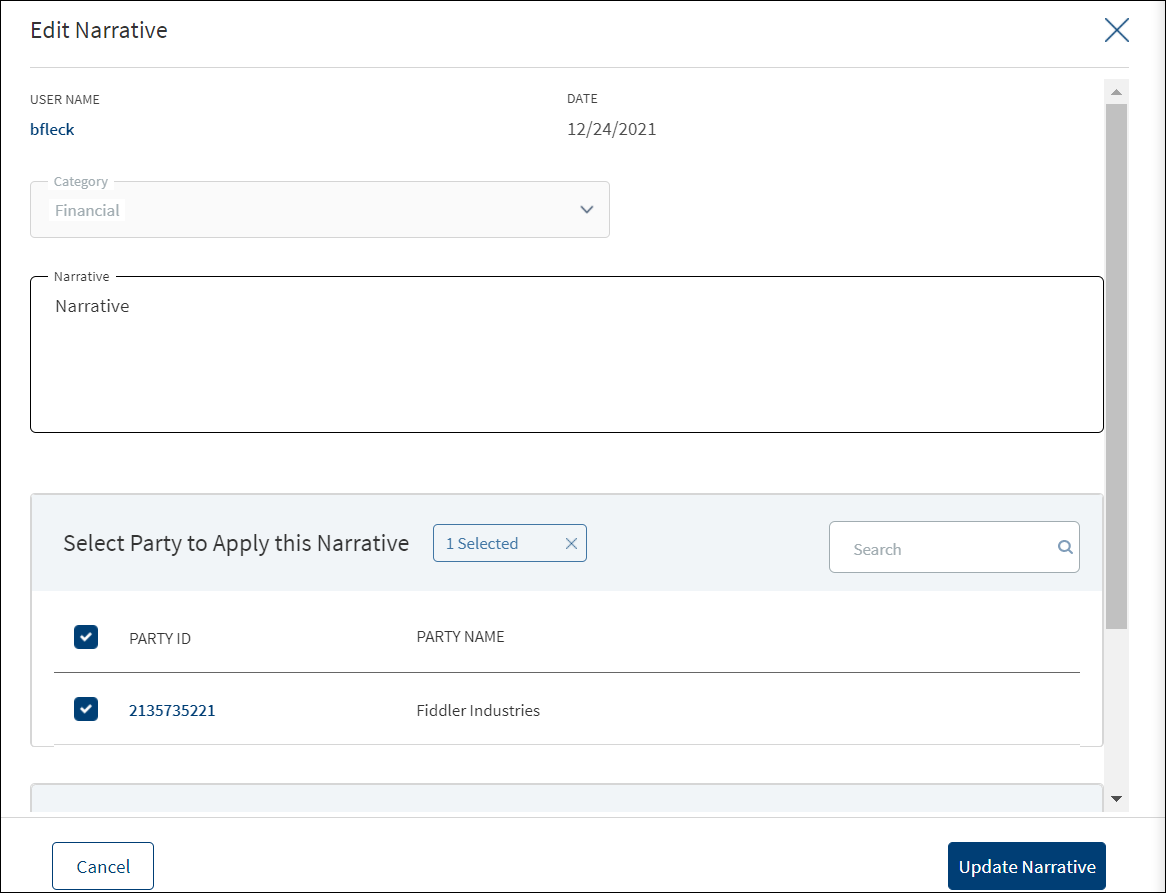
- Make the changes as required.
- A user who added the narrative can modify the following details. Other user can only view the details.
- Narrative text and Applies to in case of entity related narrative.
- Narrative text in case of Facility related narrative.
- Click Download to download the existing files. If there are no existing files, click Upload to upload new files. On clicking Update, the uploaded files are successfully saved and updated in the summary screen. Upload the documents at once before updating the narrative.
- Click Update Narrative to save the details.
- The application displays a confirmation message that the narrative is updated successfully.
Click Cancel to discard the changes. On the confirmation pop-up that appears, click Yes. The changes are not saved.
Documents
The application displays the list of documents associated with a request, entity, Facility, or a collateral. All documents uploaded in front-end Origination as part of the overdraft or loan lending application and those uploaded as part of the corporate lending request are visible in the documents list. The Documents can be added to both new and modification Facility in the Request Overview Documents section. The documents can be of evidence and financial proof of identity and address, balance sheet, cash flow statement among others. The Documents displayed are collected from the Evidence Management and as per the DMN rules displayed in the Entity Overview/Request Overview. Document Microservice stores the document reference and the actual file stores in downstream DMS, which by default is Formpipe Product.
This section consists of two sub-sections:
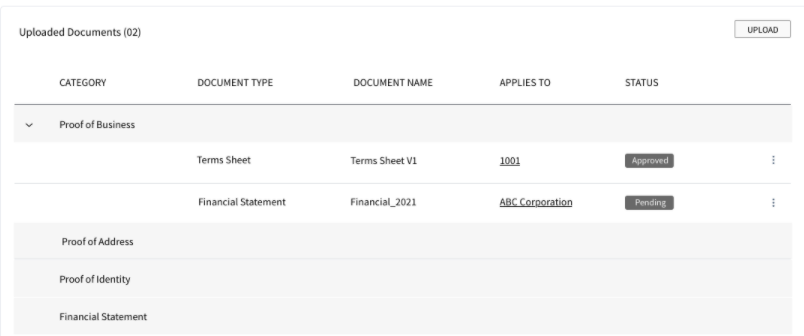
Uploaded Documents - Documents uploaded by Customer/Bank user.
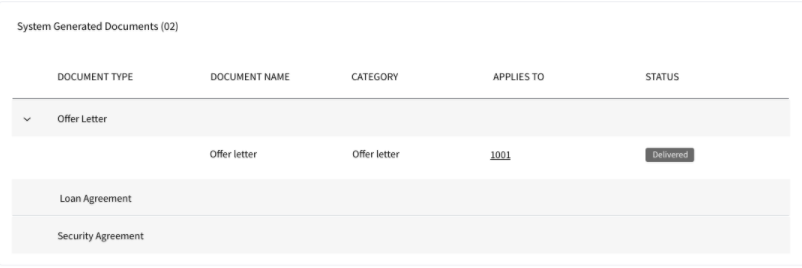
System Generated Documents - The documents generated by system.
Uploaded Documents: This section displays the documents uploaded by the customer from the Origination app and by the Bank user. They are displayed by Document category group and this category has an accordion view, which on expanding displays the actual document along with the document type.
This section consists of the following fields:
- Document Category - Displays the document category - Proof Of Address, Proof of Incomes etc.
- Document Type - Displays the Document type that is uploaded - Passport, Driving license etc. .
- Document Name - The documents submitted before submission in the Origination app have the name File Information as given by the customer. If there is no File Information added, then the document name is added as file name.
- Applies To - Request, Facility, Party, or Collateral.
- Status - Displays the status of the document in different color depending on the status - Approved, Pending, Signed, Delivered, Reviewed or Rejected. All documents uploaded in the Origination app will be in Pending status.
Upload : To upload a new document.
Checklist is not applicable for Corporate Flow.
System Generated Documents :This section displays the documents generated by the system in Infinity Assist. They are displayed by Document category group and this category has an accordion view, which on expanding displays the actual document along with the document type.
This section consists of the following fields:
Document Type - Documents submitted before submission in the Origination app have the type as stored in Document MS.
Document Name - The documents submitted before submission in the Origination app have the name File Information as given by the customer. If there is no File Information added, then the document name is added as file name.
Document Category - Displays the document category.
Applies To - Request, Facility, Party, or Collateral.
Status - Displays the status of the document in different color depending on the status - Approved, Pending, Signed, Delivered, Reviewed or Rejected. All documents uploaded in the Origination app will be in Pending status.
Mapping between the Origination document type with Infinity Assist document type.
| Document Type in Infinity Origination | Document Type in Infinity Assist |
|---|---|
| Entity Certification/Registration | EntityCertification |
| Tax ID Number Certification | TaxIdCertification |
| Articles of Incorporation | Article of Incorporation |
| Partnership Agreement / Declaration | PartnershipAgreement |
| Trust Agreement / Declaration | TrustAgreement |
| Article of Incorporation | ArticlesIncorporation |
| Financial Statement | FinancialStatements |
| Passport | Passport |
| Driving License | DriverLicense |
| National ID | TaxIdCertification |
Perform any of the following:
- Download Document: Click the Document Name to view and download the document if required. To download, click Download on the screen the appears.
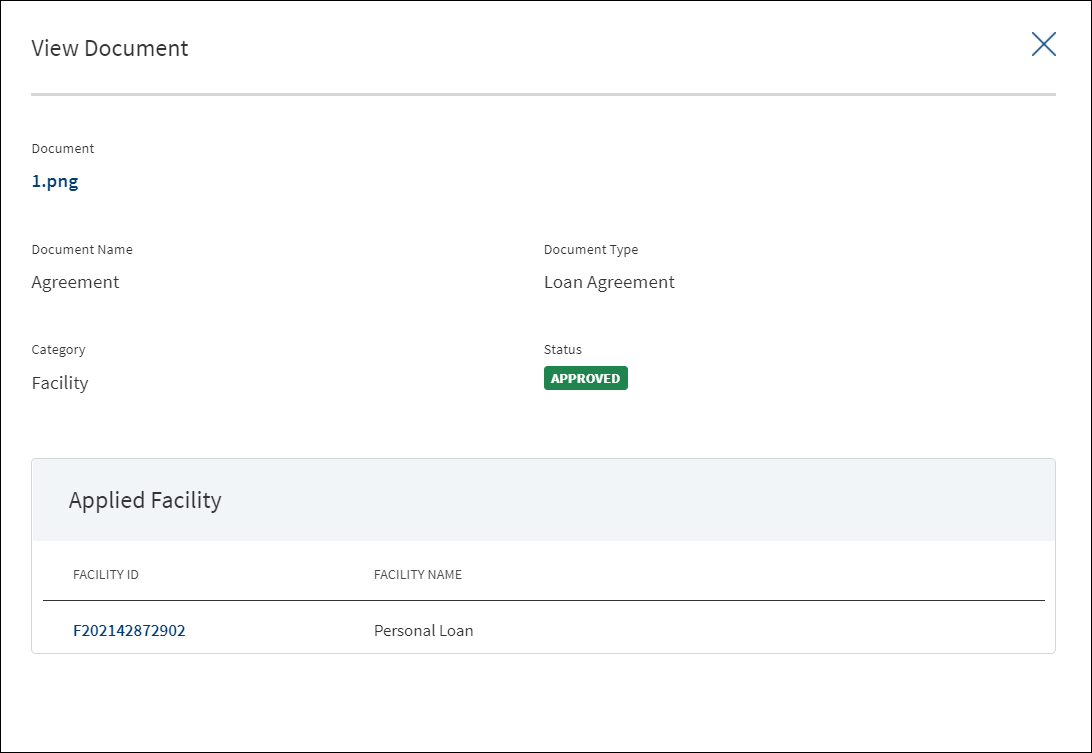
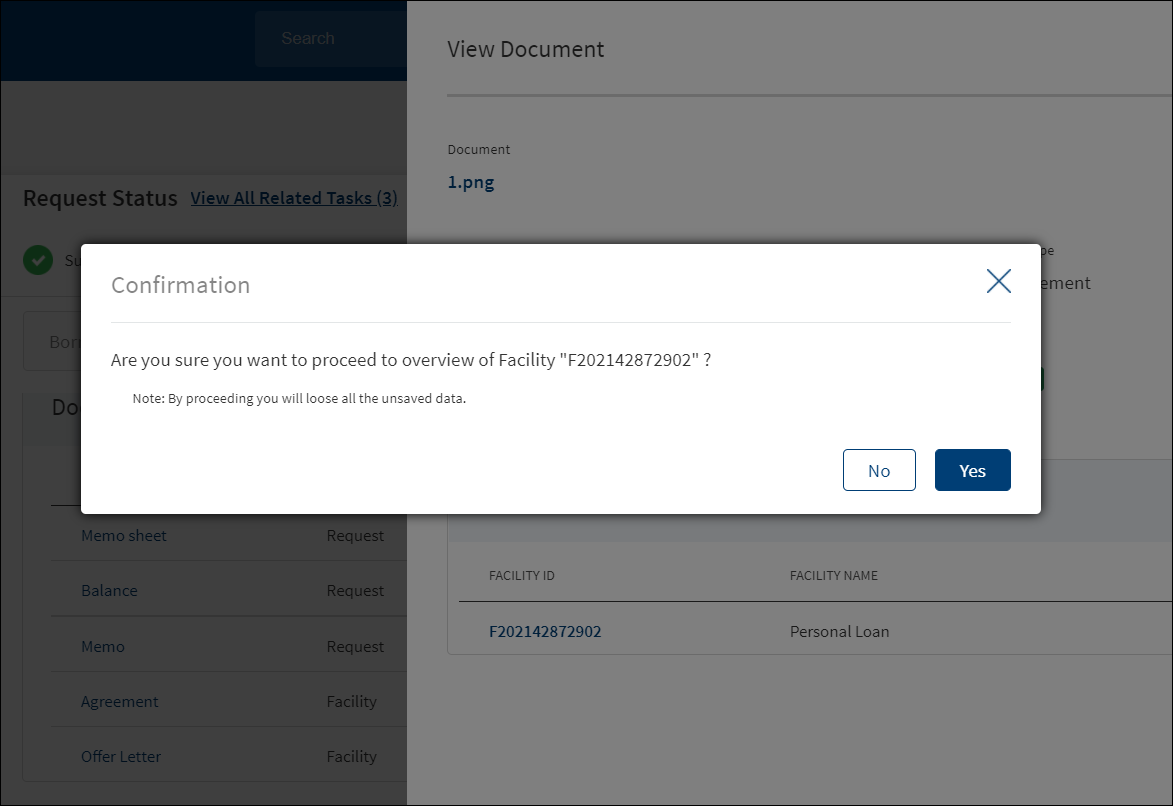
- View Details: Click the row to view the document details. Click the ID to view the overview details. The document can be mapped to a request, entity, Facility, or a collateral.
- If the document category is applied to a collateral record, then the document is displayed in the document summary under the respective facilities where the collateral is used.
- If the document category is applied to entity record, then the document is displayed in the document summary under respective entity overview only and will not be available under request overview and Facility overview.
- Click Upload to upload a new document.
- You will be able to view all the modification facilities listed along with the new facilities in facilities section with the following Facility ID, Facility type, Amount, term, Decision Status.
- If both the Purpose options are selected initially, both New and Modification facilities are listed on this screen. Otherwise, only one of the Facility displays based on the selected purpose.
- Use the context menu as required. The context menu is displayed only for the documents with Pending status:
- Click Edit to modify the details. The document with Pending/Signed status only can be edited.
- Click Delete to remove the record. The document with Pending status only can be deleted. In the confirmation pop-up that appears, click Yes. The record is removed.
If an Entity related document is uploaded in the Request Overview, the document display in the Entity Overview and for the link to Facility option, the document display in the Request and Facility Overview of the request. The Linked to field only displays the facilities of the Request.
If a Facility related document is uploaded in the Request Overview, the document display in Request , Facility overview of the Facility in the link to section.
If a collateral related document is uploaded in the Request Overview, the document display in the Entity overview (of owner of collateral) and if the link to field is selected, it displays in the Facility overview of those selected facilities and the Request Overview.
If a request related document is uploaded in Request Overview, it displays in the Request Overview. If user selects link to it displays in the respective Facility overviews.
Evidence Management- Link to Multiple documents
Bank Staff Administrator has the capability to link multiple documents to a single evidence type. For example, if the bank specifies that the first and last pages of the Passport must be submitted as Proof of Identity and if the applicant scans and uploads the first and last pages of the Passport separately as two separate documents, the system enables both these documents to be uploaded separately but links to a single Passport document type.
Subscription to business events generated by Evidence MS
Post submission of the application by the applicant, a business event is generated by Evidence MS. Infinity Assist App must subscribe to this event and link the verification of each piece of evidence submitted by the applicant to the corresponding tasks as discussed above.
Party Modifications:
- In the modification document, when an add party modification is approved by the underwriter, the Party modifications section displays in the document.
- Only if the add party modification is approved, the Added Party section displays, similarly only if the release party is approved, the Released Party section displays in the document.
Add Party Modification Document
Release Party Modification Document
Collateral Modifications:
- In the modification document if an add collateral modification is approved by the underwriter, the collateral modifications section displays in the document.
- If the add collateral modification is approved,only the Added Collateral section displays, similarly only if the release party is approved the Released Collateral section displays in the document.
- In the end of the terms and conditions the Primary borrower name gets populated dynamically.
Add Collateral Modification Document
Release Collateral Modification Document
- On the Documents list screen, click Upload.
- The Upload button is available only under “Uploaded Document” sub section.
- In the Document section, the Bank user can add single/multiple documents as required.
- The Applies to displays depending on the Document Type chosen. The mapping between Document Type and Applies To is done in DMN.
- The “Linked To” field ,lists the facilities of the Request. User can select single/multiple documents as per requirement.
- Linked to field is a mandatory field.
- The “Upload” option is available for the logged in user depending on the permissions of the role.
- A confirmation pop-up appears that the maximum file size can be up to 25 MB and the file name can be alphanumeric without any spaces. Click Yes.
- A window to upload the document is displayed.
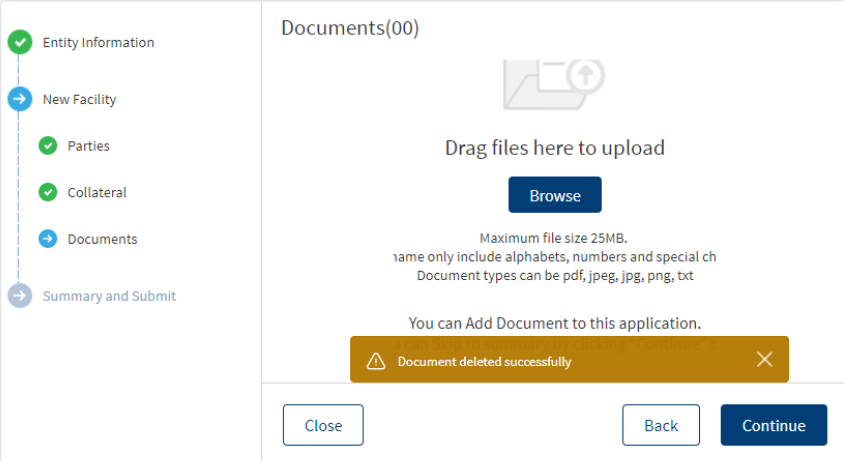
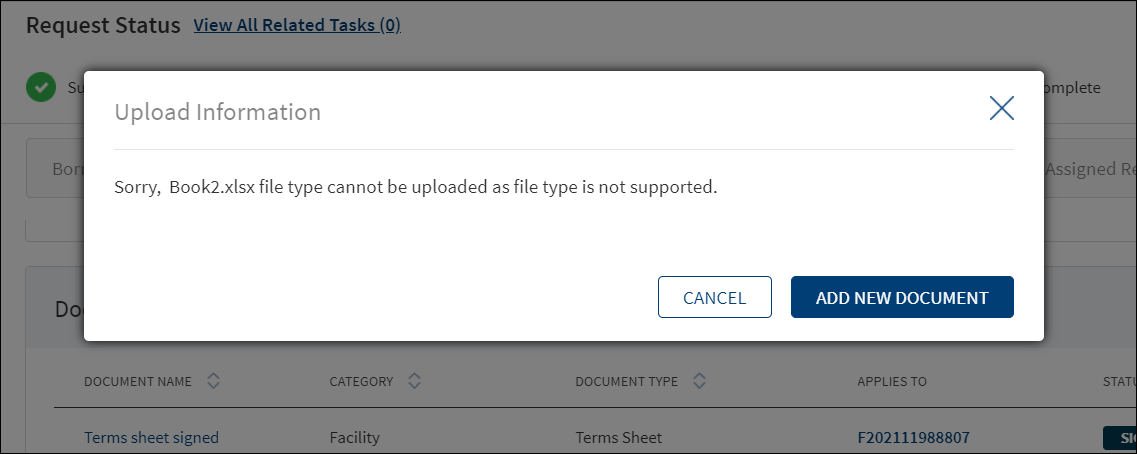
- Select the file to upload. The file name can contain alphanumeric characters and cannot contain spaces. The document types can be PDF, TXT, JPG, PNG, and JPEG. The maximum size allowed per document is 25 MB. The application displays a error message if incorrect document type is selected. In this case, click Add New Document to continue with the document upload.
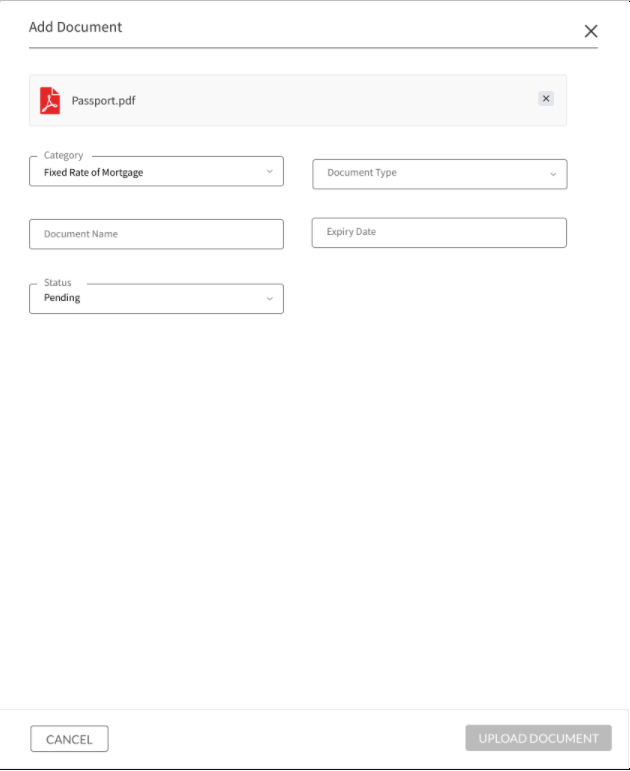
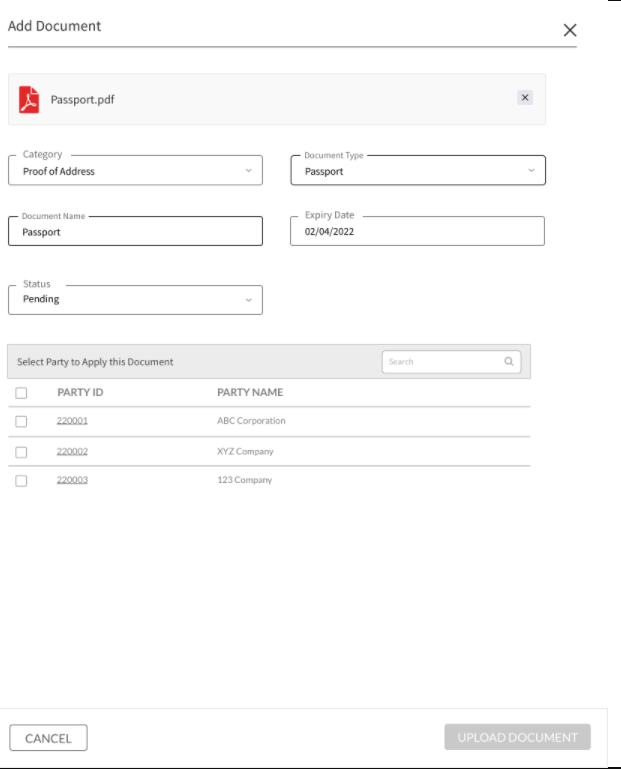
- The Add Document screen is displayed. All fields are mandatory.
- Enter the Document Name.
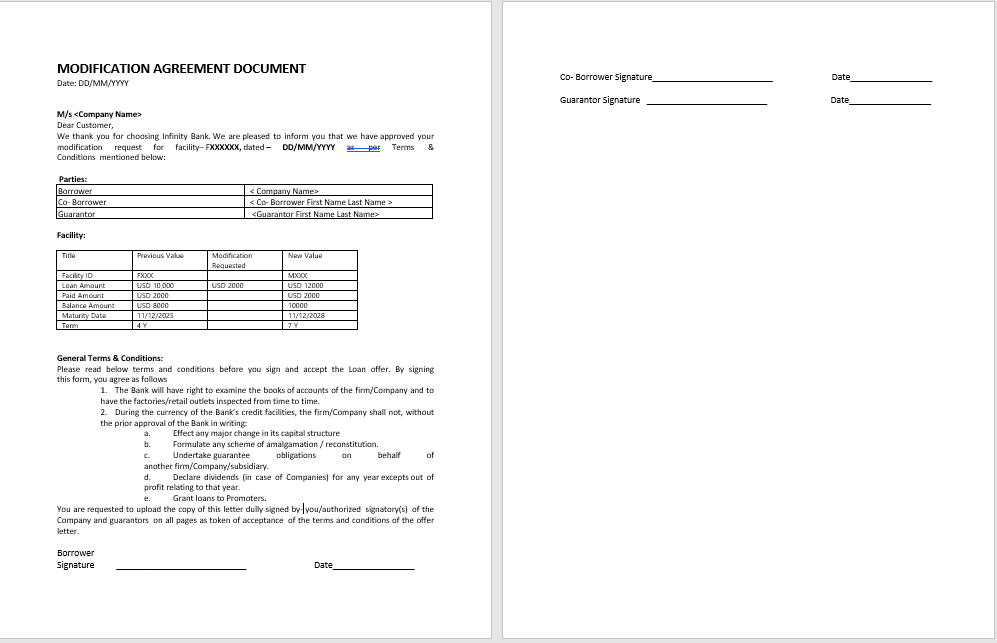
- Select the Document Type (for example, FinancialStatements, Amendments). Below is the sample modification agreement document that needs to be uploaded once the applicant accepts the changes for the Request.
- Select the Category from the list. . The document is attached to the selected category level.
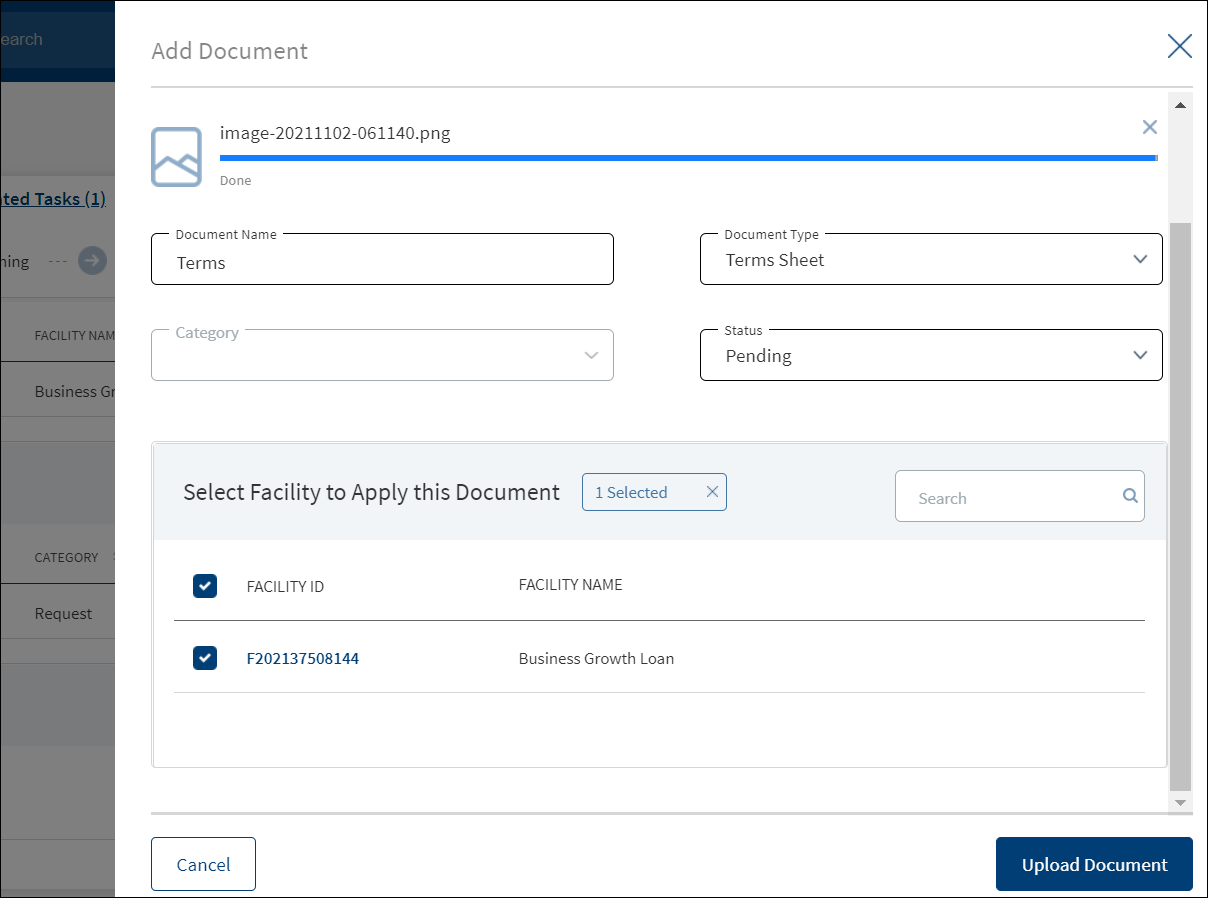
- The application displays the list depending on the selected document category. Select the category to apply to the document. The selection can be one, many, or all.
- If category is request, then the Request ID is displayed by default.
- If category is Facility, this field lists all the facilities under the request. Defaults if this list has one value.
- If category is entity, this field lists all the entities related to the request. Defaults if this list has one value.
- If category is collateral, this lists all the collateral related to the request. Defaults if this list has one value.
16. Select the Status from the list - Approved, Pending, Signed, Delivered, and Reviewed.
17. The Applies to field is displayed based on the chosen Document Type. The mapping between Document Type and Applies To is done in DMN.
18. The Expiry Date (mandatory) needs to be updated while adding a document. For the documents uploaded through “Origination App” this field remains blank, however when the bank user edits the uploaded document this field becomes mandatory.
19. The Linked To field is by default the Facility ID.
20. If an entity related document is uploaded from the Origination page, it displays in Entity Overview, Request Overview, Facility Overview for the linked Facility.
21. If a Facility related document is uploaded from the Origination page, it displays in Request Overview, Facility Overview of linked Facility.
22. If a collateral related document is uploaded , it displays Entity Overview of the Collateral owner, Request Overview, Facility Overview of the linked facilities.
23. The Add option for the logged in user depends on the permissions of the role.
24. Click Upload Document. The application displays a confirmation message that the document is uploaded successfully. The document is added to the documents list. If the document category is applied to entity record, then the document is displayed in the document summary under respective entity overview only.

25. An Adhoc document can be uploaded from any Overview(Entity, Request, Facility).
The document with Pending status only can be edited.
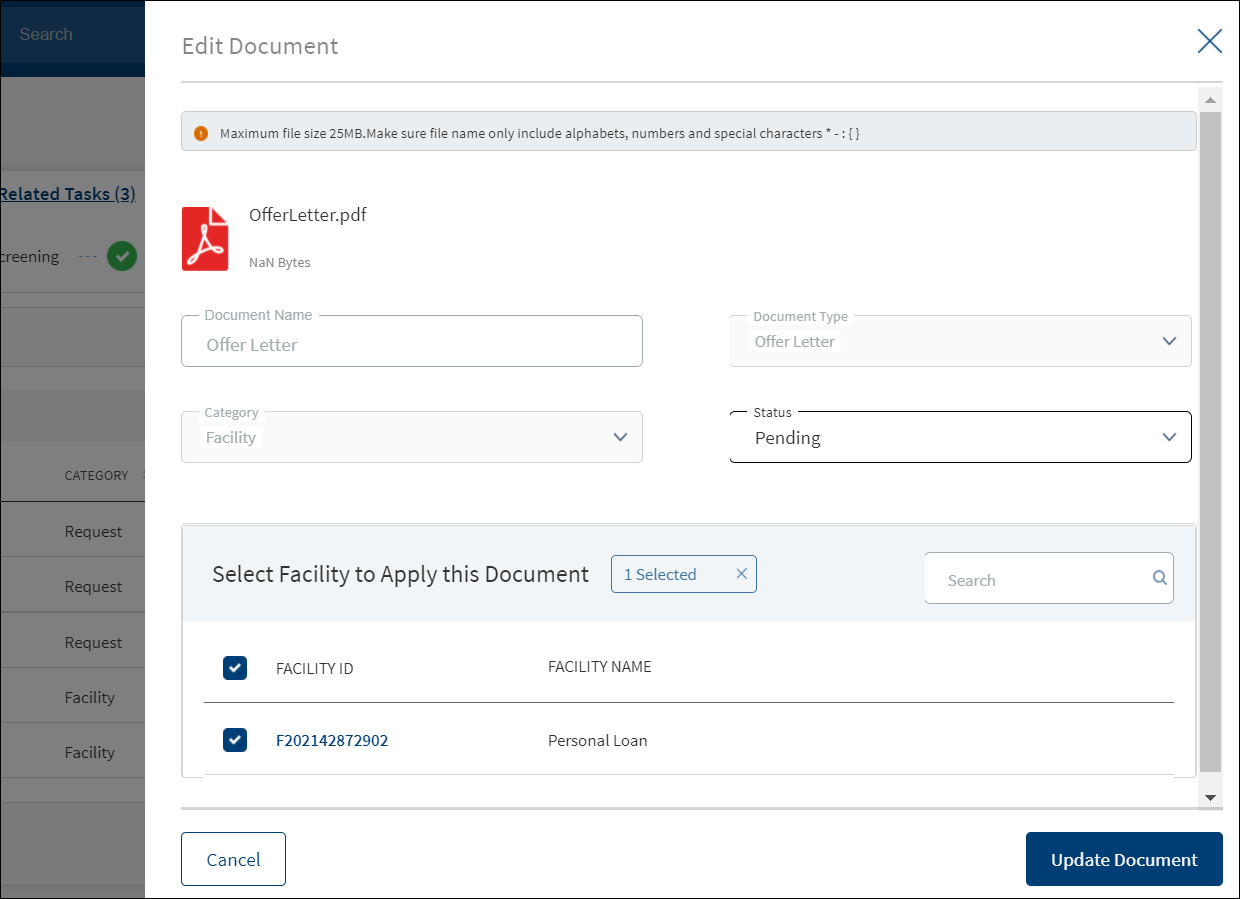
- Only the document Status, Linked To can be edited.
- Select the Status from the list - Approved, Pending, Signed, Delivered, or Reviewed.
- If the bank staff user certifies that the evidence is valid and meets the requirements for the product (or) products applied by the applicant, then the bank user marks that the evidence is Accepted through the task in Assist app after entering the Expiry Date for that piece of evidence.
- If the bank staff user certifies that the evidence is invalid or does not fulfil the requirements of the product applied, the bank user marks the evidence as Rejected through the task in Assist app.
- The status : Pending and Signed are editable.
- The Link To field is mandatory, the user can edit but it should have some value.
- Click Update Document to save the details.
- The application displays a confirmation message that the document details are updated successfully.
- If the Link To is Edited and if the Facility is removed then that document will not be visible in Facility Overview and Request Overview, however it will be visible in the Entity Overview.
- The Edit option for the logged in user depends on the permissions of the role.
- If category is collateral, this lists all the collateral related to the request. Defaults if this list has one value.
Click Cancel to discard the changes. On the confirmation pop-up that appears, click Yes. The changes are not saved.

If the bank staff user certifies that the evidence submitted by the applicant as Accepted, the application moves to the next stage of processing as defined by the workflow in the Red Hat PAM.
If the bank staff user certifies that the evidence submitted by the applicant as Rejected, a notification is triggered to the RM who owns (claimed) the application to request the customer to submit the valid evidence.
Email Notification Template
Dear <RM Name>,
Documentary evidence submitted by the customer <Entity Name> as part of application <Application ID> for the Product <Product ID> has been rejected. Please ask the customer to resubmit the appropriate document.
Regards,
Infinity Bank.
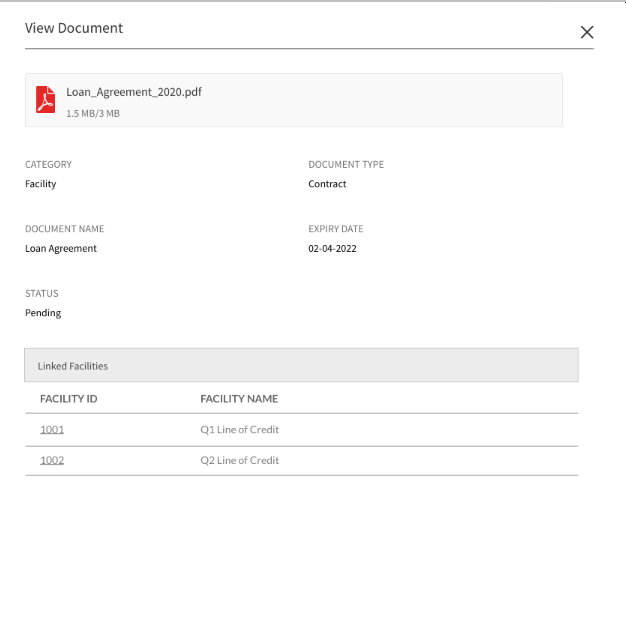
The documents uploaded by the Customer / bank user or generated by the system, bank user in the Document Section can be viewed by clicking the View Document option. The uploaded Adoc Documents can also be viewed in this section.
The Document Category with an accordion view displays : Document Type, Document Name, Applies to, Status.
When clicked on the documents in the row the following fields display:
- Document Category
- Document Type
- Actual Document
- Document Name
- Applies To
- Linked To
The view option for the logged in user depends on the permissions of the role. A Bank user will be able to View documents uploaded through Customer Action in the “Uploaded Document” section in Entity Overview, Request Overview and Facility Overview based on the Document Category and Type.
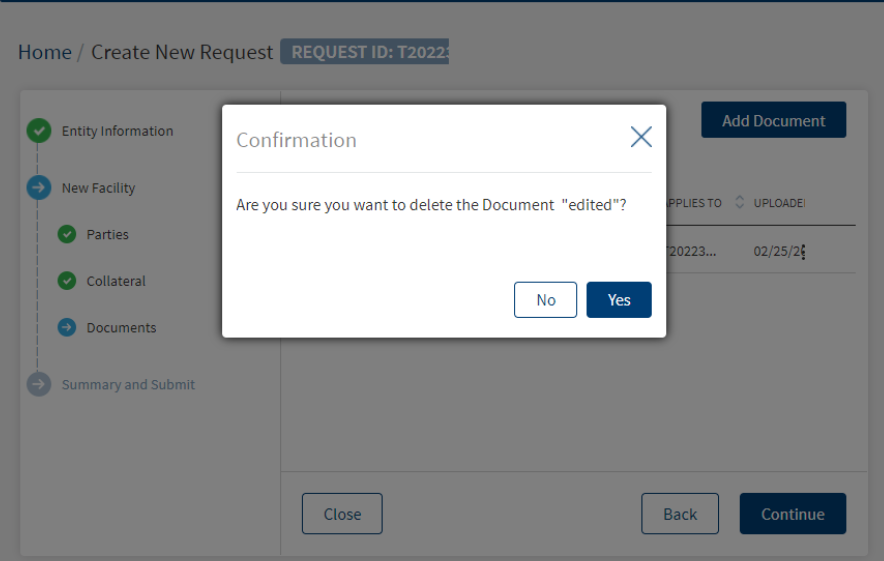
The Bank user will be able to delete the uploaded /system generated documents. The Delete option is enabled only for the documents with status pending. If we delete from the Request Overview then the document gets delinked only from Facility Overview and Request Overview , if its an Entity document it still displays in the Entity Overview. The Delete option for the logged in user depends on the permissions of the role.
Parties
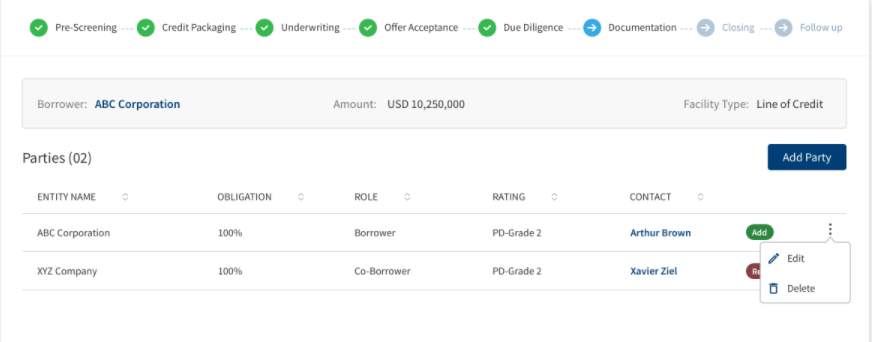
The application displays the list of parties already added to the request with the following details. The parties added in Facility overview are displayed in the request overview and changes done here reflects in the request overview and vice versa. All the parties linked to the selected modification facilities like Borrower, co-Borrower, Guarantor, pledgor of collateral etc. from the selected facilities are pre-populated in the party section if the purpose is selected as modification.
- Party name: The name of the Individual, Business, or Group. Click to view the entity details.
- Role Name : The role of the borrower (for example - Borrower) for the request.
- Obligation: The obligation to the request in percentage or as an amount. For a borrower, it is 100 percent and for other roles, it is as defined in the party screen.
- Applies to : A request or a Facility. Click the ID to view the overview details.
All the Parties linked to Modification facilities display along with the icon indication in the Parties section. The Addition and Release party requested in Onboarding and Facility Overview is prepopulated along with Add/Release icon indication in the sub rows in Parties summary.
The User can view the request indication in Parties summary section, Change request icon indication is displayed in sub rows. The icon indication is applicable only for the Modification Facilities. The Party sub rows with new facilities in Applies To column do not have any add or release icon. In the View party/Edit party/ Edit Existing party screens - Role information section, Change request icon indication is displayed.
In the Parties Summary, user sees newly generated modification ID (prefix m, current year and suffix _01,02) for the existing facilities in Applies To Column and View party/Edit party/Edit existing party screen – Role information section (if applicable).
Perform any of the following actions:
- Use the context menu as required:
- Click Edit to modify the details. A borrower record cannot be edited.
- The Applies To section is not editable in Edit Role screen.
- Click Delete to remove the record. In the confirmation pop-up that appears, click Yes. A user cannot delete the Request Borrower/applicant and the Party with role as Borrower.
- The Delete option is not displayed in Parties for both Prepopulated parties linked to modification facilities and Newly added parties (added in onboarding or Facility overview) linked to modification facilities.
- Click the row to view the party details.
- Click the Party Name link to view the entity details.
- Click Add Party to add a party to the request - individual, business, or group. There can be only one borrower role per request. The other parties will be other roles such as co-borrower, guarantor and more. If the role that is associated with modification Facility is linked to existing facilities then the context menu option is not available as the inputs are pre- populated.
- In the Request Overview user can search for an existing group by clicking on add party. If a group party is selected for addition, when clicked on applies to Facility, the user will not view any modification facilities in the request, only the new facilities associated are displayed. By doing this a group member can be tagged to a new Facility but not to modification type of facilities.
A User can view only the approved Parties without the change request icon in Request Overview after the approval of the Facilities, This is only for Parties linked (add and release requested) to modification facilities.
If the selected Purpose is only Modification ,a User can view the Help text which redirects to Facility overview for any Request modification, the Add Party button and Contextual menu do not display.
Only new facilities are displayed for add role screen navigated from any screen (add new party, edit party, add existing party, edit existing party).
The post approval Changes reflect in view/edit party Screen and Change Request Icon is not displayed in role information section, Only the Approved parties and Roles are displayed.
Modifications (Add/Release Party) List of Parties displayed in the Request Overview
The user views all the parties of the request in the exposure section of the Request Overview.
- The distinct parties which are part of the request display in the exposure section of the request.
- The Added/Released parties are part of the exposure.
- In the modification document, when an add party modification is approved by the underwriter, the Party modifications section displays in the document.
- Only if the add party modification is approved, the Added Party section displays, similarly only if the release party is approved, the Released Party section displays in the document.
Add Party Modification Document
Release Party Modification Document
Credit
This section explains the following:
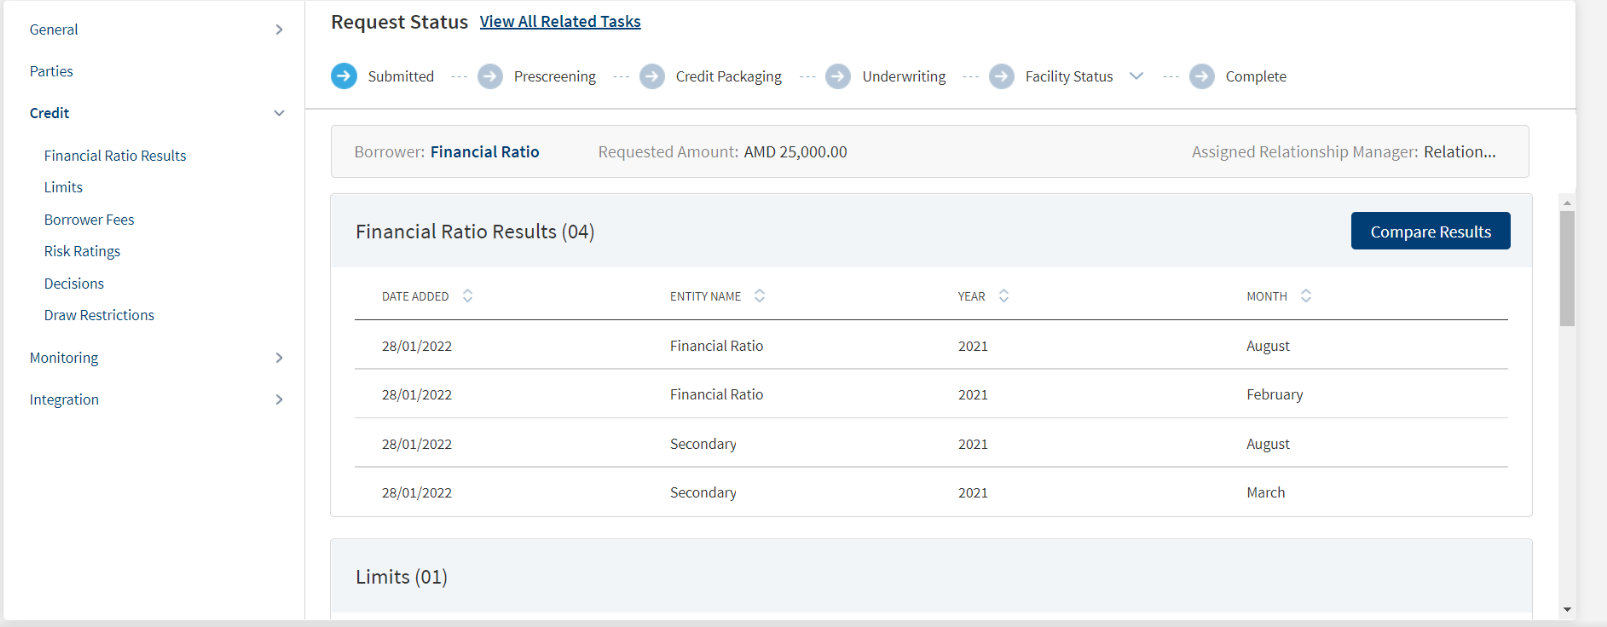
Financial Ratio Results

The application displays the financial ratio results of both New and Modified with entity name and the result date. Financial ratio results of parties linked with modification facilities displays prepopulated in this section if thepurpose is selected as modification. Do any of the following:
- Click the row to view the details.
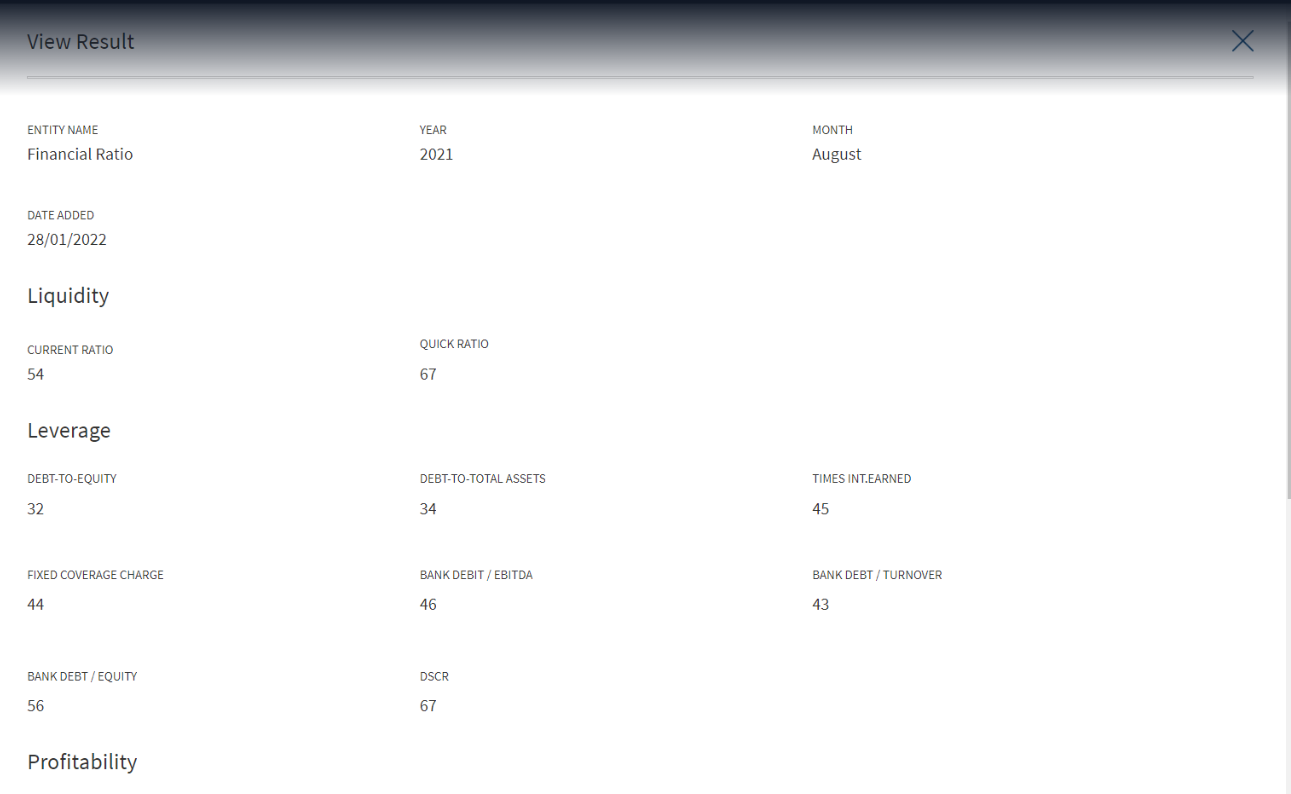
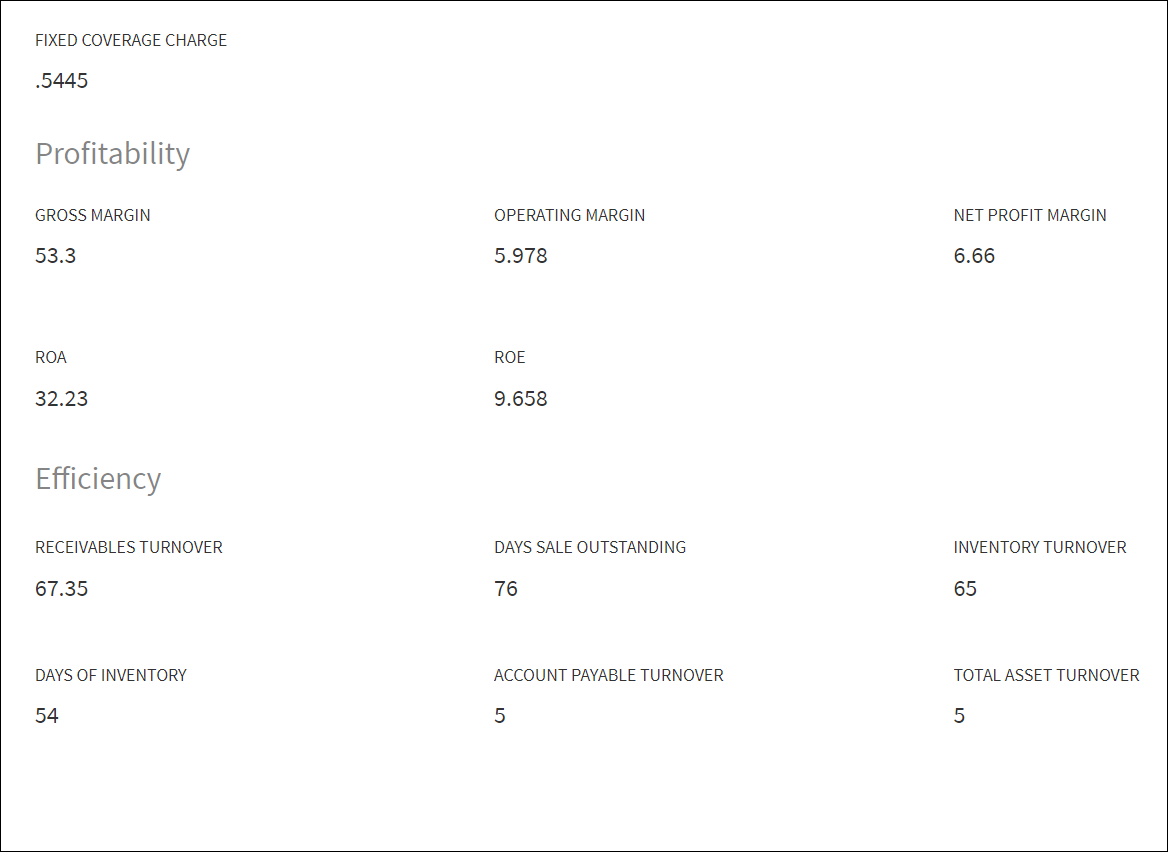
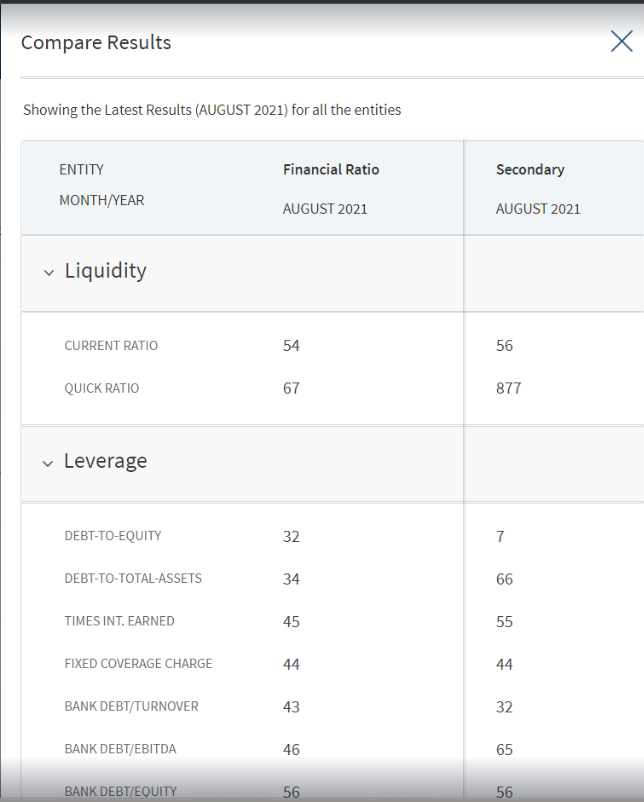
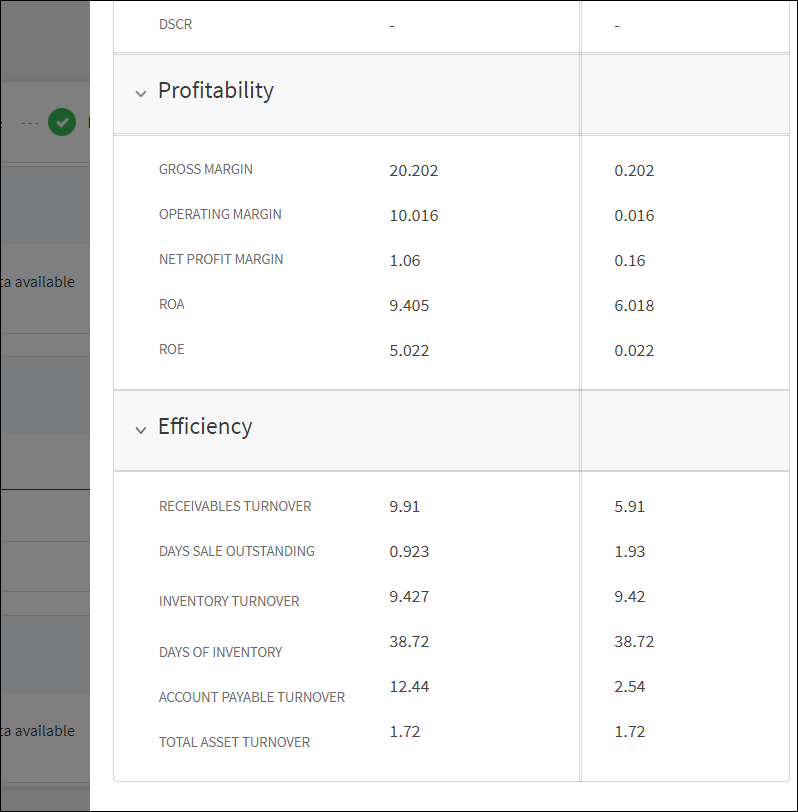
- Click Compare Results to compare results between the parties that were added at the entity level. The information was either entered by the user or fetched from the third-party system.
- Click Compare Results under Financial Ratio Results section. The comparison of financial ratios of the latest results are displayed. note that the comparison happen only if the date year is the same. That is, comparison will not happen between two records that have different financial years.
- If there are only three records, system displays the comparison of the three records.
- If there are more than five records, system picks the latest five records and displays the comparison.
Only entity field is editable. All the fields on the compare screen are not editable.

Limits

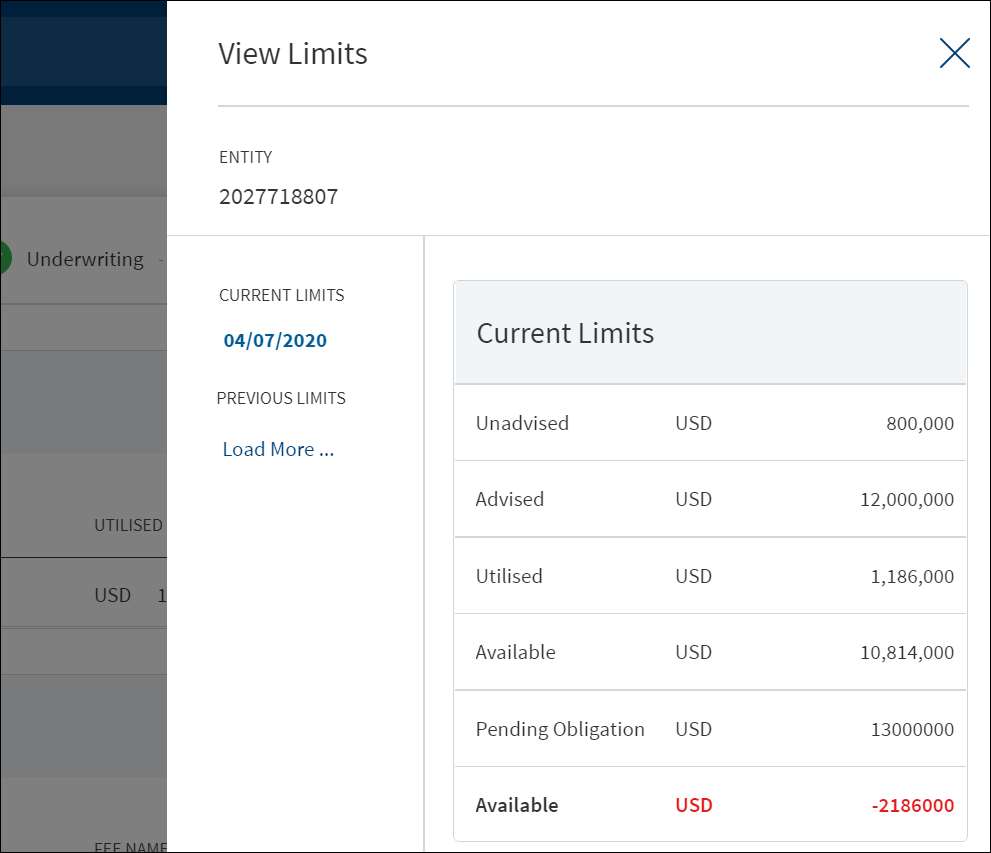
The application displays the limits summary along with the history for a request with the following details: Entity name, advised or offered amount, utilized or drawn amount, obligation or the pending request amount, and the available amount (balance of the advised amount after utilization). This feature is not applicable for Retail lending and SME lending requests and not visible to the bank user roles managing these requests.
Do any of the following:
- Use the context menu to manage the limit.
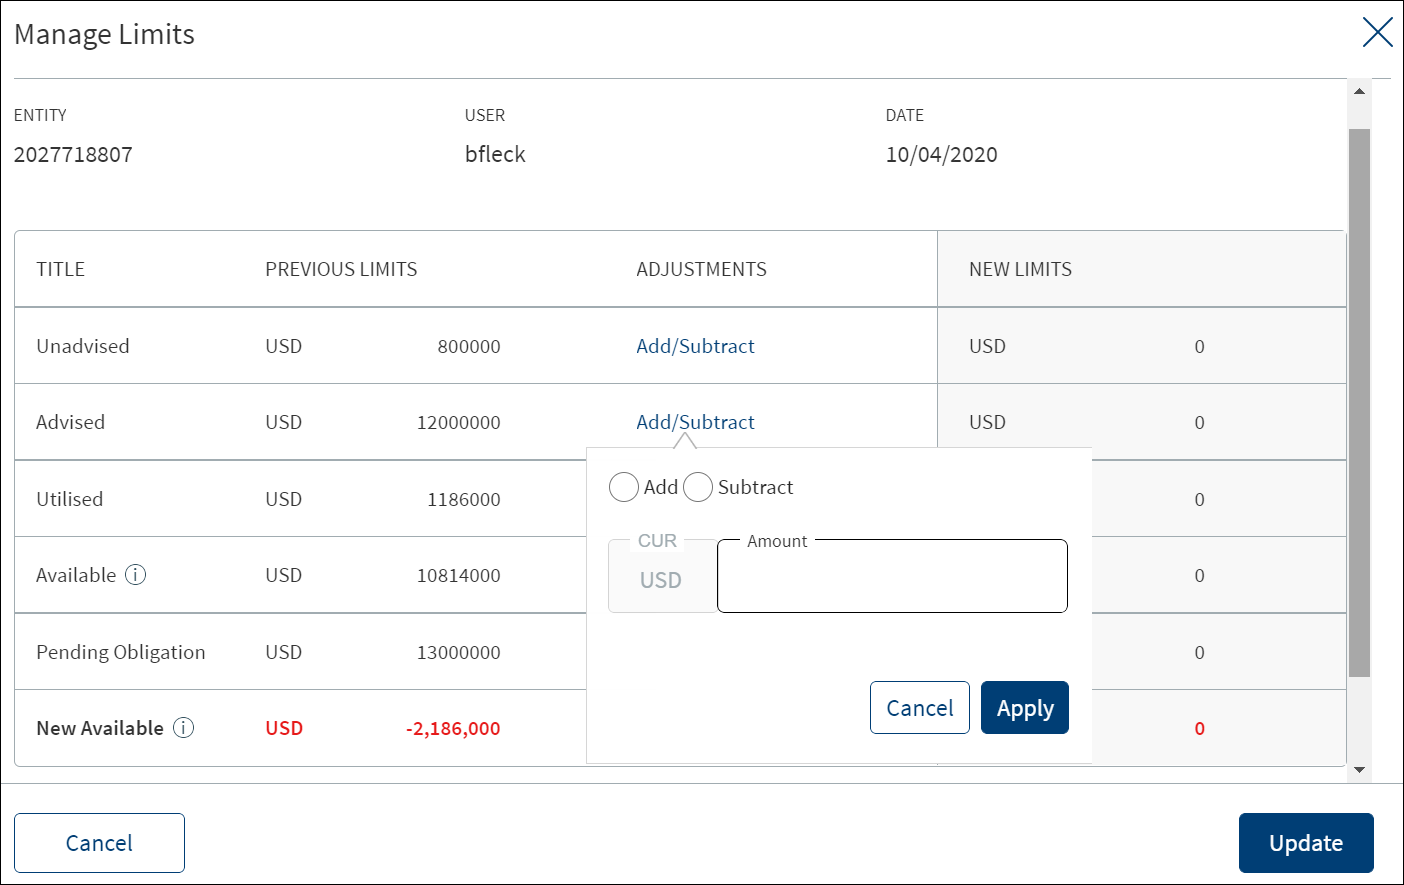
- Adjust the unadvised (amount the bank can offer), advised (amount communicated to the borrower), and pending obligation amounts as required.
- Click Update. The new values are updated in the limits list. This is a placeholder screen.
- Click the row to view the details.
Borrower Fees
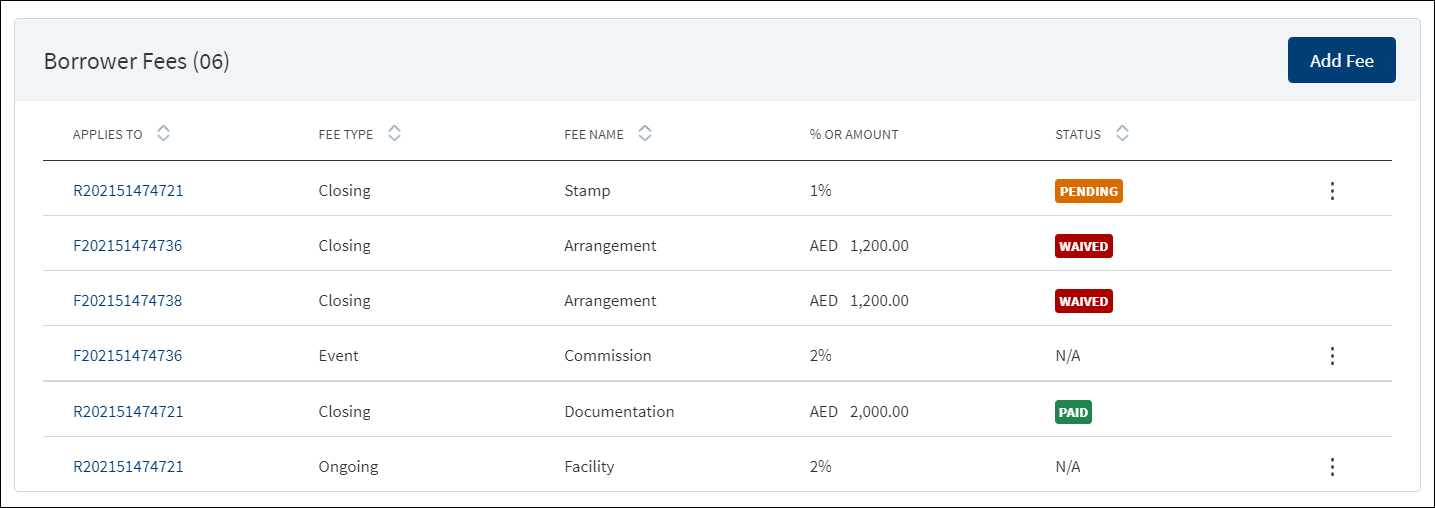
A bank user of relationship manager and underwriter roles with the necessary permissions can view and manage (add, edit, delete) the feature. Fee that is added in Facility overview (both new and modification Facility) will be displayed here.
The application displays the borrower fees with the following details: The Request or Facility ID or Modified Facility ID to which the fee applies, Fee Type, Fee Name, % Or Amount, and Status (applicable only for closing fees). Fee that is linked to all the modification facilities will be prepopulated in the summary if the purpose is selected as modification.
For Retail - The borrower fees can be added in the Drawings level, the Applies to section displays the following radio buttons:
- Request
- Product : This displays the products of the Request.
- Drawings : This displays the drawings. Incase the product does not have drawings, only the above two options display.
When the borrower fees is added for Drawing, the Drawing ID displays in the Applies To section of the summary. The Fees added at the Drawing level from the Request Overview display in the Request, Product and Drawing Overview.
In case the Product/Drawing already has the Borrower fees in MCMS , the system displays the Applies To accordingly. The Applies To section displays the Product ID in the Product level and Drawing ID in the Drawing level.
Do any of the following:
- Context menu: Use the context menu as required:
- Click Edit to modify the fee details. Records with Paid and Waived status cannot be edited.
- Click Delete to remove the record. On the confirmation pop-up that appears, click Yes. The record is removed from the borrower fee list. Records with Paid and Waived status cannot be deleted.
- View Borrower Fee: Click the row to view the borrower fee details. For example, the fee name can be Penalty Interest, Commission, Stamp, Arrangement and more.
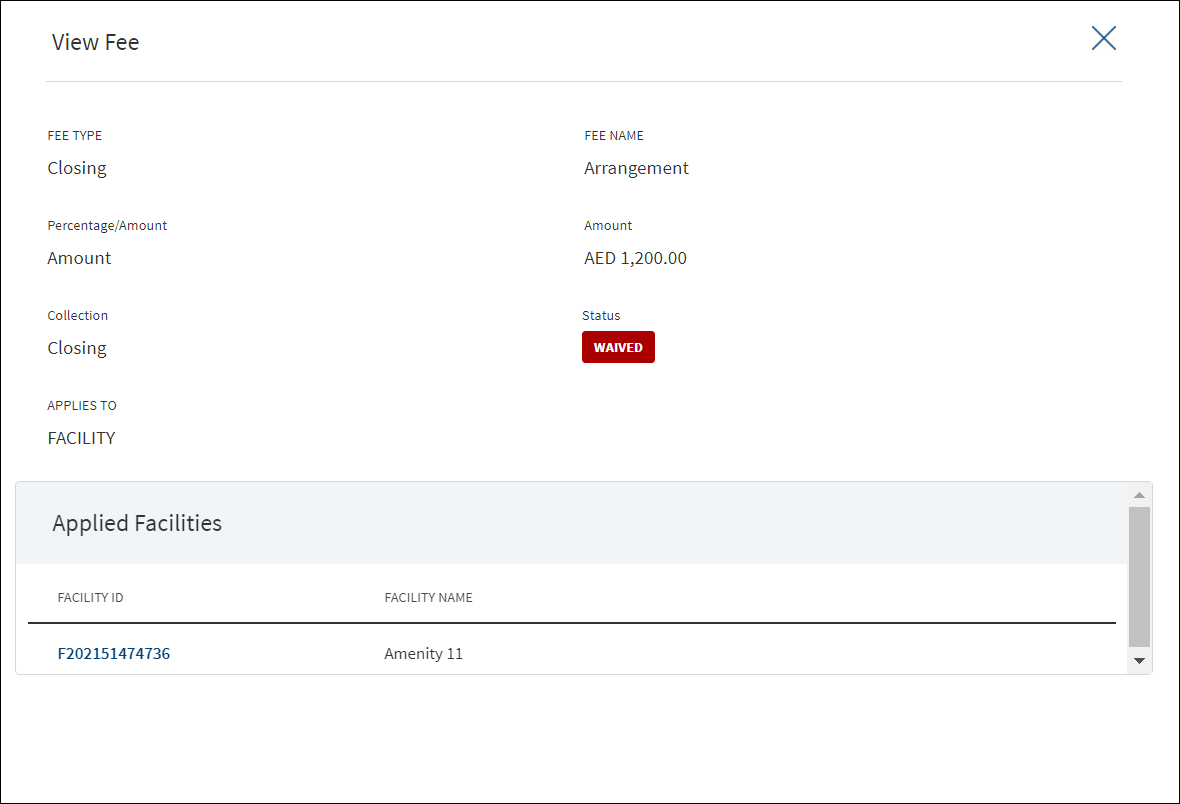
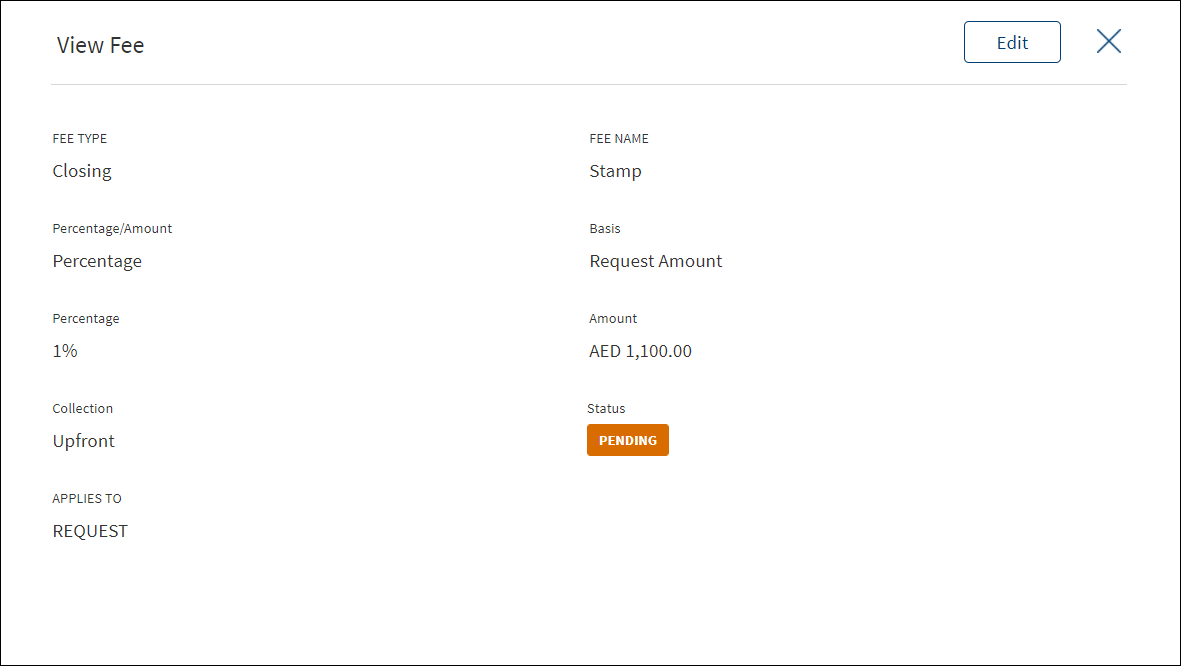
- Click Edit to modify the fee details. A fee with status as Paid or Waived cannot be edited.
- If the fee applies to a Facility, it is displayed in both request overview and corresponding Facility overview as well. Click the Facility ID to navigate to the Facility overview screen.
- Click X to close the screen.
- Click Add Fee to add a new borrower fee.
Use the feature to add a fee at the request or the Facility level. In this screen both New and Modification facilities are listed if both the Purpose options are selected initially, otherwise only one of the Facility displays as per the purpose selected
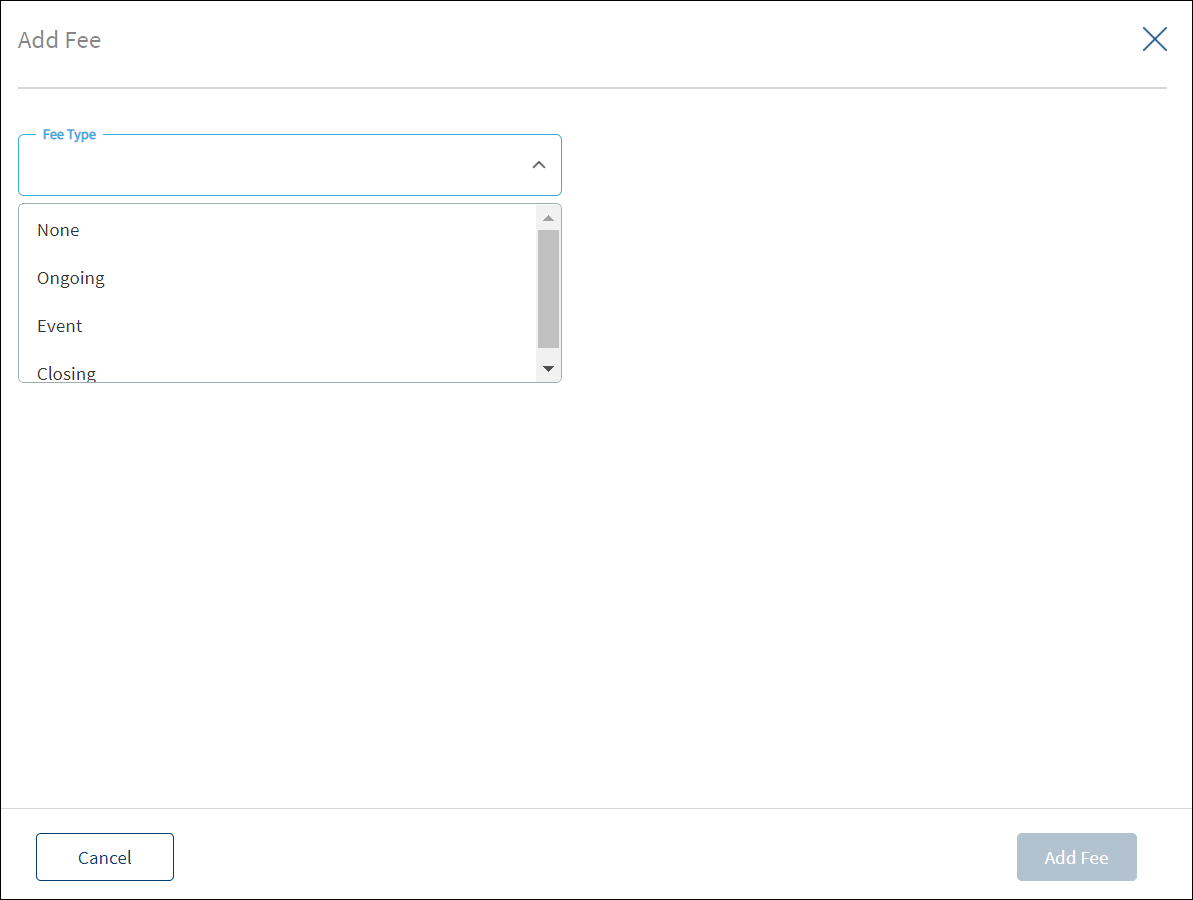
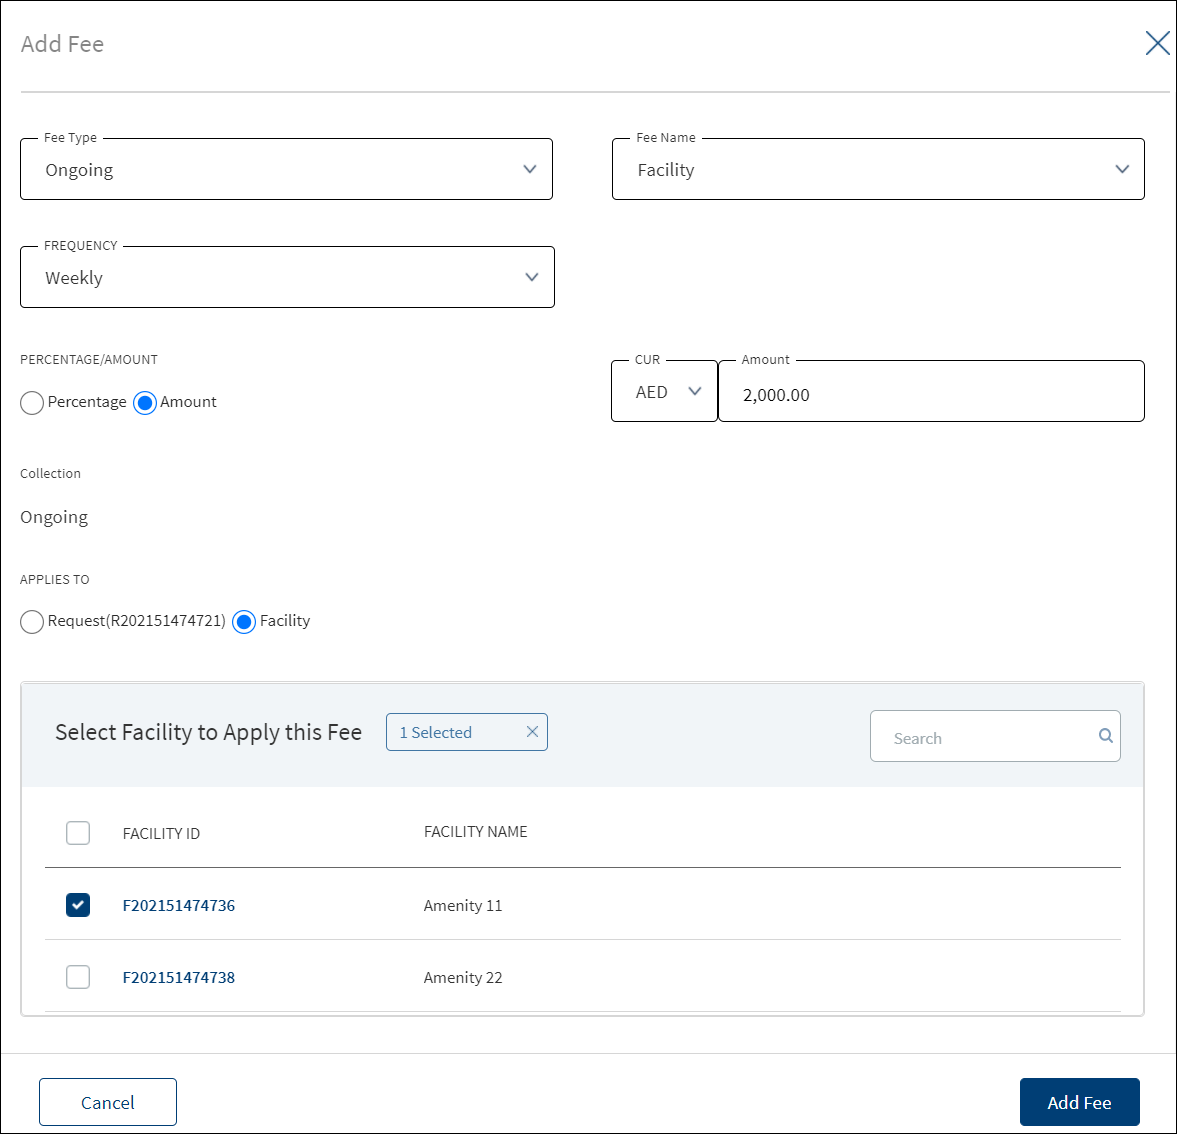
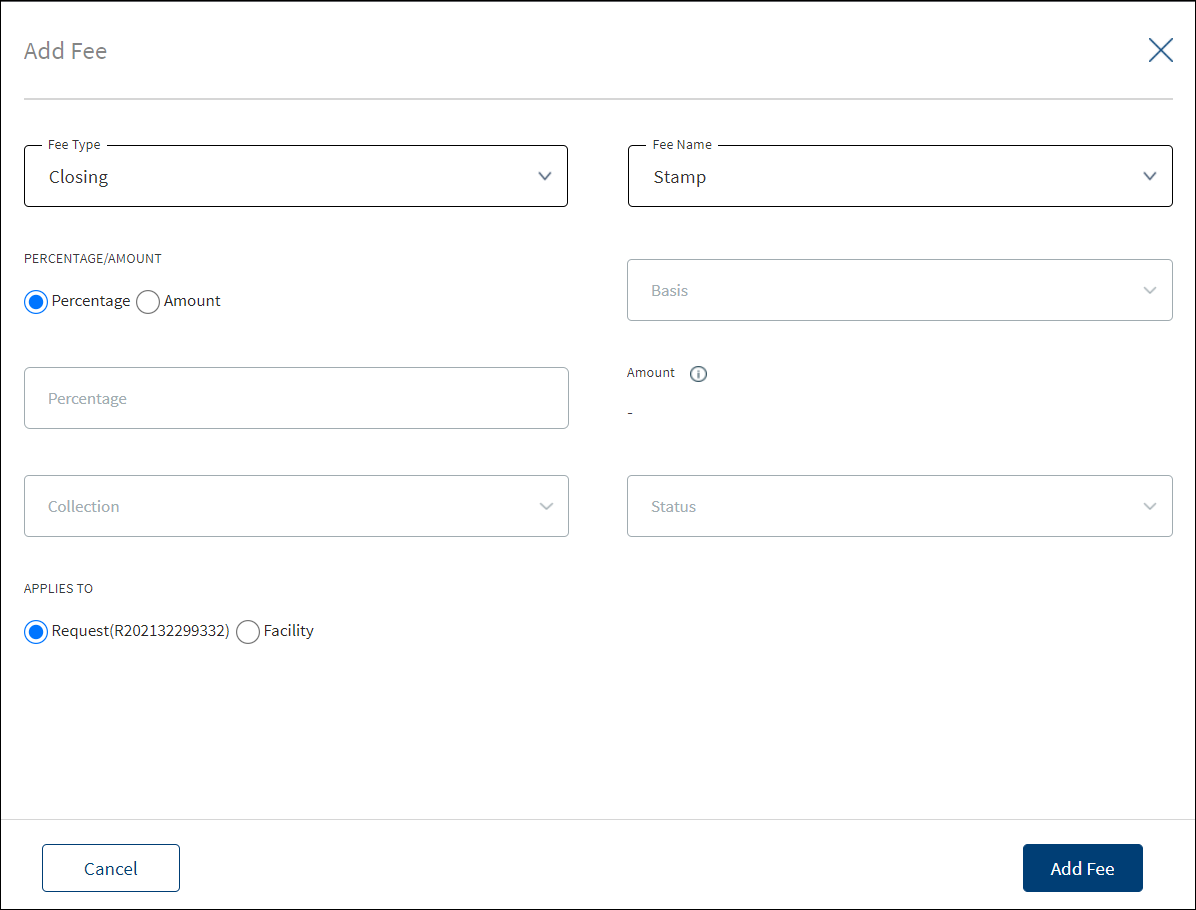
- Select the Fee Type from the list. The application displays various options depending on the selected fee type.
- Ongoing
- Select the Fee Name from the list (for example, Available, Facility, Utilized).
- Select the Frequency from the list.
- Select fee as a Percentage or Amount. If Amount is selected, then select the currency from the list and enter the Amount. The currency field has predictive search where you can enter your option in the box and select the required option from the matching result rather than scroll down the list to select a currency.
- Rate Basis: Visible only if percentage is selected in percentage/amount.
- Balance Type: Visible only if percentage is selected in percentage/amount
- Rate Type: Default to Fixed, Visible only if percentage is selected in percentage/amount.
- By default, the application applies the Collection as Ongoing.
- Event
- Select the Fee Name from the list (for example, Documentation, Penalty Interest, Commission).
- Select fee as a Percentage or Amount. If Amount is selected, then select the currency from the list and enter the Amount. The currency field has predictive search where you can enter your option in the box and select the required option from the matching result rather than scroll down the list to select a currency.
- Basis: Visible only if percentage is selected in percentage/amount. The following list items are available - Facility Amount and Prepayment Amount.
- Closing
- Select the Fee Name from the list (for example, Arrangement, Documentation, Stamp).
- Select fee as a Percentage or Amount. If Amount is selected, then select the currency from the list and enter the Amount. The currency field has predictive search where you can enter your option in the box and select the required option from the matching result rather than scroll down the list to select a currency.
- Basis: Visible only if percentage is selected in percentage/amount. The only list item available is Facility Amount.
- Select the Collection Type from the list.
- Select the Status from the list - Pending, Paid, Waived, and N/A.
- Ongoing
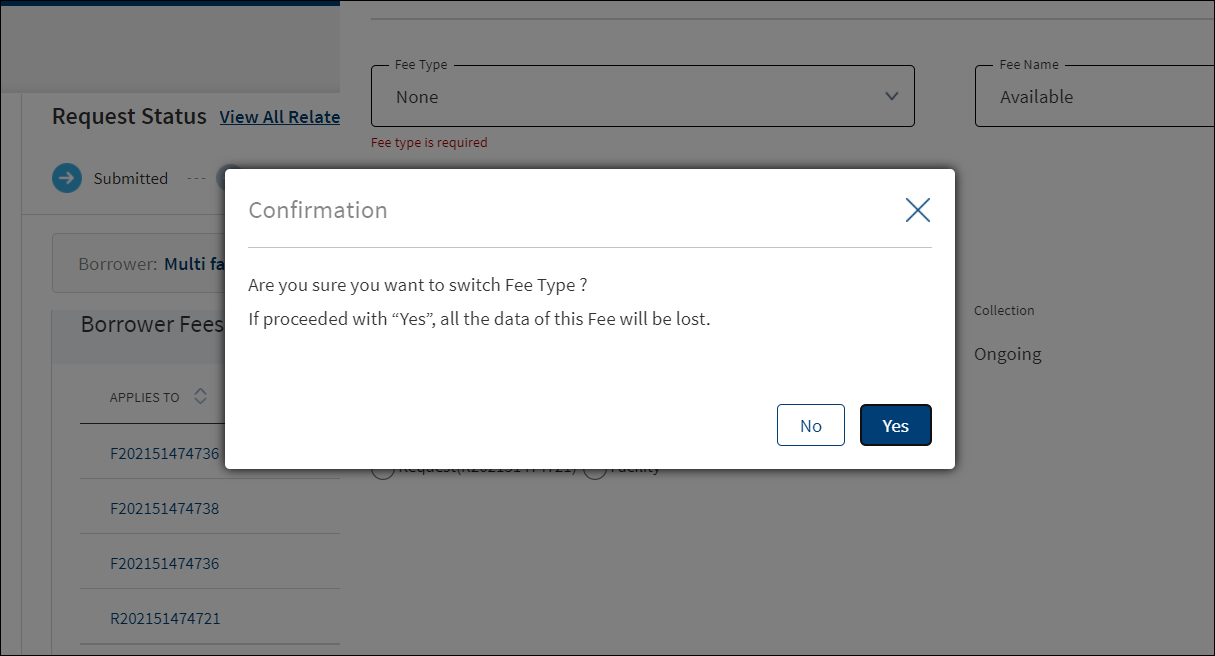
- On changing the Fee Type, the application displays a confirmation pop-up for switching the fee type. On clicking Yes, the data entered so far will be lost.
- Applies To: Select Request or Facility option to which the fee applies.
- On selecting Request, the current Request ID is displayed, and Fee is applied to the current request.
- On Selecting Facility, the Facility to which the fee is applied is displayed. Select the facilities in case the request has multiple facilities.
- Click Add Fee. The application displays a confirmation message that the fee is added successfully and adds the record to the Borrower Fees list.
Click Cancel to discard the changes. On the confirmation pop-up that appears, click Yes. The changes are not saved.
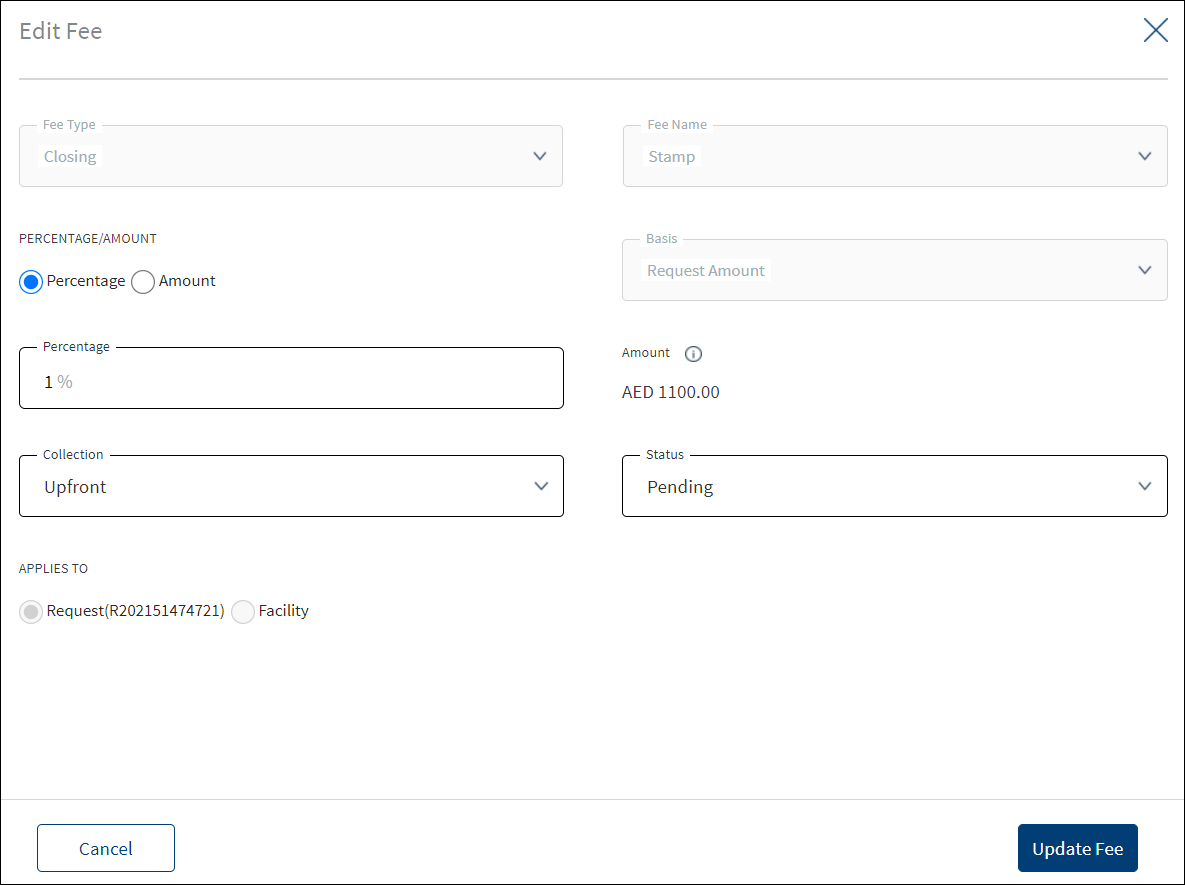
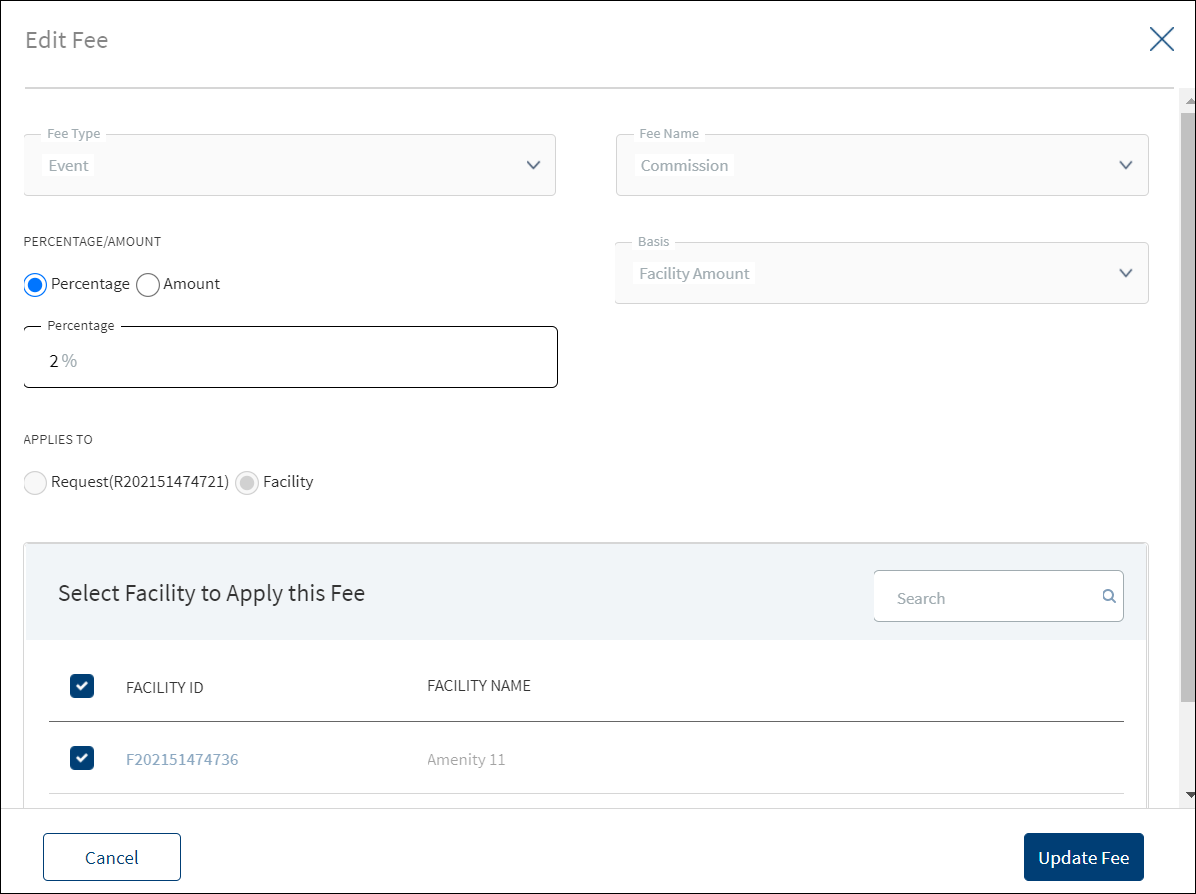
Use the feature to edit the borrower fee details. A fee with status as Paid or Waived cannot be edited.
- Make the changes as required. The Fee Type, Fee Name and Applied To fields cannot be edited.
- The following details can be edited depending on the fee type: Fees Percentage or Amount option, Basis request amount, Percentage, Amount, Collection, and Status.
- Click Update Fee to save the details.
- The application displays a confirmation message that the record is updated successfully. The updated borrower fee details are displayed on the view screen. The Request ID or Facility ID to which the fee is applied is displayed in the Apply To column of the borrower fee list.
Click Cancel to discard the changes. On the confirmation pop-up that appears, click Yes. The changes are not saved.
Risk Ratings

On submitting the onboarding request, the application fetches the related parties of the request and their ratings, and auto populates the information with the following details: Rating type, Entity name, and Rating given by the bank. The Adjustment Rating is displayed if available, otherwise New Rating is displayed.
Do any one of the following:
- Click the entity name to view the entity details.
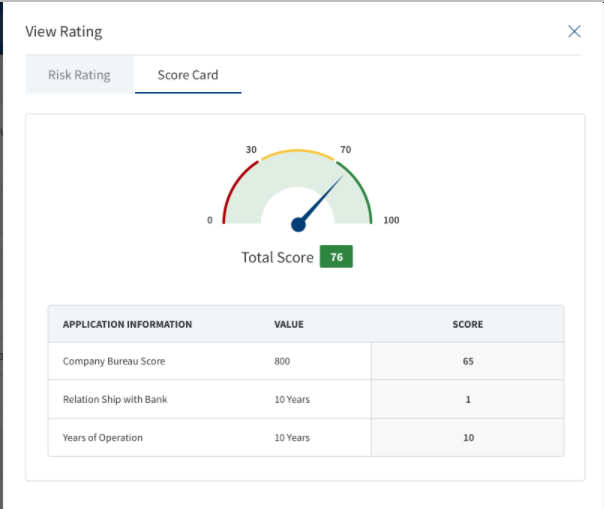
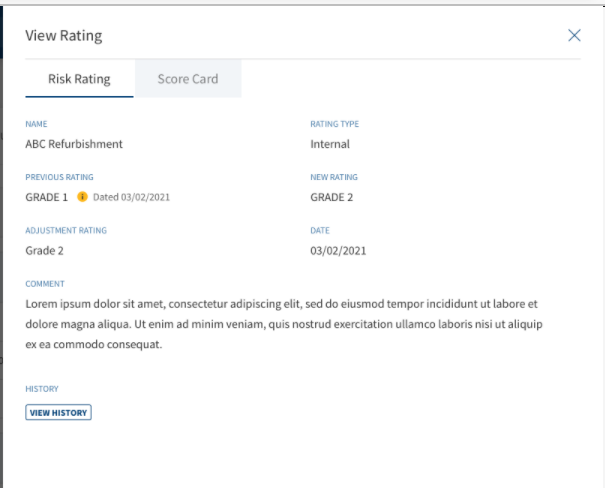
- Click the row to view the rating details. The application displays two sections: Risk Rating and Score Card.
- Risk Rating displays the following details: Rating Type, Previous Rating, New Rating, Adjustment Rating, Date, Comment, and History button.
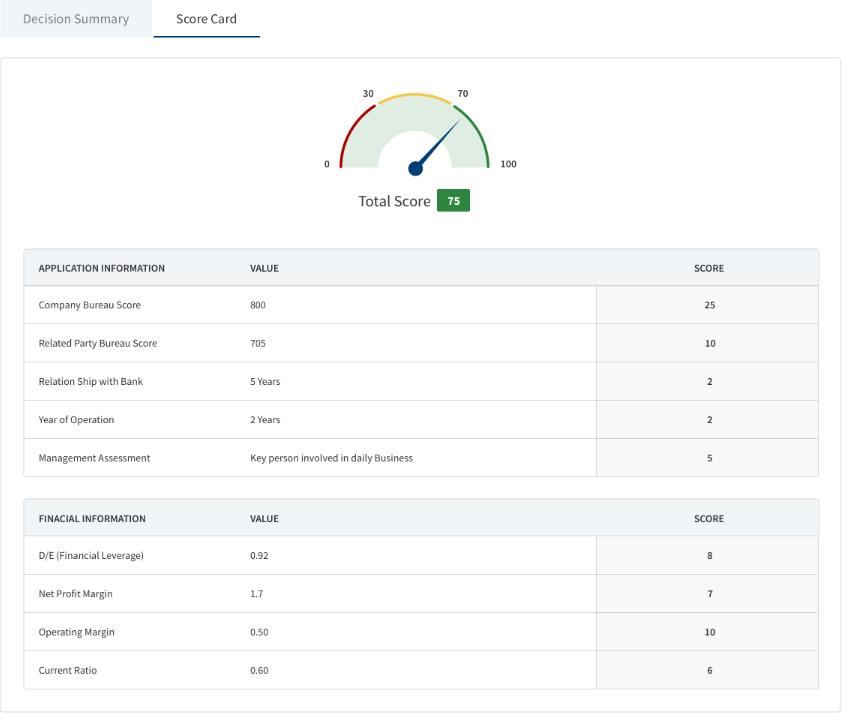
- Score Card: This section displays the Total Score eligibility for the Entity. The value ranges from 0 TO 100. It displays the following fields: Application Information, Value, Score. This is a non-editable section. Since this section is controlled by permissions ,only if the logged in user has requisite permission only then the Score card can be viewed else it is not displayed. This Data is taken from riskScoreCard API in LOS MS.
DMN Rules
| Rating Type | Rating Score | Eligibility | Risk Category |
|---|---|---|---|
| Internal | Grade 1 | >80 | Low |
| Internal | Grade 2 | 71-80 | Low |
| Internal | Grade 3 | 61-70 | Medium |
| Internal | Grade 4 | 51-60 | Medium |
| Internal | Grade 5 | 41-50 | Medium |
| Internal | Grade 6 | 31-40 | Medium |
| Internal | Grade 7 | 21-30 | High |
| Internal | Grade 8 | <20 | High |
The risk score rules are defined in DMN and is the total of variables like individual bureau score, years of operation, etc for the respective Applicant (business and individual party).
Click View History to view the historical ratings.
Click X to close the form.
The Score Card section is currently applicable only for SME.
Decisions
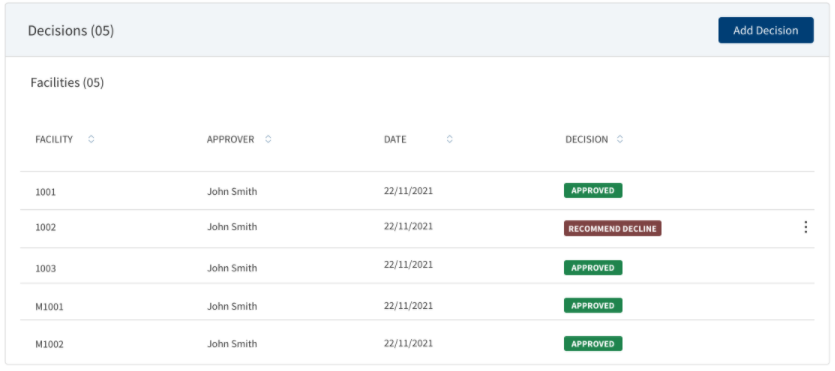
The below image is only applicable for Retail.
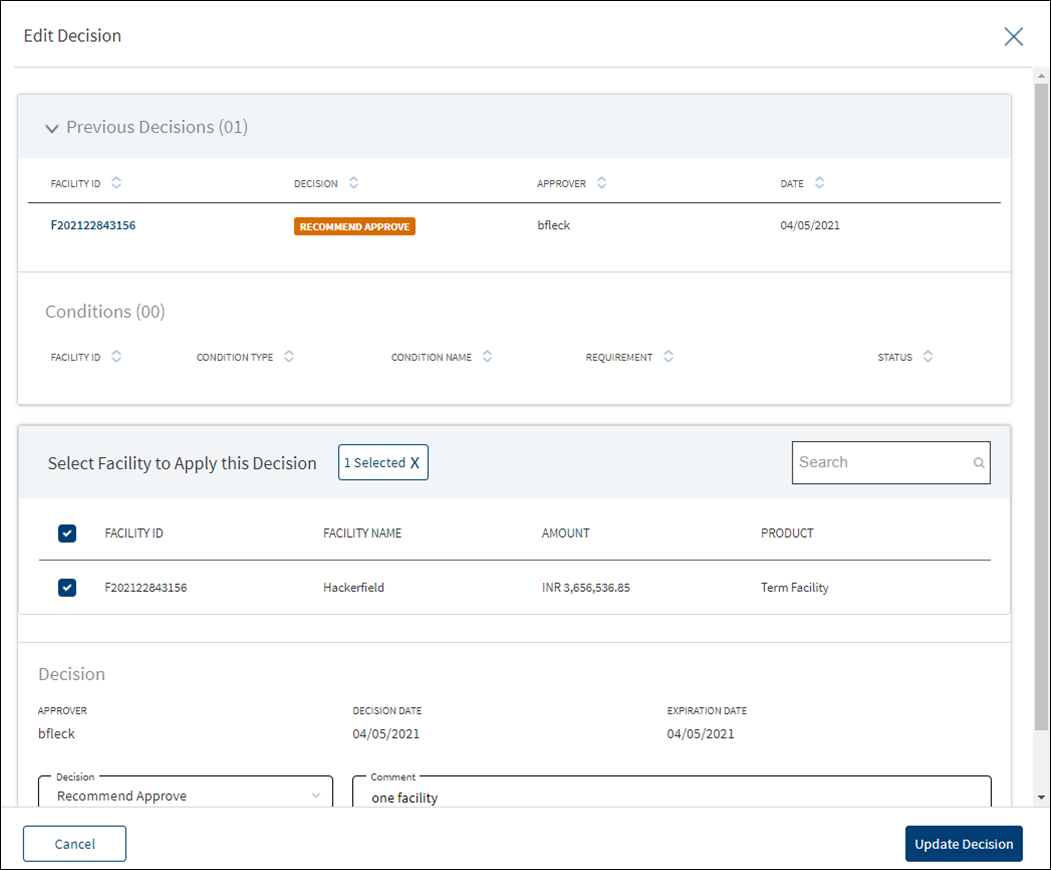
Using the feature, a bank user with underwriter and supervisor roles can take individual or committee decisions in a bank for single and multiple facilities in a request. The application displays the summary of all decisions for a Facility/all Facility within a request.
For more information on credit score and automated decision rules, click here.
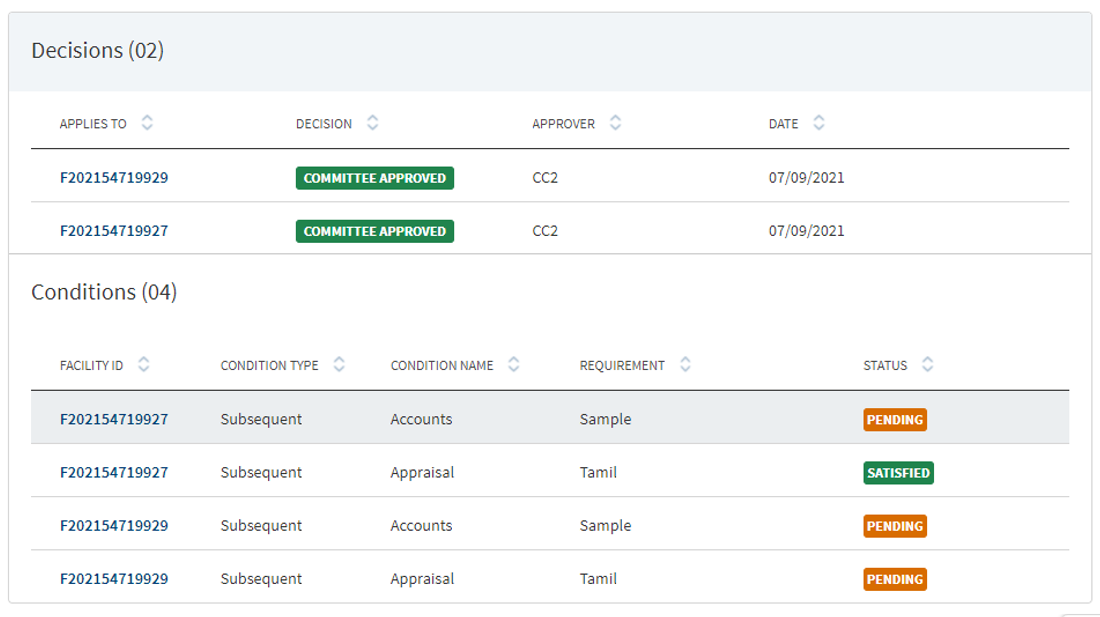
The application displays the following details:
- Facility ID: The unique identifier of the Facility
- Approver : Displays the approver name in the case of Individual. In case of Committee approval, the Committee Name is displayed.
- Date: The Date on which decision was saved.
- Decision: The decision accorded. The values are as follows:
- Individual decision: Recommend Approve, Recommend Decline, Approve, and Decline.
- Committee decision: Committee Pending, Committee Approve, and Committee Decline.
The application also displays the list of corresponding conditions with the following details: Facility ID, Condition Type, Condition Name, Requirement, and Status.
When the same decision and conditions are added to multiple facilities, in the summary view, the decision and condition are displayed Facility-wise in multiple rows.
After the Decision Engine rules are executed ,a Decision record is automatically created in the Request overview & Facility Overview.
- If it is Auto Approval , the decision record is view only .
- If it is Manual Review:
- The decision record is created for the Approver (based on the Approver Matrix) .
- A Decision task is created for the Approver.
- User can click on the record and provide the decision accordingly:
- Approve
- Recommend Approve
- Decline
- Recommend Decline
- Other than the final decision “Approve “ or “Decline , if the approver provides any other decision then an other task is created for the same Approver.
- If it is Auto Decline, the decision record is view only.
Updating Verified Prospect status in Transact
If the applicant is a verified prospect and when the applicant withdraws the application, then the status of the prospect is updated in customer table as EXIT.STATUS → WITHDRAWN.
If the applicant is a verified prospect and when bank user rejects the application, then the status of the prospect is updated in customer table as EXIT.STATUS → REJECTED.
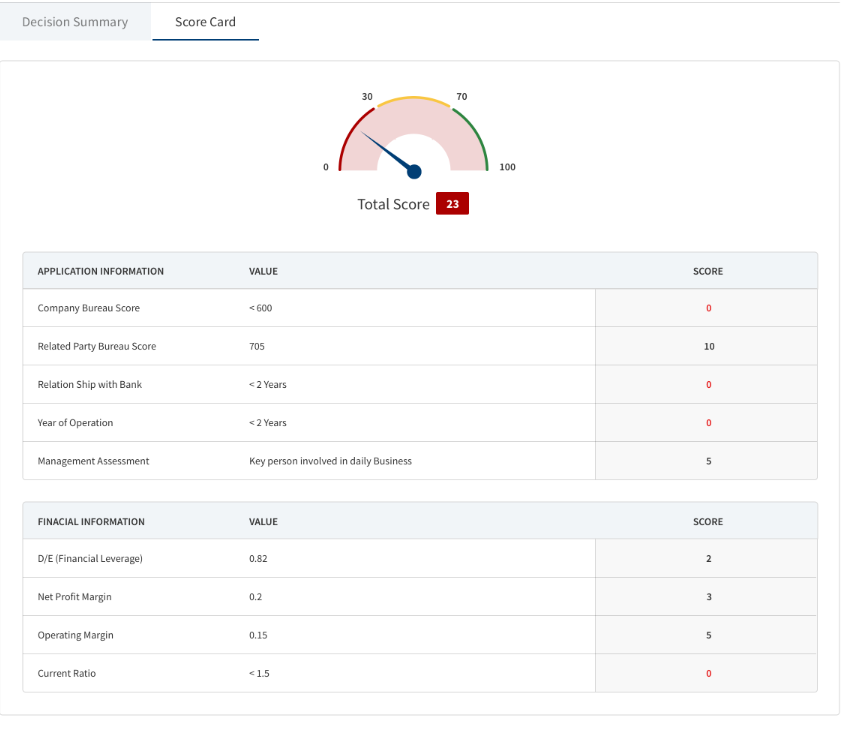
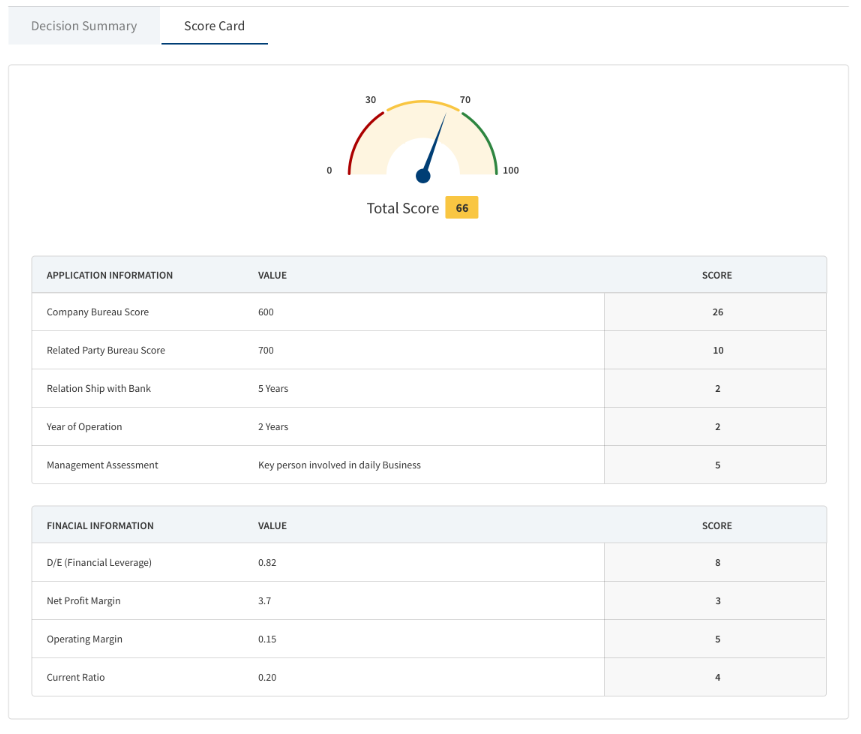
The application displays two sections: Decision record and Score Card.
Decision section displays the following details: Approver, Decision Date, Expiration Date, Facility ID, Product, Requested Amount, Decision, Approved Amount.
Score Card: displays the following details:
- Application Information, Value ,Score.
- Financial Information , Value, Score.
This is displayed only in the case of automated Decisions. In case the Decisions are not automated ( for Corporate Lending) , this section does not display. This is a non-editable section, Since this section is controlled by permissions ,only if the logged in user has requisite permission only then the Score card can be viewed else it is not displayed.
Do any of the following:
Add Decision
Click Add Decision to add an individual credit decision or committee credit decision. Only a user with Underwriter or Supervisor role can add a decision.
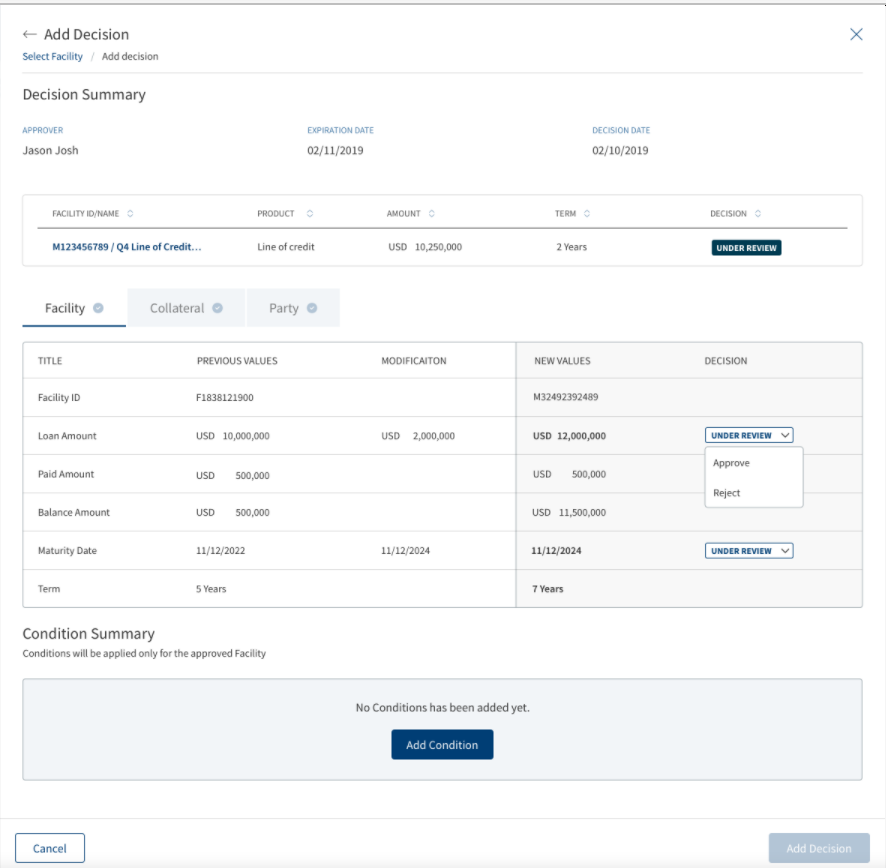
The decision summary consists of the following:
- Facility ID/Name
- Product
- Amount
- Term
- Decision
The Decision status consists of the following :
- Under review - Until requests are approved or declined (Pre-approval)
- Approved - If all the modification requests are approved
- Decline - If all the modifications are declined
- Partially approved - If few requests are approved and few are declined.
For Retail - A user can add decision to the Product and drawings from the Request Overview Credit Decision section. The Decision is created at the Product Level, the user can add Approved amount at Drawings level only and the approved amount is automatically calculated at the at Product Level.
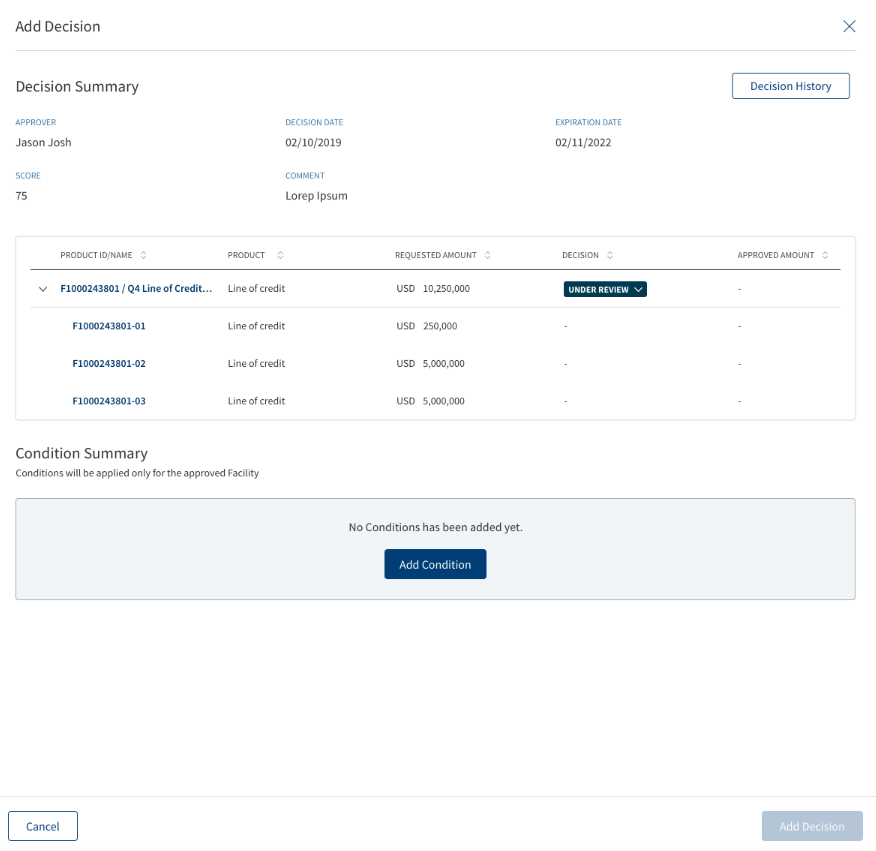
When the user clicks Add Decision the following fields display:
- Approver
- Decision Date
- Expiration Date
- Score
- Comment
- A decision table with below columns:
- Product ID/Name
- Product
- Requested Amount
- Decision
- Approved Amount
In the case of Automated Decision, Score card section, the same above fields display in an accordion view for Drawings.
When user clicks the Under Review to approve/decline:
- When clicked Approve, all the requested drawing amount is displayed.
- The user only enters the Approved amount in Drawings , the Approved amount in the product level is calculated from the summation of all the approved amount in Drawings.
- The Approved Amount of all the Drawings is pre-filled with the Requested amount and currency an option to edit .
- The Comment is displayed at the Product level.
- When clicked Decline, the approved amount displays as N/A at the Product level and for all the Drawings.
- The decision added from the Request Overview displays in both the Request and Product Overview.
- When the Decision is Auto Approved - The approved amount in the Drawings is same as the Requested Drawing amount which adds up the Approved Product amount.
- When the Decision is Auto Rejected - The Approved amount is N/A at Product level and for all the Drawings .
- The decision is not displayed in the Drawing Overview.
Context Menu
Use the context menu placed against the decisions and conditions as required:
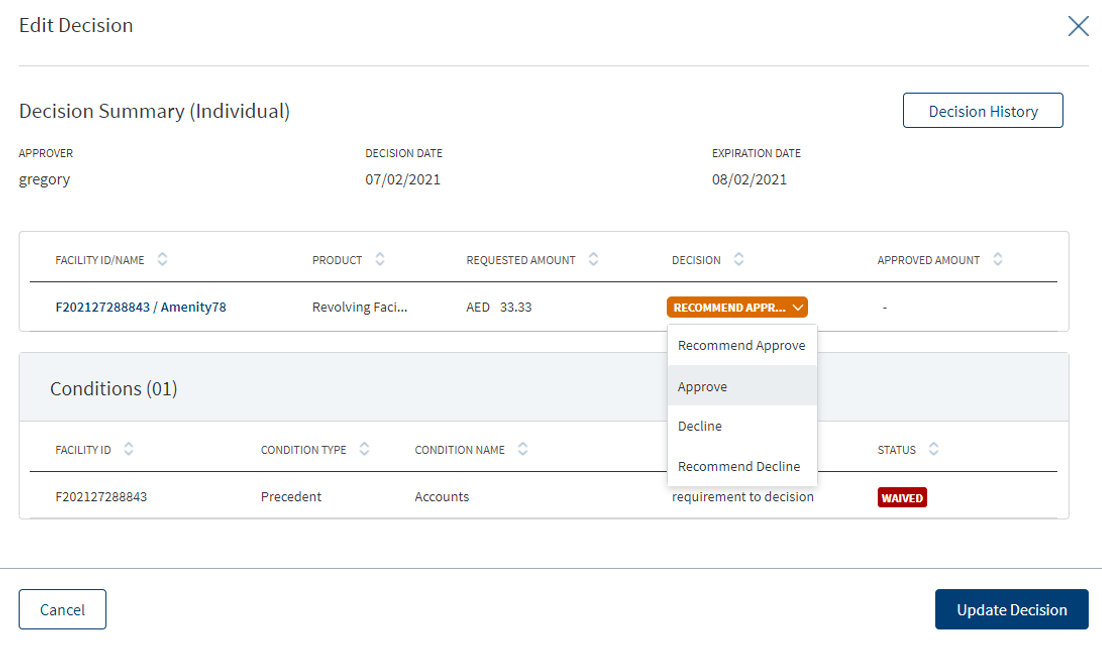
- Click Edit to modify the summary details. User who added the decision only can update the decision details. A decision or condition with Pending status only can be edited. Only users with the required permission can edit a record.
- Click Delete to remove the record. A decision or condition with Pending status only can be deleted. In the confirmation pop-up that appears, click Yes. The record is removed. Only users with the required permission can delete a record.
- The Modification Facility Context Menu has two options : Approve or Decline. The Add decision button is Enabled only if the decision status is Approved or Declined or Partially approved.
Click the row to view the decision and corresponding condition details. For multi-Facility, even if the approver gives the same decision for multiple facilities, in the decision summary, multiple rows are displayed with each row displaying separate Facility. The user can easily differentiate between an Individual and a Committee decision. For a Modification Facility, all the modification decisions are displayed in the view decision screen, however the edit option is not available. If Modification is requested, User can view collateral and party tabs along with other details.
The User can view all the Modifications requested in Decision screen to either Approve or Decline the Request. Decision status is changed only after decisions are taken on all the tabs. Facility, party, collateral tabs are dynamic and displayed depending on the modification type selected for the Facility.
Facility :
This section displays all the Facilities accessible in the Facility section in the Facility Overview along with Add/Release icon. The drop down displays options as Under review, Approved and Declined for every row, which can be selected accordingly.
For Retail - If a Product has drawings in the decision table ,the Product along with the drawings is displayed in the accordion view .
Collateral :
This section displays all the Collaterals accessible in the collateral section in the Facility Overview along with Add/Release icon. The drop down displays options as Under review, Approved and Declined for every row, which can be selected accordingly.
Parties :
This section displays all the Parties accessible in the Parties section in the Facility Overview along with Add/Release icon. The drop down displays options as Under review, Approved and Declined for every row, which can be selected accordingly.
The Add decision button is enabled only if the decision status is Approved or Declined or Partially approved.
Once underwriter approves the requested modifications, the User can view tool tip displaying the status -Requested and Approved by Underwriter. For approved status - Increase in Loan amount ,Change in Maturity date.
The User can view tool tip displaying the status - requested and approved in both Add Decision and View Decision section in the Request Overview Screen.
Individual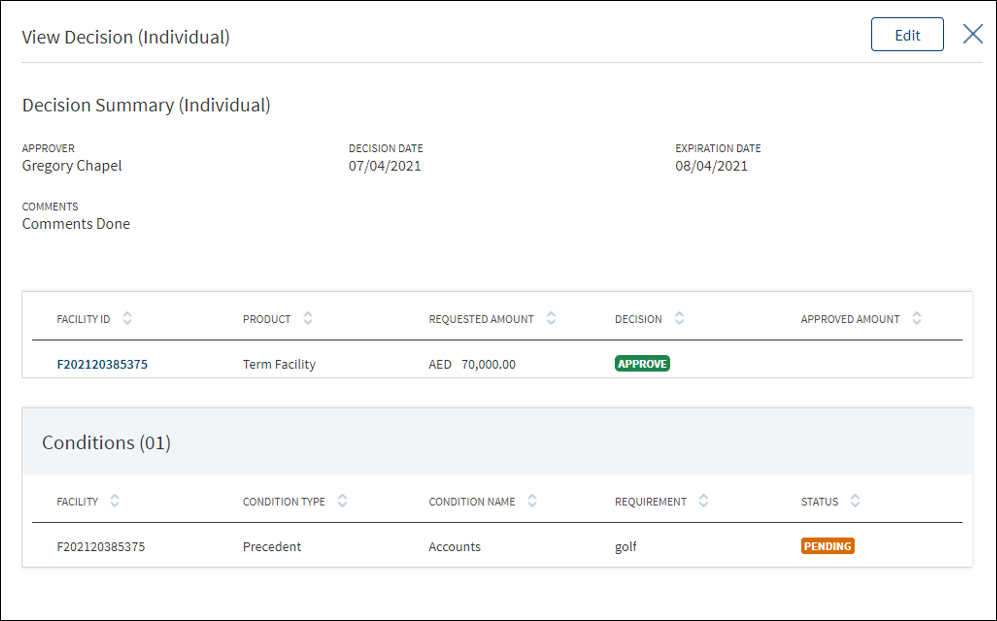
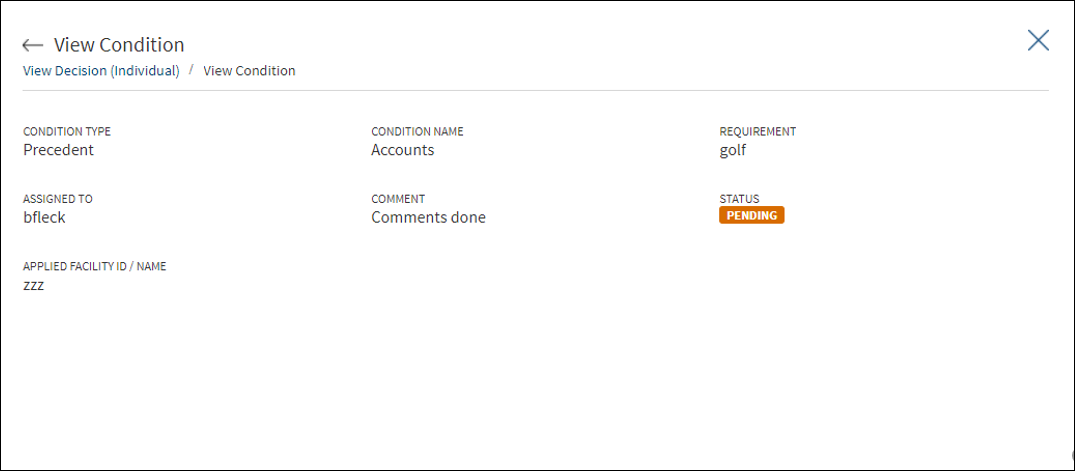
The application displays the following:
- Decision Summary: Approver, Decision Date, Expiration Date, Decision, and Comments.
- Facility details: Facility ID, Product, Request Amount with currency, Approved Amount with currency, and Decision.
- Condition details: Condition Type, Condition Name, Requirement, Assigned To, Comments, Applied Facility ID/Name, and Status.
Committee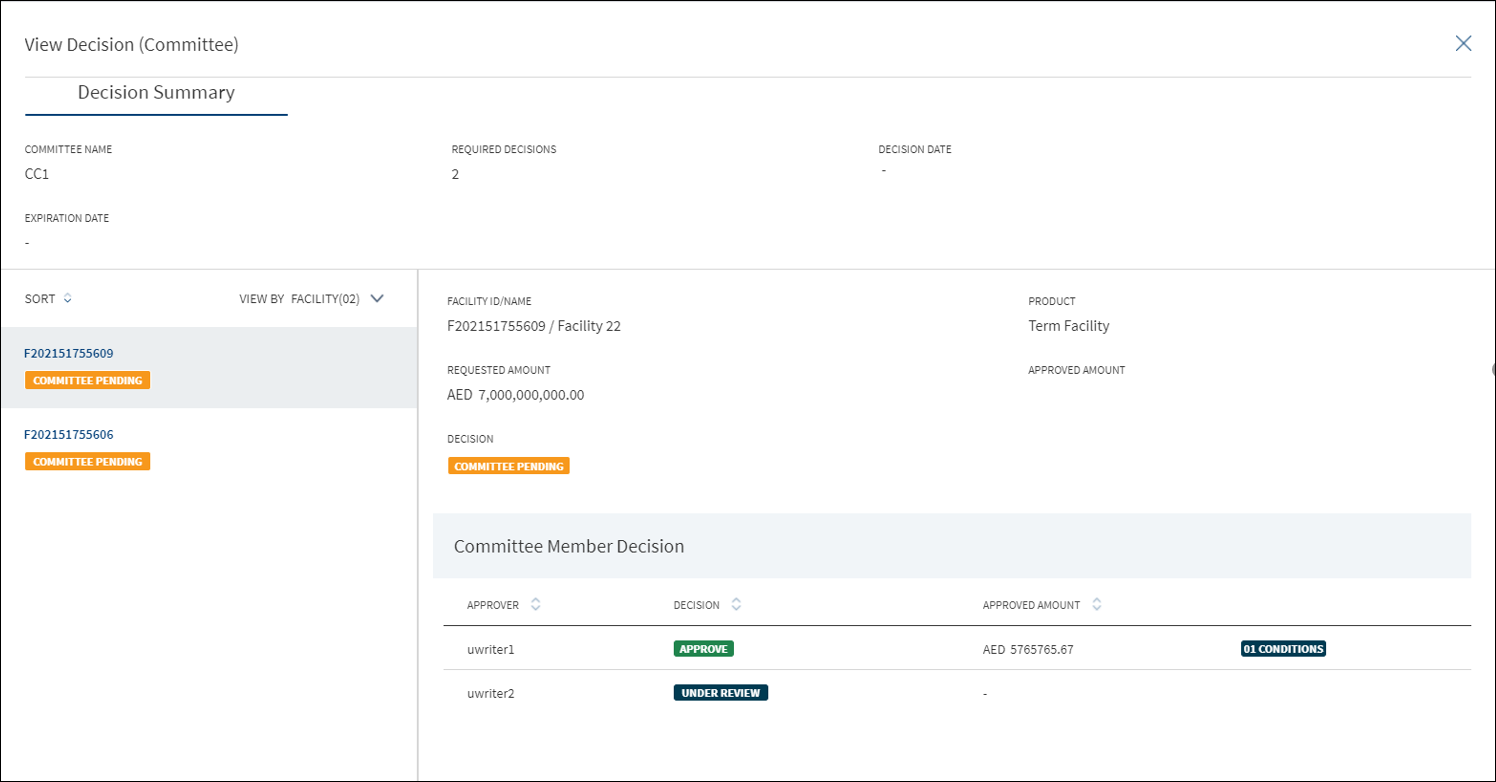
When a request hosts multiple Facility, then for a committee decision, following scenarios can occur:
- All the facilities go to the same credit committee for approval.
- Few facilities go to one credit committee and other few goes to another credit committee for approval
The application displays the following:
- Decision Summary: Committee Name, Required Decisions (the number of members in the committee who can give decision. It can have values like 4 or 4/6), Decision Date, and Expiration Date.
- The user can view the details of the Facility under the Facility section.
- Facility details: Facility ID, Product, Request Amount with currency, Approved Amount with currency, and Decision.
- Committee Member Decision section with user able to view following columns which can be sorted: Approver, Decision (Pending, Approve, and Decline), Approved Amount with currency, and Conditions (indicates that the user has given some conditions along with approval). This section is visible the moment a task for all the members are formed. As and when the committee members complete the task, the decision status is updated.
- Condition details: Condition Type, Condition Name, Requirement, Assigned To, Comments, Applied Facility ID/Name, and Status.
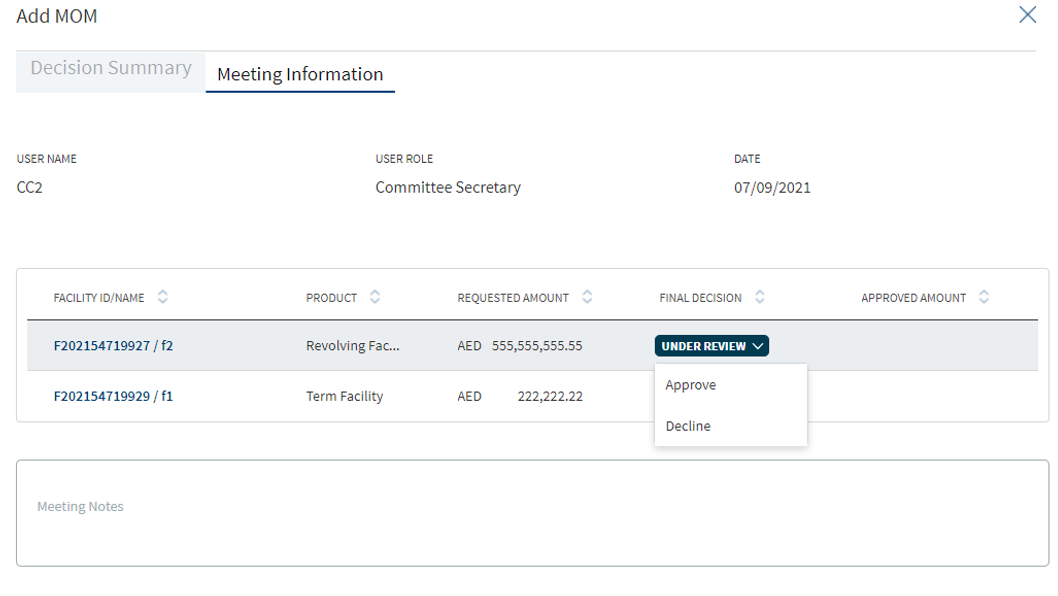
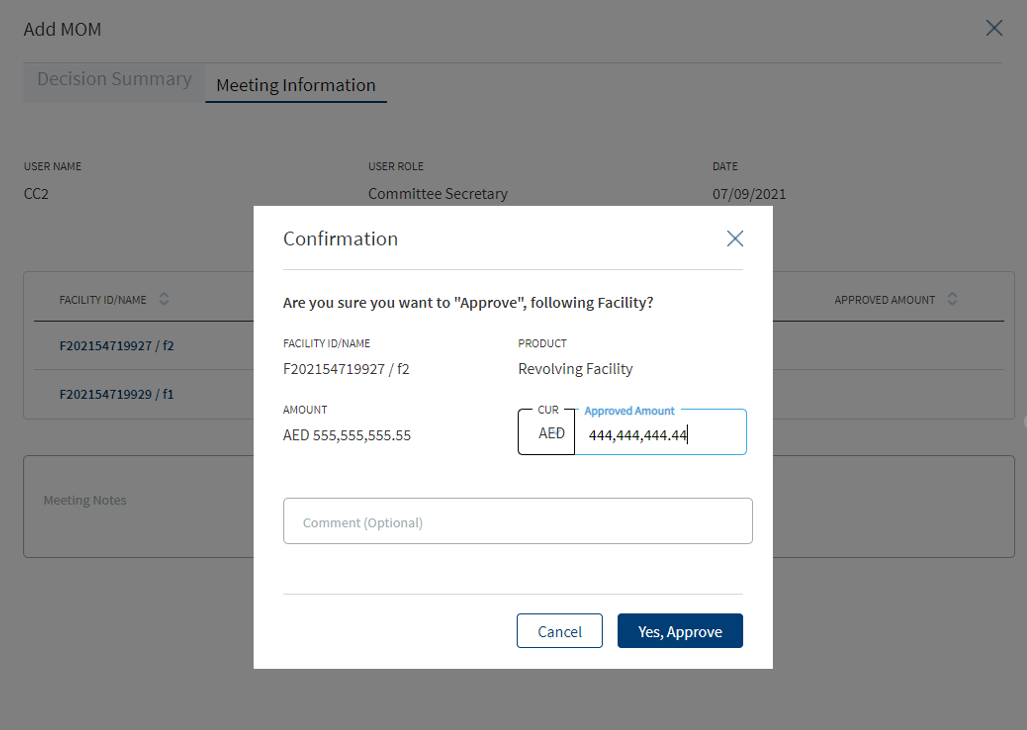
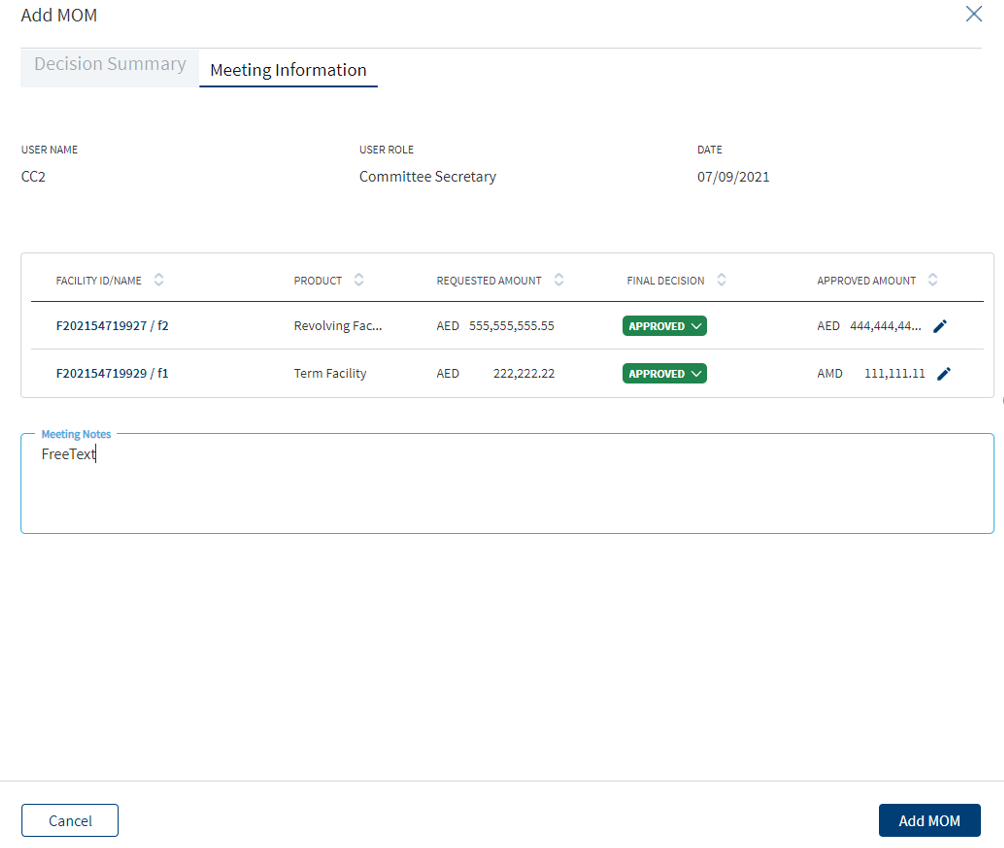
- Minutes of the Committee meeting: Committee User, Role (Secretary), Date, and Minutes (text of the minutes). The Minutes of the Committee is available only when the Committee Secretary completes the task. This task comes up only when all the committee members gives their decision. Click the row to view the details of a decision given by a particular member.
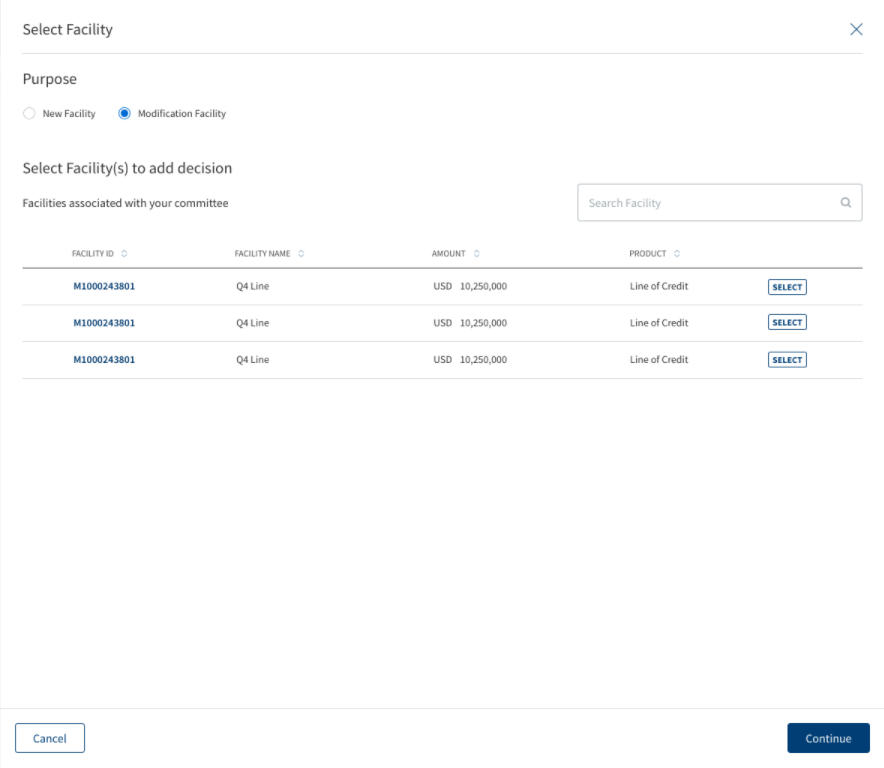
In the Add Decision screen two radio button options are available for new Facility and modification Facility. The options can be selected based on your requirement.
After clicking the New Facility radio button, a list of all the new facilities are displayed with checkboxes, multiple boxes can be checked to proceed.
After clicking the Modification Facility radio button, a list of all the Modification facilities are displayed with a select button against each of them, only a single option can be selected.
Add an individual credit decision or a committee credit decision as required. The user can easily differentiate between an Individual and a Committee decision. A bank user with Underwriter and Supervisor roles can capture decision and related conditions for a Facility or multi-Facility.
An authorized user can capture decision and related conditions for a Facility or multi-Facility.
After adding the required details, click Add Decision. On the confirmation pop-up, click Yes. The application displays a message that the decision is added successfully. On completion, the decision condition summary is updated. The Decision, Comment, and Conditions added to a Facility is displayed at the Decision section of the Facility Overview screen.
The Decision is divided into the following sections:
Previous Decision
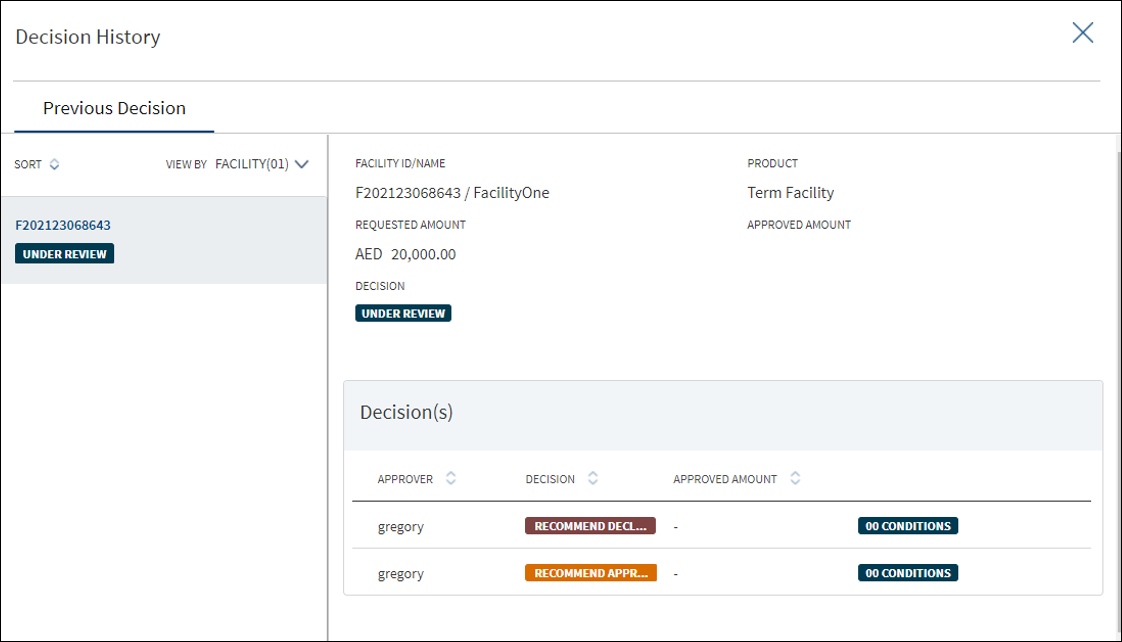
Displays the list of previous decisions made with the associated conditions.
- The heading displays the count of previous decisions.
- User can view the existing decision given on the Facility.
- The following columns are displayed in view-only mode :
- Facility ID
- Decision
- Approver
- Date
Facilities
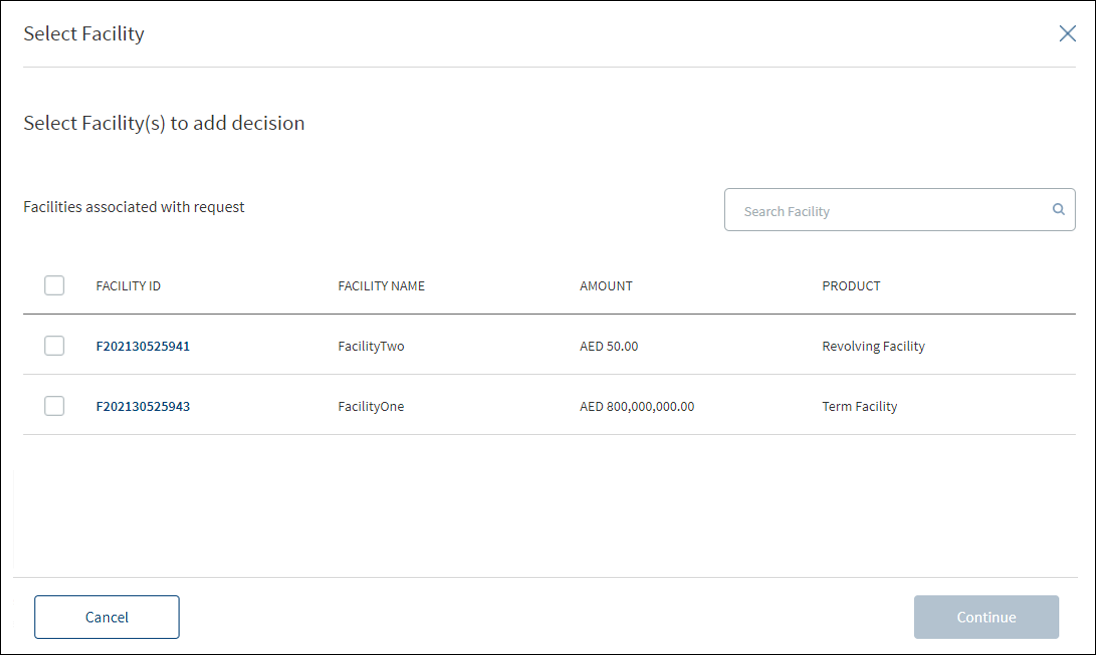
The application displays the list of facilities included in the request. Select the required Facility to apply the decision. Selection can be one, many, or all the facilities.
- User can view the Facility or multiple facilities under a request.
- The following details are displayed:
- Facility ID
- Facility Name
- Product
- Requested Amount with currency - Facility amount
- Approved Amount with currency – The value defaults to zero and approver has to enter the amount while giving the decision.
User can select all the facilities, few of them, or only one Facility from the list to give decision.
Decision Details
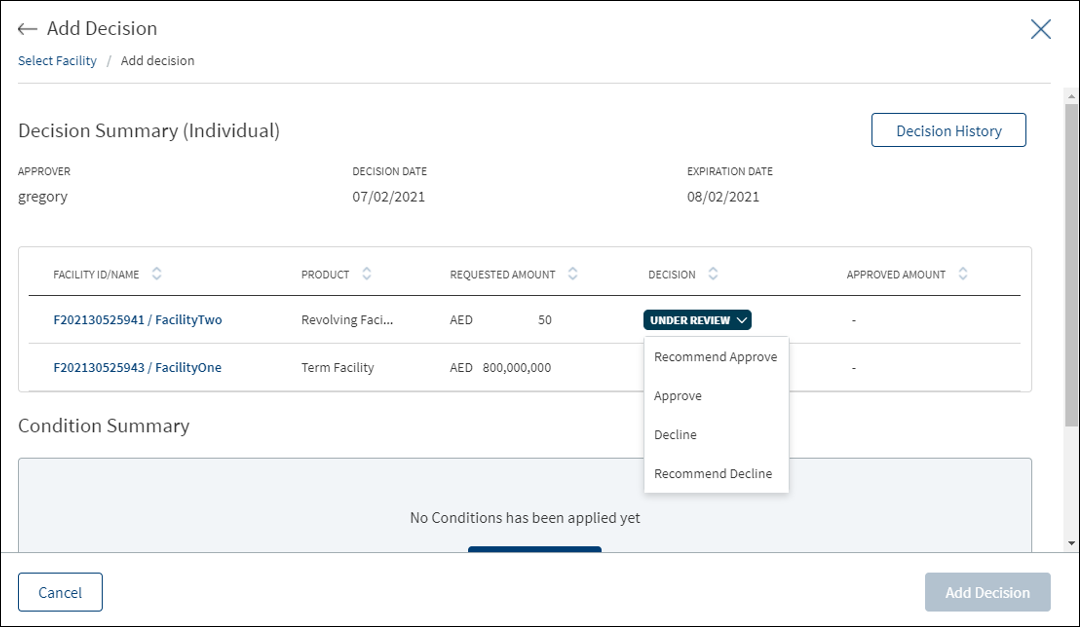
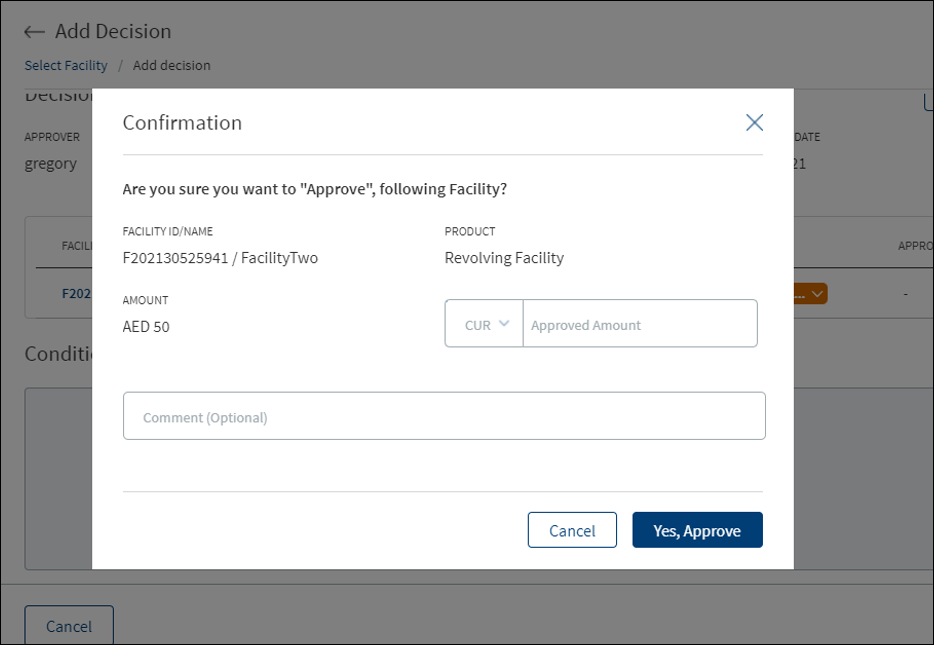
- User can capture the following fields:
- Decision: The list with blank as default option. User can select the decision from the list. The list items are fetched from the Origination Processing MS. The list items are: Under Review, Recommend Approve, Approve, Recommend Decline, and Decline.
- Approver: View only, auto captures the name of the person taking the decision.
- Decision Date: View only, auto captures the date on which decision is made.
- Expiration Date: Defaults to a month from the decision date and cannot be updated.
- Comment: Free text area.
- On completion, the decision summary is updated with the latest values.
Condition Details
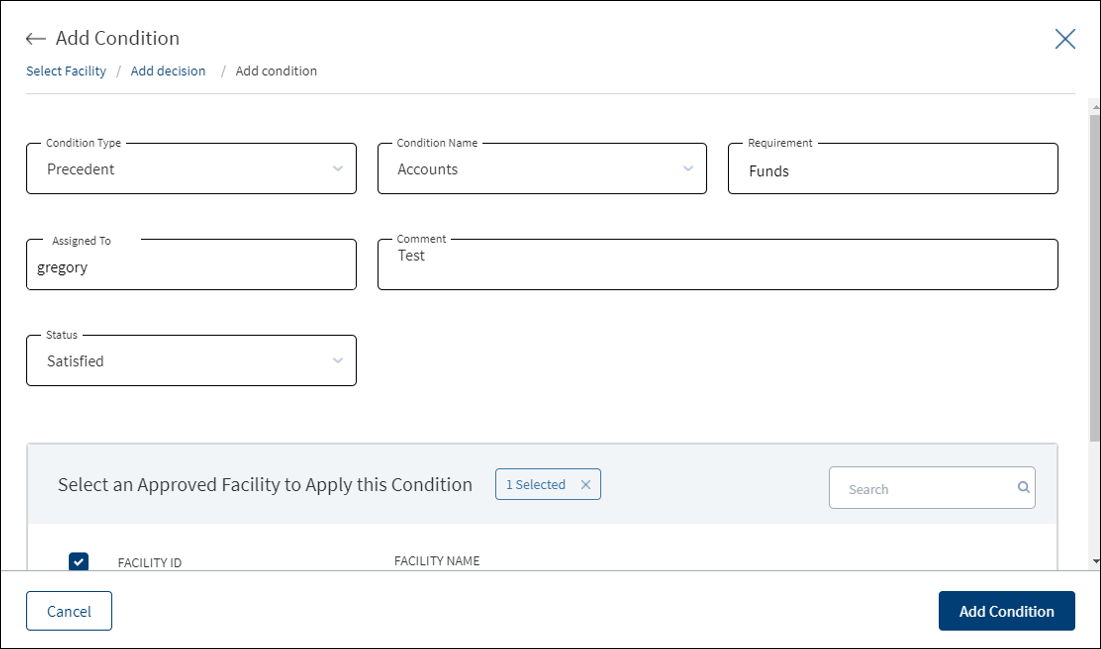
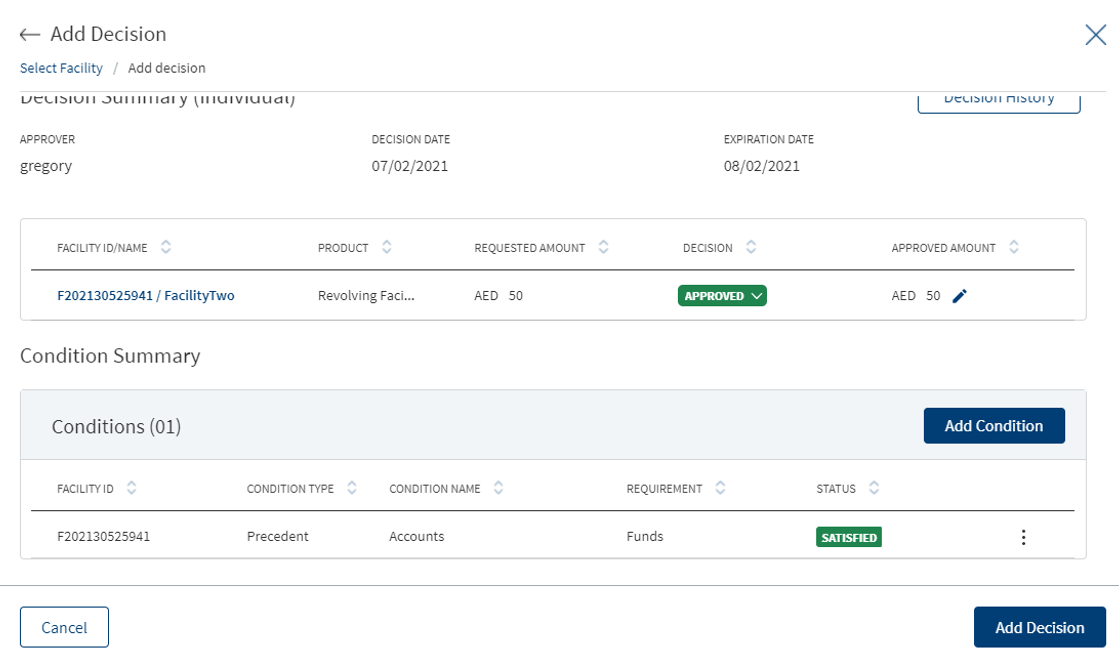
Along with the decision, a user with the required permission can add conditions to that decision. Add the details and click Add Condition to add a new condition. Multiple conditions can be added. Adding a condition for a decision is optional. The user can capture the following information:
- Condition Type list
- Condition Name list
- Requirement
- Assigned To: Search and select the required person to assign in the Assigned To field. The application displays the users maintained in the user management system. Enter the name of the bank user (first three letters minimum to search) to assign. The assigned user will receive this as a task to perform. The assigned user proceeds to the decisions section of the request overview screen and approves the task, and then can mark the task as completed on the task sticky footer.
- Status: The list items are Pending, Satisfied, and Waived.
- Comment: When a lengthy comment or description is entered which does not fit the field, then the content moves to the next line of the field. The field accepts up to 500 characters.
A member of a credit committee can give decision for a Facility or multi-Facility that has come for review. After adding the required details, click Add Decision. On the confirmation pop-up, click Yes. The application displays a message that the decision is added successfully. On completion, the decision condition summary is updated. The Decision, Comment, and Conditions added to a Facility is displayed at the Decision section of the Facility Overview screen.
The Decision is divided into the following sections:
Previous Decision
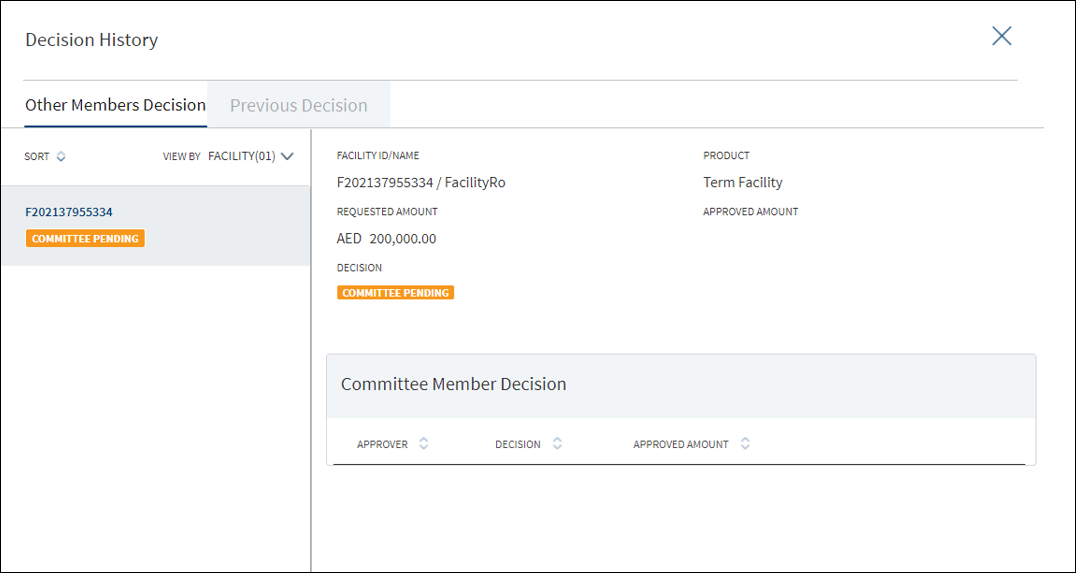
Displays the list of previous decisions made with the associated conditions.
- The heading displays the count of previous decisions.
- User can view the existing decision given on the Facility.
- The following columns are displayed in view-only mode :
- Facility ID
- Decision
- Approver
Date
Facilities

The application displays the list of facilities included in the request. Select the required Facility to apply the decision. Selection can be one, many, or all the facilities.
- User can view the Facility or multiple facilities under a request.
- The following details are displayed:
- Facility ID
- Facility Name
- Product
- Requested Amount with currency - Facility amount
- Approved Amount with currency – The value defaults to zero and approver has to enter the amount while giving the decision.
User can select all the facilities, few of them, or only one Facility from the list to give decision.
Decision Details
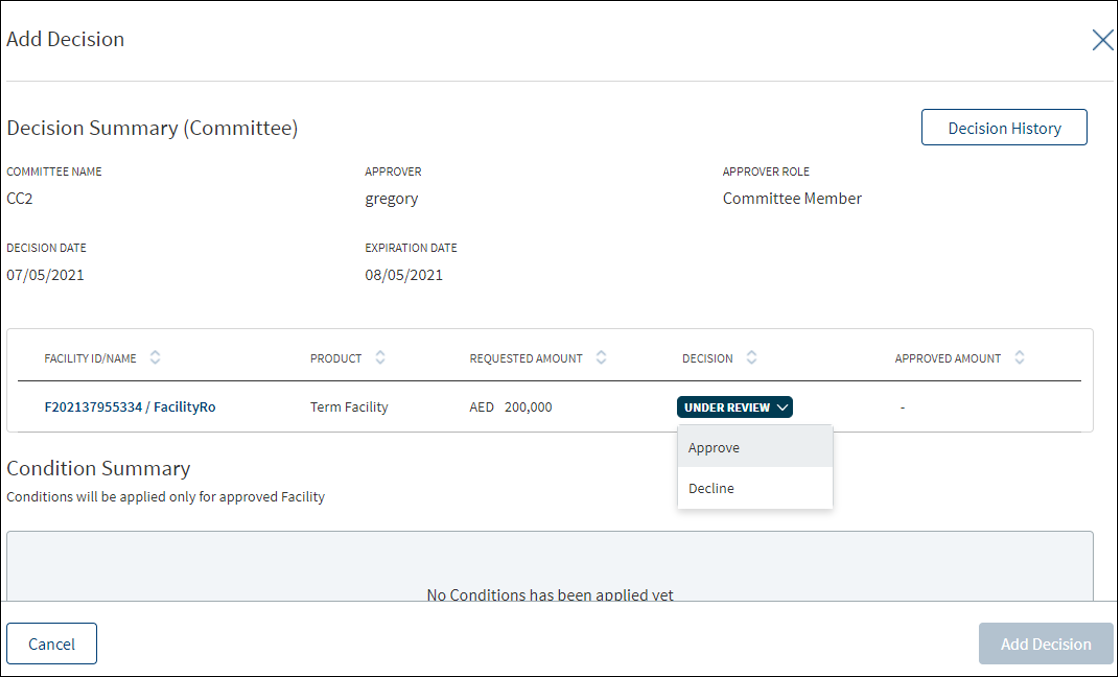
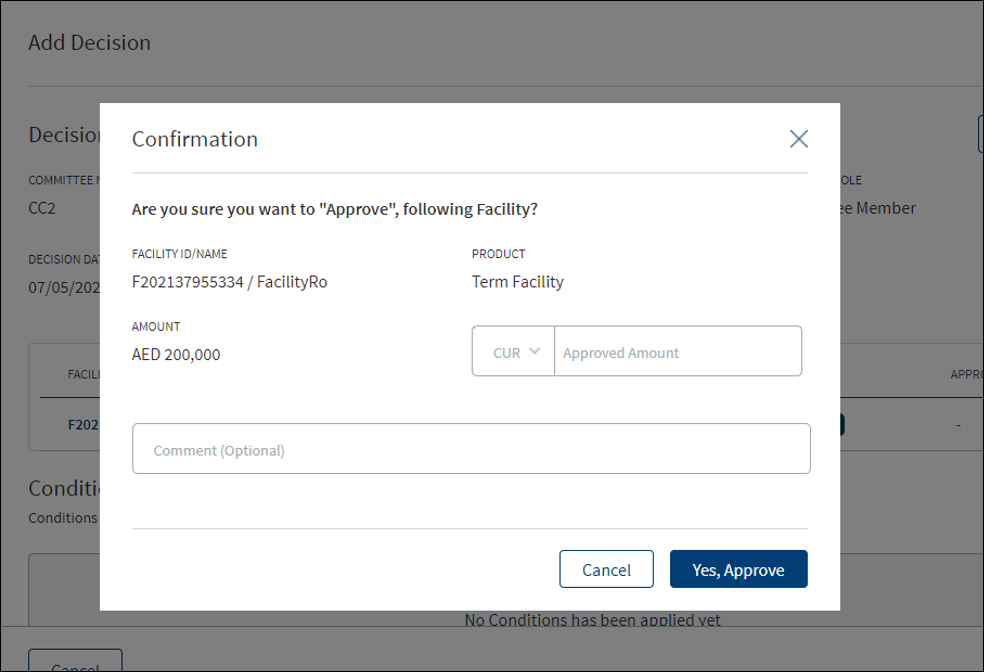
- User can capture the following fields:
- Decision: The list with blank as default option. User can select the decision from the list. The list items are fetched from the Origination Processing MS. The list items are Approve and Reject.
- Credit Committee Name
- Approver role: Defaulted as Committee Member.
- Decision Date: View only, auto captures the date on which decision is made.
- Expiration Date: Defaults to a month from the decision date and cannot be updated.
- Comment: Free text area.
- While giving the decision, the committee member can view the decision given by the other committee member for the Facility.
- On completion, the decision summary is updated with the latest values.
Condition Details

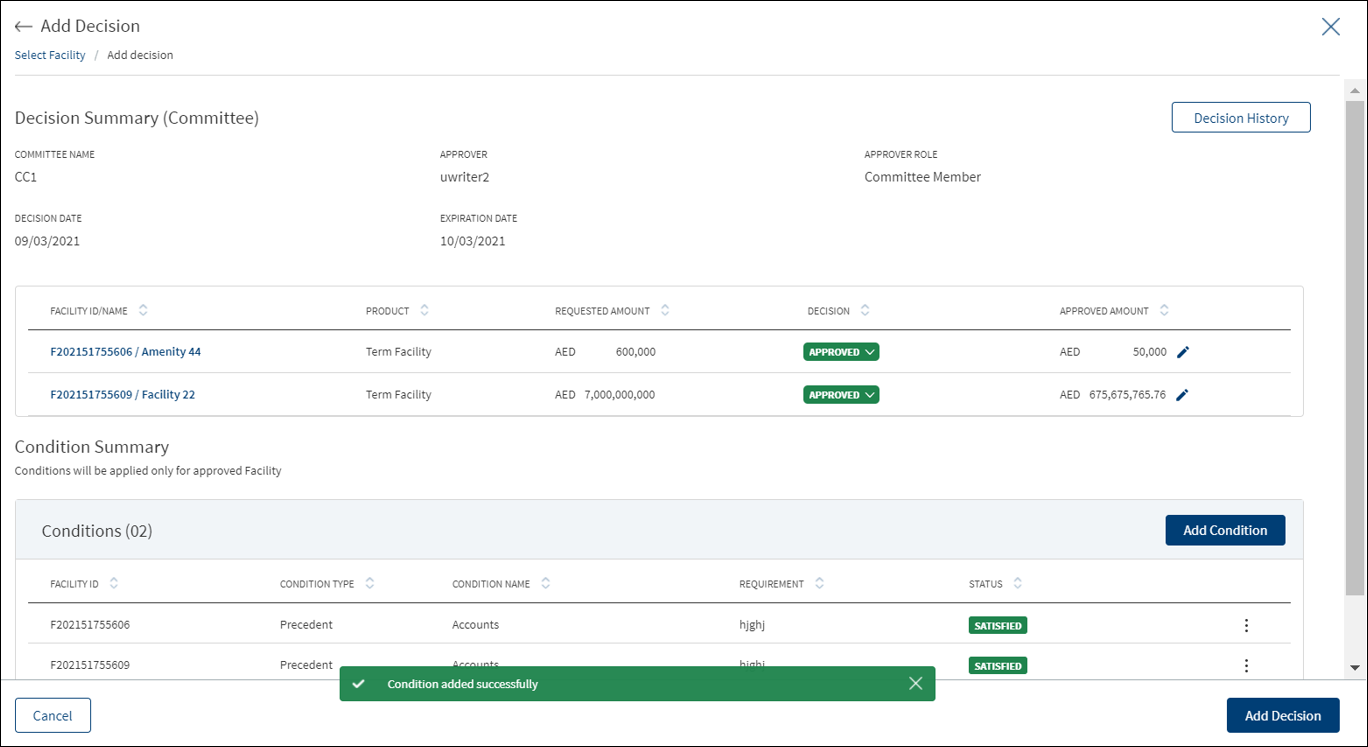
Along with the decision, a user with the required permission can add conditions to that decision. Add the details and click Add Condition to add a new condition. Multiple conditions can be added. Adding a condition for a decision is optional. The user can capture the following information:
- Condition Type list
- Condition Name list
- Requirement
- Assigned To: Search and select the required person to assign in the Assigned To field. The application displays the users maintained in the user management system. Enter the name of the bank user (first three letters minimum to search) to assign. The assigned user will receive this as a task to perform. The assigned user proceeds to the decisions section of the request overview screen and approves the task, and then can mark the task as completed on the task sticky footer.
- Status: The list items are Pending, Satisfied, and Waived.
- Comment: When a lengthy comment or description is entered which does not fit the field, then the content moves to the next line of the field. The field accepts up to 500 characters.
Add Minutes of Committee Meeting (MOM)
A bank user with a Secretary user role and as a Credit Committee Secretary, can capture the minutes of the committee meeting. All the facilities in a request goes to the highest committee for approval and prompts the secretary to enter the Credit Committee meeting minutes.
- When all the members have given their decision for all the facilities in a request, a task is created for the Committee Secretary.
- The Committee Meeting Information section is editable when all the members of the committee have given their decision. The available fields are:
- Date: View only, auto captures the date on which minutes are given.
- User Name: Defaulted with the user name.
- User Role: Defaulted as Committee Secretary.
- Minutes: Free text and the user can enter the minutes of the committee. When a lengthy comment or description is entered which does not fit the field, then the content moves to the next line of the field.
- Only after the minutes are entered, the final decision is updated for a credit committee decision.
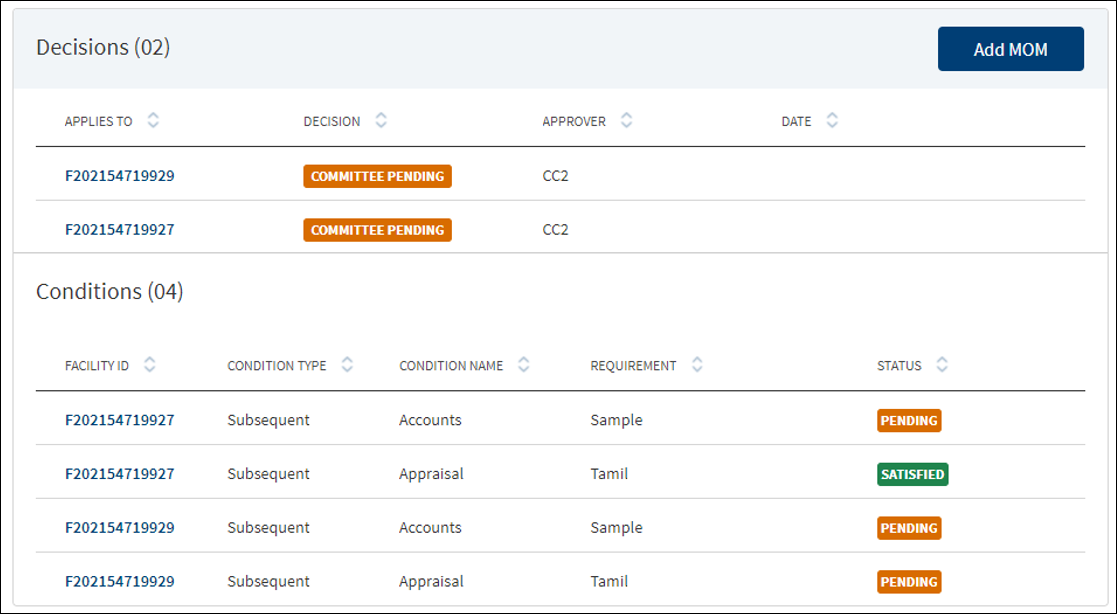
- On the Decisions list screen, click Add MOM. The Add MOM screen appears with Decision Summary and Meeting Information tabs. The Decision Summary tab is selected by default.
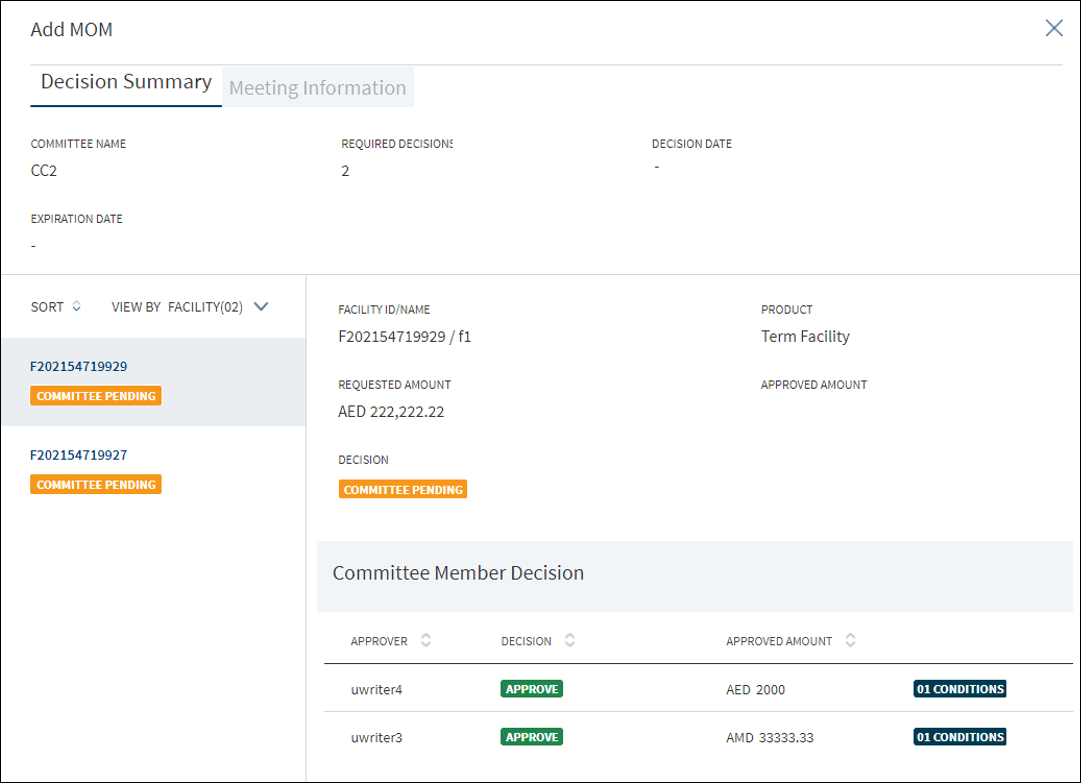
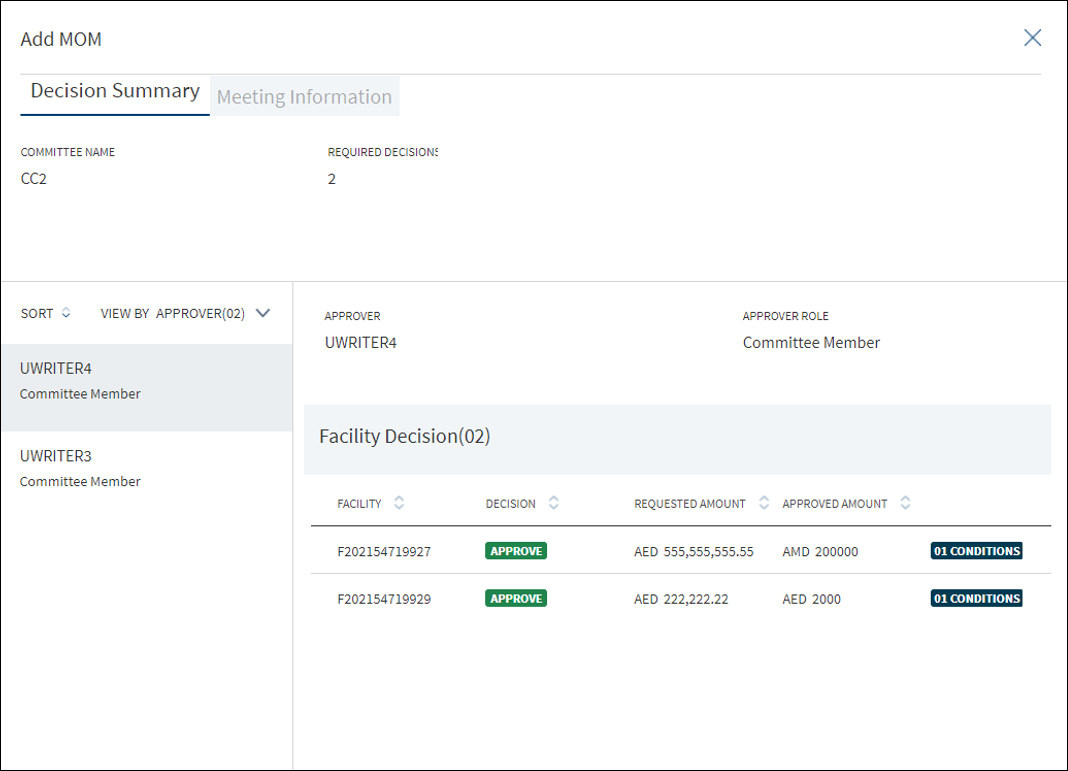
- Click to open the Meeting Information tab.
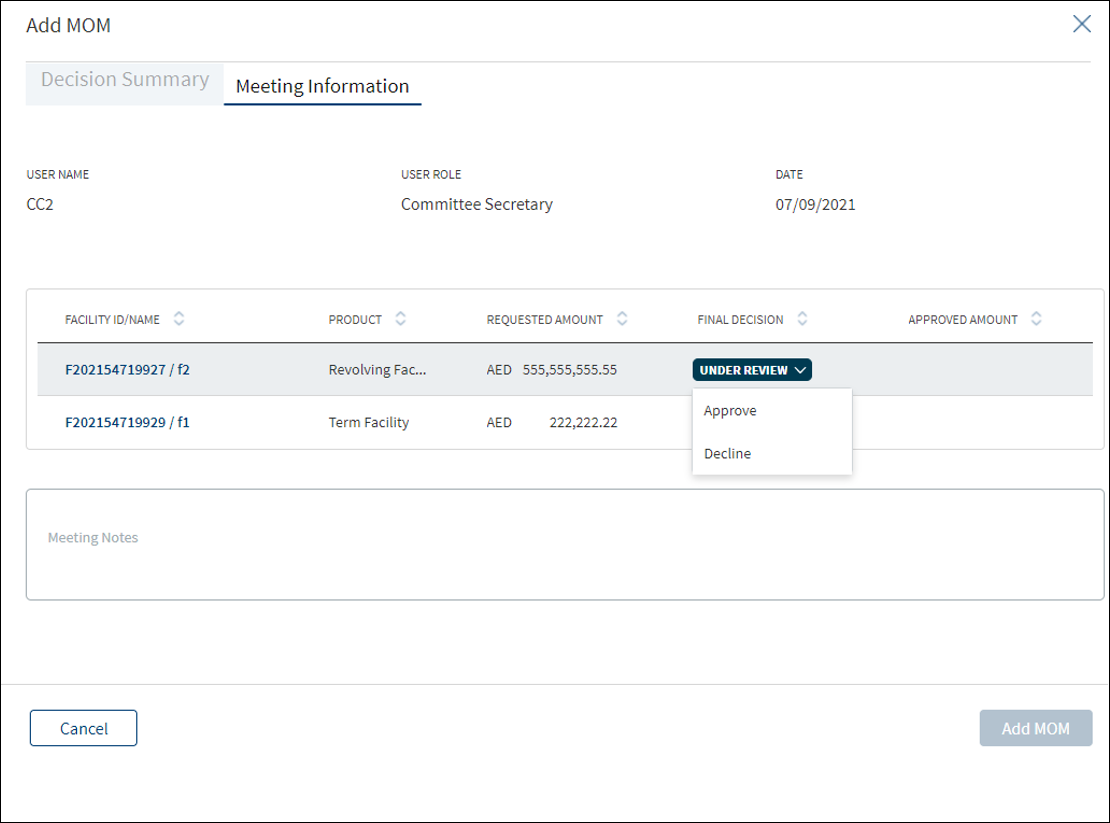
- The data in the following fields are auto populated: User Name, User Role, Date
- Enter the Meeting notes. When a lengthy comment or description is entered which does not fit the field, then the content moves to the next line of the field.
- The application displays the list of facilities with Facility ID, Facility name, Product, Requested Amount with currency, Approved Amount with currency, and Final Decision list.
- In the Final Decision List, select Approve. The application displays a confirmation screen.
- Enter the Approved Amount with currency and Comments.
- Click the Yes, Approve button.
- The Final Decision status of the Facility is changed to Approved. After changing the status of all facilities, click Add MOM.
- The application displays a confirmation message that the MOM is added successfully. The Decision field in the Decisions list is updated as Committee Approved.
An authorized user who created the decision can edit/update a credit decision while also monitoring a variety of variables, thresholds, and options, and react accordingly. The records that are updated at request overview also reflect at Facility and entity overview and vice versa.

On the context menu of the decisions list, click Edit. The Edit option is not present for credit committee decisions and applicable only for individual decision.
- Make the changes as required.
- The following details can be edited: Decision, Comment, and Approved Amount (recommended amount if it is not final decision).
- A final decision is not editable and only a decision with Pending status can be edited or deleted. On the Edit Decision screen, user cannot add/edit/delete conditions. The Applies To section cannot be edited in case of multi facilities.
- Click Update Decision to save the details.
- The application displays a confirmation message that the decision is updated successfully.
The updated records are displayed in the decision summary list.
Click Cancel to discard the changes. On the confirmation pop-up that appears, click Yes. The changes are not saved.
Draw Restrictions
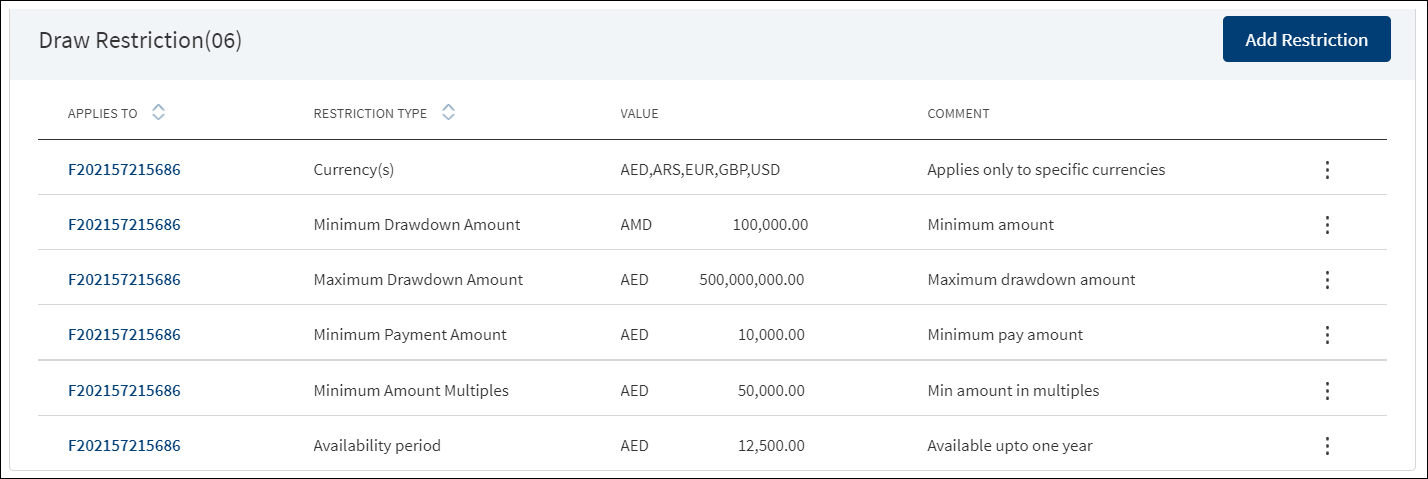
The application displays the list of restrictions for both new Facility and modification Facility with the following details: Applies to which entity or Facility, Restriction Type, Value, and Comment. This feature is not applicable for Retail lending and SME lending requests and not visible to the bank user roles managing these requests. If the purpose is selected as modification , Draw Restrictions that are linked to all the modification facilities are prepopulated in the summary.
Do any of the following:
- Click Add Restriction to add a new restriction.
- Use the context menu as required:
- Click Edit to modify the details.
- Click Delete to remove the record. In the confirmation pop-up that appears, click Yes. The record is removed
- Click the row to view the details.
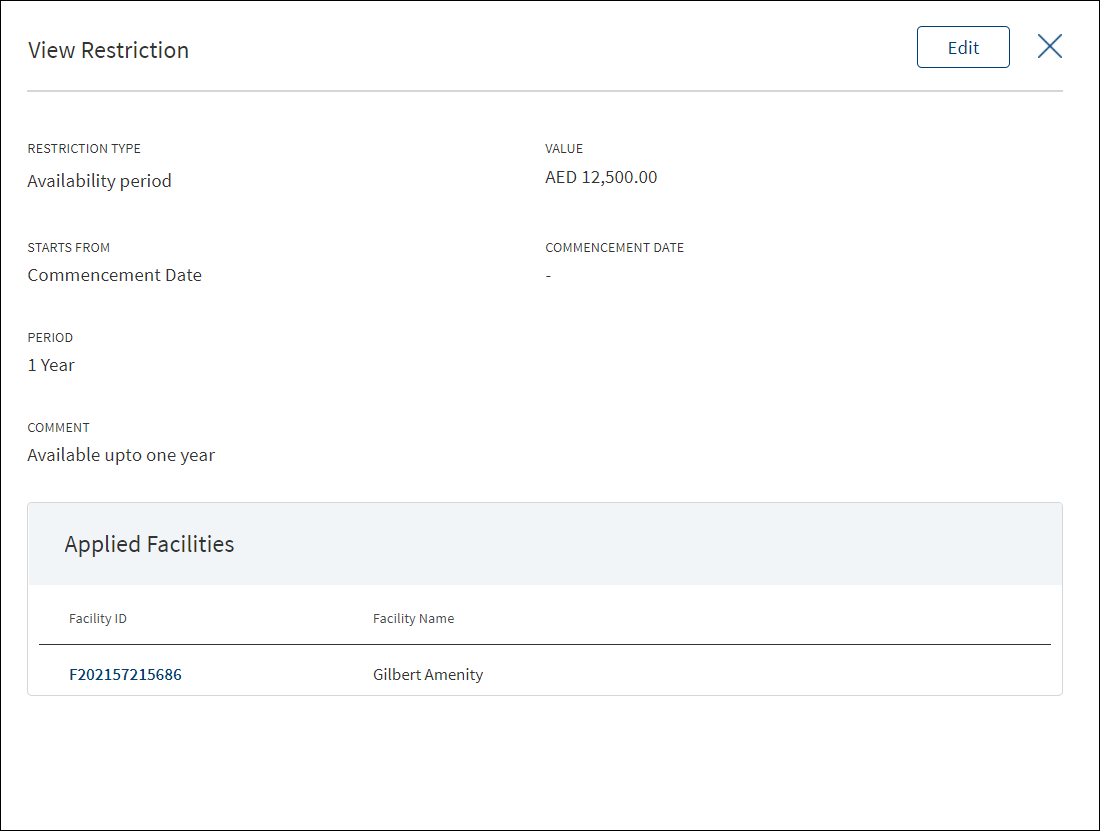
- Click Edit to modify the details or click X to close the form.
- Click the Facility ID to navigate to the Facility overview screen.
Click Add Restriction to draw a restriction.
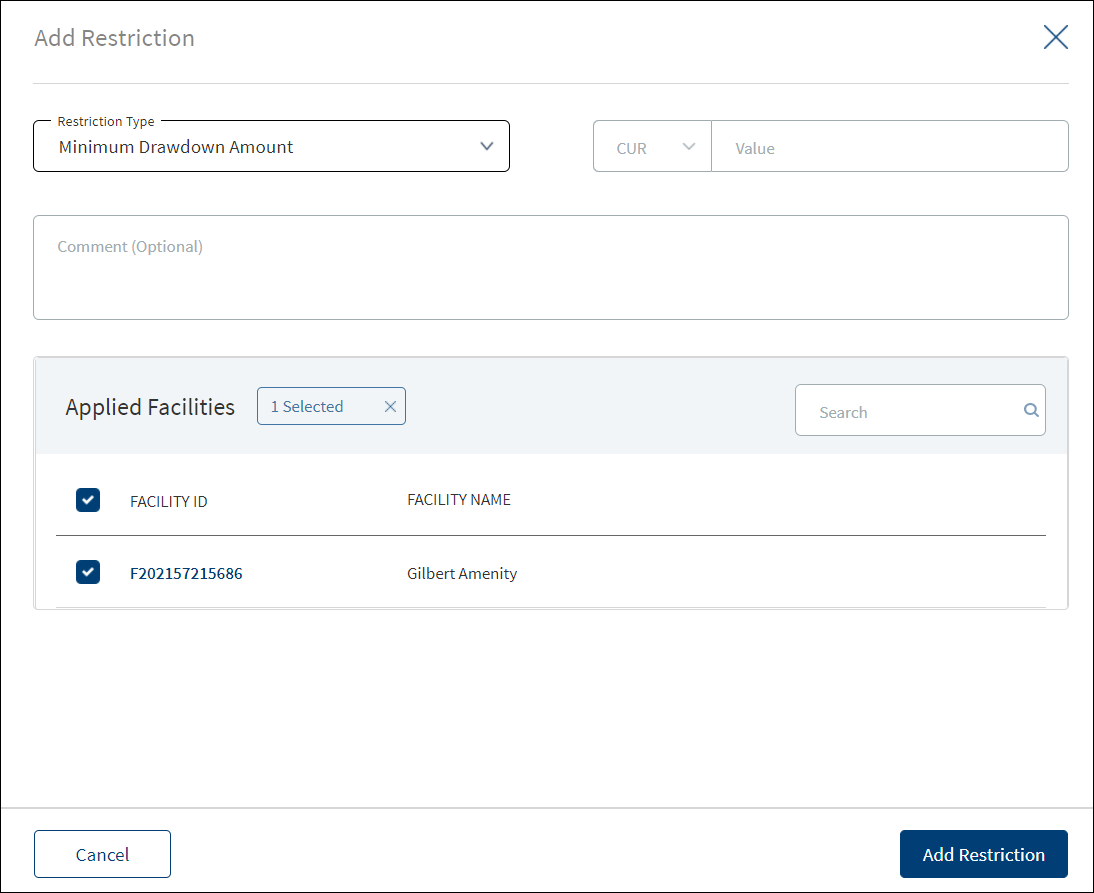
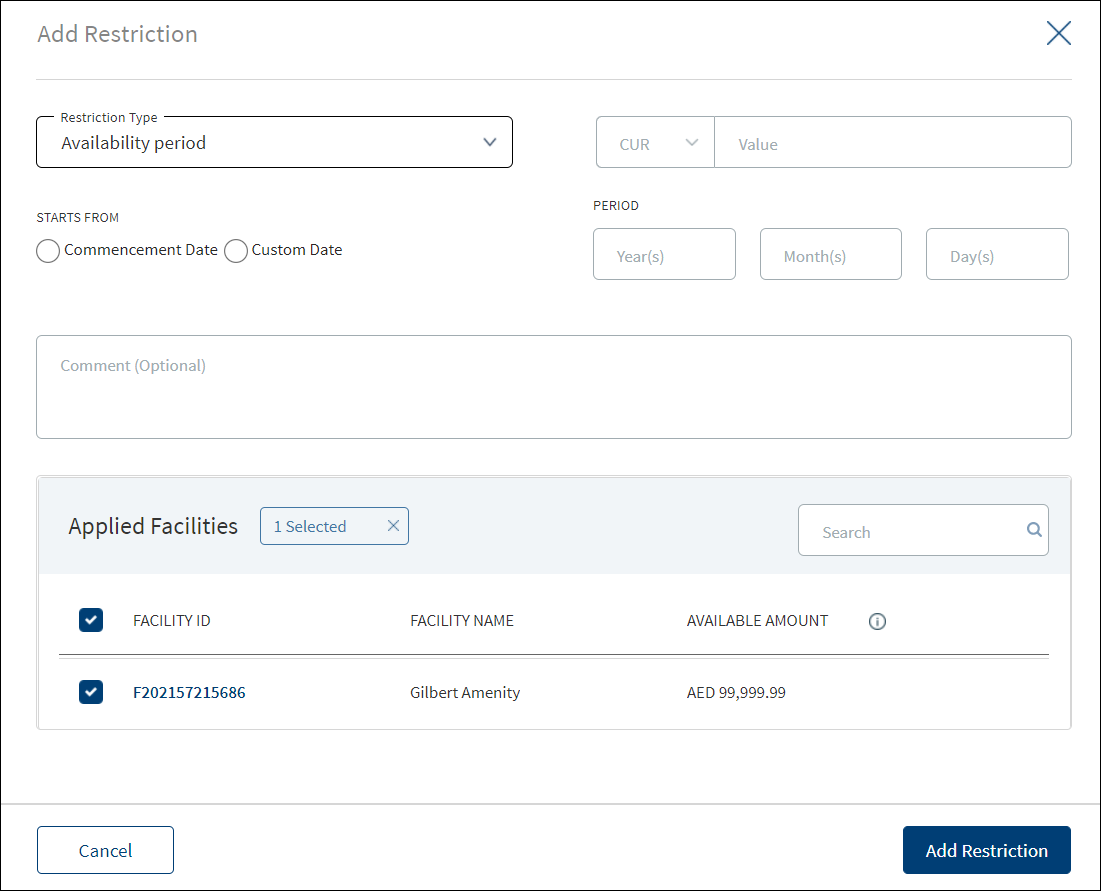
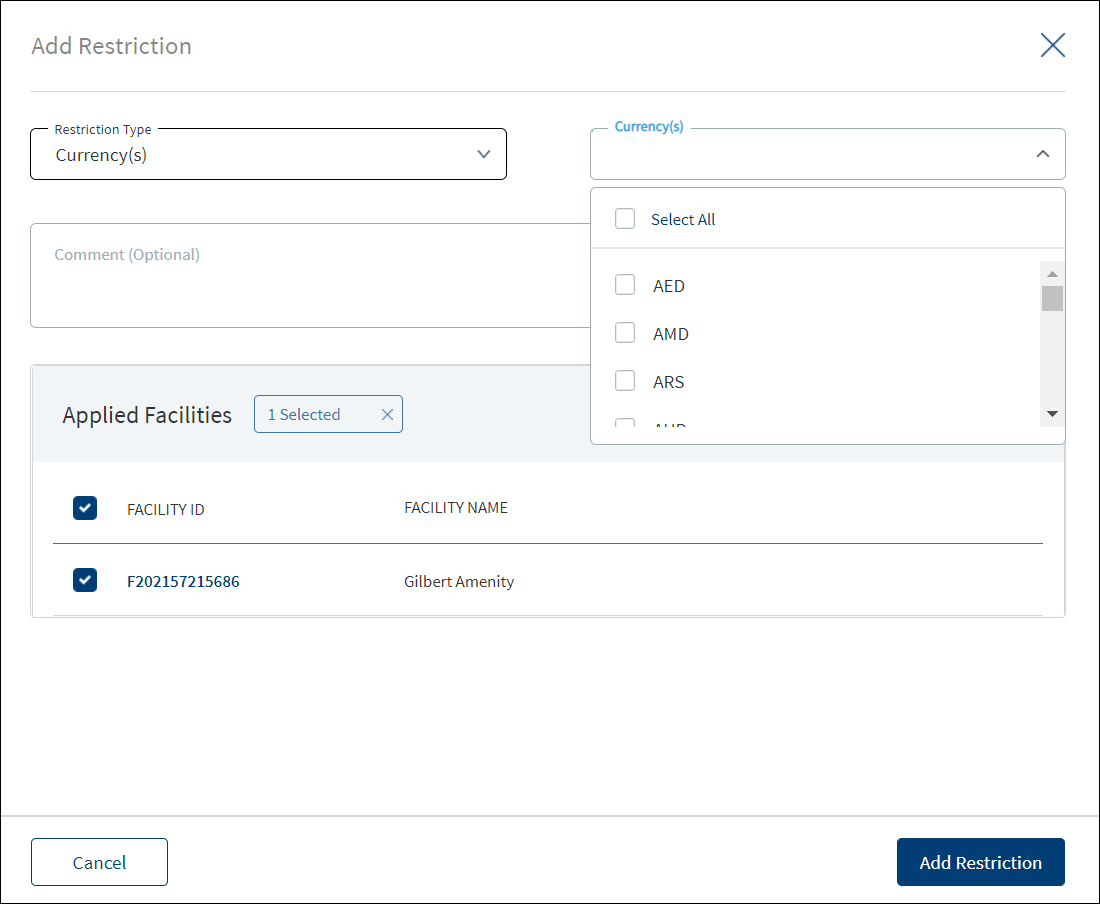
- This section displays only the New facilities.
If the request has only modification as the purpose, the Add Draw Restriction button is not applicable.
- Select the Restriction Type from the list. On selecting the restriction type, the application displays the fields depending on the selection. On changing the restriction type, the application displays a pop-up if you want to change the restriction type. On clicking Yes, all the data entered so far will be lost.
- Minimum Drawdown amount: The minimum amount that the borrower can draw in a funding request. The following fields appear: Currency, Value, Comment, and Applied Facilities.
- Maximum Drawdown amount: The maximum amount that the borrower can draw in a funding request. The following fields appear: Currency, Value, Comment, and Applied Facilities.
- Minimum Payment Amount: The minimum payment that the borrower can repay the bank. The following fields appear: Currency, Value, Comment, and Applied Facilities.
- Minimum Amount Multiples: The minimum amount multiples in which the borrower can draw in a funding request. The following fields appear: Currency, Value, Comment, and Applied Facilities.
- Currencies: The curries for which a restriction can be applied. The following fields appear: Currency, Comment, and Applied Facilities.
- Availability Period: The restriction availability period. The following fields appear: Currency, Value, Starts From date (Commencement date and Custom Date), Period in Years, Months and Days, Comment, and Applied Facilities.
- Select the Currency from the list. This field has predictive search where you can enter your option in the box and select the required option from the matching result rather than scroll down the list to select a currency. If the restriction type is currencies, select the applicable currency check boxes or click Select All to select all currencies.
- Enter the restriction amount Value.
- Under Starts From date, select the restriction Commencement Date or Custom Date option. If Custom Date is selected, enter the date in mm/dd/yyyy format. This field is applicable only if the restriction Type is Availability Period.
- Add Comments if required. When a lengthy comment or description is entered which does not fit the field, then the content moves to the next line of the field. The field accepts up to 500 characters.
- Applied Facilities: The application displays the list of Applied Facilities with Facility ID, Facility Name, and Available Amount (only for Availability Period restriction). Use the search bar to narrow down the search for facilities. Selection can be one, many, or all facilities. The facilities are listed for selection based on the Value entered if the restriction type is Availability Period. Restriction type for a Facility is unique. A user cannot add more than one same restriction type for a Facility. However, Availability Period restriction can be added multiple times for the same Facility.
- Click Add Restriction. The application displays a confirmation message that the restriction is added successfully and adds the record to the Draw Restrictions list.
Click Cancel to discard the changes. On the confirmation pop-up that appears, click Yes. The changes are not saved.
Edit screens from request overview
Edit screens from facility overview
- On the context menu, click Edit or on the view screen, click Edit.
- The Context Menu is not applicable for Modified Facility as all the fields are prepopulated and cannot be edited.
- Make the changes as required.
- The following details can be edited depending on the Restriction Type:
- Minimum Drawdown amount: Comments section.
- Maximum Drawdown amount: Comments section.
- Minimum Payment Amount: Comments section.
- Minimum Amount Multiples: Comments section.
- Currencies: Currencies and Comments section. The check boxes of the currencies that are being used cannot be cleared.
- Availability Period: Starts From date, Period in year, months and days, and Comments section.
- Click Update Restriction to save the details.
- The application displays a confirmation message that the restriction is updated successfully.
Click Cancel to discard the changes. On the confirmation pop-up that appears, click Yes. The changes are not saved.
Exposure
The user fetches the latest exposure records of all the related parties of the request from the Request Overview. Once the request is submitted the Summary section display the following.
- Entity Name - One record for each party which is “Borrower” “Co-Borrower” “Guarantor' and “Corporate Guarantor” in the request.
- Date - MM/DD/YYYY
- Time - HH:MM AM/PM (when the record was fetched)
- Currency - Bank Currency (Maintained in fabric)
- Total Potential Exposure - Aggregated Exposure Amount
- Fetch Exposure (A button to fetch the exposure details of the Entity from Transact).
Initially when the record is not fetched from transact the fields, Date, Time, Total Potential Exposure remain blank.When the user clicks on the fetch button, a prompt displays confirming if the latest exposure date for the entity from the transact is needed. If yes, the exposure details are fetched from the core-banking system.
API to fetch the exposure details of the entity is : /api/v3.2.0/holdings/customers/{customerId}/creditAgreements/exposures
For a Prospect, whose customer id is not created in Transact the API call is not required. Clicking the fetch option displays only the pending in process details, the direct detail/Indirect detail section do not display. After the record is fetched the details of Date, Time, Total Potential Exposure get populated in the record and the contextual menu has the view/edit option.
The User can fetch the record multiple times until the request passes the underwriting stage(this is configurable) when the fetch button is clicked again, the same record gets updated with the same API. Once the request passes the Underwriting stage, the fetch and the edit button get disabled.
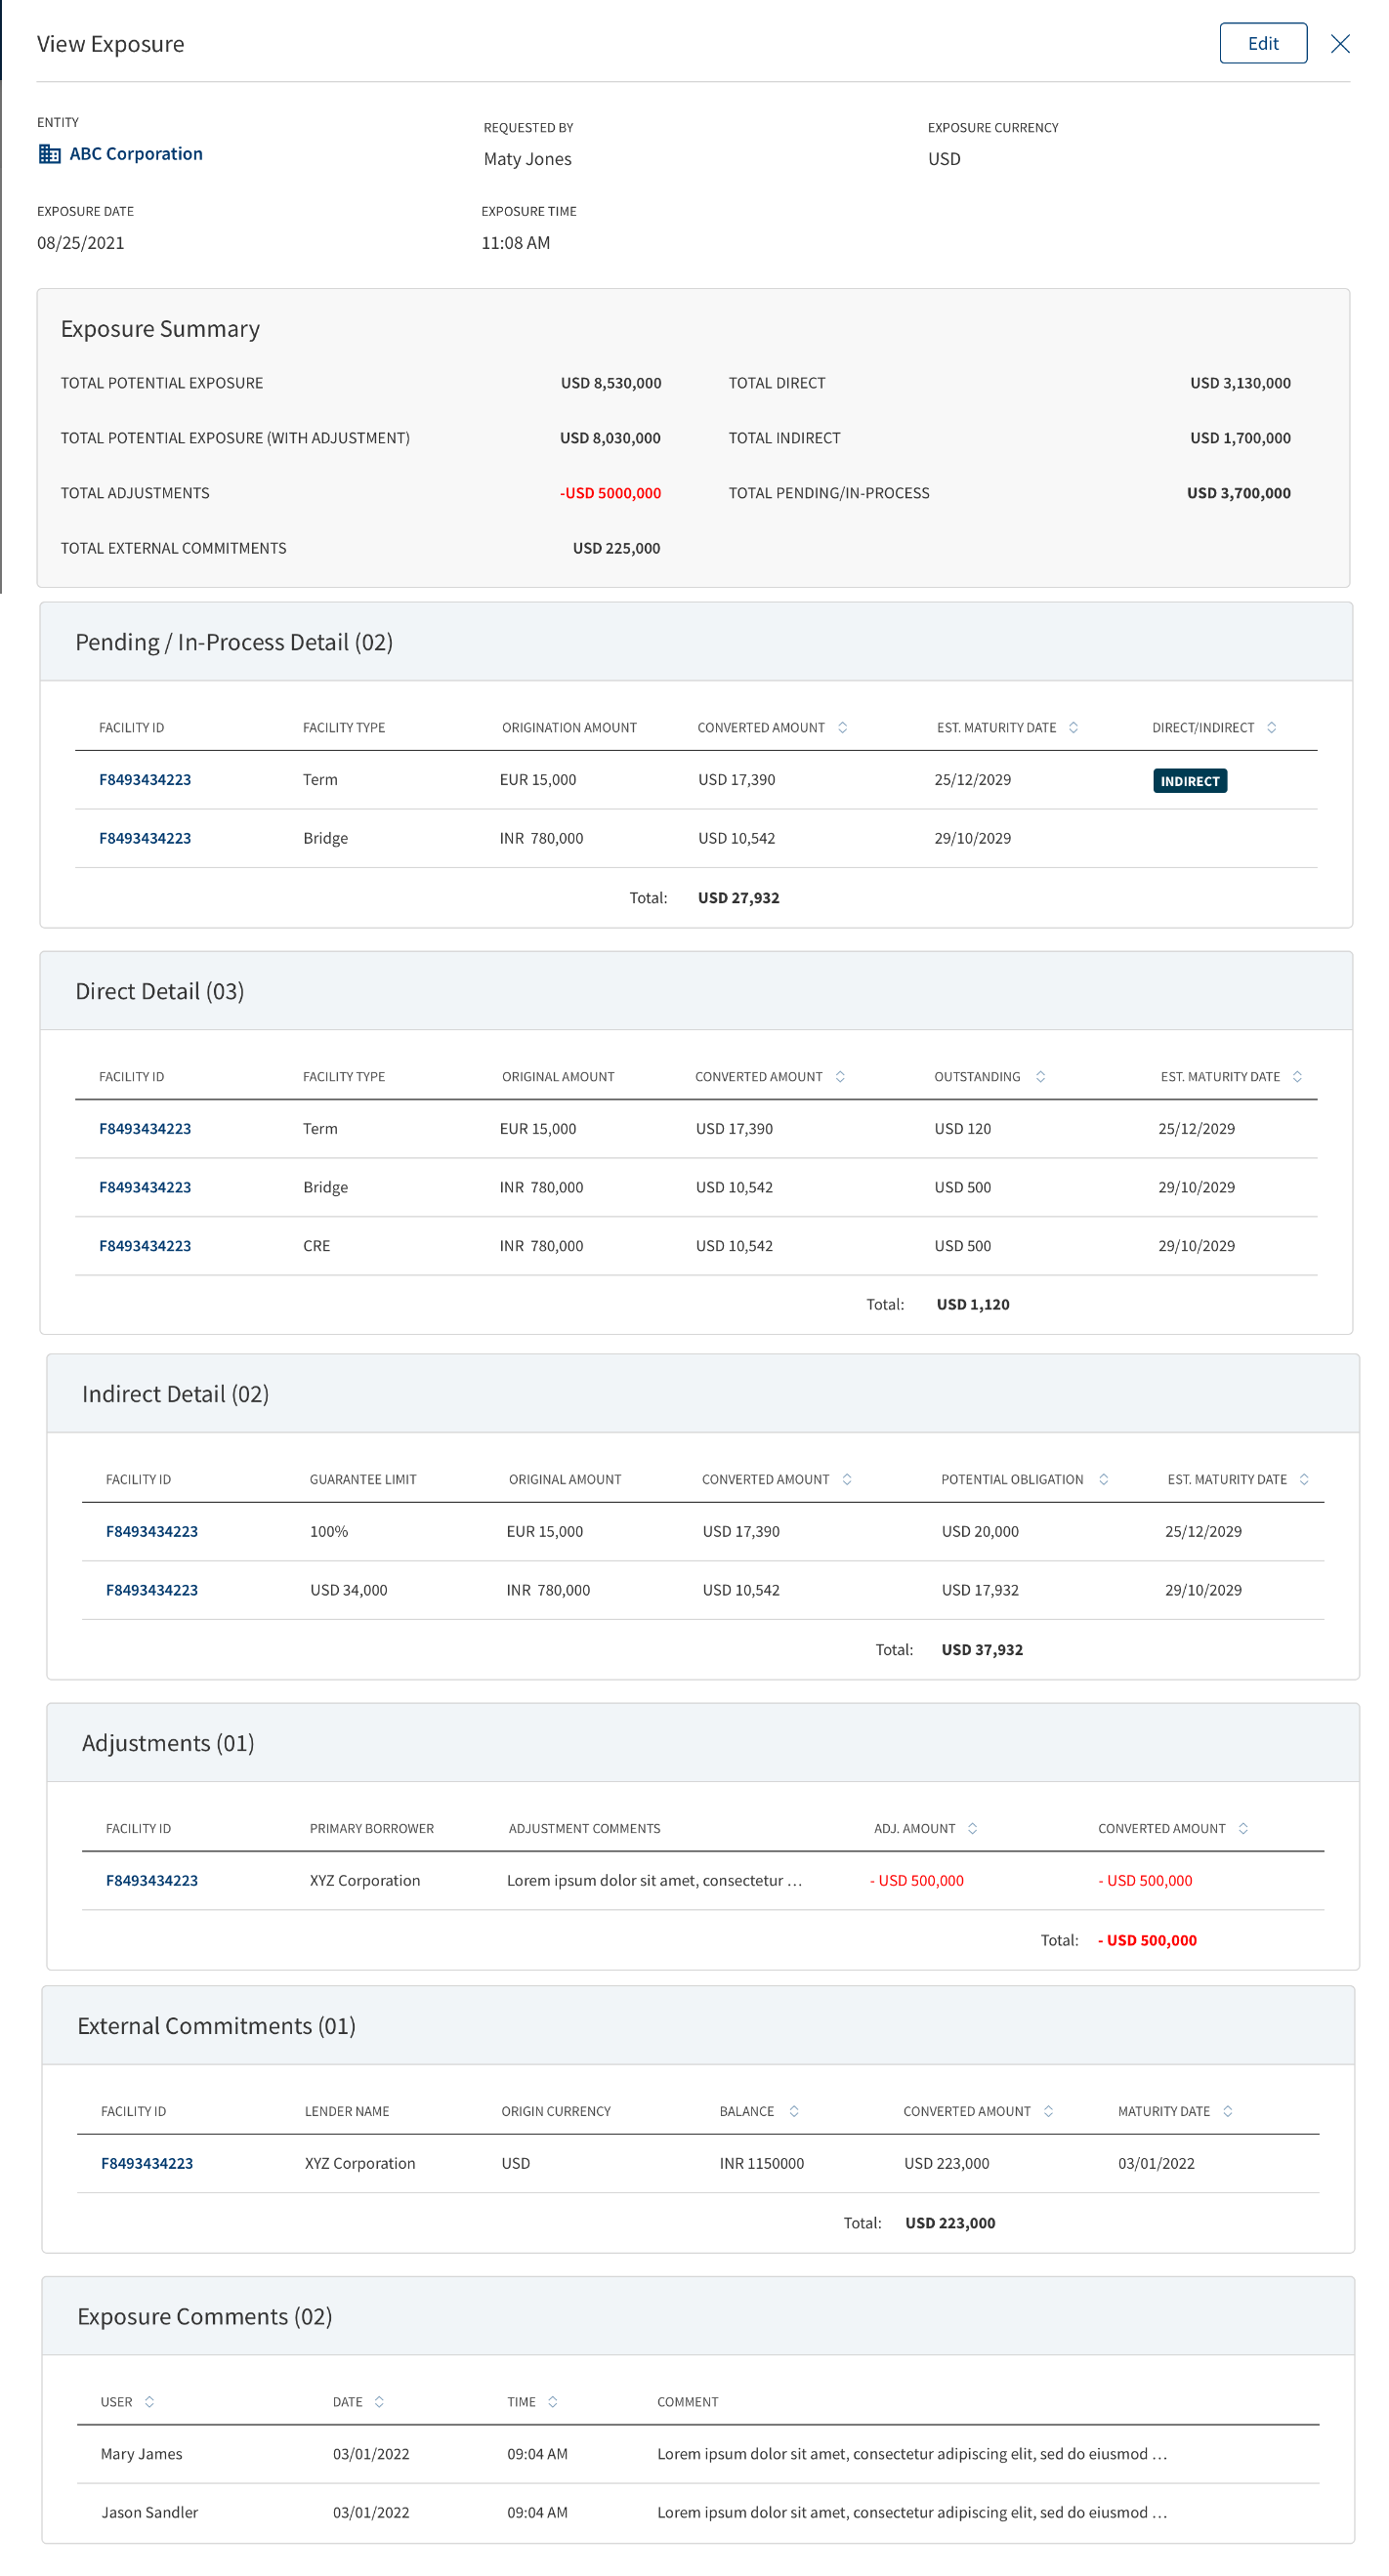
The user can view the exposure record by clicking the exposure record or the view option in the contextual menu from the Request Overview page.
- If the exposure record is not fetched for a party, the view on click or contextual menu does not display for the user. The contextual menu displays only once the record is fetched for an entity.
- The Exposure is editable in the Request Overview.
- In the Exposure summary widget , by clicking on the record the user accesses details regarding the latest fetched/updated exposure.
- When the user clicks on the record, a model sheet displays with all the details of the exposure record.This includes the exposure detail, exposure summary, pending details, direct details, indirect details, adjustments, external commitments, and comments.
- In the contextual menu of adjustments, external commitments and comments, only the view option displays.
- All the fields display in the read only/uneditable mode.
- Clicking the X button after viewing the model sheet navigates back to the exposure summary widget.
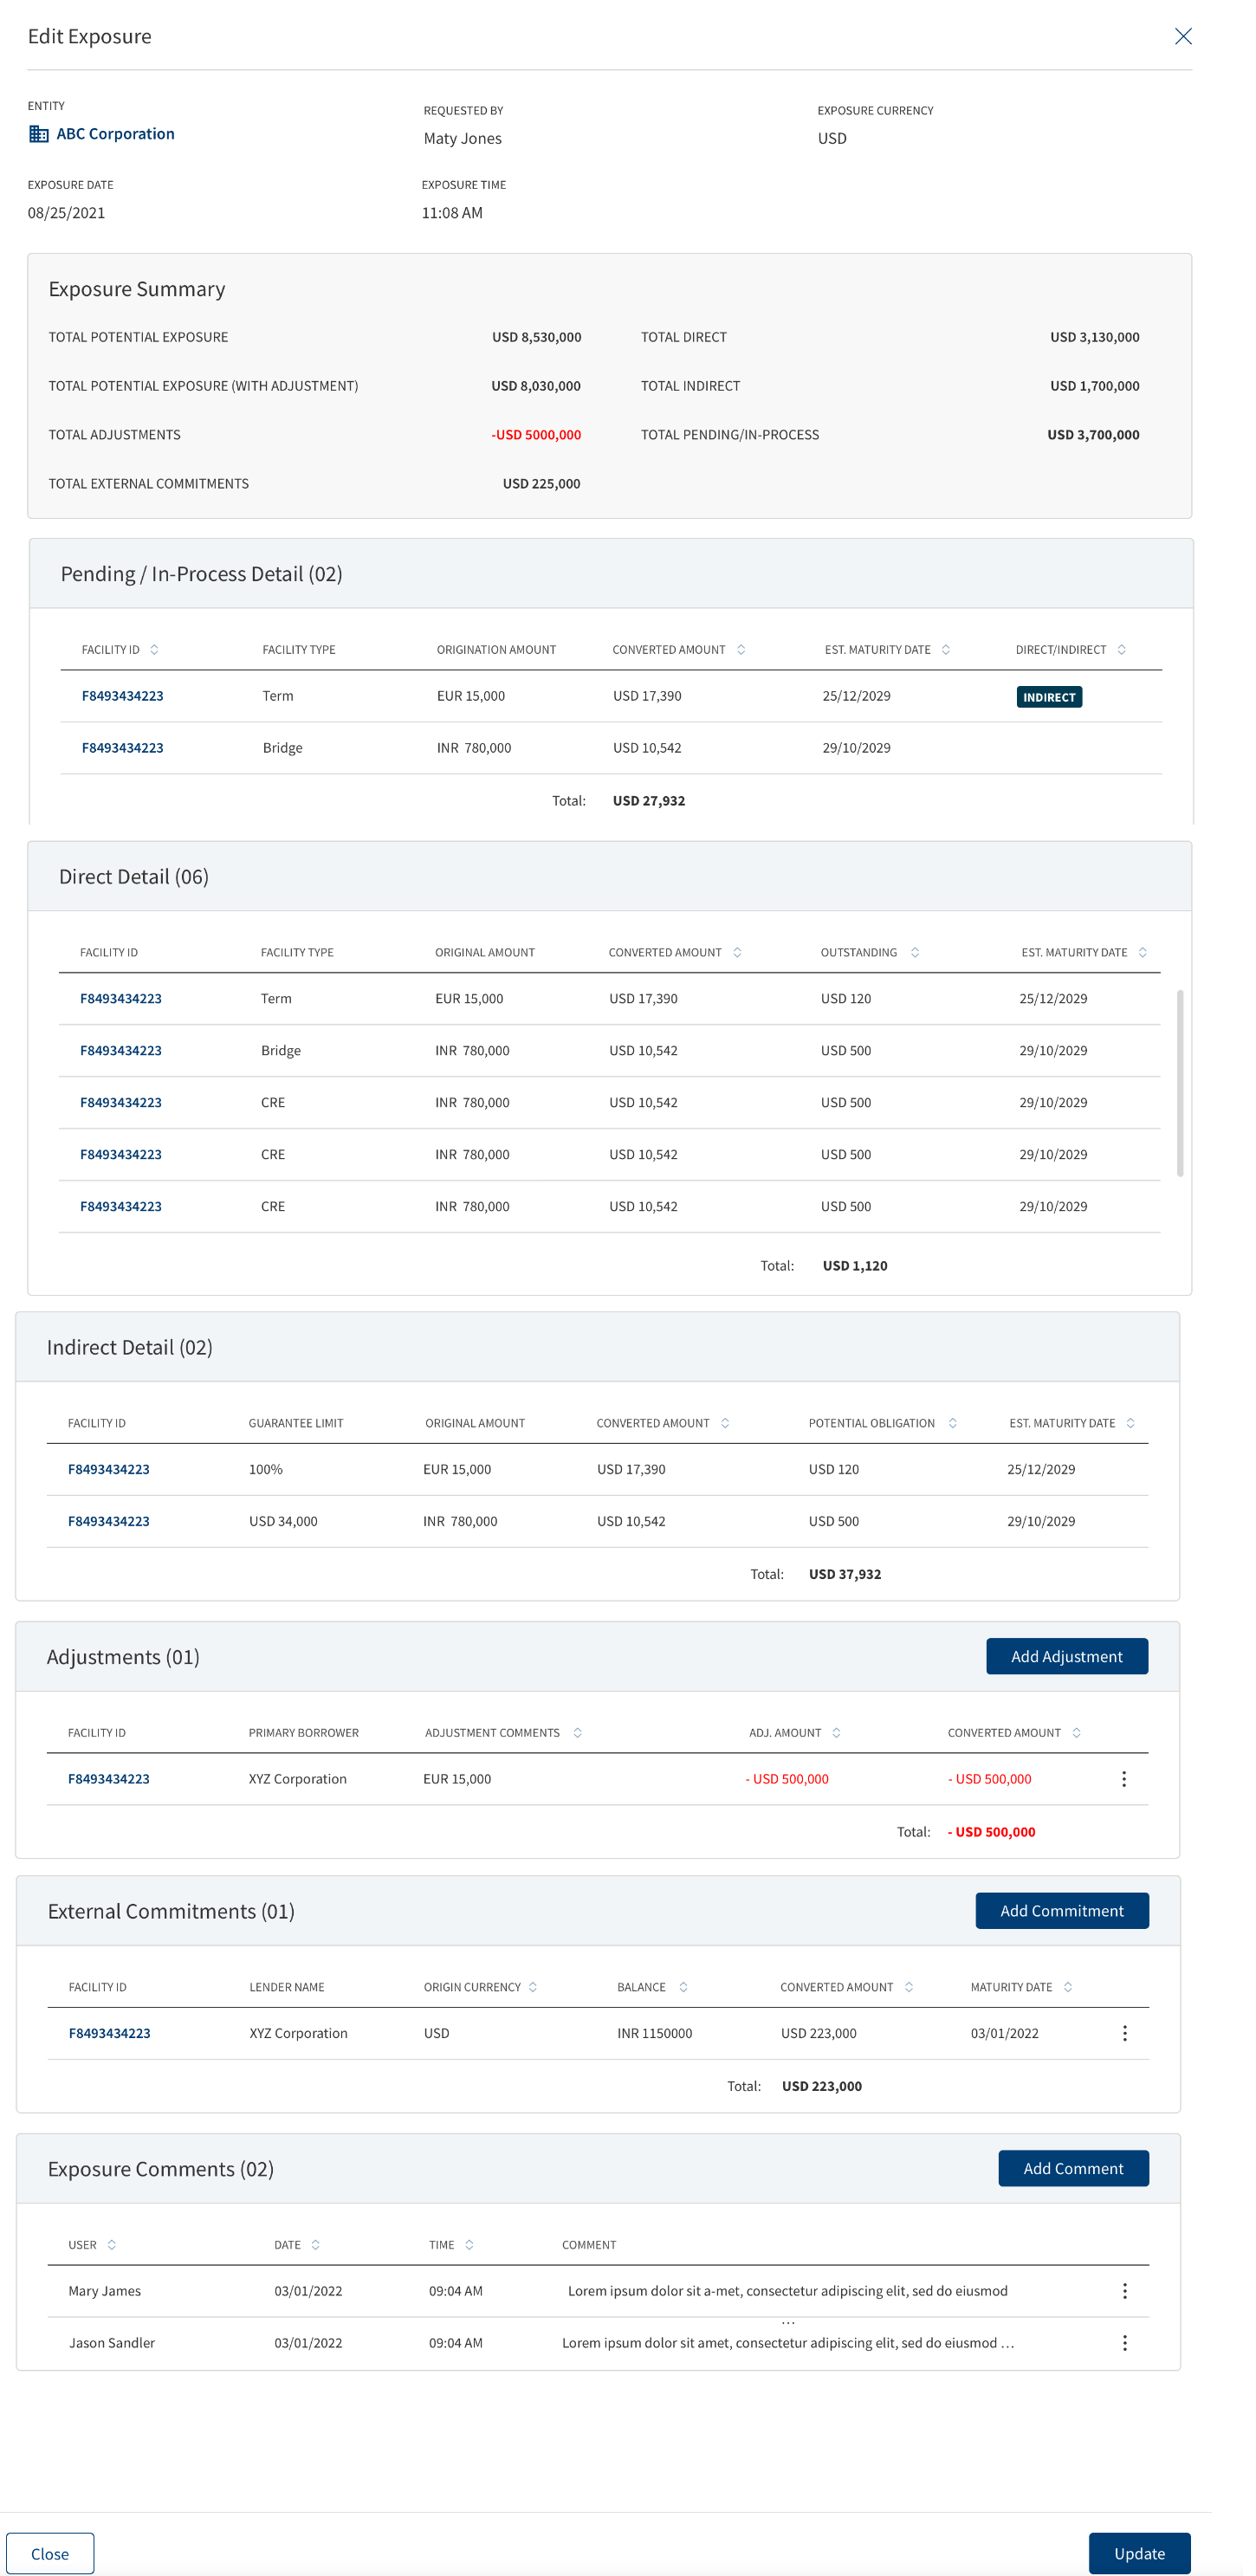
By clicking the edit button on the contextual menu, the user makes the required changes in the the Exposure record.
- In the Exposure summary widget,the user makes changes to the details of a fetched record by clicking the edit option in the contextual menu.
- User adds adjustments, external commitments, comments in this screen if required.
- The contextual menu displays view, edit and delete options for adjustments, external commitments, comments.
- The Supervisor/User who adds the adjustments, external commitments, comments can only edit/delete the adjustments, external commitments, the delete option does not display to others. The details of the user who does the latest edit displays in the user name, date and time.
- After editing the exposure details, the user clicks the update button, and the record gets updated.
- When the user clicks the final update button, the same record also get updated in the Entity Overview of the respective entity, since it is the latest record.
- The User cannot edit the fields updated by the core-banking system.
- Click the X button to cancel the edit and navigate back to the previous screen.
This section displays the below fields related to exposure.
- Entity: Name of the Entity/Individual with the icon- Non editable.
- Requested By: User name of the person who generated exposure request- Non editable.
- Exposure date: MM/DD/YYYY - Non Editable.
- Exposure Time: HH:MM AM/PM - Non Editable.
- Exposure Currency: USD (Defaulted to currency maintained in fabric) - Non Editable.
The fields in exposure summary of a record are derived through computation using the exposure values received from core banking and infinity system.It displays the following fields.
- Total Potential Exposure -Sum of---- Total Pending (sum of converted amount) + Total Direct exposure (sum of converted outstanding Balance) + Total Indirect (sum of converted Pending Obligation Amount).
- Total Potential Exposure(with adj) --- Pending (sum of converted amount) + Total Direct (sum of converted outstanding Balance) + Total Indirect (sum of converted pending obligation amount) + Total Adjustments(converted).
- Total Adjustments – Sum of all the Adjustment Amounts(converted).
- Total External Commitments - Sum of all the External Commitments(converted).
- Total Direct – Sum of all the Direct outstanding Amounts(converted).
- Total Indirect – Sum of all the Pending Obligation Amounts(converted).
- Total Pending/In-process – Sum of all the Pending In process Amounts(converted).
Exposure Pending/In-Process Details
This section displays the facilities which are not approved.
- The pending/In-process section in the exposure summary displays the list of facilities where the entity is the borrower, co-borrower, guarantor or corporate guarantor, but the facilities are not created in the core banking system.
- Since the details are not created in the core banking system for the facilities, the information displays from the infinity system.
- The following fields display in the Pending/In Process Detail.
- Facility ID (This has a hyperlink to Facility Overview).
- Facility Type.
- Indirect (Indirect-Yes, if the entity is a guarantor/corporate guarantor, Indirect-No if the entity is a borrower or co-borrower, if the role of the entity is anything other than borrower, co-borrower, guarantor, corporates guarantor the facility does not display in exposure).
- Origination Amount - Currency + Amount (If its direct- this is origination amount: This displays the requested amount if the amount is yet to be approved and approved amount in case the facility is approved)if indirect then its the guarantee amount. If the facility is withdrawn/declined, the facility does not display in the section.
- Converted Amount - Currency + Amount (Converted Origination Amount).
- Estimated maturity date(the Date when facility is added in Request + Term = Estimated Maturity date)
- User also views the Total Origination Amount and Total Converted Amount in the Pending/In-Process detail section.(This sums up all the facility amounts).
- The fields are read-only and cannot be edited.
This section displays the list of facilities where the entity is the borrower/Co-borrower and the facilities get created in the core banking system.
- The information regarding the Arrangement ID is updated from the Core banking system, this is mapped to the facility ID in the OPMS.
- The following fields display in the Pending/In Process Detail.
- Facility ID (This has a hyperlink to the Facility Overview)- Arrangement ID received from the Transact is mapped to the OPMS and displays the Facility ID.
- Facility Type - From Facility ID to Facility Type mapping in OPMS, displays the Facility Type.
- Original Amount - Currency + Amount (displays the entire amount of the co-borrower also)- Received from Transact as Commitment Amount.
- Converted Amount- Currency + Amount
- Converted Outstanding Balance- Currency + Amount- Received from Transact as Outstanding Balance.
- Maturity date.-Received from Transact as Maturity date
- Total - Sum of all the converted outstanding Balances.
- The fields are read-only and cannot be edited.
This section displays the facility records where the entity is a guarantor or corporate guarantor, and the arrangement gets created in the core banking system.
- The Indirect Details section in the exposure summary displays the list of facilities where the entity is the Guarantor/corporate guarantor and the facilities get created in the core banking system.
- The following fields display in the section.
- Facility ID - Hyperlink - Arrangement ID received from Transact to be mapped to OPMS and show the Facility ID.
- Guarantee Limit - Percentage or Amount-depending on the guarantee obligation provided by the entity for the facility-Arrangement ID received from Transact to be mapped to OPMS and if the entity is guarantor, then amount or percentage limit will get populated.
- Original Amount - The total facility amount - Received from Transact as Commitment Amount.
- Converted Amount - Converted value of the original Amount.
- Potential Obligation(converted) - This is the lesser amount of the guarantee amount and outstanding balance of the facility - Outstanding Balance is received from transact and is first converted to exposure currency in backend, then the guarantee amount is calculated and converted to exposure currency. These 2 amounts are compared and the the lesser one of the two is to be displayed in the Pending Obligation.
- Maturity date- Received from Transact as Maturity date.
- Total- Sum of all the converted Potential Obligation.
- The Original Amount, outstanding balance and maturity date is received from Transact for the facility, if the guarantee limit is a %- guarantee amount is calculated and compared with the outstanding balance - whatever is the smaller amount displays as pending.
- The fields are read-only and cannot be edited.
Exposure Summary - Adjustment record
This section displays all the adjustments related to the Entity.
- Facility ID- Hyperlink
- Facility Type
- Adjustment comments
- Currency+ Adjustment Amount
- Currency + Converted Adjustment Amount
Exposure Summary - Add Adjustments

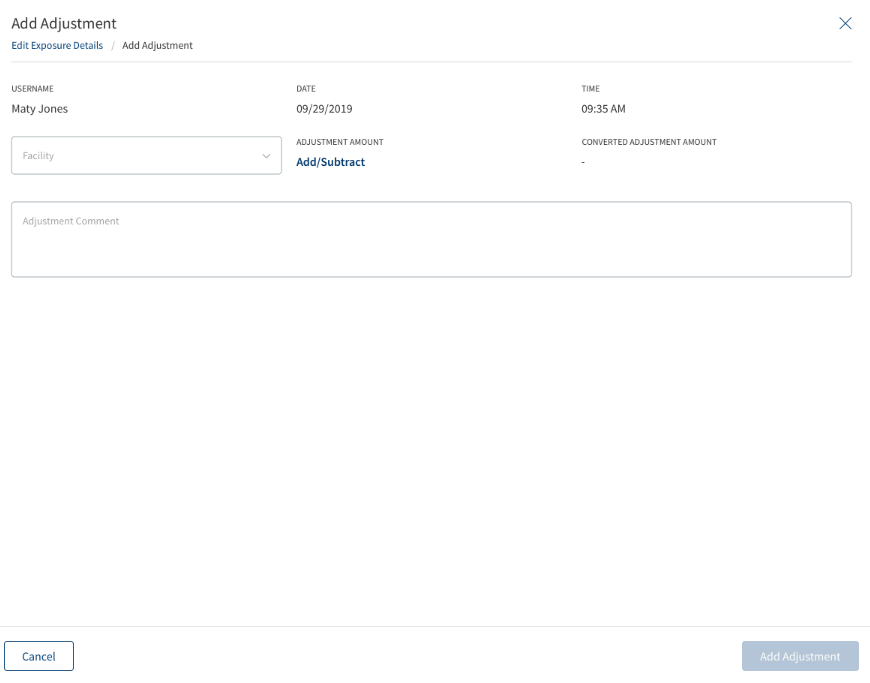
Clicking the edit option displays the Add Adjustment button using which the user can add adjustments to the exposure record in the Request Overview.
The Add Adjustment page displays the following fields.
- Facility ID - Search drop-down (displays all the Facility IDs shown in direct, indirect, pending in-process detail).
- Facility Type – This gets auto-populated depending on the selected Facility ID.
- Currency - Adjusted amount currency(dropdown).
- Adjustment Amount – Numeric (User has to select Add/Subtract and then select the currency and the amount for adjustment, if Subtract is selected - will be displayed by default in the view option and it will be displayed in red).
- Converted Amount- Currency + Numeric (This will convert the amount entered in adjustment amount to bank’s preferred currency).
- Adjustment Comments – Text (300 characters).
- Username – Auto-populated.
- Date – Auto-populated (Current date when add adjustment button is clicked).
- Time – Auto-populated (Current time when add adjustment button is clicked).
- Total - Sum of the total converted amount of adjustment.
The negative amount displays in red with a -ve sign in the summary.
Once all the details are entered, clicking the add button, creates the record in the adjustment section. After adding the adjustment, clicking the update button updates the record which also gets updated in the Entity Overview of the respective entity, since it is the latest record.
After adding the adjustment, clicking the update button for the exposure record, updates the record which also gets updated in the Entity Overview of the respective entity, since it is the latest record.
Clicking the X or cancel, aborts the record addition.
Exposure Summary-View Adjustment
In this section the user views the adjustments of the Exposure Record.
- The view adjustment screen displays the following fields.
- Facility ID
- Facility Type
- Adjustment Amount ( Selected currency)
- Converted Adjustment Amount (Converted to bank’s currency maintained in spotlight)
- Adjustment Comments
- Username
- Date (Current date)
- Time (Current date)
- The negative amount displays in red with a -ve sign in the summary.
- Clicking the X button navigates back to the previous exposure screen.
Exposure Summary- Edit Adjustment
The assigned user and supervisor can edit the adjustments of the exposure record in the Request Overview.
- The user edits the adjustment record using the contextual button.
- The edit option displays only for the user/supervisor who creates this adjustment.
- Clicking edit displays the fields in the section, only the following are editable fields.
- Adjustment Amount
- Adjustment comments.
- When a user edits the record, the latest user name, date and time displays.
- After editing the adjustment, clicking the update button for the exposure record,updates the record which also gets updated in the Entity Overview of the respective entity, since it is the latest record.
Exposure Summary- Delete Adjustment

A User/Supervisor who created the exposure record can delete the adjustments.
- The delete option in the contextual button for existing records displays only to the user/supervisor who created the adjustment.
- On clicking delete, a prompt displays to confirm if the record needs to be deleted or not.
- When clicked yes, the record gets deleted, on Clicking No, the operation gets aborted.
- A User can delete only their individual adjustment records and cannot delete the comments provided by others.Only the Supervisor can delete the other records.
- After deleting the adjustment, clicking the update button for the exposure record,updates the record which also gets updated in the Entity Overview of the respective entity, since it is the latest record.
Exposure Summary - External Commitments
This section displays all the exposures of the Entity which are not part of the bank.
The following fields display for each external commitment record.
- Facility Number (This is not a hyperlink)
- Lender name
- Currency + Balance Equivalent- Input fields
- Currency + Converted Amount - Display fields
- Maturity Date- Input field- Date
Exposure Summary -Add External Commitments
Clicking the edit option displays the external commitments button, the user adds external commitments to the exposure record in the Request Overview.
The Add External Commitments section displays the following fields.
- Facility Number - alphanumeric
- Lender Name - Text
- Balance Equivalent (currency to be selected)– Numeric
- Converted Amount (exposure currency)- Display field
- Maturity Date- Date
- Username – Auto-populated.
- Date- – Auto-populated.
- Time- – Auto-populated.
Once all the details are entered, clicking the add button, creates the record in the external commitments section. After adding the external commitment, clicking the update button updates the record which also gets updated in the Entity Overview of the respective entity, since it is the latest record.
Clicking the X or cancel, aborts the record addition.
Exposure Summary – View External Commitments
The user can view the external commitments record by clicking the view option in the contextual menu from the Request Overview page.It displays the following and are read-only fields.
- Facility Number
- Lender Name
- Currency
- Balance Equivalent
- Exposure currency
- Converted Amount
- Maturity Date
- Username
- Date
- Time
Exposure summary- Edit External Commitments
The assigned user and supervisor can edit the external commitment of the exposure record in the Request Overview.
- The user edits the adjustment record using the contextual button.
- The edit option displays only for the user/supervisor who creates this commitment.
- Clicking edit displays the fields in the section, only the following are editable fields.
- Facility Number
- Lender Name
- Currency
- Balance Equivalent
- Maturity Date
- When a user edits the record, the latest user name, date and time displays.
- After editing the external commitment record, clicking the update button for the exposure record,updates the record which also gets updated in the Entity Overview of the respective entity, since it is the latest record.
Exposure Summary –Delete External Commitments
A User/Supervisor who created the exposure record can delete an external commitment.
- The delete option in the contextual button for existing records displays only to the user/supervisor who created the commitment.
- On clicking delete, a prompt displays to confirm if the record needs to be deleted or not.
- When clicked yes, the record gets deleted, on Clicking No, the operation gets aborted.
- A User can delete only their individual commitment records and cannot delete the comments provided by others.
- After deleting the commitment, clicking the update button for the exposure record,updates the record which also gets updated in the Entity Overview of the respective entity, since it is the latest record.
Exposure Summary - Exposure Comments
This section displays the comments, it consists of the following fields.
- User
- Date
- Time
- Comment
Exposure Summary – View Exposure Comments
This section displays the view the comments of the exposure record, It consists of the following fields.
The user can view the comments of the exposure record by clicking the view option in the contextual menu.It displays the following and are read-only fields.
- User Name
- Date
- Time
- Comments
Exposure Summary - Edit Exposure Comments
As a user, when editing the exposure record, I should be able to edit the comments that I have provided or as a supervisor I should be able to edit any comments.
- The assigned user and supervisor can edit the comments of the exposure record in the Request Overview.
- The user edits the comments using the contextual button.
- The edit option displays only for the user/supervisor who creates this commitment.The Supervisor can edit other comments as well.
- Only the following field is editable- Comments.
- When a user edits the record, the latest user name, date and time displays with the updated comment record.
- After editing the external commitment record, clicking the update button for the exposure record,updates the record which also gets updated in the Entity Overview of the respective entity, since it is the latest record.
Exposure Summary - Delete Exposure Comments

A User/Supervisor who provides the comments in the exposure record can delete the comments.
- The contextual button displays the delete option.
- A User can delete only their individual comments and cannot delete the comments provided by others.The Supervisor can delete other comments as well.
- On clicking delete, a prompt displays to confirm if the record needs to be deleted or not.
- When clicked yes, the record gets deleted, on Clicking No, the operation gets aborted.
- After deleting the comment, clicking the update button for the exposure record,updates the record which also gets updated in the Entity Overview.
Impact of Modification/Amendment Journey to Single Entity Exposures
The User views the correct amount of exposure even if there are modifications applied to the facilities of an entity.
The following scenarios are covered after implementing both the modifications/amendments journey and the exposure functionality into Infinity Assist.
Scenario -1
If any entity has a modification facility which is pending to get boarded, in the pending/in-process stage only the latest amount (new + requested) displays.
- F1- 100 -Booked
- MF1-150-request raised
Till the modification Facility is pending:
- Pending/in-process detail display MF1 and the amount is 150.
- Direct Detail do not display F1-100, as this lead to duplication.
After the modification request passes the closing stage:
- Pending/in-process detail do not display MF1.
- Direct Detail display MF1-150.
Scenario-2
If any entity has a modification facility but the modification type is not only for increase amount but add/release collateral, change in maturity date also.
- F1- 100 -Booked.
- MF1-150-request raised- Add/release collateral, maturity date
Till the modification Facility is pending:
- Pending/in-process detail display MF1- 150.
- Direct Detail do not displayF1 and the amount 100, as this leads to duplication.
After the modification request passes the closing stage:
- Pending/in-process detail does not display MF1.
- Direct detail displays MF1- 150.
Scenerio-3
If any entity’s facility undergoes multiple modification and the latest one is pending to get boarded, in the pending/in-process stage the latest facility with the pending modification is displayed. In the direct detail, the facility is not displayed.
- F1- 100 -Booked.
- MF1-120- Booked
- MF2- 150 - request raised
Till the modification Facility is pending:
- Pending/in-process detail display MF2 and the amount is 150.
- Direct Detail does not display F1, MF1 or MF2.
After the modification request passes the closing stage:
- Pending/in-process detail do not display F1, MF1, or MF2.
- Direct Detail do not display MF2-150.
Scenario-4
To an existing facility, if a new party is added as a part of modification, then
- F1- 100 -Booked- (Parties- “A”)
- MF1-120- Request raised- Add Party (Party- “B”- Role= Any amongst Borrower/Co-borrower/Guarantor/Corporate Guarantor)
In the exposure of “A”
Till the modification Facility is pending:
- Pending/in-process detail display MF1 and the amount is 120.
- Direct Detail does not display F1, MF1.
After the modification request passes the closing stage:
- Pending/in-process detail does not display MF1 since the request is complete.
- Direct Detail displays MF1-120.
In the exposure of “B”
Till the modification request Facility is pending:
- Pending/in-process detail display MF1 and the amount is 120.
- Direct Detail does not display F1, MF1.
After the modification request passes the closing stage:
- Pending/in-process detail does not display MF1 since the request is complete.
- Direct Detail should display MF1-120,since there’s no integration for add party API for now, this does not display the facility MF1-120 in direct detail.
Scenario-5
To an existing facility, if a existing party is released as a part of modification, then
- F1- 100 -Booked- (Parties- “A” and “B”)
- MF1-150- Request raised- Release Party “B” and Add Party C
In the exposure of “A”
Till the modification Facility is pending:
- Pending/in-process detail displays MF1 and the amount is 150.
- Direct Detail does not display F1, MF1.
After the modification request is Complete passes the closing stage:
- Pending/in-process detail does not display MF1 since the request is complete.
- Direct Detail displays MF1-150.
In the exposure of “B”
Till the modification Facility is pending:
- Pending/in-process detail displays MF1 and the amount is 150.
- Direct Detail does not display F1, MF1.
After the modification request passes the closing stage:
- Pending/in-process detail does not display MF1 since the request is complete.
- Direct Detail does not display MF1-150 but since there’s no integration for add/release party API as of now, this displays the facility MF1-150 in direct detail.
In the exposure of “C”
Till the modification request Facility is pending:
- Pending/in-process detail displays MF1 and the amount is 150.
- Direct Detail does not display F1, MF1.
After the modification request passes the closing stage:
- Pending/in-process detail does not display MF1 since the request is complete.
- Direct Detail should actually show MF1-150 ,since there’s no integration for add party API for now, this does not display the facility MF1-150 in direct detail.
Permissions for Exposure - Request Overview and Entity Overview.
Monitoring
This section explains the following:

Covenants
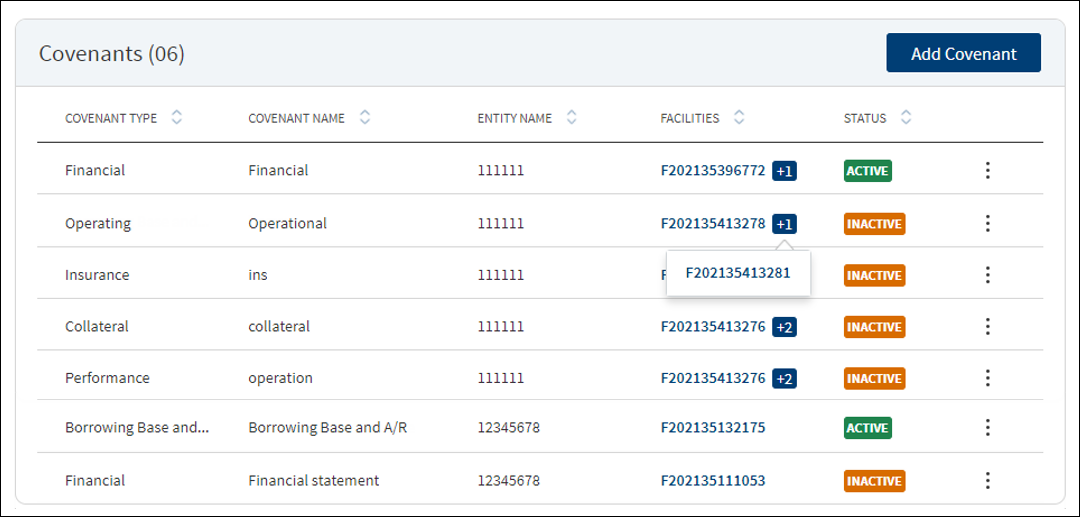
The application displays the summary of covenants for New Facility and modification Facility or the tracking conditions for a request with the following details: Covenant Type, Covenant Name, Entity Name, Facilities, and Status. All active covenants are required for tracking. The count icon beside the Facility ID denotes that the covenant is mapped to more facilities.
Covenants linked to all the modification facilities are prepopulated in the summary if the purpose is selected as modification.
Do any of the following:
- Click Add Covenant to add a covenant.
- Use the context menu as required:
- Click Edit to modify the details.
- Click Delete to remove the record. The covenants with Active status cannot be deleted. In the confirmation pop-up that appears, click Yes. The record is removed
- Click the row to view the details.
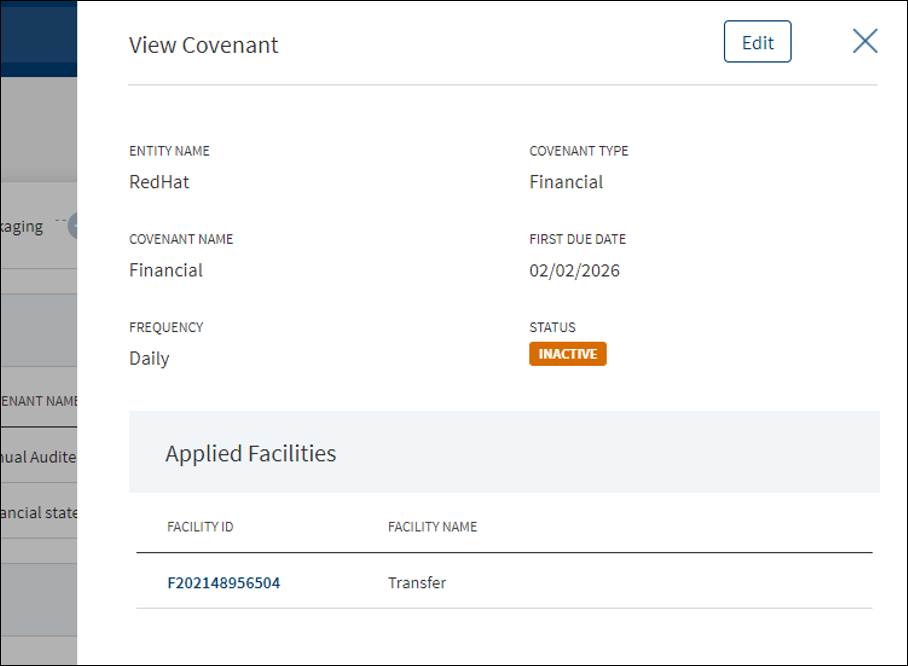
- Click Edit to modify the details or click X to close the form.
- Click the Facility ID to navigate to the Facility overview screen.
In Add and Edit section only the New facilities are listed. If the request has only modification as purpose, the Add Covenant button is not applicable.
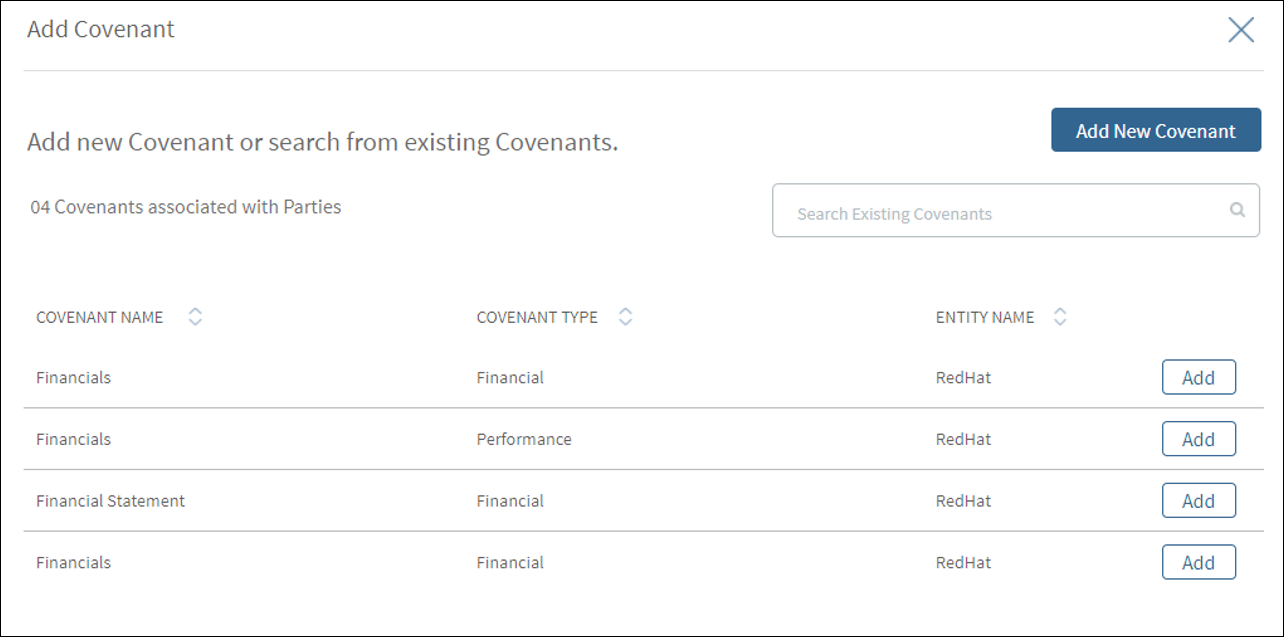
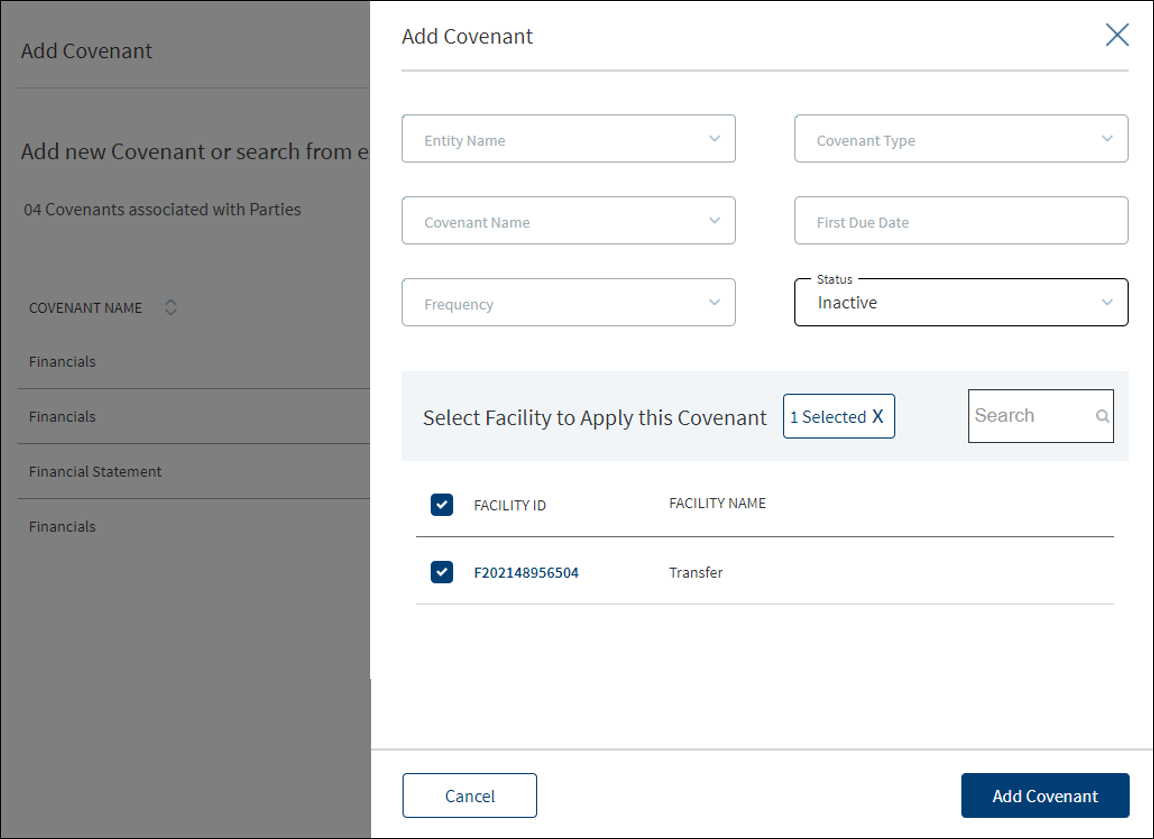
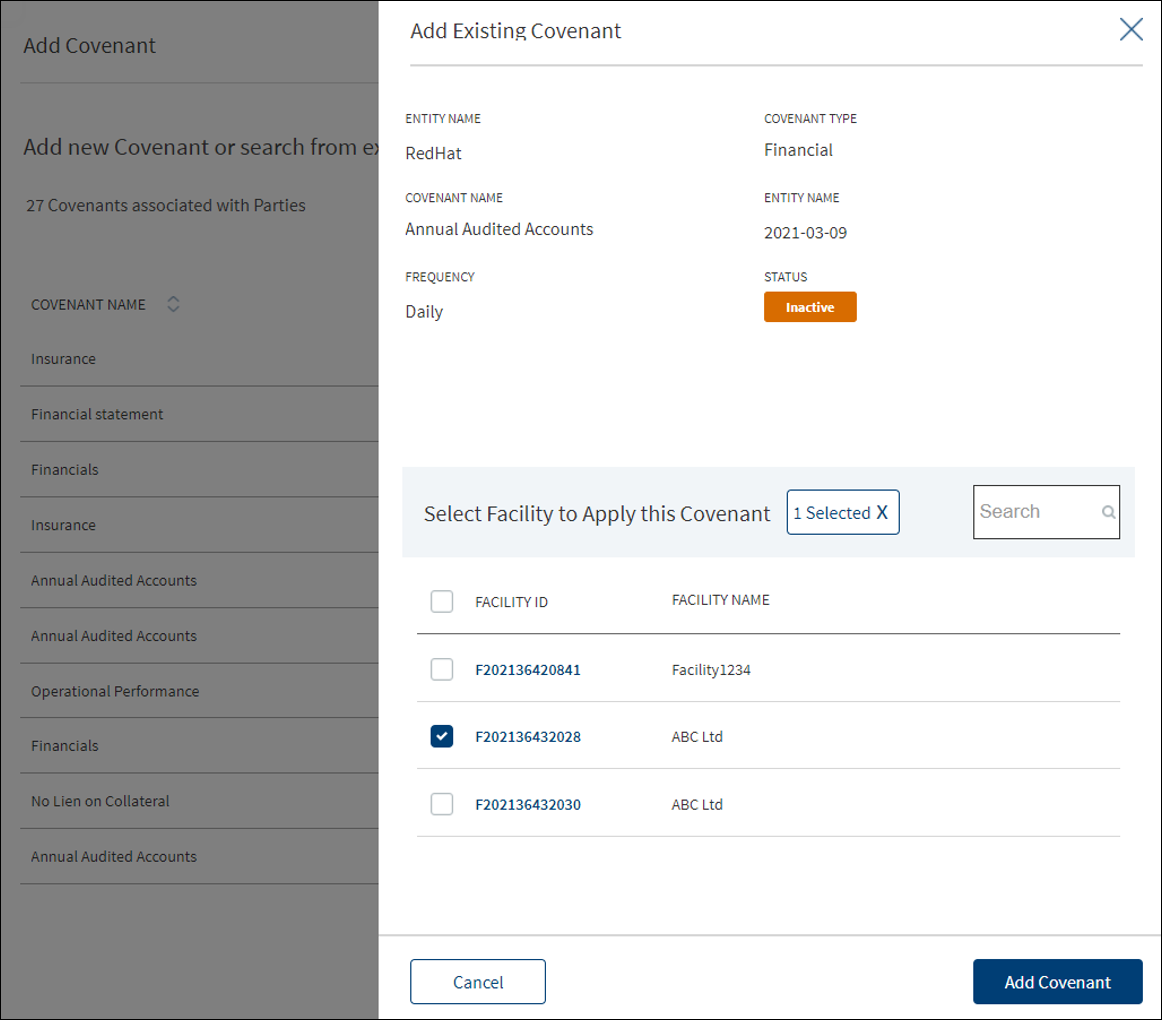
- The application displays the list of covenants already added for the parties with the following details: Covenant Name, Covenant Type, and Entity Name. Use the search bar to search for a specific covenant. Do any one of the following:
- Existing covenant: Add any existing covenant from the list.
- The application pre-populates the existing covenant details and displays the list of facilities to which the covenant can be applied.
- Select the required Facility from the list. The selection can be one, many, or all items.
- Click Add Covenant. The covenant is added to the Covenants list.
- New covenant: Click Add New Covenant.
- Existing covenant: Add any existing covenant from the list.
Add New Covenant Flow
- Select the Entity Name from the list. The covenant will be associated with the selected entity and available in the entity overview screen.
- Select the Covenant Type from the list - Financial, Performance, Collateral, Borrowing base and more. For Performance covenant, enter the Operator and Requirement details.
- Select the Covenant Name associated with the Covenant Type from the list.
- Select the Frequency from the list - Daily, weekly, monthly and more.
- Enter the First Due Date in MM/DD/YYYY format. The application checks that the First Due Date is not less than the current date.
- Select the Status from the list - Active or Inactive. By default, Inactive is selected.
- The application displays the list of facilities to which the covenant can be applied. Select the required Facility from the list. The selection can be one, many, or all items. Covenant Type with Covenant Name combination for a Facility is unique. A user cannot add more than one same combination for a Facility.
- Click Add Covenant. The application displays a confirmation message that the covenant is added successfully and adds the record to the Covenants list.
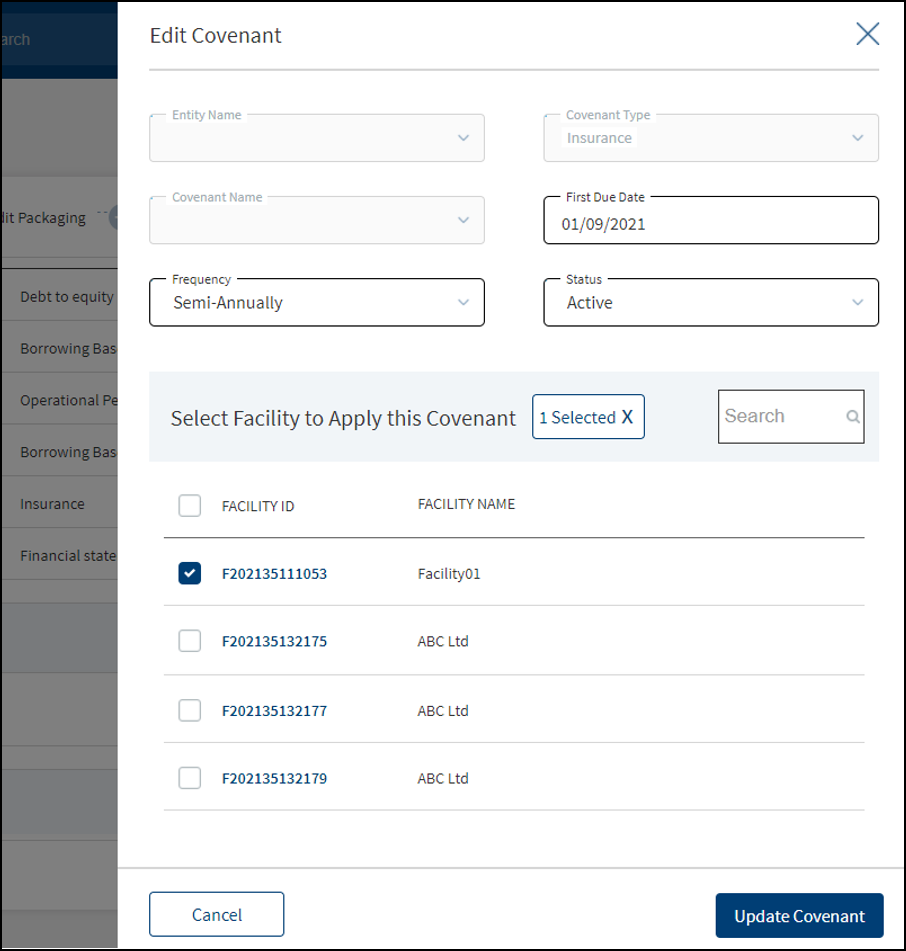
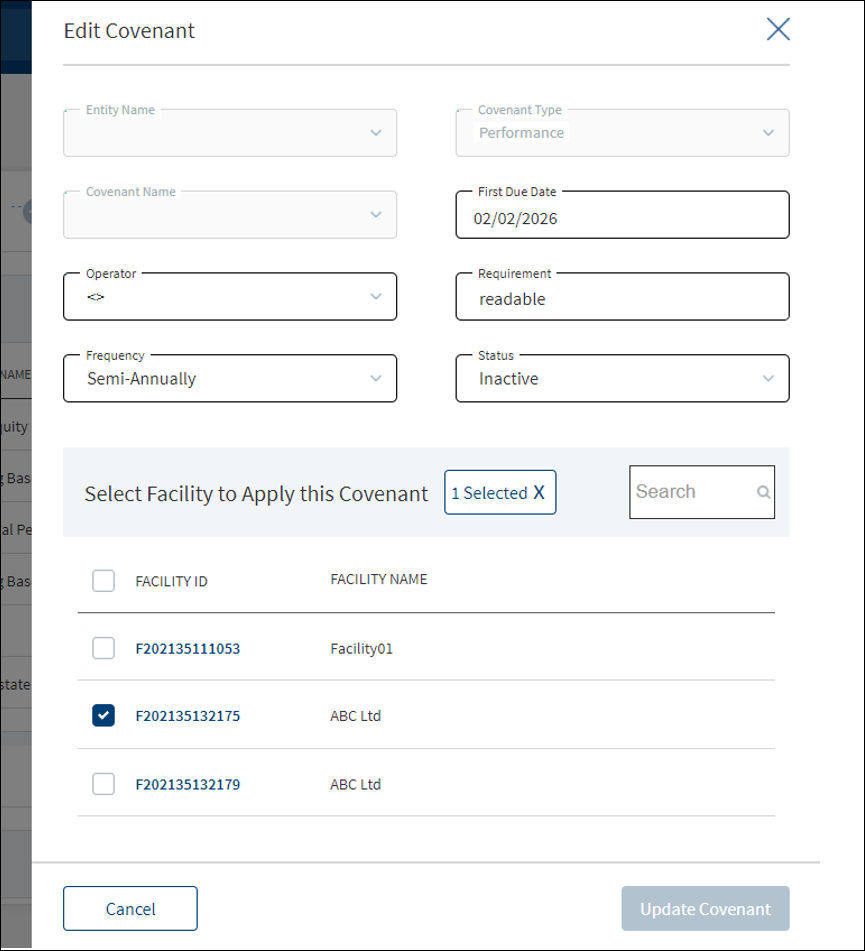
- Make the changes as required.
- The following details can be edited: Frequency, First Due Date, Status, and the Facility that is mapped to the covenant.
- The application checks that the First Due Date is not less than the current date.
- If the Covenant Type is Performance, two fields, Operator and Requirement are displayed, and these two fields can be edited.
- Click Update Covenant to save the details.
- The application displays a confirmation message that the covenant is updated successfully.
Click Cancel to discard the changes. On the confirmation pop-up that appears, click Yes. The changes are not saved.
Policy Exceptions
Policy Exception section provides an overview of all policy exceptions involved with the request.

The application displays the list of policy exceptions for both Facility and modification Facility noted for the request with the following details: Exception Type, Description, Applies to which Entity/Facility/Collateral, and status (accepted, rejected, and waived). Otherwise, the application displays an appropriate message if the policy exception list is empty.
Policy Exception linked to all the modification facilities are prepopulated in the summary if the purpose is selected as modification.
Do any of the following:
- Click the row to view the details.
- Click Add Exception to add an exception to the request.
- Use the context menu to edit the exception details. Only the exception with Rejected status can be modified.
In this screen both New and Modification facilities are listed if both the Purpose options are selected initially, else only one of the Facility displays as per the purpose selected.
- Click the row to view the details.
- Click Edit to modify the details. Only the exception with Rejected status can be modified.
- Click X to close the form.
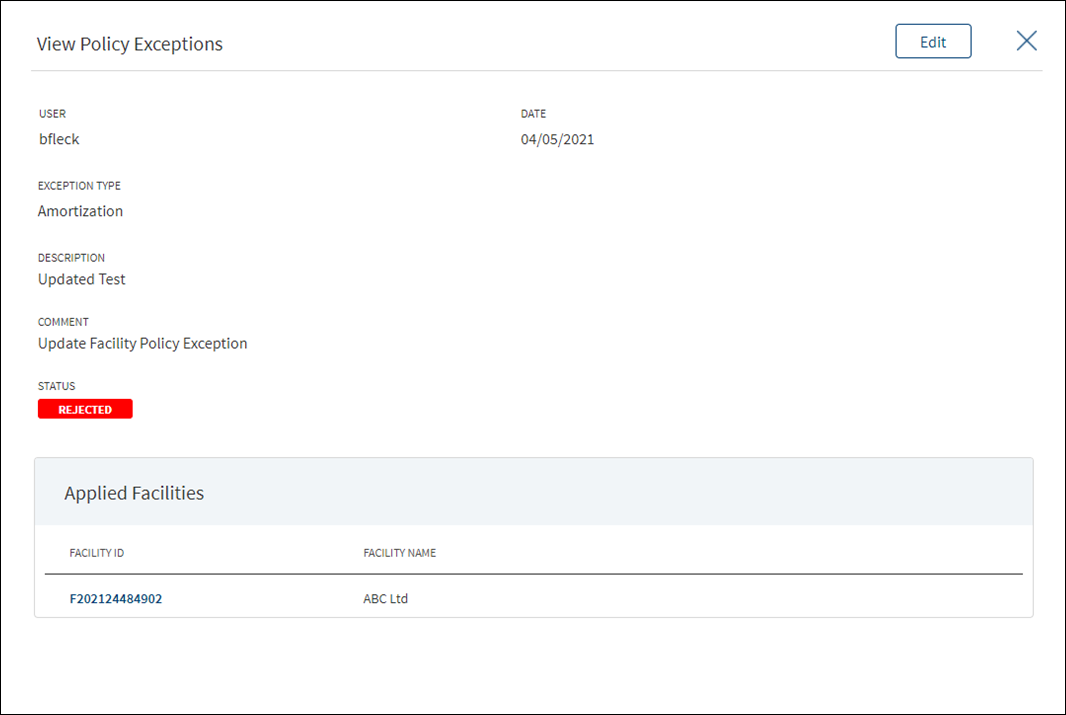
Use the feature to add an exception to the request. Until otherwise stated, information in all the fields is mandatory.In this screen New and Modification facilities are listed if both the Purpose options are selected initially, else only one of the Facility displays as per the purpose selected.
- Click Add Exception. The application displays the logged-in user name and the current date on top of the form.
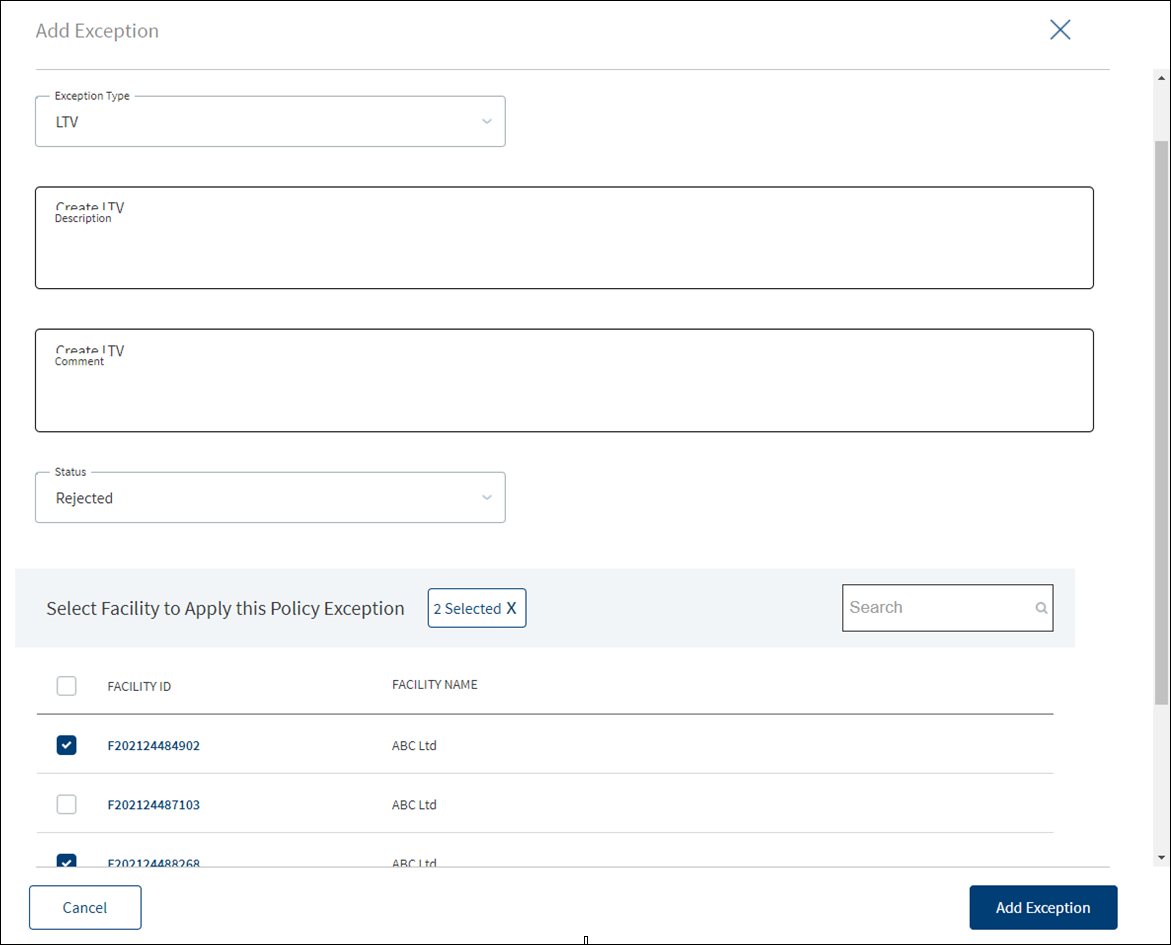
- Select the Exception Type from the list. The following items are listed: Amortization, Appraisal, Collateral, DSC, Environmental, Equity, Exposure, Guarantor, Industry, Lien, Term, LTC, LTV, Occupancy, Purpose, and Credit History.
- Enter the Description.
- Select the Status from the list. The options are Accepted, Rejected, and Waived.
- Enter Comments if required. This information is optional. When a lengthy comment or description is entered which does not fit the field, then the content moves to the next line of the field. The field accepts up to 500 characters.
- The application displays the list of entities, facilities, or collateral depending on the selected Exception Type. If the list has only one value, that record is selected by default. The exception can be applied to one, many, or all the records of either Entity/Facility/Collateral.
- Click Add Exception.
- The application displays a message that the exception has been added successfully and the newly added exception is added to the exceptions list.
Click Cancel to cancel the action anytime. The application displays a confirmation screen. Click Yes to discard the changes. The changes are not saved.
Use the feature to modify the exception item details from the policy exception list. Only the exception item with Rejected status can be modified.

- On the
 context menu, click Edit to edit the exception. This is applicable only for the exceptions with Rejected status.
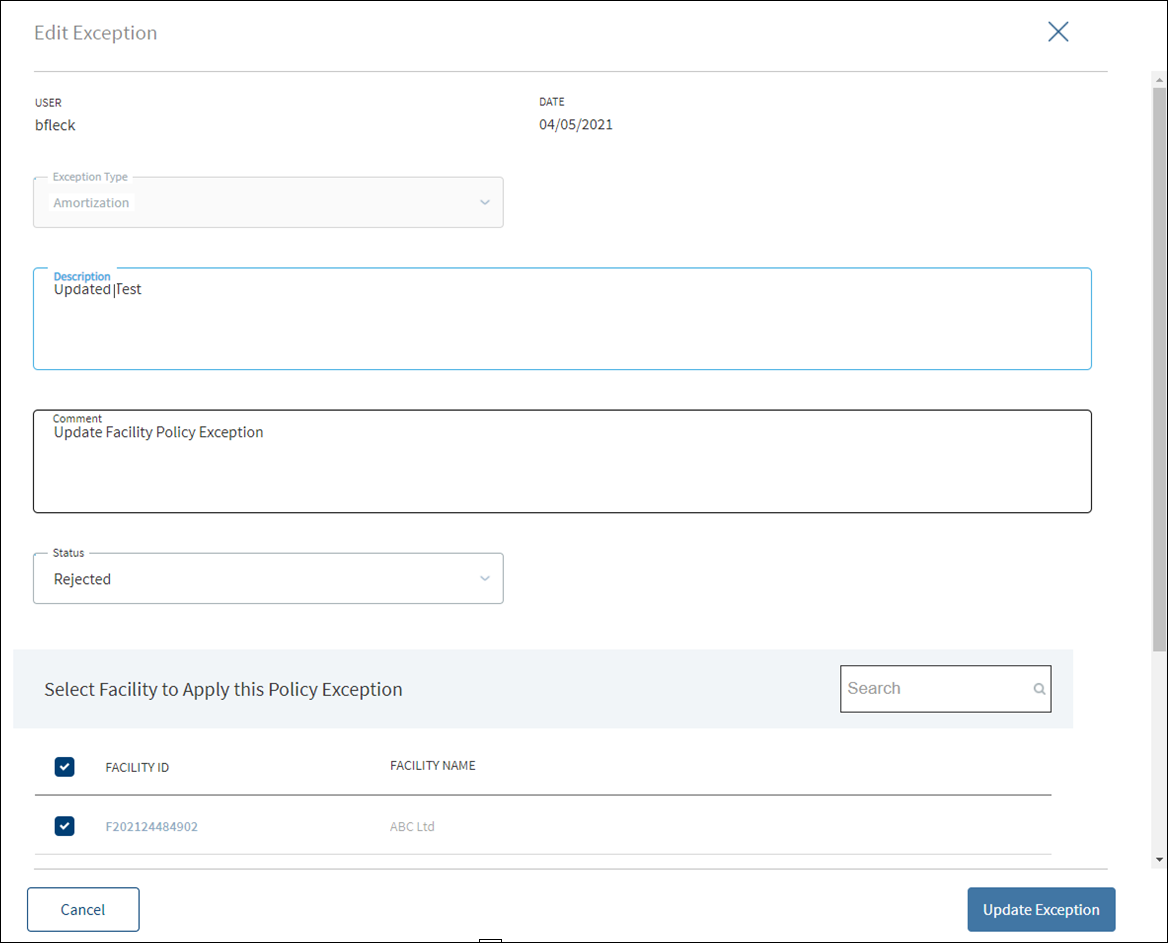
- Modify the following details as required:
- Description.
- Select the Status from the list.
- Comments.
- Click Update Exception.
- The application displays a message that the exception has been updated successfully and adds the exception to the Policy Exceptions list.
Click Cancel to cancel the action anytime. The application displays a confirmation screen. Click Yes to discard the changes. The changes are not saved.
Compliance
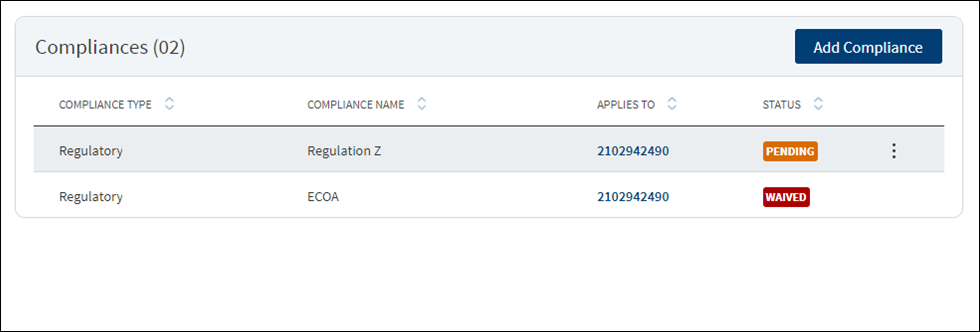
The compliance can be third-party integration or manually handled. The application displays the current listing of all compliance items (required at this point of processing) for review. This list indicates all relevant regulatory and internal compliance required. This section provides an automated overview of all compliance line items involved with the request up to the current processing stage. A user Should be able to add Compliance to both new and modification Facility in request overview Compliance section and can add a compliance item and view the compliance result. The following details are displayed: Compliance Type, Compliance Name, Applies to which party or Facility depending on the selected compliance type and name, and status.
In this screen both New and Modification facilities are listed if both the Purpose options are selected initially, else only one of the Facility displays as per the purpose selected
Do any of the following:
- Click Add Compliance to add a compliance item.
- On the context menu, click Edit to modify the details. The items with Pending and Failed status only can be edited.
- Click the row to view the details.
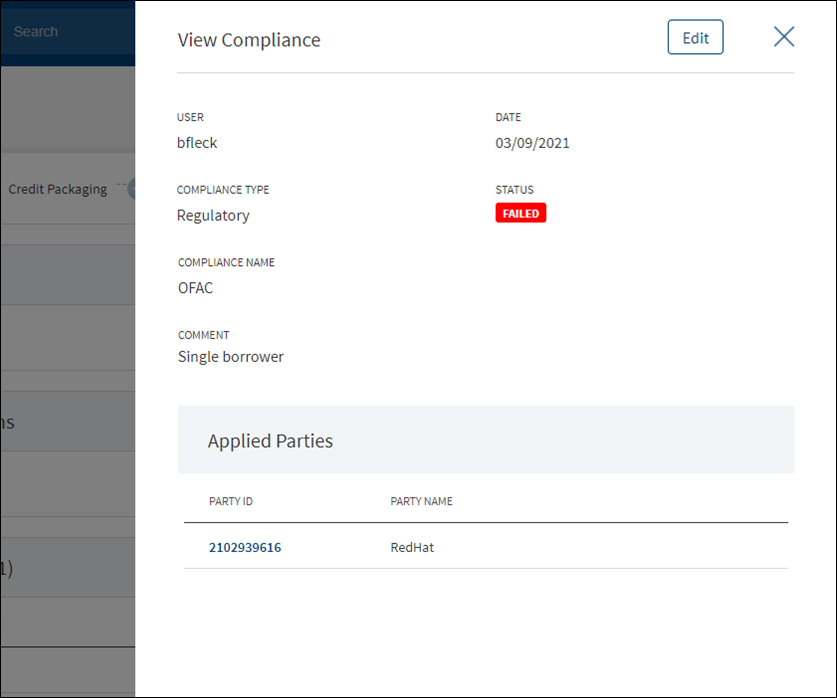
- Click Edit to modify the details. The items with Pending and Failed status only can be edited.
- Click X to close the form.
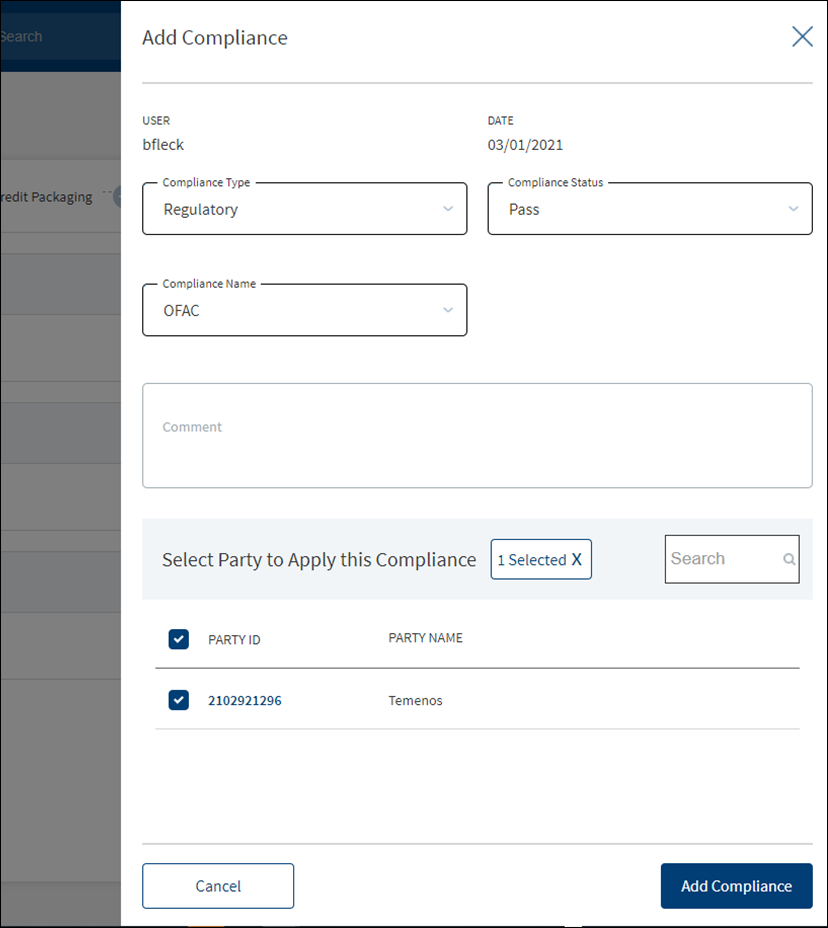
- The application displays the signed-in user name and the current date.
- Select the Compliance Type from the list - Regulatory and Internal.
- Select the status type from the list - Passed, failed, pending, and waived. If a third-party system is used, it is possible to pull the result directly from that system.
- Select the Compliance Name associated with the Compliance Type from the list.
- Add Comments. When a lengthy comment or description is entered which does not fit the field, then the content moves to the next line of the field. The field accepts up to 500 characters.
- The application lists the parties, facilities, or collateral depending on the selected compliance type and compliance name. Refer to the following examples. Select the required item. By default, one item is selected.
- Example: Compliance Type - Regulatory, Compliance Name - ECOA. Entities list is displayed.
- Example: Compliance Type - Internal, Compliance Name - Underwriting Guidelines. Facilities list is displayed.
- Example: Compliance Type - Internal, Compliance Name - Appraisal. Collateral list is displayed.
Compliance cannot be added/applied more than once to a Entity/Facility/Collateral. The Entity/Facility/Collateral to which the Compliance Name and Compliance Type combination is already applied is disabled and not available for the user to select.
- Click Add Compliance. The application displays a message that the compliance item has been added successfully and the compliance is added to the Compliance list.
The items with Pending and Failed status only can be edited.
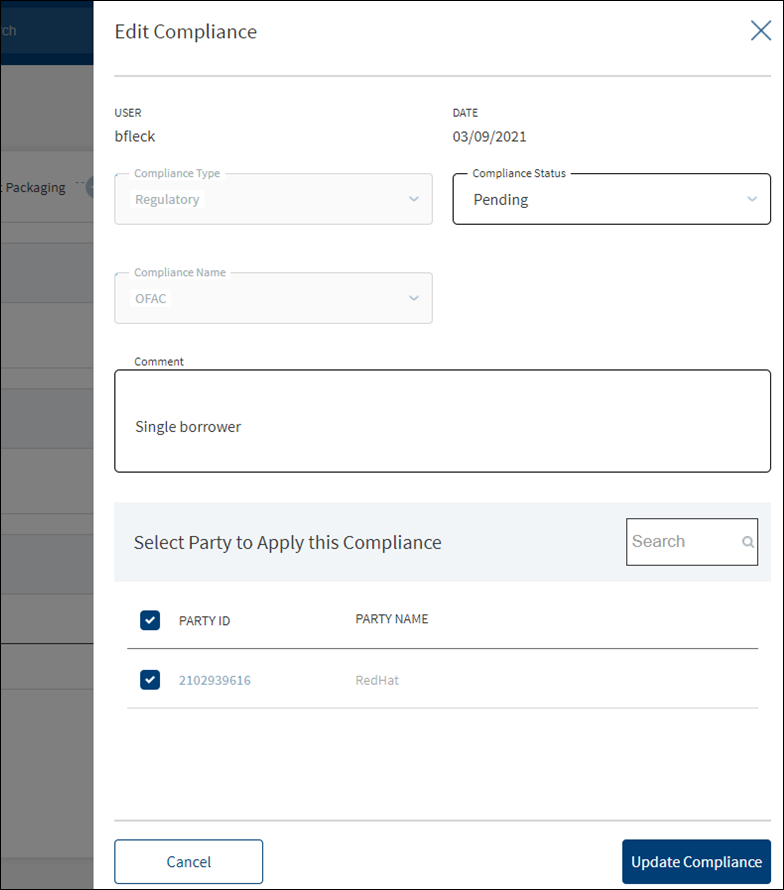
- Make the changes as required.
- The following details can be edited: Status and Comments section.
- Click Update Compliance to save the details.
- The application displays a confirmation message that the compliance is updated successfully.
Click Cancel to discard the changes. On the confirmation pop-up that appears, click Yes. The changes are not saved.
Integration
The section explains the external service details.

External Services

Capability to add external services (third-party integrations) and storing their result in the Origination Processing MS against each entity and the provision to upload documents.
The application displays the list of external service providers associated with an entity for various account types with the following details: Service Provider name, Entity Name, Account Type, Date report received, Status, and Report to download.
Do any of the following:
- Click Add Service to add a service provider.
- Click the row to view the details.
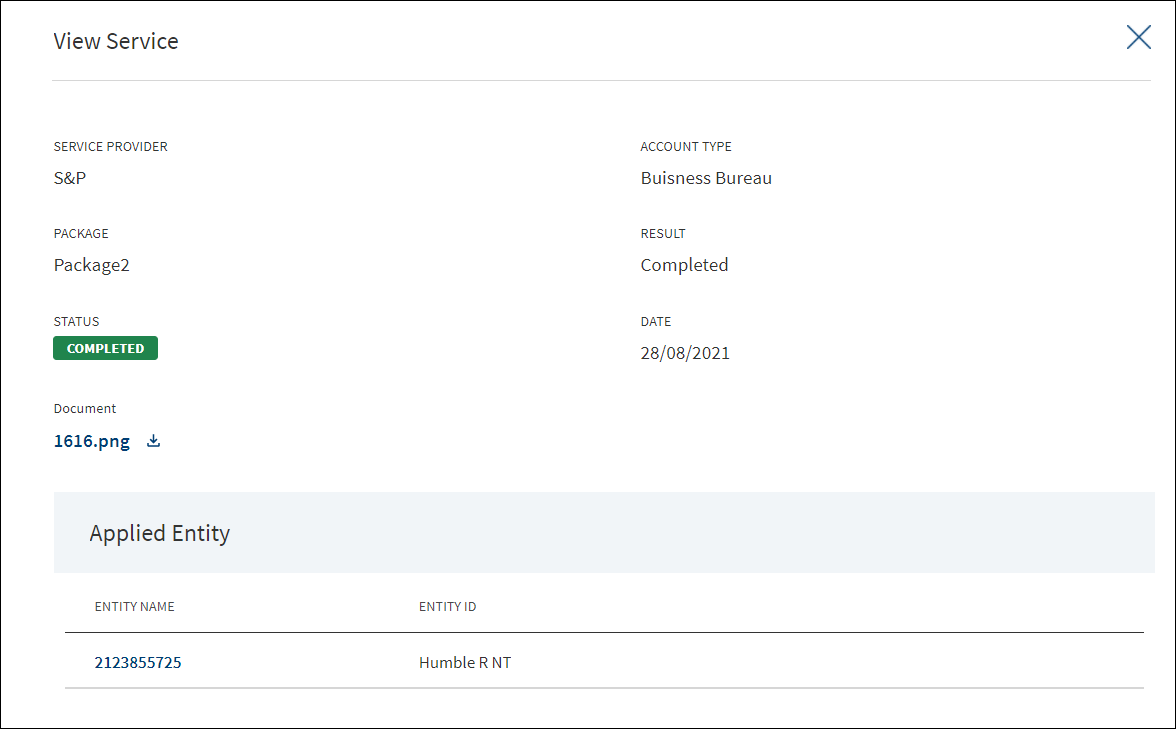
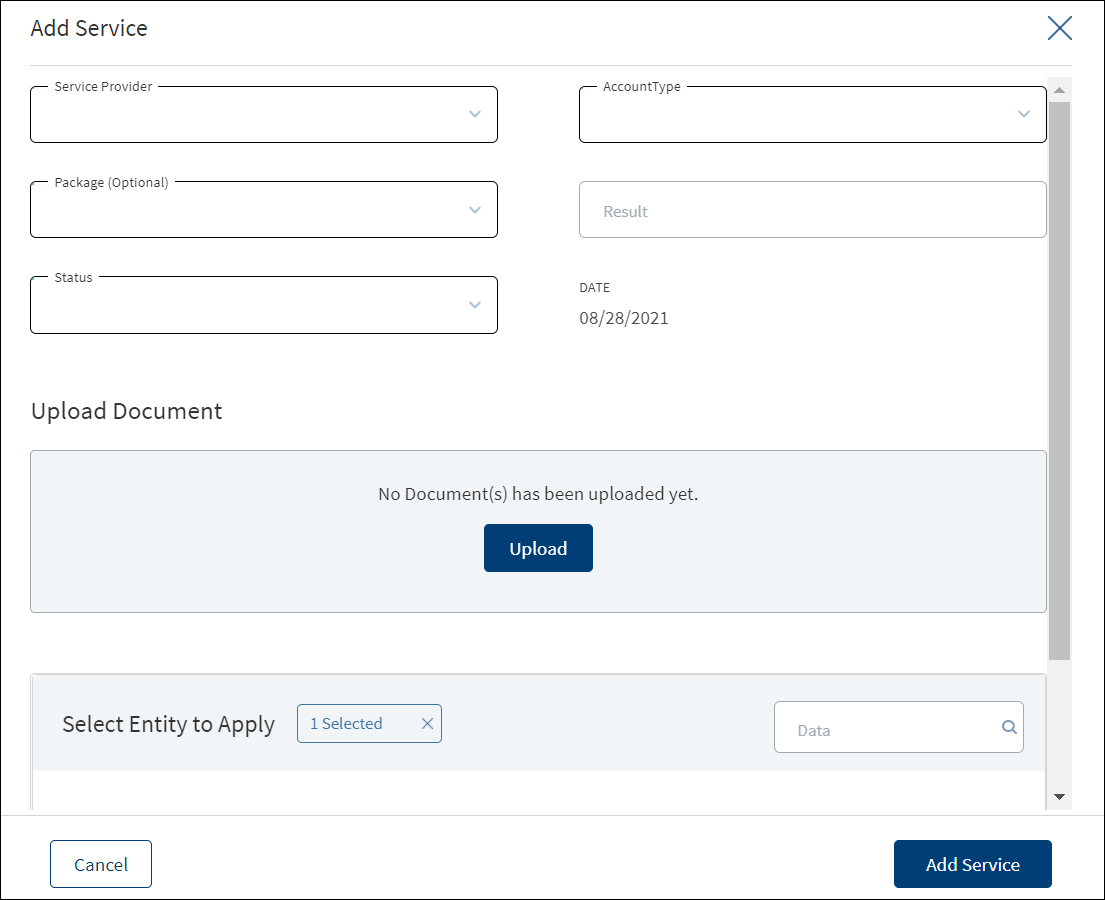
Until otherwise stated, all fields are mandatory.
- Select the Service Provider from the list.
- Select the Account Type from the list.
- Select the Package from the list. It is an optional field.
- Enter the Result.
- Select the Status from the list. The options are: Pending, Completed, Rejected, or Failed.
- If required, click Upload to upload document(s) in support of the service. Select the file to upload. The file name can contain alphanumeric characters and cannot contain spaces. The document types can be PDF, TXT, JPG, PNG, and JPEG. The maximum size allowed per document is 25 MB.
- In the Select Entity to Apply section, select the required entities. Filter the entities by Date as required.
- Click Add Service. The application displays a confirmation message that the service is added successfully.
Customer Actions
This is applicable for Retail Journey.
A User can raise Customer Actions (Manual) at the Product level and not at the Drawing level. Automatic or system generated customer actions are generated at the Drawing level. Funding related customer actions are at the Drawing level and not at the Product level (in case the Product has drawings).Funding related customer actions are generated depending on the number of drawings the Product has. Each drawing has a separate customer action.
- Additional Information for repayment related customer actions display at the Drawing level and not at the Product level(in case the Product has drawings).
- Additional Information for repayment related customer actions is generated depending on the number of drawings for the Product.
- If the Product does not have drawings , then the funding related customer action is triggered at the Product Level.
The Applies To displays the Drawing ID, in the Funding customer action for Drawings.
The customer actions display in the Entity Overview/ Request overview/ Product Overview / Drawing Overview.
Please refer to the link for Detailed information regarding Customer Actions.
Checklists
A checklist is a group of associated tasks. A task can be associated with a defined checklist or created as adhoc tasks and nestled in adhoc tasks checklist. When a new task or a new checklist is added in a stage, that item is appended to the workflow list and displayed as stages in the stage indicator on top of the screen. A signed-in user can see the list of checklists and associated tasks that must be completed in a specific stage by clicking the stage indicator. When all the task statuses under a stage are either waived or complete, the current stage is marked as completed and the request moves on to the next stage. This Section is not applicable for Corporate Lending.
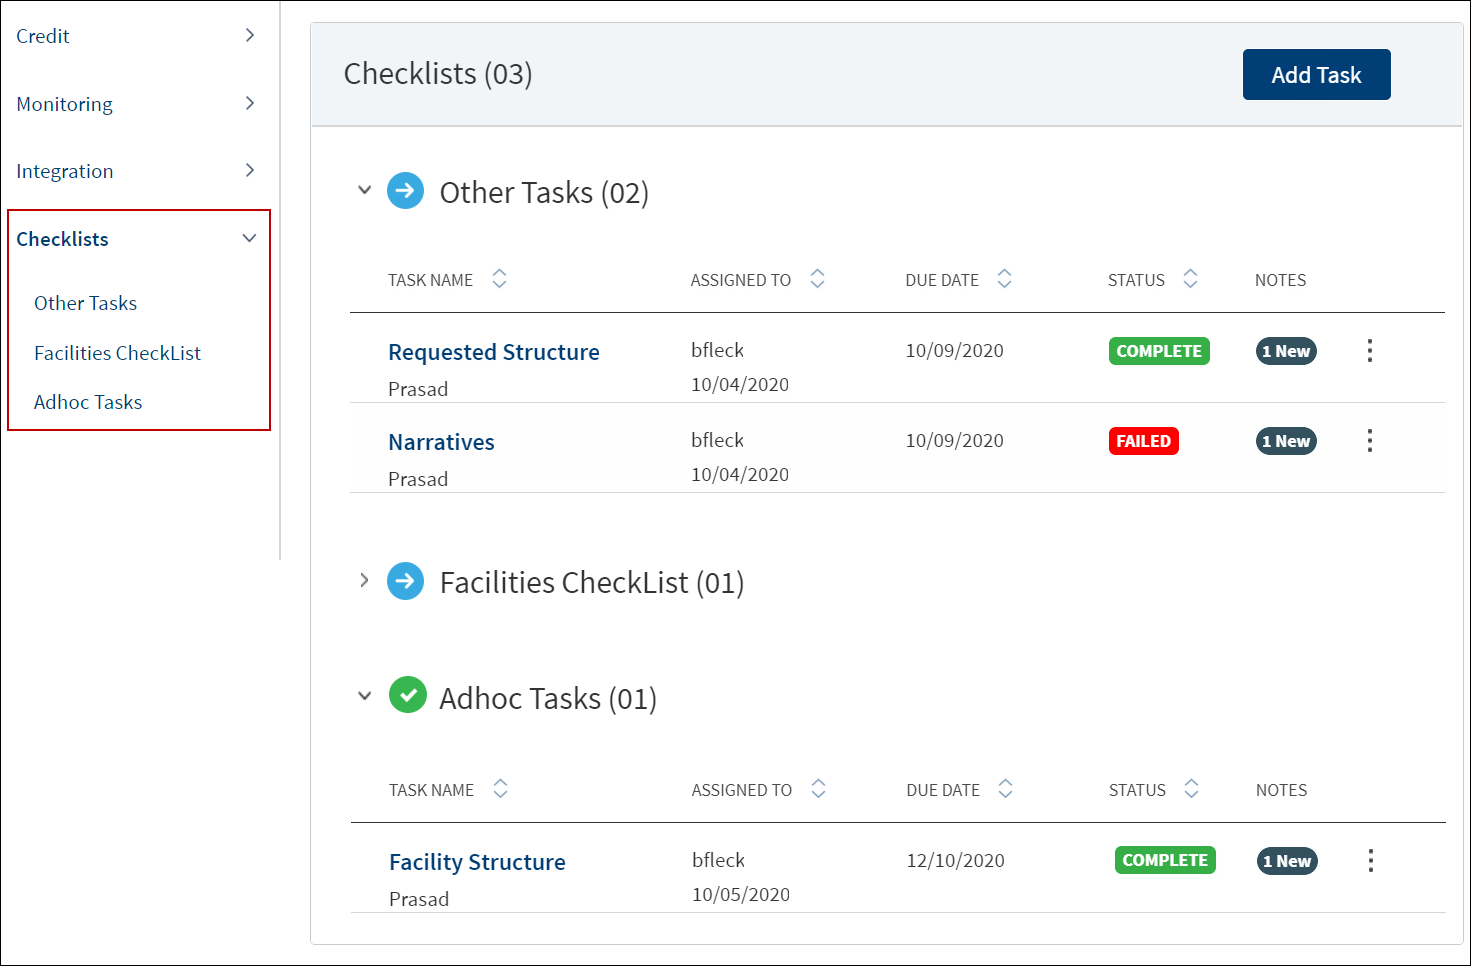
The application displays the following:
- The list of all checklists and tasks as menu items on the left pane and the corresponding details on the right pane with the following information: Task name, entity name if the task is tied to an entity, task assigned to user, task due date, task status, and notes.
- The number within parenthesis denotes that many tasks are available in the checklist.
- The checklist can be collapsed and expanded by using the up and down chevrons respectively.
- The checklist in which all the tasks are completed or waived are displayed in green color and those that are ongoing are displayed in blue color.
- The number in the notes column indicates that the task has so many notes added to it.
Do any of the following:
- Use the context menu to edit the task.
- Use the up and down chevrons to collapse or expand the checklists respectively.
- Click Add Task to add a task.
- Click the row to view the task details.
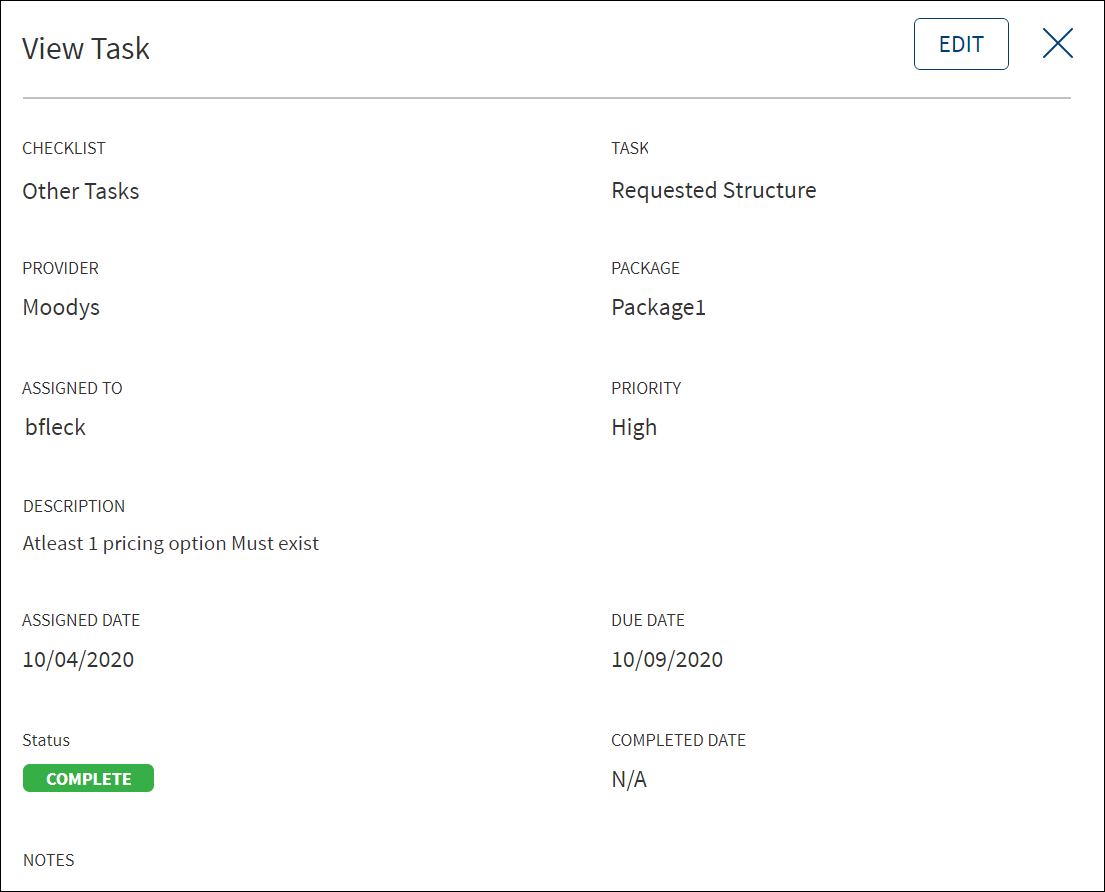
- Click Edit to modify the details.
- Click X to close the screen.
APIs
For the complete list of APIs shipped as part of this feature, see Experience APIs documentation.
In this topic
