Wire Transfer
Use the feature to do an electronic money transfer including bulk wire transfer which means multiple wire transfer details are uploaded in a single instance. A traditional wire transfer goes from one bank or credit union to another using a network such as SWIFT. A user with the required permissions can initiate a wire transfer to any accounts (saved or unsaved) if the user had filled all the required information about the recipient.
The Wire Transfer feature is not integrated with Transact and linked with Mock DB.
- The accounts are segregated by customer ID at all relevant places in the application during transfers and other flows and icons against each account indicates the type of account.
- A combined user with access to both business and retails accounts, while initiating a wire transfer or managing payees can know the recipients that were added for personal use and the ones that were added for business use, and whether the accounts to which a wire transfer is to be initiated are personal accounts or business accounts.
- Transfer Money: Shows a list of wire recipients. The application differentiates between personal and business recipients with specific icons.
- Manage Recipients: Shows a list of personal and business recipients. See notes on beneficiaries for more information.
- Create Wire Transfer: Selection of from account shows a differentiation between the personal and business accounts, and which recipients were added for personal and business use.
Web Channel Menu path: Side menu > Wire Transfer
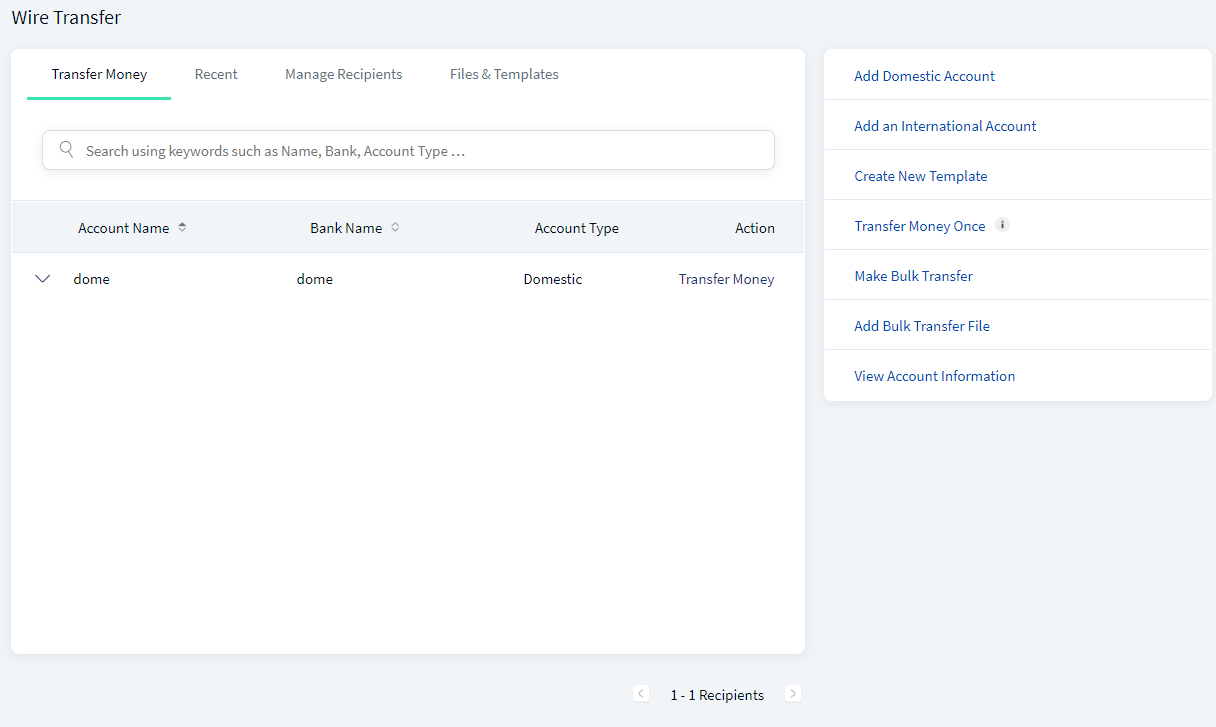
The application displays the Wire Transfer screen with the focus on the Transfer Money tab. For first-time users, activating the wire transfer feature is a mandatory step.
When you open the Wire Transfer for the first time, the application displays the Activate Wire Transfer screen. It is mandatory to complete the activation process before transferring money. It is an one-time activity.
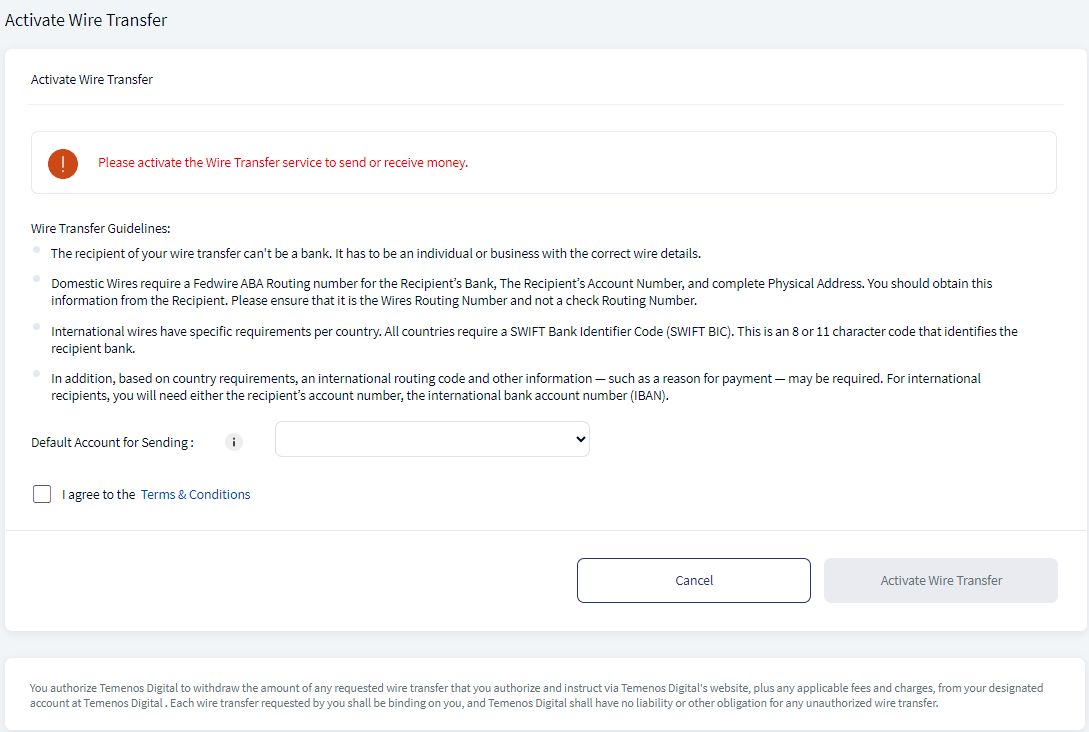
- Read the wire transfer guidelines.
- The recipient of your wire cannot be a bank. It has to be an individual or business with the correct wire details.
- Domestic wires require a Fedwire American Bankers Association Routing Transit Number (ABA RTN) for the recipient's bank, the recipient's account number, and complete physical address. You should obtain this information from the recipient. Note that it is the wires routing number and not a check routing number.
- International wires have specific requirements by country. All countries require a SWIFT Bank Identifier Code (SWIFT / BIC). This is an 8 or 11-character code that identifies the recipient's bank.
- In addition, based on country requirements, International routing code and other information, such as a reason for payment, may be required. For International recipients, you will need either the recipient's account number or the International Bank Account Number (IBAN).
- The application lists all your accounts in the Default Account for Sending list. Select the required account. This selected account is used as a default while making subsequent wire transfers.
- Select the check box to agree to the Terms and Conditions. It is mandatory to agree to the terms and conditions to activate the wire transfer process.
- Click Activate. Note that this button is enabled only when you accept the terms and conditions. The wire transfer is activated, and you can do electronic money transfers.
- The application displays the Wire Transfer screen.
The wire transfer form contains four tabs and a host of links to activities on the right-side bar:
- Transfer Money tab
- Recent tab
- Manage Recipients tab
- Files and Templates tab
- Add a domestic recipient
- Add an international recipient
- Create new template
- Make one-time transfer (Transfer Money Once)
- Make a wire transfer (Transfer Money)
- Make a bulk wire transfer
- View account information
Business Process Diagram - Transfer
Transfer Money Tab
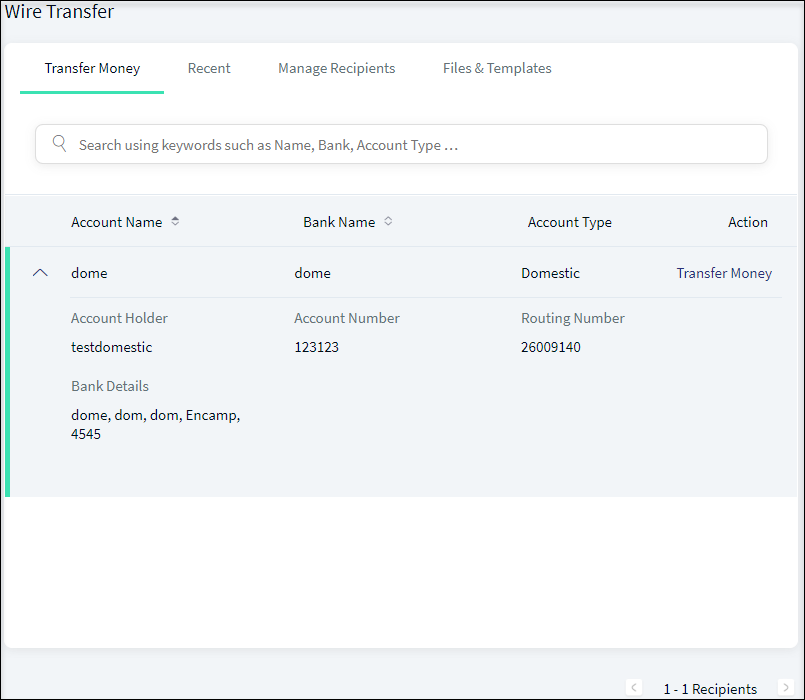
The Wire Transfer main screen displays the Transfer Money tab by default. The application displays the recipients' list in rows with details such as Account Name, Bank Name, Account Type, and Actions.
Web Channel Menu path: Side menu > Wire Transfer > Make Transfer
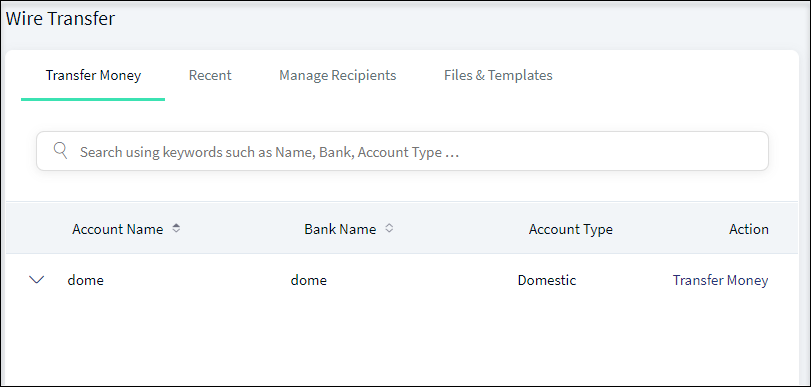
The list is sorted by Account Name by default, but you can also sort the list based on Bank Name using the sort  icon.
icon.
Do any of the following:
- Search for a recipient by using the Recipient Name, Bank Name, or the Account Type (domestic or international).
- Click the arrow to view the selected recipient's details.
- Click Transfer Money to initiate a wire transfer.
Transfer Money (Initiate a Wire Transfer)
Use the feature to initiate a wire transfer to the required recipient.
Web Channel Menu path: Side menu > Wire Transfer > Make Transfer (Transfer Money tab) > Transfer Money
The application displays the Transfer Money tab with the list of recipients already added.
Click Transfer Money available on the required recipient row to initiate a wire transfer. Transaction fees may be applicable to international transfers based on the selected country. If the recipient is not available in the saved list, select Make One Time Transfer (Transfer Money Once).
To initiate a wire transfer, follow these steps:
- If required, search for a recipient from the saved recipients list using search criteria such as the Recipient Name, Bank Name, or Account Type.
- Click Transfer Money. The application displays the Wire Transfer screen. The Recipient Name and Bank is automatically populated. The personal and business accounts can be distinguished by different icons.
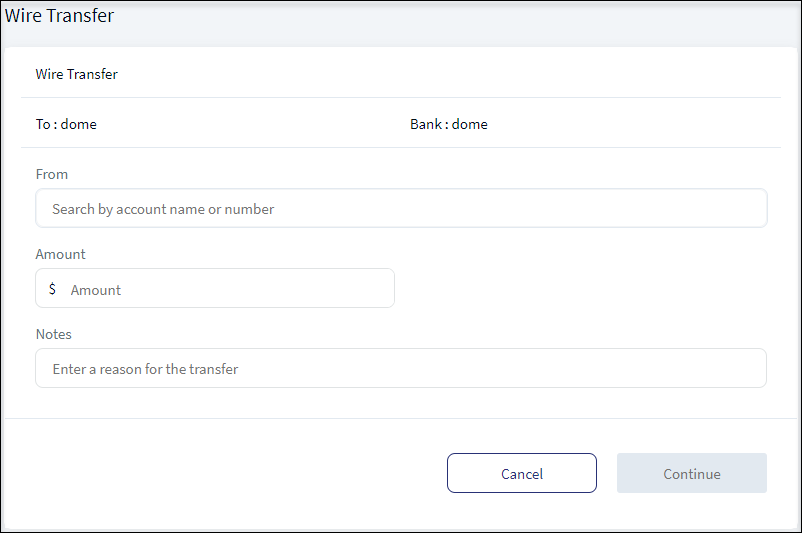
Transaction fees may be applicable to international transfers based on the selected country. If the recipient is not available in the saved list, click Transfer Money Once on the right-side bar.
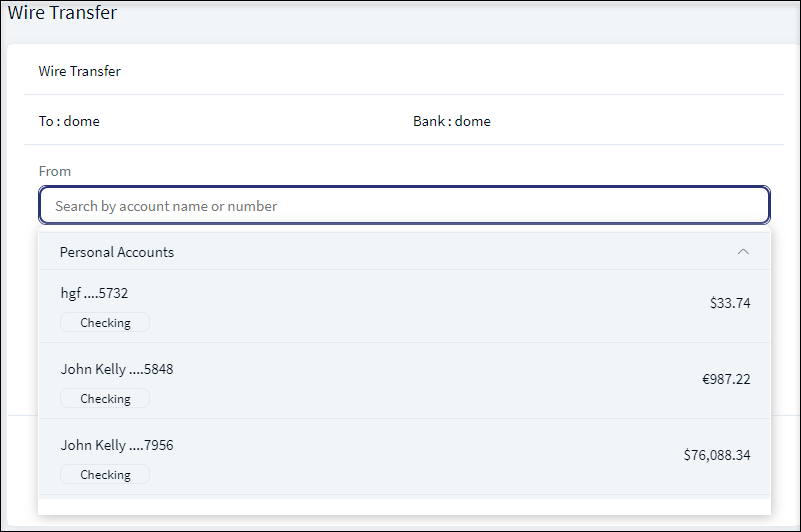
- Select the source account from the list. The display of the accounts in the drop-down list depends on the permission given to the user, (a) for a user with access to only one Customer ID, the accounts are grouped by account type such as Savings, Checking and more, (b) for a user with access to personal accounts and multiple Customer IDs, the accounts are grouped by personal accounts followed by Customer ID names and their respective accounts, and (c) for a user with access to multiple Customer IDs, the accounts are grouped by Customer IDs.
- Select the currency type from the Choose Currency list.
- Enter the Amount.
- Enter the reason for transfer as a Notes.
- Click Continue. The application displays the Confirm Details screen.
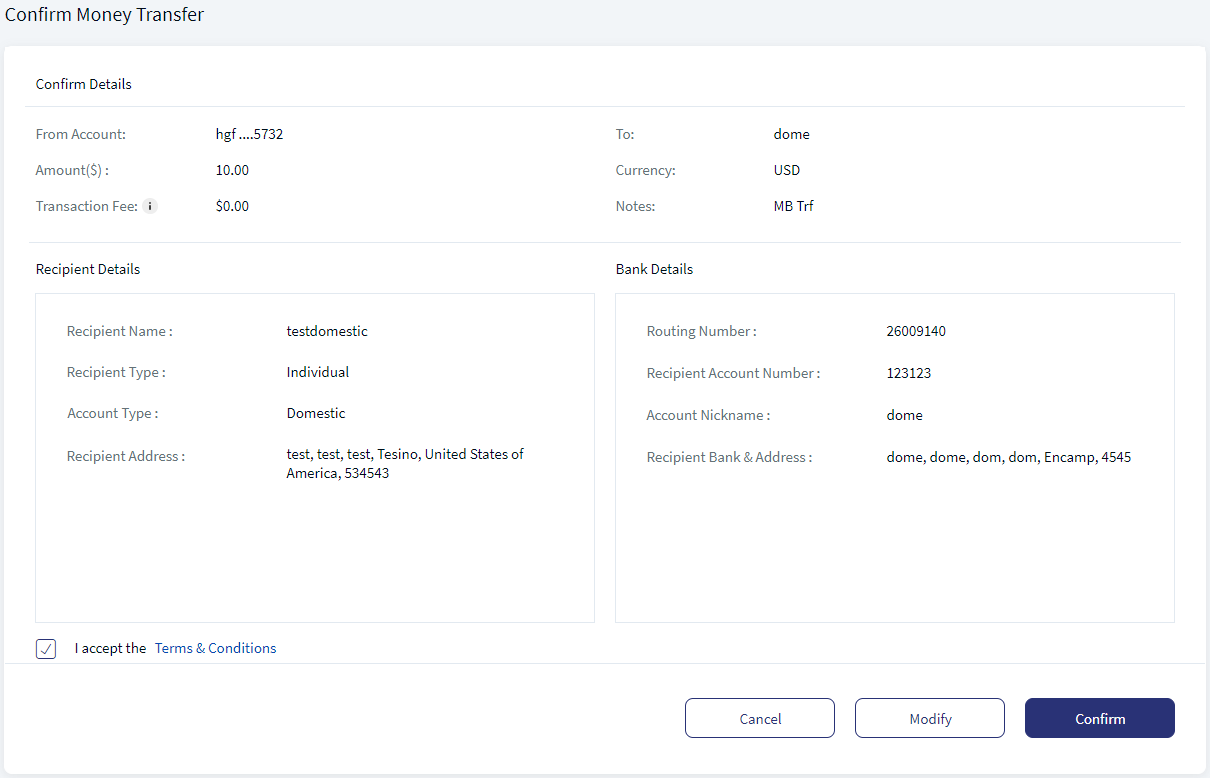
- Click Modify to change the details.
- Select the Terms and Conditions check box. Click to read the Terms and Conditions.
- Verify the transaction details and click Confirm.
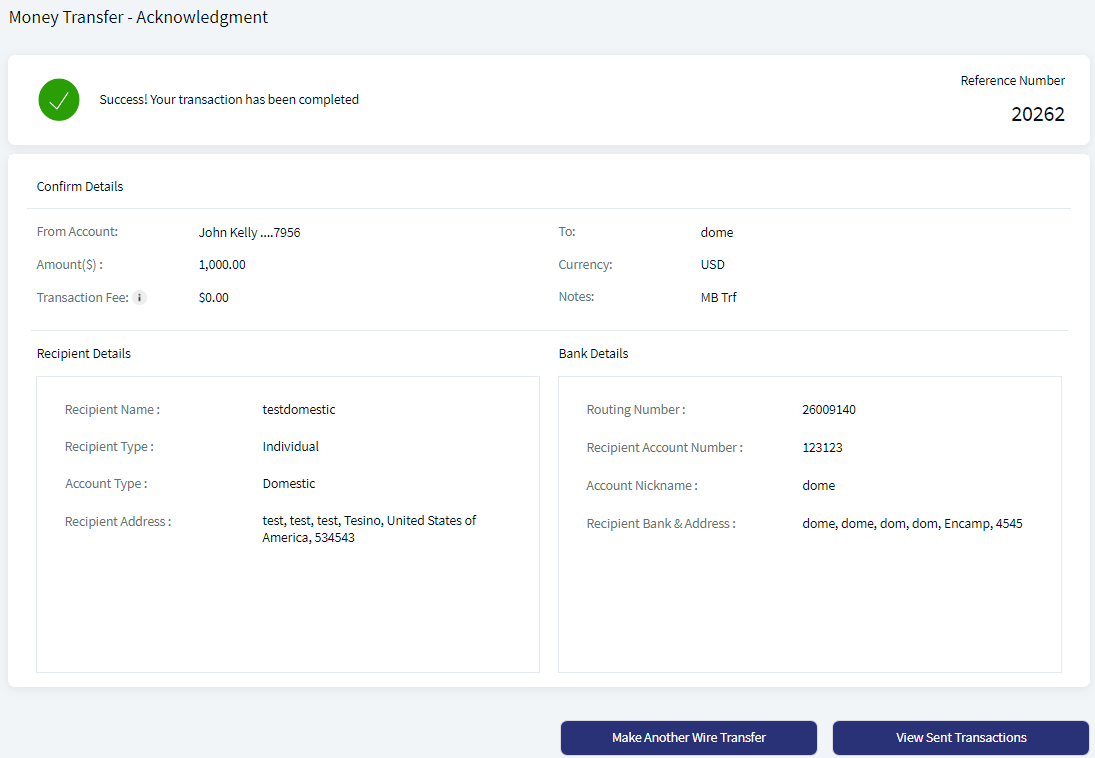
If the wire transfer is initiated successfully, the application displays an acknowledgment screen with a unique reference number to the transaction along with Transaction, Recipient, and Bank Details.
Do any one of the following:
- Make Another Wire Transfer: Click to carry out another wire transfer.
- View Sent Transactions: Click to view all the recent wire transactions.
Make One Time Transfer
Use the feature to make an one-time wire transfer even if the domestic and international recipients are not added yet.
Web Channel Menu path:
- Side menu > Wire Transfer > Make One-Time Payment
- On the right-side bar > Transfer Money Once
The application displays the Transfer Money Once screen.
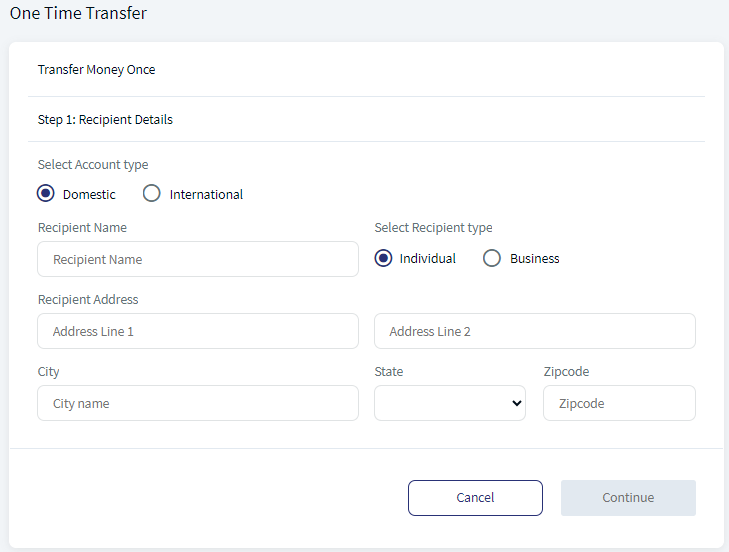
The one-time transfer process has the following three steps. It is mandatory to fill all the fields:
- Step-1: Recipient Details
- Step-2: Recipient Account Details
- Step-3: Transaction Details
Step-1: Recipient Details
All fields are mandatory.
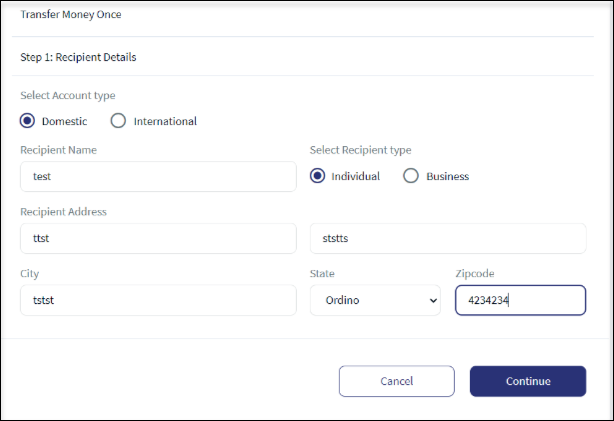
- Select the Account Type. The options are Domestic or International. For international account, select the country name from the Country list.
- Select the Recipient Type. The options are Individual or Business. For business accounts, enter the business or recipient name.
- Enter the Recipient Address details.
- Enter the City name.
- Select the State from the list.
- Enter the Zip code of the city.
- Click Continue. The Continue button is enabled only when all the mandatory fields are filled.
Step-2: Recipient Account Details
All fields are mandatory.
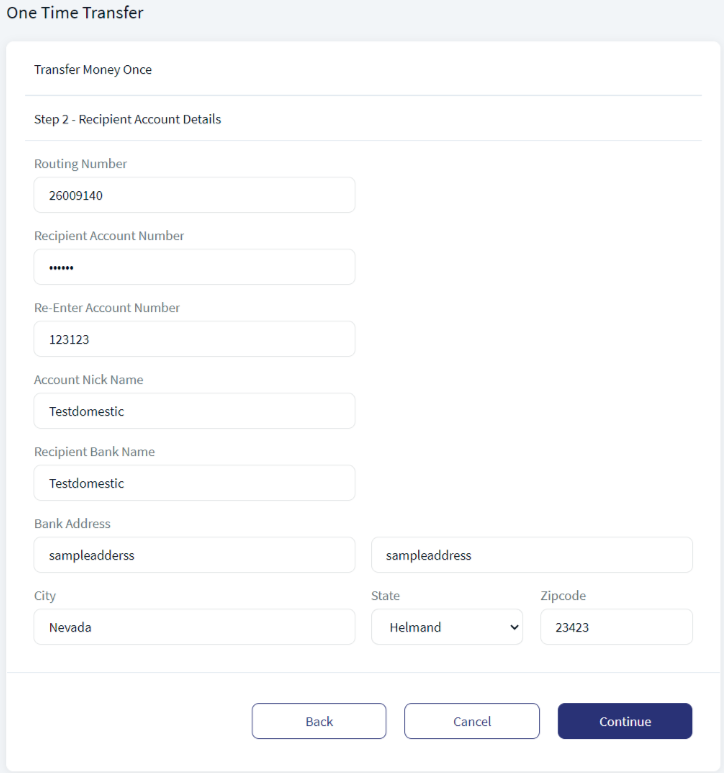
- Enter the Routing Number. In case of international account transfers, enter the recipient bank SWIFT Code and depending on the selected country, enter the International Route Code (IRC) or International Bank Account Number (IBAN) as applicable.
- Enter the Recipient Account Number. Enter the account number again to confirm.
- Enter the Recipient Account Nickname.
- Enter the Recipient Bank Name.
- Enter the Bank Address details.
- Enter the City name.
- Select the State from the list.
- Enter the Zip code of the city.
- Click Continue. The Continue button is enabled only when all the mandatory fields are filled.
Step-3: Transaction Details
All fields are mandatory.
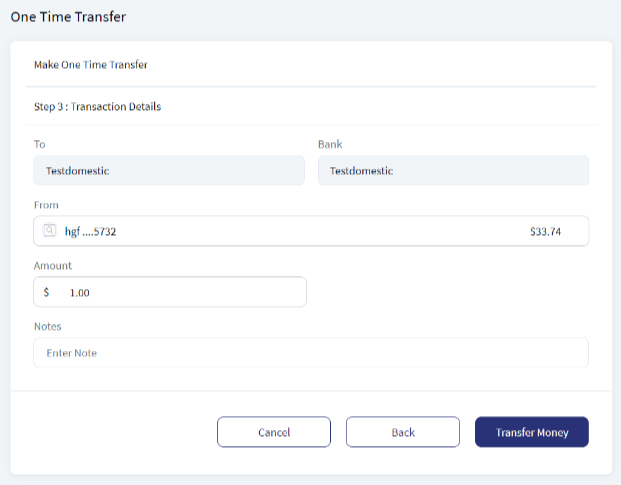
- The Recipients Name and Bank Details are auto-filled based on the information given in the previous step.
- Select the source account from the list from which the transfer is made. The display of the accounts in the drop-down list depends on the permission given to the user, (a) for a user with access to only one Customer ID, the accounts are grouped by account type such as Savings, Checking and more, (b) for a user with access to personal accounts and multiple Customer IDs, the accounts are grouped by personal accounts followed by Customer ID names and their respective accounts, and (c) for a user with access to multiple Customer IDs, the accounts are grouped by Customer IDs.
- Enter the Amount.
- Select the currency type from the Choose Currency list.
- Enter the reason for transfer as a Notes.
- Click Transfer Money.
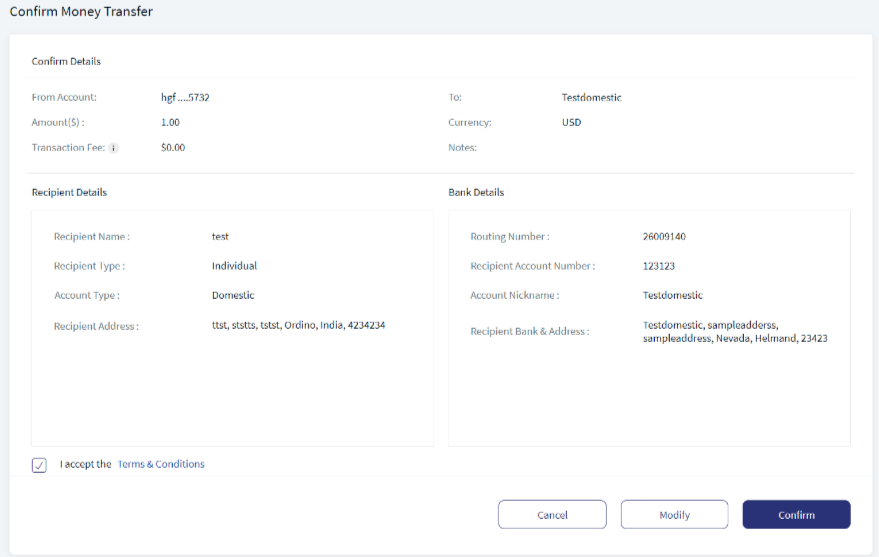
Confirm Money Transfer - On the Confirm Details screen, check the transaction details and click Modify to make any changes.
- Accept the Terms and Conditions check box.
- Click Confirm.
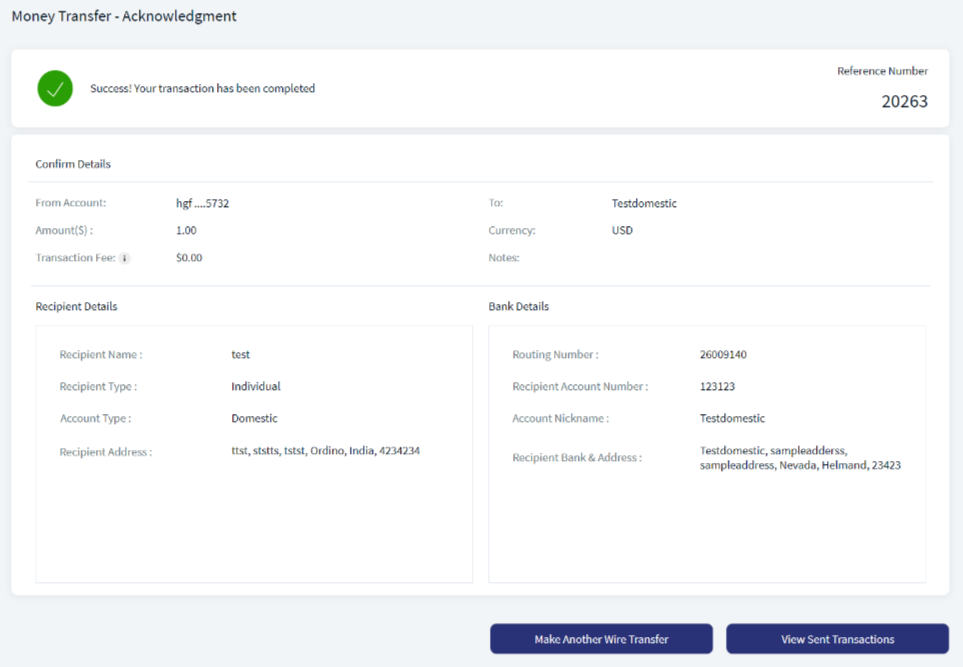
If the transfer is initiated successfully, the application displays the acknowledgment screen with transaction details and unique reference number to the transaction.
Do any one of the following:
- Make Another Wire Transfer: Click to carry out another wire transfer. You will be redirected to the Step-1.
- View Sent Transactions: Click to view all the recent wire transactions.
Recent Transfers
Use the feature to view the consolidated list of completed wire transfers. The user can also recreate a specific transaction and repeat it as a new transaction on another date. The application displays the transactions list in rows with details such as Transaction date, Sent to, Amount, and Actions.
Web Channel Menu path: Side menu > Wire Transfer > History (Recent tab)
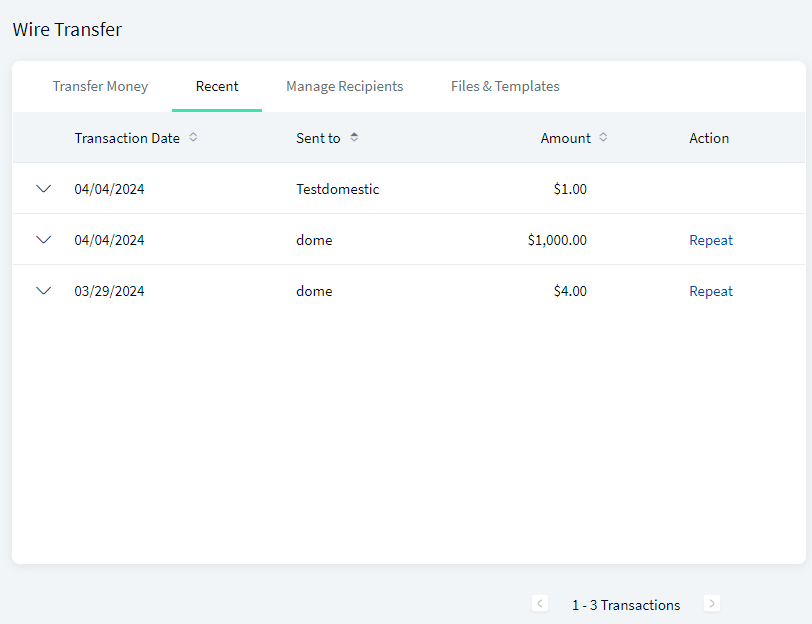
The application displays the list of transactions as determined by the service response (10 transactions by default) with the following information. The transactions are grouped by month and sorted by date (most recent on top), but you can also sort the list based on Sent to and Amount using the sort  icon. If no transactions are retrieved from the banking service, the application displays a relevant message.
Do any of the following:
- Search for a transaction.
- Click the arrow to view the selected transaction details such as the reference number, from account number, recipient bank details, transaction fee, transferred currency, amount received by the recipient, if it is recurrent transaction, transaction note, and the transaction status.
- Repeat a transaction
Repeat a Transaction
Use the feature to recreate the same transaction.
- Click Repeat.
- The application navigates to the Wire Transfer screen. By default, the application auto-fills the same fields for the new transaction as the original transaction.
- Modify any of the fields for the new transaction and click Continue.
- After reviewing the details, click Confirm to proceed with the transaction.
Manage Recipients
Use the feature to manage the Wire Transfer recipients. The application displays the recipients' list in rows with details such as Account Name, Bank Name, Account Type, and Action to edit a recipient.
The Manage Recipients tab is shown only if the user has any one of the following feature action permissions in Domestic Wire Transfer / International Wire Transfers. The Manage Recipient tab is common across domestic and international wire transfers. If the user does not have permission for all the following feature actions under both the features, the Manage Recipients tab will not be displayed. But if the user has the feature action permissions either under Domestic or International, the Manage Recipients section will be displayed. See Permissions, for more information.
- View Recipient
- Create Recipient
- Delete Recipient
Web Channel Menu path: Side menu > Wire Transfer > My Recipients
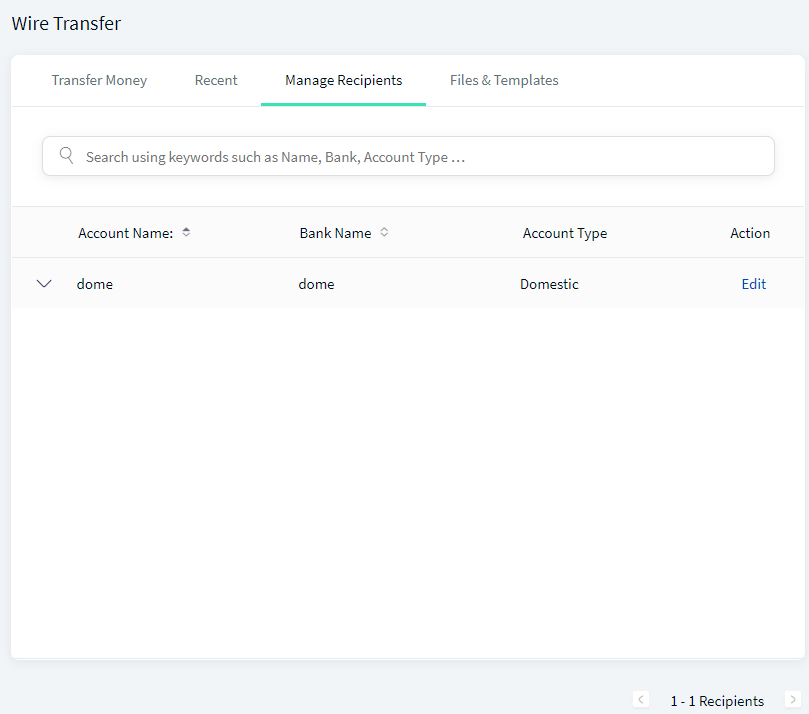
The recipients list is sorted by Account Name by default, but you can also sort the list based on Bank Name using the sort  icon.
icon.
Do any of the following:
- Search for a recipient by using the Recipient Name, Bank Name, or the Account Type (domestic or international).
- Click Edit to modify the recipient details.
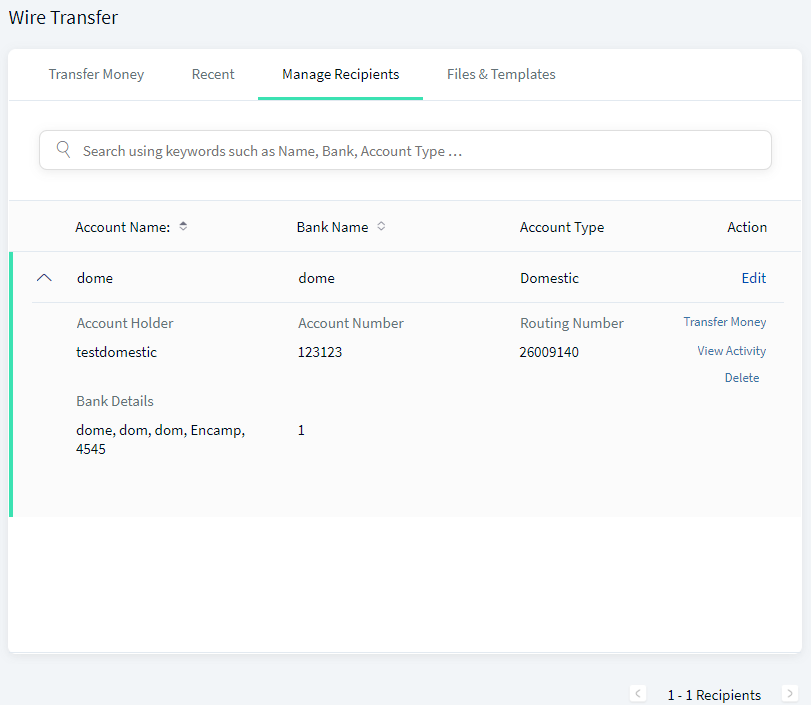
- Click the arrow to view the recipient's details such as the Account Holder Name, Account Number, Routing Number, Swift Code (applicable for international accounts), and Bank Details.
- Click Transfer Money to initiate a wire transfer.
- Click View Activity to view the previous transfer activity of a recipient.
- Delete a recipient.
View Activity
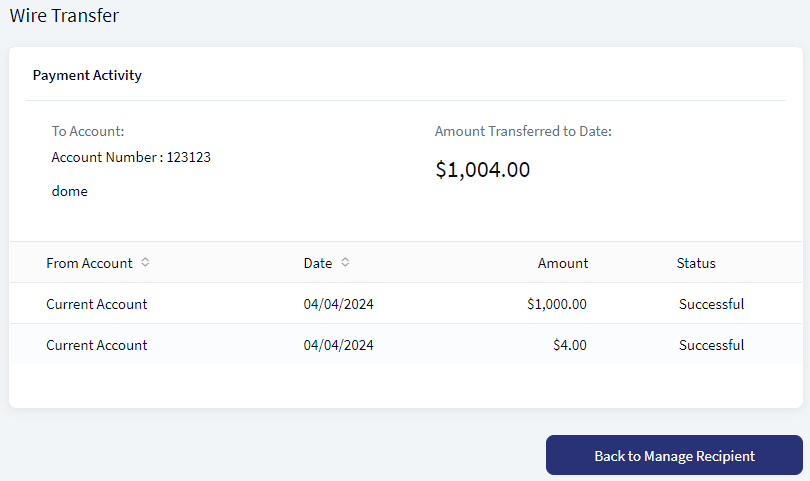
Use the feature to view the previous transfer activity of a recipient.
- On the Manage Recipients tab, click View Activity.
- The application displays the Wire Transfer Activity screen with details such as the Recipient Name and Account Number with the total amount transferred to date.
- The application also displays the list of individual transfers with details such as the from Account, Date, Amount, and Transaction Status.
- After viewing the details, click Back to Manage Recipient to navigate back to the Manage Recipients screen.
Edit Recipient Details
Use the feature to modify the recipient details.
- On the Manage Recipients tab, click Edit.
- Make the changes and click Proceed. The application updates the details of the recipient.
Cancel the process at any time. The details will not be changed.
Delete a Recipient
Use the feature to delete a recipient.
- On the Manage Recipients tab, click Delete.
- The application displays a message asking if you want to delete the recipient.
- Click Yes. The application deletes the recipient and removes it from the list of saved recipients and from all the templates that it has been added.
Add Recipient (Domestic and International)
Use the feature to add a domestic or an international recipient or account for wire transfers.
Web Channel Menu path:
- Side menu > Wire Transfer > Add Recipient
- On the right-side bar > Add a Domestic Account or Add an International Account
The application displays the Add Recipient screen with the Domestic Account selected as default.
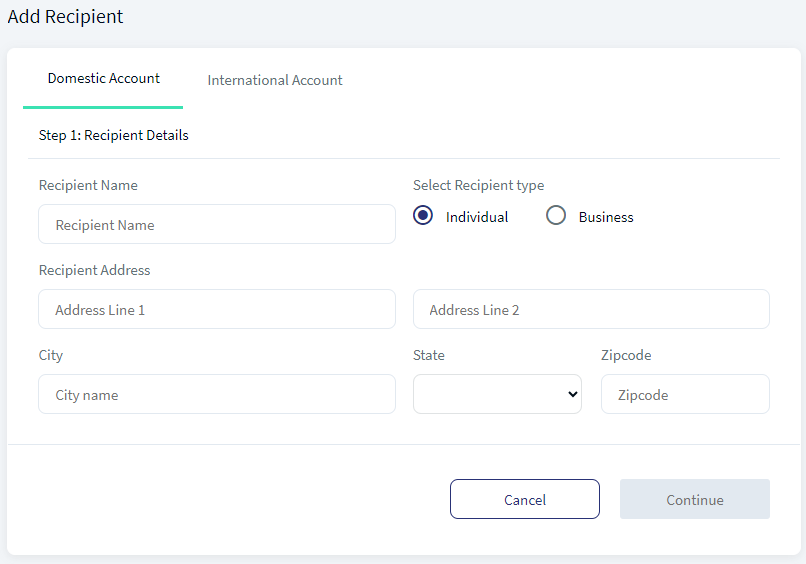
To add a domestic or international recipient, follow these steps:
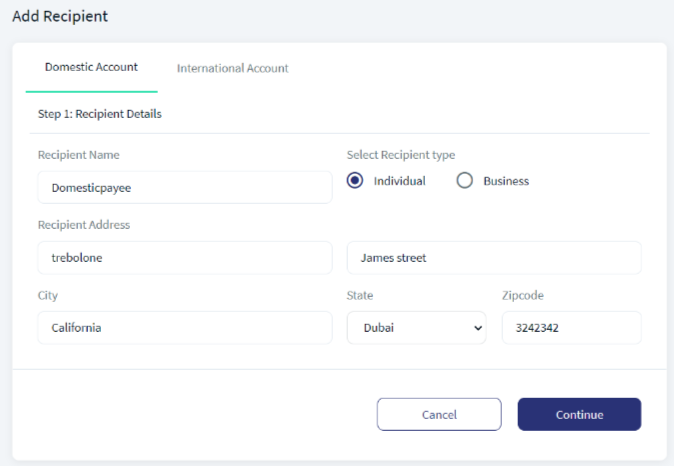
Step-1: Recipient Details
All fields are mandatory.
- Select the Account Type. The options are Domestic or International. For international account, select the country name from the Country list.
- Select the Recipient Type. The options are Individual or Business. For business accounts, enter the business or recipient name.
- Enter the Recipient Address details.
- Enter the City name.
- Select the State from the list.
- Enter the Zip code of the city.
- Click Continue. The Continue button is enabled only when all the mandatory fields are filled.
Step-2: Recipient Account Details
All fields are mandatory.
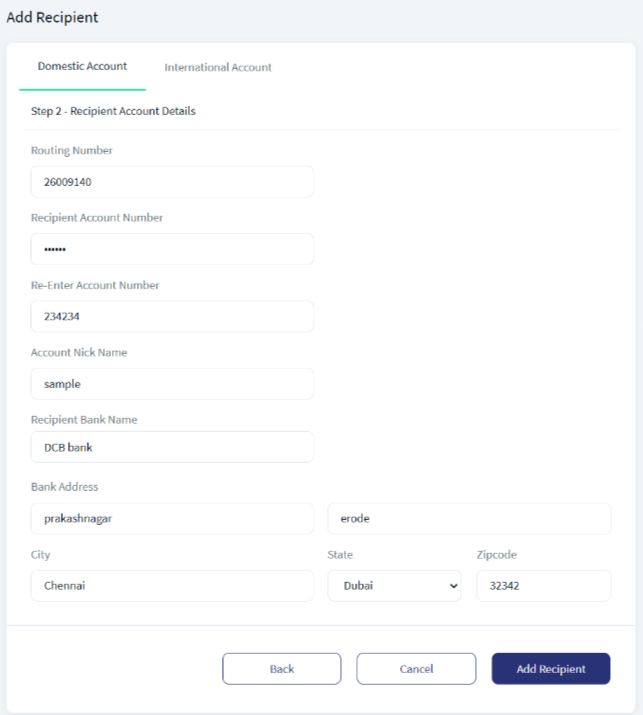
- Enter the Routing Number. In case of international account, enter the recipient bank SWIFT Code and depending on the selected country, enter the International Route Code (IRC) or International Bank Account Number (IBAN) as applicable.
- Enter the Recipient Account Number. Enter the account number again to confirm.
- Enter the Recipient Account Nickname.
- Enter the Recipient Bank Name.
- Enter the Bank Address details.
- Enter the City name.
- Select the State from the list.
- Enter the Zip code of the city.
- Click Add Recipient. The Add Recipient button is enabled only when all the mandatory fields are filled.
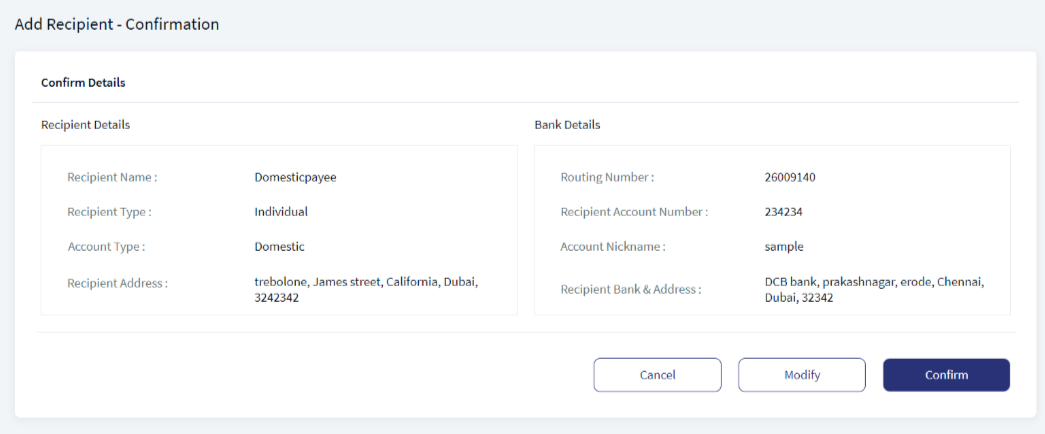
- On the Confirm Details screen, check the recipient and bank details and click Modify to make any changes. The application goes to Step-1 screen for making the changes.
- After verifying the details, click Confirm.
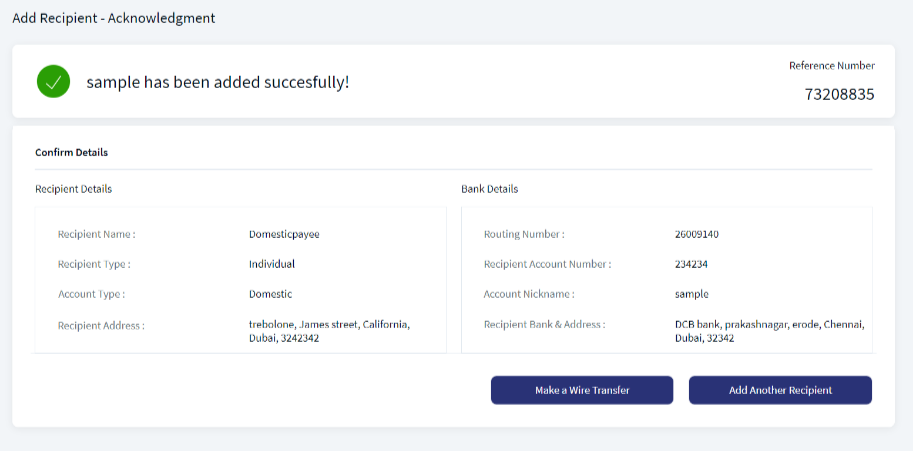
If the recipient is added successfully, the application displays the acknowledgment screen with recipient details and unique reference number.
Do any one of the following:
- Make Another Wire Transfer: Click to make a wire transfer.
- Add Another Recipient: Click to add another domestic or international recipient or account.
Upload Bulk Transfer File
Use the feature to initiate a bulk wire transfer by uploading a file that has the details of multiple wire transfers.
Web Channel Menu path:
- Side menu > Wire Transfer > Upload Bulk Transfer File
- On the right-side bar > Add Bulk Transfer File
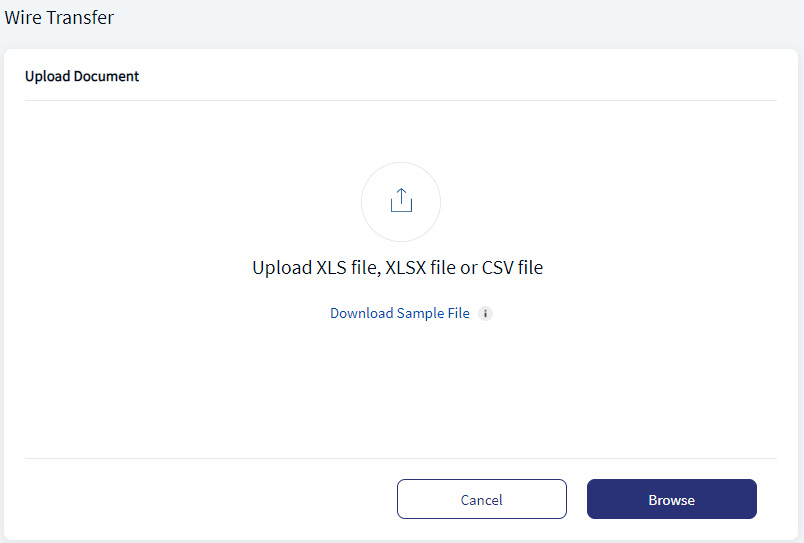
The application displays the screen to upload a bulk wire transfer file.
- The following file formats are supported: XLS, XLSX, and CSV.
- Click the Download Sample File link to download the file and use as a base for uploading with valid data later.
- Click Browse and locate the file to be uploaded.
- The application parses the file and if no errors are encountered, then displays a message that the upload is successful. The file is added to the list of already uploaded files for future reference.
- The application deploys an error message if the file has data errors or any of the following error occurs during file upload resulting in the upload not being successful. The user has to fix the error first and then only can upload the file.
- Incorrect file format
- Incorrect columns
- Empty row, column, or field
- Missing values
- Invalid data in the fields
- Insufficient permissions
- If a file uploaded has Domestic Wires included but the user has the permission to Initiate Bulk Wires for International wires only, then an error message is displayed.
- If a file uploaded has International Wires included but the user has the permission to Initiate Bulk Wires for Domestic wires only, then an error message is displayed.
- The following fields are included in the upload file: Domestic / International, Country Name, Recipient Name, Individual / Business, Recipient Address - Line 1, Recipient Address - Line 2, City, State, Zip Code, SWIFT code, Recipient Account Number, Routing Number, International Routing Code, Account Nickname, Recipient Bank Name, Bank Address - Line 1, Bank Address - Line 2, Bank - City, Bank - State, Bank - Zip Code, From Account, Currency, Amount, Note.
- Do any of the following:
- Click Open File to open and view the details of the just uploaded file.
- Click Make Bulk Transfer to initiate a bulk wire transfer using the uploaded file.
- Click Add New File to add or upload another file.
- Click View All Files to navigate to the list of uploaded files on the Bulk Transfer Files tab.
Create New Template
Use the feature to create new templates for bulk wire transfer. You can add the wire transfer templates by entering the template information and the details of the recipients.
Web Channel Menu path: side menu > Wire Transfer > Create New Template
On the Wire Transfer screen > Right-side bar > Create New Template
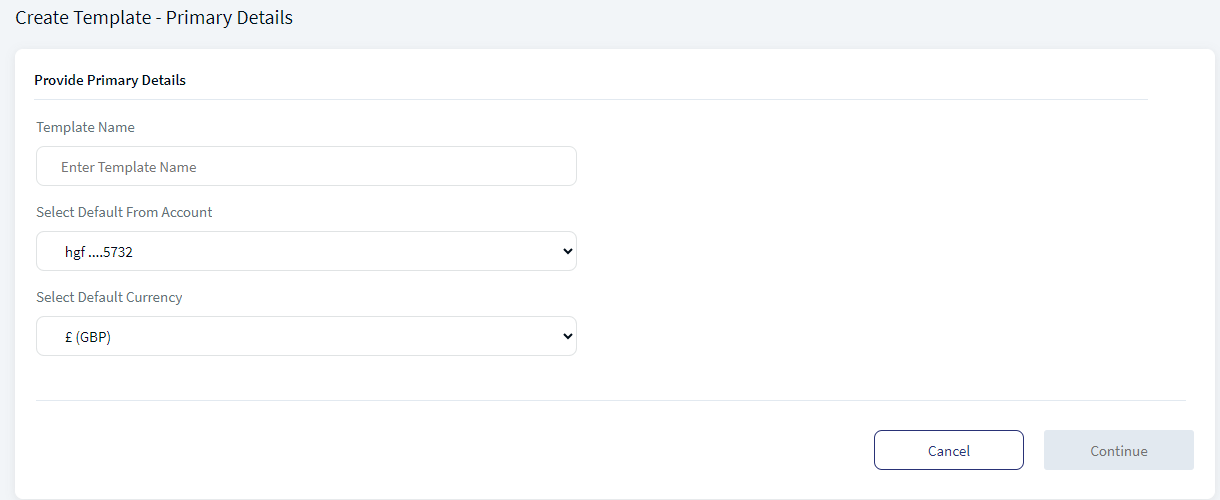
To create a new bulk wire transfer template, follow these steps:
On the Create Template screen, enter the following information.
- Primary details:
- Template Name. Enter a template name to identify the template.
- Select Default From Account. Accounts eligible for wire transfer are displayed in the list. Select an account from the list. The display of the accounts in the drop-down list depends on the permission given to the user, (a) for a user with access to only one Customer ID, the accounts are grouped by account type such as Savings, Checking and more, (b) for a user with access to personal accounts and multiple Customer IDs, the accounts are grouped by personal accounts followed by Customer ID names and their respective accounts, and (c) for a user with access to multiple Customer IDs, the accounts are grouped by Customer IDs.
- Select Default Currency. Currencies supported for all international transfers are displayed. The supported currencies are:
- Pounds
- Euro
- USD
- Indian Rupee
- Click Continue to proceed to the next step.
Cancel the process at any time. The changes are not saved.
Template name must be unique. The maximum length of the template name is 50 characters.
- Add Recipients. You can add recipients in the following methods.
- Add to the template beneficiaries who are already created and verified.
- Add beneficiary details manually.
- Extract beneficiary details from a file and add to the template.
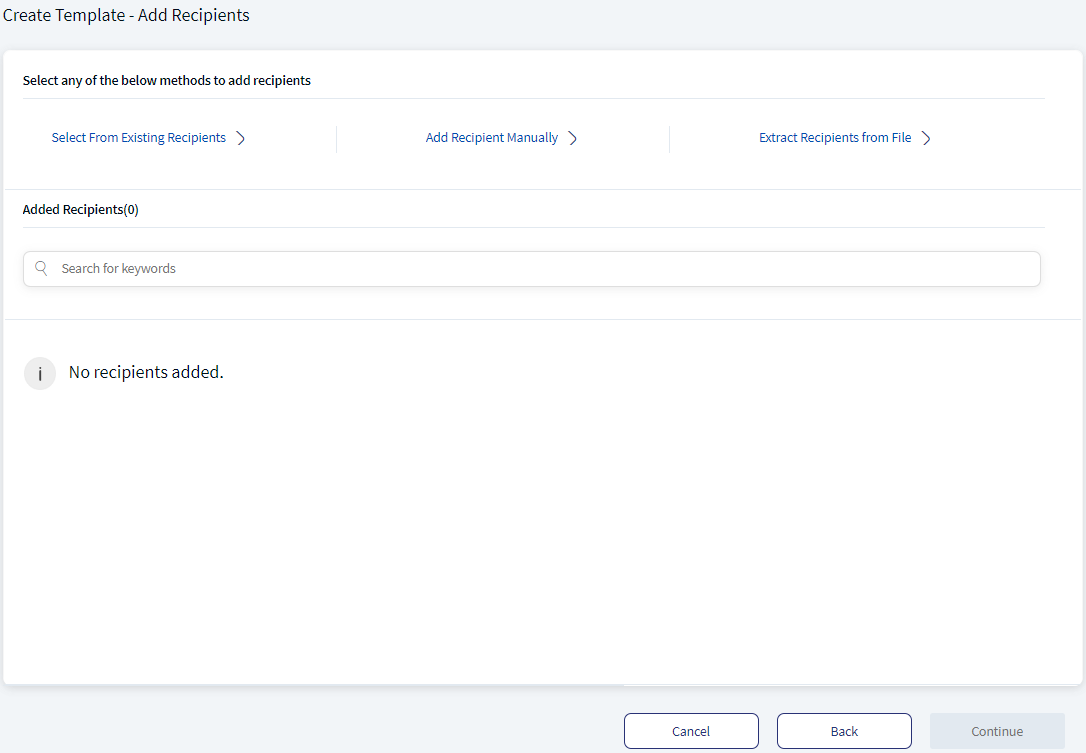
- Add Recipients from existing template. You can add the existing recipients who are already created and verified. To add existing recipients, follow these steps:
- Click Select from Existing Recipients from the Add Recipients screen. The select recipients page appears that enlists the saved recipients.
A user must have permissions to view the domestic and international recipients.
- The following recipient details are displayed:
- Recipient Name
- Bank Name
- Transaction Type
- Added By
- Click the down arrow besides each to view the additional details such as
- Recipient Type
- Recipient Address
- SWIFT code
- Recipient Account Number
- Routing Number
- International Routing Code
- Bank Address
- You can perform following actions in this screen:
- Search for the recipients using the search bar.
- Sort the list recipients using the following sort criteria:
- Name
- Bank Name
- Type
- Added by
- Click the check box to select the recipient. You can click Select All to select all the recipients.
- Turn on / off to view only the selected recipients to review before adding them to the template.
- This option is turned off by default.
- It cannot be toggled if there are no recipients to select from.
- On turning on, only the selected recipients are shown while maintaining the same sort order applied on the page.
- On turning off, all the recipients would be shown while maintaining the same sort order applied on the page.
- Click Add to add the selected recipients to the template.
- Click Back to view the Add Recipients screen.
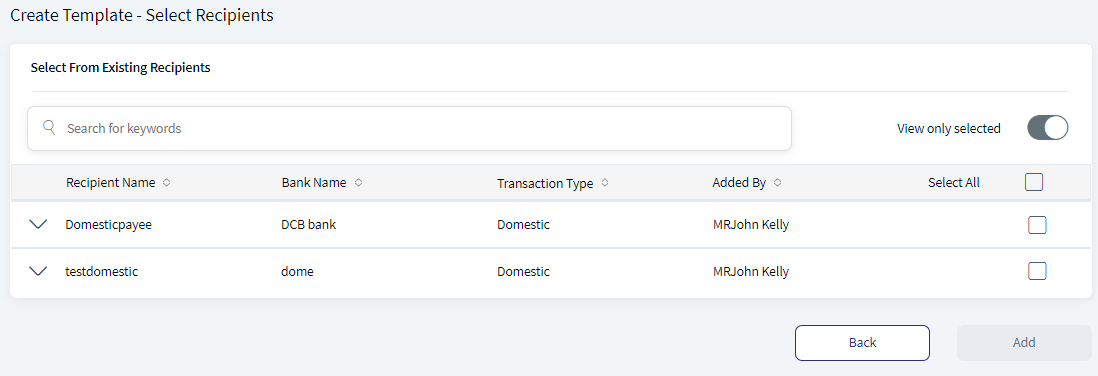
- Click Select from Existing Recipients from the Add Recipients screen. The select recipients page appears that enlists the saved recipients.
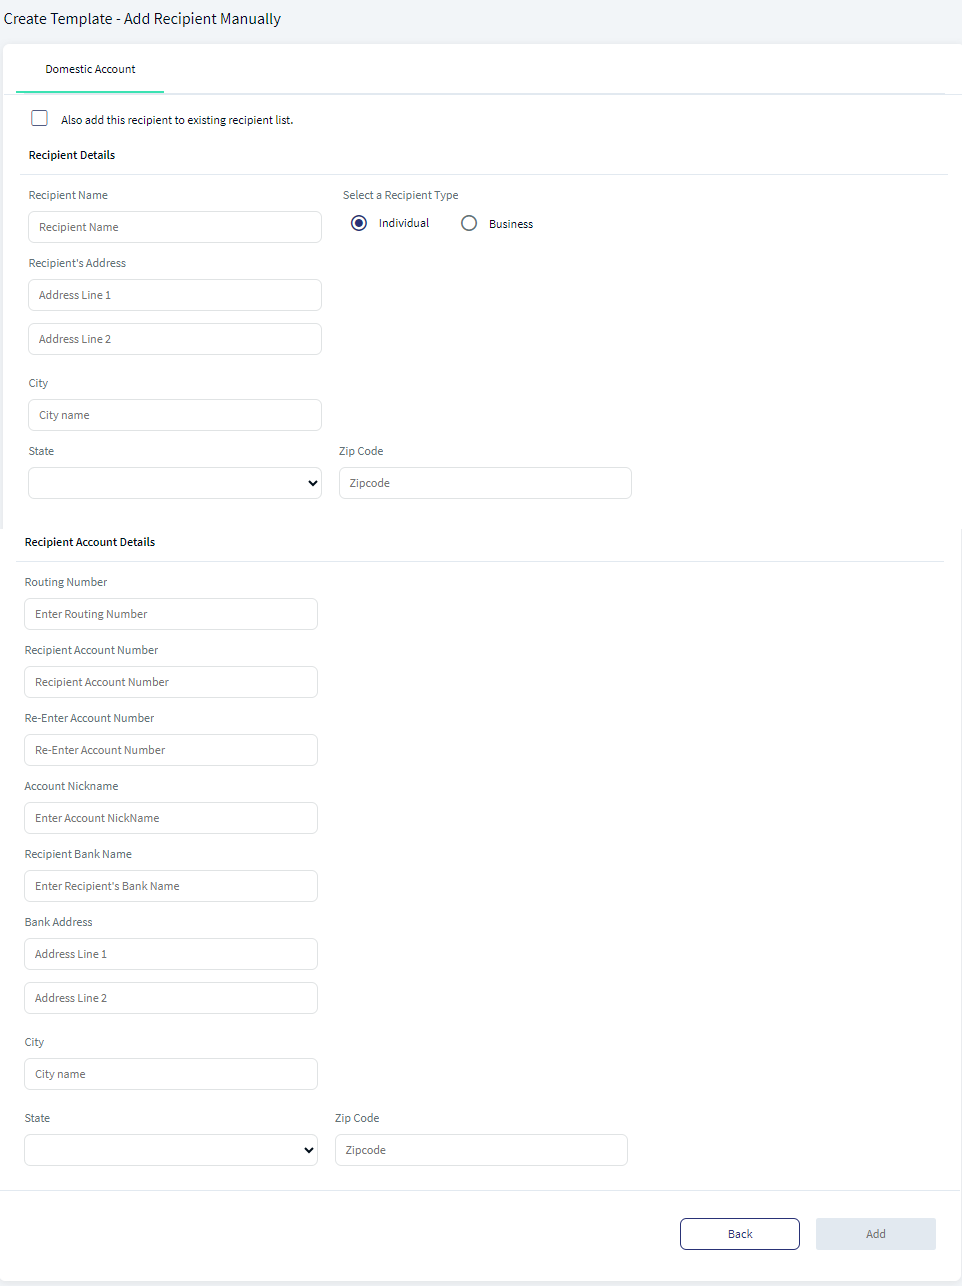
- Add Recipients Manually. You can add recipients manually to the template. To add recipients manually, follow these steps:
- Click Add Recipient Manually from Add Recipients screen. The Add Recipient page appears to add the required details.
- For the steps to add recipients manually, refer Add Recipients.
- Click the Also add the recipient to the existing recipients list check box to add the recipient to the list of registered beneficiaries. This step is optional.
- Click Add to add the recipient to the template and you will be redirected to the Create Template screen with the message "Recipient successfully added to the template".
- If the check box is selected, clicking on Add the following message is displayed "Recipient successfully added to template and saved as a registered recipient".
Removing the recipient from the template will not remove the person from the list of registered beneficiaries.
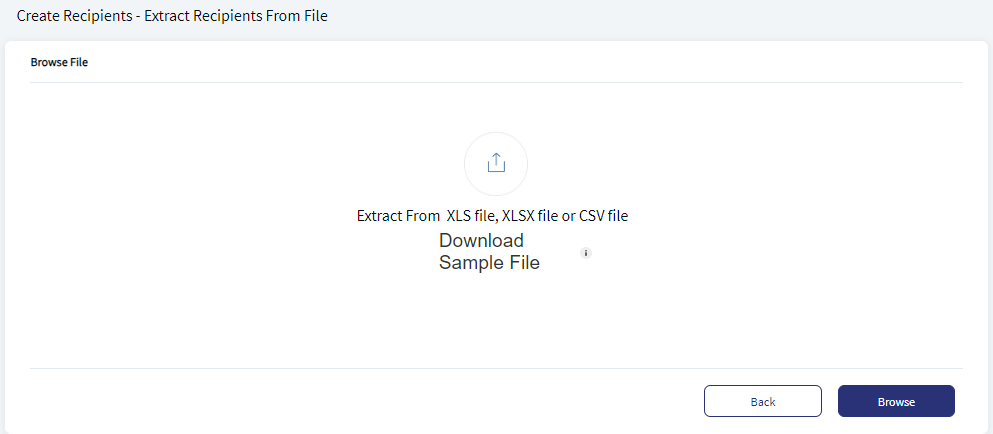
- Extract Recipients from File. You can extract beneficiary details from a file and add them to the template. To extract recipients from a file, follow these steps:
- Click Extract Recipients from File from Add Recipients screen. The Upload Bulk Transfer File screen appears.
- For steps to upload a bulk transfer file, refer Bulk File Upload.
- Remove the recipients as required.
- Click Add to add the recipients to the template and you will be redirected to Create Template page with a message such as "Selected recipients are added successfully to the template".
- The Add Recipients screen displays the list of recipients added to the template.
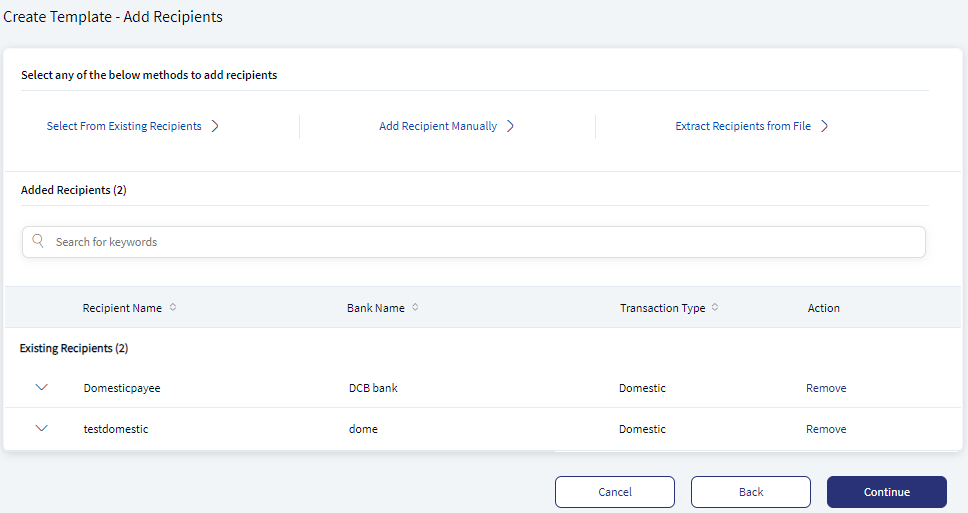
- Click Continue.
Click Back to move to the primary details screen or click Cancel to cancel the process at any time. The changes are not saved.
- The application displays the Verify and Create Template screen.
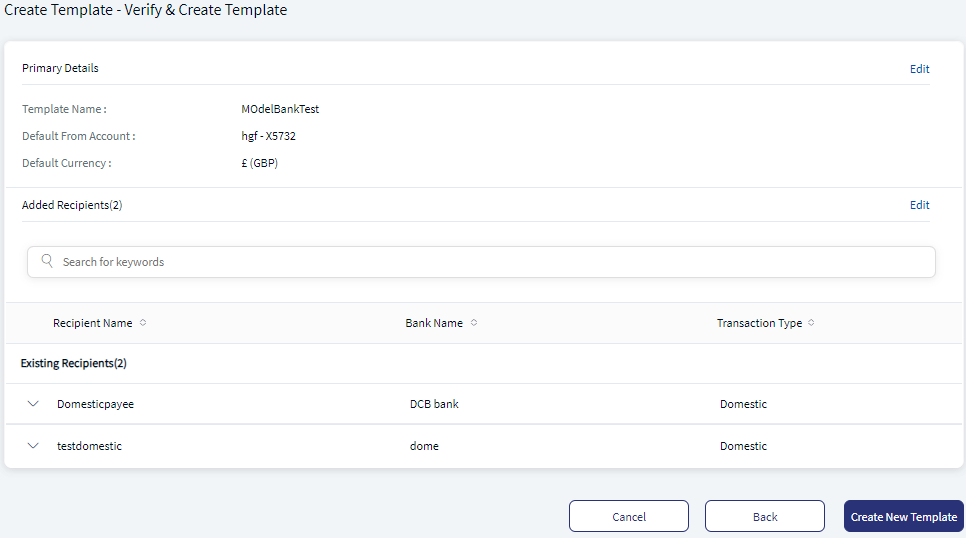
- Verify and Create Template. The Verify and Create Template screen displays the following details.
- Primary Details. This section includes Template Name, Default From Account, Default Currency.
- Added Recipients. List of recipients added to the template with the following details: Recipient Name, Bank Name, Transaction Type, and count of added recipients.
- You can perform the following actions in this screen:
- Verify the contents of the template
- Edit the displayed details
- Search for the recipients using the search bar.
- Sort the list recipients using the following sort criteria:
- Name
- Bank Name
- Type
- Added by
- Click Create Template to create the template. The template is created and the application displays an acknowledgment screen.
Click Back to go back to the previous screen or click Cancel the process at any time. The changes are not saved.
- Acknowledgment. After the template is successfully created, the application displays an acknowledgment screen with the following details:
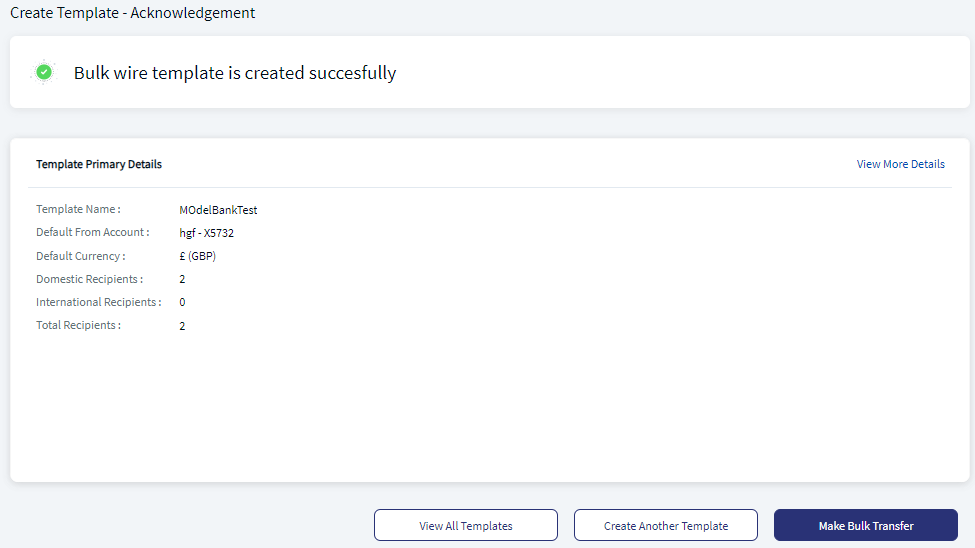
- Template Name
- Default From Account
- Default Currency
- Count of domestic recipients added
- Count of international recipients added
- Total number of recipients
- Click View more details to view additional details of the template.
- You can perform the following actions on this screen:
- View all templates - Navigates to list of all the created templates.
- Create Another Template
Manage Files and Templates
Use this feature to view the list of all bulk wire files and templates that have been successfully uploaded.
Web Channel Menu path: Side menu > Wire Transfers > Files and Templates. The files and templates screen appears. The files and templates screen displays the list of uploaded files and templates.
- Users with appropriate permissions only can view the screen.
- If no files or templates are found, the application displays an appropriate message with the provision to upload bulk wire transfer file and create a template as applicable.
The list is sorted by Name by default, but you can also sort the list based on Created By and Created On columns using the sort  icon.
icon.
Do any of the following:
- Search for a file or template by using the search criteria.
- Click the down arrow to view the file or template details.
- File: File name, file created by, created on date, total recipients in the file, number of domestic and international recipients, type (file), and file last used on date. Click Open File to view the file details. Click Download File to download the file, modify details as required, and upload again.
- Template: Template name, template created by, created on date, total recipients in the template, number of domestic and international recipients, type (template), and template last used on date. Click View Details to view details of the template, view the primary details and the added recipients list, edit the details of the template, or delete the template.
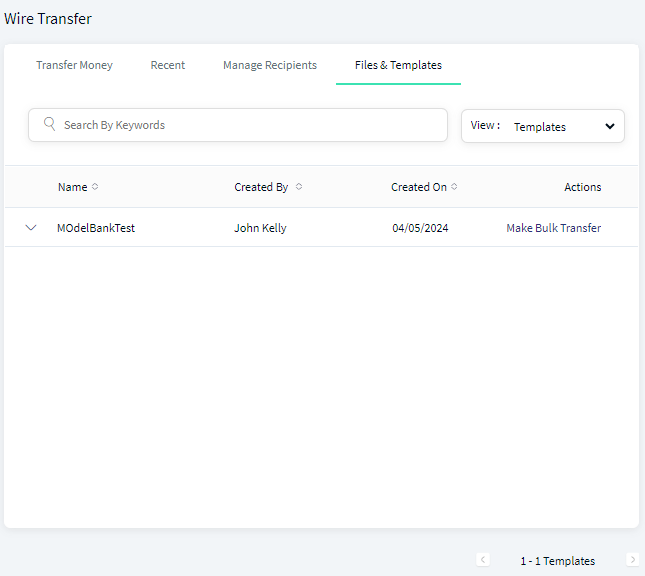
You can perform the following actions on this screen:
- Make Bulk Transfer. You can initiate a bulk transfer directly using the listed file / templates. For more information on initiating a bulk transfer, see Make Bulk Wire Transfer.
- Add / upload bulk wires file.
- Create a new template
- Sort the list of uploaded files and templates in alphabetical order
- By file / template name
- By Name of the person who added the file
- By the date on which the file / template was added (default sort order).
- All. This field is selected by default. Selecting this option lists both the files and templates.
- Files. Select this option to view the list of files uploaded.
- Template. Select this option to view the list of templates uploaded.
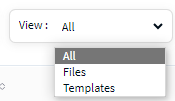
If a search is active, then this filter would apply on top of the search results.
-
Search through the list of all bulk wire files and templates that have been successfully added. Search criteria is:
- File / Template name
- Type
- Added by
Open File
Use the feature to view the details in the file.
- On the Files & Templates tab, expand a file to view the available options.
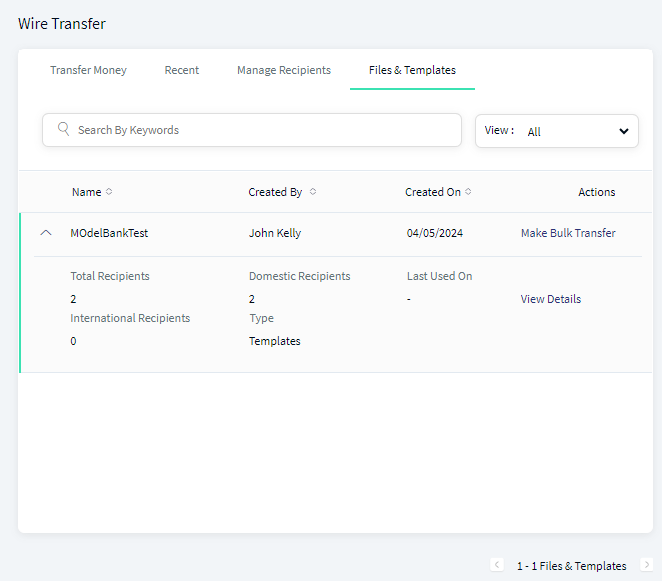
- Click View Details. This will display the template details.
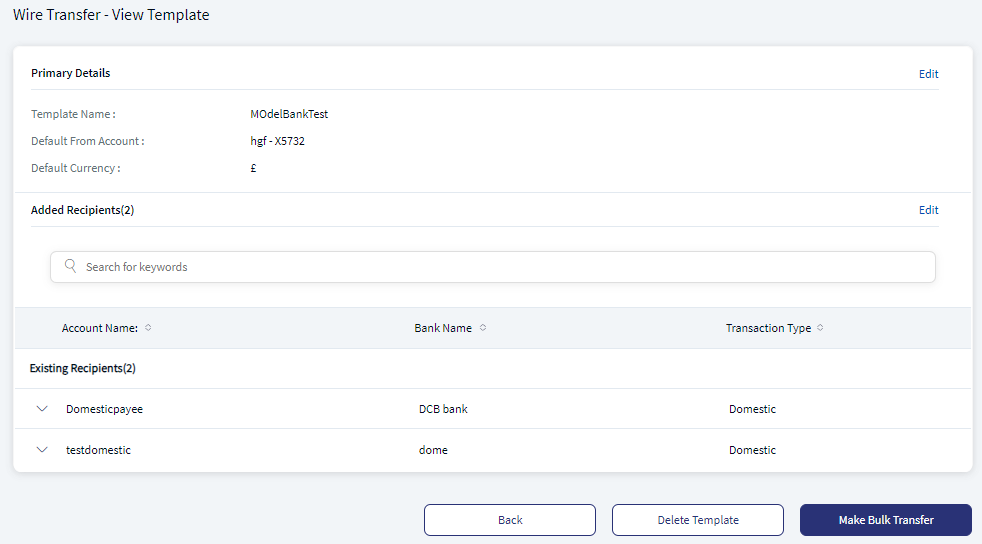
- Click Make Bulk Transfer to initiate a bulk wire transfer.
- Click Go Back to the Bulk Transfer Files tab screen.
Make Bulk Wire Transfer
Use the feature to execute a bulk wire transfer using files or templates so that multiple wire transfer details are uploaded by the user and the transfers are initiated in a single instance. The bulk transfer is applicable for domestic and international recipients (accounts).
This feature is applicable only for users who have the Initiate Bulk Wires permission and can do the following:
- View the option to initiate a bulk wire using a file upload or a template.
- View the uploaded files and templates for bulk wires and perform other actions on the files or templates.
To initiate a transfer using an uploaded file or a template, a user must have the Create permission to this feature.
Web Channel menu path:
- Side menu > Wire Transfer > Make Bulk Transfer
- On the Files & Templates tab and right-side bar > Make Bulk Transfer
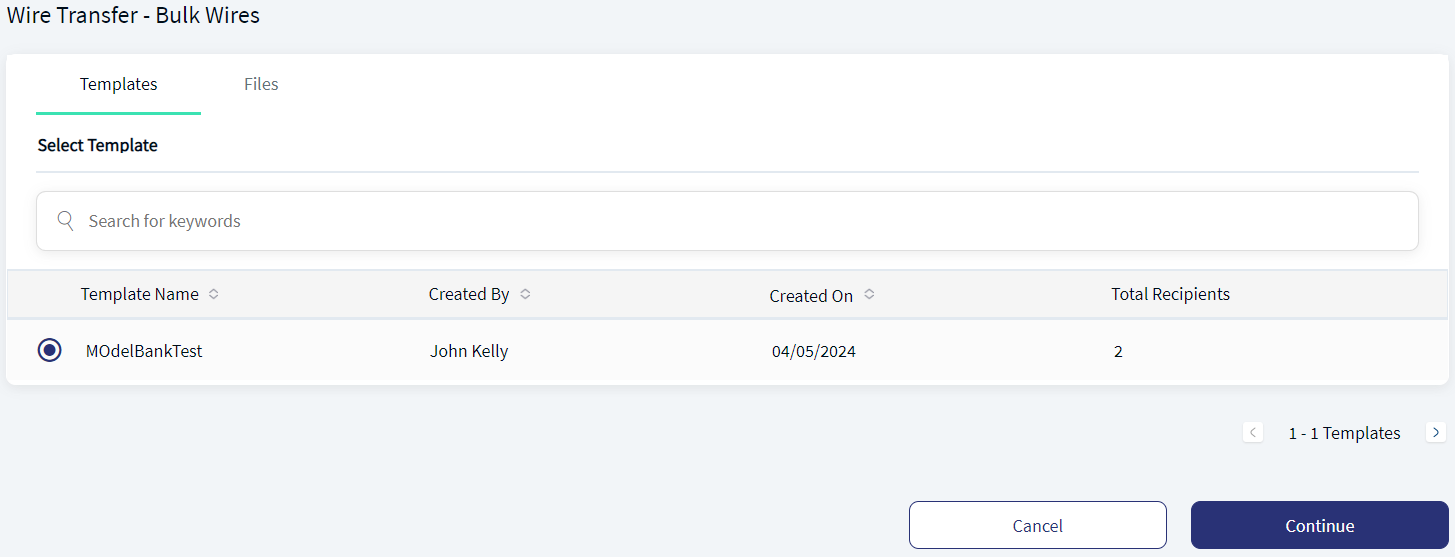
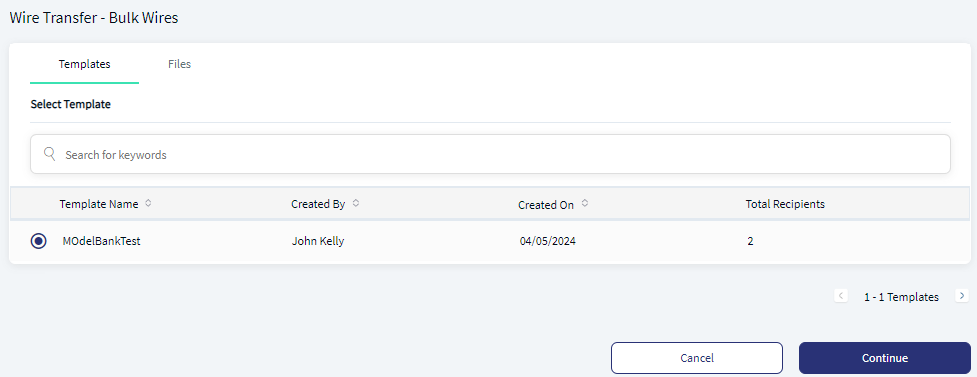
The application displays the Templates and Files tabs with the following details:
- Templates tab: Template Name, Created By, Created on Date, and Total Recipients.
- Files tab: Recipient Name, Added By, Added on Date, and Total Recipients.
If no files or templates are found, the application displays an appropriate message with the provision to upload bulk wire transfer file and create a template as applicable.
To Initiate a bulk wire transfer using an uploaded file or a bulk wire template, follow these steps:
- Do any one of the following:
- On the Files tab, from the list of uploaded files, select the required file. You should have already uploaded the bulk transfer file with transfer data. See Upload Bulk Transfer File for more information. Click Continue.
- On the Templates tab, from the list of templates, select the required template. You should have already created the templates. See Create New Template for more information.
- Click Continue. The application displays the Select & Edit Recipients screen.
- Fill the details and click Continue.
- The application displays the Verify & Confirm Transfer screen.
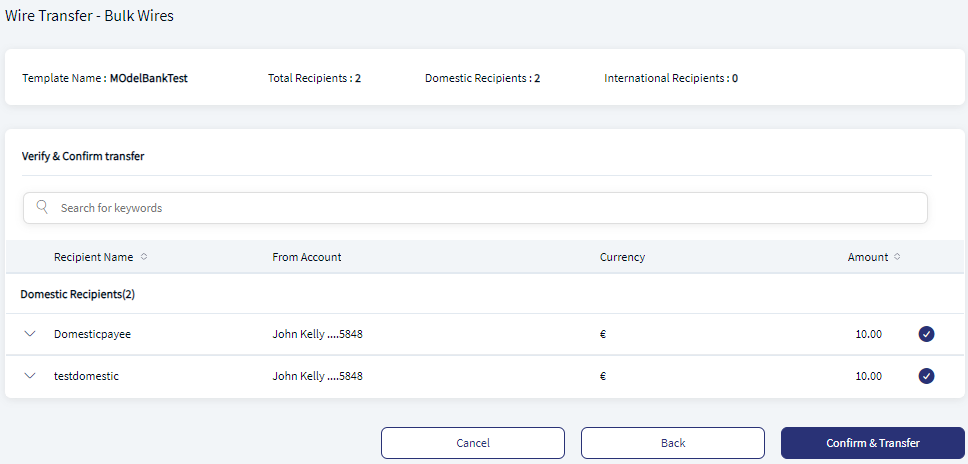
- Verify the recipients before confirming the transfer or click Edit Recipients to modify the details. You can review and change the details such as From Account, Currency, and Transfer Amount, and even choose to remove recipients from the list.
The application displays the Select & Edit Recipients screen with the list of segregated domestic and international recipients with the following details: Recipient name, the account from which the transfer is done, currency, and transfer amount. The application also displays the number of added recipients for bulk wire transfer on top of the screen.
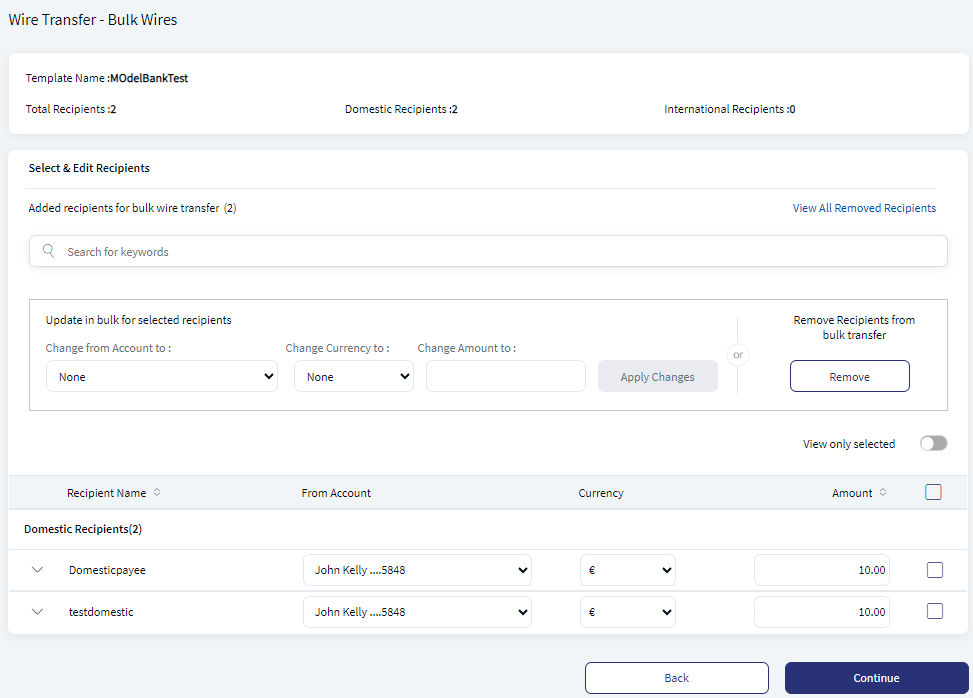
The list is sorted by Recipient Name by default, but you can also sort the list based on the Amount using the sort icon.
- Do any of the following as required before saving the form:
- Search for recipient(s) using the recipient name, bank, or account type.
- Update in bulk for selected recipients: Select the check box of the required recipients and update the data in bulk. The following information can be updated:
- Change From Account Number from the list.
- Change the Currency from the list.
- Enter the changed Amount.
- Click Apply Changes. The data of the selected recipients is updated.
- Remove recipients from bulk transfer
- Select the check box of the required recipients whom you want to remove.
- Click Remove.
- View All Removed Recipients: Click to view the list of all removed recipients. You can add a new recipient on the Removed Recipients screen.
- Click the view only selected toggle button to display only the selected recipients.
- Change the from account, currency, and transfer amount of individual recipients
- After all updates, click Save & Update to save the details and go to Verify & Confirm Transfer screen.
- After modifying and verifying the details, click Confirm & Transfer. Each of the wires is executed as a separate wire transfer using the respective feature corresponds to a domestic or international transfer.
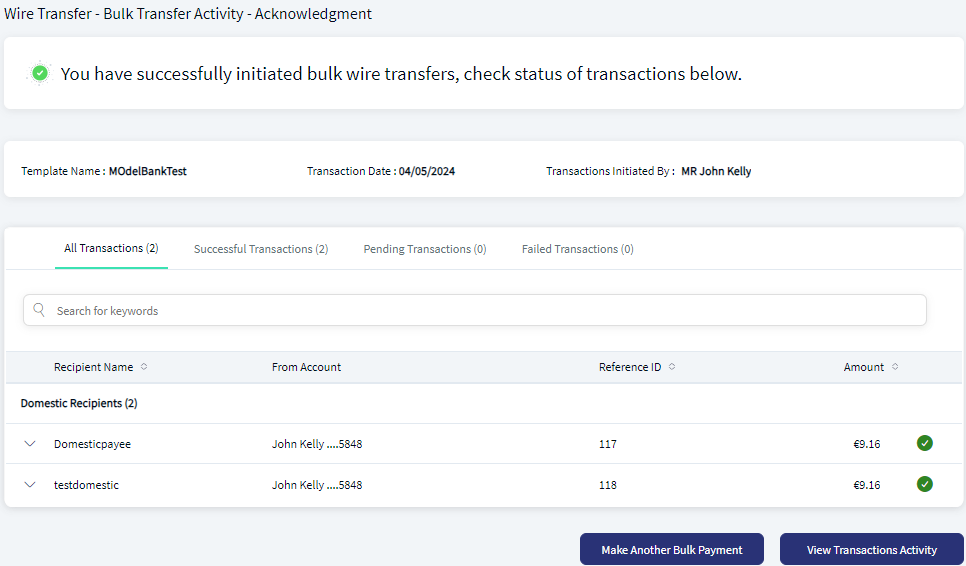
If the bulk wire transfer is initiated successfully, the application displays an acknowledgment screen summarizing the transaction that have been executed - count of all, pending and successful transactions, and the transaction status (green tick for successful and yellow tick for pending transfer).
Do any one of the following:
- Make Another Bulk Payment: Click to carry out another bulk wire transfer with the same file.
- View Transactions Activity: Click to view the details of each transfer included in the file.
- Limits (based on the feature type):
Per transaction limit applies on each of the wires.
Daily and weekly limits apply on all the transfers individually, in the order in which they appear in the file.
- Approval (based on the feature type): Each wire separately goes through or sent for approval based on the approval matrix.
View Account Information
Use the feature to view your account details for inbound wire transfers.
Web Channel menu path: On the right-side bar > View Account Information
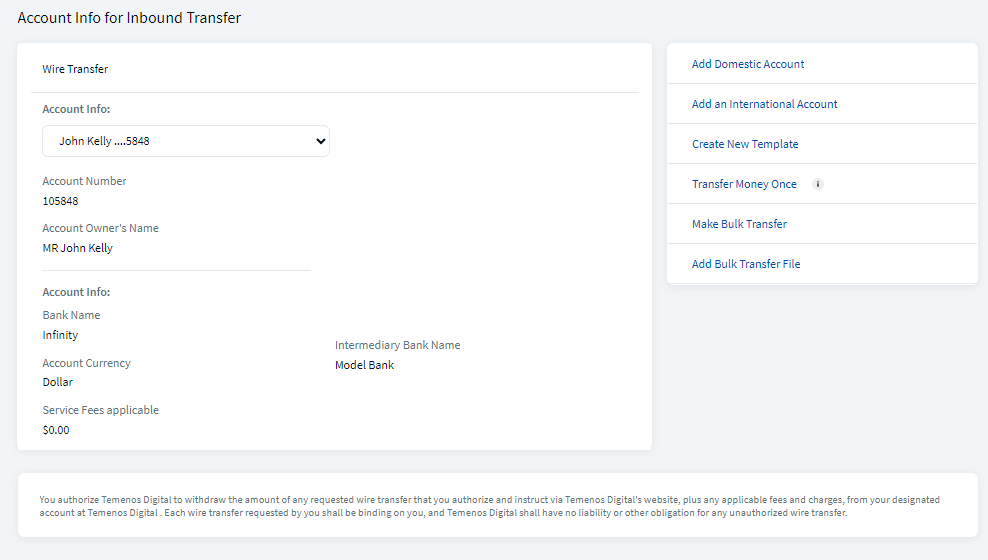
The application displays the following information: Account name, account number, Account owner's name, Bank Name, Routing Number, SWIFT Code, Account Currency, and the Applicable Service Fees.
Select the account name from the list to view the corresponding account information.
Configuration
The following configurations are applicable for Wire Transfer:
- The visibility of each feature is controlled through the permissions defined for the user.
- The permissions at role and user levels are defined during user creation and while editing the user details after the user is created. In case the user does not have access to any of the features, that option will not be visible on the form and on the menus. The permissions at the company level are defined in the Spotlight application.
-
The following configurations are applicable for Bulk Payments:
- The visibility of each feature is controlled through the permissions defined for the user.
- This feature is applicable only in online banking application and integrated with Temenos Digital Transact directly. The request is created in Transact and the Transact application processes the payments.
- Depending on the bank configuration, if Strong Customer Authentication(SCA) is enabled for the feature, SCA is triggered. The authentication type is configured and can be turned on or off in the Spotlight application. See Push Notifications for more information.
- Beneficiary Management
- Single Retail Customer ID (Retail)
- Multiple Retail Customer IDs (Retail)
- Single Business Customer ID (Business)
- Multiple Business Customer IDs (Business)
- Multiple Retail & Business Customer IDs (Combined)
- The beneficiaries created are associated with Customer ID.
- A logged-in user can create/edit a beneficiary only if the user has permission for Create Beneficiary feature action under any of the following: Transfer/Bill Payment/Bulk payment/Domestic and International Wire/P2P.
- If the logged in user has access to more than one Customer ID, the user will have an option to share the beneficiary with one or multiple Customer IDs (to which the user has permission).
- If the user has Edit permission, the user can edit the beneficiary also as stated above.
- In case of Delete, if the user deletes a specific beneficiary, it will be deleted against all the customer IDs linked to it.
- While making a payment, when a user selects a specific account based on the customer ID of the that account in the "To" field, all the beneficiaries are listed.
- The same logic is applied when making payment through "Send Money" option from the Manage Beneficiary screen. This is applicable only for transfers.
- In the "Manage Beneficiary" section, the beneficiaries are listed based on the customer IDs the user has access. Also, if the same beneficiary is available across multiple Customer IDs, the beneficiary appears once on the screen. On clicking the Beneficiary, the number of customer IDs with which it is associated are displayed.
- In addition to the customer ID level access, the beneficiary listing is based on the Feature level permission of the logged-in user.
- If a user tries to add a same beneficiary record which is already associated with that customer ID, the system will do a duplicate check and throw error.
A user can have access to multiple contracts and a contract can have single or multiple Customer IDs within it. Also, a contract can be a combination of single or multiple retail and business customer IDs. The beneficiaries are stored/associated at a customer ID level and all the actions of view, edit, and delete a beneficiary is controlled by the permissions the user has at the customer ID level. A user can share the beneficiary with other customer IDs (to which the user has permission) or associate with one or multiple customer IDs. In the "Manage Beneficiary" screen, the beneficiaries are listed based on the customer IDs to which the user has access. The beneficiaries are stored in the DBX DB.
A contract can have the following use cases and a user associated with the contract can be classified as:
Key points:
APIs
The following APIs are shipped as part of this feature. For the complete list of APIs with more information, see Experience APIs documentation.
| Name | Description | Introduced In |
|---|---|---|
| createWireTransfersPayee | This API creates and stores a Wire Transfer payee for an authorized user | 2020.04 |
| deleteWireTransfersPayee | This API deletes the Wire Transfer payee based on the ID provided by the authorized logged in user. | 2020.04 |
| editWireTransfersPayee | This API edits the Wire Transfer payee details for an authorized user. | 2020.04 |
| getWireTransfersPayee | This API retrieves all the domestic and international Wire Transfer payee details for an authorized user. | 2020.04 |
| getUserWiredTransactions | This API retrieves the list of Wire Transfers. | 2021.10 |
| getRecipientWireTransaction | This API retrieves the list of Wire Transfers to a wire transfer payee. | 2021.10 |
| DomesticWireTransfer | This API allows the user to perform a domestic wire transfer. | 2020.04 |
| InternationalWireTransfer | This API allows the user to perform an international wire transfer. | 2020.04 |
| CreateBulkWireTemplate | This API allows the user to create a new bulk wire template and also the recipients of the template. This template contains multiple recipients. and by using the template the user can transfer the amount to all the recipients at once. This template can be reused multiple times. | 2020.07 |
| UpdateBulkWireTemplate | This API allows the user to update an existing bulk wire template and the recipients that belong to the template. | 2020.07 |
| DeleteBulkWireTemplateRecipient | This API allows the user to delete a recipient from an existing bulk wire template. | 2020.07 |
| DeleteBulkWireTemplate | This API allows the user to delete an existing Bulk Wire Template | 2020.07 |
| getUnselectedPayeesForBWTemplate | This API allows the user to fetch all the payees that are not selected in the specified template. | 2020.07 |
| getBulkWiresForUser | This API allows the user to fetch all the Bulk wire templates and files that are accessible to the logged-in user. | 2020.07 |
| getBulkwireFileLineItems | This API allows the user to fetch the line items(recipients) for a given Bulk wire template. | 2020.07 |
| CreateBulkWireTransfer | This API allows the user to perform wire transfer by using the Bulk Wire template. The Bulk Wire template contains the details of all the recipients that are required for placing a Bulk Wire transfer request. | 2020.07 |
| getTransactionsByBulkWireTemplateExecutionId | This API allows the user to fetch the details of all the wire transactions that were executed during a Bulk Wire Transfer. The user must provide the ExecutionId as an input request to fetch all the corresponding wire transfer details. | 2020.07 |
| getBulkWireTemplateTransactionDetail | This API allows the user to fetch the details of all the Bulk Wire transfers that were executed by using a Bulk Wire template. The user must provide the TemplateId as an input request to fetch all the corresponding bulk wire transfer details. | 2020.07 |
| uploadBWFile | This API allows the user to extract and return the recipient and recipient details from a Bulk Wire Template/Bulk Wire file. | 2020.07 |
| initiateDownloadBulkWireSampleFile | This API allows the user to download the sample file for Bulk Wire Template / Bulk Wire File based on the input request provided by the user. | 2020.07 |
| getBulkWireTemplateLineItems | This API allows the user to retrieve bulk wire template line items. | 2021.10 |
| getBulkWireFileTransactionDetail | This API allows the user to fetch the transaction details from a bulk wire file. | 2020.04 |
| getTransactionsByBulkWireFileExecutionId | This API allows the user to fetch the execution details of the bulk wire transaction. | 2020.04 |
In this topic
