Common Functionalities in Tasks
- Recently viewed requests
- My Request
- View all request
- Tasks dashboard
- View the list of related tasks and perform actions
- Launch and manage task (task sticky footer)
- Edit a task
- Add an adhoc task
- Lending Dashboard
- Global Search
Recently Viewed Requests
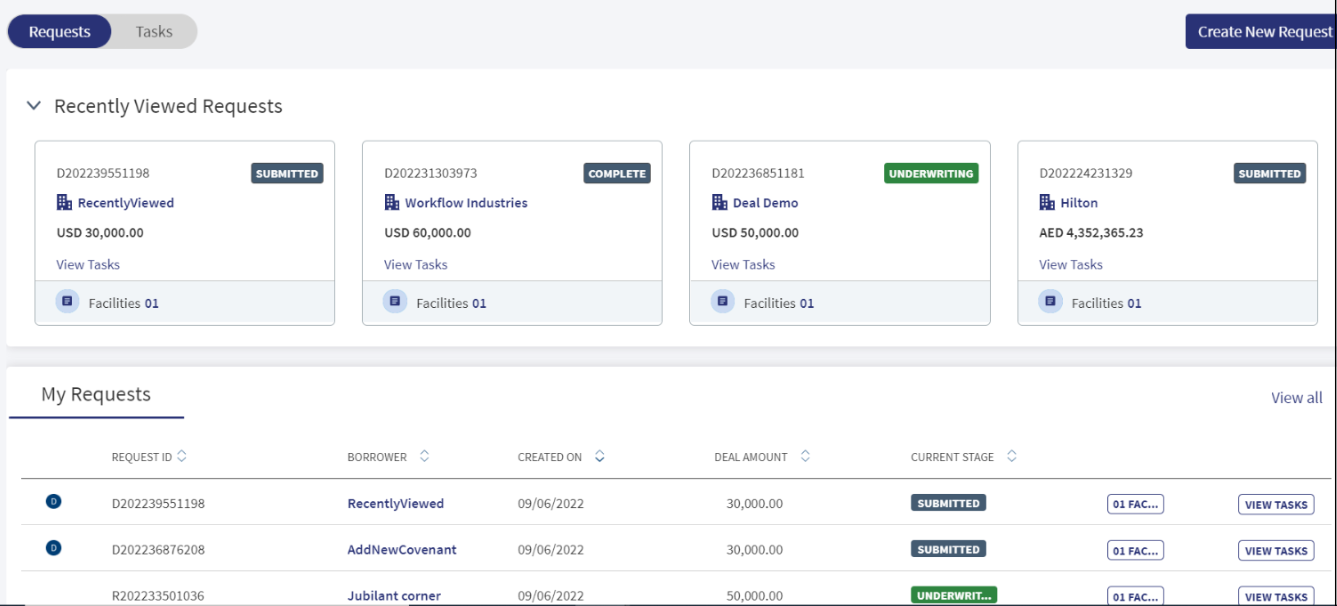
The recently viewed requests display as cards if a request is created with purpose as deal and facility.
The request card in the recently reviewed requests display the following:
- Request ID with prefix “D“ if the request is created with the purpose deal and facility.
- Borrower Name (primary borrower)
- Requested Amount (Currency + Amount)
- Scenario 1: Request with Deal and Facility
- Deal Amount - Sum of facility amount should be displayed
- Scenario 2: Request with facility alone
- Sum of facility amount should be displayed
- Current Stage
- Number of Facilities
- View Tasks
When user clicks the hyperlink of number of facilities and deal on the Request card, the user views a model sheet which displays all the facilities and Deal related information.
My requests
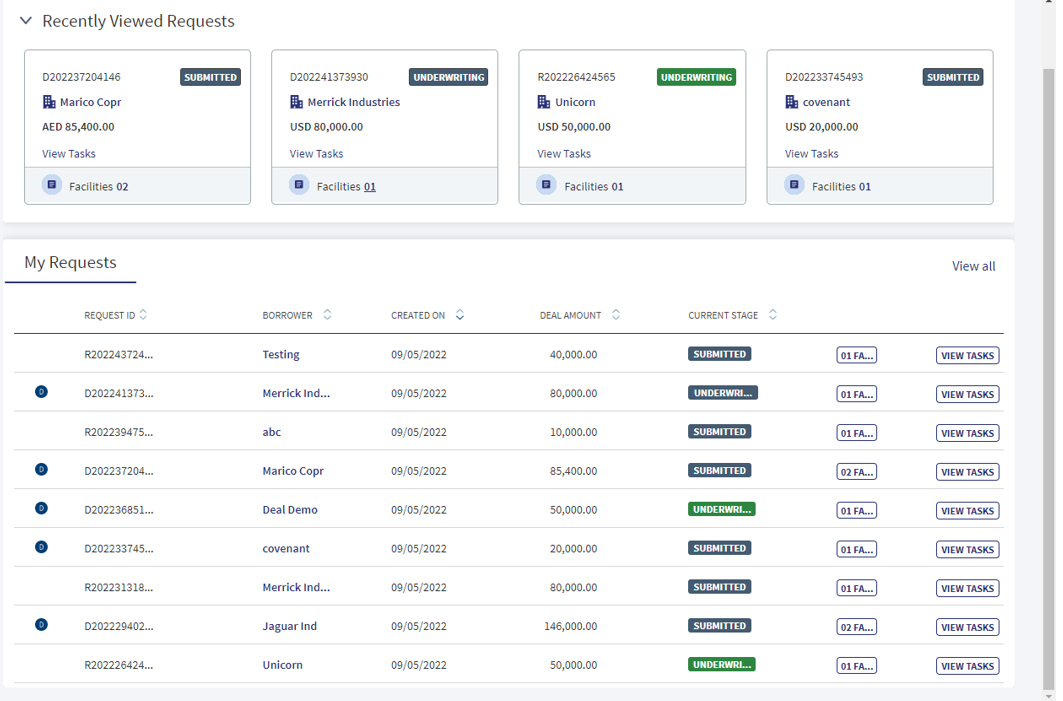
This section displays the request created with purpose - deal and facility.
The request created with the purpose of deal and facility only contain the Deal Icon (i.e. it displays when the user clicks on the view all request)
- Request ID with prefix “D“ if the request is created with the purpose deal and facility.
- Borrower
- Created on
- Deal Amount
- Current Stage
- Facilities
- View Tasks
When the user clicks the facilities hyperlink on the my request, a model sheet displays all the facilities and deal information.
If the request is created with the purpose - facility alone,the model sheet displays only the facility-related information.
View All Requests

- The view all requests screen displays the list of Requests.
- The requests list is sorted from latest to oldest(creation date) by default.
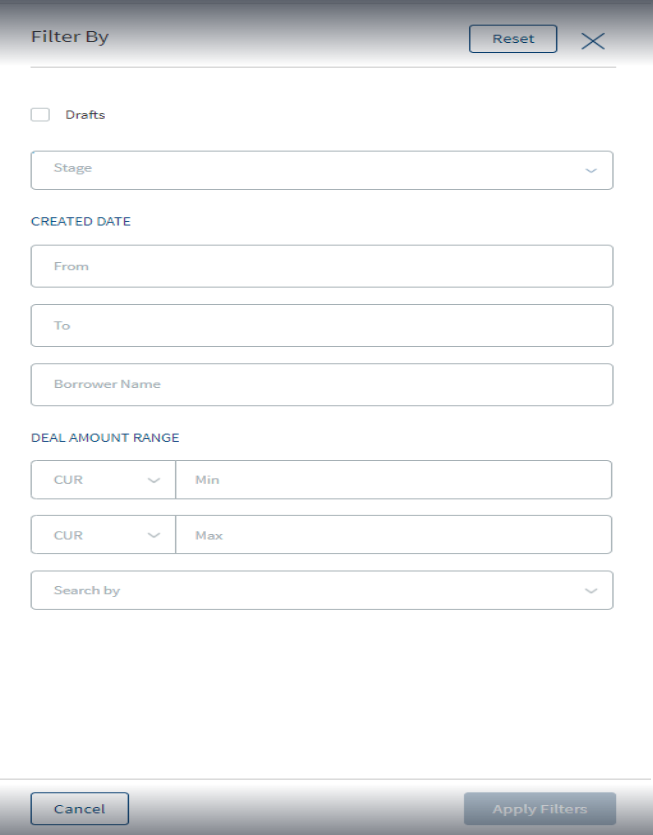
- The user can filter the requests as per requirement.
- When the user enters the facility name in the global search box, the facility id and name also get displayed.The details entered in the global search box no longer display if the cursor is clicked elsewhere on the application in the same screen.
- The user can search in the global search box by the Request Id.If the request is created with the purpose deal and facility the Request Id displays with prefix “D".
- Draft check-box: When the user selects Draft, the other fields in the filter go blank and get greyed out. The system filters and displays all the draft requests.It filters the request in the Draft stage.
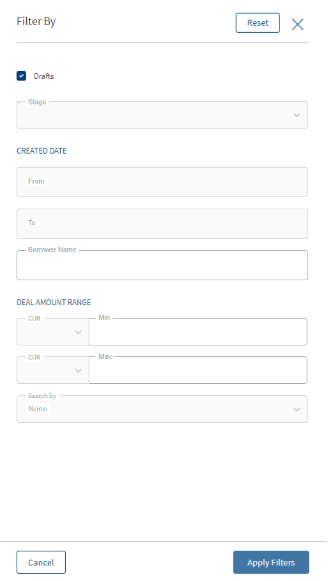
- When the other filter fields are selected the draft option gets greyed out.
- Stage:This is a multi select drop-down consisting of the following stages.
- Submitted
- Prescreening
- Credit Packaging
- Underwriting
- Underwriting Complete
- Completed
- Withdrawn
- When the user selects option as Underwriting complete, an other dropdown field named facility stage (optional field) displays.The request post underwriting needs to added in this field.
- The Facility Stage (optional sub filter) is a multi select dropdown with the following stages.
- Offer Acceptance
- Due Diligence
- Documentation
- Closing
- Follow up
- If the underwriting is selected,only the requests in the underwriting stage display.
- If the underwriting complete is selected as the request stage and due diligence is selected as one of the facility stage,all the requests in which at least one of the facilities is in Due Diligence stage displays.
- Created on:From date and To date.
- Borrower name: Primary borrower.
- Deal Amount range:Min to Max . When a currency field is selected, the other currency is same by default. The search is also done as per the currencies.
- Search By: Request/Entity/Product/Application ID.
- ID or Name: If the search by option is selected, ID or name needs to be provided.
- If the user selects Search by Facility and enters an facility ID or name, all the requests with the facility ID or name associated to it display. Likewise for the Request option.
- If there are no matching record for the filter, the screen displays "No request matches the filter criteria entered".
Persistence of Filter: The filter option displays until the user is in the request dashboard screen,if the user moves to an other screen, the filter option does not display.
The reset option in the filter feature removes the existing filters.
The user can access filter for requests created with purpose
- Deal and facility
- Facility alone in the view all request
If the user selects the purpose type as deal, all the requests created with purpose of the deal get filtered and vice versa for the standalone facility.All the filter fields are applicable for both type of Purpose.
Sort :In the request dashboard, when user clicks view all, the requests are sorted by the creation date. The latest task always appear on the top.The sort toggle option sorts the required tasks based on each parameter.
The sort toggle consists of the following columns.
- Request ID: Alphanumeric sort.
Clicking the up arrow sorts in ascending order. Example: Requests with IDs starting with R display ahead of requests with T. subsequently following the ascending order of numbers if the alphabet is same. Clicking the down arrow sorts in descending order, where requests with T display ahead of requests with R, subsequently following the descending order of numbers if the alphabet is same. If one of the sort is already clicked and then an other is clicked, the latest one gets highlighted and the initial one is not applicable anymore. - Borrower:Alphabetical sort (Up arrow is ascending, down arrow is descending).
- Created On:Sort based on date (Up arrow is ascending, down arrow is descending).
- Amount:Highest to Lowest (based on any currency) (Up arrow is ascending, down arrow is descending).
- Stage:The requests are categorized in groups as per alphabetical order.
Persistence of sort: Till the user is in the request dashboard screen, load more is not selected, the filters are not changed the sort selected should persist. If the filter is changed then the sort also should go to default stage(created on descending).
The sort option displays until the user is in the request dashboard screen and the filters are not changed, if the filter is changed the sort goes to default stage(created on descending).
My team requests filter (Supervisor):The following options display for the user to search in the My team requests filter for the supervisor.
- User name - This is a single select dropdown which displays the users tagged to the supervisor.
- Request Stage- This is a multi select dropdown.
Facility Stage-This is a multi select (Sub Filter) (This displays only when the underwriting complete is selected in the request stage).
- Created on:From date and To date.
- Borrower name: Primary borrower.
- Deal Amount range:Min to Max . When a currency field is selected, the other currency is same by default. The search is also done as per the currencies.
- Search By: Request/Entity/Product.
- ID or Name: If the search by option is selected, ID or name needs to be provided.
- If the user selects Search by Facility and enters an facility ID or name, all the requests with the facility ID or name associated to it display. Likewise for the Request option.
- If there are no matching record for the filter, the screen displays "No request matches the filter criteria entered".
If the user selects Search by Facility and enters an facility ID or name, all the requests with the facility ID or name associated to it display. Likewise for the Request option.
If there are no matching record for the filter, the screen displays "No request matches the filter criteria entered".
Persistence of Filter: The filter option displays until the user is in the request dashboard screen,if the user moves to an other screen, the filter option does not display.
The reset option in the filter feature removes the existing filters.
For Retail and SME:
- Request Dashboard view all screen: The filter in My requests(view all) has "Submitted” and “Draft” as a value in the stage option.
- Request Dashboard- My queues screen: The request stage field is greyed out in my queues filter option.
Task Dashboard
The task module has the following features:
- Capability to create tasks.
- Claim feature where user can claim a task on the Team Tasks tab.
- User can reassign own task to another user.
- Pending task status which denotes the task is yet to be started by the user.
- Failed task status category for manual tasks that denotes that the manual task has failed while completing criteria.
The user can view all the tasks that are related to the request (Deal) in Task dashboard, Queue and View all related task.
The application displays the list of tasks depending on the user role and the permission given to the user.
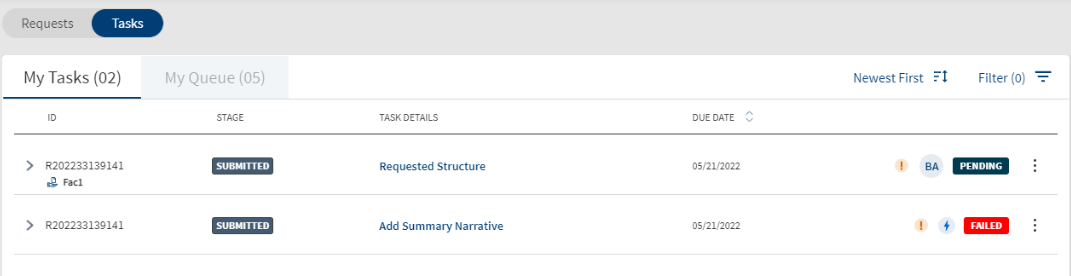
The application displays the list of tasks with the following details:
- ID
- Stage
- Task Details
- Due Date
- Username
- Task status. The task status - Pending, In Process, Failed, Waived, and Completed. The completed and waived tasks are not displayed in the task list. All the manual tasks created by the workflow (Red Hat PAM) will be created with Pending status. The status is changed to In Process after the first user clicks on the task either on the dashboard or on the stage indicator on the request and facility overview screens.
- Contextual menu to perform actions.
When the user hovers over the icon the tooltip displays.
- Priority: High/ Priority: Critical- When hovered over priority Icon.
- User name - When hovered over the assigned to user.
- Ad hoc /Automatic- When hovered over the Adhoc task or Automatic.
- Due Date/ Completed Date- When hovered over date Icon.
When a new adhoc task or an already generated task is assigned to a user by an other user, a notification displays in the assigned users dashboard in the below format.
Request ID
A task related to the <Request ID> has been assigned to you by <user name>, please go to the my tasks section of the dashboard to access the task.
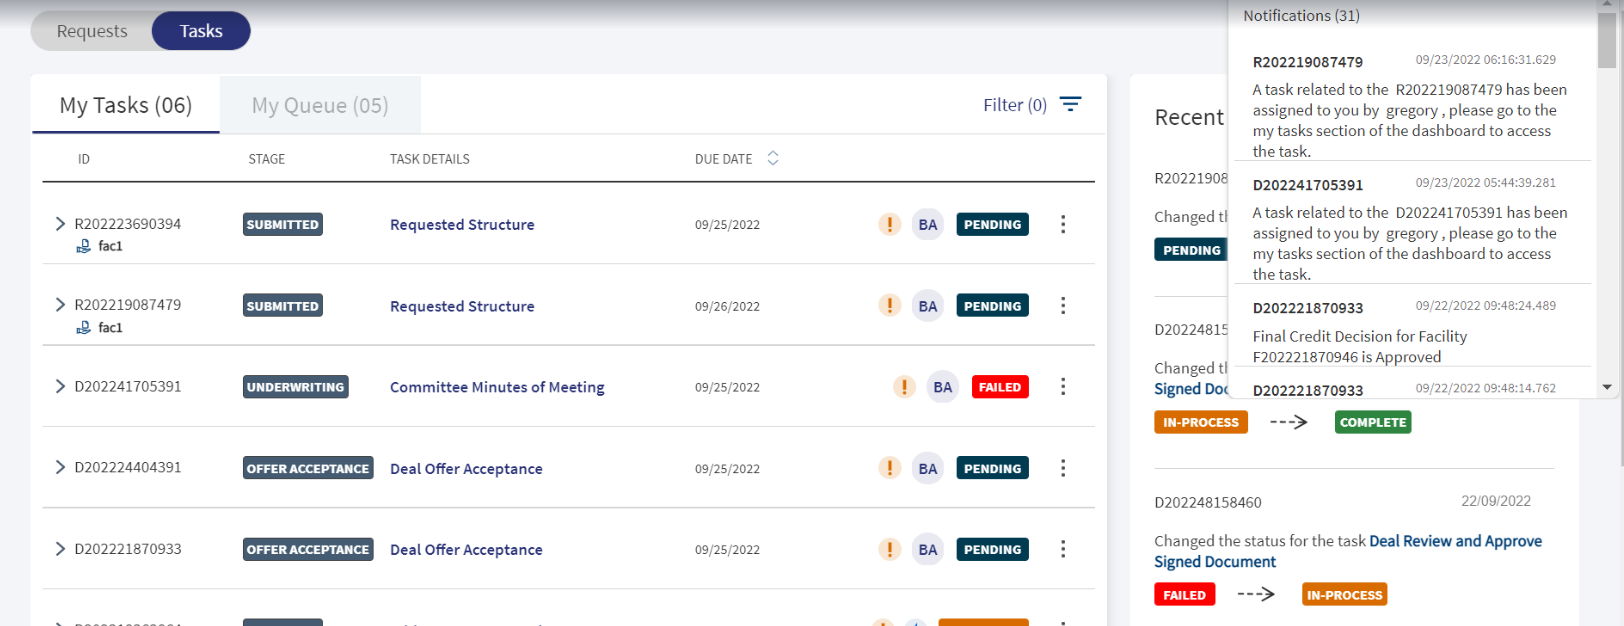
For a Facility related task, Facility name displays with an icon below the Request ID.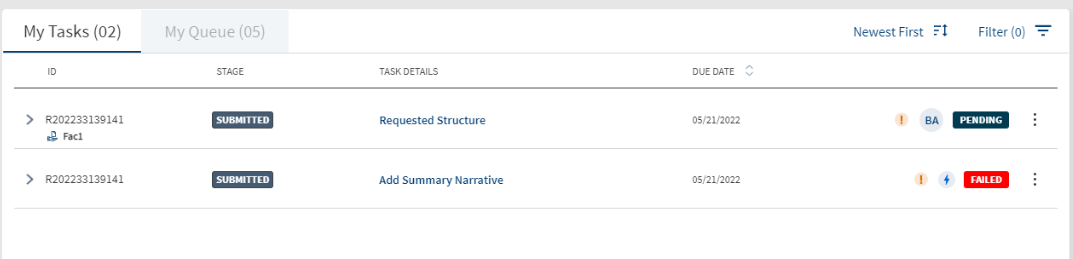
For a Entity related task,Entity name displays with an icon below the Request ID.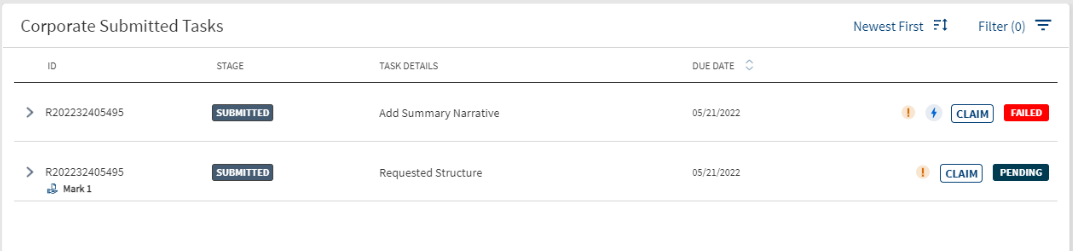
For a Request related task, nothing displays below the Request ID. 
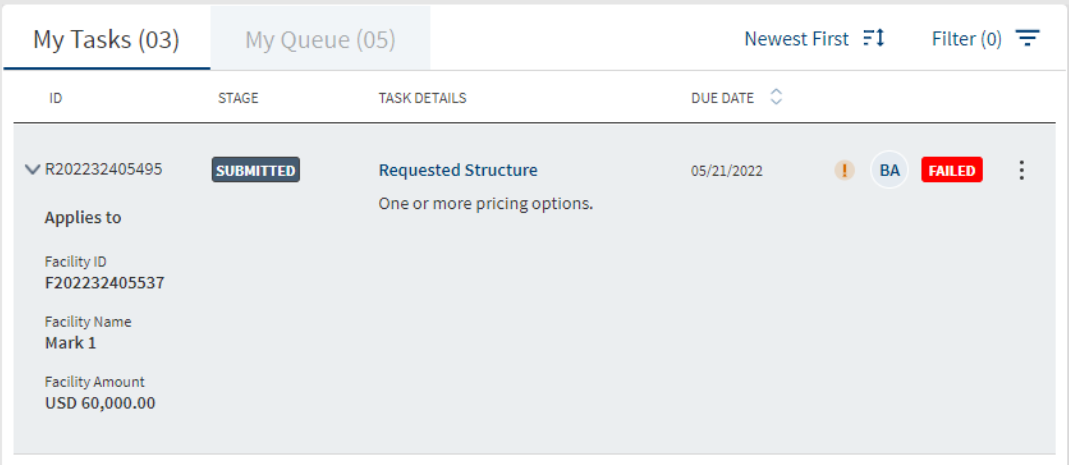
Clicking the accordion,displays the following fields apart from the task description.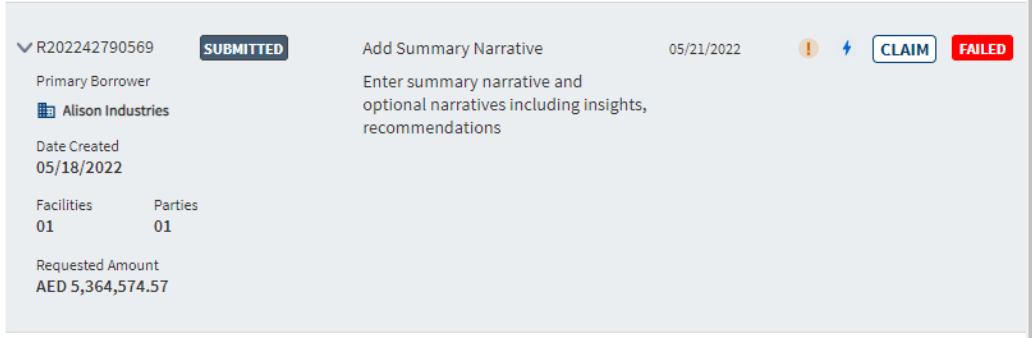
- For Request overview
- Primary Borrower
- Created On
- Number of Facilities
- Number Parties.
- Request Amount
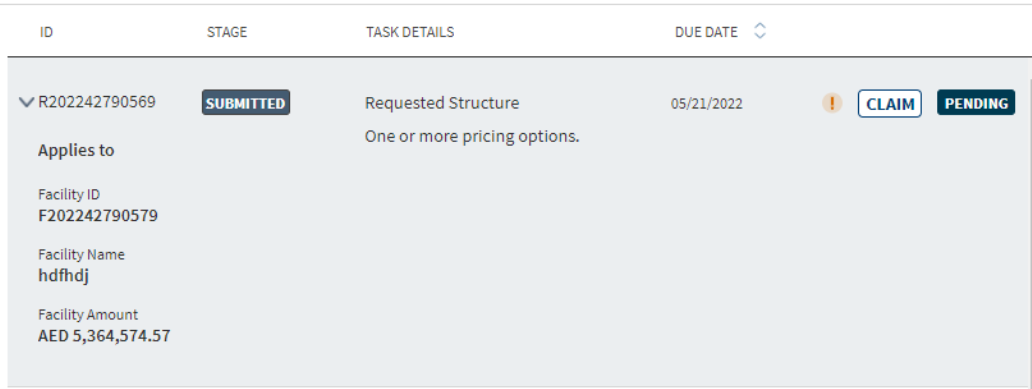
- For Facility overview
- Facility Name (Facility for which the task was generated).
- Facility ID (Facility for which the task was generated).
- Facility Amount (Facility for which the task was generated).
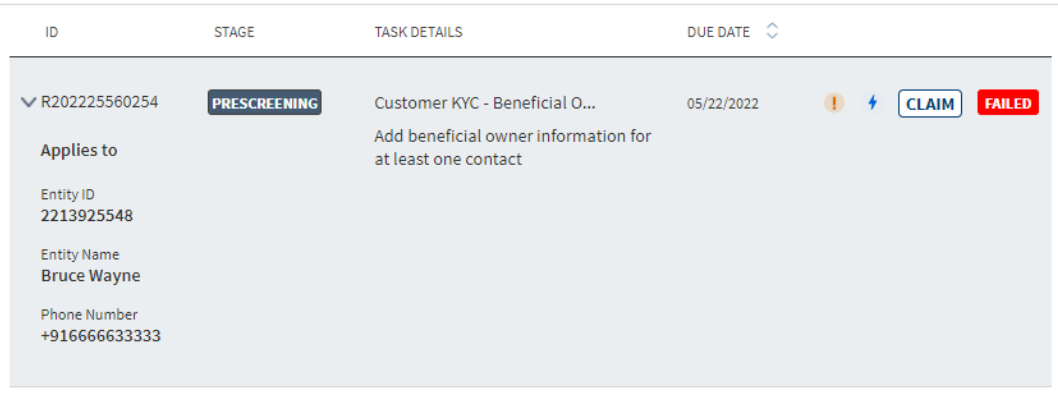
- For Entity overview
- Entity Name (Entity for which the task was generated).
- Entity ID (Entity for which the task was generated).
- Phone (Contact of Entity for which the task was generated).
- When the user clicks the accordion,the Collateral related tasks display the following details.
- Collateral ID
- Collateral Name
- Collateral Value
Perform any of the following:
- Click View All to view all the tasks.
- Use the search bar to search for tasks and sort by due date when all the tasks are displayed.
- Use the Filter to filter the In-Process, Pending, and Failed tasks.
- Click the task name to manage the task on the respective request, facility, or entity details screen.
- Clicking the accordion under the Task details displays the task description, if the task description is too long the user can view the entire description by hovering on it.

- On the Team Tasks Tab, click Claim to assign the task to self and work on the task for completion. On the confirmation screen, click Yes. The task is moved to the My Tasks tab. The tasks are sorted as per the assigned date/claimed date,the latest task always appear on the top.This feature is applicable only to Supervisor roles.
- Click the contextual menu to do any of the following:
- Edit the task.
- Reassign the task to other users.
- Mark the task as completed. The application displays a message that the task is completed successfully. The task is removed from the list.
- Mark the status of the task as In-Process. Not applicable for the tasks that are already in process.
- Mark the status of the task as Release. The task will be go into the queue until it is assigned to some other bank user.
- Waive off the task as required. The application displays a message that the task is waived off successfully. The task is removed from the list.
For more information on the tasks dashboard, filter and sort tasks, see Dashboard.
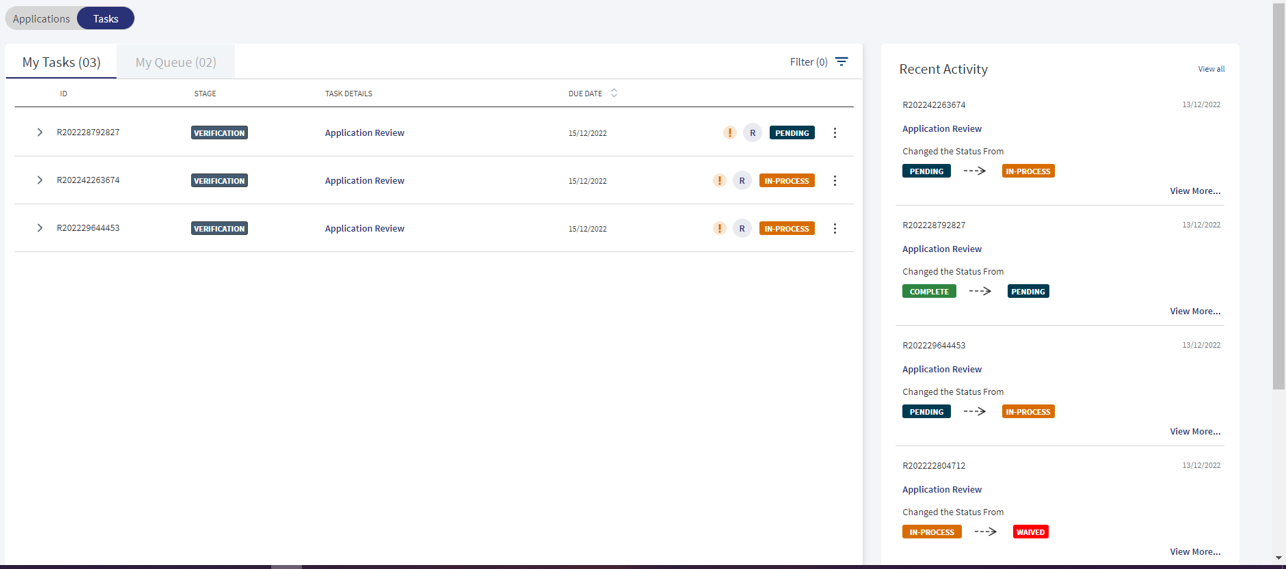
When the user clicks the tasks button at the top left corner of the login page, it navigates to the "My Tasks” dashboard where the recent activity is viewed.This section displays the recent list of activities performed by the logged in user with the latest activity appearing initially on the list.
It displays the following tabs when it is not expanded.
- Request ID : Entity ID or Product ID
- Clickable task name : Clicking the task name navigates the user to the particular task’s landing page, irrespective of the status of the task (Pending, Complete, Failed, In-process, etc). The Task name is clickable for all tasks irrespective of the activity (if it is to change the status or in future any other activity is added such as change in priority, change in due date, etc).
- Recent activity (eg: Pending -- Complete)
It currently supports only the change in status activity.
It shows the latest activity (if the activity is for change in status, the latest status change displays).Clicking View more displays all the previous movement in status in descending order.
- Date & Time (When the latest activity was performed.Date displays in DD/MM/YYYY format and time as HH/MM/SS format by default, the date and time format are configurable).
- Two clickable options:
- View All
- View More
Clicking "View More" option on Recent Activity Screen:Clicking the “view more” option displays all the the previous changes performed for this activity (ex: if the activity is change in status,it shows the previous status changes, displaying it in descending order).
Examples:
Case 1:
- If the RM User is in the Review KYC task and changes the task status from Pending to In-process, then the status displays as:
- Pending → In-process
- If the RM changes the status from In-process to Complete, the status displays as “In-process to Complete”.Clicking “view more” display the first and previous status change.
- In-process→ Complete
Case 2:
- If the bank user changes the priority of the task,it displays as changed priority from:
- Low → Medium or
- Then, Medium → High
The latest change in the activity diplays at the top.
Clicking "View Less" option on Recent Activity Screen:Clicking the “View Less” option scales down the expanded form displaying all the previous movement in the status.
Clicking "View All" option on Recent Activity Screen:Clicking the "View All" option navigates to the My Activity screen.The bank user views the following columns and the corresponding information.
- Request ID
- Task Name
- Activity
- Date and Time
- View more
Clicking "View More" option on My Activity Screen:Clicking the "View More" option displays all the changes in the Task status performed by the user earlier.
Examples:
Case 1:
- If the RM User is in the Review KYC task and changes the task status from Pending to In-process, then the status displays as:
- Pending → In-process
- If the RM changes the status from In-process to Complete, the status displays as “In-process to Complete”.Clicking “view more” display the first and previous status change.
- In-process→ Complete
Case 2:
- If the bank user changes the priority of the task,it displays as changed priority from:
- Low → Medium
- Then, Medium → High
The latest change in the Task Status diplays at the top.
Clicking "View Less" option on My Activity Screen:Clicking the "View Less" option scales down the expanded form displaying all the previous movement in the status.
"Load More" option on My Activity screen:Clicking the "Load More" option on my activity screen, displays the past applications on the bank user screen.
Navigating to "Home" on My Activity Screen: Clicking the “Home” option on my activity screen navigates to “My Tasks” dashboard screen.
The number of days activities is configurable via fabric run time properties, the bank user can change it when required.
View All Related Tasks
The application displays the request and facility related tasks list when a bank user clicks the View All Related Tasks link on the stage indicator of the request and facility overview screens.
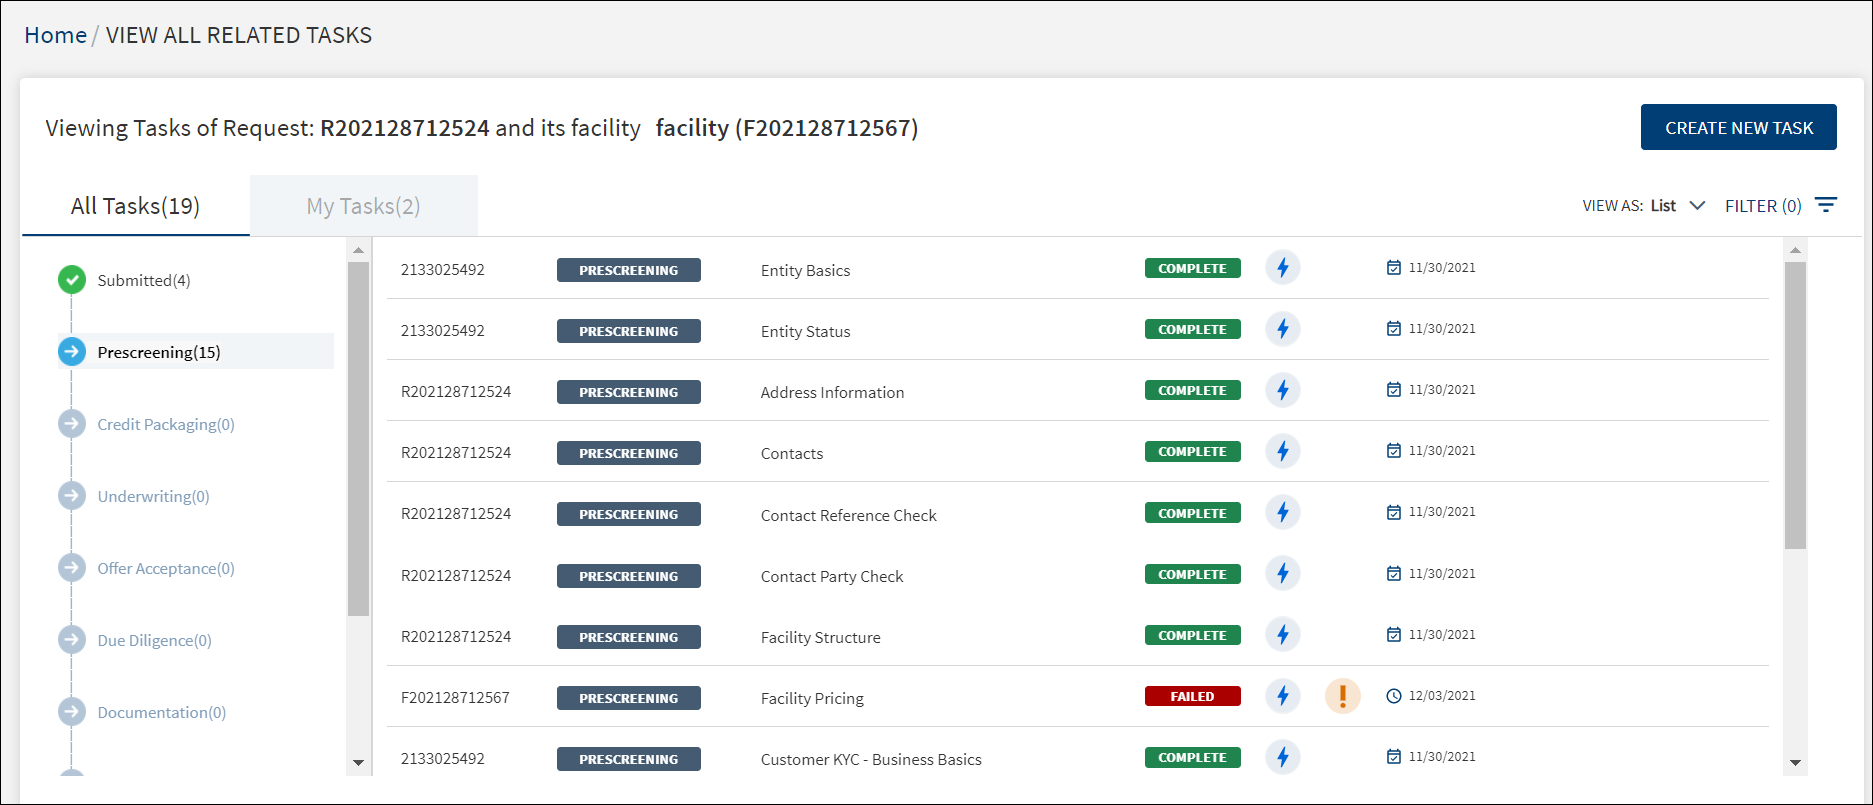
The application displays the following:
- Stage:
- The stages of the facility on the left pane and the corresponding list of all the tasks pertaining to the request on the right pane.
- Click any stage on the left pane to view the corresponding tasks on the right pane.
- Beside each stage, the number of pending and complete tasks of the stage is displayed. For example, Prescreening(10) means there are 10 pending and complete tasks in Prescreening stage. For a stage if the tasks are yet to be generated, the number of tasks is displayed as a hyphen. For example, if the request is at Prescreening, near Due Diligence stage since the tasks are not yet generated, it shows as Due Diligence(-). If tasks have been generated as part of request and there is no task assigned to the user in a stage, then it is displayed as 0. For example, Credit Packaging (0).
- The following explains the relation between the request and facility stages:
- For a request which has not reached the underwriting stage, the facility stage of all the tagged facilities and the request stage will be the same. For example, in case, the Request R1 has two facilities F1 and F2 linked to it .The Request stage for R1 and Facility stage (F1 and F2) will be Prescreening.
- In a case where all the facilities in the multifacility request have completed an end stage like Closing stage or Rejected stage, the request stage will change from Underwriting-green to complete.
- In a case where at least one of the facilities has not reached an end stage, the request status will still be Underwriting-green.
- If a request has been Withdrawn, all the stages of the facilities related to the request will show as Withdrawn.
- Task tabs: List of tasks on All Tasks tab and My Tasks tab with the count of tasks in parenthesis.
- The My Tasks tab displays the list of tasks assigned to the signed-in user. On the My Tasks tab, user can see all the stages, and in each stage user can view the task that has been assigned to the signed-in user specifically.
- When All Tasks tab is selected, all the stages of the journey of the facility right from Prescreening to Follow Up stages are displayed.
- Click on load more to load more tasks.
- A normal task and adhoc task that has been created in the task dashboard are differentiated by icons. An adhoc task will not have the navigation on clicking the task in task overview unlike the auto task. The user cannot navigate to the respective task location in case of an adhoc task.
- Sort: For multi-facility request, "All" is displayed on the top and user can select any facility and view their respective tasks. When the All option is selected, all the request, entity, and facility (all facilities) tasks are displayed. If a facility is selected from drop-down, then all the request, entity, and facility(selected facility) tasks are displayed.
- View Tasks - List or Board view: By default, the tasks are displayed in a List view. Use the View As list to select to Board view.
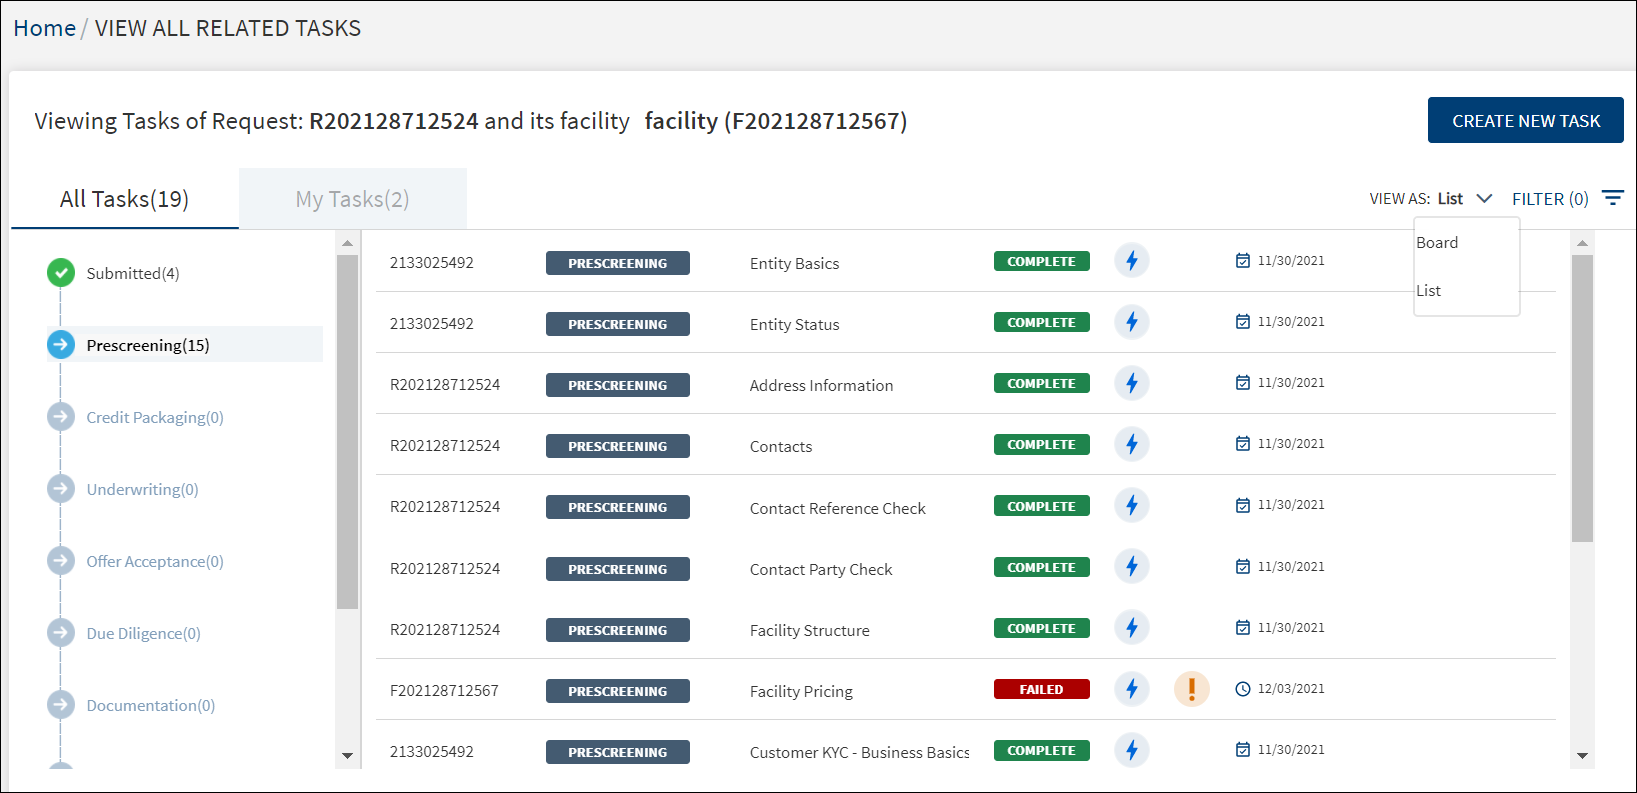
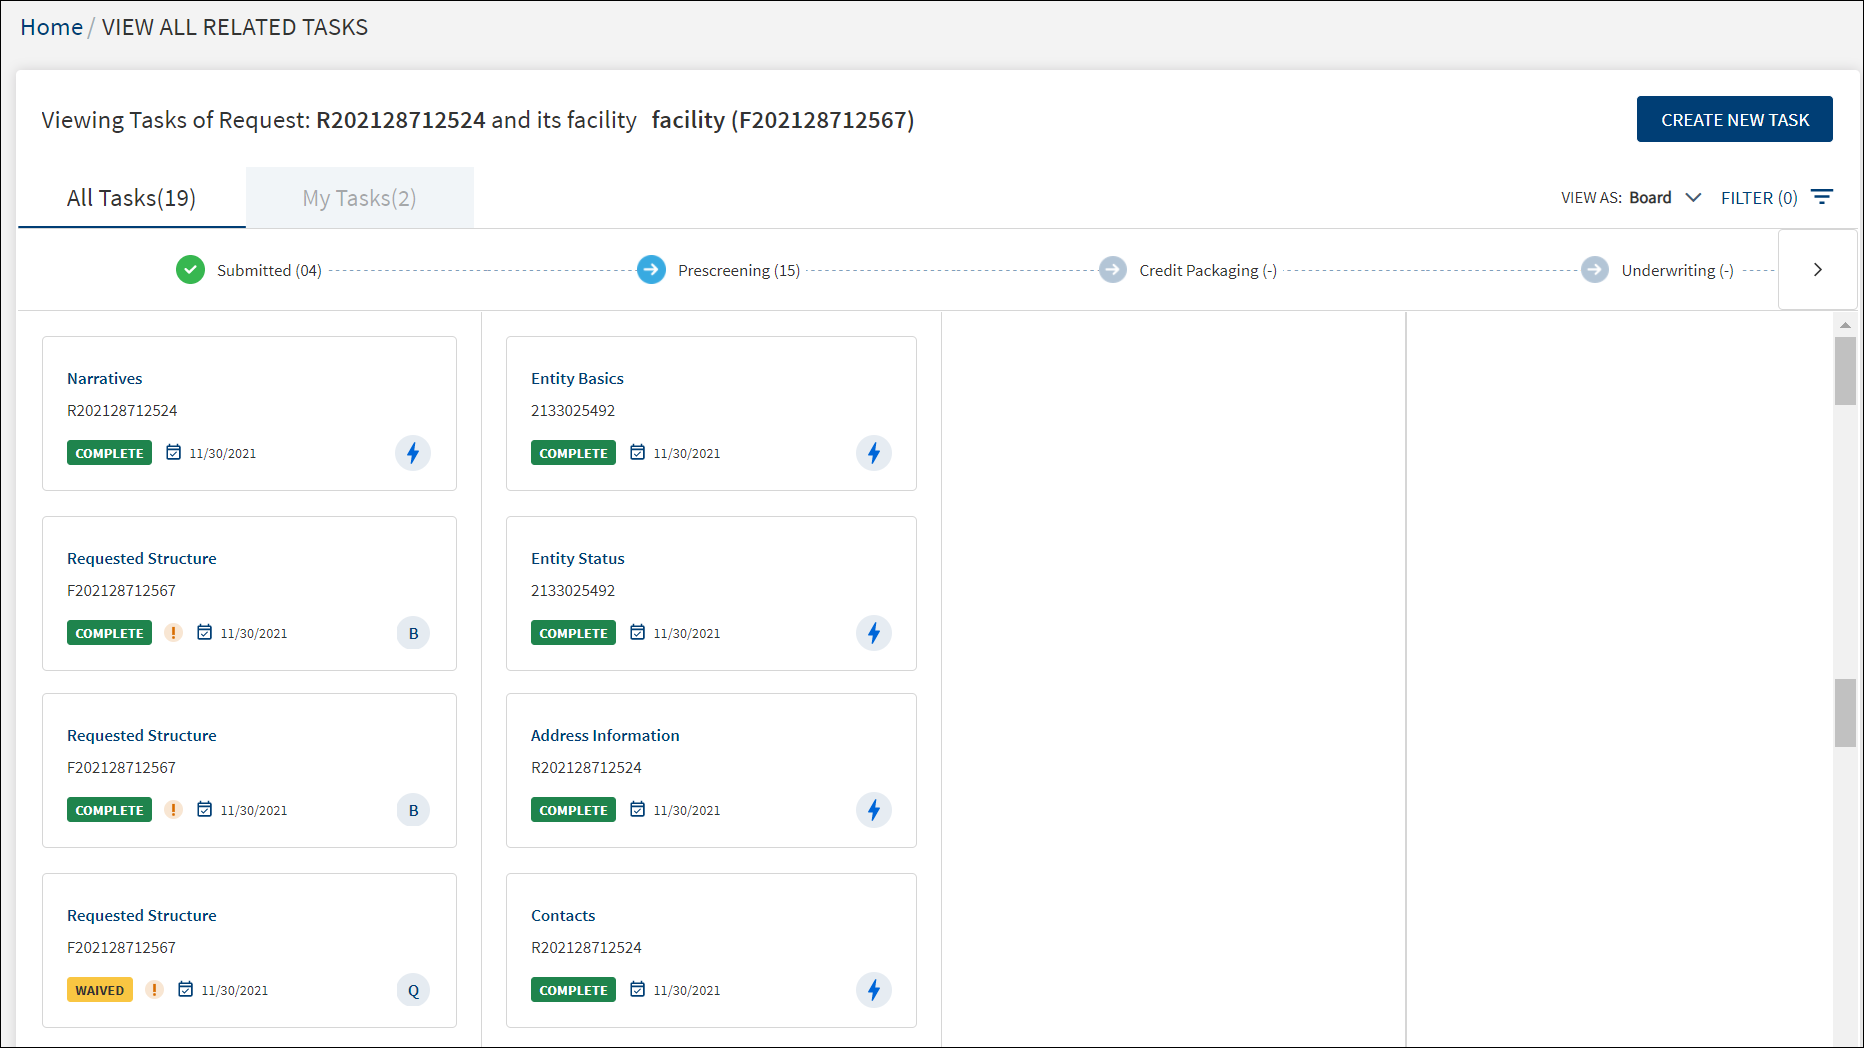
- In the Board view, the tasks are displayed in the form of a card. The card is view-only and does not navigate to any other forms. However, clicking the card as a whole displays the task details.
- The card displays the following details of the task:
- Task name
- Entity name/Facility ID/Request ID
- Task status - Complete, Pending, In Progress, Waived.
- Due Date for a pending task or Completed Date for a completed task.
- Task priority is represented as an exclamation logo. On hover, the tooltip indicates High Priority so that the user understands the logo is for priority.
- Assigned person or if it is an auto task and a different icon for adhoc tasks. On hover, the tooltip displays the assigned person name and auto task respectively.

- The creation date displays the date when task was created.
- The assigned/claimed date displays the date when the task was claimed by the current user. If the task is not yet claimed or is an auto task which has been completed, it displays a hyphen.
- The Completed date the date when the task got completed, if not yet completed it displays a hyphen.
- The user can view all the tasks that are related to the request (Deal) in Task dashboard, Queue and View all related task.
- Filter Tasks: Use the filter to the tasks in the list view and the board view.
- Click the Filter icon.
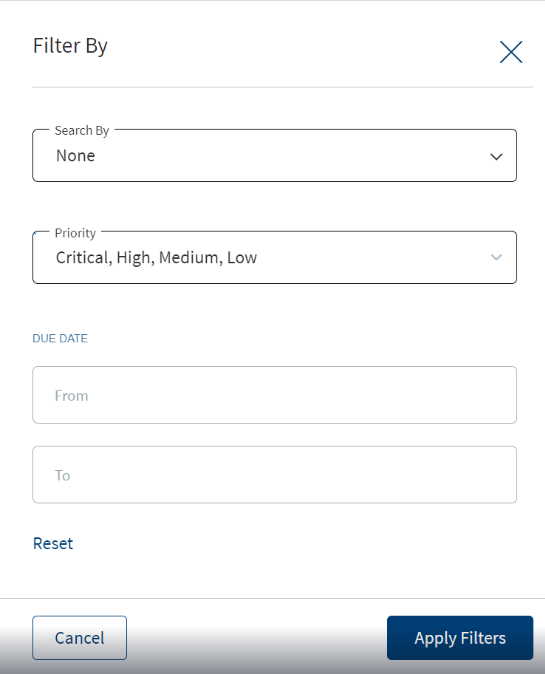
- On the Filter By screen, use the following filters:
- Search By: None, Entity Id, Request ID, Facility ID. If the search is done by selecting Entity ID or Entity Name, all the tasks related to Entity ID or name display, like wise for the other selected options.
- Priority: Critical, High, Medium, Low.
- Due Date: From and Due Date To - Provide the from and to date in dd-mm-yyyy format to view the tasks which have due date in between the from and to date.
- Reset: Click Reset to clear all the filter criteria and start all over again.
- Click Reset to clear all the filter criteria and start all over again.
- Click Apply Filters.
- A Supervisor can also perform the above actions in the My team tasks-Filter.
- User can apply the filters one-by-one and filter the tasks based on the selection combination.
- The application displays the number of filters applied in parenthesis.
- Click Cancel to cancel the operation. Click Reset to discard the filters and start all over again.
- After the session is complete, the filters does not persist and is reset.
- The above Filter option is applicable for My Queue also.
- Click the Filter icon.
Customer Action in View All Related Task:
In Temenos Digital Assist – For Lending Application (Retail/SME).
- Clicking the Request ID and View all Related Task displays the list of pending tasks and its status.
- The bank user can get details of the customer action pending status in the view related task.
- Irrespective of the customer action status it displays in the view all related tasks.
Technical Error Action in View All Related Task:
In Temenos Digital Assist – For Lending Application (Retail/SME)
- Clicking the Request ID and View all Related Task displays the list of pending tasks and its status.
- If there are any technical error/issues due to server, network, database etc.while working,Technical error task gets generated automatically in the View All Related Task and assigned to the System Administrator of the Bank.
- The Error task remains in view all related task irrespective of the task status.
- The following details are shown on the View All Related Tasks screen:
- Request ID, Facility ID, or Entity ID for entity related tasks.
- Stage
- Task name
- Task status
- Icons to denote if the task is assigned to a user or if it is an auto task. On hover, the tooltip displays the assigned person name and it is an auto task respectively.
- Priority. An exclamation logo shows for high and critical priority tasks. When the user hovers over the exclamation logo, the tool tip indicates High Priority so that the user understands the logo is for priority.
- Due date displayed for a pending task and completed date is displayed for a completed task.
- The requests are sorted by the creation date. The latest task always appear on the top.
- Clicking the due date column header sorts the tasks in ascending or descending order.
- If the user goes to different screen or different tab, the sort will be defaulted back to claimed date in my tasks and creation date in my queues.
- In case of a multi-facility request, all tasks are displayed and the stages are displayed until the underwriting stage.
- The user can view all the tasks that are related to the request (Deal) in Task dashboard, Queue and View all related task.
Do any of the following:
- Click Create New Task to add a new adhoc task.
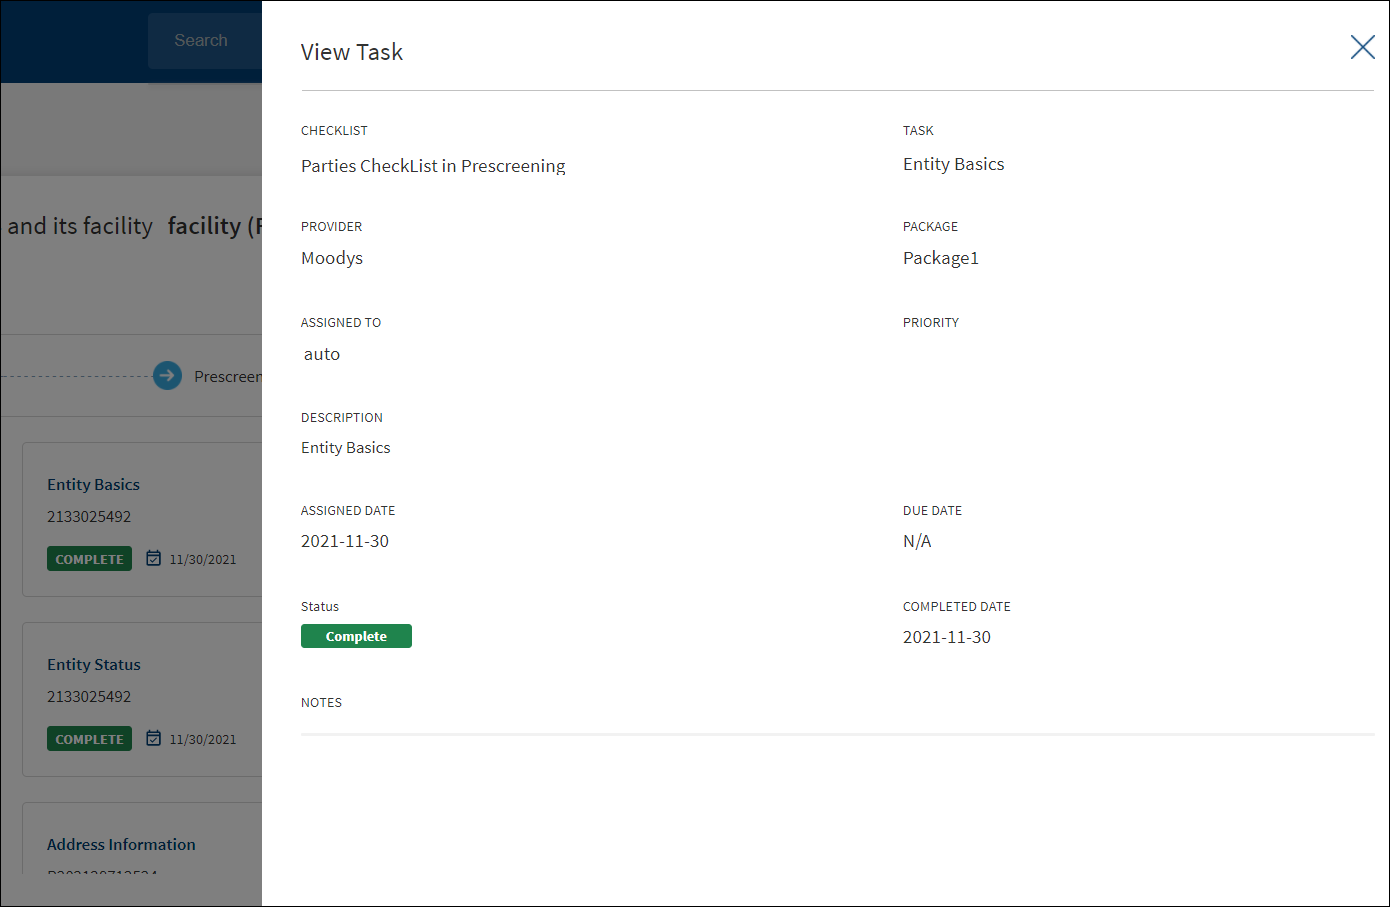
- Click the row to view the task details.
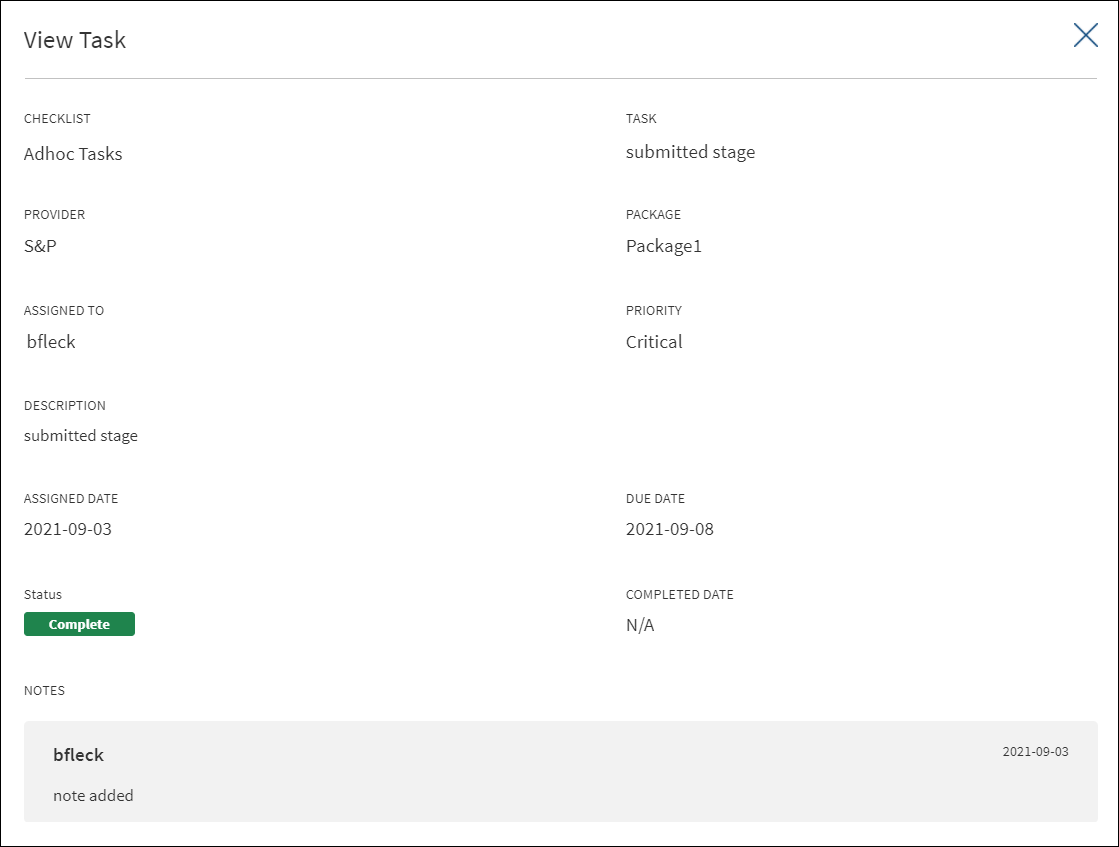
- The following details are shown: Checklist, Task, Provider - Optional, Package - Optional, Assigned to (shows auto task in case of auto tasks), Priority, Description, Assigned Date, Due Date, Status, Completed Date, and notes.
For a Facility related task, Facility name displays with an icon below the Request ID.
For a Entity related task,Entity name displays with an icon below the Request ID.
For a request related task, nothing displays below the Request ID.
Clicking the accordion,displays the following fields apart from the task description.
- For Request overview
- Primary Borrower
- Created On
- Number of Facilities
- Number Parties.
- Request Amount
- For Facility overview
- Facility Name (Facility for which the task was generated).
- Facility ID (Facility for which the task was generated).
- Facility Amount (Facility for which the task was generated).
- For Entity overview
- Entity Name (Entity for which the task was generated).
- Entity ID (Entity for which the task was generated).
- Phone (Contact of Entity for which the task was generated).
Task Sticky Footer
The task sticky footer is launched from the task list and appears on the footer of the Facility and Request details screens. It is used to manage a task efficiently from one-place. The tooltip gives the information when hovered over the icons.


To launch the task sticky footer and manage a task, do the following on the task list:
- Click the task name to manage the task on the request overview screen.
- Click the entity name to manage the task on the entity overview screen.
The task sticky footer is displayed on the bottom of the screen with the following details:
- Request ID
- Task Description
- Due Date for the task to be completed.
- Edit Icon
- Task Dashboard - Clicking this redirects the user to the my tasks screen of the task dashboard.
- Task Status - Pending, In Process, or Failed. All the manual tasks created by the workflow (Red Hat PAM) will be created with Pending status. The status is changed to In Process after the first user clicks on the task either on the dashboard or on the stage indicator on the request and facility overview screens
Do any of the following on the sticky footer:
- Click the down or up arrow to hide or show the task footer respectively. Click the x button to close the task footer. The footer is displayed only after the page loads again.
- Click the Edit icon to edit the task details.
- Click the Reassign icon assign the task to another user.
- Click the note icon to view the task details and edit the task to add a note if required.
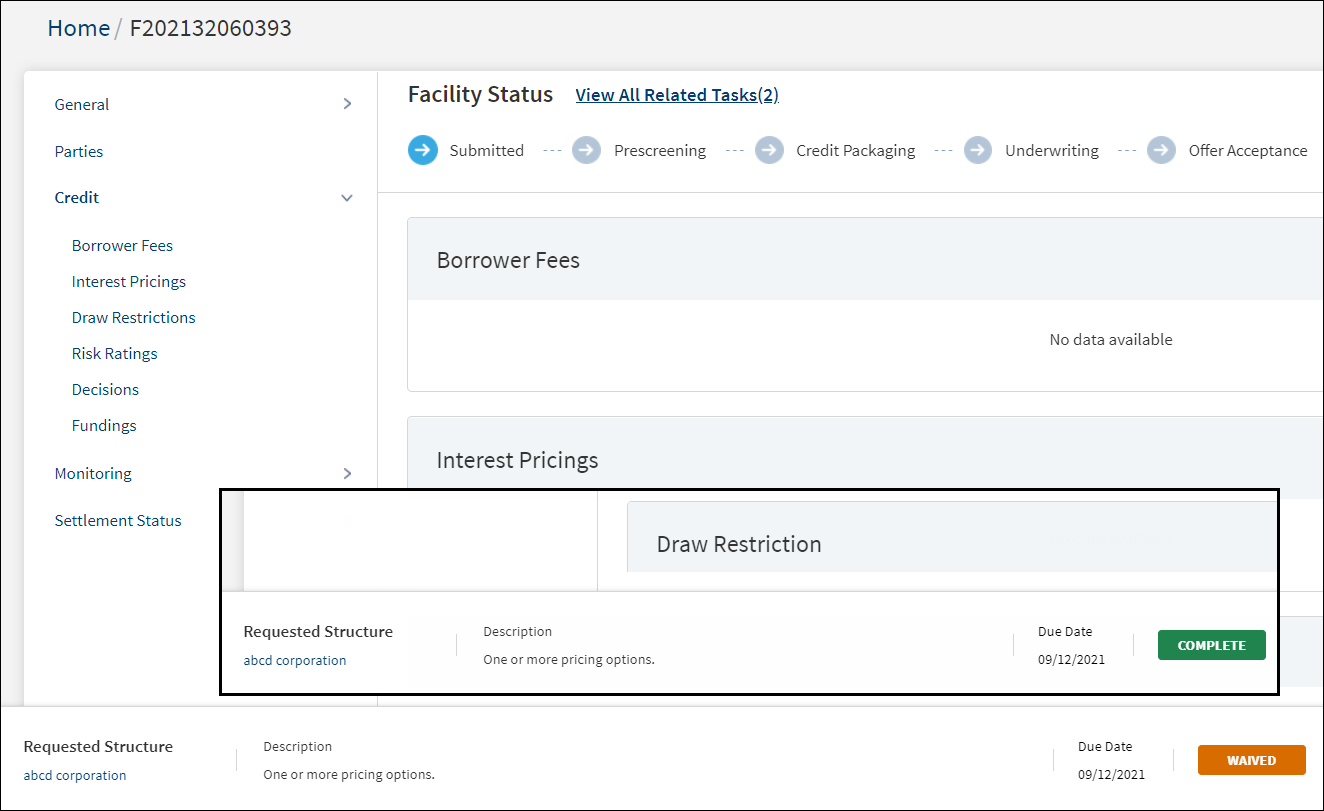
- Complete. Click to mark the task as completed. The application displays a message that the task is completed successfully. The status is changed to "Complete". The task is removed from the task list on the dashboard.
- Waive. Click to waive off the task as required. The application displays a message that the task is waived off successfully. The status is changed to "Waived". The task is removed from the task list on the dashboard.
Edit Task
Use the feature to edit a task. The tasks can be edited from the following sources:
- Contextual menu on the task list.
- Clicking the Edit icons on the task sticky footer of the request and facility details screens.
The application displays the Edit Task screen with the details that were already filled in while adding the task. This screen is like the add task screen.

To edit the task, follow these steps as required:
- The Checklist name and Task name are already filled and read-only.
- Make the required changes. The following fields can be edited:
- Provider and Package. These are optional.
- Assigned To: Click and select the user from the list to reassign the task.
- Priority
- Description
- Assigned Date - auto filled
- Due Date
- Change the Status. The options are In-process, Failed, Complete, and Waived.
- Completed Date - auto filled
- Add a note in the notes section. It is a mandatory field.
- Click Update Task. The application displays a message that the task is updated successfully.
- The creation date displays the date when task was created.
- The assigned/claimed date displays the date when the task was claimed by the current user. If the task is not yet claimed or is an auto task which has been completed, it displays a hyphen.
- The Completed date the date when the task got completed, if not yet completed it displays a hyphen.
Click Cancel or X to cancel the action anytime. The application displays a confirmation screen. Click Yes to cancel the operation. The changes are not saved.
Add Task
Use the feature to add an adhoc task using the view all tasks link on the stage indicator of request and facility overview screens.

To add an adhoc task, follow these steps:
Until otherwise stated, information in all the fields is mandatory.
- On the request overview or product overview screen, click the View All Related Tasks link on the stage indicator.
The application displays the all tasks screen. - Click Create New Task.
- The application displays the Add Task screen. All master data and list items for the drop-down lists come from the Loan Origination Service (LOS) Microservice.
- Checklist defaulted to adhoc task.
- Enter the Task Name.
- Select the Provider and Package from the respective lists. The fields are optional.
- Search and select the required person to assign in the Assigned To field. The application displays the users maintained in the user management system. Enter the name of the user in part or in full to whom the task is to be assigned. The application displays the matching names. Click the required name. The assigned user will see the task in their task list.
- Select the task Priority from the list. The options are: Critical, High, Medium, and Low.
- Enter the task Description.
- Enter the task Due Date in MM/DD/YYYY format.
- Select the task Status from the list. The options are: In-process, Complete, Pending, Failed, and Waived.
- Add a note in the notes section.
- Applies to. Lists all the facilities linked to the request. For a single or multi-facility request before submitting the task details, select the facilities for which the adhoc task is linked. Select one or many but select at least one facility. This field is applicable only if the task is created after the underwriting stage.
- Click Add Task.
On adding an adhoc task,
- The application displays a message that the task is added successfully.
- The task is listed in the view all related tasks list if the adhoc task is created in or before underwriting stage.
- After submission, the adhoc task is added as a task record to the respective facility section in the view all tasks screen if the task is created after underwriting stage.
- The task is added to the task list of the assigned user on the My Tasks tab.
- The creation date displays the application date by default.
- The assigned/claimed date also displays the application date.
- The Completed date displays blank.
If the task is created before Underwriting, the task gets created at the request level and displays the following.
- Adhoc task created before Underwriting:
- Primary Borrower
- Created On
- Number of Facilities
- Number Parties
- Request Amount
- Adhoc task created after Underwriting:
- Facility Name (Facility for which the task was generated).
- Facility ID (Facility for which the task was generated).
- Facility Amount (Facility for which the task was generated).
Click Cancel or X to cancel the action anytime. The application displays a confirmation screen. Click Yes to cancel the operation. The changes are not saved.
Application ID global search
RM enters the application ID in the search box and clicks Search button. The system displays the results that match the application ID. The value that is searched against the Application ID is generated in ODMS for each of the applications initiated via RM Initiated Application Feature.
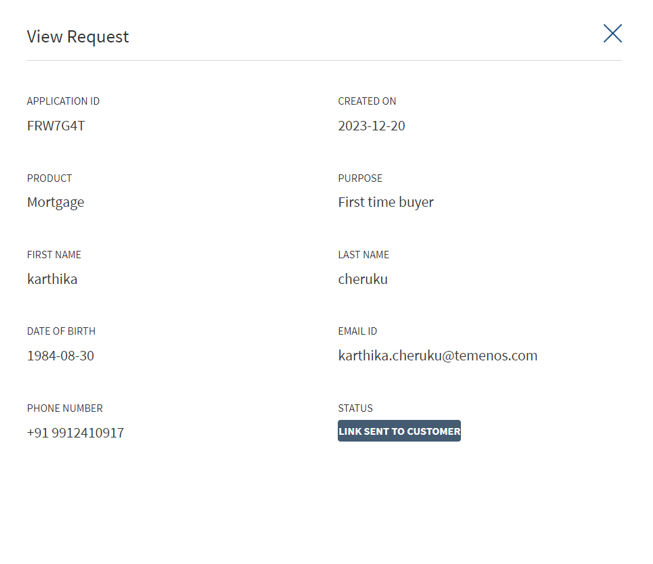
If the RM searches for an application in the global search using the application ID for the applications that are in the draft, discarded, or link sent to customer status, in the search auto suggestions the following details display:
- Application ID
- My application
- Applicant Name
When RM clicks on the search auto-suggestion, the RM navigates to the respective screen.
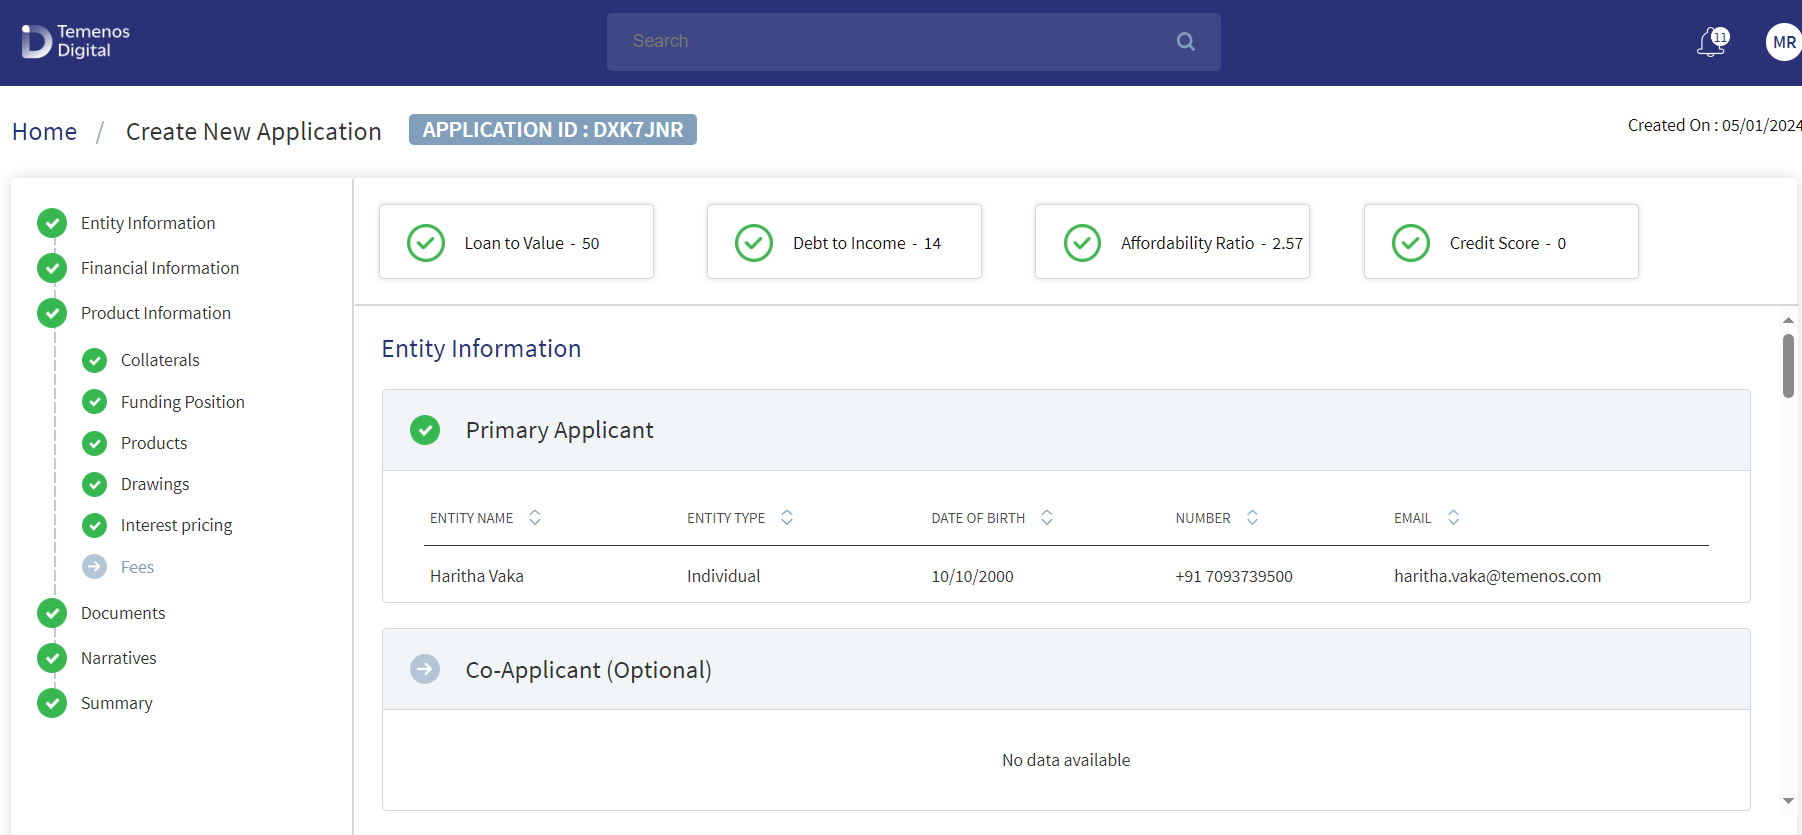
- For example, if the user searches for an application that is in draft status, on click of search auto-suggestion the user navigates to the Summary screen of the RM initiated application in the draft status. The user can view and update the application if required.
- If the user searches for an application that is in the link sent to the customer status, on click of search auto-suggestion the results display under My Applications View Request screen

-
If the user has sent link to the customer and the customer has submitted the application, and the application move to the post submission – then if the user searches the application using the application ID, in the search auto-suggestion it displays both my application and in Request Overview, Entity Overview and Product Overview.
-
If the RM searches for an application in the global search using the application ID for the application that is in the submitted status, in the search Auto suggestions the following fields display:
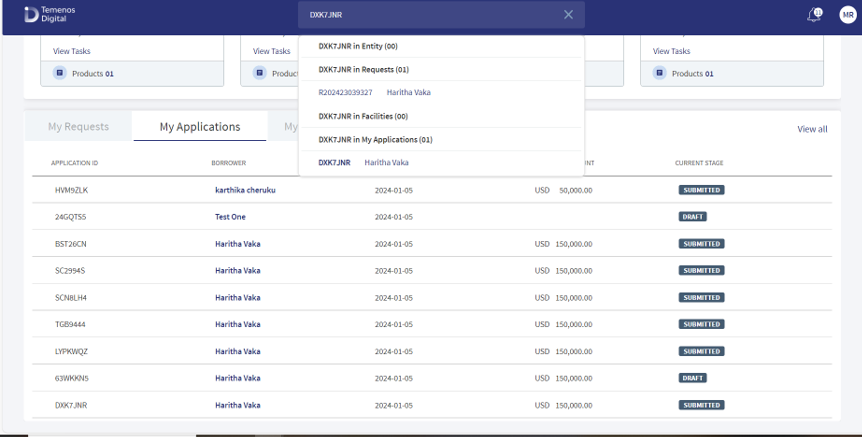
If the user clicks on the application ID in the global search, the user navigates to the Summary screen. If the user clicks on the Request Id in the global search, the user navigates to the Request Overview screen.
- Application ID
- My application
- Applicant Name
- Request ID
- Overviews (Entity, Request, Product)
In the search auto-suggestion for the submitted application, it displays both RM initiated application and the request ID created for the same application as the application has moved to the post-submission flow.
- If RM clicks Application ID in My Application, it navigates user to the summary of the RM submitted application.
- If RM clicks Request ID in Overview, it navigates user to the respective overview.
If the RM has sent link to the customer and the customer has not submitted the application. If RM searches for the same application using the Application ID, in the search auto-suggestion it displays only Application ID in My Application, request header does not display in the auto-suggestion till the user submits the application in the Origination app.
In this topic