Custom Roles
The custom role feature provides the self-service option for business owners and other authorized manager of business users to create and manage custom role templates. The feature is available to only those users who are given explicit permission (Create / Edit Templates permission) to manage custom roles.
Why is a custom role required?
Users have permissions-based access to accounts and features in the application based on their user roles. The roles are configured at the financial institution (FI) level and are assigned to every user, which controls the features and actions that the user can perform. A role can even contain permissions to a partial set of actions for a feature and the permissions can be restricted at the user level as well. Therefore, an authorized person can take away some of the permissions that the user inherits from a role and it is possible to have a custom set of permissions for every user.
This is where a custom role is used. Instead of working on a user's permissions individually, which is time consuming, an authorized user can create custom role templates with predefined permissions over the base parent role of the user and store them in the DBX database. When it comes to redefining permissions for a user, a custom role template can be assigned to users depending on the business needs.
A custom role is a template that includes predefined access rights and permissions for the following:
- Permissions - account level features and other features
- List of accounts and role for selected contract
- Transaction limits
An authorized business user can create a custom role as a template and apply the template to a user while creating a business user or to the existing business users based on the business needs. When a user is assigned a custom role, all the above are copied from the custom role into the user’s profile. These values can be modified for a user if required.
Custom role template can be created from any of the following scenarios:
- Assign permissions manually from scratch.
- Copy permissions from existing user or custom role.
Menu Path: Side Menu > User Management > User Roles
UX Overview

The User Management > User Roles screen displays the list of custom role templates that have been already created earlier. This is also the landing page of the custom role module. You can do the following:
- View the custom roles list
- View permissions and update custom role details
- Create a custom role
- Search for a custom role
Custom Roles List
The application displays the list of user roles that have been created earlier. The custom roles are fetched from the DBX database.
Menu Path: Side Menu > User Management > User Roles
The list is represented as rows with the following details. The count of roles available is shown within parenthesis:
- Custom role name.
- Role created on date.
- Name of the user who created the role.
- Action link to view the permission details.
The list is sorted by Role Name by default, but you can also sort the list based on Created On and Created By using the sort  icon.
icon.
Do any of the following:
- Filter the records from the View list. By default, all the custom roles are displayed. Filter by specific Customer ID.
- Click View Permissions to view the role permission details and modify details if required.
- Click Create Custom Role to create a custom role template.
- Search for a custom role.
View Permissions and Update Custom Role Details
Use the feature to view or modify the details of a selected custom role:
Menu Path: Side Menu > User Management > User Roles> Click View Permissions link

The screen is like the one while you create a custom role. To edit the details in any of the sections, follow these steps:
- On the custom roles list screen, click the View Permissions link. The application displays the screen to view or edit permissions with role details.
- The details on the screen are divided into the following sections. Click the View/Edit link in the respective sections and make the changes as required.
 Account Access and Role
Displays the customer ID and role.
- Customer ID
- Role. Assign a new role if required and click Update. The change is updated. The feature permissions and transaction limits changes based on the role.
- Selected Accounts.
Account Level Feature PermissionsDisplays the permissions to access the features and associated actions for the selected Customer ID. Make the changes by selecting or clearing the feature check boxes of respective accounts. Click Update. The changes are updated. The permissions and transaction limits changes based on the changes.
Other Feature PermissionsDisplays the permissions given to other non-transactional features. Make the changes by selecting or clearing the feature check boxes. Click Update. The changes are updated.
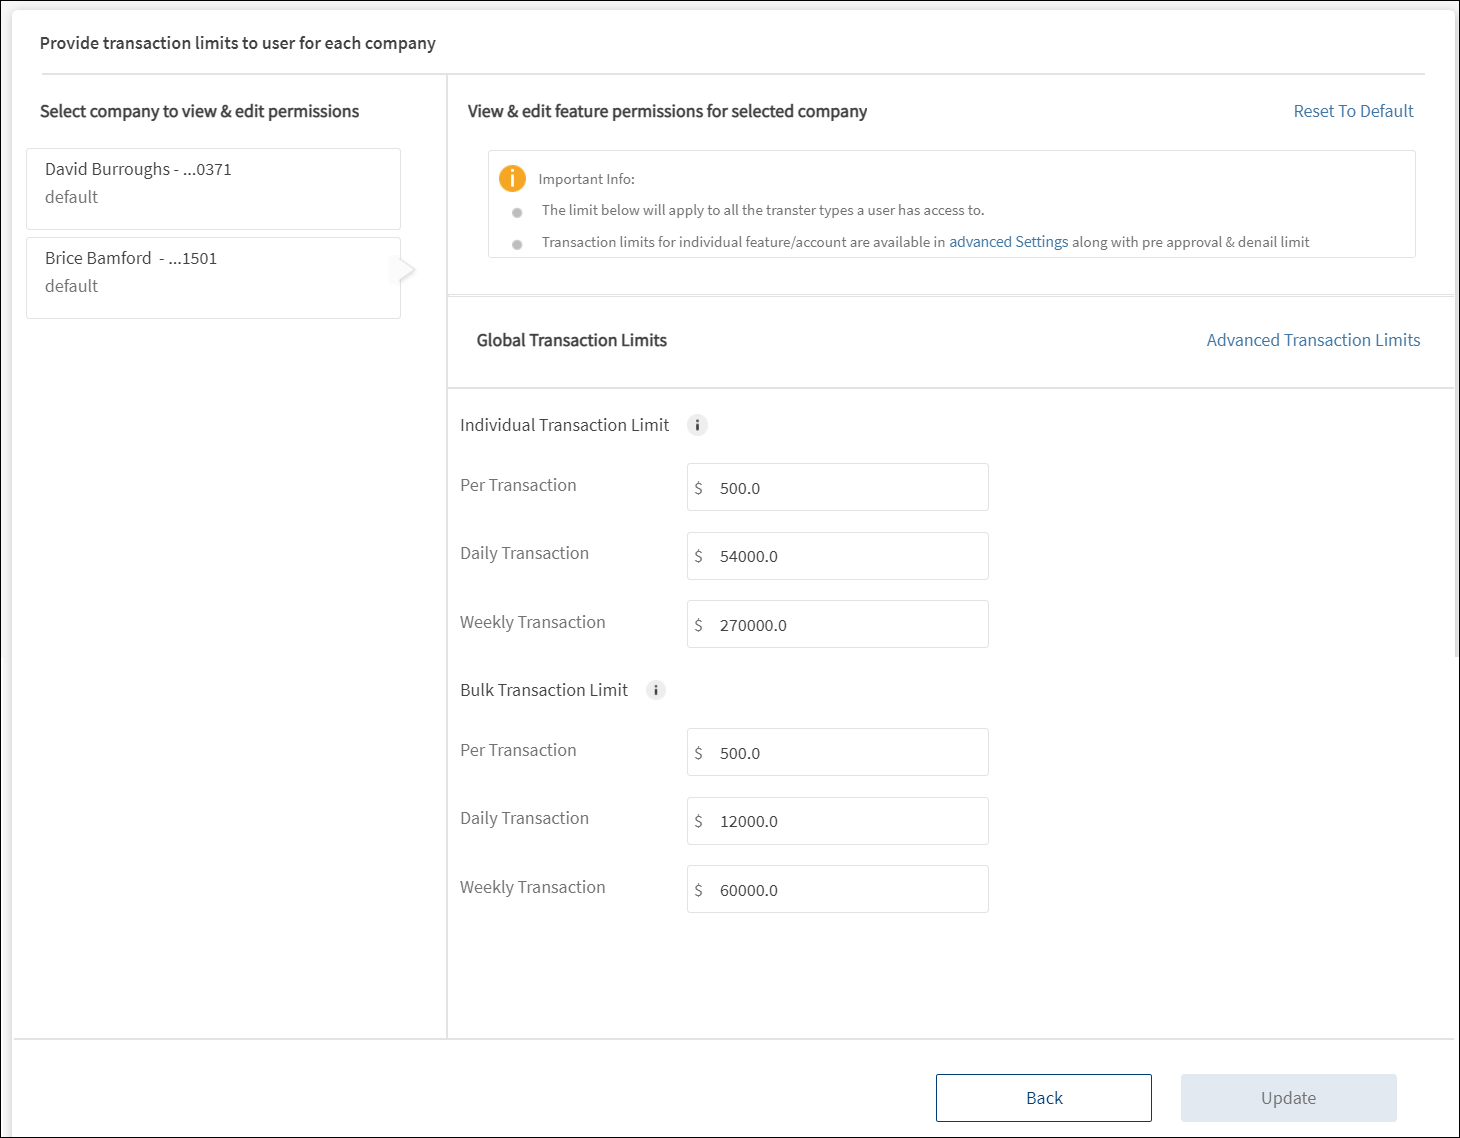
Transaction LimitsDisplays the transaction limits defined for the various services of corresponding Customer ID. Make the changes to pre-approval and denial limits. Click Update. The changes are updated. Note that the changes will affect all future transactions.
- After updating the details, click Update. Only an authorized user with permissions to apply custom roles can use this feature. The changes are updated.
Click Back to navigate to the previous screen and make any changes.
Create Custom Role
A custom role is a template that includes predefined access rights and permissions to features and can be assigned to any user. Use the feature to create custom role templates. The template can be created in any of the following methods:
- Method 1: Initiating the creation of a custom role from a newly created user.
- Method 2: Initiating the creation from the side menu.
- Assign permissions manually.
- Copy permissions from existing user or custom role.
Menu Path: Side Menu > User Management > Create Custom Role. Alternatively, on the User Management dashboard screen, click Create Custom Role. The application displays the Custom Role - Primary Details screen.
The custom role creation process is divided into the following sections:
- Enter primary details
- Assign account access (applicable only when the role is created manually)
- Verify and submit details
- Acknowledgment
To create a custom role template, follow the steps explained in the following sections.
Primary Details
Capture the primary details in the Create Custom Role - Primary Details screen.

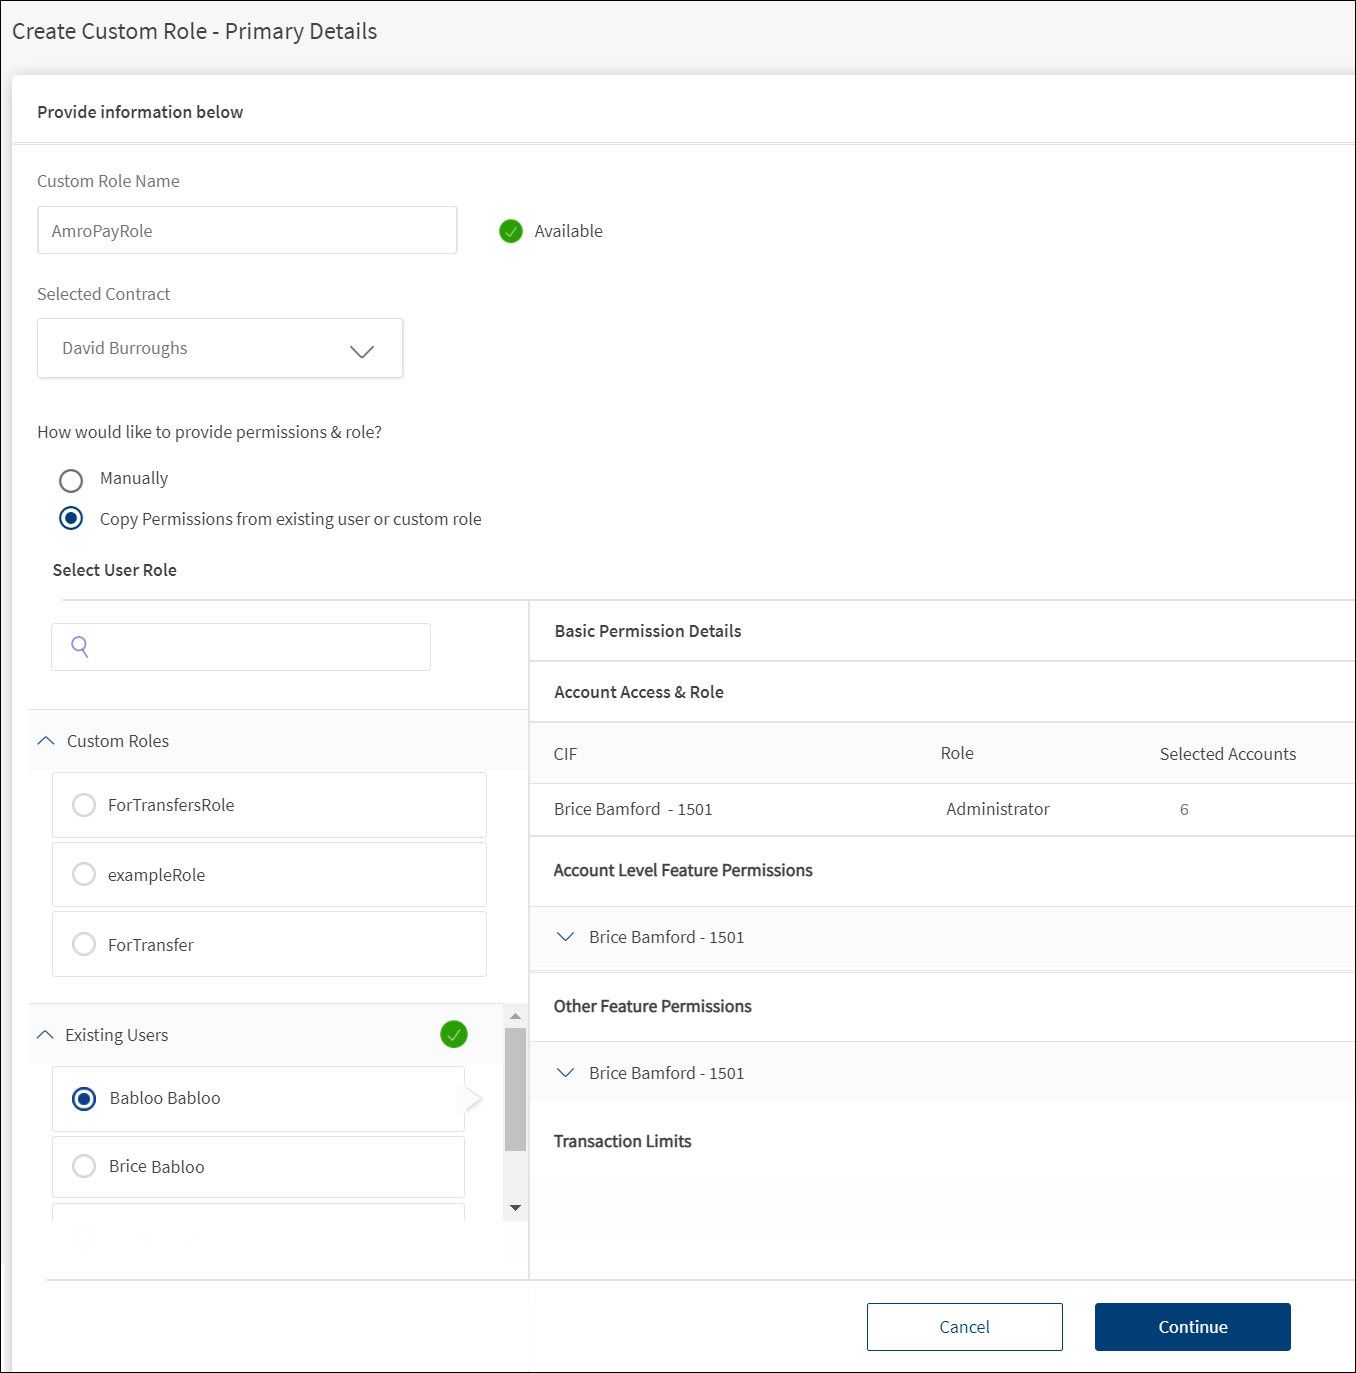
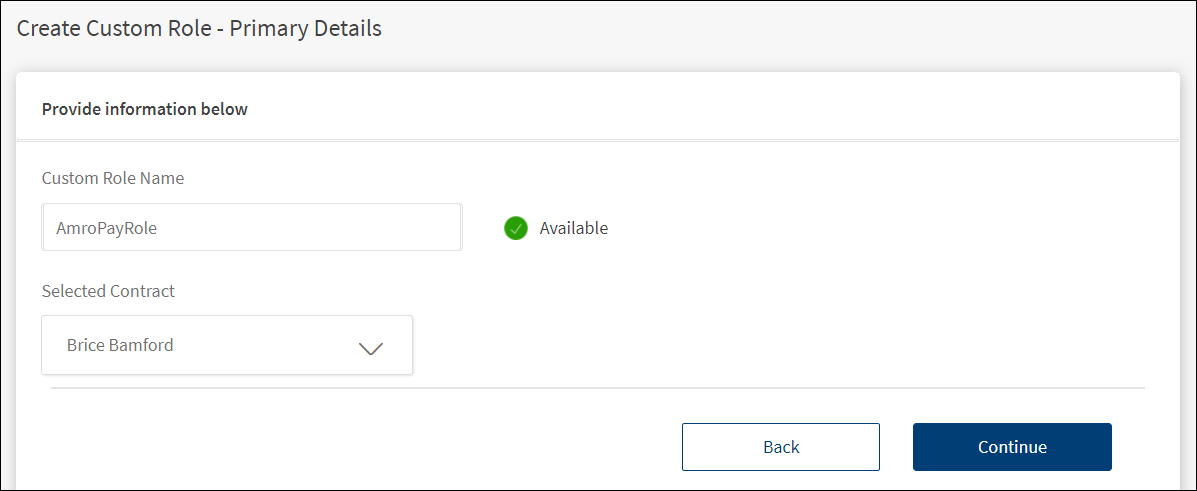
- Enter the Custom Role Name. Enter a custom role name and verify for availability. The name must be unique. The name can contain only alphanumeric characters and must be a single word without spaces in between the characters. Click Check Availability to validate the given name for its uniqueness. If the status of the validation is Available, then you can use the role name. Otherwise, change the role name and check the availability again. The Check Availability link is active only after you enter a name in the box.
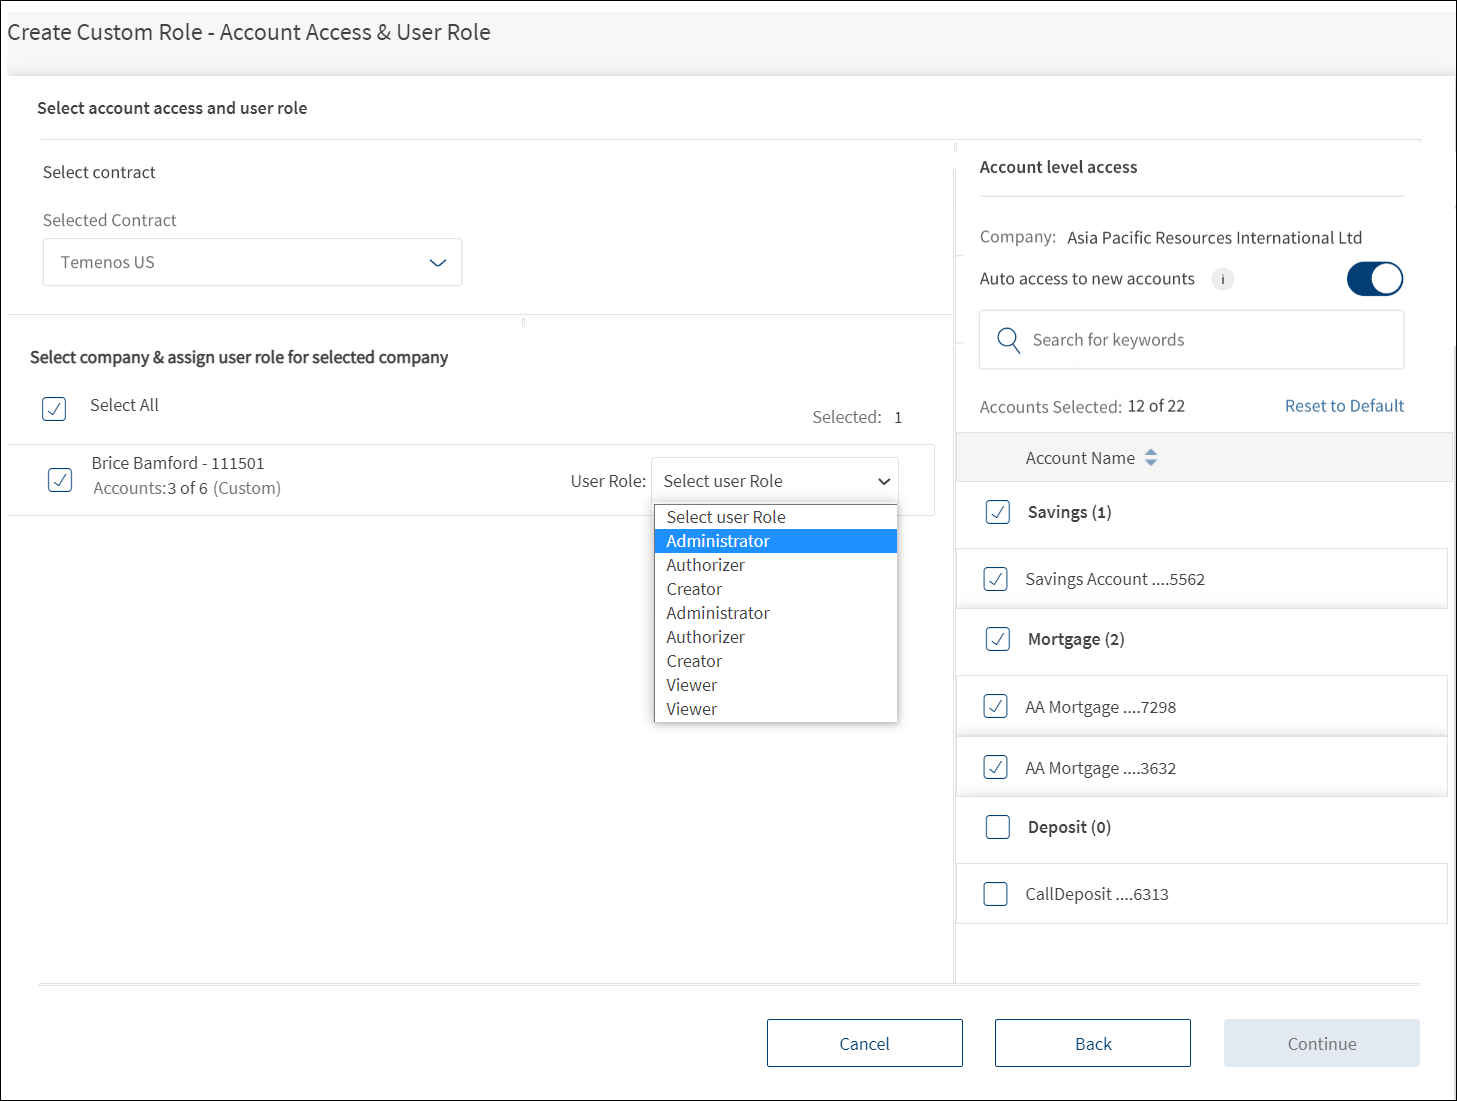
- Select the contract from the list.
- Do any one of the following:
- Assign permissions manually from scratch
- Click the manually option to assign permissions and role.
- Click Continue.
- The screen provides an option to select the Contract from the list. Select the Contract from the list.
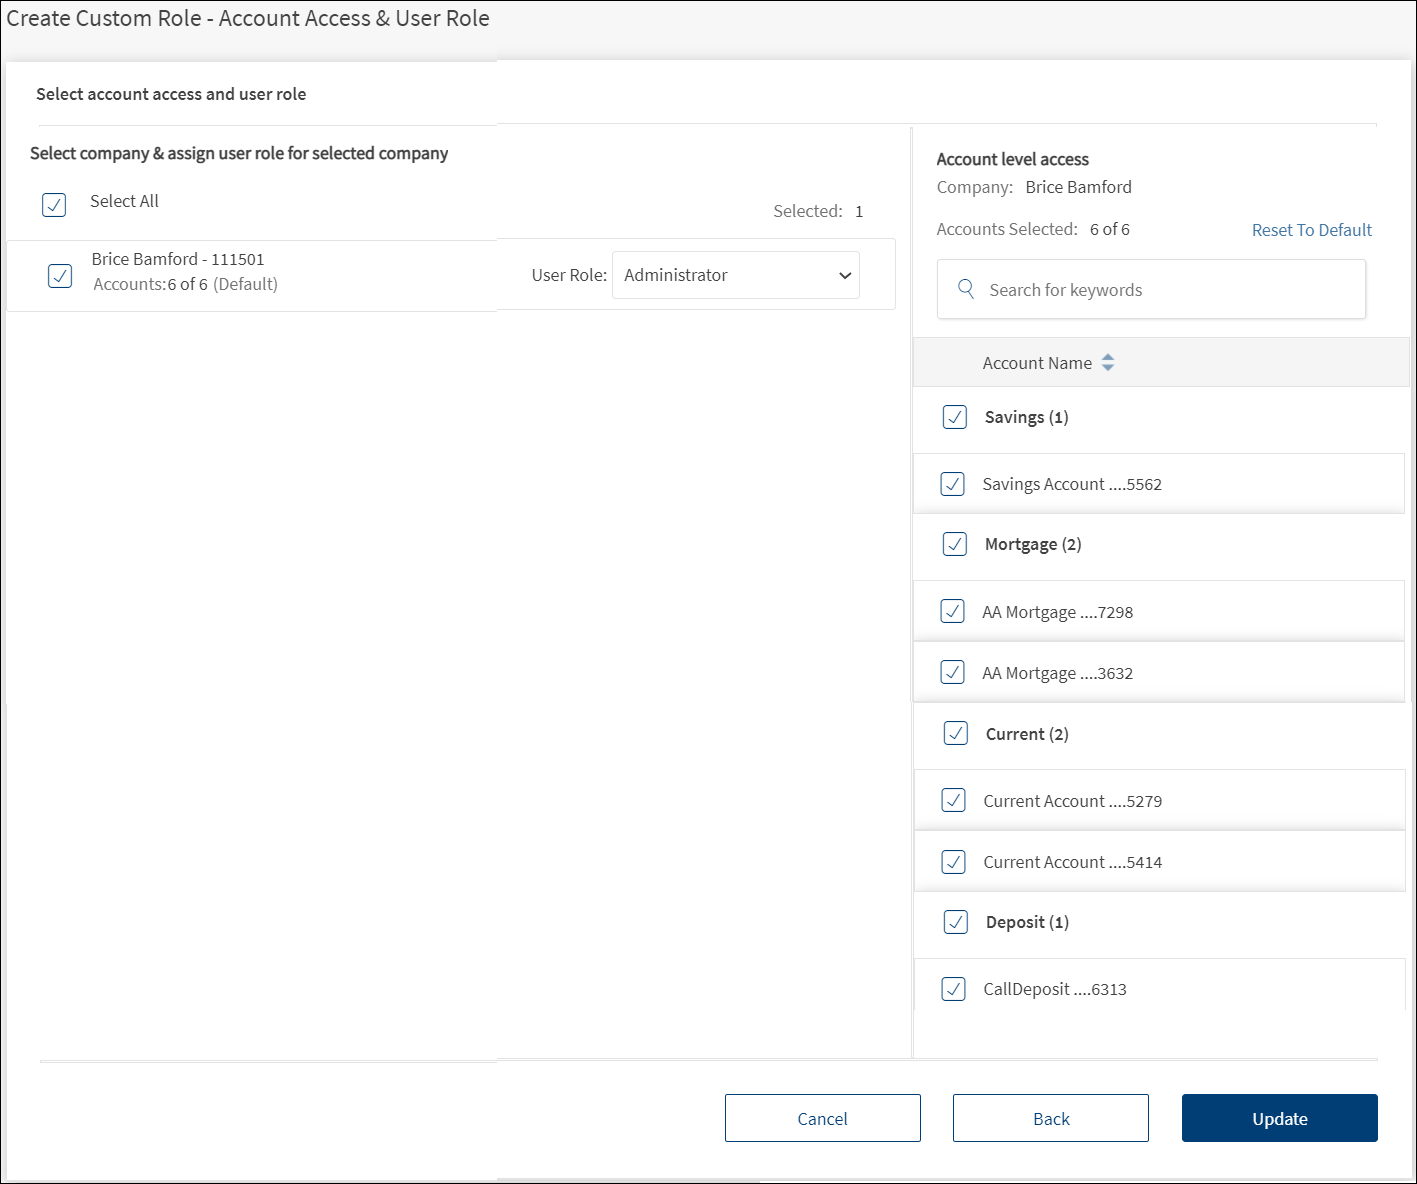
- The application displays the list of customer IDs and available user roles for the selected Contract. The roles are fetched from the Spotlight application. On the right pane, the application displays the list of accounts for the selected contract.
- Select the customer IDs from the list and the corresponding User Role from the list.
- Use the Auto access to new accounts toggle button if user is to inherit access automatically to a new account opened against a Customer ID that is assigned to the user in the backend/core banking system.
Auto access to new accounts is a functionality through which an authorized user with User Management permission can define whether a user will inherit access automatically to a new account opened against a Customer ID that is assigned to the user in the backend/core banking system. A user can use the feature while creating or editing a role at user level as well as Customer IDs level within a user access.
- Select the required accounts under Account Level Access on the right pane. The user who is assigned with this role will be able to view or operate only the selected accounts when the user signs in to the application. It is mandatory to select at least one account.
- Click Continue. The button is enabled only after a user role is selected.
- Copy permissions from existing user or custom role
- Click the copy permissions from existing user or custom role option.

- The screen displays the existing Custom Role and Existing Users list. Search for a role or user by entering the keyword in the search box.
- Do any one of the following:
- Expand the Custom Roles list. The application displays all the custom roles that have been already created.
- Select the required custom role. The selected role is highlighted alongside the custom role list when the list is collapsed.
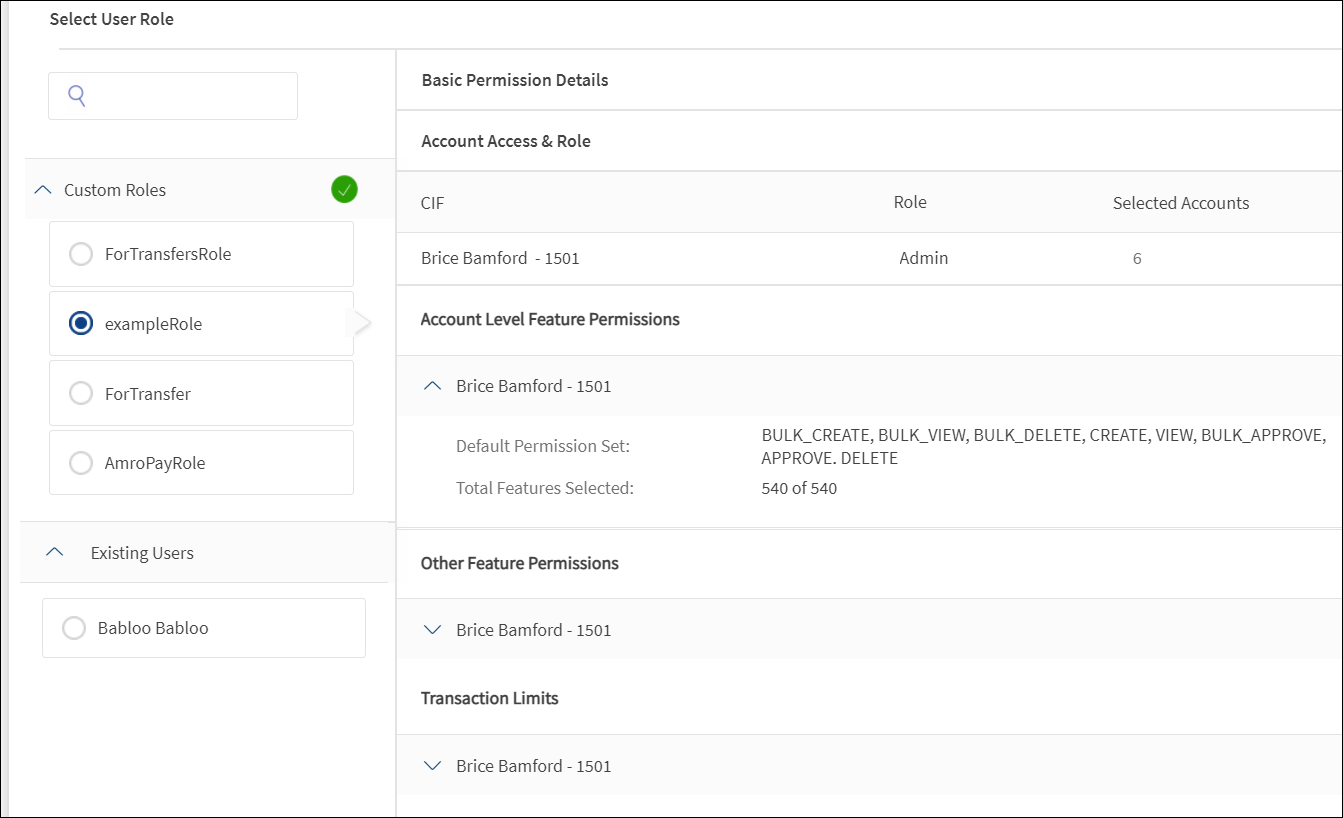
- The application displays the basic permission details, account access and role, account level feature permissions, other feature permissions, and transaction limits. The custom role being created will inherit all the permissions of the selected custom role.
- Expand the Custom Roles list. The application displays all the custom roles that have been already created.
- Click the Existing Users list. The application displays all the existing users.
- Select the required user.
- The application displays the basic permission details, account access and role, account level feature permissions, other feature permissions, and transaction limits. The custom role being created will inherit all the permissions of the selected custom role.
- Click Continue. The Continue button is enabled only if a valid custom role name is entered.
Click Back to go back to the previous screen or click Cancel to can the operation. The changes are not saved.
Review Role Details and Permissions to Account Level Features, Other Features and Transaction Limits
Review the details that you have already entered and modify the account level permissions to features and define transaction limits as required. The permissions and transaction limits are set up based on the mode you selected to create the custom role - assign permissions manually or copy permissions from existing user or custom role. You can modify the permissions to features now or review and change the details later.
The application displays the following sections. Use the edit option to modify the details:
- Role Details
- Account Access and Role
- Account Level Feature Permissions
- Other Feature Permissions
- Transaction Limits
To edit the details in any of the sections, follow these steps:
- Click Edit or View/Edit links as applicable to modify the details.
- Modify the changes as required.
- Click Update. The changes are updated.
- After reviewing the custom role details, permissions to features, and defining the transaction limits, click Create Role to submit the form.
For more information, see review permission section of the Create Business User feature.
Role Details
- Modify the Custom Role Name and select the contract from the list as required.
- Click Continue.
Account Access and Role
- Modify the details as required - contract, user role, and account access.
- Click Update to save the changes. The button is enabled only if there are any unsaved changes.
Account Level Feature Permissions
- Modify the details as required - contract, feature permissions, and feature level access permissions.
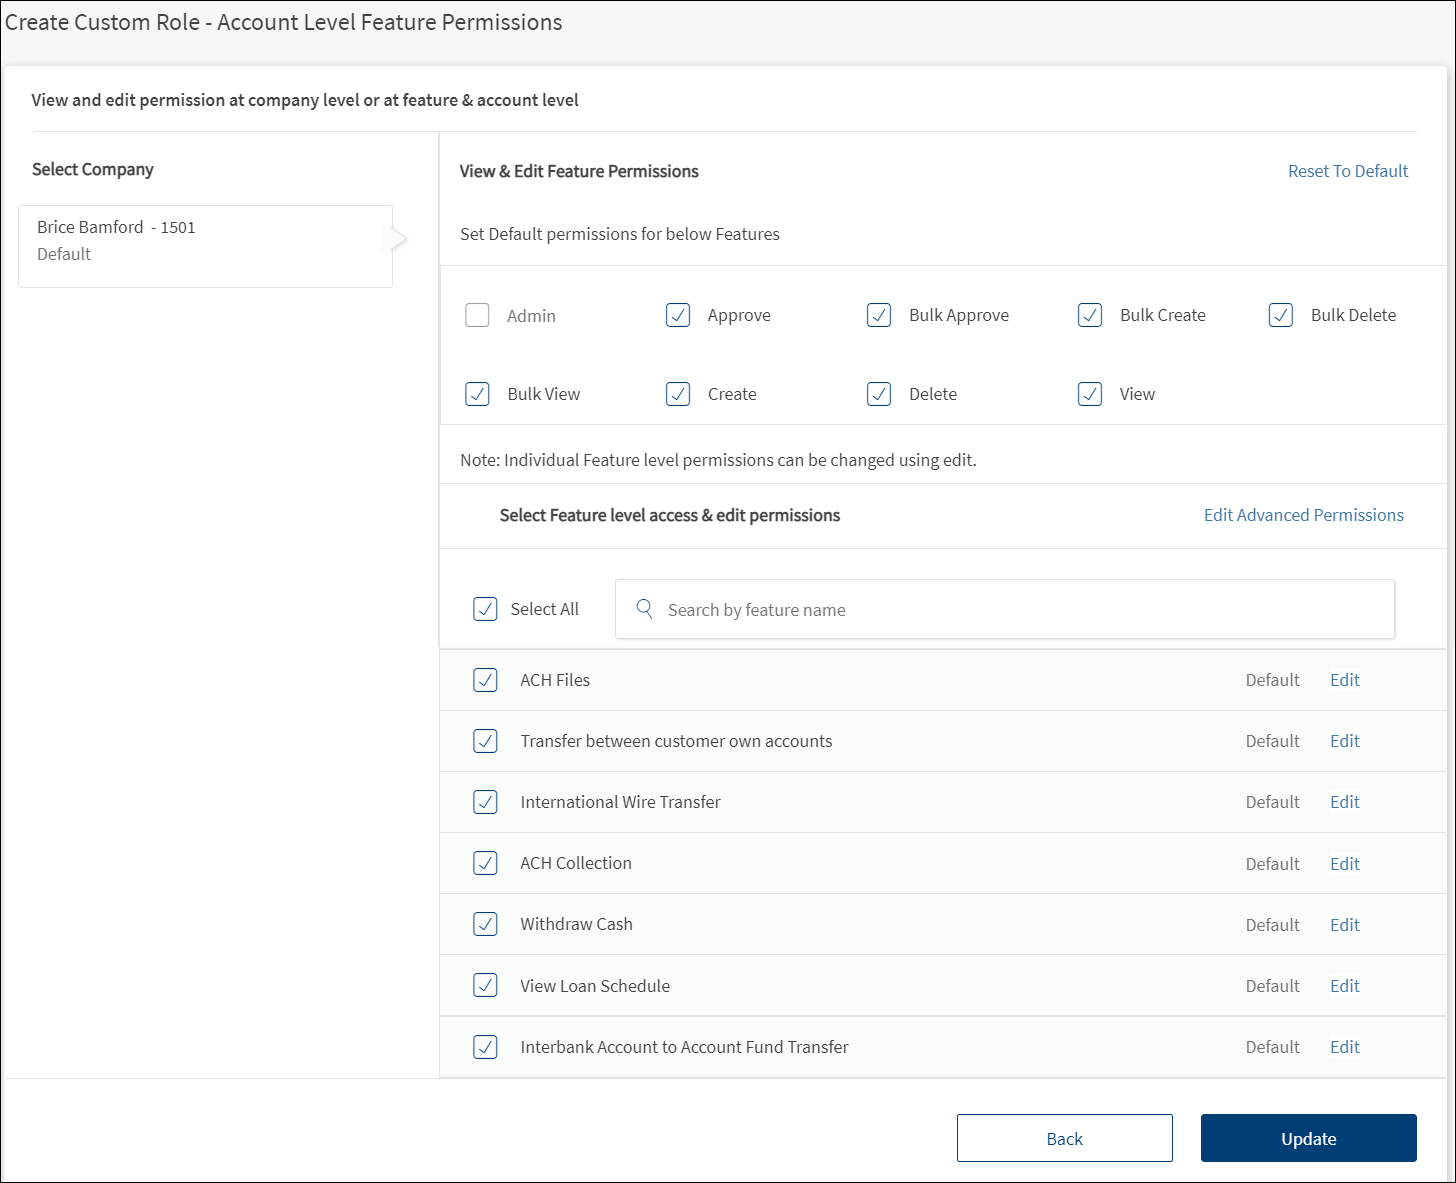
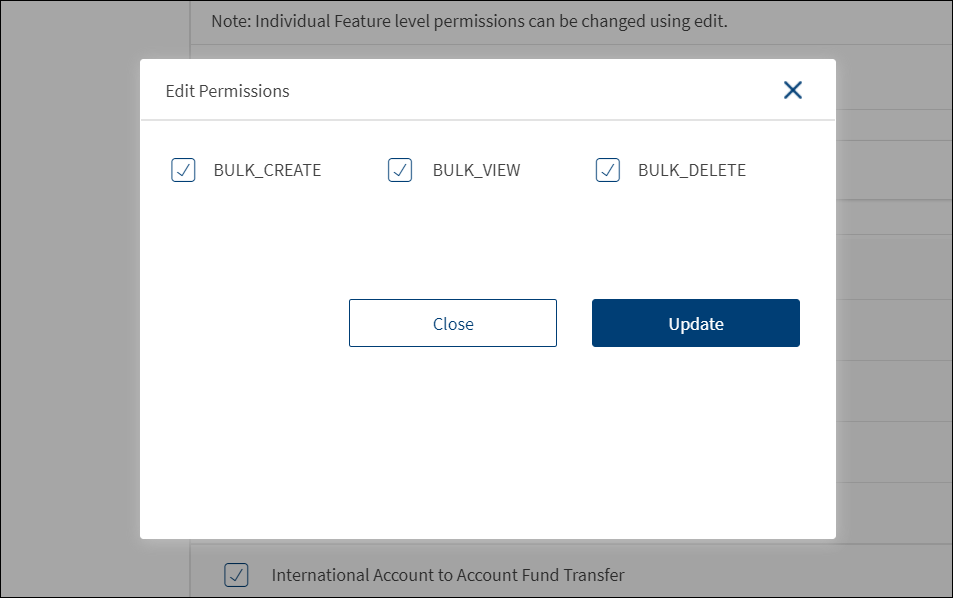
- Click the Edit link placed beside the features and make permission changes as required for the selected feature and click Update.
- Click Edit Advanced Permissions to modify the account level permissions in bulk.

- Click Update to save the changes. The button is enabled only if there are any unsaved changes.
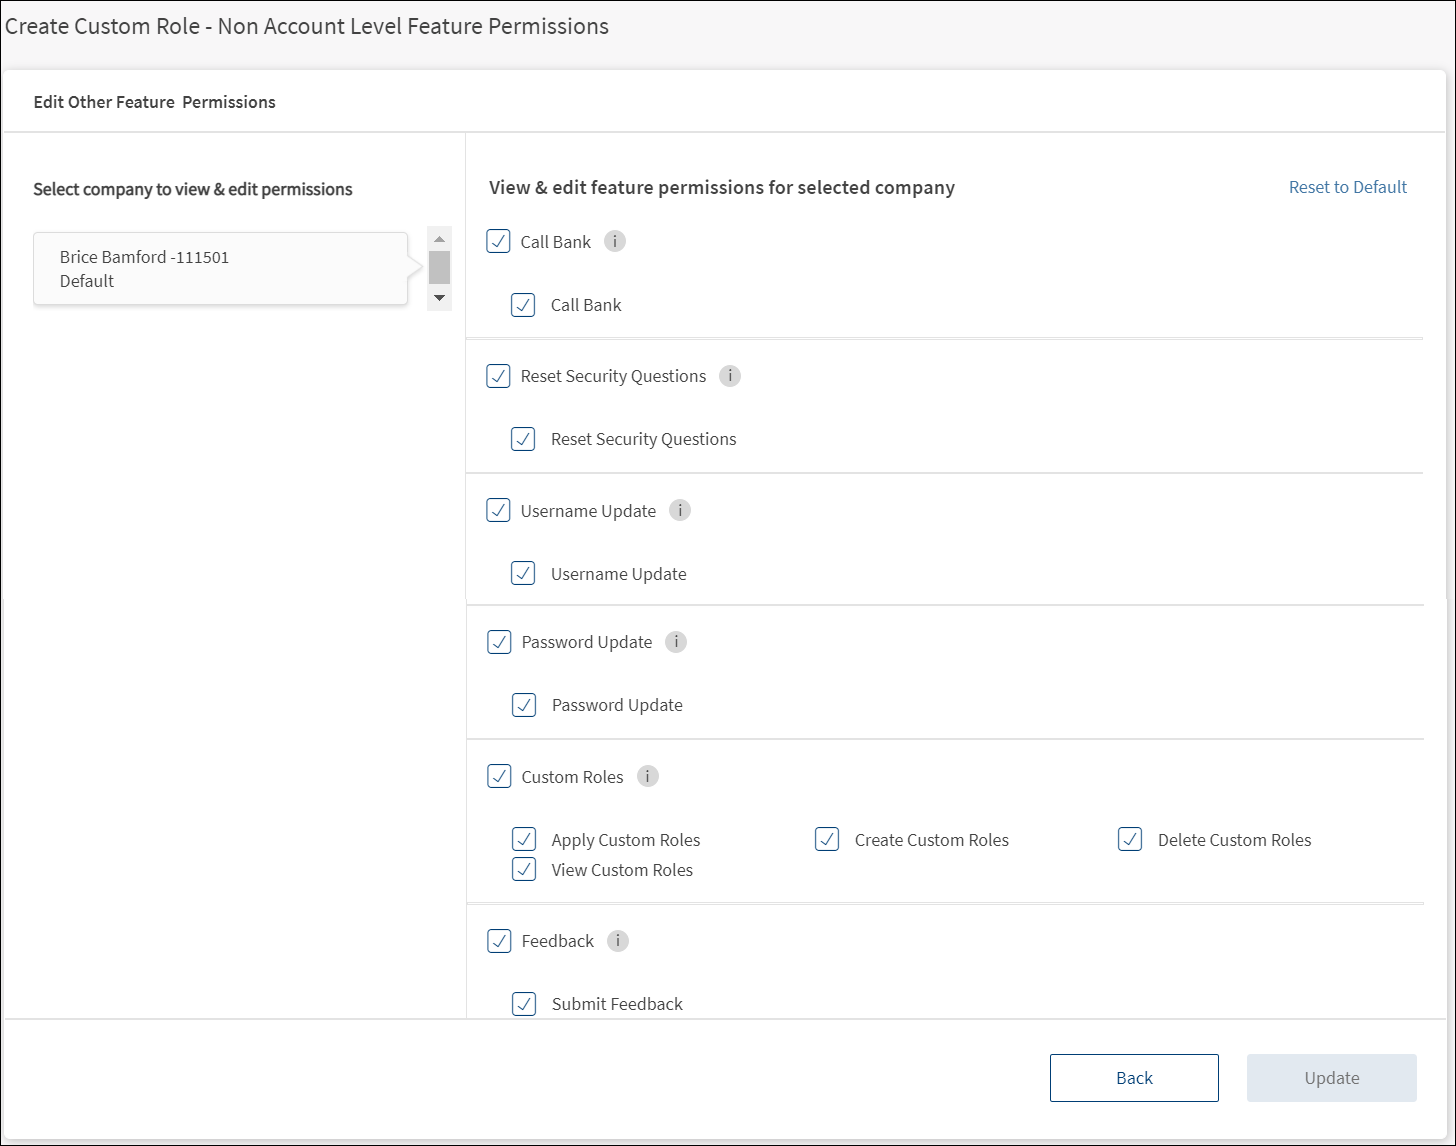
Other Feature Permissions
- Modify the details as required - contract and feature permissions.
- Click Update to save the changes. The button is enabled only if there are any unsaved changes.
Transaction Limits
- Modify the details as required - contract, global transaction limits, and advanced transaction limits.
- Click Update to save the changes. The button is enabled only if there are any unsaved changes.
Create Role Acknowledgment
After the form is submitted, the custom role is created successfully, and the application displays an acknowledgment screen with a unique reference number and few details of the custom role such as the custom role name, contract name, user role, and permission details.
The record is added to the list of user roles. At the backend, the record is saved to the DBX database.

You can do any of the following on this screen:
- Expand account level feature permissions, other feature permissions, and transaction limits to view the details.
- Click View All Roles to navigate to the list of custom roles.
Search for a Custom Role
Use the search option to search for a custom role using search criteria. Enter the search keyword in full or in part.
Menu Path: Side Menu > User Management > User Roles > Search option

The keyword can be from any of the following fields:
- Role name
- Role creator name
- Parent role
Configuration
- The visibility of each feature is controlled through the permissions defined for the user. See permissions for more information. The permissions at user levels are defined during user creation and while editing the user details after the user is created. In case the user does not have access to any of the features, that option will not be visible on the form and on the menus. The permissions at the company level and role level are defined in the Spotlight application.
- The custom roles are saved to the DBX database.
- The parent roles are fetched from the Spotlight application.
- The Feature/Role/Company level transaction limits for recurring, nonrecurring, non-scheduled, and scheduled transactions are managed in the Spotlight application. User level limits can be managed in Spotlight and the customer-facing application.
-
Feature and action names. A retail/business banking user who has requisite permissions to create/edit Custom roles can see the Feature Actions listed by the FEATURE_ACTION name when trying to Edit the Advanced Transaction Limits for the custom role. A user going into the Advanced Transaction Limits flow at the account level for a Custom Role can see the Feature Name - Action Names under the Transaction Type column.

APIs
The following APIs are shipped as part of this feature. For the complete list of APIs with more information, see Experience APIs documentation.
| API | Description |
|---|---|
| createCustomRole | Creates custom role for a specific organization. POST method is used for sending the data to back-end system. |
| fetchCustomRoleList | Gets the list of all custom roles that were created for a specific organization. POST method is used for fetching the custom role list. |
| getCustomRoleDetails | Fetches all the permissions template details from the server - primary details, account access, feature permissions, account transaction limit. POST method is used for fetching the data from server. |
| updateCustomRole | Edits and updates the existing custom roles through view permissions details page. POST method is used. |
| deleteCustomRole | Deletes the existing or newly created custom role. POST method is used. |
| assignCustomRoletoCustomer | Applies the created custom role to users. POST method is used. |
In this topic