Signatory Groups
Signatory groups are created so that rules can be defined in the approval matrix for a set of users with required approval permissions formed as a group to approve or reject transactions instead of setting the rules per user which would be otherwise cumbersome to handle when an establishment has many users in the approving role. When the rule is applied on a particular transaction, any member of the signatory group can be used to fulfill the criteria of the approval rule that is referencing the group instead of specific users
Signatory Groups are used to group users with same signatory power. Signatory Groups can be created for each level of hierarchy within an organization. For each customer, the business administrator can create multiple Signatory or Approver Groups and add users who have approval permissions to these groups. A signatory group is assigned to a customer and online banking users (external users) are then referenced in these Signatory Groups. The Signatory Groups can be accessed and customized through a dedicated menu in the self-service channel. From here, groups can be created or deleted, and individual users can be added or removed from groups.
Use the feature to create and manage signatory groups for approving monetary and non-monmonetary transactions.
Signatory Groups feature appear as a sub-menu item under the Approval Matrix option of Settings menu provided the authorized user has View Signatory Groups permissions on at least one customer. The user can view the list of customers that have signatory groups associated with the customers and the number of signatory groups associated, provided the user has at least a View Signatory Groups permissions on those individual customers.
An FI or a bank would like that businesses are able to use permissions (entitlements) to control which users are able to view and setup or manage Signatory Groups on a customer ID. For this, a feature, called Signatory Groups is created in Spotlight which is a user level permission that can be assigned on Customer IDs. This feature has two associated actions, “View-Signatory Groups” and “Edit-Signatory Groups”.
- View-Signatory Groups is a mandatory action on the feature that allows the user to view the signatory groups that are associated with a customer ID.
- Edit-Signatory Groups is an optional action on the feature that allows the to create signatory groups on a customer ID or edit existing Signatory Groups for a customer.
A user who has permissions to set up the approval matrix has View-Signatory Groups permission compulsorily. These two permissions go hand-in-hand as these are essential to view the details of the signatory groups whenever approval rules are being set up for a specific customer ID.
- The elements, menus, actions that can be performed are permission-driven and controlled depending on the permissions assigned to the user. For example, a user with only the view permissions cannot edit or delete the signatory groups.
- The signatory groups have a set of permissions such as view signatory groups, create edit signatory groups, and delete signatory groups. A user will see the actions on the application depending on the permissions assigned to the user. For example, if the user does not have create edit signatory group permission, then the user will not see the option to create a signatory group.
- Depending on the size and needs, an organization can decide either to have a user based or signatory group based approval matrix. This can be configured at the contract level in the Spotlight application. If the approval matrix is set to user based, then the Approval Matrix > Signatory Groups tab will not be displayed on the menu. In this case, the rules are to be set user based using the Approval Matrix > Manage Approvals tab. The Manage Approvals tab, however, will be displayed even if the approval matrix is set to signatory based because all users will have the minimum view permissions.
Menu Path:
- Side menu > Settings > Approval Matrix > Signatory Groups
- Top menu > Profile picture > Approval Matrix > Signatory Groups
UX Overview
The application displays the Approval Matrix dashboard on the Settings screen. By default, the Manage Approvals tab is selected. On the left pane, click Signatory Groups.


The Signatory Groups tab displays the following on the right pane:
- List of customer IDs: List of customers that have signatory groups associated with them and also the number of signatory groups associated, provided the user has at least a View Signatory Groups permissions on those individual customers. The following details are displayed: Customer Name, Contract name, number of Signatory Groups created for the customer, and the Action that can be performed. The newly added signatory group shows under the respective customer to which it is added.
- View Groups: Click the link to view the list of existing signatory groups for the customer and additionally, manage signatory group details and add a new group for the selected customer as required
- Search: Use the search option to look for specific customers by customer name, customer ID, or the contract name.
- View filter: Use the View list to filter the list by contract, signatory group, or users. By default, the All option is applied.
- Sort: The list is sorted by Customer Name by default, but you can also sort the list based on Signatory Groups using the sort
 icon.
icon.
View Signatory Groups List
Use the feature to view the list of existing signatory groups created for the customer.
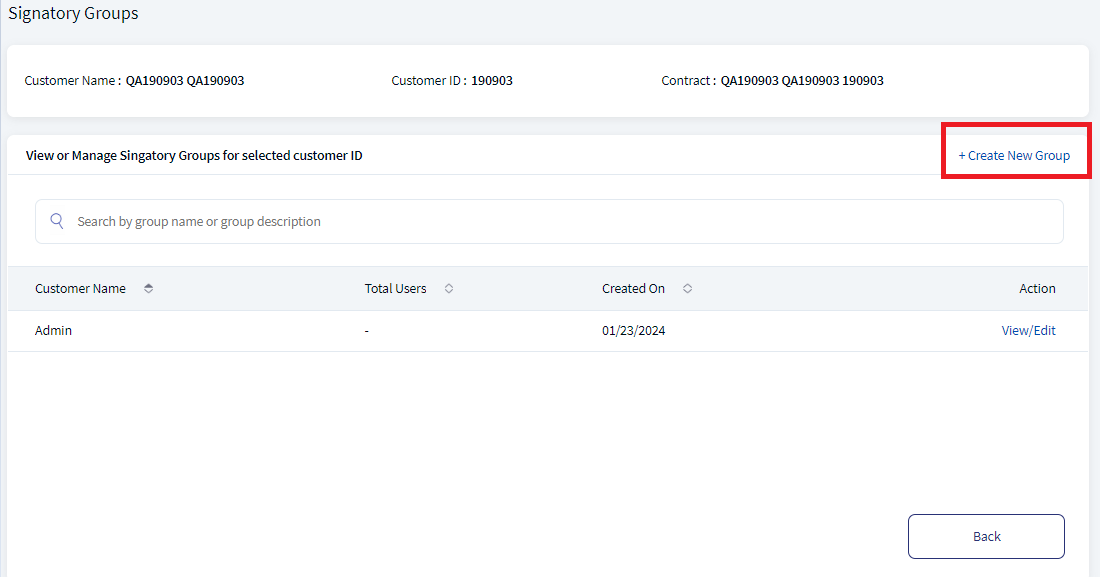
On the Signatory Groups tab, click the View Groups link. The application displays the Signatory Groups screen.

The application displays the following:
- Header: The Customer Name, Customer ID, and the Contract name on the header.
- Groups list: The list of signatory groups already created for the customer with Group Name, Total Users, Created On date, and the Action that can be performed.
Do any of the following:
- Search: Use the search option to look for specific groups by group name or group description.
- Sort: The signatory group list is sorted by Group Name by default, but you can also sort the list based on the group Created On date using the sort icon.
- Manage group details: Under Action, click the View/Edit link to manage the signatory group details such as edit the group details, manage users in the group, and delete the group if it is no longer required.
- Create new group: Click the Create New Group link to create a new signatory group.
Manage Signatory Group
Use the feature to manage the signatory group details such as edit the group details, manage users in the group, and delete the group if it is no longer required.
An authorized user can have the permission to View Signatory Groups for one or more Customer IDs. These customer IDs may belong to the same contract or be part of different contracts.
- A user with permissions to view signatory groups for one or more Customer IDs can view the details of every signatory group that the user has the permission to access.
- A user with permissions to edit signatory groups can see the option to edit the group details.
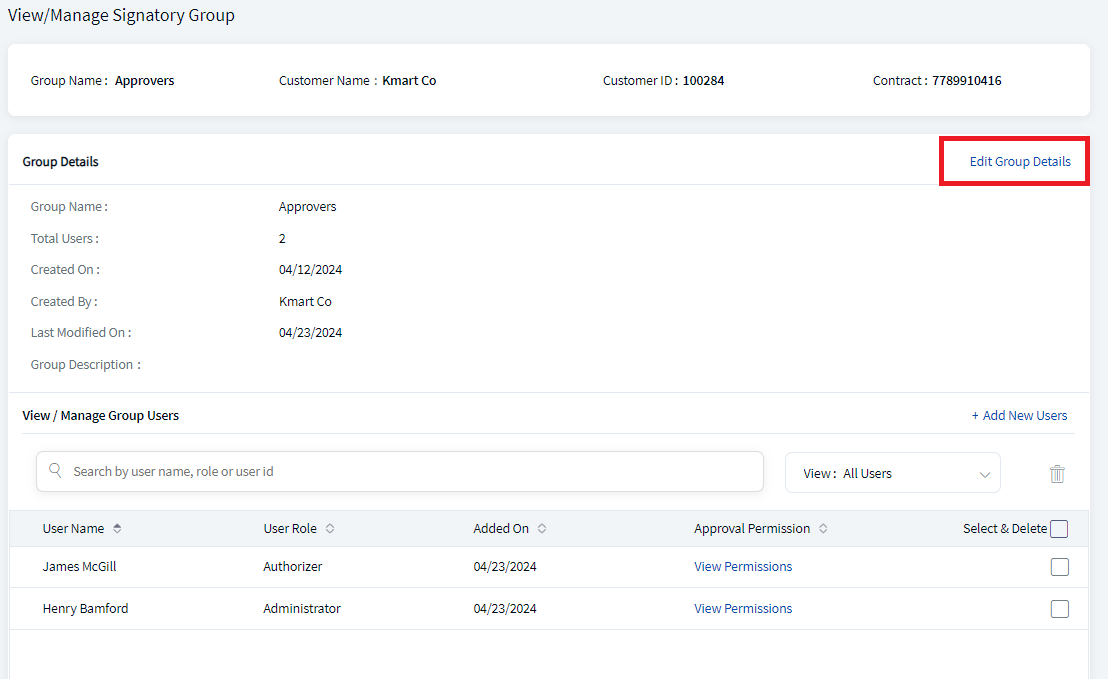
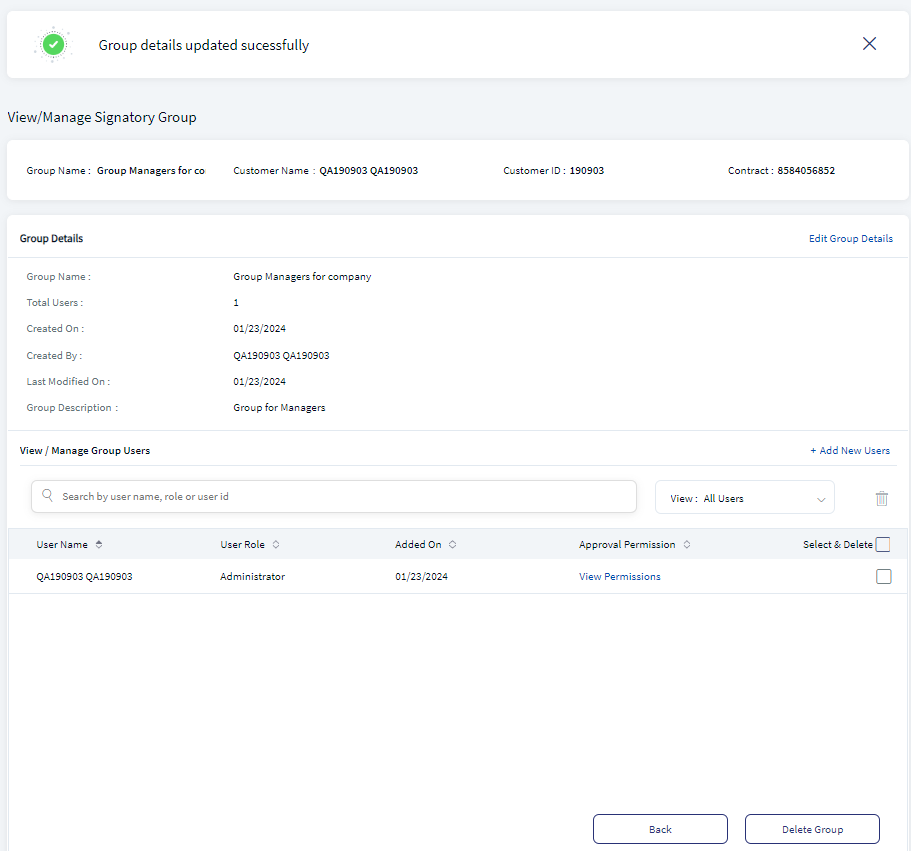
On the Signatory Groups list screen, click the View/Edit link of the group that you want to modify. The application displays the View/Manage Signatory Group screen.
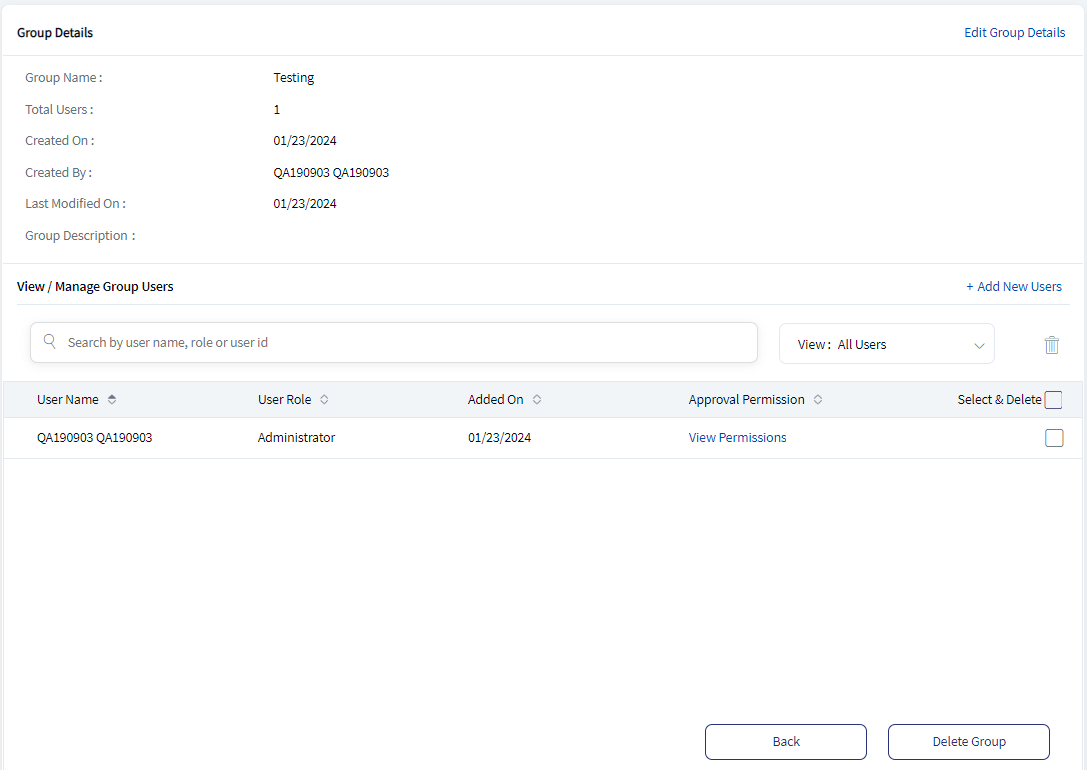

The application displays the following:
- Header: The Group Name, Customer Name, Customer ID, and Contract name on the header.
- Group Details: Under Group Details, the application displays the following: Group Name, Total Users in the group, Created On date, Created By, Last Modified On, and the Group Description.
- View/Manage Group users: The list of users already added to the group with details such as User Name, User Role, Added On, Approval Permission, and Select & Delete option.
Do any of the following:
- Under View/Manage Group User, do any of the following:
- Search: Use the search option to search for specific user by user name, role, or user ID.
- View filter: Use the View list to filter the list by user role or approval permissions. By default, the All Users option is applied.
- Sort: The user list is sorted by User Name by default, but you can also sort the list based on the User Role, user Added On date, and Approval Permission by using the sort icon.
- Add New Users: Click to add new users to the group.
- Select & Delete: Remove specific users from the group.
- View Permission: Click to view the permission details of the user.
- Edit Group Details: Click to modify the group details.
- Delete Group: Click to delete the group that is not being used by any approval group.
Add Users to Group
Use the feature to add new users to the group. An authorized user with permissions to create signatory groups can add users to the signatory groups. For more information on adding users to the group, see create a signatory group.
To add users to the group, follow these steps:
- From the View/Manage Group Users section, Click Add New Users.

- The application displays the Add New Users screen with the list of users not yet part of the group with User Name, User Role, and check box to select the user to the group.
- Search: Use the search option to select user by first name and last name, user role, or user ID. The search works only on the selected filter option.
- View filter: Use the View list to filter the list by user role or feature permissions. By default, the All Users option is applied.
- Select the check box of a user to be added. Multiple selection is allowed. Click Select All to select all users in the list. An authorized user with permissions to edit signatory groups can add additional users to the group.

- The application displays the number of users selected as Total Selected on the section header.
- After selecting the users, click Continue. The button is enabled only after a user is selected.

- The application displays the screen with the selected users and provision to modify the details if required. Click Modify to add or remove any user.
- Click Add Users.
- The application displays a confirmation message that the selected users are added to the group. The selected users are added to the group.

Remove Users from Group
Use the feature to remove the selected users from the group. If the user does not have Edit permission, the functionality on the last row to select and delete individual users will not be available. An authorized user with permissions to edit signatory groups can remove users from the group.
To remove users from the group, follow these steps:
- From the users list under the Select & Delete column, select the check box of the users that you want to remove from the group. The delete bin icon is enabled. Otherwise, the icon will be in disabled state. Multiple selection is allowed. Click Select All to select all users in the list to remove from the group. Only an authorized user with permissions to edit signatory groups can remove users from the group.

- Click the delete bin icon to remove the selected users from the group.

Impact of removing users from group: A group may be part of an approval matrix used as part of a rule (for example, International transfers on Customer #100100 need two signatures from Group "Managers"). Removing a person from the "Managers" group will not impact the transactions that are already pending approval. All future transactions will consider the changes set in the group.
- The application displays a confirmation message that the selected users are removed. The selected users are removed from the list.

View User Permission
Use the feature to view the approval permissions available to the selected user.
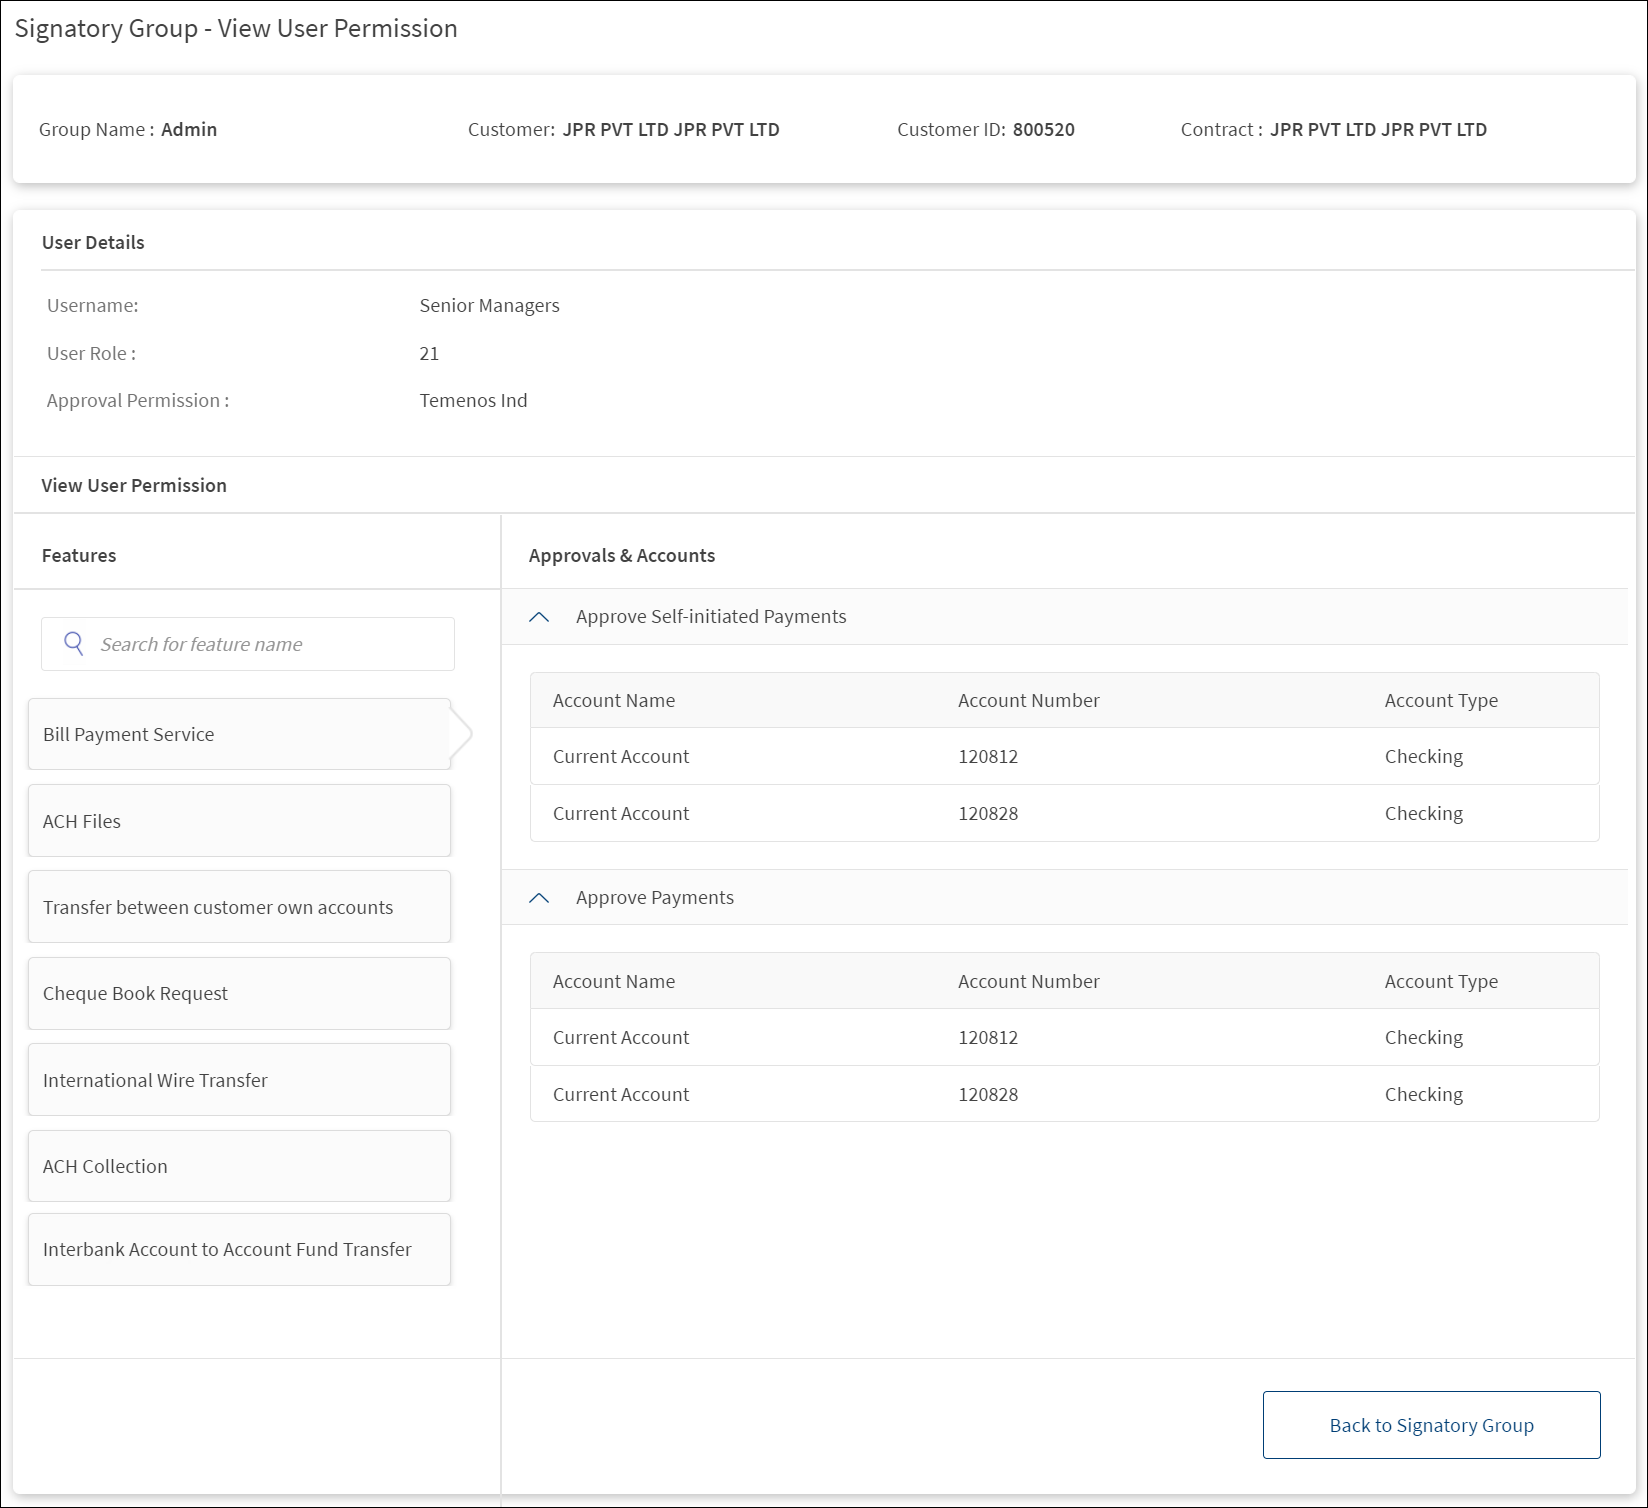


The application displays the following details:
- Header: The Group Name, Customer name, Customer ID, and the Contract name on the header.
- User Details: The Username, User Role, and Approval Permission.
- View User Permission section
- Displays the monetary and non-monetary features list on the left pane.
- Displays the corresponding approval permission details for the accounts on the right pane under Approvals & Accounts grouped under Approve Self-initiated Payments and Approve Payments. Use the arrow keys to expand or collapse the details.
- Select any feature on the left pane to view the corresponding approval details on the right pane.
- Use the search box to search for a specific feature by feature name.
Click Back to Signatory Group to go back to the previous screen.
Edit Signatory Group Details
Use the feature to modify the signatory group details. An authorized user with permissions to edit signatory groups can see the option to edit the group details and edit the following details of an existing signatory group: Group Name and Group Description.
Follow these steps:
- On the View/Manage Signatory Group screen, click the Edit Group Details screen. The application displays the Edit Group Name modal screen with the following details: Group Name and Group Description.
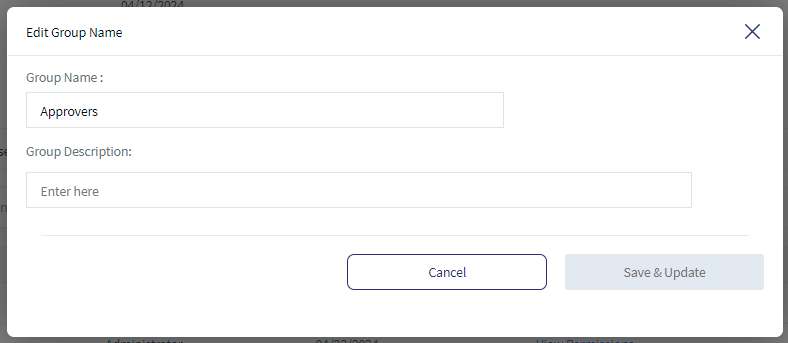
- Modify any of the following:
- Group Name: Enter a unique name and check for uniqueness by clicking Check Availability. A green tick mark is displayed if the new group name is available.
- Group Description
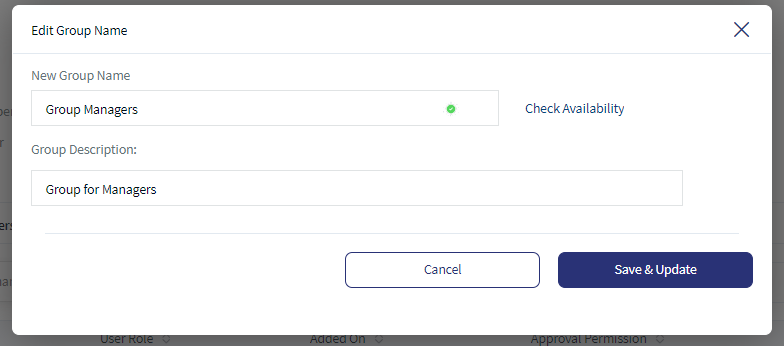
- Click Save & Update.
- The application displays a confirmation message that the details are updated successfully.
Create Signatory Group
Use the feature to create a signatory group. The signatory groups created here are displayed as a list while creating approval rule for approval matrix.
On the Signatory Groups list screen, click the Create New Group link.
Follow these steps:
- On the Signatory Groups list screen, click the Create New Group link.
- The application displays the Create New Signatory Group screen with the following details:
- Header: The Customer Name, Customer ID that the group is associated with, and the Contract name on the header.
- Provision to enter group name and select users to the group.
- Provide group name and select users section
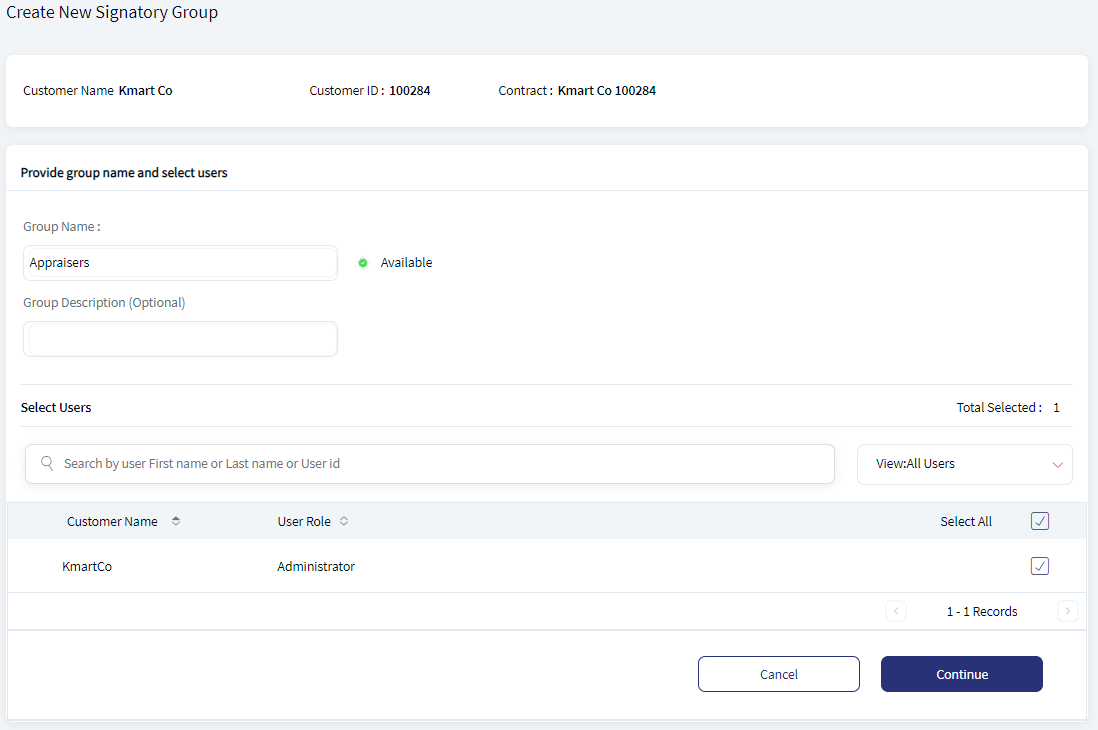
- Enter a unique Group Name and check for uniqueness by clicking Check Availability. A green tick mark is displayed if the new group name is available.
- Enter Group Description in the box. It is an optional field.
- Select Users section
- The application displays the list of users with User Name, User Role, and check box to select the user to the group. The Total Selected users to the group is also displayed.
- Search: Use the search option to select user by first name and last name, user role, or user ID. The search works only on the selected filter option.
- View filter: Use the View list to filter the list by user role or feature permission. By default, the All Users option is applied.
- Sort: The user list is sorted by User Name by default, but you can also sort the list based on the User Role, user Added On date, and Approval Permission by using the sort icon.
- Only the users meeting the following criteria in the example below can be added to a signatory group. Consider Signatory Group "Managers" has been created for Customer ID #100100.
- User must have access to the Customer ID #100100.
- User must have Approval Permission for at least one feature for any of the accounts associated with the Customer ID #100100.
- User must not be part of any other Signatory Group for the same customer ID (if the user is part of Signatory Group "Supervisor" of Customer #100100, then the user cannot be added to Signatory Group "Managers").
- User must not be already added to the signatory group (user should not be already part of Signatory Group "Managers"). This includes the committed changes and the soft additions.
- After the users are added to the signatory group, these are still maintained as a soft addition until the signatory group creation is completed.
- Impact of adding more users to a group: A group may be part of an approval matrix used as part of a rule (for example, International transfers on Customer #100100 need two signatures from Group "Managers"). Adding another person to the "Managers" group will not impact the transactions that are already pending approval. All future transactions will consider the changes set in the group.
- For information on removing users from the group, see Remove users from group.
- Select the check box of a user to be added. Multiple selection is allowed. Click Select All to select all users in the list. Adding users to the group is optional. Groups can be created even if there are no users added to the group.
- The application displays the number of users selected as Total Selected on the section header.
- After selecting the users, click Continue. The button is enabled only after a user is selected.
- The application displays the list of users with User Name, User Role, and check box to select the user to the group. The Total Selected users to the group is also displayed.
- The application displays the Verify & Confirm screen with the following details:
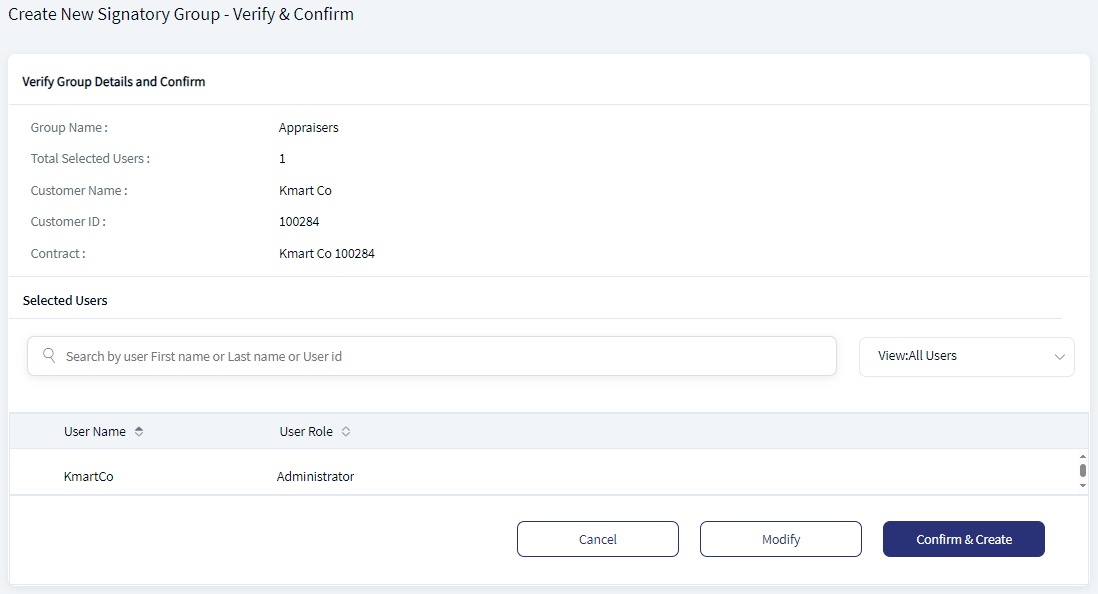
- Group Name
- Group Description (Not shown if the details are not entered)
- Total Selected Users in the group
- Customer Name
- Customer ID
- Contract name
- Selected Users with User Name and User Role
- Provision to modify the details if required.
- Click Modify to change any user if required.
- After making the required changes, click Confirm & Create.
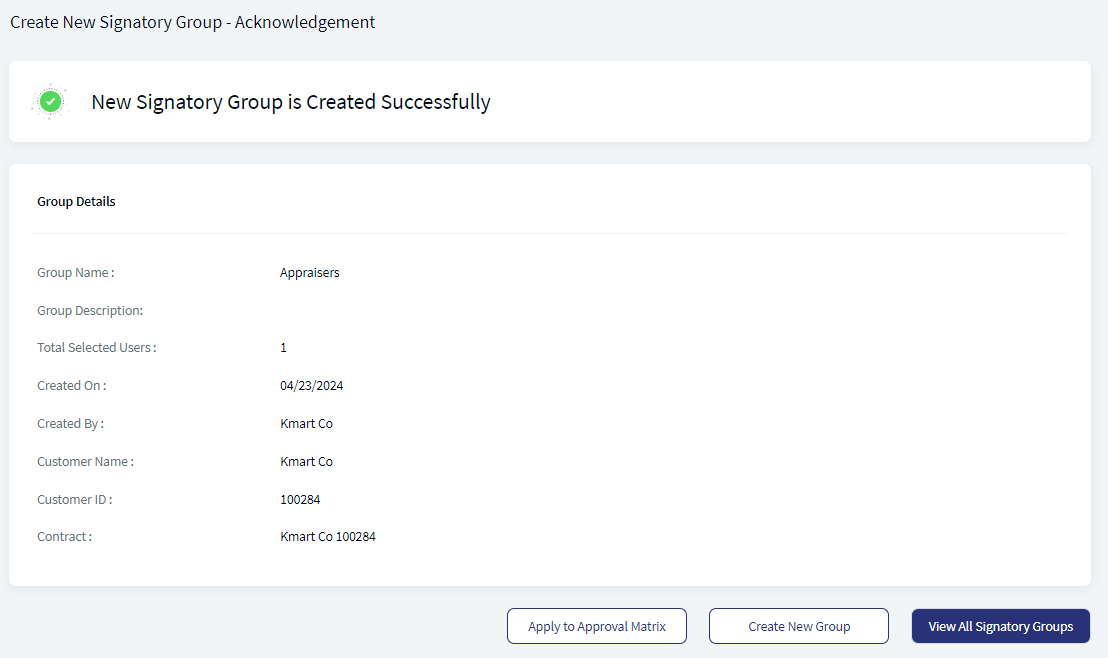
- The application displays a confirmation message that the signatory group is created successfully with the following details: Group Name, Group Description (not shown if not entered), Total Selected Users, Created On date, Created By, Customer Name, Customer ID, and Contract name. The new group is added to the signatory groups list.
- Do any of the following on the acknowledgment screen:
- Create New Group: Click to create another signatory group.
- View All Signatory Groups: Click to navigate to signatory groups list.
- Apply to Approval Matrix: Click to navigate to approval matrix and apply for approval matrix. This button is displayed only if the signed-in user has Approval Matrix Edit permissions.
Delete Signatory Group
Use the feature to delete a signatory group that is not being used by any approval group. The delete feature is visible only to those users who have Delete Signatory Group permissions on the customer ID.
Follow these steps:
- On the View/Manage Signatory Group screen, click Delete Group.

- The application displays a pop-up to confirm. Click Delete.
- Click Cancel to cancel the operation. The changes are not saved.
- If the signatory group is associated with pending transactions, the group cannot be deleted. The application displays an appropriate pop-up. The group must be removed from approval policies before it can be deleted.

- The application displays a confirmation screen that the group is deleted and navigates to the signatory groups list.

Configuration
- The visibility of each feature is controlled through the permissions defined for the user. See permissions for more information. The permissions at user levels are defined during user creation and while editing the user details after the user is created.
- In case the user does not have access to any of the features, that option will not be visible on the form and on the menus.
- The permissions at the company level and role level are defined in the Spotlight application.
APIs
The following APIs are shipped as part of this feature. For the complete list of APIs shipped as part of this feature, see Experience APIs documentation.
| API | Description |
|---|---|
| FetchSignatoryGroups | Fetches all the Signatory Groups for specified coreCustomer ID and Contract ID. |
| FetchSignatoryGroupDetails | Fetches all the Signatory Group details based on signatoryGroupId. |
| FetchEligibleSignatoryUsers | Fetches all the eligible user with at least one approval permission for specified coreCustomer ID and Contract ID. |
| IsSignatoryGroupEligibleForDelete | Checks if the signatory group is not being used by any approval group and if there are no approvals pending with this signatory group. |
| DeleteSignatoryGroup | Deletes the signatory group. |
In this topic