View Statements
The Statements feature displays the list of all transactions made in the selected time period. Use the feature to view the statements for the selected account instantly. The app contains View Statements feature enabled for all eligible accounts.
Menu path for View Statements:
- Online Banking: From the accounts dashboard screen, click on the required accounts contextual menu
 > View Statements or click on the required account, and click View Statements from the What else do you want to do? list. The app displays the View Statements screen.
 - Mobile Native: From the account dashboard screen, tap on the required account. The app displays account summary screen with Statements as one of the contextual buttons.
View all the statements generated and archived in the document management system for that particular month. For each month there could be more than one statement based on the frequency in which the statements are generated. For example, Daily, Weekly, Bi-monthly, or Consolidated statement is generated Quarterly or Annually. All the statements generated in a month are grouped under that month. Switch between years to view statements for a specific year.
The statements are displayed with the document name or the date the statement was generated as the display name. The name of the document is retrieved from the document management system.
Online Banking

Use the Statements feature to download the statement of the required month for the selected account.
Specify the following:
- Select Account: By default the selected account is displayed in Select Account list.
- Select Year: Select the required year from the list.
- Click on a statement to view/download the PDF format of the statement generated for the selected month.
Online Banking

Mobile Native


On the online banking application, click Go to Account Summary to navigate to the online banking dashboard screen or click Statement Result to navigate to the account details screen of the selected account.
In mobile native application, view/download the PDF statement on the device. Tap the back < icon to return to the Account Statements screen.
Enabling E-Statements
Enable the e-statements feature for any account from the Account Settings feature. When a user enables e-statements, the user will stop receiving the hard copy of statements to the registered address. Instead, receive the soft copy of the statements to the user's registered email ID.
Combined Statements
Users can download the consolidated statement across their multiple accounts. A user can perform the following to download a consolidated statement:
- Select multiple accounts to generate a combined statement
- Accounts can be grouped by account type
- Filter the accounts using the default filters
- Download the reports within the selected time range
- Modify or change the accounts or time range
- View the statement generated
- Download the statement (PDF/Excel/CSV)
Menu path:
- Online Banking: Side menu > Account Services > Account Statements
- Mobile Native: Hamburger menu > Account Services > Account Statements
The Account Statements screen displays the E-Statements tab by default. Click Combined Statements to generate a consolidated statement for the selected account.
To generate a consolidated statement, follow these steps:
- Click Generate New Statement.
- Select the time range for which the statement to be generated. Select the From and Date.
The consolidated statements can be generated only for the past six months of transaction. However, this can be configured in Spotlight under System Configurations. If the time range is greater than six months, an error message is displayed.
- Personal Bank Accounts. All the accounts of the logged in user are displayed. The accounts are grouped based on the account type or customer ID.
- Click Select All to select all the accounts of the user.
- Based on the selected account type, the list of accounts with the account name, nickname, and the last four digits of the account number are displayed. Select a particular account by clicking the check box.
- Click the list on the top to filter the different account types. The available filter options are:
- Preferred accounts
- Personal accounts
- Customer ID
All accounts are displayed by default. Filter the accounts based on the requirement.
- Click Continue. A pop-up is displayed with the selected time range and the format to generate the statement. The available formats are:
- Excel
- CSV
- Select the option from the list and click Generate. A system notification is displayed when the statement is prepared.
- Click OK. The status of the statement generated will be In progress and a message is displayed at the top of the screen.
- Once the statement is generated successfully, the status In Progress is changed to Download.
- Click Download to download the generated statement. The generated statement is downloaded and saved into your local system.
A user can download only the last combined statement and the previously generated statement will not be available.
- After the combined statement is generated successfully, the previously generated statement will be automatically deleted. The generated statement is stored in the Spotlight database.
- View the following details in the generated combined statement.
- Transaction Date
- Transaction Reference Number
- Transaction Description
- Amount
- Balance
- Transactions/statements grouped by the account
- Account Name or Nick Name followed by the last four digits of the account number
The combined statement can be fetched by integrating with Transact and Holdings Microservice.

Select the Account 
Continue 
Formats 
System Notification 
Download Status 
Download to View 
Combined Statement Format


Adhoc Statements
If the user performs an advanced search in account overview to download the statement, users will navigate to this feature if the download time exceeds the configured time in Fabric.
Follow these steps to download the statements in Adhoc Statements:
- See Advanced Search to download the Adhoc Statements.
- After the Adhoc Statement is generated successfully, the previously generated statement will be deleted.
For one account, the user will see one Adhoc Statement.
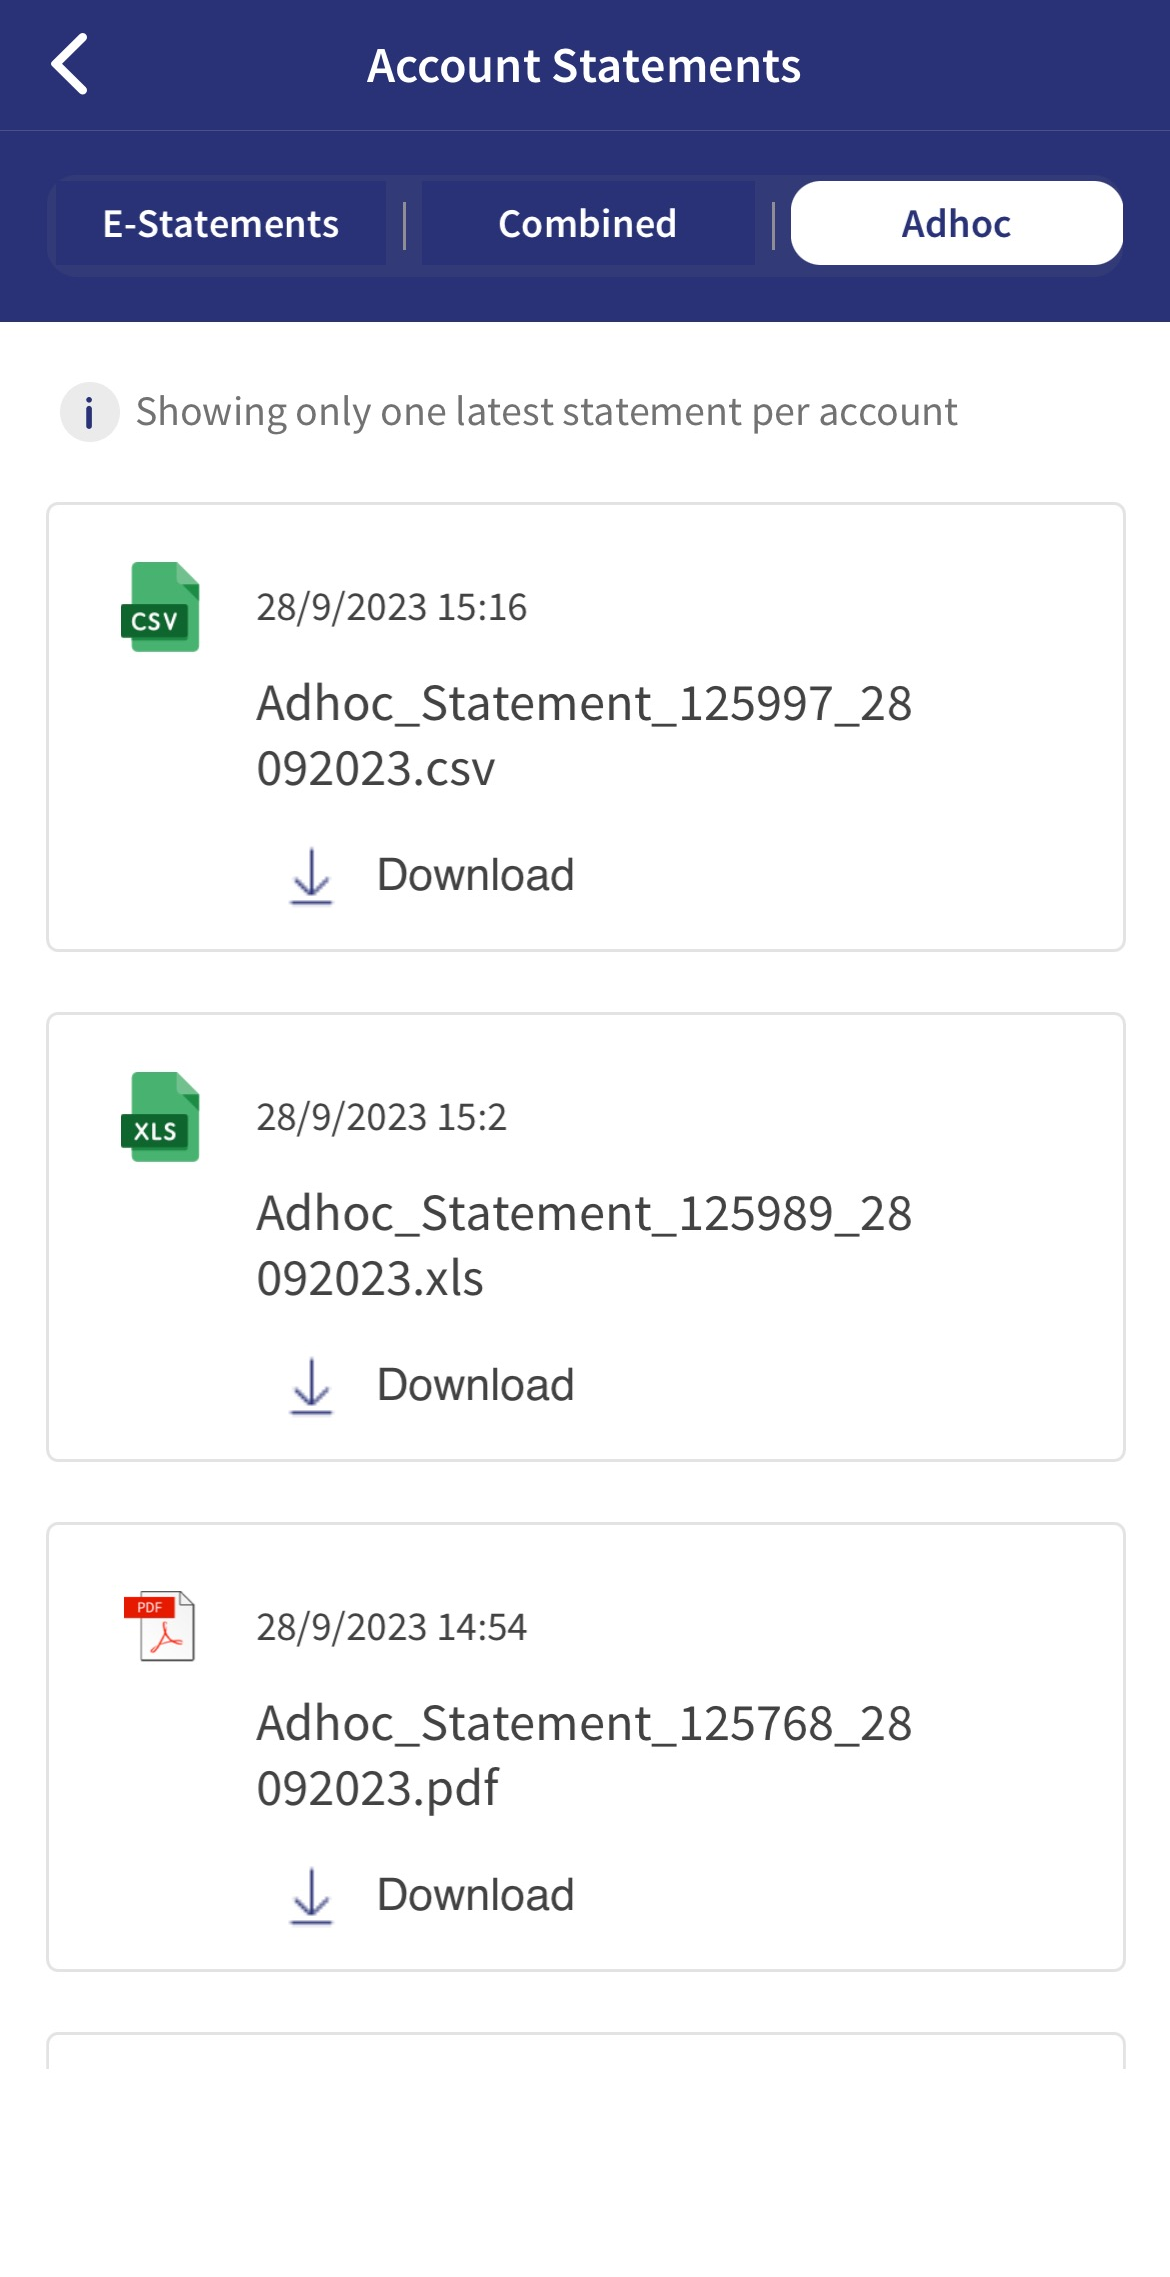
From the current version, the user will see new layout and information changes in the generated PDF statements (Combined and Adhoc statements).
- User can view the following details in the generated Adhoc Statement.
- Account Name
- Account Number
- Search Criteria
- Transaction Date
- Transaction Description
- Transaction ID
- Debit
- Credit
- Balance

In Mobile Native, the user cannot generate the Adhoc statements. The user can only download the statements that is generated in Web Channel.
Configuration
User Permissions in Spotlight
A few user permissions at the system level must be configured in Spotlight. The following configurations must be performed in Spotlight under Master Data Management to access E-Statements in online banking or Mobile Native. Only the features and actions that are enabled and assigned to customer roles by the bank user in Spotlight are accessed by the customers in the client-facing banking application.
The features and actions can be enabled or disabled from the master data management of Spotlight at FI level. The features and actions that are enabled can only be accessed in the client-facing banking application.
To activate/inactivate Account Statements, follow these steps:
- In Master Data Management > Features > Search for Manage Account Statements. The direct debit feature must be active to access the feature in the banking application.
- Click the feature to view the feature details and associated actions.
- Click the Contextual menu (three dots) on the right corner to activate/deactivate the feature. A user can also edit the feature and activate/deactivate the feature.


- You can activate/deactivate the associated actions by clicking the contextual menu available besides each action. A user can also edit the associated actions.


Unlink Transact while Enabling E-statement
This section explains the procedure to unlink Transact when a user enables e-statements. For enabling e-statements, in the backend, only the Arrangements Microservice API is used based on the existing server property, Arrangements_Backend and the possible value will be MS only.
When a user enables or disables the e-statement preference, the request goes to the Service Request Microservice (SRMS) for execution. On viewing the details, the updated details are fetched from SRMS.
Follow these steps:
- Sign-in to your Fabric console.
- From the left pane, select Environments.
- For your Fabric run-time environment, click App Services.
- Navigate to Settings > Configurable Parameters.
- On the Server Properties tab, go to
Arrangements_BackendField Name and set the Field Value to MS. - Click Save.

API
For the complete list of APIs shipped as part of this feature, see Experience APIs documentation.
In this topic