Defining the Flow
You need to define an Integration Framework flow and select the data to be collected in the integration events.
Follow the steps below to define flow.
- Click the Flow tab to define the fields which hold the data that has to be sent out of Transact.
- In the Flow name field, specify the name for the flow and click Edit.
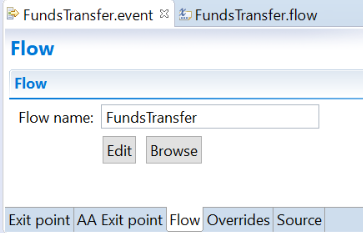
- Click Browse to attach an existing flow to the event.Remember to attach only valid flows to the exit point. For example, attaching a FundsTransfer flow to a Teller version will result in a publish error, as the fields in FundsTransfer are not available in Teller.
Based on the Application or Version that you selected in the exit point, a list of all the fields is displayed in the Field box.
- Select required fields from the list. The selected fields appear in the Flow Enrichments Table in the lower left section of the screen. You can view the XML representation of the Table under the Source tab. This XML file is an expert view of the project file.You can use the custom field to define information for the integration event which may, for example, be used as a delivery option.
- Add your chosen fields to the flow: select the chosen fields and click Add.
- Press the Ctrl key and click the chosen fields (multiple selection).
- Click Add All, to add all the fields to the flow.
- You can also press the Shift key and click the first and last fields to select a continuous list of fields.
- Click Remove to remove the field that you have added.
- Click Move Up and Move Down, to modify the order of the added fields.

- Select the required company or companies for which this event needs to be triggered. If you do not select anything, the event for this flow will be triggered for all companies.
- Set the priority for event delivery of the event type that is under design. This value will be used to deliver events based on the priority. The default priority is 0 and you can set it to a positive integer. This value is stored in the Event Priority field of IF.INTEGRATION.FLOW.CATALOG. Integration events with the highest priority are considered first for delivery. When the priority is set to a number greater than 0 and if the flow attribute Streaming Event is selected, then the business event redirects to Priority Data Events table instead of Default Data Events table.
- Select the Include before image option to add the existing transaction data to the generated event.The option Include Before Image is applicable only for Application, Version, TSA Service, AA Activity / Activity class, Inflow, and On-demand event exit points.
- Select the Process updates only option to add values to the integration event only if they changed for the current transaction. All other fields, unchanged, are ignored while generating the event.The option Process Updates Only is applicable only for Application, Version and TSA.SERVICE exit points.
- Optional: The Display Name column in the Flow Enrichments section is an editable column. Once a Transact field is added to the schema, use this column to specify a different name to the field only in the flow to make the names more meaningful. This does not change the field name in the underlying application.
- Select the Streaming Event check box to allow the Integration Framework events to be streamed to streaming systems. They are not stored in IF.EVENTS.INTERFACE.TABLE. To learn more about streaming events, see the Streaming events user guide.
- Select the Raw XML check box to store the Integration Framework event as an internal XML representation of Integration Framework event XML. This option provides faster event delivery. The following options cannot be used when using RAW_XML type of event:
- Defining filters when using IIB Adapter
- Adding IF Event Field values in a JMS message header when running integration service
- Modifying or filtering data when running integration service.
A new flow attribute WRITE_TO_OUTBOX has been introduced in R20. This attribute makes the integration event to be written to Outbox, not in IF.EVENTS.INTERFACE.TABLE. This is currently under development.
Adding a Join Field to the Flow
It is possible to add a join field to the flow. A join field is a field that is used to retrieve related information.
Follow the steps below to add a join field to the flow.
- Select the field through which the join has to be defined. Here, it is CREDIT.ACCT.NO.
- Select Join. A window is displayed.
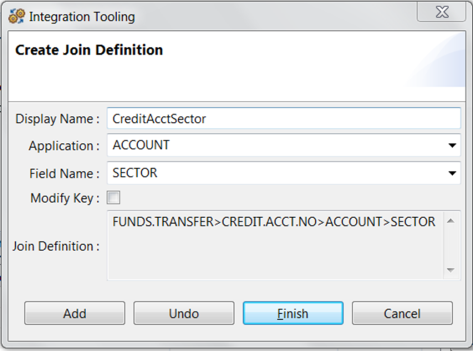
- Select the application from the Application drop-down menu from which the join retrieves the data. Here, it is ACCOUNT.
- Select the field from the Field Name drop-down list. This is the field from which the join field gets the value. Here, it is CURRENCY.
- The Modify Key option allows you to define complex joins to fetch data from two indirectly related or unrelated tables: To use this option, select the Modify Key check box before adding the field to the join.
The application for which the key need to be modified will be prefixed with the hash character (#) and an API implementation needs to be written to resolve the key. For more information, see Defining and Using a Complex Join Feature.
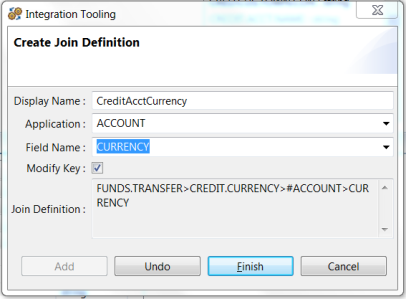
- Click Add to add the join definition
- Repeat steps 3 - 6 till the join field is completed in the Join Definition field.
- Click Finish to complete the join definition.
The Source and Overrides Tabs
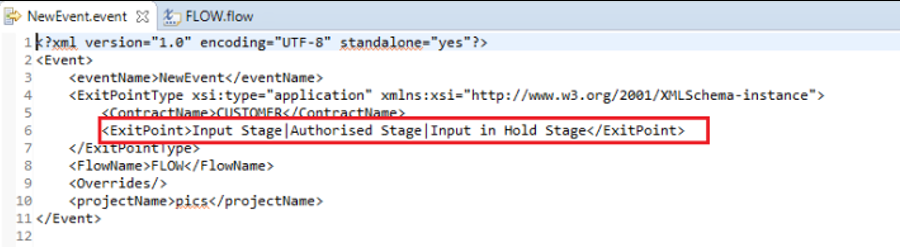
The Source tab provides the XML representation of the flow as shown below.
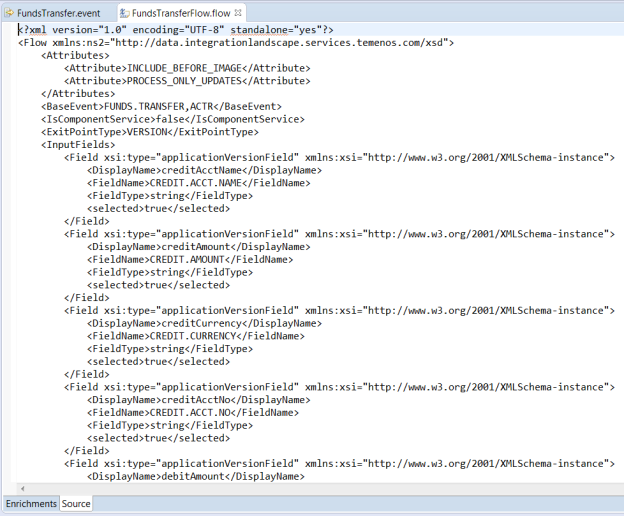
You can also click the Source tab on the event page to view the source for the event.
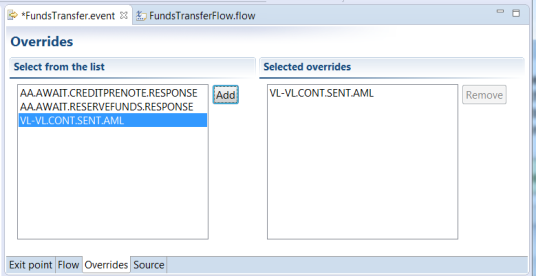
You can specify overrides using the Overrides tab. This helps in implementing DISPO.PROCESSING, such that a particular user can authorize the record. Only the overrides with DISPO.PROCESSING set to FORCE are available. The Overrides tab is enabled only for the INPUT.ROUTINE exit point, as override is inappropriate during the Authorized stage. These overrides are technical overrides.
To know about Conditional Event Generation, see the Using Conditional Event Generation section.
In this topic