Taxation Interface to CPB SECTRAS Installation Guide
This document aims at explaining the installation procedures required to install the containerized package for interacting with CPB Sectras for message transfers in both on-prem and cloud environments.
The scope of the document is to cover the deployment of the containerized package for the message processing for Sectras Taxation in the cloud and on-premise.
This document explains the implementation of the package built with jdk 11.
Terminology used:
- UTP: Unified Temenos Platform.
- MQ: Message Queue.
System Requirements
The following are the pre-requisites for installing this package.
For the On-Prem environment:
- Temenos Transact.
- JMS queue / ActiveMQ.
- Jdk 11.
For the Cloud environment:
- Temenos Transact.
- AmazonMQ / ActiveMQ.
- Helm.
- Kubernetes.
- AWSCLI (For AWS only).
- eksctl (For AWS only).
Pre-Installation Steps
The pre-installation steps are described below.
For the Cloud and On-prem deployments, follow the steps below.
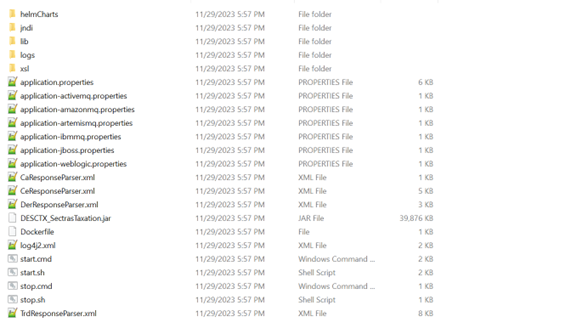
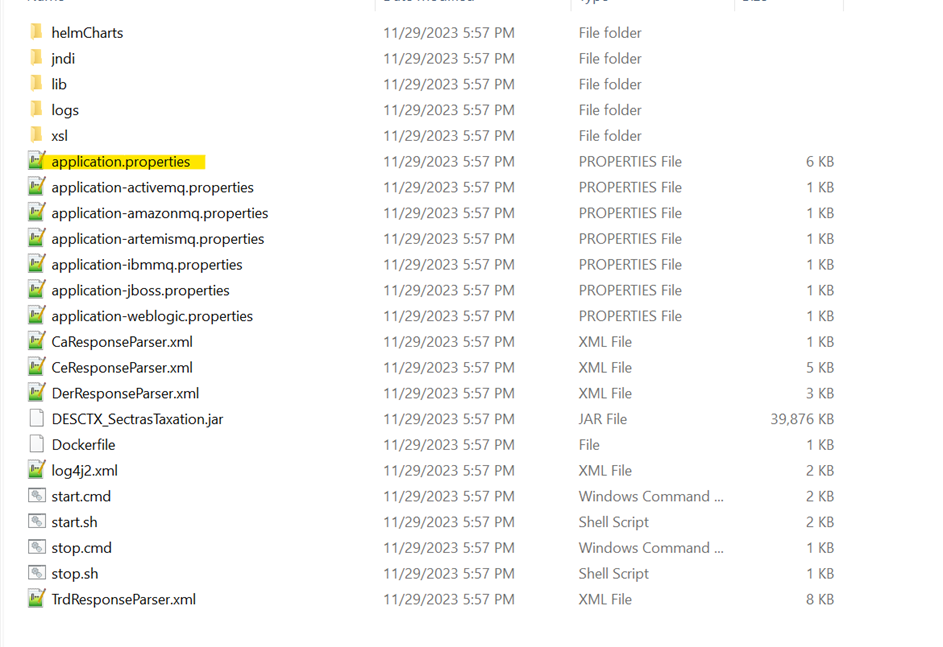
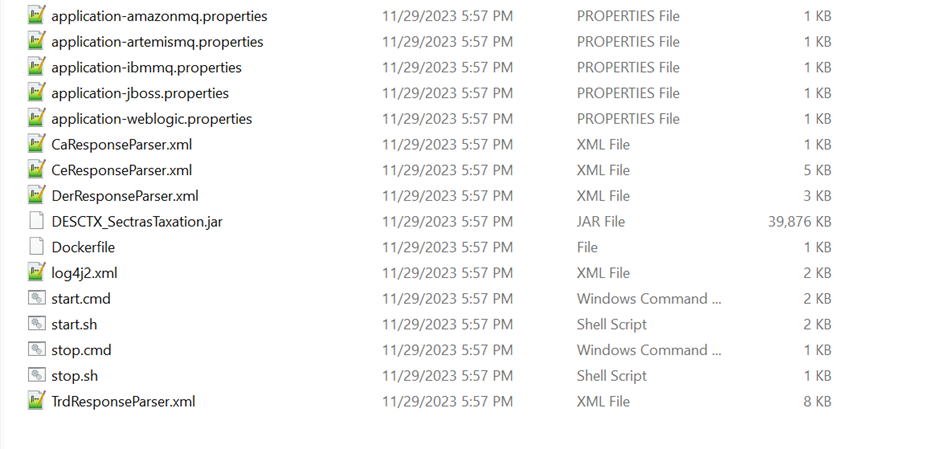
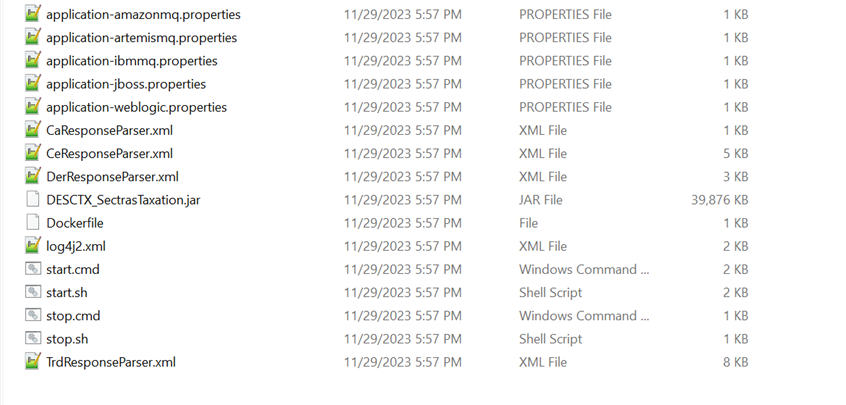
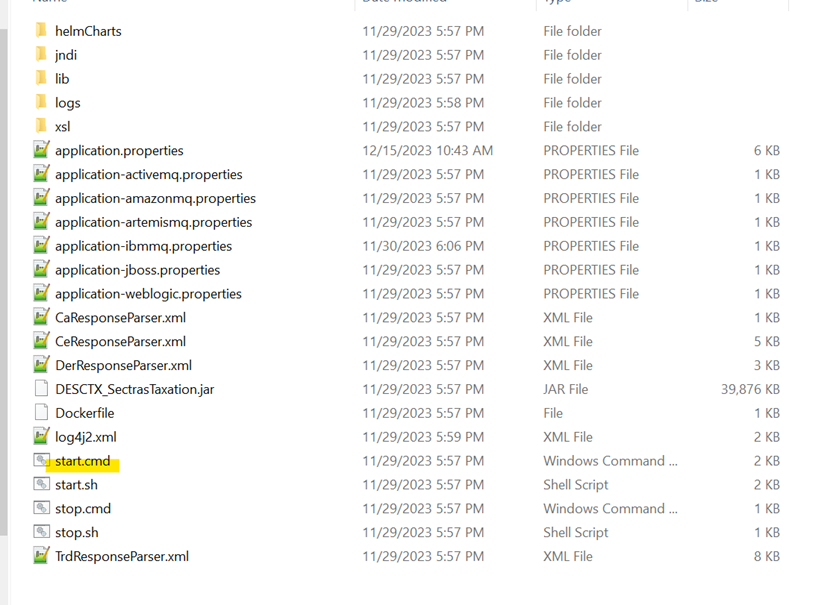
- Unzip the package DESCTX_SectrasTaxation and place it in the required folder. The contents of the package will be as in the below snapshot.
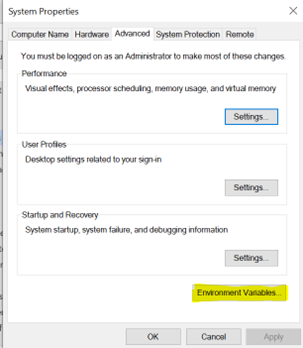
- Edit the system environment variables and click on the Environment Variables.
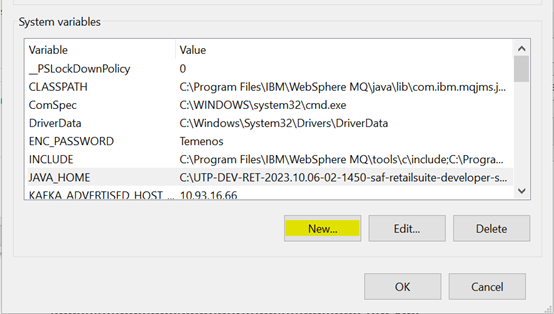
- Click on New to add a new System variable.
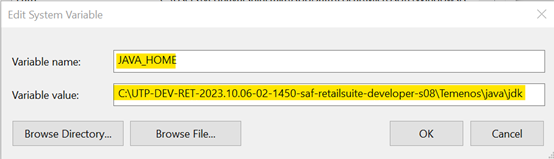
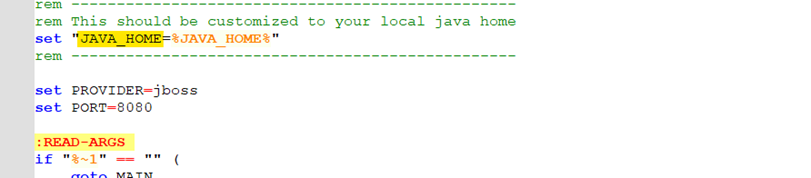
- Set the JAVA_HOME in the system variables.
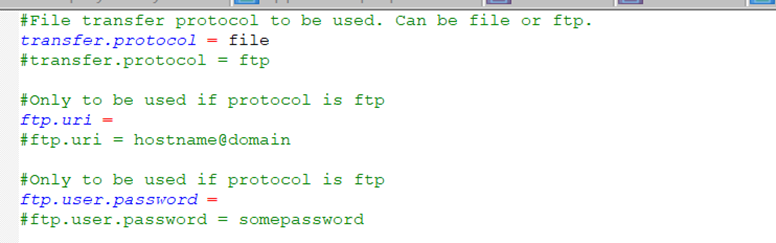
- Configure the queues required for the message transfers. These queues need to be configured in Temenos Transact in the path ...\jboss\standalone\configuration\standalone-utp.xml if the environment has JMS queues. For ActiveMQ, the queues can be created from the ActiveMQ Console.
The system needs to be configured as per below.
The queues required for the file extracts need to be configured in Temenos Transact in the path ...\jboss\standalone\configuration\standalone-utp.xml.
For each exit point type, a new event queue along with a new corresponding trigger queue need to be created. The same event queue needs to be mentioned in the Temenos Transact request queue property and the corresponding trigger queue needs to be mentioned in the Sectras request queue property in application.properties of the DESCTX_SectrasTaxation package.
Below is the sample configuration for one single file type.

The event queues must be configured in the IF.INTEGRATION.SERVICE.PARAM>SYSTEM record. A sample configuration is given below.
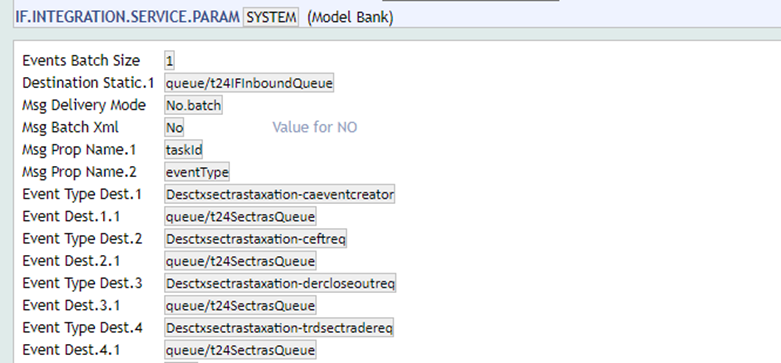
The corresponding event queue needs to be configured at the client area.
The application.properties present in the package needs to be configured as per the below instructions.
Configure the queues to be used for PSD, EXT, TRD, CE, DER and CA transfers.
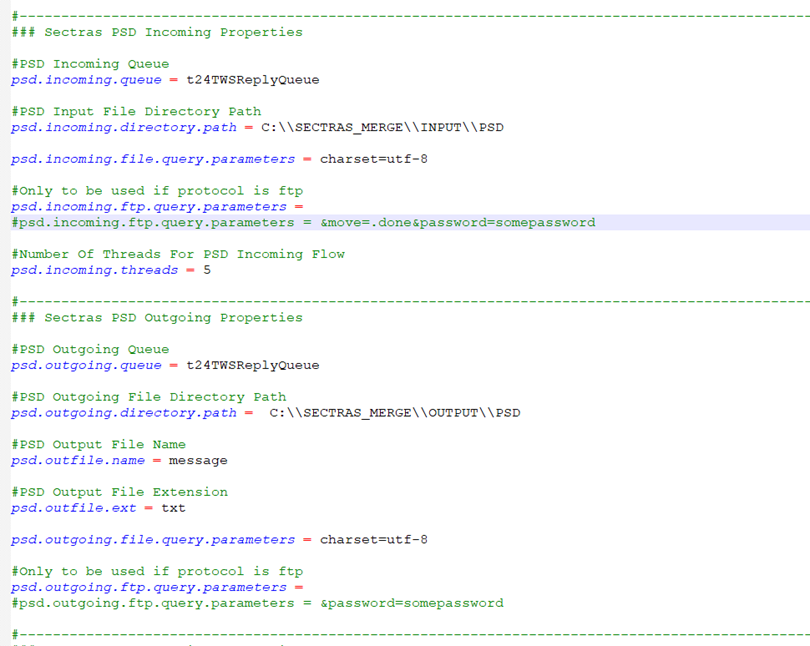
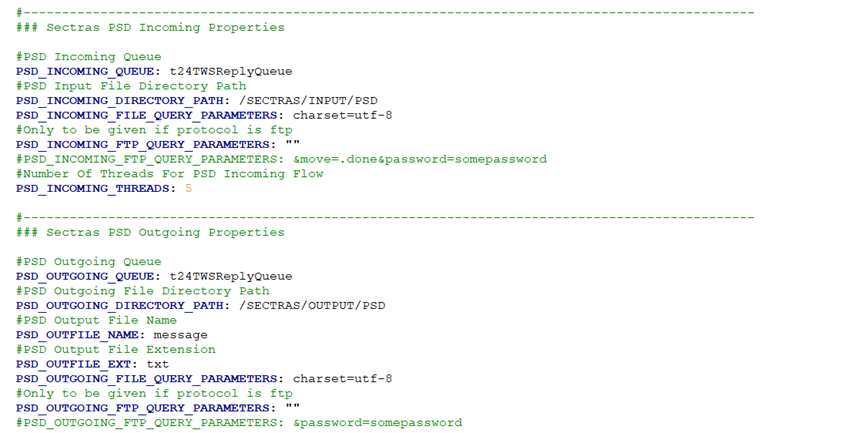
- psd.incoming.queue - Queue for incoming PSD messages.
- psd.outgoing.queue – Queue for outgoing PSD messages.
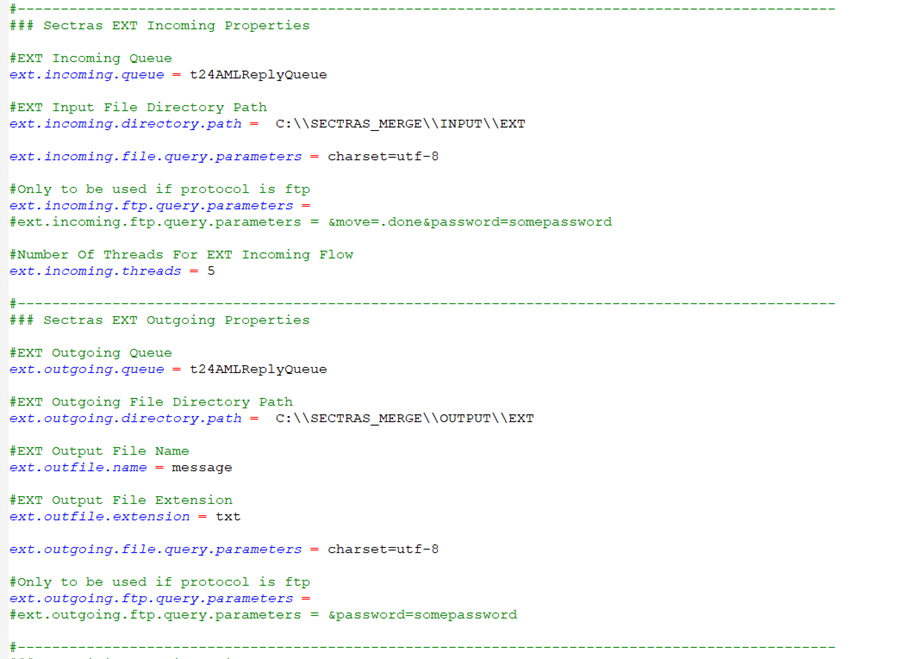
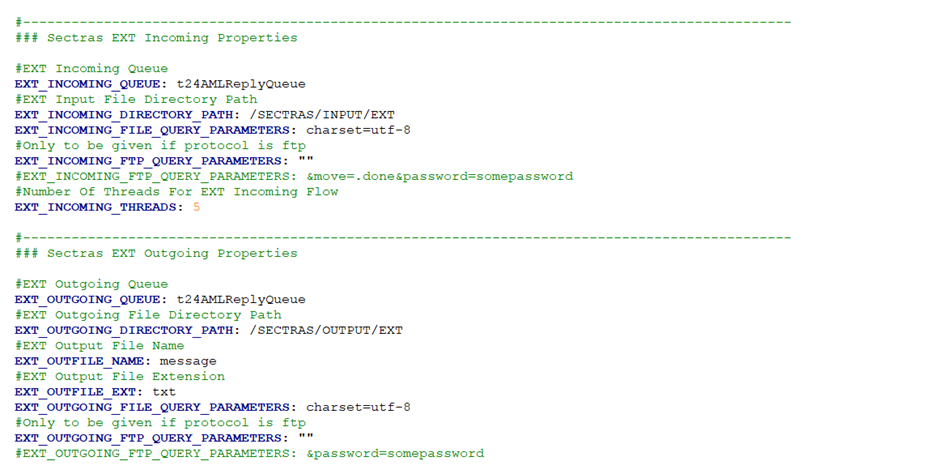
- ext.incoming.queue – Queue for incoming EXT messages.
- ext.outgoing.queue– Queue for outgoing EXT messages.
- t24.trd.request.queue – Queue in Temenos Transact to place TRD Requests.
- sectras.trd.request.queue – Queue for Sectras to pick up TRD Requests.
- sectras.trd.response.queue – Queue for Sectras to place TRD Responses.
- t24.ce.request.queue – Queue in Temenos Transact to place CE Requests.
- sectras.ce.request.queue – Queue for Sectras to pick up CE Requests.
- sectras.ce.response.queue – Queue for Sectras to place CE Responses.
- t24.der.request.queue – Queue in Temenos Transact to place DER Requests.
- sectras.der.request.queue – Queue for Sectras to pick up DER Requests.
- sectras.der.response.queue – Queue for Sectras to place DER Responses.
- t24.ca.request.queue – Queue in Temenos Transact to place CA Requests.
- sectras.ca.request.queue – Queue for Sectras to pick up CA Requests.
- sectras.ca.response.queue – Queue for Sectras to place CA Responses.
The configuration is given below.
The configuration is given below.

The configuration is given below.

The MQ Connection details can be made in the application-<broker>.properties.

In case of the WebsphereMQ, configure the below in the application.properties.

- The Log4j2.xml file will be part of the package in the root directory. This path needs to be configured in the application.properties.
- In the logging.config path, configure the log4j2.xml file location present in the package.

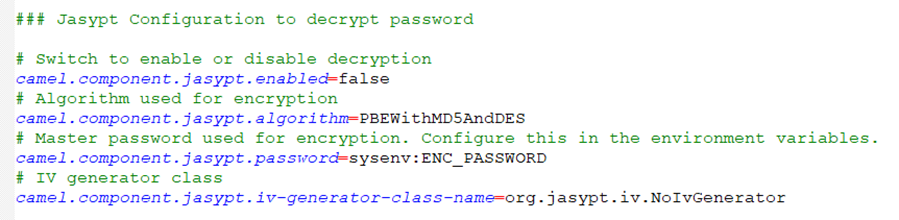
- The Jasypt configurations are given below.
The following configurations need to be done.
Configure the queues to be used for PSD, EXT, TRD, CE, DER and CA transfers.
- psd.incoming.queue - Queue for incoming PSD messages.
- psd.outgoing.queue – Queue for outgoing PSD messages.
- ext.incoming.queue – Queue for incoming EXT messages.
- ext.outgoing.queue– Queue for outgoing EXT messages.
- t24.trd.request.queue – Queue in Temenos Transact to place TRD Requests.
- sectras.trd.request.queue – Queue for Sectras to pick up TRD Requests.
- sectras.trd.response.queue – Queue for Sectras to place TRD Responses.
- t24.ce.request.queue – Queue in Temenos Transact to place CE Requests.
- sectras.ce.request.queue – Queue for Sectras to pick up CE Requests.
- sectras.ce.response.queue – Queue for Sectras to place CE Responses.
- t24.der.request.queue – Queue in Temenos Transact to place DER Requests.
- sectras.der.request.queue – Queue for Sectras to pick up DER Requests.
- sectras.der.response.queue – Queue for Sectras to place DER Responses.
- t24.ca.request.queue – Queue in Temenos Transact to place CA Requests.
- sectras.ca.request.queue – Queue for Sectras to pick up CA Requests.
- sectras.ca.response.queue – Queue for Sectras to place CA Responses.
The configuration is given below.

The configuration is given below.

The configuration is given below.

- The Log4j2.xml file will be part of the package in the root directory. This path needs to be configured in the application.properties.
- In the logging.config path, configure the log4j2.xml file location present in the package.

- The Jasypt configurations are given below.

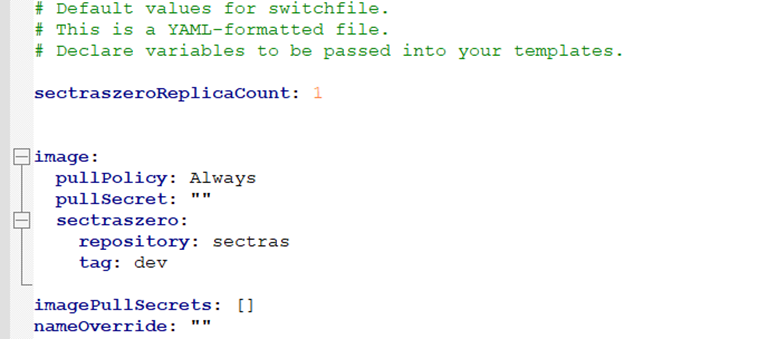
- Update the values.yaml file for increasing the instance count (by default it is one).
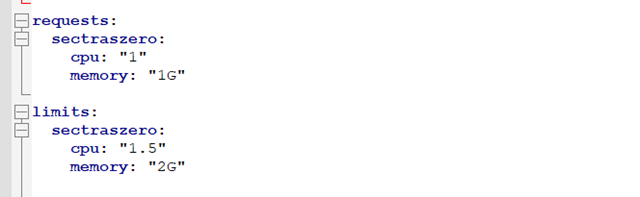
- Mention the range of memory and cores.
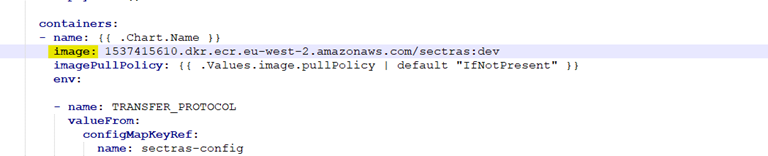
- Update the templates/sectraszero-deployment.yaml with the image name as required in the sample below.
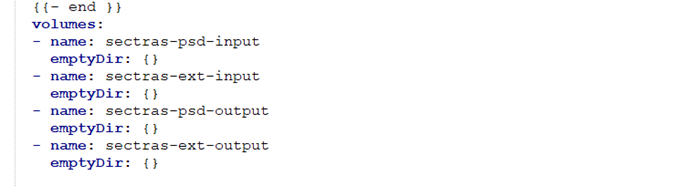
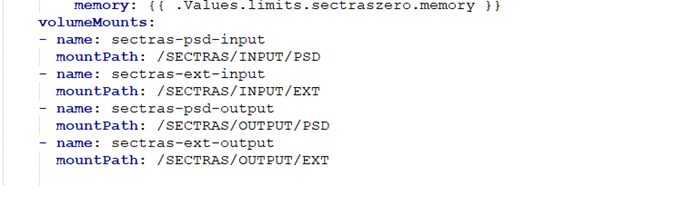
- Update the templates/sectraszero-deployment.yaml file to configure the container instance of mount location.
- Configure the port where the Tomcat server will run. The default port is 8080.

The configuration is given below.

In case of the Websphere MQ, configure the below property as well.

Install the DESCTX_SectrasTaxation.zip
The installation steps are described below.
- Unzip the zip package into a folder DESCTX_SectrasTaxation.
- Configure the java home path in the DESCTX_SectrasTaxation/start.cmd.
- Run the adapter by double clicking the start.cmd or use a console to run the following command: start.cmd -p <application_server> -po <port>.

- Terminate the adapter by double clicking the stop.cmd or run the following command: stop.cmd.
Follow the steps below.
This section explains deployment for the Docker desktop.
- Download the Sectras Taxation image TAR file and Helm charts that were provided and make them available in a folder in the destination system.
- Check if any images are existing (using the docker images command) in the destination system. If so, remove them using:
- docker images --filter reference=sectras
- docker rm <image id>
- Locate the folder where the image tar is located and open the command prompt to execute the following command. This will build the image.
Load Images:
- Syntax: docker build -t <image name>.<tag> <location>
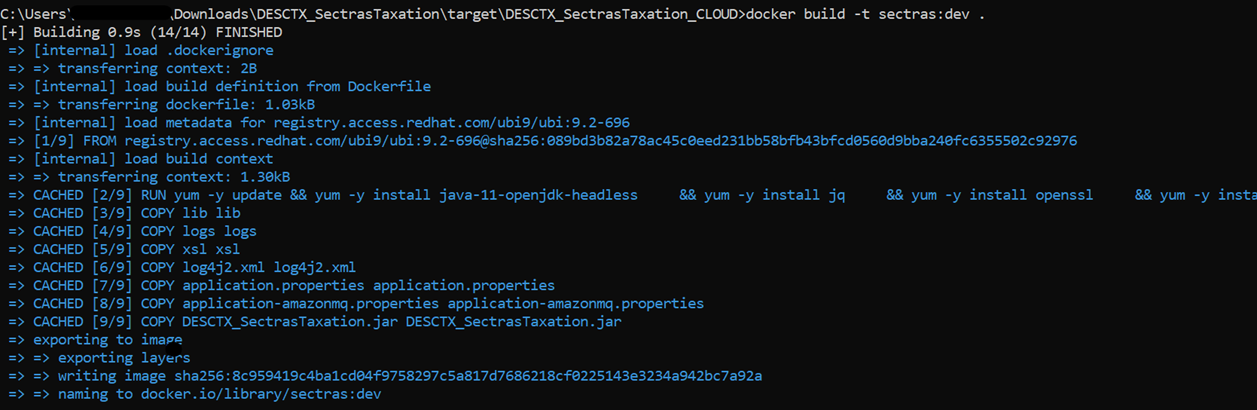
- docker build -t sectras:dev .

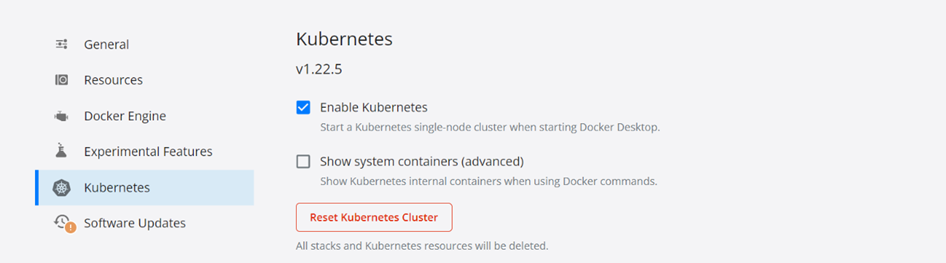
- Start Kubernetes, in this example, we use the Kubernetes provided by the Docker desktop.
- Start a local docker registry server using the docker image that will be used as a container registry hosting all the sectras images deployment.
- Start Local Registry: docker run -d -p 5000:5000 --restart=always --name registry registry:2

- Once the registry is started, we need to tag and push the images that were loaded earlier. The syntax and samples for tag and push is mentioned below.
Docker tag images:
Syntax: docker tag <Repository> <local registry host>:<local registry port>/<repository>:<tag>
where:
- Repository – sectras
- local registry host – localhost
- local registry port – 5000
- tag – dev
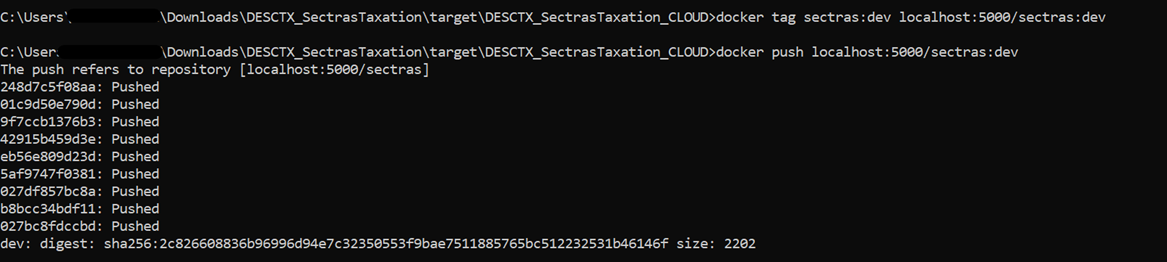
docker tag sectras:dev localhost:5000/sectras:dev
Docker push images:
Syntax: docker push <local registry port>/<repository>:<tag>
docker push localhost:5000/sectras:dev
- Navigate to the helm folder and start the sectras services using below command.
- Start services: helm install -name <<image name>> . -n <<image namespace>> --create- namespace
helm install -name sectras . -n sectras --create-namespace

- Check if the services are up using below command.
- Get pods: Kubectl get pods -n <<image namespace name>>
kubectl get pods -n sectras

- Check if the pod details using below command.
- Get pods: Kubectl describe pods -n <<image namespace name>>
kubectl describe sectras -n sectras
- To uninstall the sectras service, use the below command.
- Uninstall the service: helm uninstall <<image name>> -n <<namespace name>>
helm uninstall sectras -n sectras
This section explains the deployment in the AWS cloud environment.
- Download the Sectras Taxation image TAR file and Helm charts that were provided and make them available in a folder in the destination system.
- Check if any images are existing (using the docker images command) in the destination system. If so, remove them using.
- docker images --filter reference=sectras
- docker rm <image id>
- Locate the folder where the image tar is located and open the command prompt to execute the following command. This will build the image.
Load Images:
- Syntax: docker build -t <image name>.<tag> <location>
- docker build -t sectras:dev .
- Ensure you have installed AWS CLI: aws --version.

- Configure AWS CLI to authenticate user to use aws. Here, you would require a sso-start-url and sso-region provided by the AWS admin: aws configure sso.
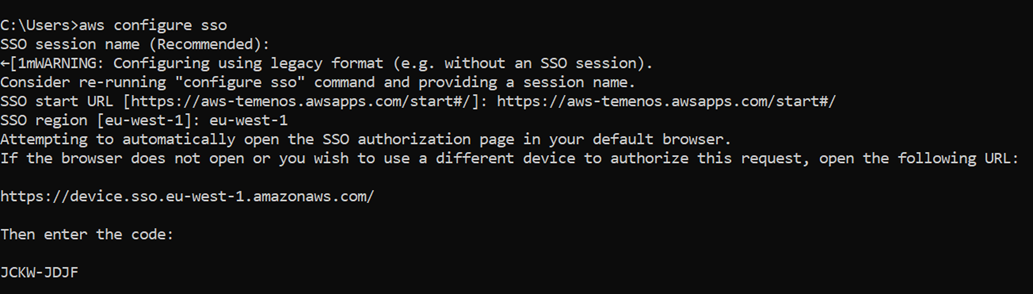
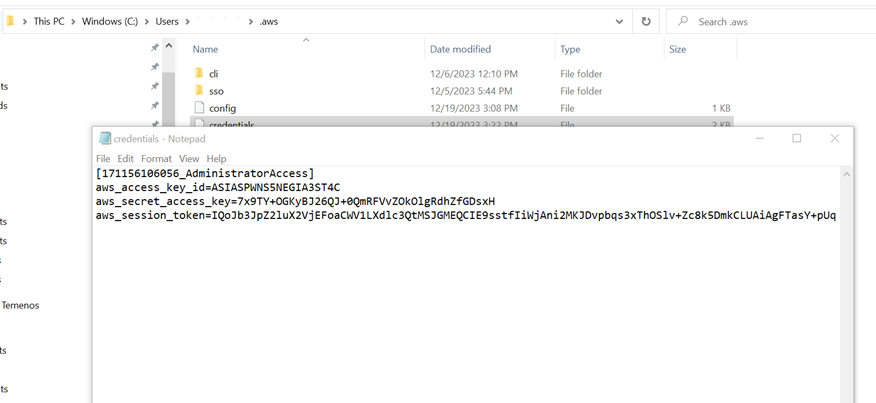
- Once logged in, a profile is generated in .aws/credentials.
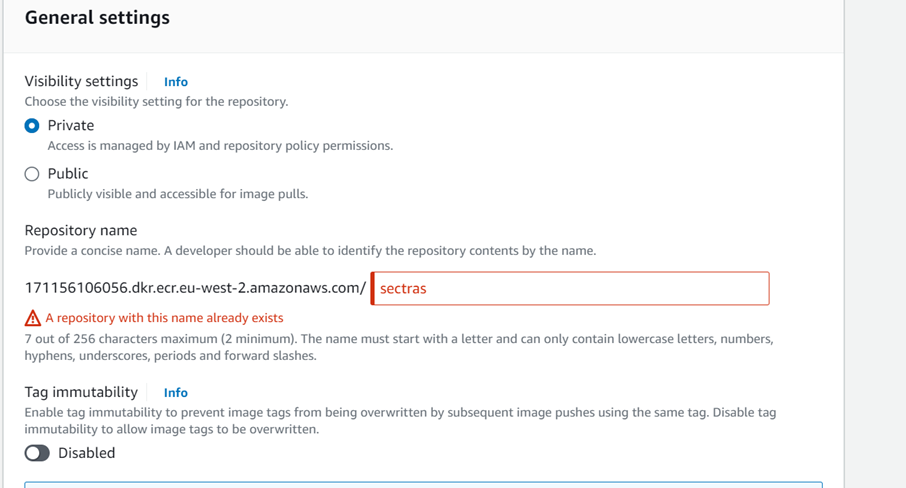
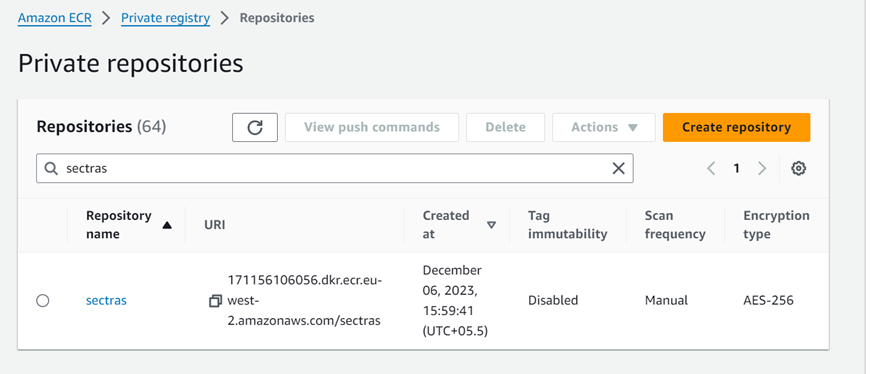
- Create an ECR in AWS.
- Configure the .aws/credentials file as explained in the AWS start page.
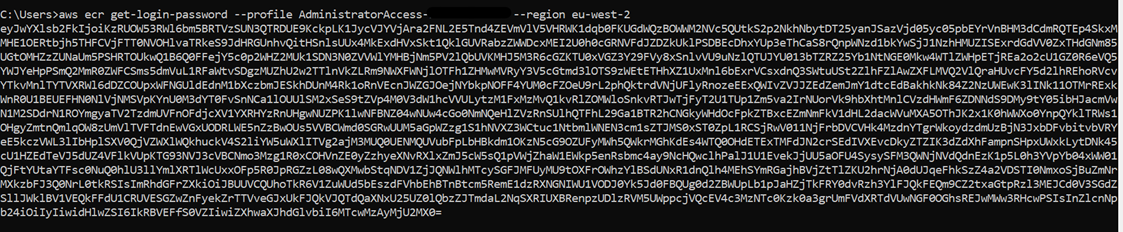
aws ecr get-login-password --profile <profile> --region <region>
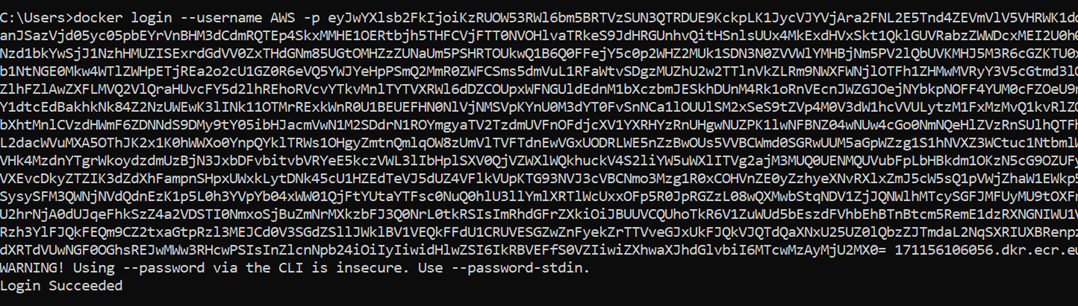
- Authenticate the docker to the ECR registry: docker login --username AWS -p (give password here from prev cmd) <ECR URI>
Ensure the Docker engine is running before issuing this command.
- Once the registry is started, we need to tag and push the images that were loaded earlier. Syntax and samples for tag and push are mentioned below.
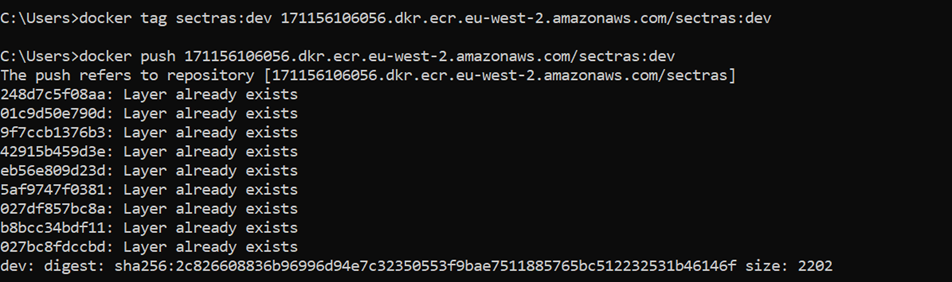
Docker tag images:
- Syntax: docker tag <image> <ECR URI>:<tag>
docker tag sectras:dev 171156106056.dkr.ecr.eu-west-2.amazonaws.com/sectras:dev
Docker push images:
- Syntax: docker push <image> <ECR URI>:<tag>
docker push 171156106056.dkr.ecr.eu-west-2.amazonaws.com/sectras:dev
- Create an AKS cluster using the eksctl tool: eksctl create cluster --name <cluster name> --region <region> --profile <profile>


- Configure kubectl to connect to the EKS cluster: aws eks update-kubeconfig --region <region> --name <cluster name> --profile <profile>

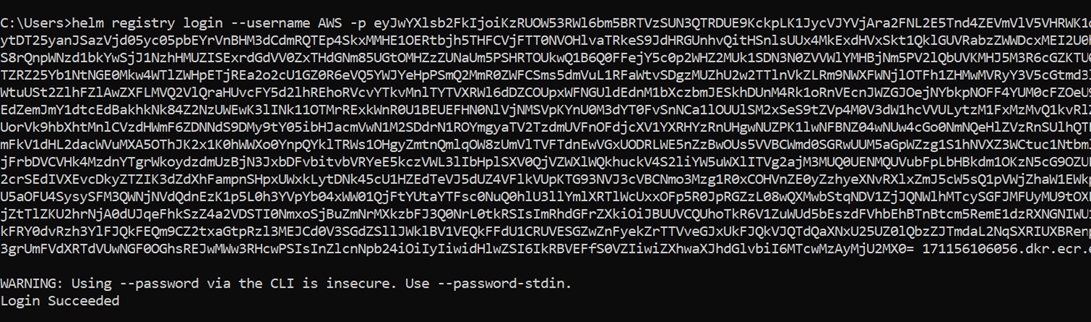
- Authenticate Helm to connect to the ECR registry: helm registry login --username AWS -p (password generated with get-login-password) 171156106056.dkr.ecr.eu-west-2.amazonaws.com/sectras:dev
- The package folder containing helm charts (Ensure the chart.yaml name is the same as the registry name) is helm package helmCharts.
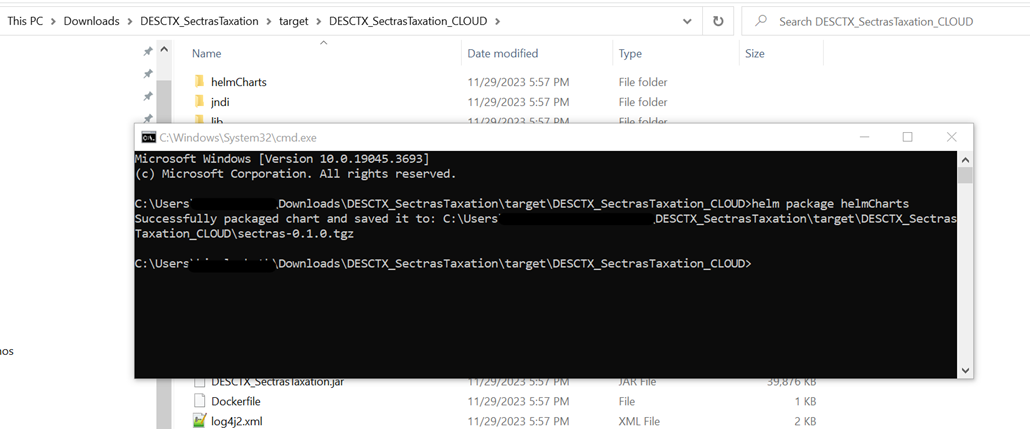
- Push the charts to the registry: helm push sectras-0.1.0.tgz oci://171156106056.dkr.ecr.eu-west-2.amazonaws.com/

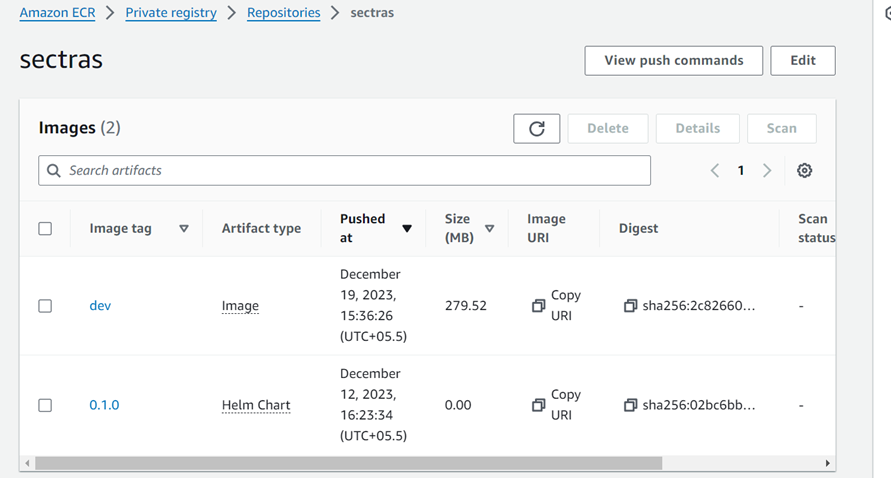
- The helm charts are available in ECR as shown below.
- Install the helm charts: helm install sectras oci://171156106056.dkr.ecr.eu-west-2.amazonaws.com/sectras --version 0.1.0

- Check if the services are up using below command.
- Get pods: Kubectl get pods
kubectl get pods

- Check if the pod details using below command.
- Get pods: Kubectl describe pods
kubectl describe pods
- To uninstall the sectras service use the below command.
- Uninstall the service: helm uninstall <<image name>>
helm uninstall sectras

Install the 1_IF_DesctxSectrasTaxationIFExitPoints_1_JAVA_<version>.jar
The installation steps are described below.
The event and flow mapping for file types are described below.
|
File type |
Event |
Flow |
|---|---|---|
|
CE |
SectrasFtEvent.event
|
CEFtReq.flow |
|
TRD |
SectrasTrdEvent.event |
TrdSecTradeReq.flow
|
|
DER |
SectrasDerEvent.event
|
DerCloseoutReq.flow
|
|
CA |
SectrasCaEvent.event |
CAEventCreator.flow |
The events for the package deployment are given below.
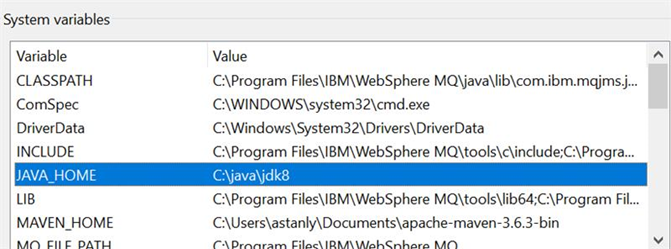
- Configure the environment variables as below.
- Set JAVA_HOME as per the below screenshot.
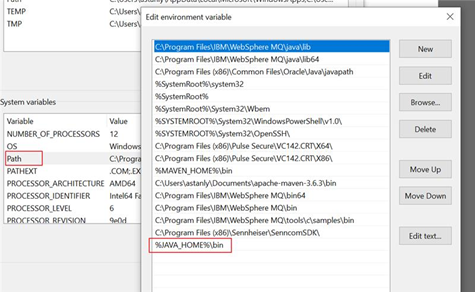
- Add the %JAVA_HOME%\bin in the path variable as in the below screenshot.
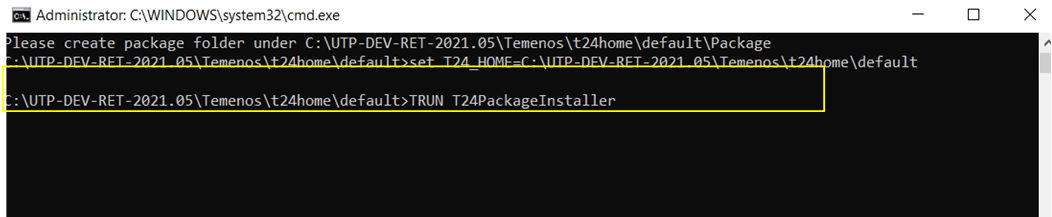
- Place the jar in the following existing package folder ..\Temenos\t24home\default\Package.

- Set the run directory as Temenos Transact Home.
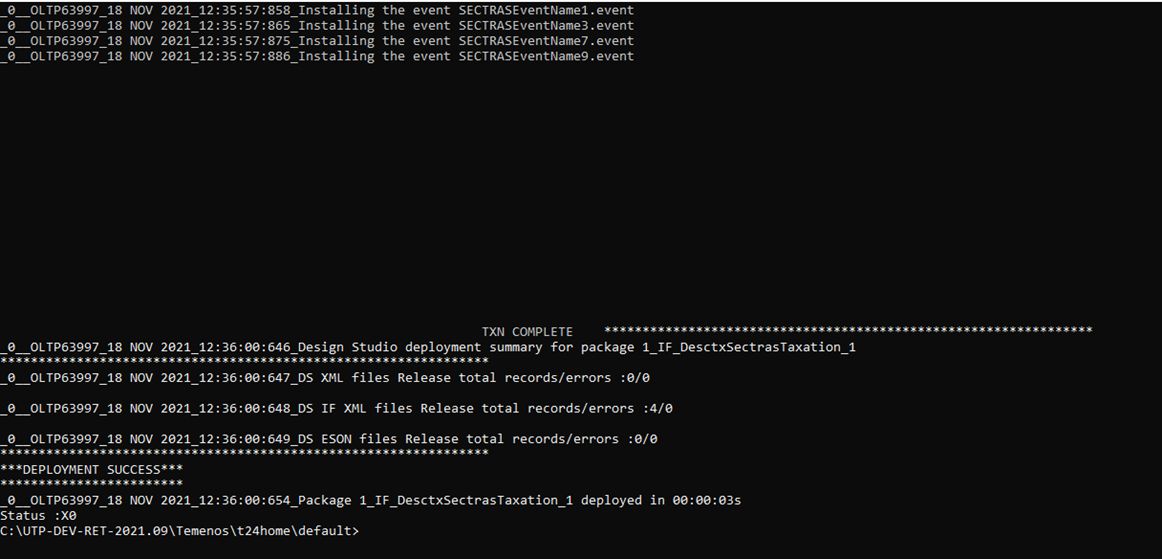
- Execute the following command: tRun T24PackageInstaller
- The successful completion of the command will result in the below message.

- Execute the following command: tRun packageDataInstaller
Special Instructions
The special instructions are described below.
- Ensure that the “start.sh” has “LF” as a line separator.
- To start the adapter, run the following command: sh start.sh -p <provider> -po <port>
- To terminate the adapter, run the following command: sh stop.sh
- To run the script in the background, include the following commands in the start.sh.
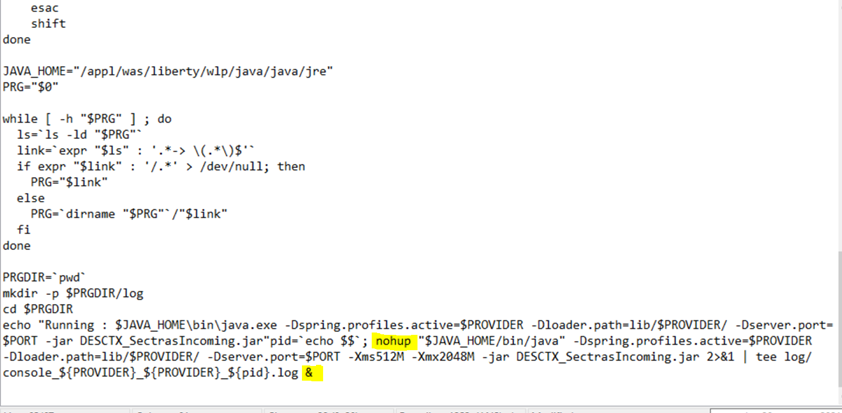
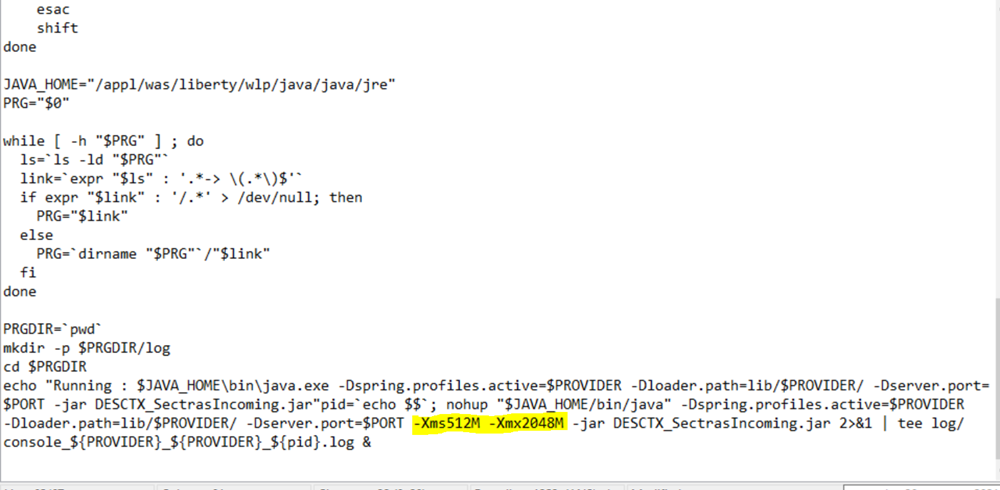
- To set the min and max heap size, include the below commands in start.sh.
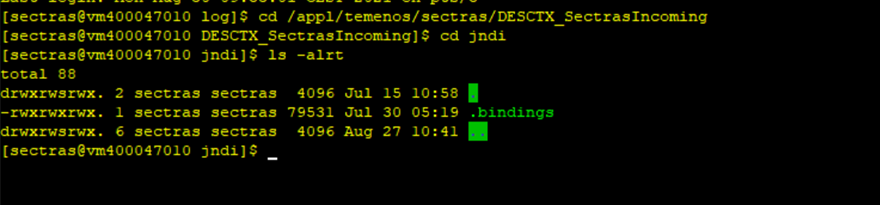
- Place the IBM MQ Bindings file in the jndi folder of the package.
- To connect with IBM MQ, set the following in the application-ibmmq.properties file.
- The provide URL needs to point to the IBM MQ Bindings file location.
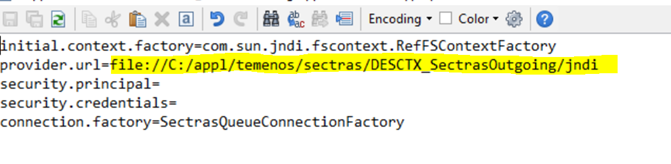
- The other properties in the file needs to be set according to the bindings file.
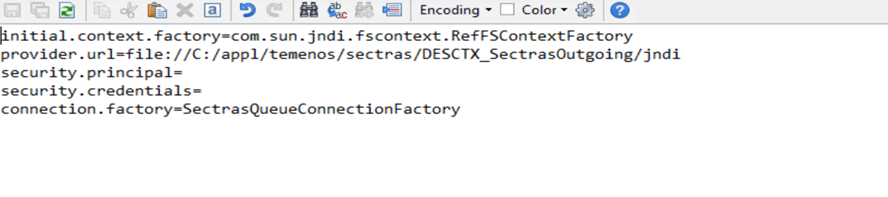
- The provide URL needs to point to the IBM MQ Bindings file location.
In this topic