Manage Customers
The Customers module deals with the three types of users of the banking applications - Retail Customer, Business User, and Applicant. All users who have an account or relation with the bank or credit union is a customer. Those who have started the process of becoming a customer with the Onboarding capability are applicants. Details of these types of users are maintained in the same identity systems or Database. At any time, Spotlight does not list all the customers or applicants by default. Suitable search query or criteria must be applied to view the list of relevant users. Once a user is selected, it is possible to view the various settings and details associated with a user. For an existing user, appropriate systems and database may have to be integrated to retrieve the correct information. Data for an applicant is sourced from the Onboarding process. Use the feature to search and manage customers and applicants. The customers can be retail users or business users.
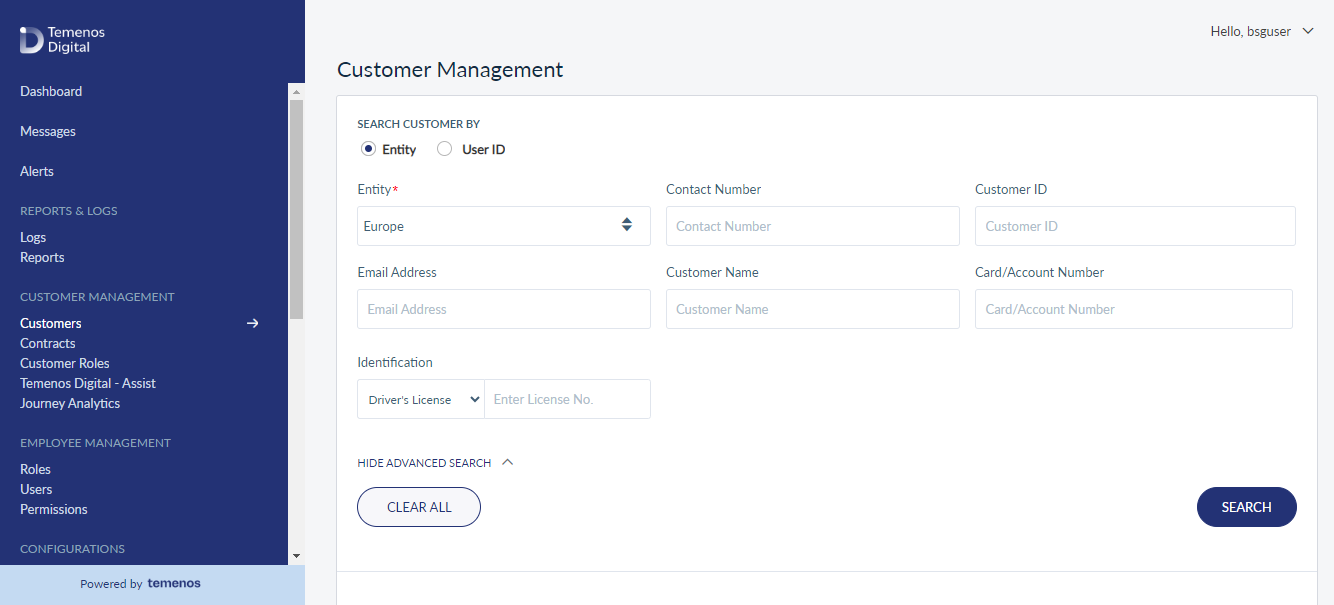
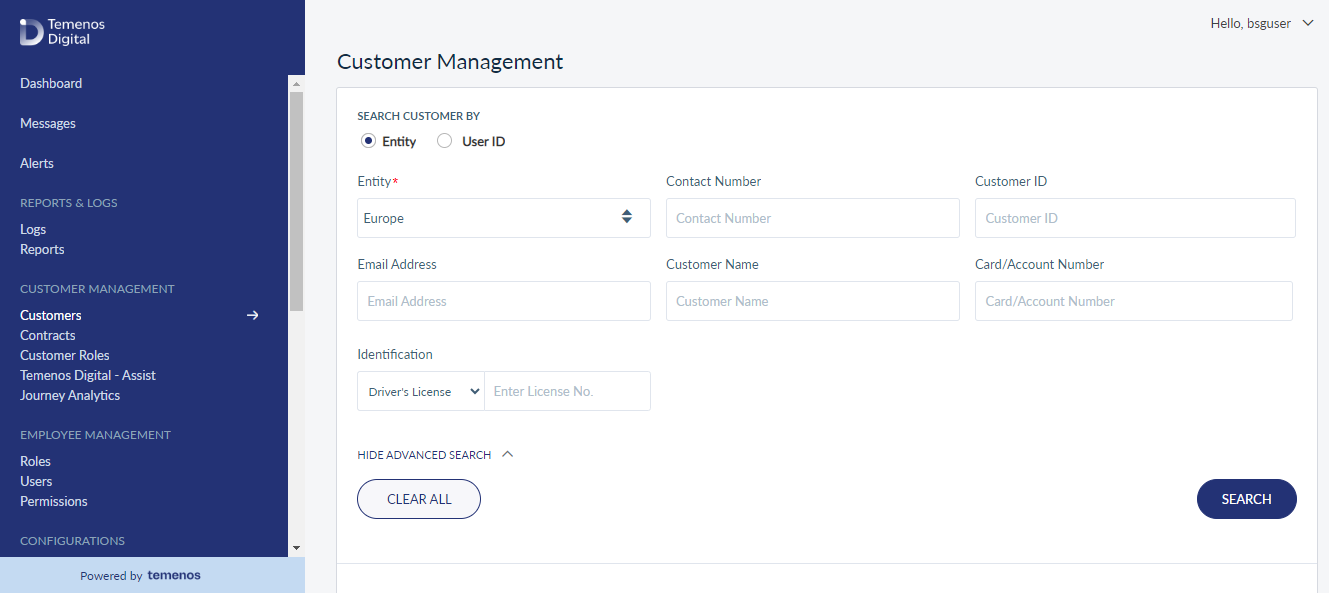
Menu path: Customer Management > Customers
The app displays the search fields to search existing customer types. This is also the main screen of the Customers module. You can do the following:
- Search for a Customer
- View Profile Details
- Retail and Business Customers
- Applicants
- Enroll a Customer
- Suspend or Activate Customer's Account
- Create Customer (Onboarding)
- Edit Customer Profile Details
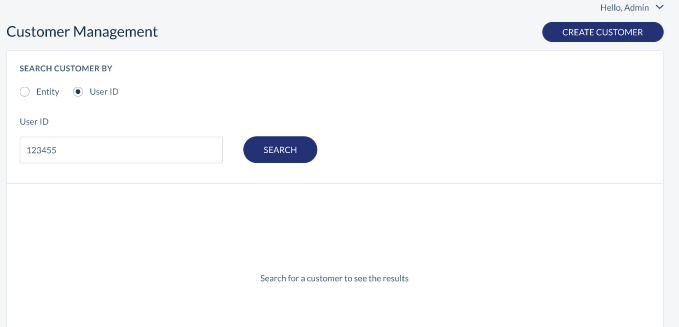
Search for a Customer
Use the search option to search for an existing customer or applicant.
Menu path: Customer Management > Customers

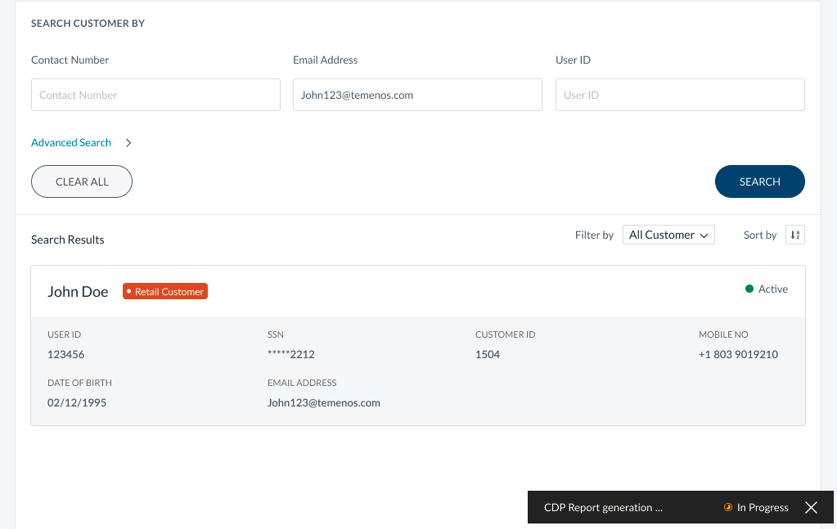
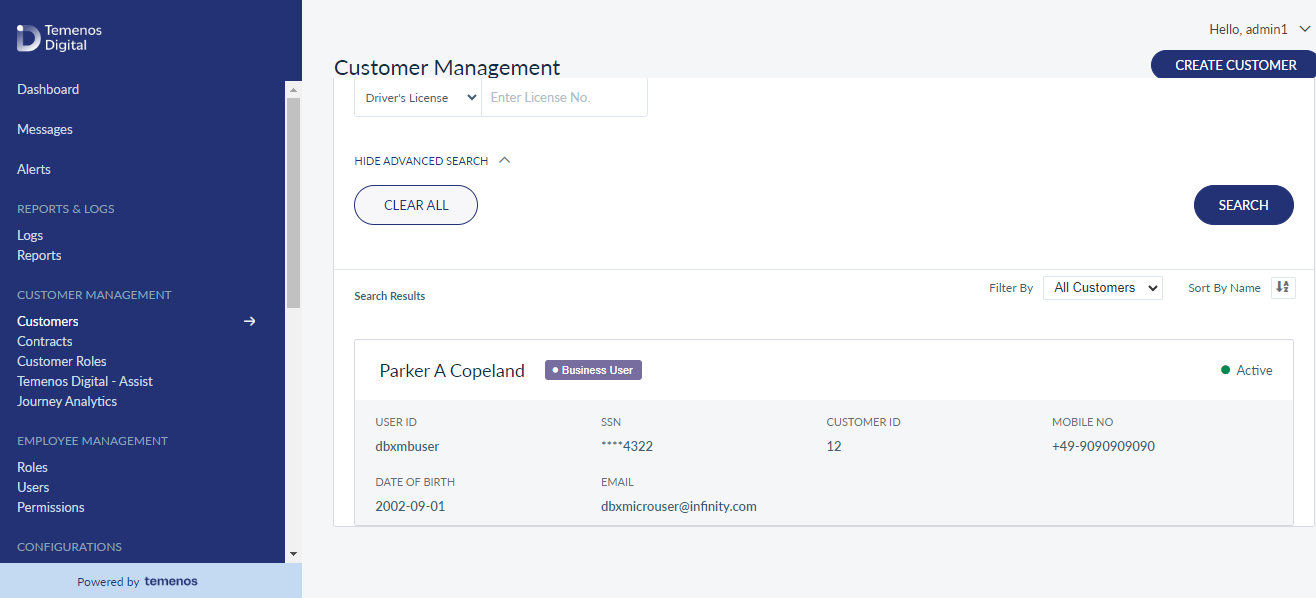
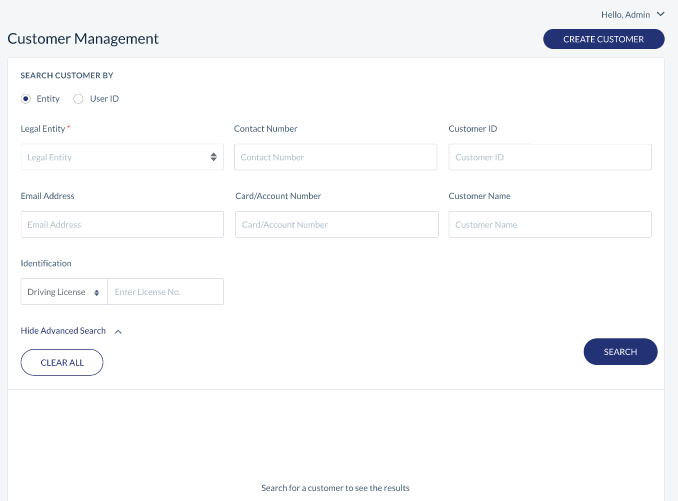
You can search for the customer information either through a simple search (by limiting the search to a particular phrase) or by Advanced Search (by limiting the search with the specific customer details)
To perform a simple search, enter the Contact Number, Email, and User Id in the respective fields and click on Search.
To perform an advanced search, click on the Advanced Search link. The screen refreshes with Customer ID, Customer Name, Identification fields as shown below:
Enter the Customer Name in the respective fields and then select the Identification either as Driver’s License, SSN, Passport or as TIN from the drop-down list. Based on the selected value, enter the specific information in the provided field and click on Search.
It is mandatory to enter the value for at least one of the criteria in the Search screen.
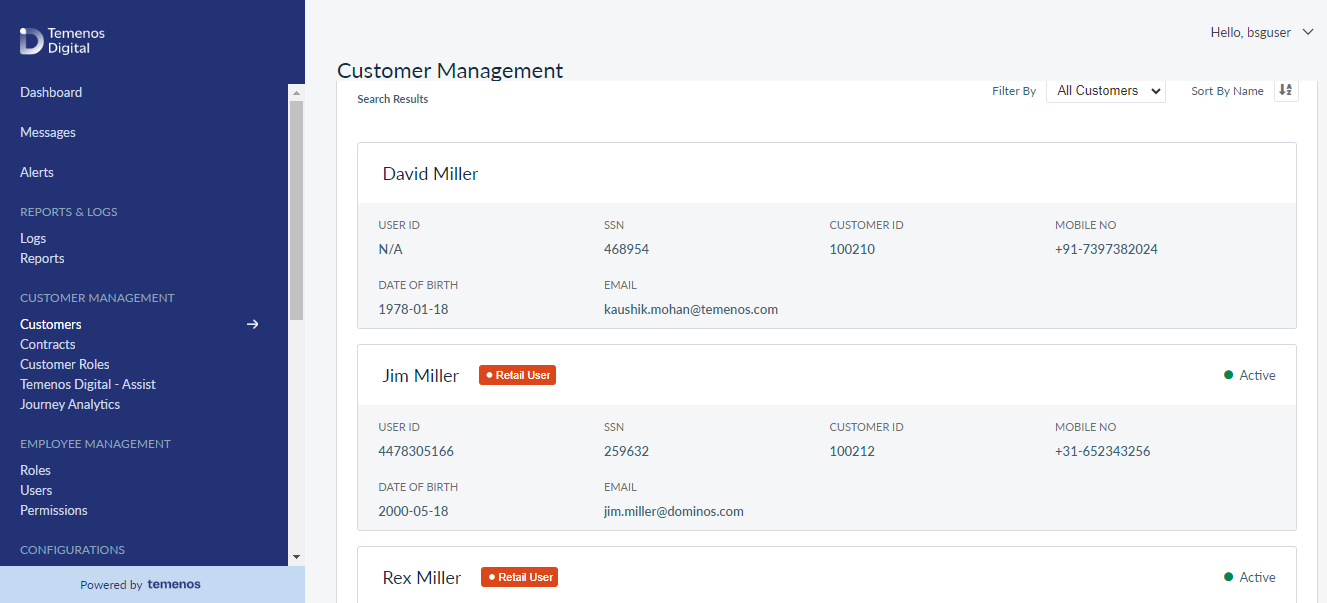
The app auto-displays the customer details matching the search criteria.
The number of parameters used by the search criteria has been reduced and only the most used and logical search parameters are available for the agent to search.
Customer Search
As an Internal user, you will able to search for Customers and List of Contracts with the Email / Customer Name.
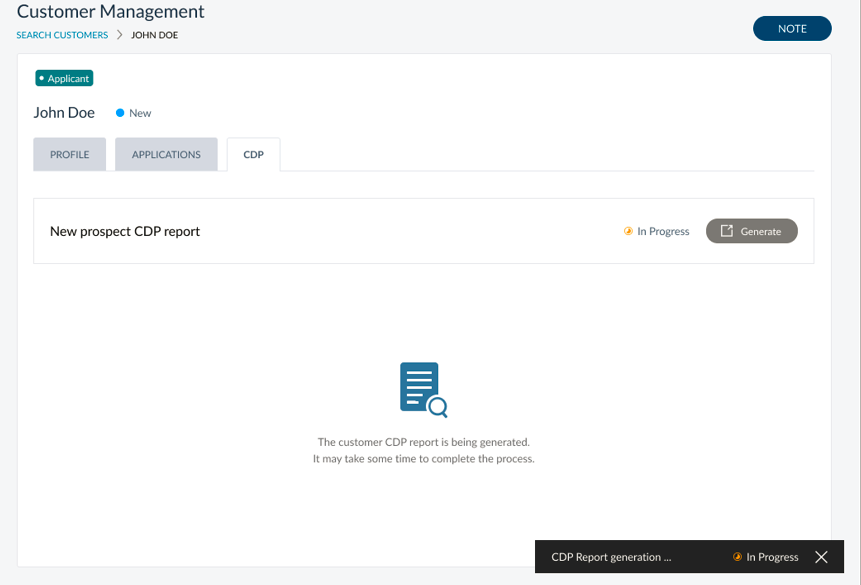
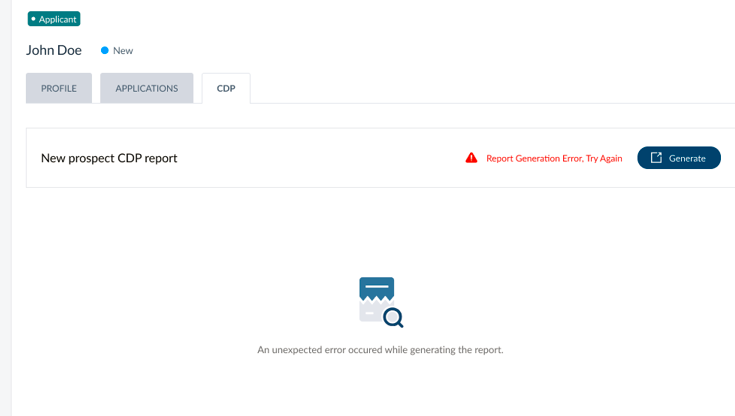
CDP - Generating Reports for New Prospect
Initiating SAR / DP Report for New Prospect
As a system administrator, if a New Prospect requests a report of their existing data with the bank, the Bank User can generate a report from Spotlight.
When a SAR / DP request is received from a New Prospect, the request has to be manually triggered from Spotlight. The Spotlight application is enhanced to accommodate this new feature under the Customer Management menu. SAR report generation will be enabled only for New Prospect, but for Verified Prospects and Customers, it will be initiated from Transact.
- When the user navigates to Customers under Customer Management and searches for any Customer, the CDP tab will be visible only for New Prospects.
- By clicking the generate button, you hit the the Experience API: “services/data/v1/CustomerManagementObjService/operations/Customer/generateCDPReport.” The above Experience API will further hit the Orchestration service “CDPReportOrchService-getDataForCDPReport." The mentioned Orchestration is of “Composite Concurrent” execution type, which hits multiple backends for e.g. ODMS, DBXDB, ODMS with Lead Entity Definition code.
- As soon as you click the generate button, the generate button is disabled and, shows the In Progress label and the text “The customer CDP report is being generated. It may take some time to complete the process.”
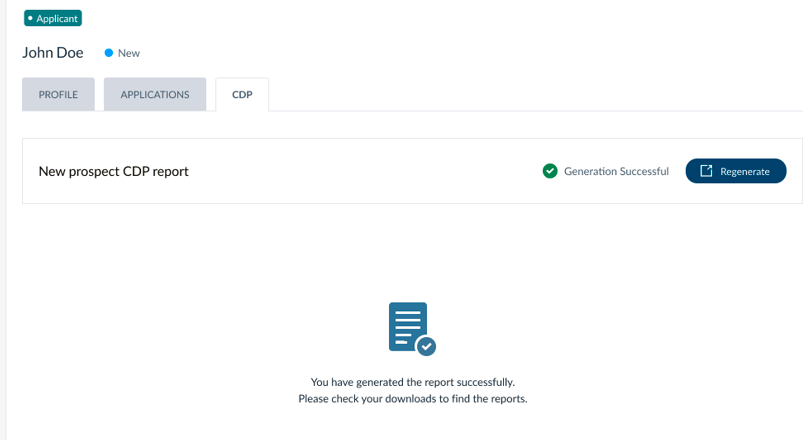
- Once the report is generated, the system will automatically download the report to the local machine.
After Report Generation
As a system administrator, if a New Prospect requests for a report of their existing data with the bank, the system administrator should be able to generate a report from Spotlight.
Once the report generation is complete, the user can trigger another report.
Storage of Reports
As a system administrator, once the report is generated it should be downloaded to the local and stored in the folder < Digital Profile ID > CDP Report.
View Profile Details
Use the feature to view the details of the selected customer and edit the details, if required.
Menu path: Customer Management > Customers > Search for customers
Click on the required customer to view the profile details.
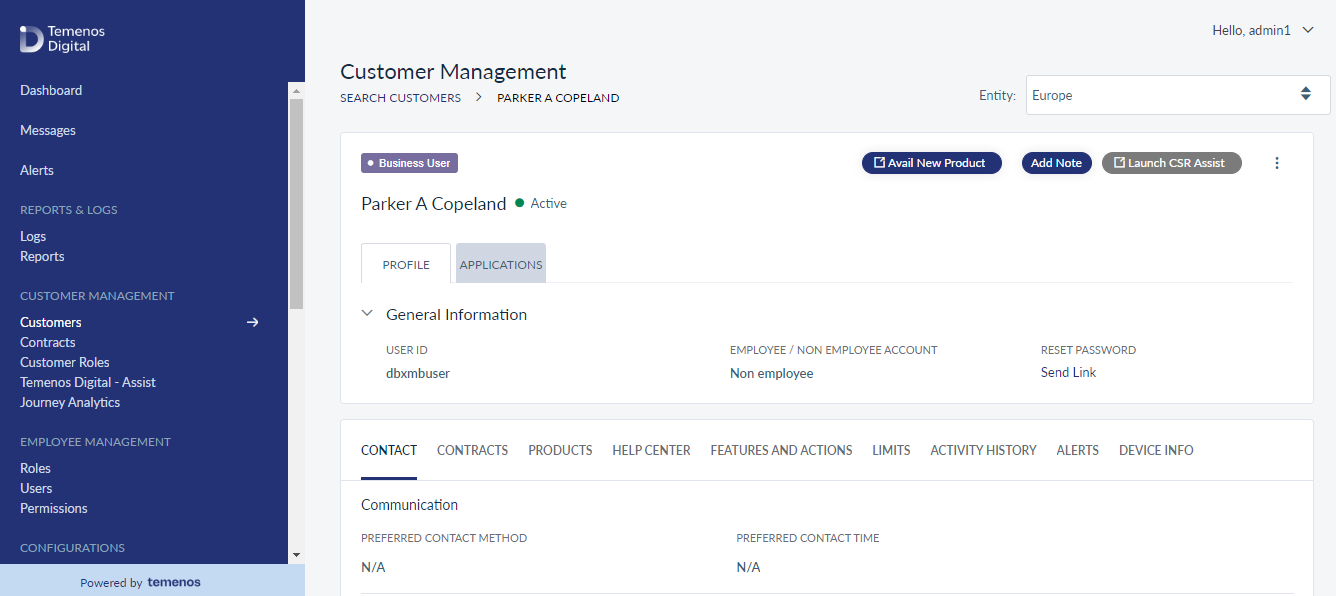
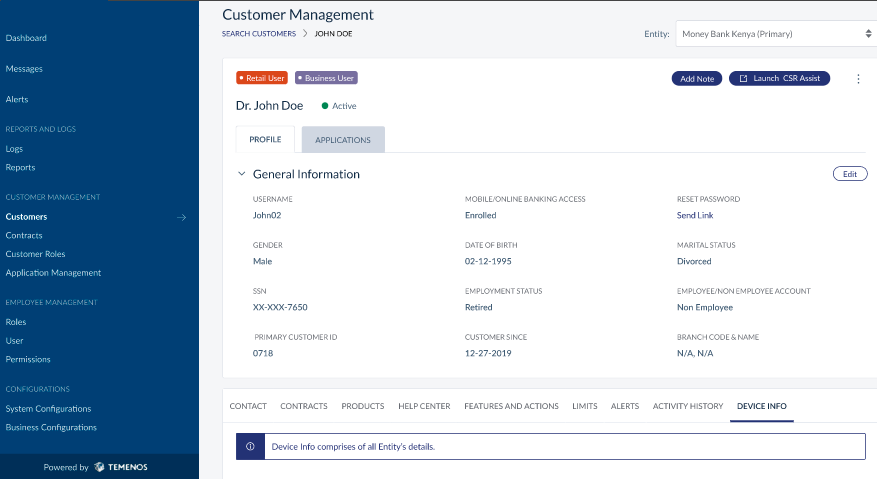
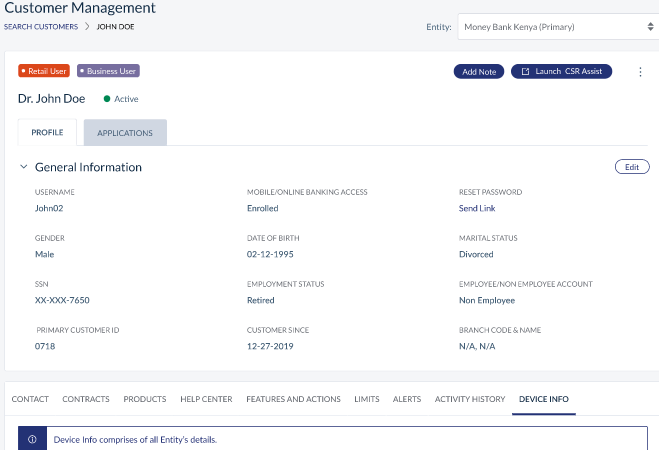
For the existing retail and business customers, the application displays the following tabs:
- Profile tab - Displays the general information and other details as shown below.
- Deposits tab - It displays information on the applications on deposits started and submitted.
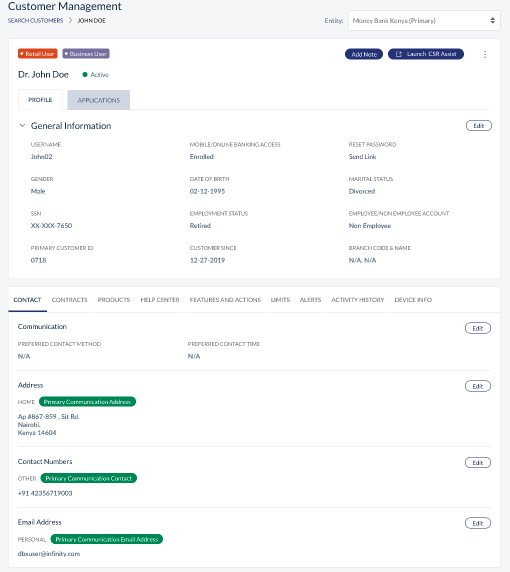
Profile - General Information
This section displays the following information:
- Customer type - Retail Customer or Business User.
- Current status of the customer.
- New: A customer remains in this status when created from the Spotlight application or created by a business owner by providing only the username. The application sends a link to the customer to set the password. After the password is set, the customer becomes active.
- Active or Suspended: If Active, the customer can use the banking application.
- Locked: The account is locked automatically after a defined number of failed login attempts. No unlock customer button is visible. The following conditions apply:
- The account is unlocked after the predetermined time period or when the customer resets the password.
- Reset password link is active.
- CSR assist is disabled. Hovering over the CSR assist button displays the message, "Disabled as the customer is locked / suspended / has not consented".
- Hovering over Mobile / Online Banking Status displays the message, "Disabled as the customer is locked / suspended / has not consented".
- Username: Used for logging on to the banking applications.
- Gender: Applicable only for retail customers.
- Customer ID: Relationship number or member ID of the customer with the Bank. Customer ID is different from the username.
- Date of Birth.
- E-agreement Status: Required or not required, and if required, whether signed or not. Applicable only for business users.
- Employment Status: Applicable only for retail customers.
- Identification Number: The Social Security Number (SSN).
- Marital Status.
- Role of the customer: Applicable only for business users.
- Customer Since date.
- Employee / Non-Employee Account. Whether the customer is also an employee of the bank / CU.
- Branch Code and Name.
- Reset Password link.
When the Retail and Business profiles are linked, one can view the company details also. The details include:
- Contact Information
- Due Diligence
- Contracts
- Products
- Help Center
- Features and Actions
- Limits
- Activity History
- Alerts
- Device Info
Click Edit to modify the customer profile details. If the customer has raised any requests or travel notifications, the app displays an alert message showing the number of requests and notifications raised. You can do the following:
- Launch CSR Assist.
- Reset Password: If the customer has requested for resetting the password, click Send Link to Reset Password of the customer. The app sends an automated mail to the customer with a link to set new password. Through this link, the customer can set new password without any further authentication. This option is available only if the customer record is Locked or in Active status. The reset password option is not applicable if the customer is suspended and the app displays an appropriate message.
- Link or De-Link retail and business profiles.
- Context Menu
- Suspend: Suspend or activate a customer.
Click note if you want to make a note about any changes made in the customer's profile. All the notes written are available for any future reference.
The Link / Delink in customer profile functionality is unavailable from 2021.01. The configuration that is shown in UI has no real-time impact.
Profile - Detail Tabs
This section contains Contact, Products, Help Center, Roles, Features and Actions, Activity History, Alerts, and Device Info. You can click each tab to view the particular information. Click Add or Edit to perform the required activity.
Applicants
The application displays the following details:
- Application ID
- Applied For Product Type or Name
- Contact Number
- Application Date
- Status
- Email ID
- Application Channel
- Document Submitted
Enroll a Customer
Bank staff can enroll an existing customer to digital banking if any customer is not having access to online banking. Once enrolled from spotlight, a digital profile is created and the system generated username and activation code are shared with the customer via email and phone number respectively. The customer can then enter the username and activation code in online banking apps to activate their profile
- It is mandatory to have the contact details (email ID and contact number) to enroll a customer, otherwise the application will show appropriate error message.
- For integrating with a third-party Authentication provider additional processes might be involved.
You can search for an un-enrolled user with a Customer ID, email, or Contact Number. The app displays the list of un-enrolled users. Click on any row to view the customer profile information (customers who has not yet enrolled):
- SSN
- DoB
- Customer ID
- Status of Mobile / Online access
- Contact Information
Click on Enroll Now, present at the top-right corner of the page. The Enroll screens appears.
You can perform the following:
- From the service list, select a service which will define weather the customer is getting enrolled for Retail Banking or Business Banking application.
- From the Role list, select an appropriate role for the customer which will define the access levels of the customer.
- If you want to associate more customer IDs to the customer, do the following:
- Click Add Customer ID. The Add Customer screen appears.
- The Add Customer screen lists all the related customer ID related to the new user’s primary customer ID. Click Search Other Customers if you want to associate any other ID. Choose the required customer ID.
- Click Select, the details of the selected customer ID are displayed along with the contract details to which the selected customer ID is associated. You can also view other customer IDs associated with that contract and if required, select any of them.
- Click Add, the Enroll screen appears. Select the role for the customer which determines the access levels in the newly added customer ID.
Add Customer - From the contextual menu of each customer ID, you can manage the accounts, permissions and limits for each account at a more detailed level in Edit User Access screen.
- Once you have added all the details, click Enroll.
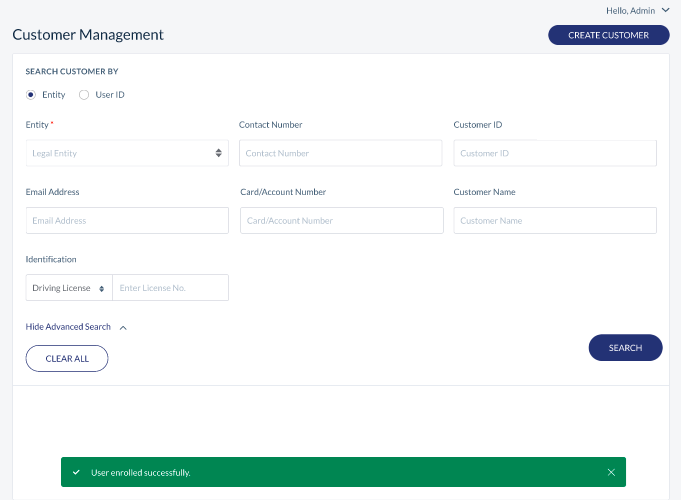
Based on the information available about the customer in core, a digital profile is created in Spotlight for the user and the username and activation code is sent to the primary contact details (email ID and mobile number). You would see a confirmation message stating the same. The status of the customer changes to New till the customer activates the profile using the activation code.
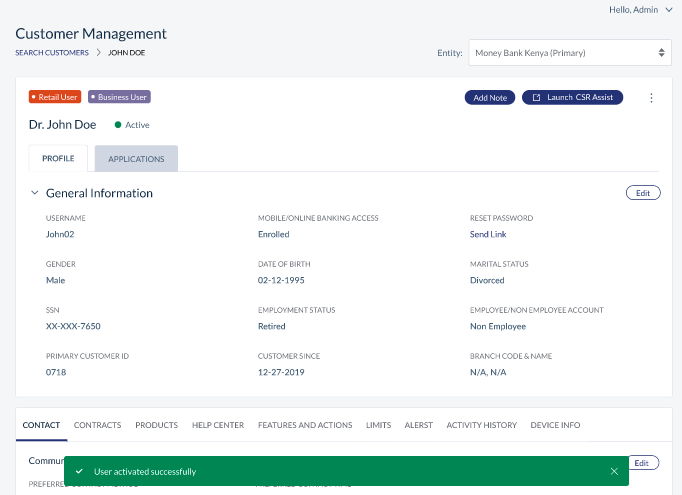
Once the user activates the profile, the status of the customer changes to Active.
If the user has lost the activation code or if it is expired, they can send a request to resend the code to the bank staff. You can regenerate the code and send it again with the help of Resend Activation Code link. Click Yes on the confirmation message, the new activation code is sent to the user.
When you regenerate the code, the old code becomes invalid.
- For enrolling a customer from Spotlight / OLB, the following fields are mandatory and should be added. Even though these required fields aren't added in Transact, these need to be filled for enrollment. Otherwise, the customer will not be enrolled and might get an error message.
- The following table explains the mandatory fields required for successful enrollment in Spotlight / OLB if the core system is Transact (T24):
| SN | Mandatory Field |
| 1 | Mnemonic |
| 2 | GB Short Name: As per our wish |
| 3 | GB Name 1 |
| 5 | GB Street |
| 6 | GB Address |
| 7 | GB Town Country |
| 8 | Sector |
| 9 | Account officer |
| 10 | Other officer |
| 11 | Target |
| 12 | Industry |
| 13 | Nationality |
| 14 | Customer Status |
| 15 | Residence |
| 16 | Language |
| 17 | Title |
| 18 | Given Names |
| 19 | Family Name |
| 20 | Gender |
| 21 | Date of Birth |
| 22 | Phone : +<CountryCode>-<PhoneNumber> |
| 23 | SMS : +<CountryCode>-<PhoneNumber> |
| 24 | |
| 25 | Address Location |
| 26 | Tax ID |
Here is a small video that helps the customer of a bank becomes digitalized via Spotlight.
Edit User Access
Using the Edit User Access feature, you can modify the access that a user has to several other features. Features that can be defined are as below. The following are some of the features that you can edit:
You can perform the following:
- View Accounts List
- Edit Permissions
- Edit Limits
- Edit Signatory Groups
- Edit Contract Details
- Delete User Access
Select Accounts
You can view the list of accounts that are associated with the selected customer IDs. All the accounts are selected by default, you can uncheck the required accounts. You can view the following information about the accounts:
- Account Number
- Account Type
- Account Name
- Ownership Type
This accounts list is retrieved from the database and the customer who is getting enrolled will have access to all the accounts that are selected here.
Account Level Features and Actions
You can view the list of features and actions associated with the accounts in the customer ID. The list is displayed based on the Service Definition associated with the customer ID. By default, the list is displayed in Customer view which means that the features list is displayed with respect to each customer ID. Click By Accounts, if you want to view the features list related to each account. If required, you can uncheck any action related to a feature. In By Accounts view you can even update the features and actions list in bulk using Update Permissions in Bulk option. Following are the steps to do that:
- Click Update Permissions in Bulk.
- From the Features list, select a feature.
- From the Actions list, select an action.
- From the Permission type list, select Enable or Disable.
- Click Apply Changes and the action permission is updated across all customers.
- If you want to apply these permission to only few customers, then from the Select Customer ID list, select the required customers and click Save.
- When you disable the features, it is automatically disabled at the customer level. Upon disabling the features at the contract level per product, they aren’t included at the customer level, so the customer automatically deletes them.
- When you enable the flow, you need to enable it at the contract level and later manually enable it at the customer level, as the bank needs to decide whether the feature should remain enabled or disabled.
Other Features and Actions
This tab is similar to Account Level Features and Actions except that you can manage the features and their related actions which are not related to any account. These features are applicable to the customer associated with the customer ID in general.
Assign Limits
The Assign Limits tab lists the selected features that involve transactions. The bank employee can assign per transaction, daily and weekly transaction limits. The list is displayed based on the Service Definition associated with the customer ID. By default, the list is displayed in Customer view which means that the limits list is displayed with respect to each customer ID. Click By Accounts, if you want to view the limits list related to each account. In this view you can even update the limits list in bulk using Update Limits in Bulk option. Following are the steps to do that:
- Click Update Limits in Bulk.
- From the Features list, select a feature.
- From the Actions list, select an action related to the feature.
- From the Transaction type list, select the type of transaction to which you want to update the limit.
- In the Value field, provide the updates transaction limit.
- Click Apply Changes and the action permission is updated across all customers.
- If you want to apply these permission to only few customers, then from the Select Customer ID list, select the required customers and click Save.
Suspend or Activate Customer's Account
Use the feature to suspend a customer if required.
On the context menu, click Suspend. Once suspended, the customer cannot log on to the banking apps.
Here is a small video that shows how to activate the enrolled customer via Spotlight.
View and Edit Customer Profile Details
The app displays the customer record in edit mode. By default, the app displays the General Information panel. This feature is applicable only for existing customers.
Menu path: Customer Management > Customers > Search for customers > Customer profile details > Edit
You can do the following:
- Update the general information.
- Update the details tabs.
General Information
Displays the basic information about the customer in edit mode.
- Retail Customer
- Business User
You can update the following details:
- Salutation. Select the salutation as Mr, Mrs, Dr, or Ms, from the list.
- Marital Status. Select the marital status as divorced, married, single, or widowed from the list. This field is applicable only for retail customers.
- Employment Status. Select the required status from the list.
- E-agreement Status. This field is displayed only when the e-agreement was selected as required while adding the customer. This field is applicable only for business users.
- Risk Status: Select the risk status as defaulter, fraud detected, or high risk. You can select multiple options. These are just flags on the user's profile with no back-end implication associated.
- Click Save to update the details.
Click note on the top right corner of the screen to add notes for reference. You can also view the previously added notes, the user name who added the note, date and time-stamp. You cannot edit or delete previously added notes.
Detail Tabs
Select the required tab and click edit to update the existing information or click Add, to add new information. If the customer's profiles (Retail and Business) are linked, you can edit the details about both the profiles from their respective tabs. Do as follows in the required tab:
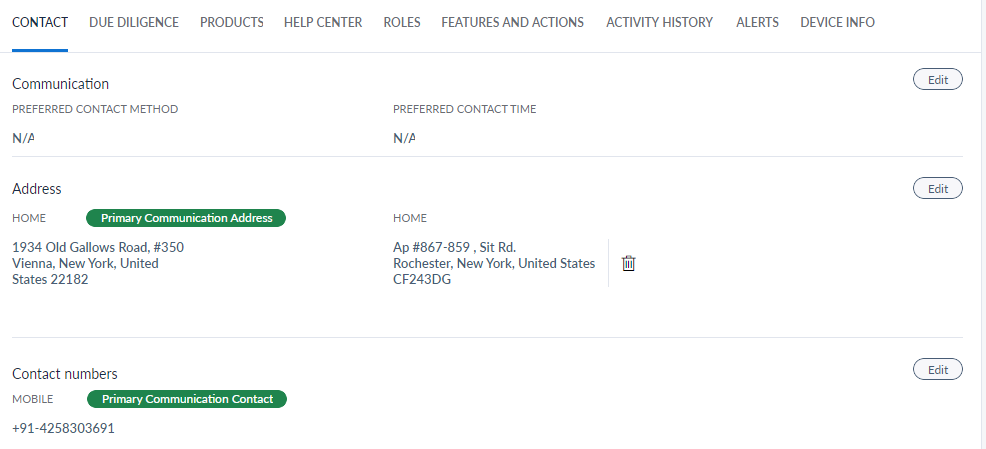
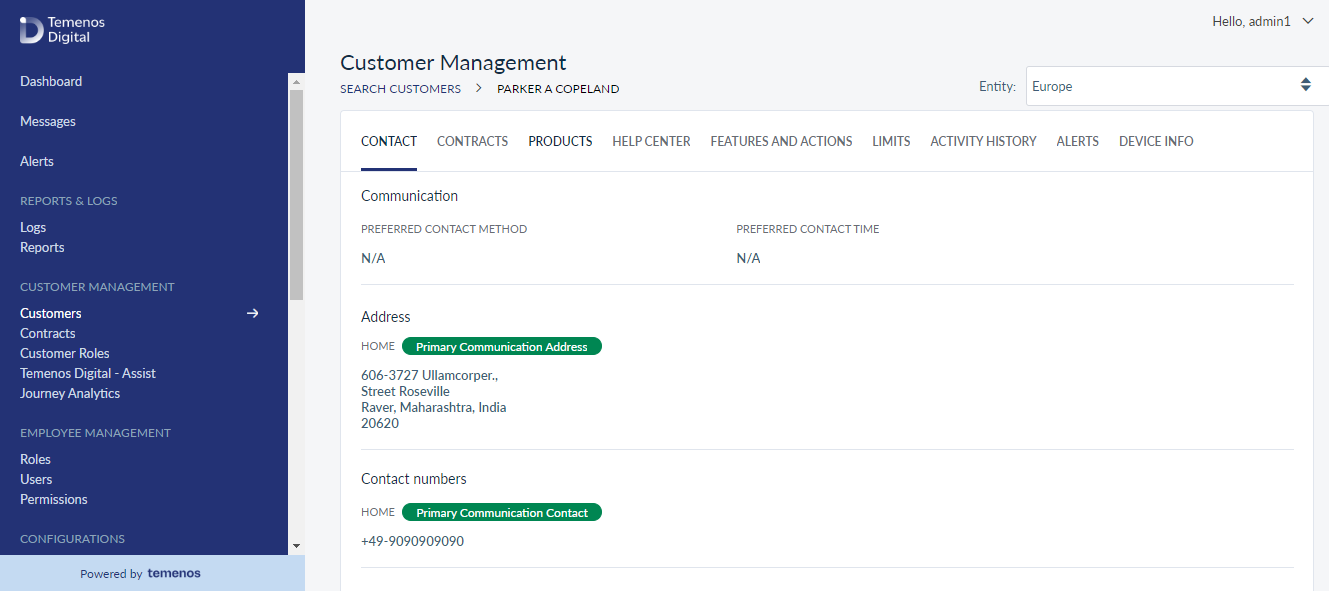
Contact
In Contact tab, you can update Communication, Address, Contact Numbers, and Email IDs related information.
Any updates made by the customer to his contact details from the retail banking application, the same will be reflected here.
Communication
You can update the preferred contact method and preferred time for the customer. Click Edit to open the Communication page.
Do as follows:
- Preferred Method: Select the call or email or both methods.
- Save the details.
AddressYou can add or update your communication address here. Click Add or Edit to open the Address page.
Do as follows:
- Select the required type of address from the list (Home or Work or Other).
- Set as Primary: Select the option to set the address as the primary address.
- Address Line 1: Enter the address.
- Address Line 2: Enter the address.
- Country: Select the country from the list.
- State: Based on the selected country, the state list is populated. Select the state from the list.
- City: Based on the selected state, the city list is populated. Select the state from the list.
- Zip code: Enter the zip code.
- Click Save to update the address.
- Click Cancel if you want to discard the address update.
Contact Numbers
You can add or update contact number. Click Add or Edit to open the Contact Numbers page.
Do as follows:
- Select the required contact type from the list (Home or Work or Other).
- Add relevant contact number below the contact type.
- Set as Primary: Select the option to set the contact number as primary contact number.
- Save the details.
Email IDs
You can add or update email IDs. Click Add or Edit to open the Email IDs page.
Do as follows:
- Select the required email ID type from the list (Home or Work or Other).
- Add relevant contact number below the contact type.
- Set as Primary: Select the option to set the email ID as primary email ID.
- Save the details.
Customer Due Diligence
It contains the information concerning the intentions of the customer regarding the usage of services provided by the bank. The banks can assess the risk based on this information provided. These risks include identity fraud, money laundering and terror financing. This tab contains three sections:
This tab contains three sections:
- Citizenship / Tax
- Employment
- Account Usage / BSA
Citizenship / Tax
It displays the customer’s Citizenship and Tax related details.
You can view the following information from the Citizenship and Tax lists respectively:
Citizenship
- Country – Displays the name of the country from where the customer belongs.
- Citizenship – Displays whether the customer has the citizenship of the country.
- Residency - Displays whether the customer is the resident of the country.
- Statutory Period Completed - Displays whether the customer has stayed in the country for the minimum tax statutory period.
Tax
- Country – Displays the name of the country from where the customer belongs.
- Tax Identification Number – Displays the customer’s Tax number.
Perform the following steps if you want to add more of these details:
Citizenship
- Click Add in the Citizenship section. The Citizenship Details screen appears.
- From the Select a Country list, select the country from where the customer belongs.
- Select an appropriate option for the questionnaire (Yes or No) and click Save and Close. If the answer is No for any option, you might have to provide additional information as requested. The details are added to the Citizenship list. You can click Save and Add Another if you want to add more citizenship details.
Tax
- Click Add in the Tax section. The Tax Details screen appears.
- From the Select a Country list, select the country from where the customer belongs.
- In Tax Identification Number – Tin field, provide the tax number with respect to the selected country in Tax Identification Number – Tin field.
- Click Save and Close. The details are added to the Tax list. You can click Save and Add Another if you want to add more citizenship details.
If you want to edit any information, click the edit icon of the list item you want to edit. Make the relevant updates and click Update and Close.
Employment
This section displays customer’s employment status and the details related to it. Based on the employment type, you can find the Employment Details, Business Type details and Business Address details here.
Following is the field level information shown for each employment type:
Employee
- Employment Details:
- Employment Role: Part time or Full Time
- Occupation
- Employment Start date
- Employment End date
- Employer Name
- Business Type or Industry classification details
- Business Category
- Business Description
- Business Detailed Description
- Business Address Details
Self Employed
- Employment Details:
- Employment Role: Part time or Full Time
- Occupation
- Employment Start date
- Employment End date
- Employer Name
- Business Address Details
Student
- Start date
- End date
Unemployed
- Start date
- End date
- Whether the customer is receiving any social security benefits
You can click on the Edit button to modify any details. All the fields are editable and once you are done with your updates click Update.
If there are no employment details, appropriate message is shown in this section with an option to add the details. Click Add and select the employment status from the list.
As mentioned earlier, the related fields appear based on the selected employment status. Provide the appropriate information and click Save.
Account Usage
You can add the details of the accounts to which you send or receive money frequently in the respective tabs Send Payments and Receive Payments.
Send Payment
Click Add in to provide the details of the accounts to which you send the money frequently. The Account Usage screen appears. Do the following to provide details:
- From the Select Countries list, select all the countries to which the customer is expected to send the money.
- In the Estimate expected number of payments per month field, provide the number of times the customer is expected to send the money in a month.
- In the Estimate expected amount of payments per month field, provide the amount that the customer is expected to send in a month.
- In the Provide a reason for outgoing payments field, provide the reason for transaction.
- Click Save. The details are added to Send Payment tab.
Receive Payment
Click Add in to provide the details of the accounts from which you receive the money frequently. The Account Usage screen appears. Do the following to provide details:
- From the Select Countries list, select all the countries from which the customer is expected to receive the money.
- In the Estimate expected number of payments received per month field, provide the number of times the customer is expected to receive the money in a month.
- In the Estimate expected amount of payments received per month field, provide the amount that the customer is expected to receive in a month.
- In the Provide a reason for incoming payments field, provide the reason for transaction.
- Click Save. The details are added to Receive Payment tab.
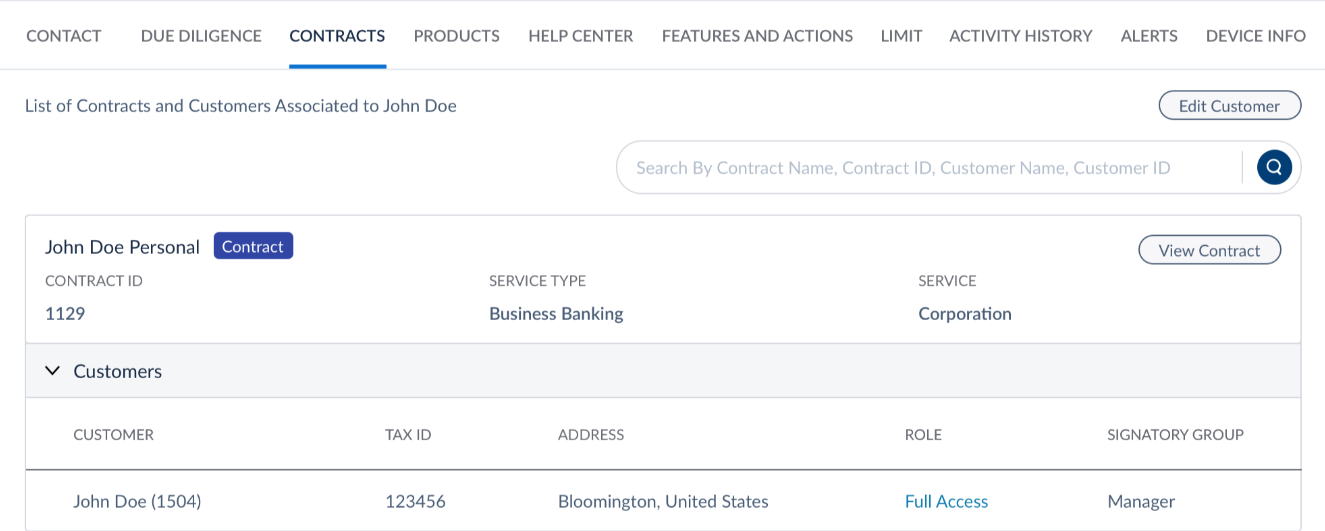
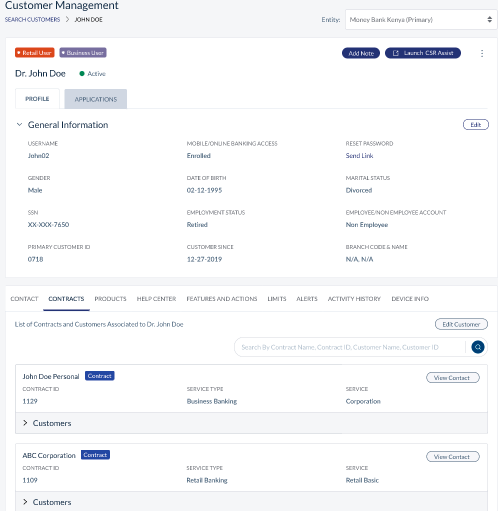
Contracts
Displays the list of Contracts that the customer is associated with. Each Contract displays the following information:
- Contract Name
- Contract ID
- Service Type
- Service
- Customers - This section displays the list of Customer IDs with which the customer is associated within the contract. Following is the information displayed related to each customer ID:
- Customer Name
- Customer ID
- Tax ID
- Address
- Role of the customer with respect to the customer ID.
- You can click View Contract to view the complete list of customer IDs associated with the contract. If you want to edit the relationship between any customer ID and customer or associate the customer with any new customer ID, click Edit Customer.
Products
Displays the list of products for which the customer has enrolled. It contains the following tabs:
- Accounts
- Cards
Accounts
The Accounts tab displays the list of contracts along with the associated customer IDs and accounts with which the customer is associated.
Click Edit if you want to manage the accounts that the customer has access within each customer ID. The Edit User Access screen appears where you can manage the accounts.
Cards
Displays the list of cards that are linked to the customer's account.
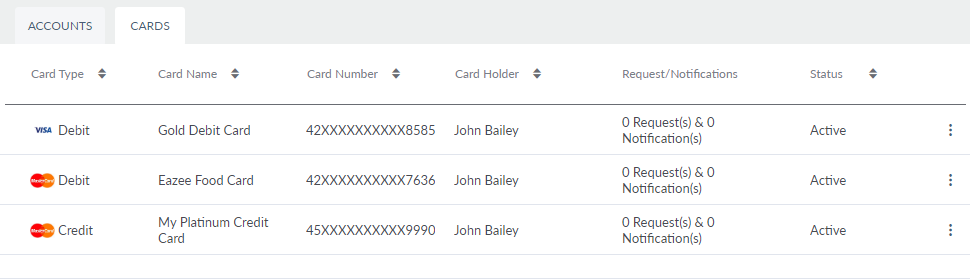
You can sort the list based on any of the columns by using the sort icon. The cards list is represented as rows with the following details:
- Product Type
- Card Name
- Card Number
- Card Holder Name
- Requests / Notifications related to the card
- Status of the card (Inactive / Active / Lost or Stolen / Blocked / Locked / Cancelled / Replaced)
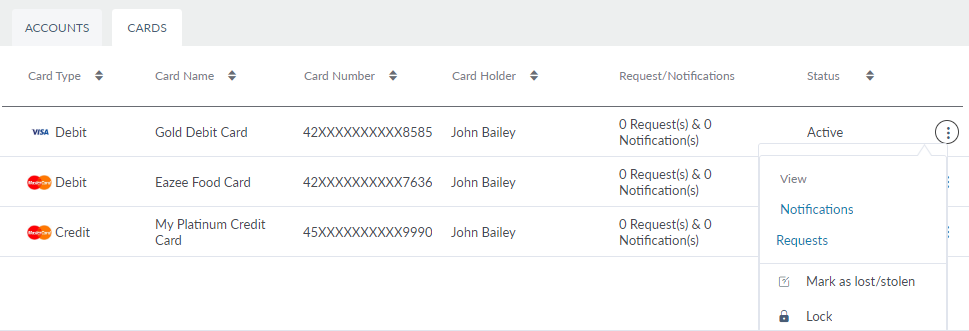
Click the contextual menu of the required card, and you can perform the following activities:
- Mark Lost or Stolen
- Lock / Unlock Card
Click Yes on the confirmation screen and the status of the selected card is changed accordingly. The changes made here are reflected in the MB and OLB applications. You can also view the Requests / Notifications of a card using the contextual menu. Select the required card to view additional details as follows:
- Card Type
- Card Network
- Option to view primary cardholder name
- Associated Account
- Date of Issue
- Date of Expiry
- Reward Points Balance
If the selected product type is credit card, the details screen will have some additional information, which is as follows:
- Current Balance
- Interest Rate
- Credit Limit
- Current Due Date
- Available limit
- Current Due Amount
- Minimum Due Amount
- Last Payment Amount
- Last Payment Date
- Last Statement Balance
- Billing Address
Click Back to Cards to navigate to the cards list.
Transaction History
The Transaction History tab includes three tabs:
- Recent: Displays all the recent transactions.
- Pending: Displays all the pending transactions.
- Scheduled: Displays all the scheduled transactions.
You can sort the list based on any of the columns by using the sort icon. The list in these tabs is represented as rows with the following details:
- Ref No
- Date and Time
- Transaction Description
- Type
- Original Amount
- Converted Amount
You can download the list as an Excel file if required.
Do as follows:
- Select the required date range from the date picker (Today, Yesterday, Last 7 Days, Last 30 Days)
- You can also select the required custom range from the dates shown in the calendar
- Click Select
- Click Apply
The app displays all the related transactions. Search for the required transaction using the Search feature if required and view the details. Click Back to Accounts to navigate to the accounts list.
Product Details
The Product Details tab displays the details of the selected account type.
Details of the selected account type:
- Current Status of the Customer: Next to the customer's name, the app displays the customer status as active or defaulter.
- Account Number or IBAN: The account number or IBAN of the customer.
- Current Balance: The current balance in the customer's account.
- Dividend Rate: The current dividend rate set by the bank.
- Ownership: The ownership of the account as an individual, joint or minor.
- Available Balance: The available balance in the customer's account.
- Dividend Paid (YTD): The last dividend (amount) paid to the customer year to date.
- Account Holder: Displays account holder's name. If the selected account type is a joint account, the app also displays the primary and secondary account holder details. If the customer is the primary owner of the account, his / her name is listed in this field, and the ownership will be Primary, and the app provides a link to navigate to the profile of the secondary owner of the account. If some other customer is the primary owner of this account, his name will be listed here and the ownership will secondary, and the app provides a link to navigate to the profile of the primary owner of the account.
- Routing Number: Bank's routing number.
- Last Dividend Paid: Last dividend (amount) paid to the customer.
- Created on: The date on which the customer account is created.
- Swift Code: Bank's swift code.
- Last Dividend Paid On: The date on which the dividend is paid to the customer.
- Last Update On: The date on which the customer's account was last updated.
You can also subscribe the selected account for e-statements from here. Click Back to Accounts to navigate to the accounts list.
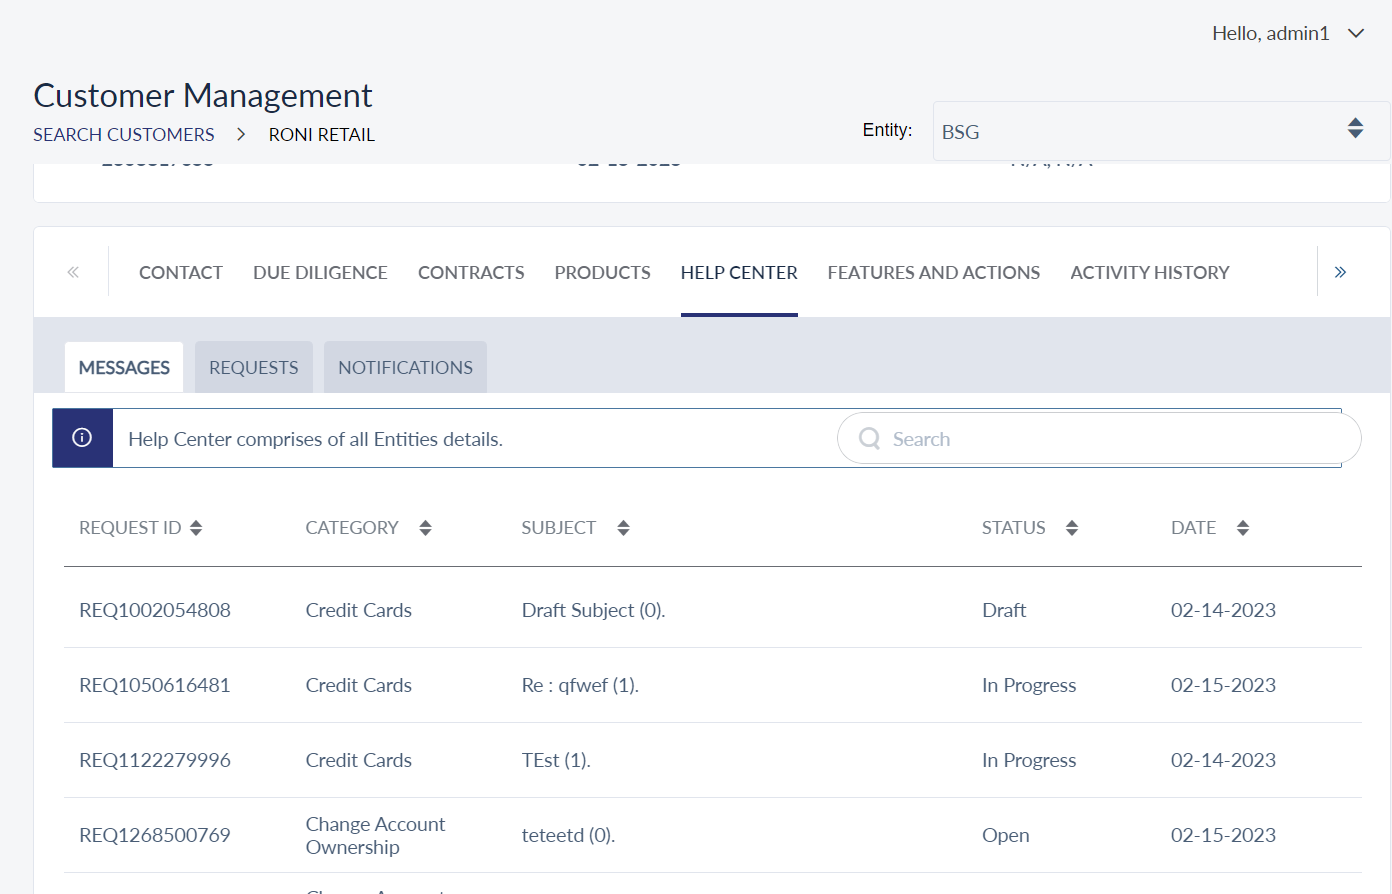
Help Center
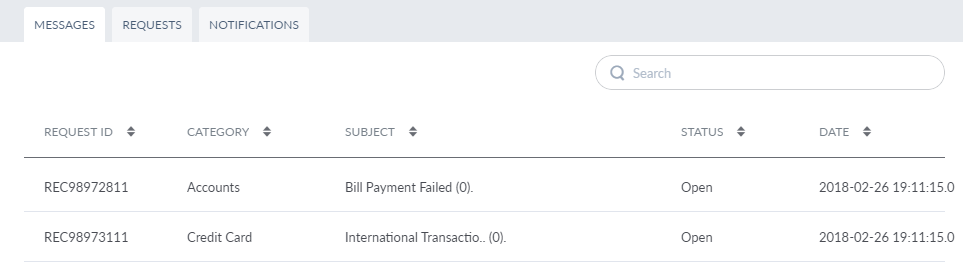
The Help Center tab displays all the message communications between the customer,
You can do the following on each tab:
Messages: Clicking on any of the threads will redirect the user to the Messages module.
You can sort the list based on any of the columns by using the sort icon. You can search for the required message using the search feature. Enter the keyword in Search to get the required message. The message list is represented as rows with the following details:
- Request ID
- Category
- Subject
- Status
- Date Requested
Click on the required message and the app will navigate you to the messages module and will show the details of the selected message.
Requests: Displays the list of requests raised by the customer. The request can be account-related or card related.
You can sort the list based on any of the columns by using the sort icon and filter the list based on the status of the customer. Enter the keyword in Search to get the required request. The request list is represented as rows with the following details:
- Request ID
- Date Requested
- Type (New Pin, Card Cancellation or Card Replacement)
- Card / Account
- Status (New / Completed / Cancelled / In Progress) - The status of the request is updated from the back-end.
Click on the required request to view more details like Card Number, Reason for Request, Delivery Mode, and Delivery Details. Click Back to Requests to navigate to the requests list.
Notifications: Displays the list of travel notifications raised by the customer.
You can sort the list based on any of the columns by using the sort icon and filter the list based on the status of the customer. Enter the keyword in Search to get the required notification. The notification list is represented as rows with the following details:
- Notification ID
- Type
- Cards
- Status (Active / Expired / Cancelled)
If any customer requests to cancel the notification (when the customer cannot access the OLB or MB application), you can click Cancel Notification icon on the required notification and cancel it on behalf of the customer. Click on the required notification to view more details like Planned Departure Date, Planned Return Date, Destination Contact Number and Additional notes if any. Click Back to Notifications to navigate to the notifications list.
Features and Actions
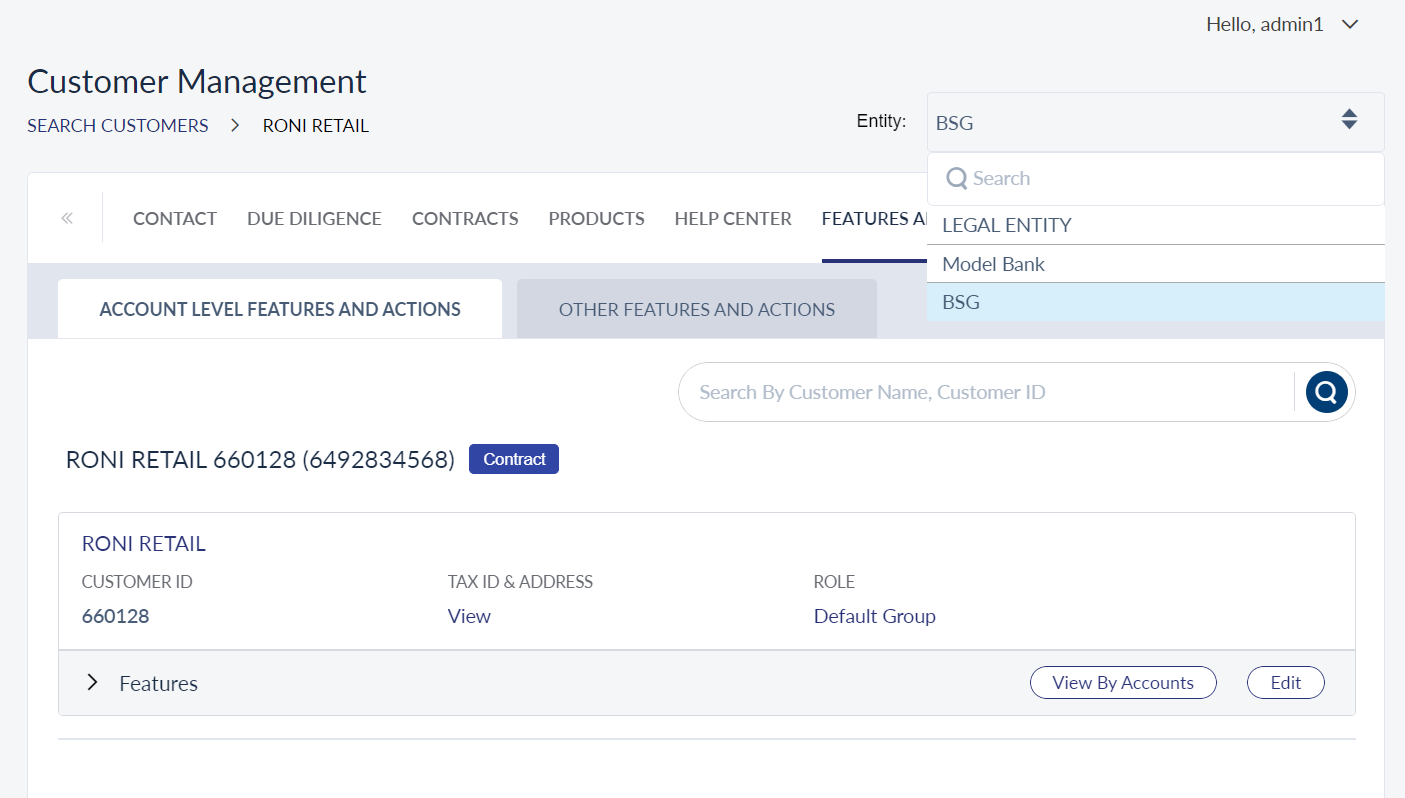
Account Level Features and Actions
You can view the list of contracts and the features and actions associated with the accounts in the customer ID of the contract. The list is displayed based on the Service Definition associated with the customer ID. By default, the list is displayed in Customer view which means that the features list is displayed with respect to each customer ID. Click By Accounts, if you want to view the features list related to each account.
Click Edit if you want to manage the features and actions that the customer has access within each customer ID. The Edit User Access screen appears where you can manage the permissions.
Other Features and Actions
This tab is similar to Account Level Features and Actions except that you can manage the features and their related actions which are not related to any account. These features are applicable to the customer associated with the customer ID in general.
Limits
You can view the list of contracts and the limits to the monetary actions related to each contract. The monetary actions are grouped into Single Transaction Limits and Bulk Transaction Limits. By default, the list is displayed in Customer view which means that the limits list is displayed with respect to each customer ID. Click By Accounts, if you want to view the limits list related to each account.
Click Edit if you want to manage the limits of the transactions within the respective contract. The Edit User Access screen appears where you can manage the limits.
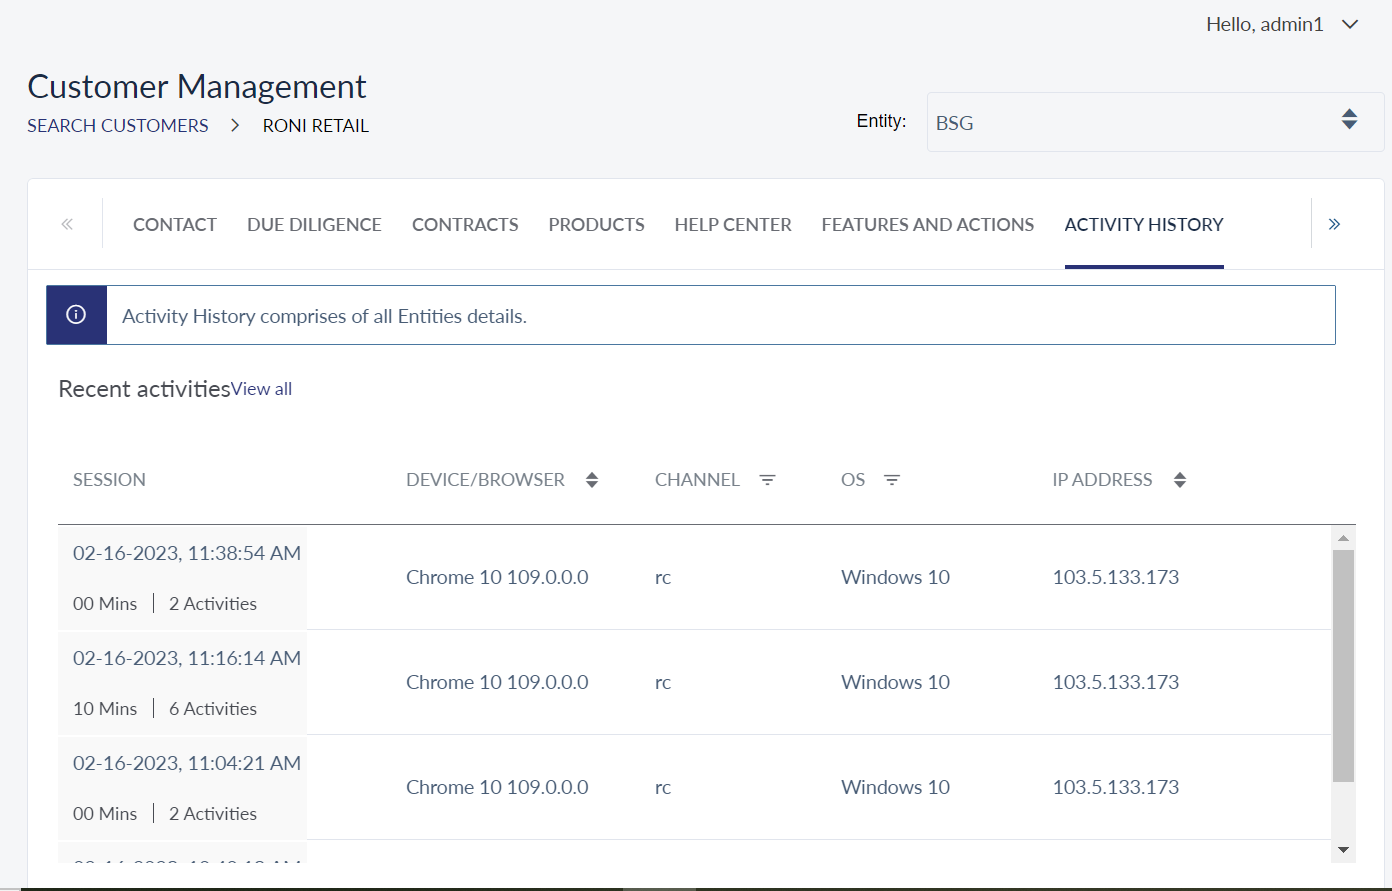
Activity History
The Activity History tab displays the list of banking activities carried out by the customer. The activity history is recorded in sessions. The list displays the details of the last three sessions. To view more sessions, click View All. The app navigates you to the transaction and logs section.
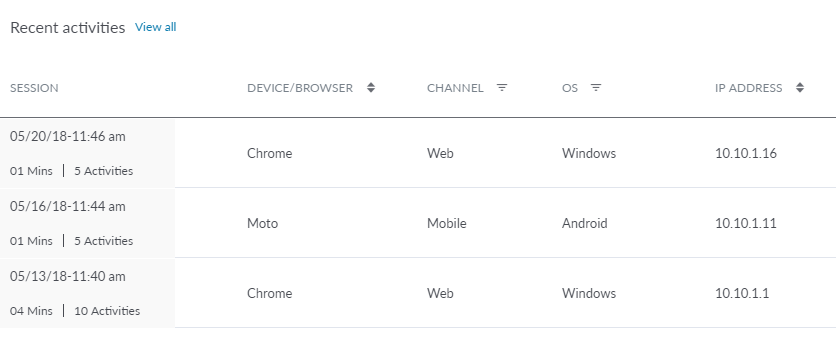
The activity history list is represented as rows with the following details:
- Session details: Includes Start Date, Time, Duration, and the number of activities carried out in the session
- Device / Browser details
- Channel (web / mobile)
- OS
- IP Address
You can sort the list based on any of the columns by using the sort icon and filter the list based on Channel and OS. Select the required session if you want to view more details about the session and activities carried out in that session.
The Session Details screen displays an additional detail, which is, the Device ID of the device on which the session started. The activities carried out in the session are represented as rows with the following details:
- Date and Time
- Name of the module in which the activity was carried out
- Activity Type
- Description of the activity
You can sort the list based on any of the columns by using the sort icon and filter the list based on Activity Type. Click Back to Sessions to navigate to the session list.
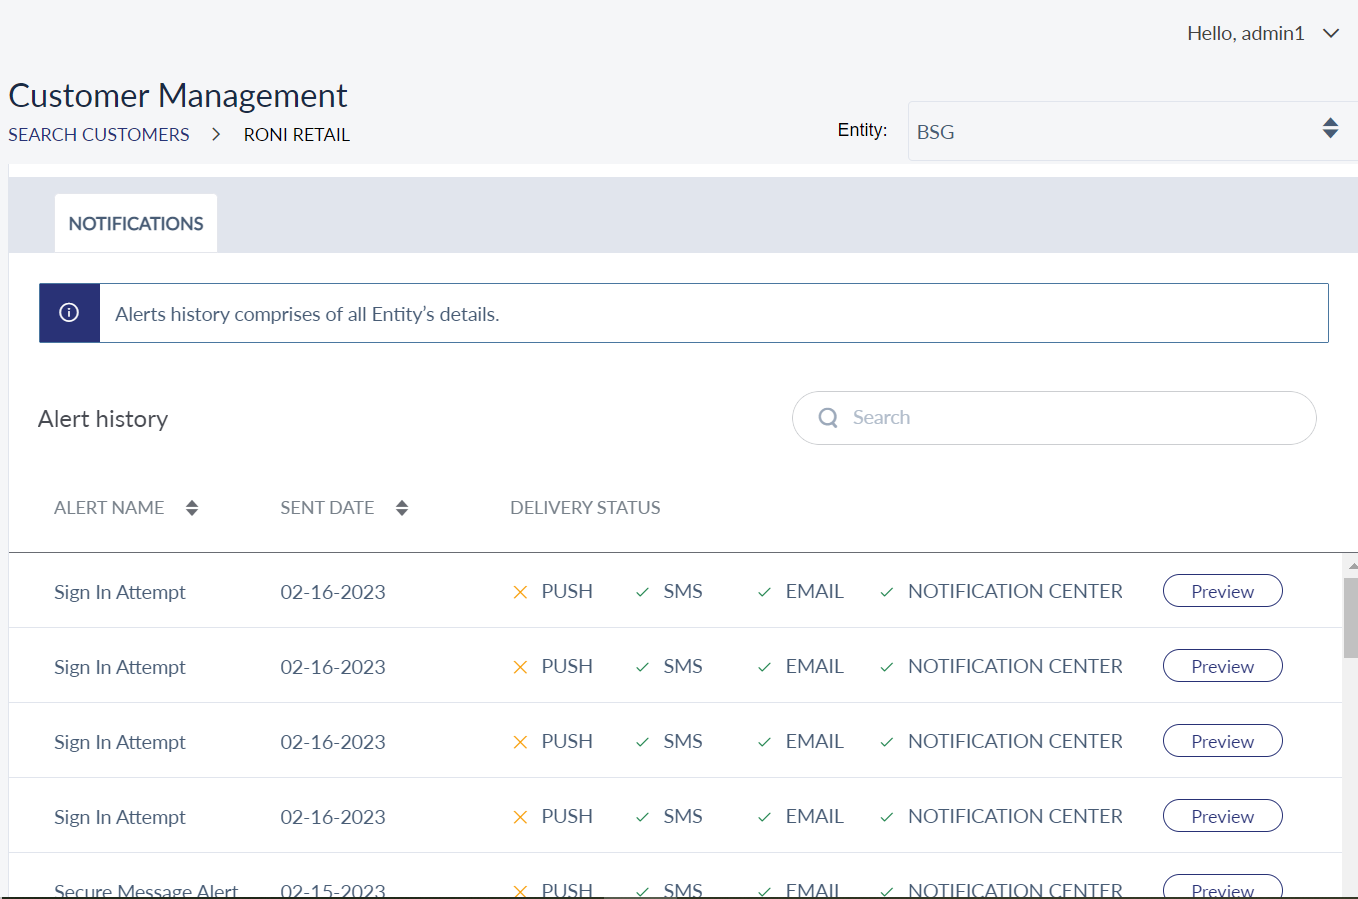
Alerts
The Alerts tab includes 'Notifications' section. By default, Spotlight displays the details in the Notifications tab when you click the Alert tab.
Notifications
The notifications tab displays a customer's history. The list is represented as rows with the following details:
- Alert Name: Name of the alert.
- Sent Date: Date when the alert was sent.
- Delivery Status: Displays through which channel the notification was sent (Push, SMS, Email, Notification Center).
- Preview: Click Preview to view the notification details sent for each channel. The following details are displayed for each channel:
- SMS / Notification Center: notification title, login success time, and notification content.
- Email: The HTML content sent in the email.
- Push: Notification Title, login success time, and notification content.
- Click Close to close the preview window.
You can sort the list based on alert name and sent date by using the sort icon. Enter the keyword in Search to get the required notification.
Preferences
Click the Preferences tab to view and edit the customer alert preferences. The Preferences page has two sub-tabs - Security and Transaction & Payment. The Security tab is selected, by default. User can set a customer's alert preferences upon request.
The Security page displays whether the alert preferences for a customer are enabled or disabled. If the alert preferences are enabled, it shows the chosen channels for receiving the alerts by the customer.
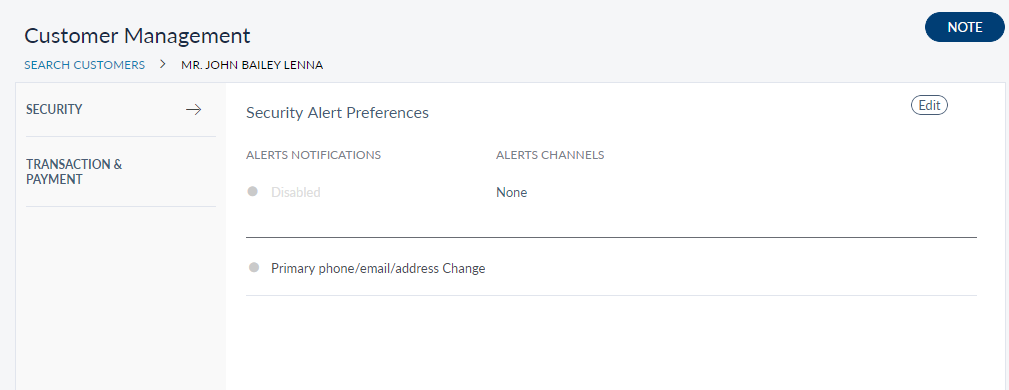
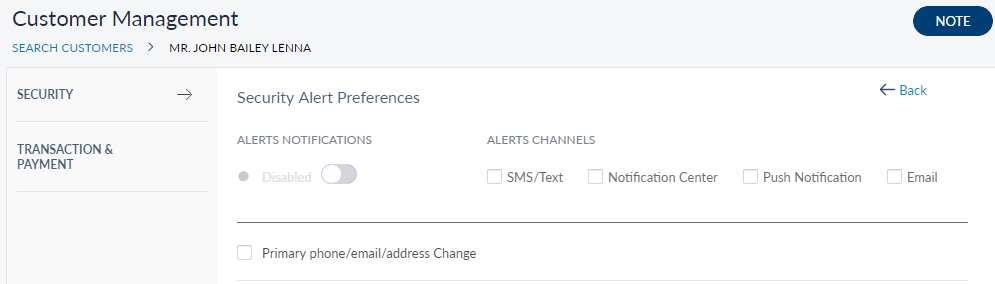
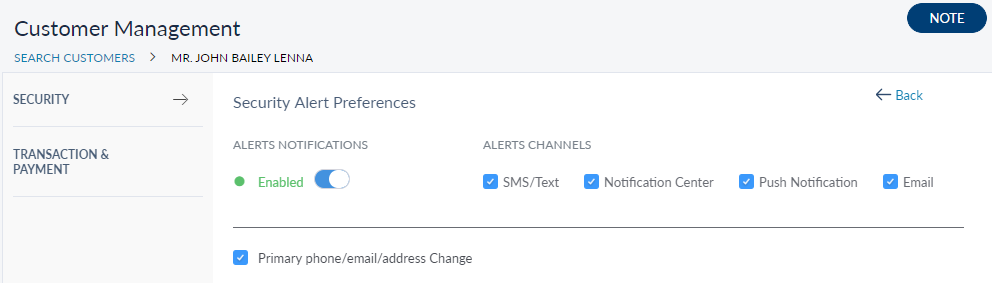
Click Edit to set alert preferences for a customer from the Security tab. The following actions can be performed:
- Notification toggle: Toggle between enabling or disabling alert notification option.
- Alert Channels: Choose the alert channels to which the notifications will be sent. The options are SMS/Text, Notification Center, Push Notification and Email.
- Primary phone/email/address change: Check the box for sending alerts.
- note: User can leave notes for future references by clicking the note tab.
Edit Security Alert Preferences option:
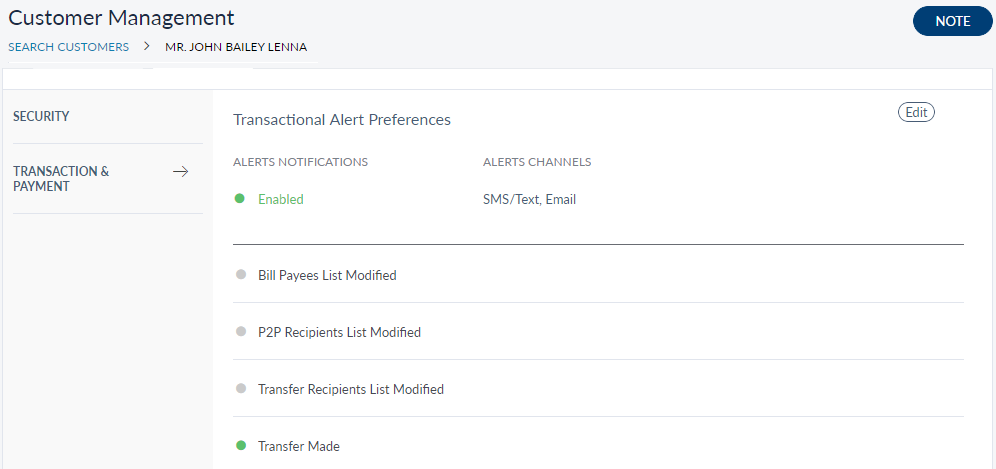
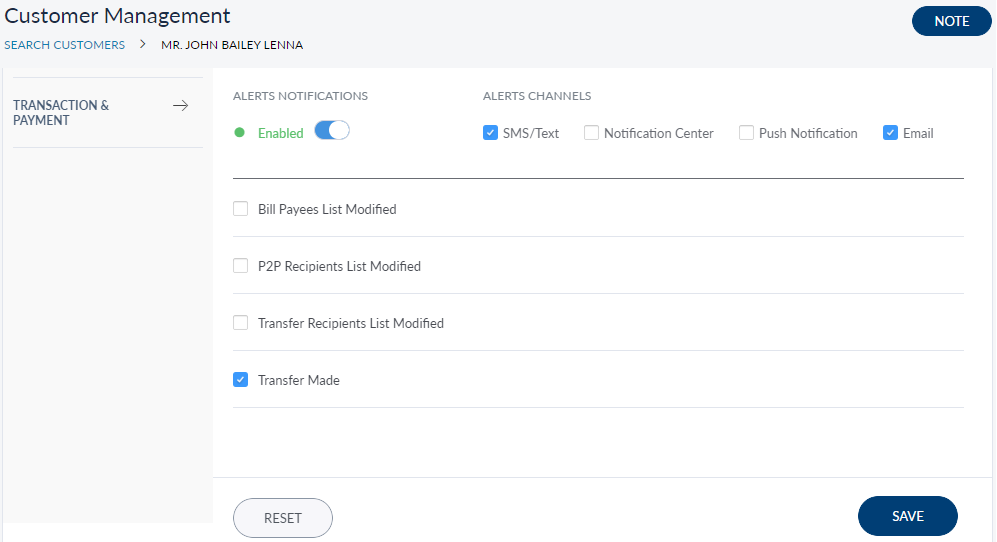
The Transaction and Payment tab shows the following information:
- Alert Notification: If the alert notification is enabled.
- Alert Channels: The chosen channels for receiving an alert.
- Alert types: A types of alerts to choose from for receiving alerts.
Transaction & Payment tab - View
Transaction & Payment tab - Edit
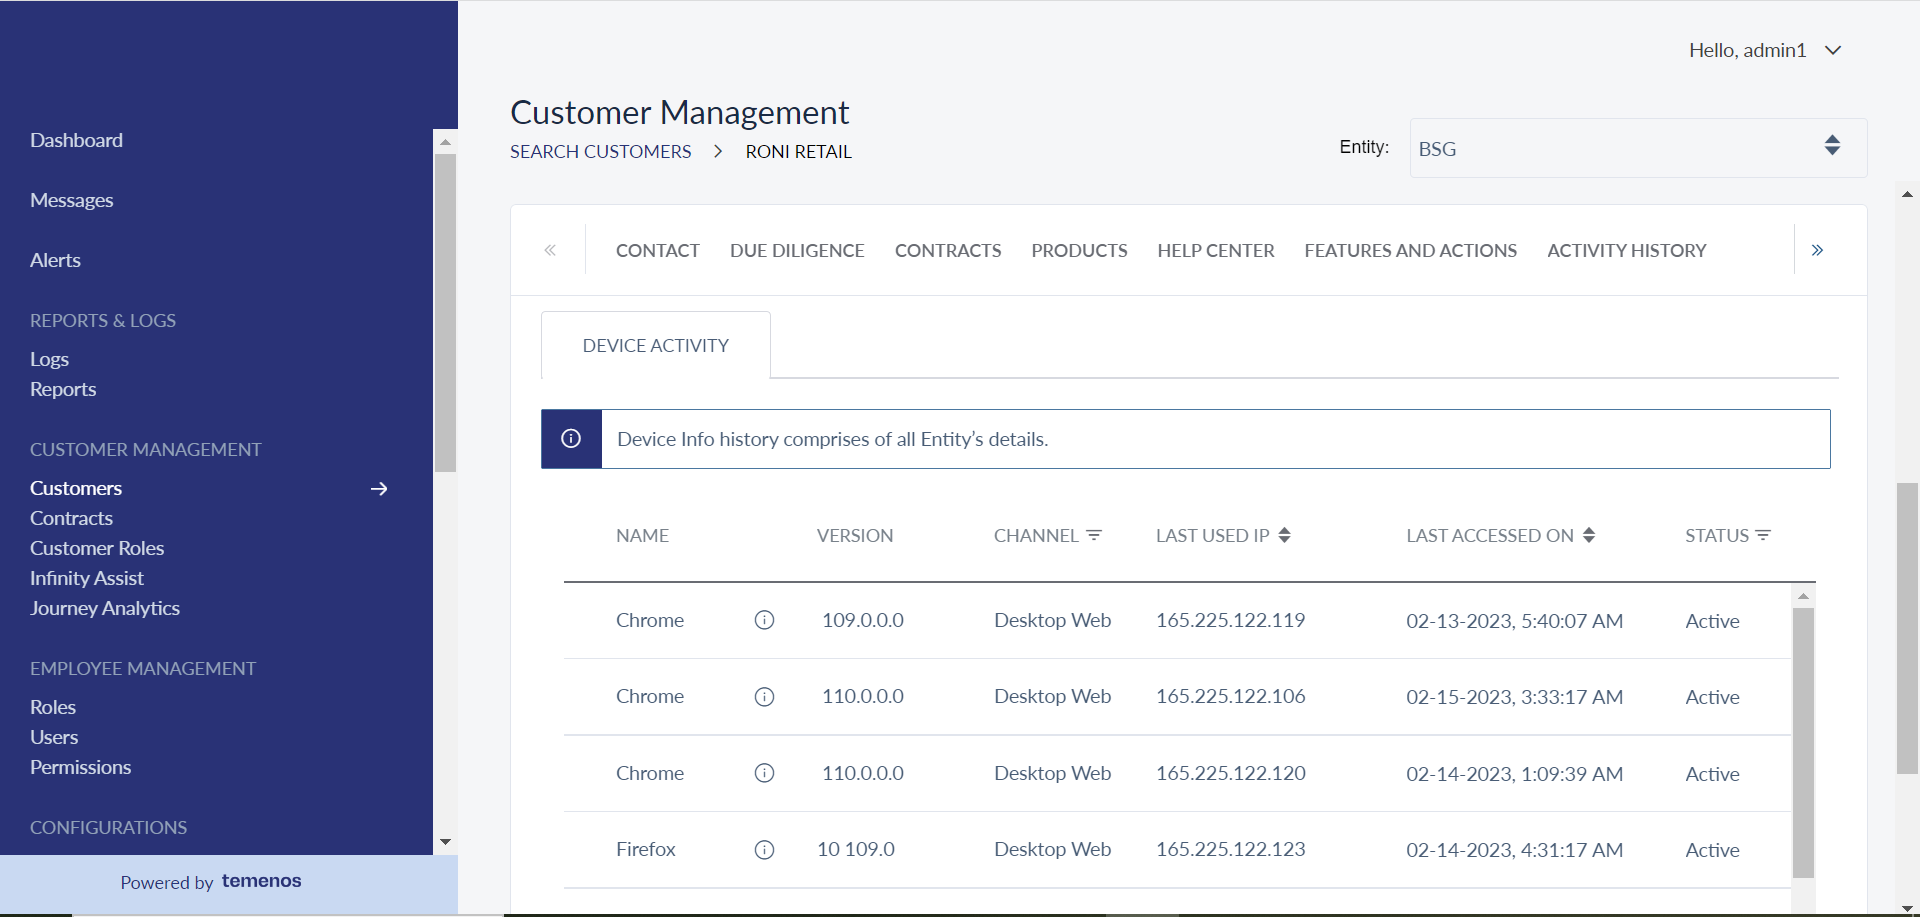
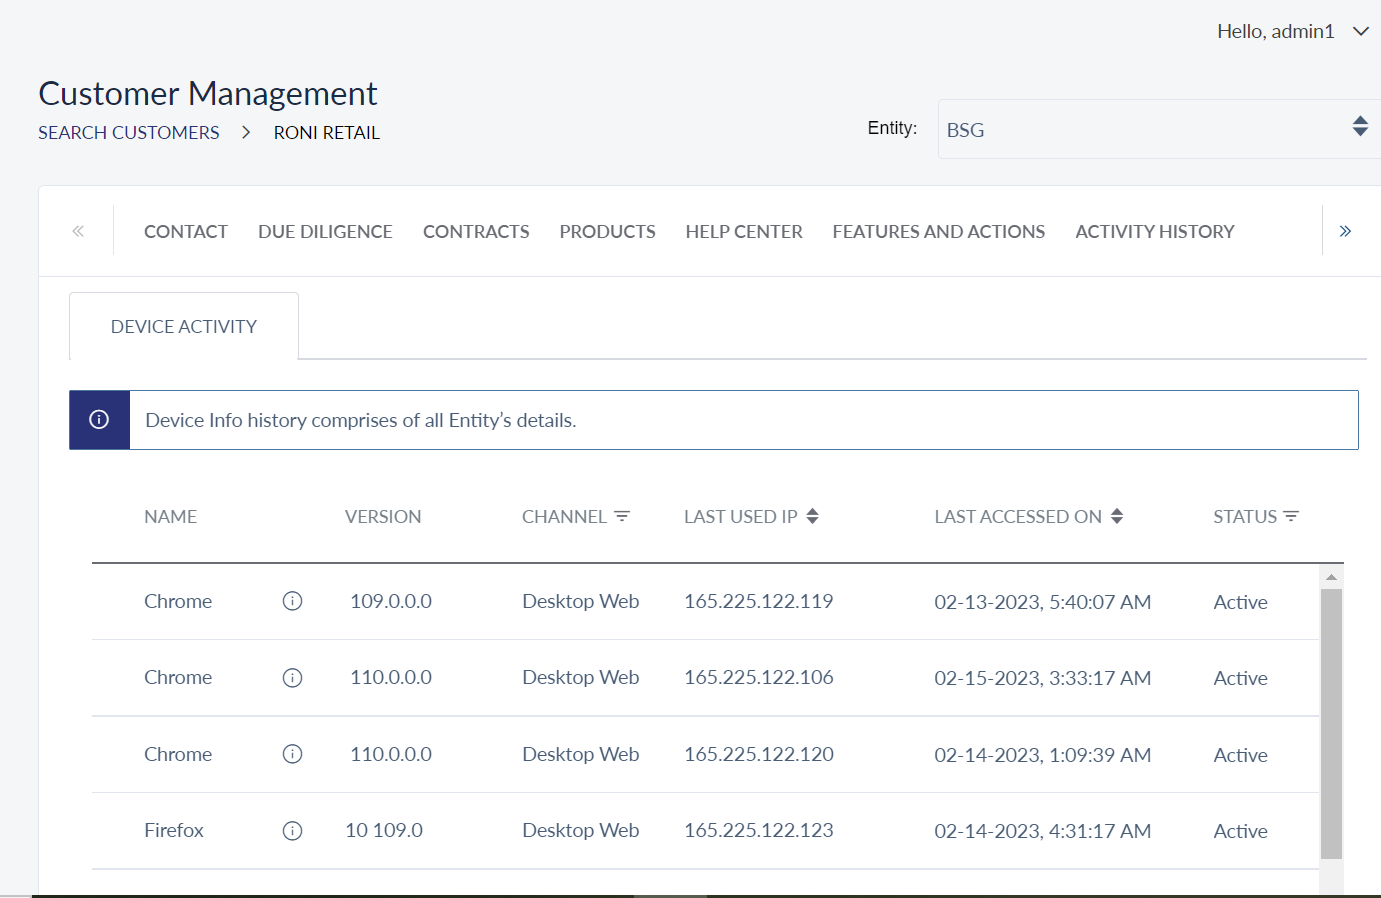
Device Info
The device info tab lists the details of all the devices registered / used for accessing the banking applications. You can also de-register the device on the customer's request if required by the bank staff.
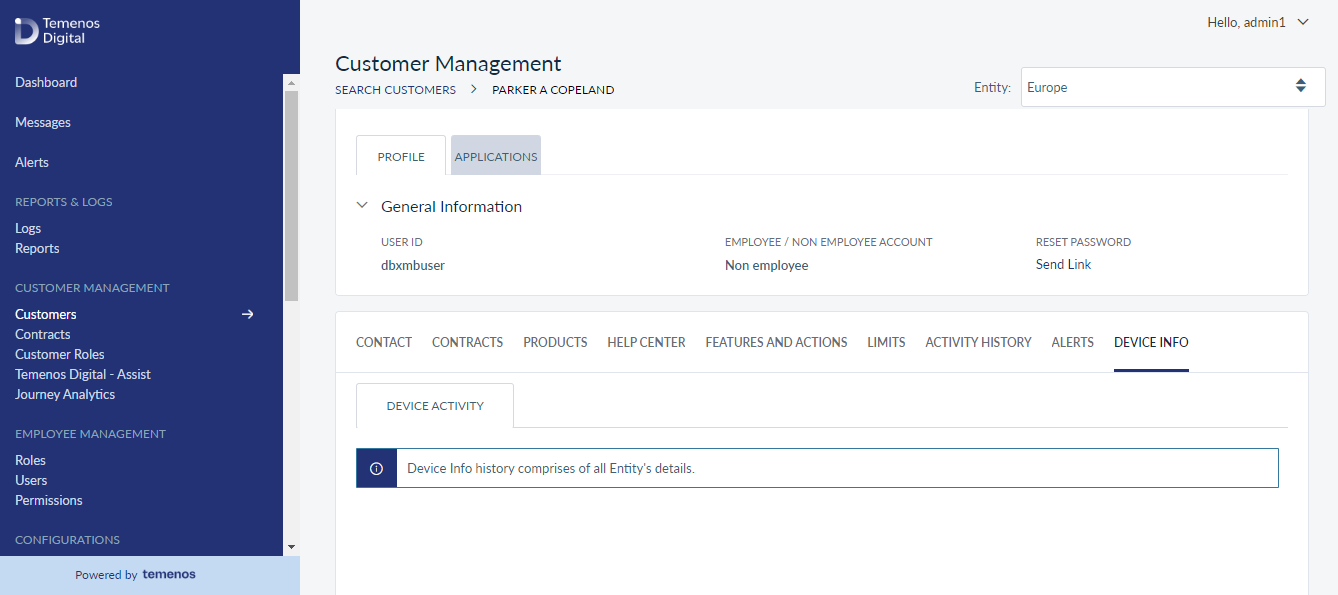
The device list is represented as rows with the following details:
- Friendly Name (Model Name): Use the details icon to view the device ID, OS, and version for mobile native, browser name, and version for OLB (iPhone X, Safari 11, etc).
- Status of the registered device: The different statuses available are as follows:
- Active: The status of the mobile device is Active when the user accesses the application from the mobile app but has not registered the device.
- Registered On: This is applicable only for mobile devices. The status of the mobile device is Registered when the user registers the mobile device with the application.
- Deregister: This is applicable only for mobile devices. The status of the mobile device is Deregister when the user Deregisters the mobile device with the application.
- Start Date and Expiry Date of the device.
- Option to Deregister a registered device.
- Option to Deactivate an active device
You can sort the list based on any of the columns by using the sort icon and filter the list based on the channel and status.
The bank staff can deactivate or deregister any device on customer's request and the status of the device will be updated automatically.
- The app lists the record of the devices with Deregistered / Active / Inactive state.
- There is no limit on how many times a device can be activated / registered.
- The Device Details and Authenticator tabs are supported based on the authentication vendor. These are configurable tabs that can be either switched on / or switched off.
- Master Reset tab is present to carry out the user profile reset that includes device entering into suspended mode (based on the authentication vendors policy) and authenticators will be removed except the activation authenticator.
Here is a small video that explains SCA Component – Device Management flow. SCA Components Block or Suspend the Device helps the user to know how a device can be blocked/suspended/activated/revoked/removed via Spotlight and Mobile Banking App.
Here is a small video that explains SCA Component - Device Info Details flow. The user's device info details can be viewed via Spotlight.
Here is a small video that explains SCA Component - Components Authenticator Details flow. The list of authenticators and their details will be displayed for the provided users so that Bank staff can see the details of individual authenticators, such as successful or unsuccessful logins.
Here is a small video that explains SCA Component - SCA Components Authenticator List flow.
View Device Info - Multi-Entity
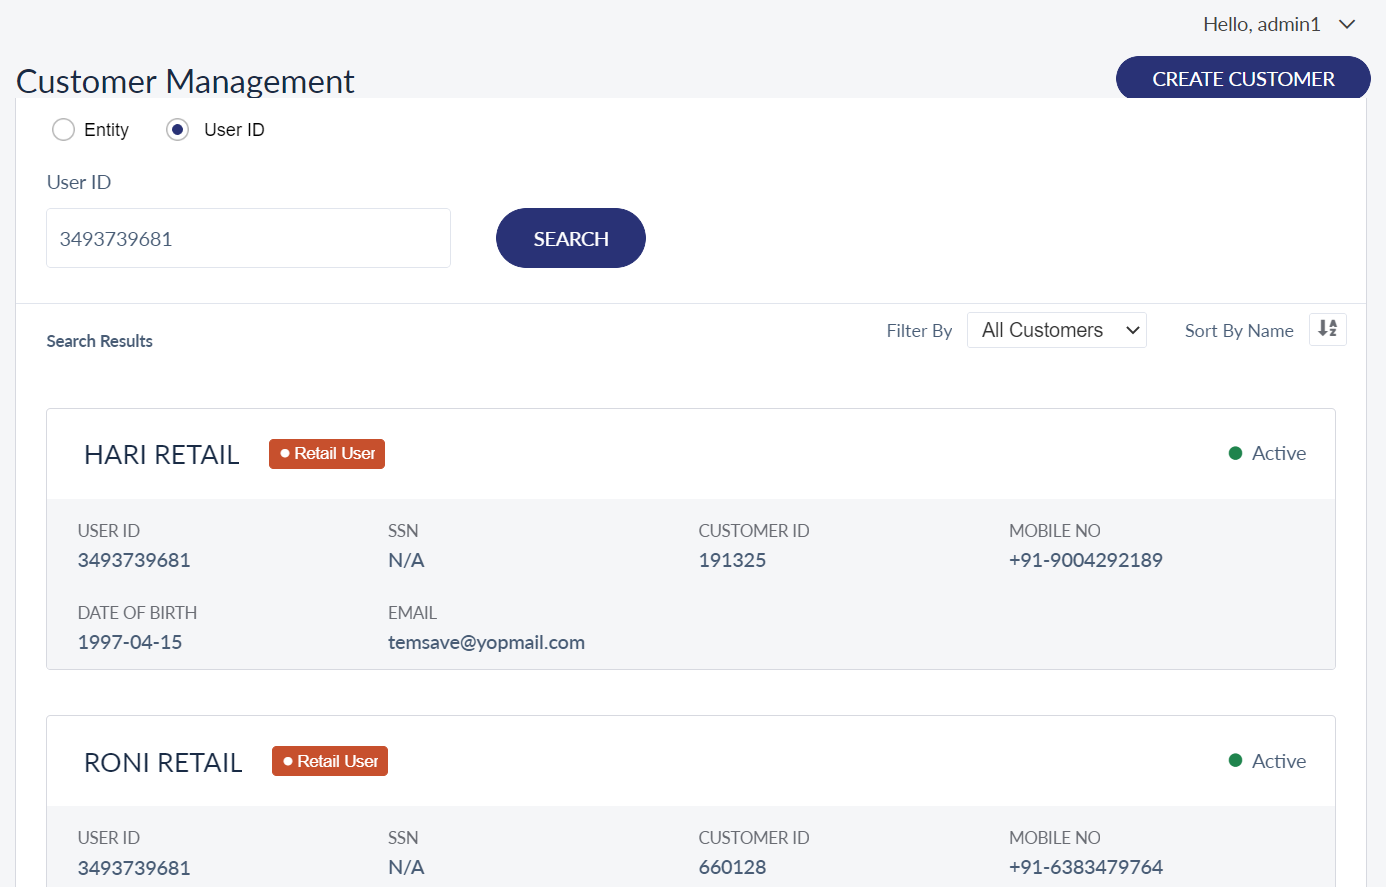
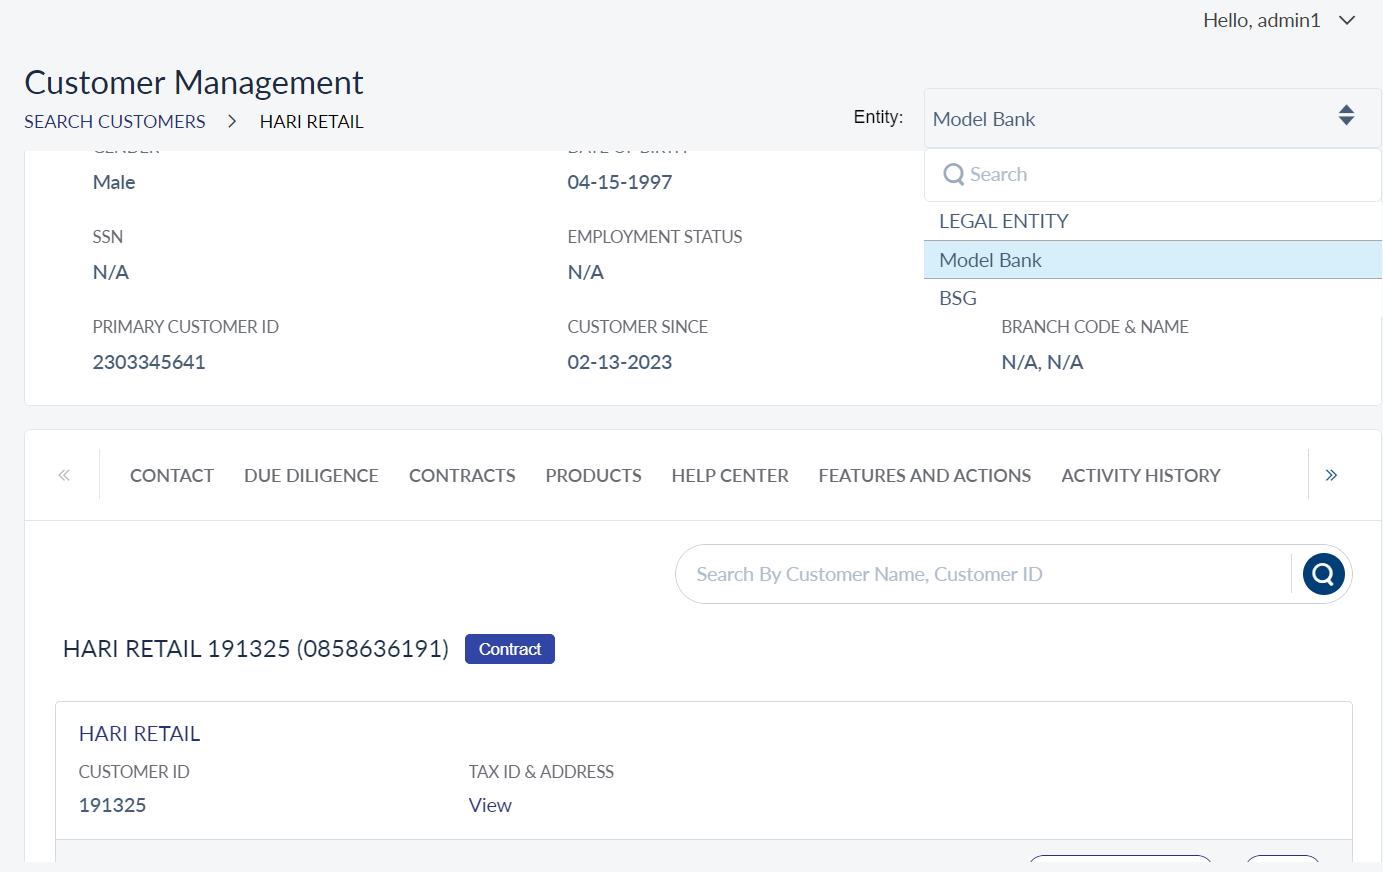
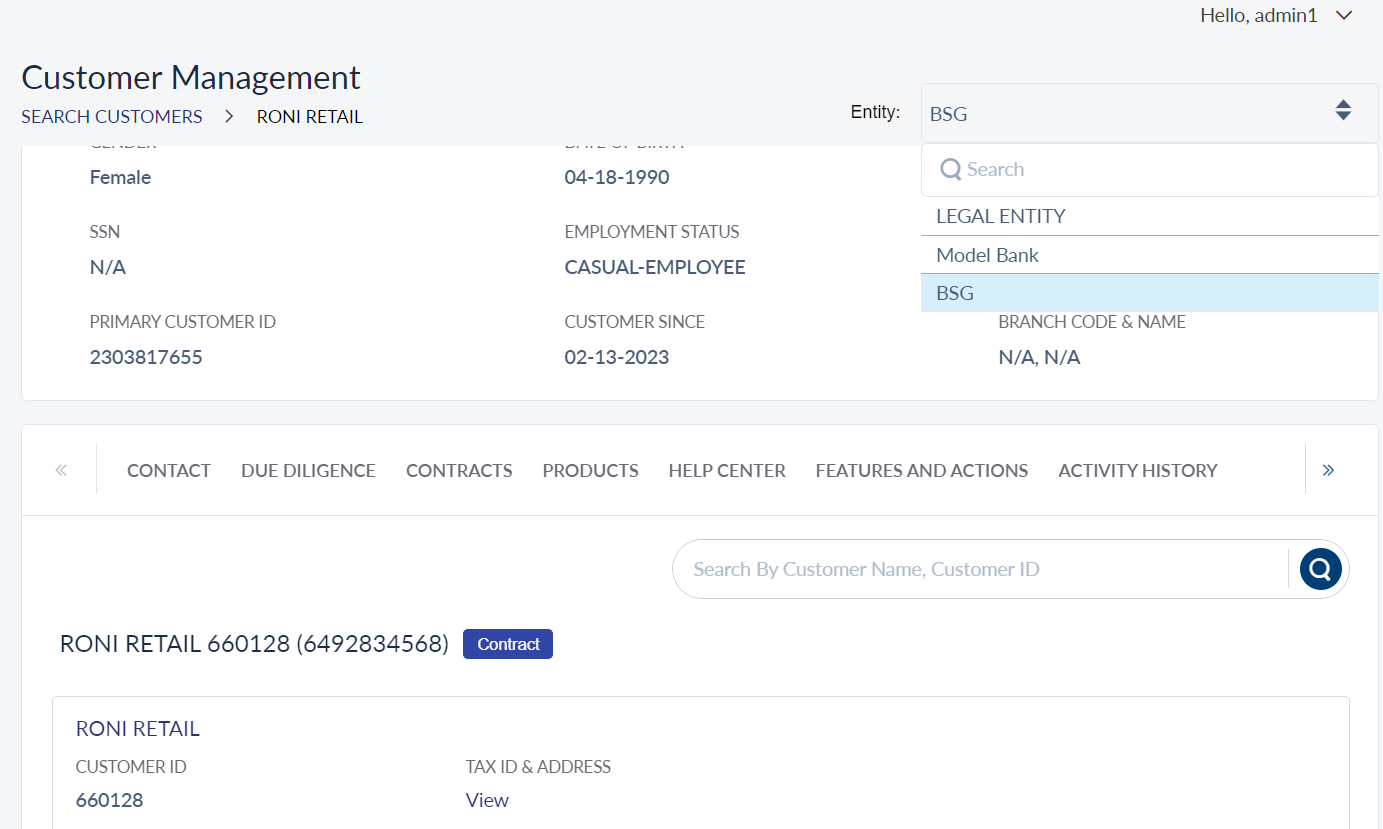
- You can search a user by providing the user ID in the customer search page.
- When you open the user profile, the system will provide a drop-down with the list of legal entities that the user belongs to and the entities the bank staff has access to.
- You will get a accumulated view of all the devices the user have logged in from.
- As a external user you can be part of different legal entities, which will potentially operate from different regions. The system will provide the capability to view device info of different legal entities of the same user.
- As a bank staff, when external user has access to multiple legal entities, you can to View the device info of the customer for a specific entity.
Enroll a Customer - Multi-Entity
As a bank user, you will be able to enroll customers who belong to your legal entity. You can provide your customers access to the features that your legal entity offers.
- When you access the customers search page, legal entity selection will be the first option.
- Legal entity selection is mandatory.
- When you click on legal entity drop-down, the system will list all the legal entities that you have access to.
- When you have access to only one legal entity, it will be selected by default.
- When you have access to more than one Legal Entity, the system will list the first legal entity (based on alphabetical order) with an option to switch to the legal entity you prefer.
- You will be able to select only one entity at a time to search and view the existing customers.
- Here the expectation is that Party Microservice will be cognizant of the legal entity of each customer.
- Post selecting the customer, by clicking on enroll, the system will direct you to the page where you can select the services and customer roles that are available for the legal entity that you have selected.
- The Legal Entity field will be pre-populated with Legal Entity name. Party Microservice which provides the customer details will pass the Legal Entity information to spotlight.
- Additionally, you will be able to edit and update following information like accounts, features and actions, other features and actions, limits, and signatory groups.
- All the updates that you make will be specific to the Legal Entity that you have selected.
- This way you will be able to enroll a customer by offering the services, features that are associated to the Legal Entity that the customer belongs to.
Unique User ID Creation - Multi-Entity
- As a system administrator of the bank, you can expect Temenos Digital product to maintain the uniqueness while creating user ID across legal entity.
- The user ID should be global identification number, so uniqueness has to be maintained for user ID regardless of how many legal entities the bank has.
- For instance, the bank initially has two legal entities (South Africa and Kenya) and down the line, they onboard the third legal entity. The system will not reuse any of user ID’s of legal entities (South Africa and Kenya).
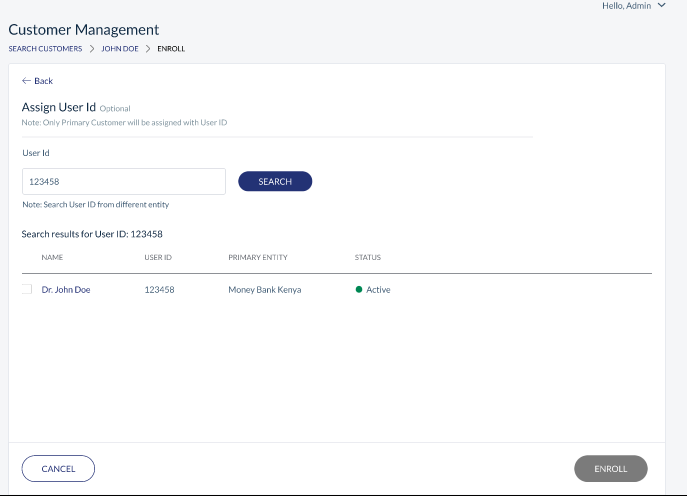
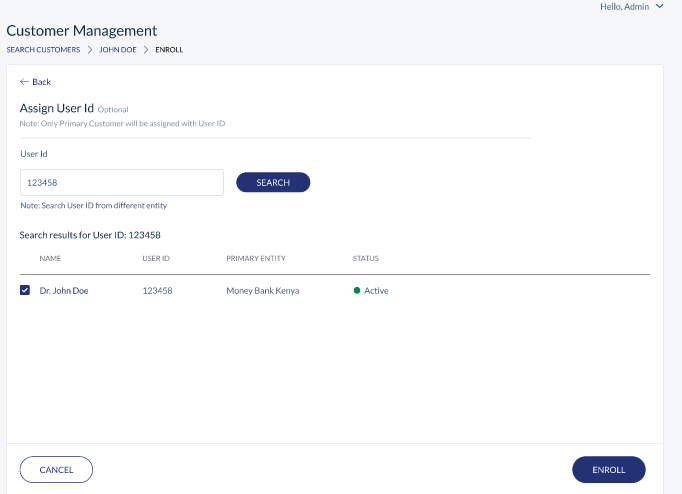
Assign User ID
- Customer A has a bank account in Kenya legal entity and when enrolled in Spotlight, the system generates a user ID.
- When the same customer opens an account in different legal entity of the same bank, then the product will provide the facility to link the customer to existing user ID, so that when the customer uses Online Banking, he can access accounts of both the legal entities using a single user ID.
- Assign user ID will be an additional option, provided by the product before enrolling the customer.

Reset Password from Spotlight
- Every customer is associated to an user ID.
- Similarly, a single user ID can be mapped to multiple customers account, multiple virtual users account, that can be part of the same or different legal entity.
- So as a bank staff, by clicking the reset password from user profile, the system will reset the password for the associated user ID, which naturally takes care of all the customer virtual user profile.
The Reset Password link will only be sent to the primary contact of the home legal entity. The system determines the home legal entity based on where the user ID was first created.
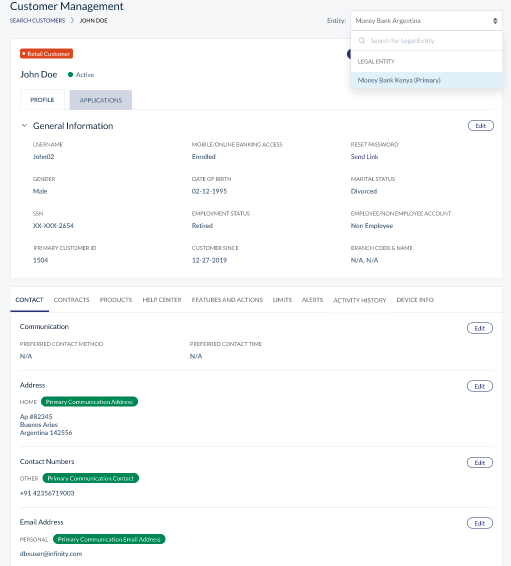
Contacts - Legal Entity Wise Segregation
- As a bank staff, when the external user has access to multiple legal entities, you can change the contact number of the customer for a specific entity.
- You can search a user / customer by providing any of the selection criteria in the customer search page.
- When you open the user profile, the system will provide a drop-down with the list of legal entities that the user belongs to and the entities the bank staff has access to.
- By using the drop-down, you can switch between the legal entities of the user and make any required changes.
- The changes that you make will be specific to the legal entity that you selected in the top drop-down.
Products - Legal Entity Wise Segregation
- As a bank staff, when an external user has access to multiple legal entities, you can maintain the products of the customer for a specific entity.
- You can search a user by providing the user ID in the customer search page.
- When you open the user profile, the system will provide a drop-down with the list of legal entities that the user belongs to and the entities the bank staff has access to.
- Using the drop-down, you can switch between the legal entities of the user and make any required changes.
Device Info - Validation
- As a bank staff, when the external user has access to multiple legal entities, you can view the device info of the customer for a specific entity.
- You can search a user by providing the user ID in the customer search page.
- When you open the user profile, the system provides a drop-down with the list of legal entities that the user belongs to and the entities the bank staff has access to.
- You can get a accumulated view of all the devices the user have logged in from.
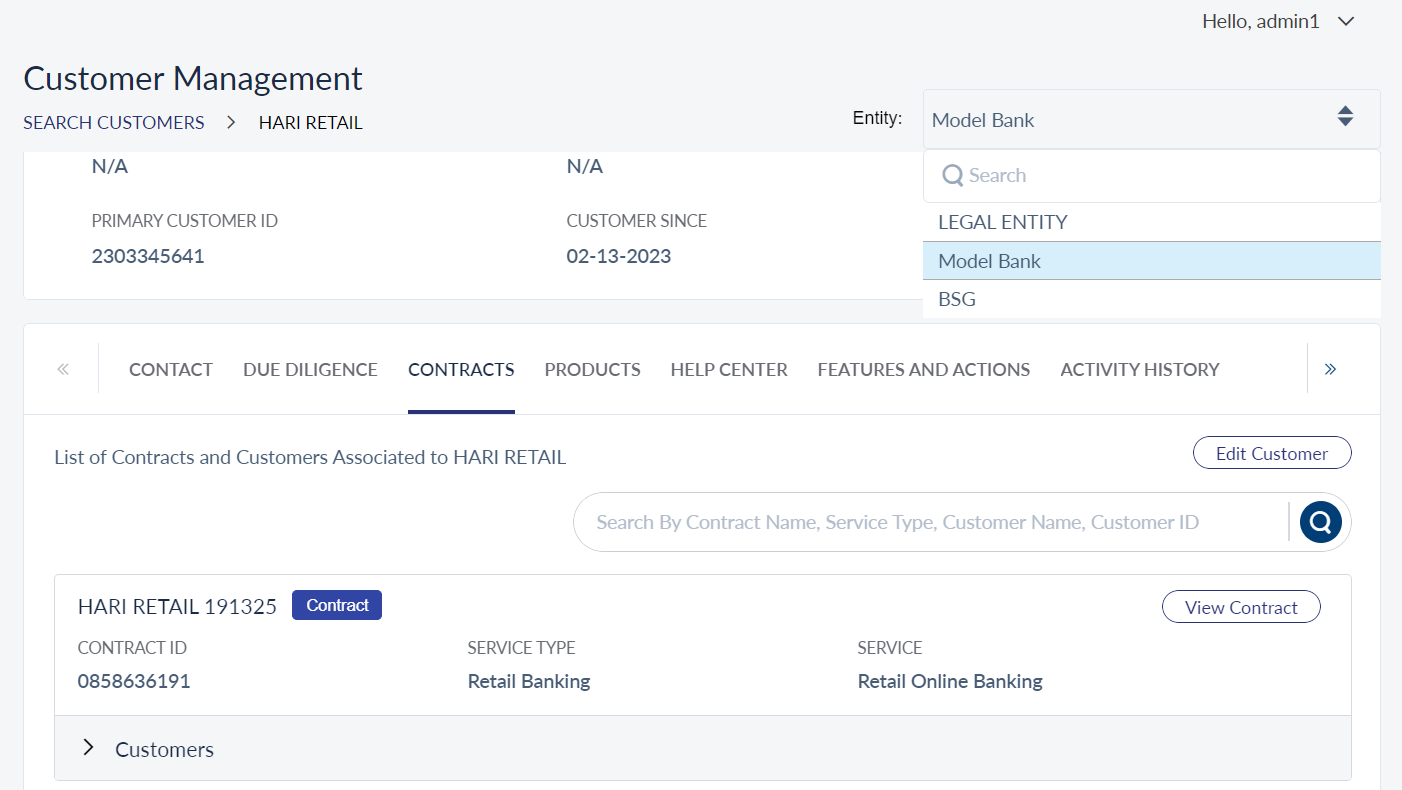
Contracts - Legal Entity Wise Segregation
- As a bank staff, when the external user has access to multiple legal entities, you can maintain contract of the customer for a specific entity.
- You can search a user by providing user ID in the customer search page.
- When you open the user profile, the system will provide a drop-down with the list of legal entities that the user belongs to and the entities the bank staff has access to.
- Using the drop-down, you can switch between the legal entities of the user and make any required changes.
- The changes that you make will be specific to the legal entity that you selected in the top drop-down.
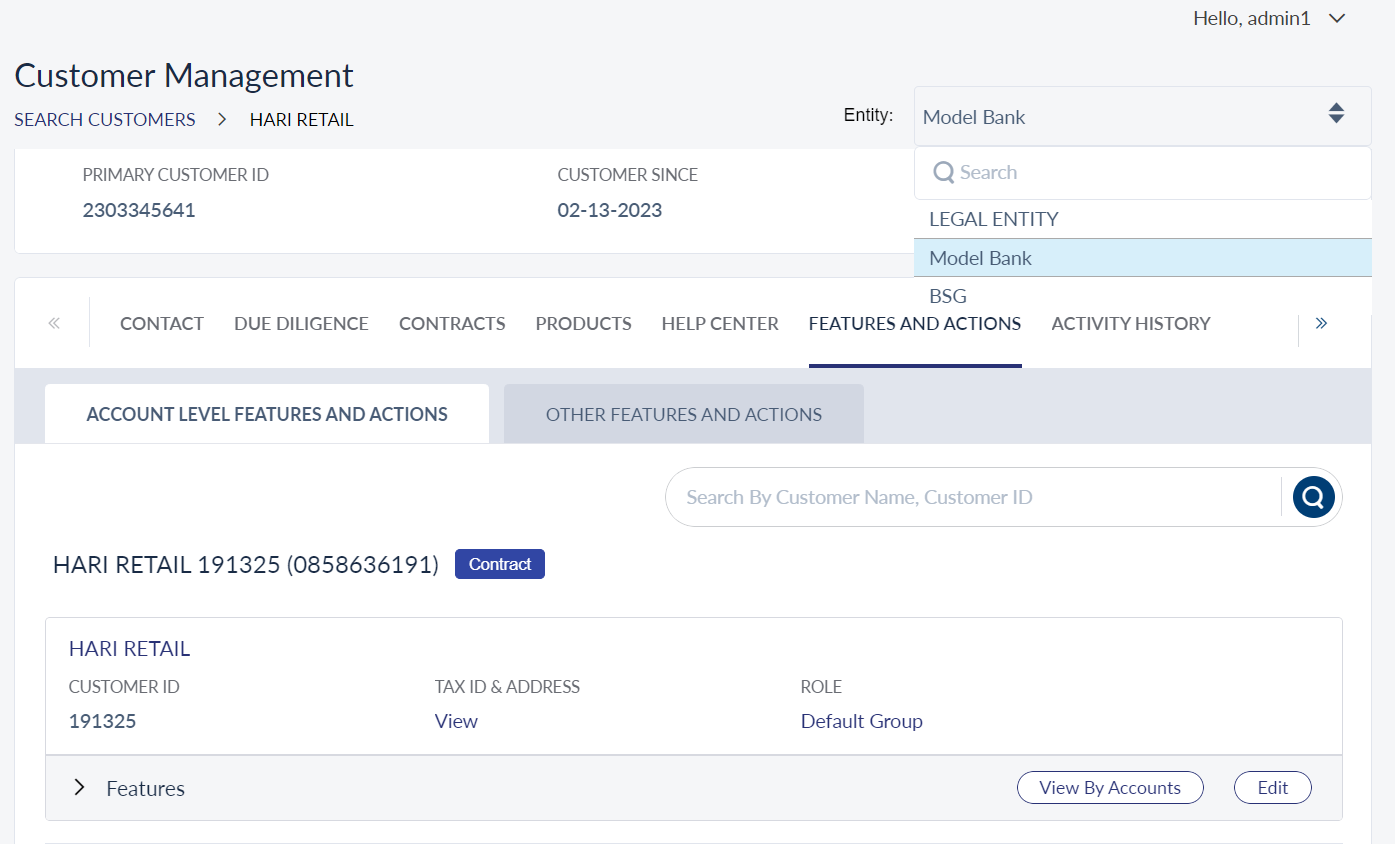
Features and Actions - Legal Entity Wise Segregation
- As a Bank staff, when the external user has access to multiple legal entities, you can maintain contract (Features and Actions) of the customer for a specific entity.
- You can search a user by providing the user ID in the customer search page.
- When you open the user profile, the system will provide a drop-down with the list of legal entities that the user belongs to and the entities the bank staff has access to.
- By using the drop-down, you can switch between the legal entities of the user and make any required changes.
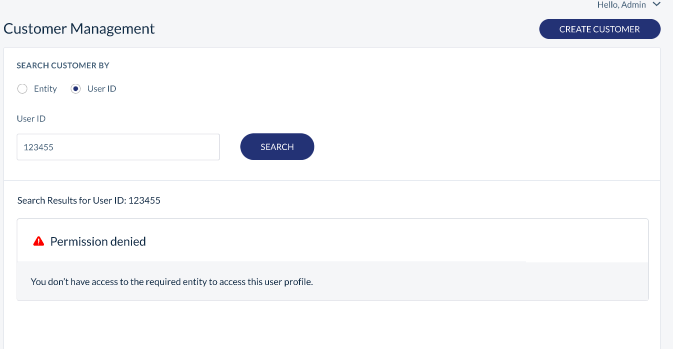
Customer Management Global Search Fields
- As a bank staff, you can search an external user by using the user ID from the legal entities that you have access to.
- Legal entity need not be a mandatory field, when you search for the user ID.
- When you search with all other fields, the system should mandate legal entity selection.
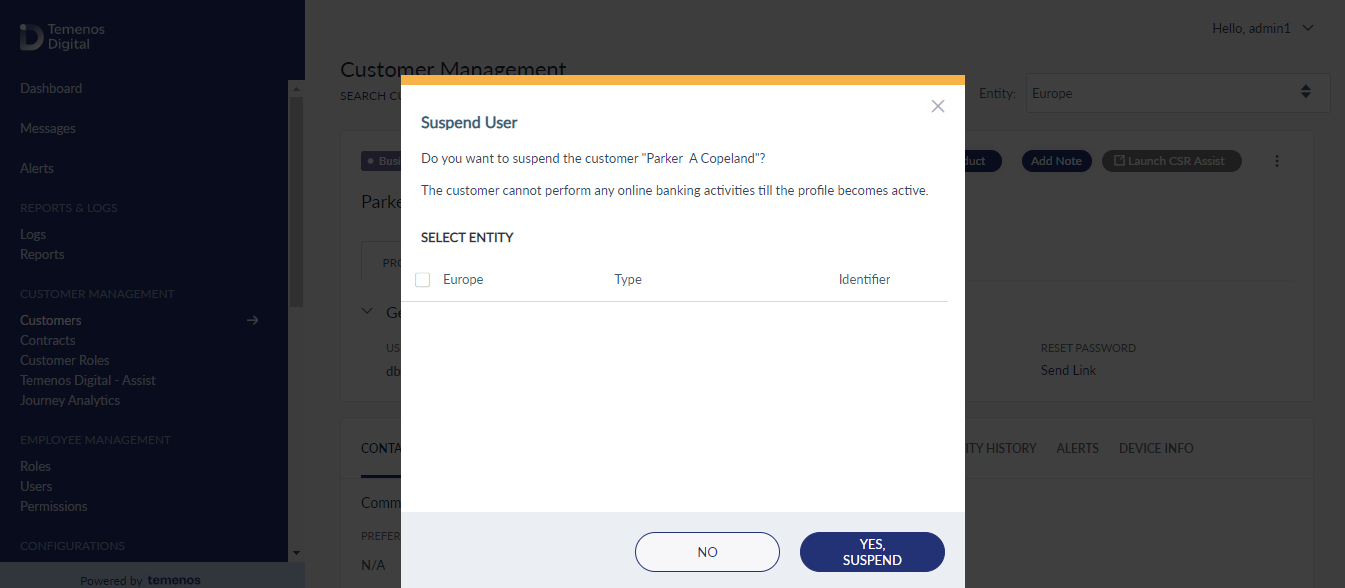
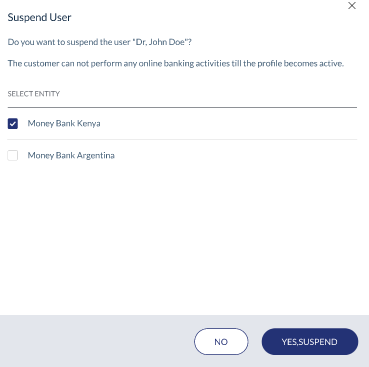
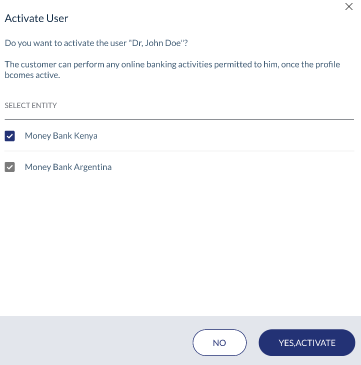
Suspend User
- When you search a user profile and click on suspend, the system will show the list of legal entities that the user is associated with and the list of legal entities the bank staff have access to, so that you can suspend the user from the legal entity that he has access to.
- You can suspend the user from more than one legal entity at the same time.
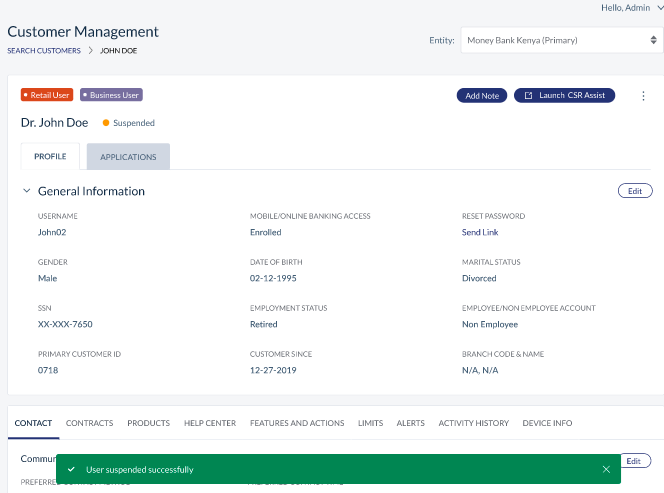
- On suspending the user, the status of the user under the suspended entity will change to Suspended, while the status is still active in other entities.
- Similarly, you can activate a user only for a selected legal entity by selecting the activate option.
Limits - Legal Entity Wise Segregation
- As a Bank staff, when the external user has access to multiple legal entities, you can maintain contract (Limits) of the customer for a specific entity.
- You can search a user by providing user ID in the customer search page.
- When you open the user profile, the system will provide a drop-down with the list of legal entities that the user belongs to and the entities the bank staff has access to.
- By using the drop-down, you can switch between the legal entities of the user and make any required changes.
Activity History - Information Message
- As a bank staff, when external user has access to multiple legal entities, you can view the activity history of the customer for a specific entity.
- You can search a user by providing the user ID in the customer search page.
- You will get an accumulated view of all the activities done by the user across all the legal entities, which you have access to.
- For few sections it will be a accumulated view like device info, activity history, alerts, help center, and messages.
In this topic