Document Checklist SME
The Documents section contains the list of documents that Related party must upload. The document list varies depending on various parameters such as Journey type, products selected, employment type and company type. For details on the complete list of documents supported in the SME user journey, refer to Document Categories and Documents.
This is an optional section that is displayed for prospects only.
UX Overview
This section provides an overview of the Documents screen.

For the SME journey, the Documents section contains the following sub-sections:
- Company Details
- Related Parties
- Product Document
Company Details
The Company Details section contains the following drop-downs:
- Proof of Business: Proof of Business comprises the following questions:
- Registration Certificate: Based on DMN rule for a particular document category, if there is only one Document Type, the type of document label displays as a static text with the Upload X icon. Click Add documents icon to upload the document.
- Partnership Agreement: Click Add documents icon to upload the document.
- Tax ID (Optional): This field is optional.
- Proof of Address: Proof of Address contains a drop down list of various documents supported as a proof of Address. Click Add Documents icon to add/upload single or multiple documents based on the requirement. All the documents the related party selected in the document type are uploaded.
- Financial Statement: Financial statement contains a drop down list of various financial statements of a company such as Tax return statement, Balance sheet. Click Add Documents icon to add/upload single or multiple documents based on the requirement. All the documents which Related party selects in the document type are uploaded.
Invited Parties documents do not display in this Checklist.
Click on Add Documents icon to upload files for each requested document. Then, provide the file information, if any. After adding the required documents and file information, click Upload to successfully upload the documents. Meanwhile, if Related party wants to delete any document, click on the cross icon.
After uploading a document, the cross icon changes to Download icon, using which main party can download the document. If Related party wants to edit the uploaded files or the file information, click Edit Information.
Related Parties
The Related Parties section contain the following drop downs:
- Proof of Identity: Proof of Identity contains the following questions:
- Tax ID: A document as a proof of your unique tax identification number.
- Document based on the input provided in the Identity section: The document type such as Passport and Driving License is pre-selected depending on the identity type that is previously chosen in the Address & Identification Details section.
- Proof of Address: Proof of Address contains a drop-down list of the various documents supported as a proof of Address.
- If the selected document is already uploaded as a part of Proof of Identity, Related party can select the check box below the Document Type field.
CRUD Operations of Documents
- Upload Documents: Click Add document icon to add/upload single or multiple documents based on the requirement. All the documents Related party selects in the document type are uploaded.
- After uploading a document, the cross icon changes to the Download icon, using which you can download the document. If Related party wants to edit the uploaded files or the file information, click Edit Information.
- View uploaded documents: Post uploading the documents, Related party can view the uploaded documents in the Document Section, by clicking on the download icon. All the uploaded documents are available in the Summary screen under Document section.
- Related party can select multiple documents and upload. Related party can download and view the uploaded documents to verify by clicking on the download icon.
- Edit document: After uploading a document, the upload icon changes to the Edit information icon, using which Related party can edit the document. While editing a file, the document is deleted in the back end, and the new document is uploaded.
- Download document: After uploading a document, the cross icon changes to Download icon. Click the download icon to download the document. If Related party wants to edit the uploaded files or the file information, click Edit Information.
- Replace document type: To replace the already uploaded documents under document category only (if multiple document types are applicable under a document category)
- Click Edit Information, Related party can replace a document type within a document category.
- When Related party wants to change/replace the document type, a notification displays If you change the Document Type, existing files under the previously selected category will be deleted. If Related party clicks Yes, select the new document type and upload the documents to proceed further.
- If Related party clicks No, the existing screen with already uploaded documents will display.
- Delete document: To delete the uploaded document in the document section, do the following:
- Click Edit Information, delete option displays against the uploaded document. Click delete, to delete a document.
- When Related party clicks Delete, a notification will prompt as on click of Yes, document will be deleted . If Related party clicks No, Related party will return to the previous page.
- If Related party has deleted a Mandatory document, then Continue button remains disabled until Related party uploads another document in the document page.
When an existing customer submits evidence and if the evidence submitted is valid, the Evidence Management system returns the evidence submitted in the past only if it is still valid, based on the expiry date and reusability for that piece of evidence. The applicant can download the valid document returned by the Evidence Management system.
- If the evidence submitted earlier is still valid and can be reused, Origination App displays a message as Document provided earlier is still valid for use with the document being available for download.
- If the applicant chooses to re-use the same evidence for the current application, then there is no need to upload a new document.
- If the applicant does not choose to re-use the same evidence for the current application, the applicant must submit new evidence towards the same requirements (e.g., provide a National ID towards Proof of Identity even if the Passport is still valid).
- When the applicant is in the Document Upload screen, System triggers the Fulfilment API to fetch the list of documents that are valid and reusable. If the customer navigates away from the Document Upload screen and comes back to the screen, the documents uploaded or retrieved earlier will not be present and System triggers the Fulfilment API to fetch the list of documents that are valid and reusable.
- Origination App performs the above steps for each category of evidence required for that specific product (journey).
If existing customer with valid evidence has to provide any additional evidence for the product applied, then Evidence Management system allows the applicant to upload the evidence to meet additional evidence requirements.
If existing customer submits evidence which is valid, the Evidence Management system returns the evidence submitted in the past only if it is still valid based on the expiry date and reusability for that piece of evidence. If the evidence submitted earlier is invalid, the applicant must upload a fresh piece of evidence towards the evidence requirements that will need to be verified again by the bank staff on submission of the application. If there are any additional evidence requirements for the products applied by the existing customer, the Evidence Management system permits the applicant to upload evidence to meet the additional evidence requirements in addition to the evidence being uploaded in lieu of the invalid evidence.
DMN rules checks the attributes, based on that the document checklist triggers. If an existing business has already submitted the proof of documents, which are valid then Related party need not upload the same documents.
- If there is change in any of the attributes in data flag value or existing evidence value, then the dynamic document checklist is triggered.
- If there is No change in data flag value or existing evidence value, then Related party need not upload the documents again in the document section.
For SME journey and entity type Business Related party can edit/modify the data in any of the attributes in Company Data and Related Parties as shown below:
Company Data: If there is any change in the company data fields listed below, data flag is set as True and document checklist triggers.
- Company Name
- Company Type
- Registration ID
- Issue Date
- Expiry Date
- Tax Id
- Address Line 1
- Address Line 2
- Country
- State
- City
- Zip code
Related Party: If there is any change in the Related party fields listed below, data flags and document checklist triggers.
- First name
- Last name
- Date of Birth
- Tax ID
- ID Type
- ID Number
- Issue date
- Expiry date
- Issue Country
- Issue State
- Address Line 1
- Address Line 2
- Country
- State
- City
- Zip Code
Product Document
The Product Document section is optional. It is displayed only for specific types of lending journeys such as vehicle loan. The Product document section may include Proforma Invoice and Insurance Quotation.
Document Categories and Documents
The following table lists the document categories and documents supported in the SME user journey.
| Document Category | Documents | |
|---|---|---|
| Proof of Business | Community Interest Company (CIC) |
|
| Charitable Incorporated Organization (CIO) |
|
|
| C-Corporation |
|
|
| S-Corporation |
|
|
| Limited Liability Company (LLC) |
|
|
| Limited Liability Partnership (LLP) |
|
|
| Limited Liability Limited Partnership (LLLP) |
|
|
| Limited Partnership (LP) |
|
|
| General Partnership |
|
|
| Private Limited Company |
|
|
| Professional Limited Liability Company (PLLC) |
|
|
| Public Limited Company |
|
|
| Sole Proprietorship |
|
|
| Trust |
|
|
| Unlimited Company |
|
|
| Loan Specific Documents | Vehicle Loan |
|
| Proof of Identity |
|
|
| Proof of Address |
|
|
| Proof of Address - Business |
|
|
| Proof of Income |
|
|
| Financial Statement |
|
|
| Sl.No | Change in Data Fields | Entity type | Applicable Document Category | Applicable Document Type |
|---|---|---|---|---|
| 1 | Company Name | Business | Proof of Business | |
| 2 | Company Type | Business | Proof of Business | |
| 3 | Country Of Incorporation | Business | Proof of Business | |
| 4 | Registration ID | Business | Proof of Business | |
| 5 | Issue Date | Business | Proof of Business | |
| 6 | Expiry Date | Business | Proof of Business | |
| 7 | Tax Id | Business | Proof of Business | |
| 8 | Address Line 1 | Business | Proof of Address- Business | |
| 9 | Address Line 2 | Business | Proof of Address- Business | |
| 10 | Country | Business | Proof of Address- Business | |
| 11 | State | Business | Proof of Address- Business | |
| 12 | City | Business | Proof of Address- Business | |
| 13 | Zip code | Business | Proof of Address- Business | |
| 14 | First name | Individual | Proof of Identity | |
| 15 | Last Name | Individual | Proof of Identity | |
| 16 | Date of Birth | Individual | Proof of Identity | |
| 17 | ID Type | Individual | Proof of Identity | |
| 18 | ID Number | Individual | Proof of Identity | |
| 19 | Issue date | Individual | Proof of Identity | |
| 20 | Expiry date | Individual | Proof of Identity | To refer to the DMN rules click here. |
| 21 | Issue Country | Individual | Proof of Address- Individual | |
| 22 | Issue State | Individual | Proof of Address- Individual | |
| 23 | Address Line 1 | Individual | Proof of Address- Individual | |
| 24 | Address Line 2 | Individual | Proof of Address- Individual | |
| 25 | Country | Individual | Proof of Address- Individual | |
| 26 | State | Individual | Proof of Address- Individual | |
| 27 | City | Individual | Proof of Address- Individual | |
| 28 | Zip code | Individual | Proof of Address- Individual |
After uploading all the mandatory documents, click Continue. The Summary section appears.
If you want to quit the application temporarily and resume later, click Save & Leave. Then, click Yes on the Save & Leave confirmation pop up. If you are a prospect user, you will receive the following email with an application resume link, user name, and application number. A temporary password is sent to the registered phone number.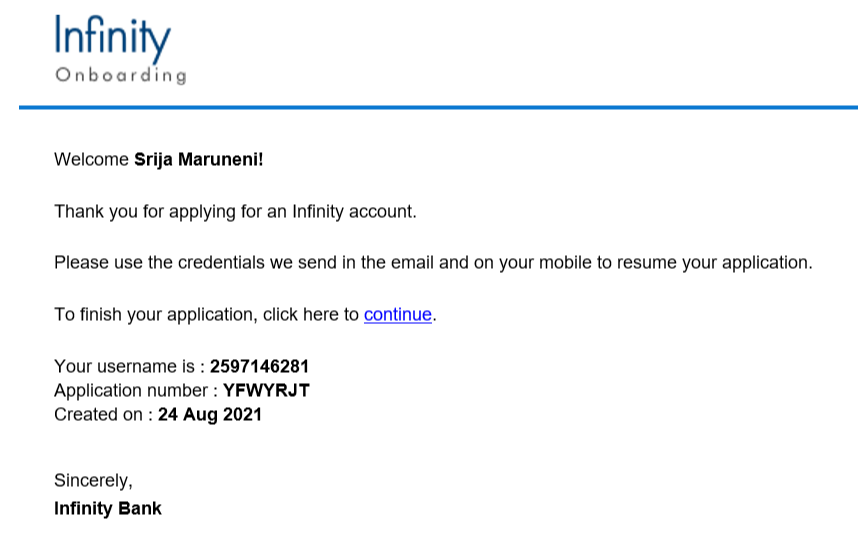
If you are existing user, you will receive the following email with an application resume link and application number. You can login to the application by using your login credentials.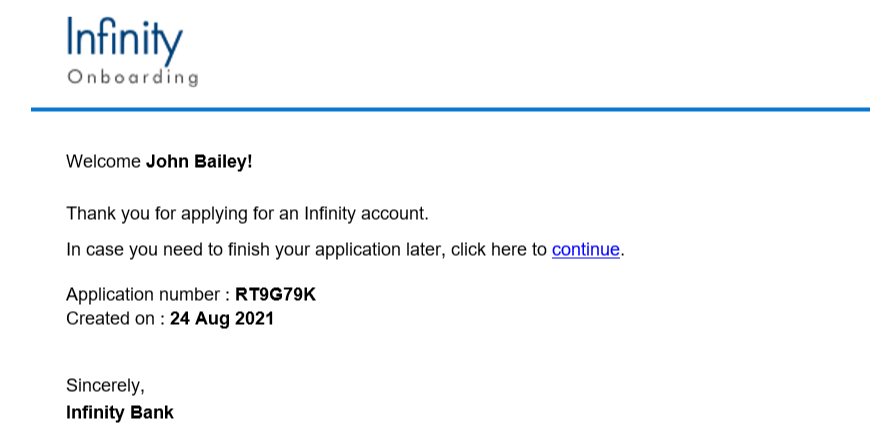
Components
The Documents section contains the following list of components:
| Component Name | Instance Name |
|---|---|
| com.dbx.uploadFiles3 | uploadFiles3 |
| com.nuo.Roadmap | Roadmap |
| com.dbx.bannerError | bannerError |
| com.dbx.customheaderNUOV2 | customheaderNUOV2 |
| com.dbx.customfooter | customfooter |
| com.nuo.loadingV3 | loadingV3 |
| com.dbx.popup | popup |
Configurations
The system administrator will have the capability to configure this module from the Spotlight app. For more information about configuring the Documents section, click here.
Extensibility
By using the Extensibility feature, you can customize the modules based on your requirements. For more information, refer to Extensibility.
In this topic