Manage Lending Tasks
Use the functionality to manage lending tasks. The following features are applicable to all user roles in the solution who are assigned a task to work on.
- Tasks dashboard
- View the list of related tasks and perform actions
- Launch and manage task (task sticky footer)
- Edit a task
- Add an adhoc task
Multiple facilities and ripple effect on the workflow
If the request has multiple facilities, the tasks that are generated in each of the stages will have ripple effect on the workflow. The facility related tasks will be created multiple times equal to the number of facilities available under the request.
Task Dashboard
The task module has the following features:
- Capability to create tasks.
- Claim feature where user can claim a task on the Team Tasks tab.
- User can reassign own task to another user.
- Pending task status which denotes the task is yet to be started by the user.
- Failed task status category for manual tasks that denotes that the manual task has failed while completing criteria.
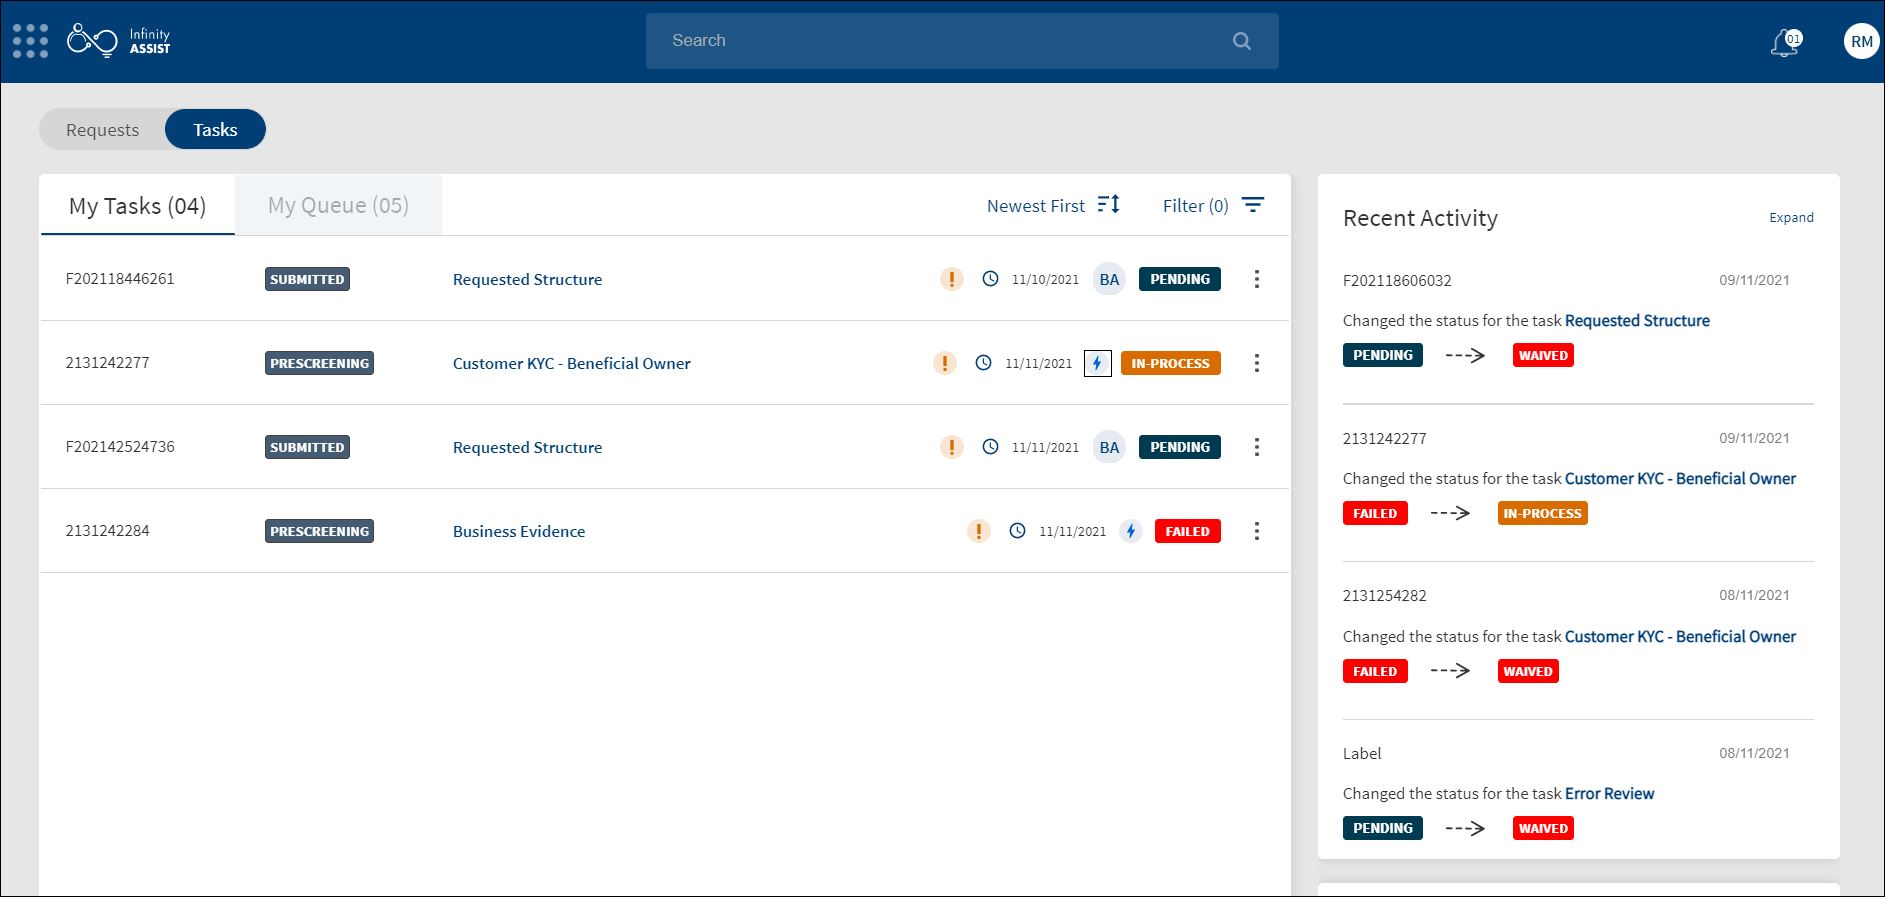
The application displays the list of tasks depending on the user role and the permission given to the user.
The application displays the list of tasks with the following details:
- Request ID
- Stage status
- Task ID
- Task description
- Entity ID
- Due Date
- Task status. The task status - Pending, In Process, Failed, Waived, and Completed. The completed and waived tasks are not displayed in the task list. All the manual tasks created by the workflow (Red Hat PAM) will be created with Pending status. The status is changed to In Process after the first user clicks on the task either on the dashboard or on the stage indicator on the request and facility overview screens.
- Contextual menu to perform actions.
Users with access to request and task widgets - Relationship Manager and Supervisor.
Other users with access to task widget only - Underwriter, Operations, and Secretary.
Do any of the following:
- Click View All to view all the tasks.
- Use the search bar to search for tasks and sort by due date when all the tasks are displayed.
- Use the Filter to filter the In-Process, Pending, and Failed tasks.
- Click the task name to manage the task on the respective request, facility, or entity details screen.
- When a user hovers over the Request ID, Facility ID, or the Entity ID on the tasks dashboard (My Tasks, Team Tasks and My Queue tabs), the application displays a window showing a brief information about the request, facility, or entity respectively. To know more, see Hover Over ID.
- On the Team Tasks Tab, click Claim to assign the task to self and work on the task for completion. On the confirmation screen, click Yes. The task is moved to the My Tasks tab. This feature is applicable only to Supervisor roles.
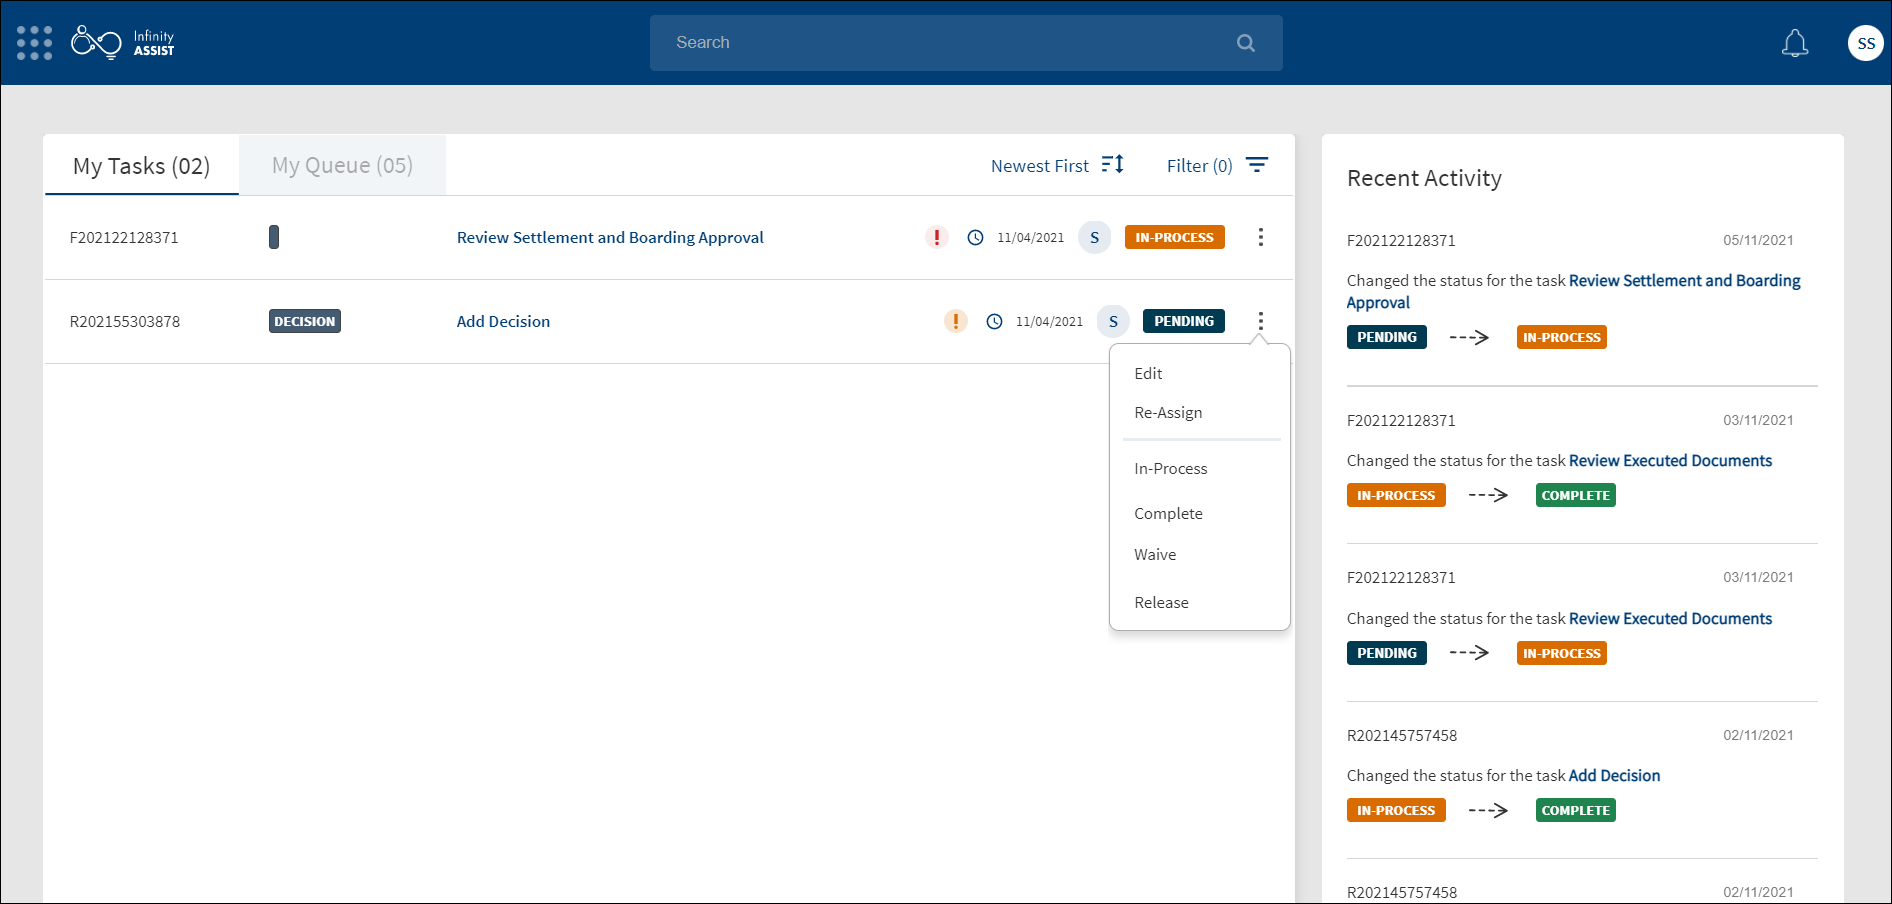
- Click the contextual menu to do any of the following:
- Edit the task.
- Reassign the task to other users.
- Mark the task as completed. The application displays a message that the task is completed successfully. The task is removed from the list.
- Mark the status of the task as In-Process. Not applicable for the tasks that are already in process.
- Mark the status of the task as Release. The task will be go into the queue until it is assigned to some other bank user.
- Waive off the task as required. The application displays a message that the task is waived off successfully. The task is removed from the list.
For more information on the tasks dashboard, filter and sort tasks, see Dashboard.
In the My queues section, the user can claim multiple tasks at once by selecting the check-box,these Check-boxes display at the beginning of each task. If the user checks more than one task, the Claim button at the end of each task gets greyed out and the claim multiple button displays at the bottom.
When the user clicks the claim multiple button, a dialog box prompts if they want to claim the multiple tasks at once, if yes, all the tasks that are claimed in the my tasks section reflect here. If No, the selected check-box display.
If the user selects cancel, a prompt displays if the multiple claim task operation need to be canceled, if yes the selected task gets cleared. If no, the selected task displays.When the user clicks load more the selected sorted tasks display.
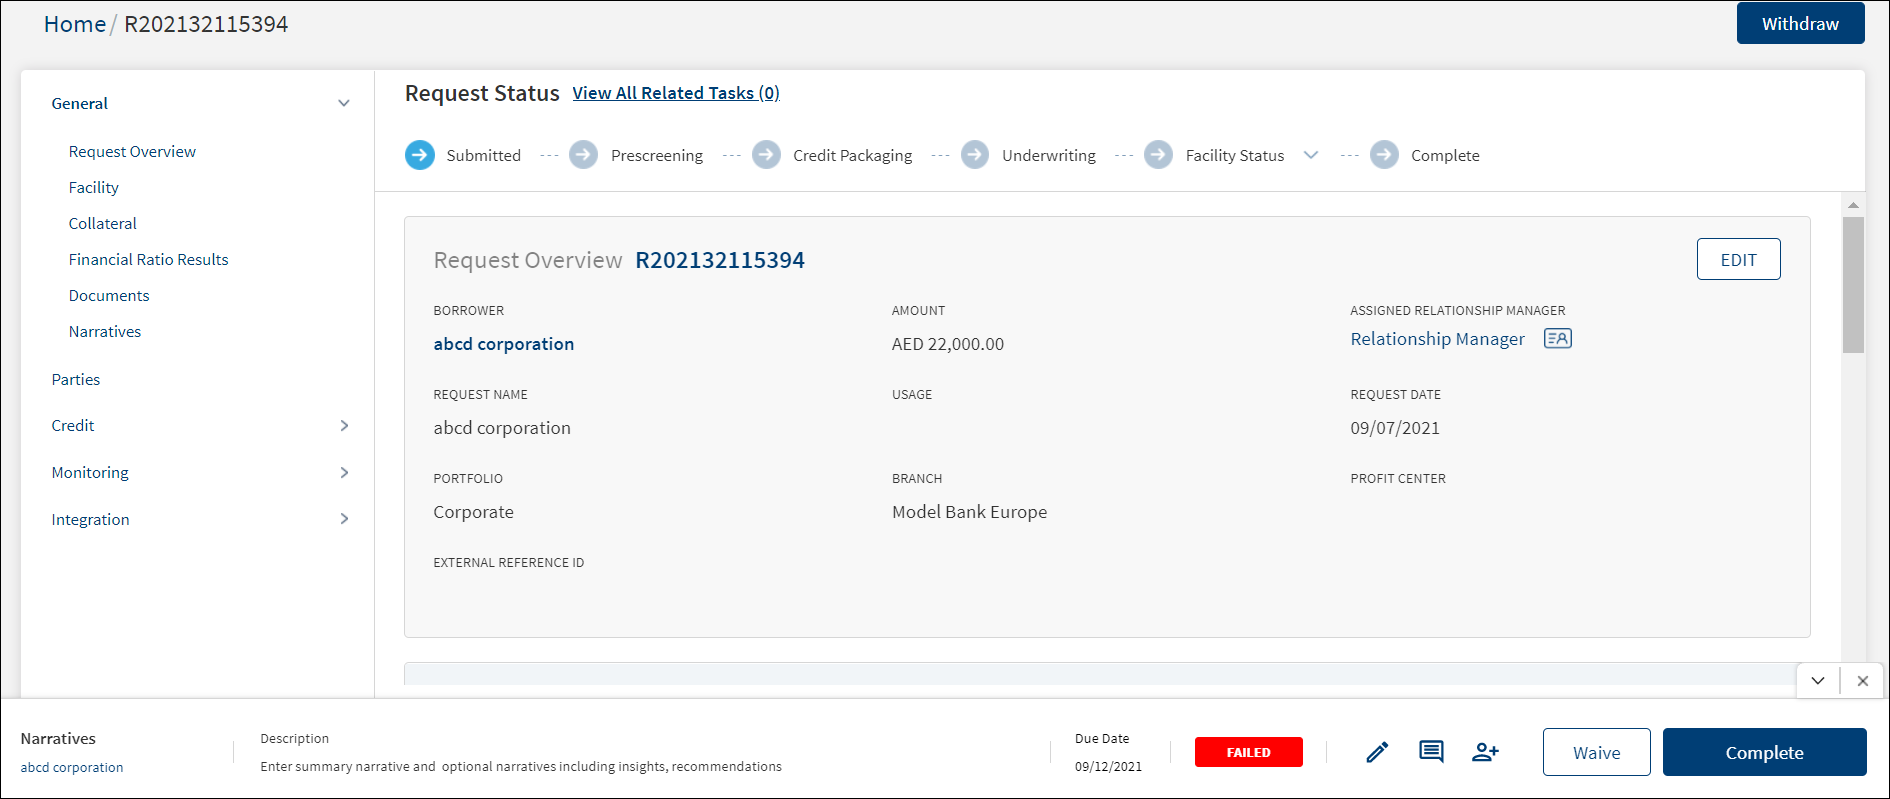
View All Related Tasks
The application displays the request and facility related tasks list when a bank user clicks the View All Related Tasks link on the stage indicator of the request and facility overview screens.

The application displays the following:
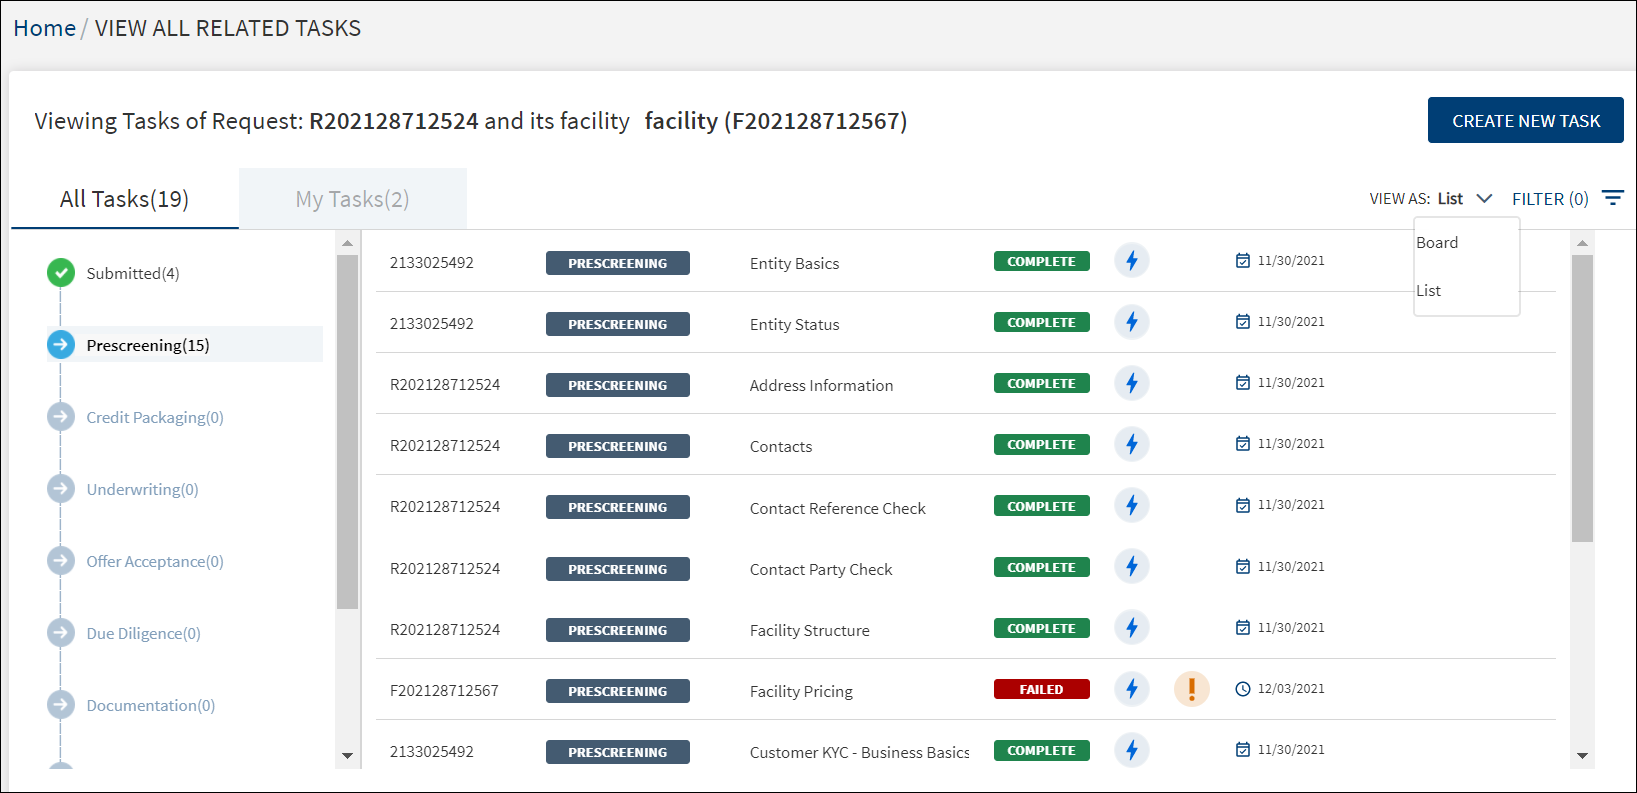
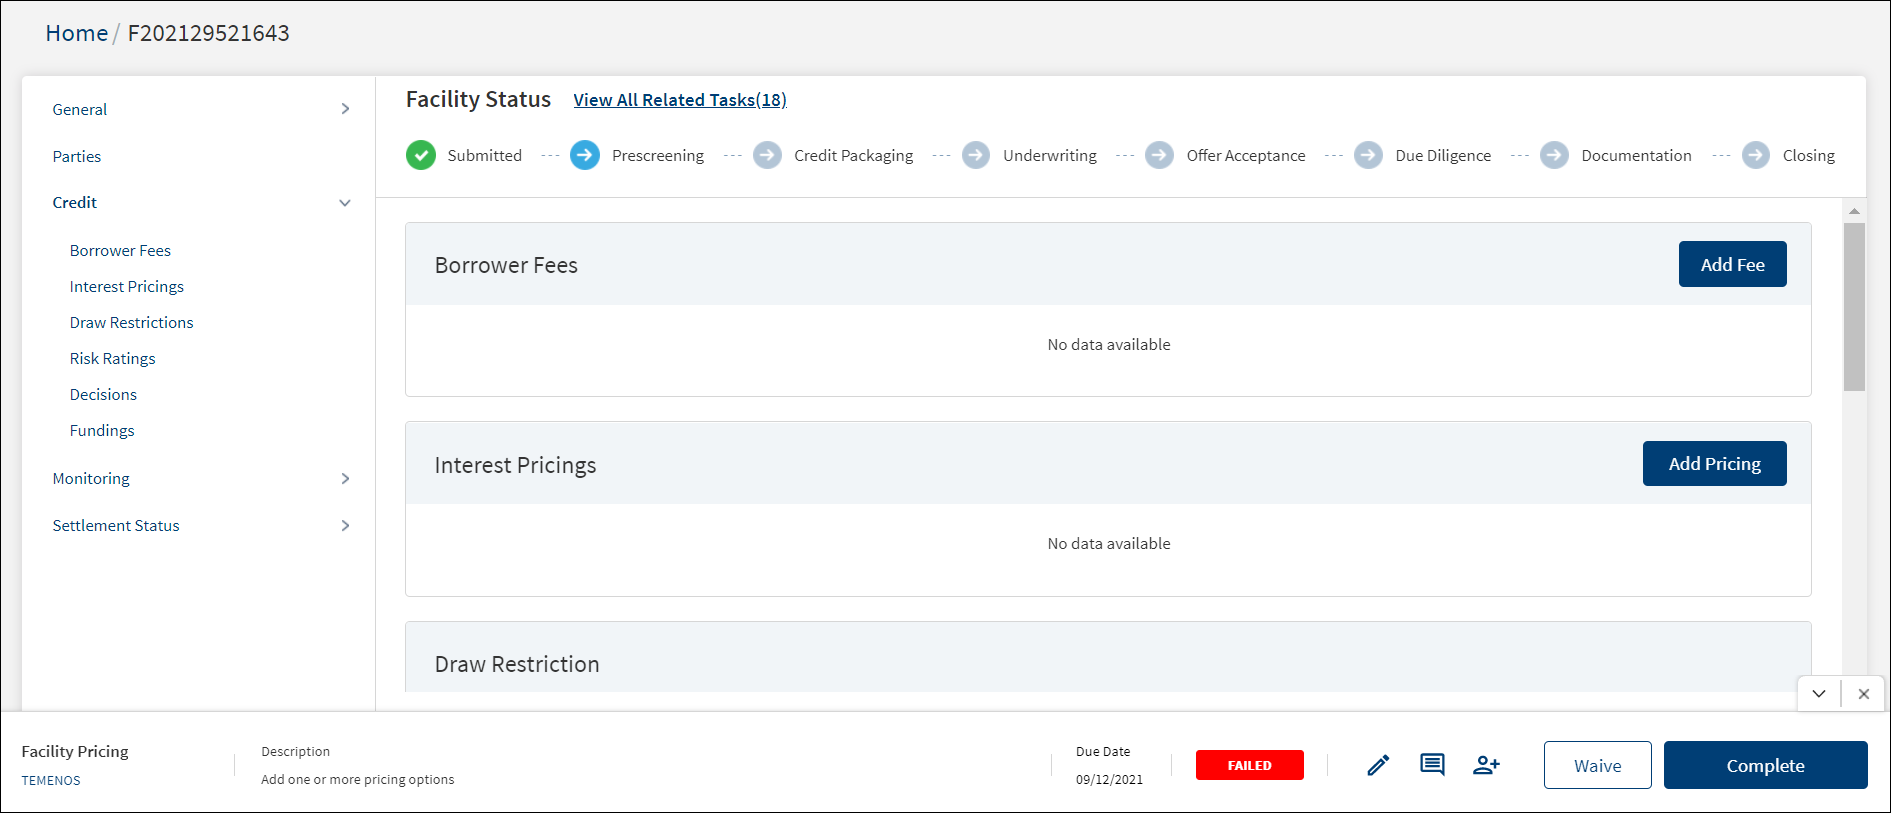
- Stage:
- The stages of the facility on the left pane and the corresponding list of all the tasks pertaining to the request on the right pane.
- Click any stage on the left pane to view the corresponding tasks on the right pane.
- Beside each stage, the number of pending and complete tasks of the stage is displayed. For example, Prescreening(10) means there are 10 pending and complete tasks in Prescreening stage. For a stage if the tasks are yet to be generated, the number of tasks is displayed as a hyphen. For example, if the request is at Prescreening, near Due Diligence stage since the tasks are not yet generated, it shows as Due Diligence(-). If tasks have been generated as part of request and there is no task assigned to the user in a stage, then it is displayed as 0. For example, Credit Packaging (0).
- The following explains the relation between the request and facility stages:
- For a request which has not reached the underwriting stage, the facility stage of all the tagged facilities and the request stage will be the same. For example, in case, the Request R1 has two facilities F1 and F2 linked to it . The Request stage for R1 and Facility stage (F1 and F2) will be Prescreening.
- In a case where all the facilities in the multifacility request have completed an end stage like Closing stage or Rejected stage, the request stage will change from Underwriting-green to complete.
- In a case where at least one of the facilities has not reached an end stage, the request status will still be Underwriting-green.
- If a request has been Withdrawn, all the stages of the facilities related to the request will show as Withdrawn.
- Task tabs: List of tasks on All Tasks tab and My Tasks tab with the count of tasks in parenthesis.
- The My Tasks tab displays the list of tasks assigned to the signed-in user. On the My Tasks tab, user can see all the stages, and in each stage user can view the task that has been assigned to the signed-in user specifically.
- When All Tasks tab is selected, all the stages of the journey of the facility right from Prescreening to Follow Up stages are displayed.
- Click on load more to load more tasks.
- A normal task and adhoc task that has been created in the task dashboard are differentiated by icons. An adhoc task will not have the navigation on clicking the task in task overview unlike the auto task. The user cannot navigate to the respective task location in case of an adhoc task.
- Sort: For multi-facility request, "All" is displayed on the top and user can select any facility and view their respective tasks. When the All option is selected, all the request, entity, and facility (all facilities) tasks are displayed. If a facility is selected from drop-down, then all the request, entity, and facility(selected facility) tasks are displayed.
- View Tasks - List or Board view: By default, the tasks are displayed in a List view. Use the View As list to select to Board view.
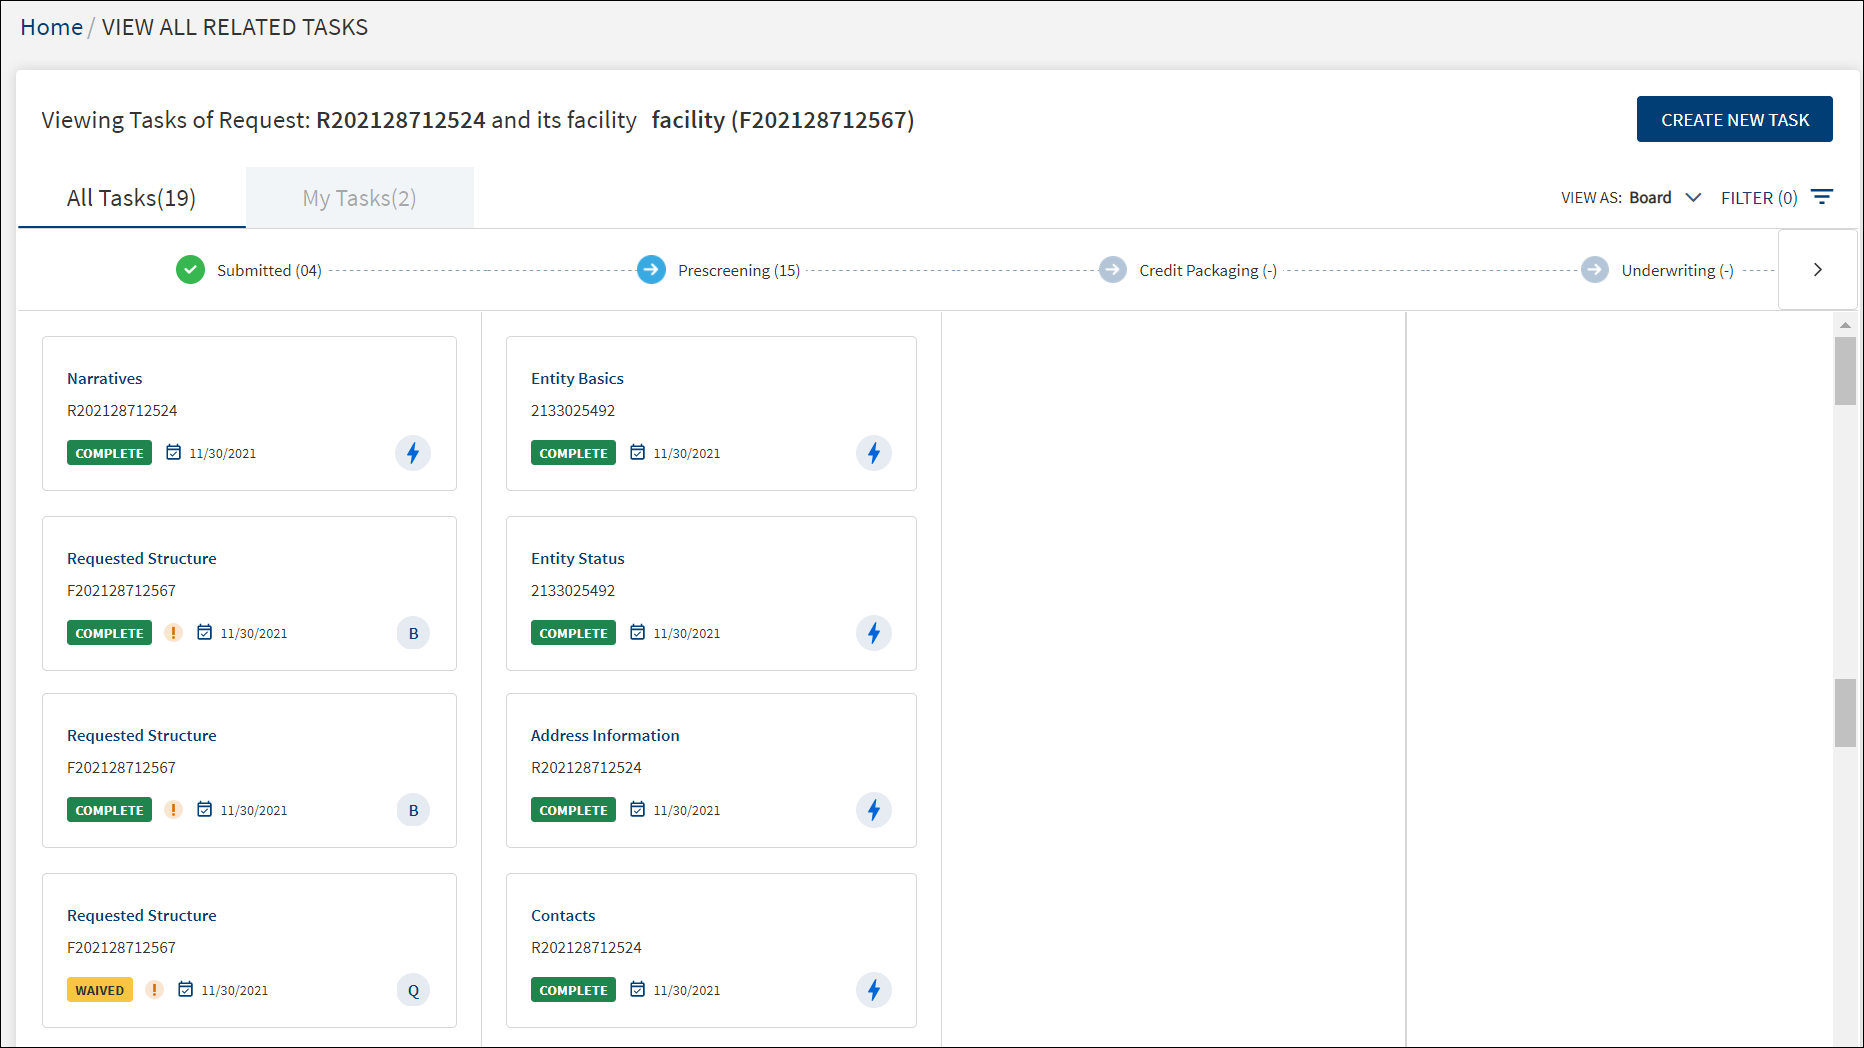
- In the Board view, the tasks are displayed in the form of a card. The card is view-only and does not navigate to any other forms. However, clicking the card as a whole displays the task details.
- The card displays the following details of the task:
- Task name
- Entity name/Facility ID/Request ID
- Task status - Complete, Pending, In Progress, Waived.
- Due Date for a pending task or Completed Date for a completed task.
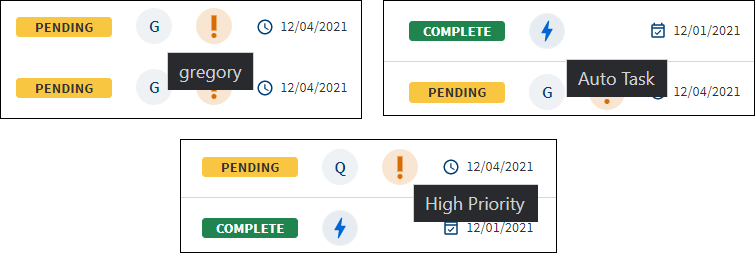
- Task priority is represented as an exclamation logo. On hover, the tooltip indicates High Priority so that the user understands the logo is for priority.
- Assigned person or if it is an auto task and a different icon for adhoc tasks. On hover, the tooltip displays the assigned person name and auto task respectively.
- Filter Tasks: Use the filter to the tasks in the list view and the board view.
- Click the Filter icon.
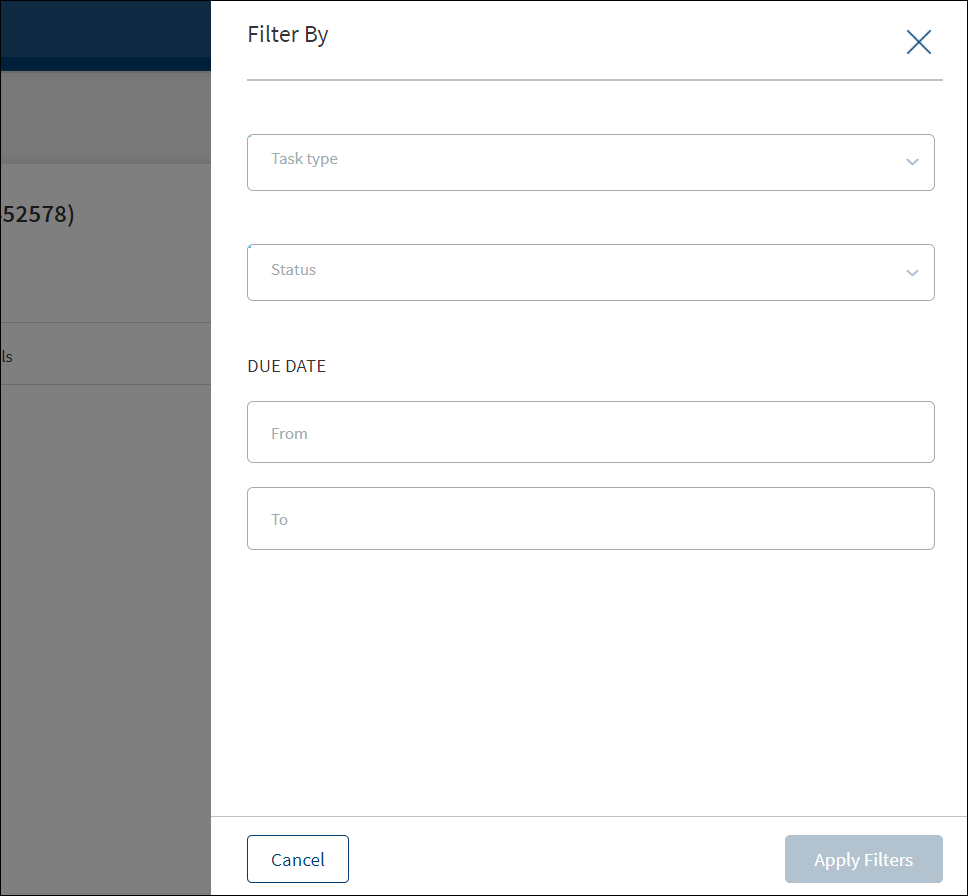
- On the Filter By screen, use the following filters:
- Task Type: Select from the list - Entity, request, or Facility. Select the Select All check box to select all. Multi-select option is also available.
- ID: Enter the corresponding Request ID, Facility ID, or Entity ID based on the selection in the Task By field. Alternatively, select the Select All check box.
- Status: Select the task status. The options are Pending, In-process, Completed, Waived, and Failed. If the filter is accessed from My Team Tasks, then this field is not displayed as task status is not applicable for My Team Tasks that are not claimed.
- Due Date From and Due Date To: Provide the from and to date in dd-mm-yyyy format to view the tasks which have due date in between the from and to date.
- Click Reset to clear all the filter criteria and start all over again.
- Click Apply Filters.
- User can apply the filters one-by-one and filter the tasks based on the selection combination.
- The application displays the number of filters applied in parenthesis.
- Click Cancel to cancel the operation. Click Reset discard the filters and start all over again.
- After the session is complete, the filters does not persist and is reset.
- Click the Filter icon.
- The following details are shown on the View All Related Tasks screen:
- Request ID, Facility ID, or Entity ID for entity related tasks.
- Stage
- Task name
- Task status
- Icons to denote if the task is assigned to a user or if it is an auto task. On hover, the tooltip displays the assigned person name and it is an auto task respectively.
- Priority. An exclamation logo shows for high and critical priority tasks. When the user hovers over the exclamation logo, the tool tip indicates High Priority so that the user understands the logo is for priority.
- Due date displayed for a pending task and completed date is displayed for a completed task.
- In case of a multi-facility request, all tasks are displayed and the stages are displayed until the underwriting stage.
Do any of the following:
- Click Create New Task to add a new adhoc task.
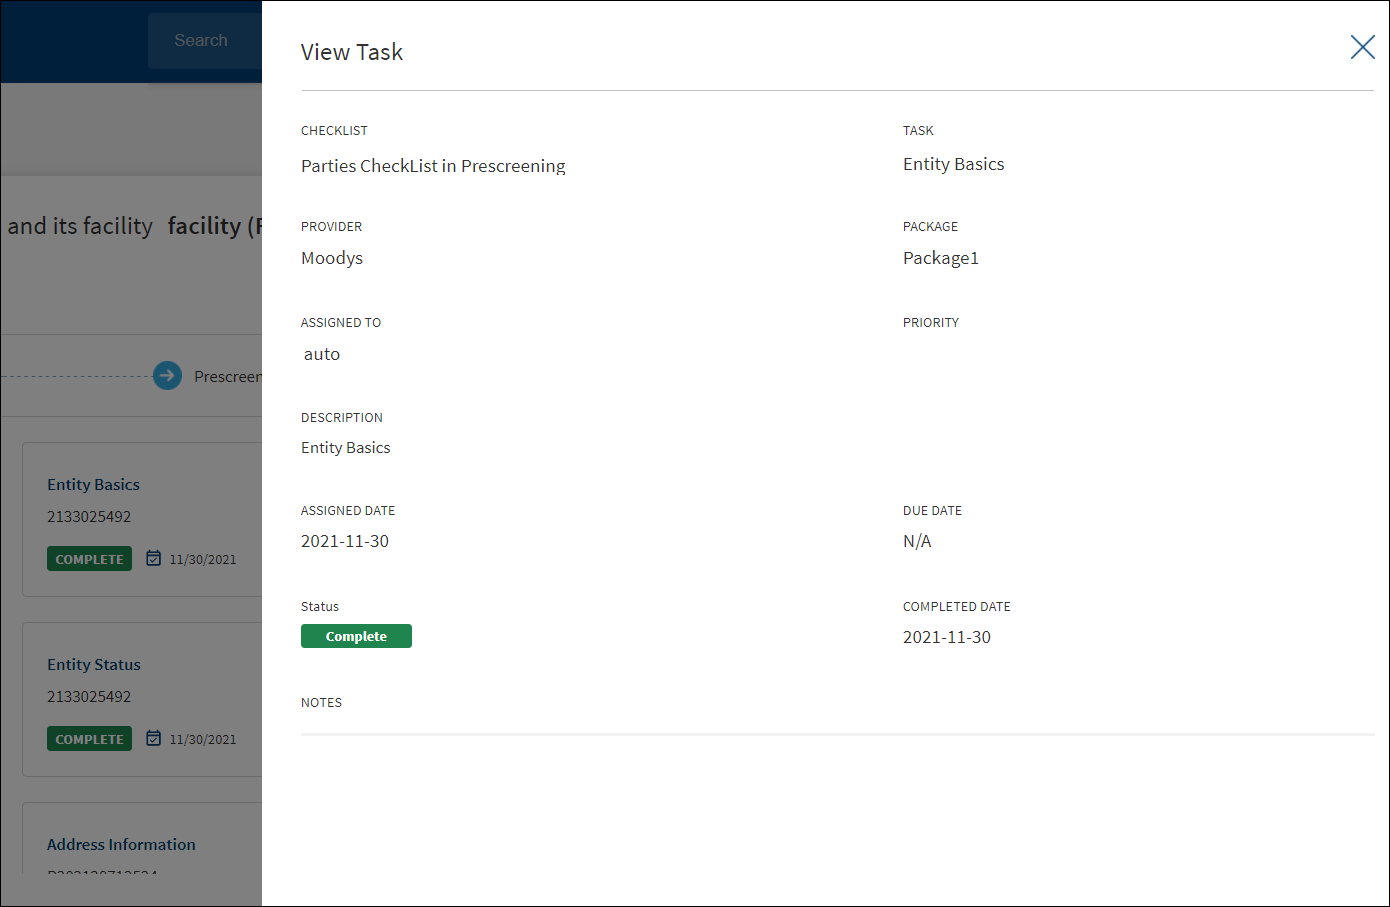
- Click the row to view the task details.
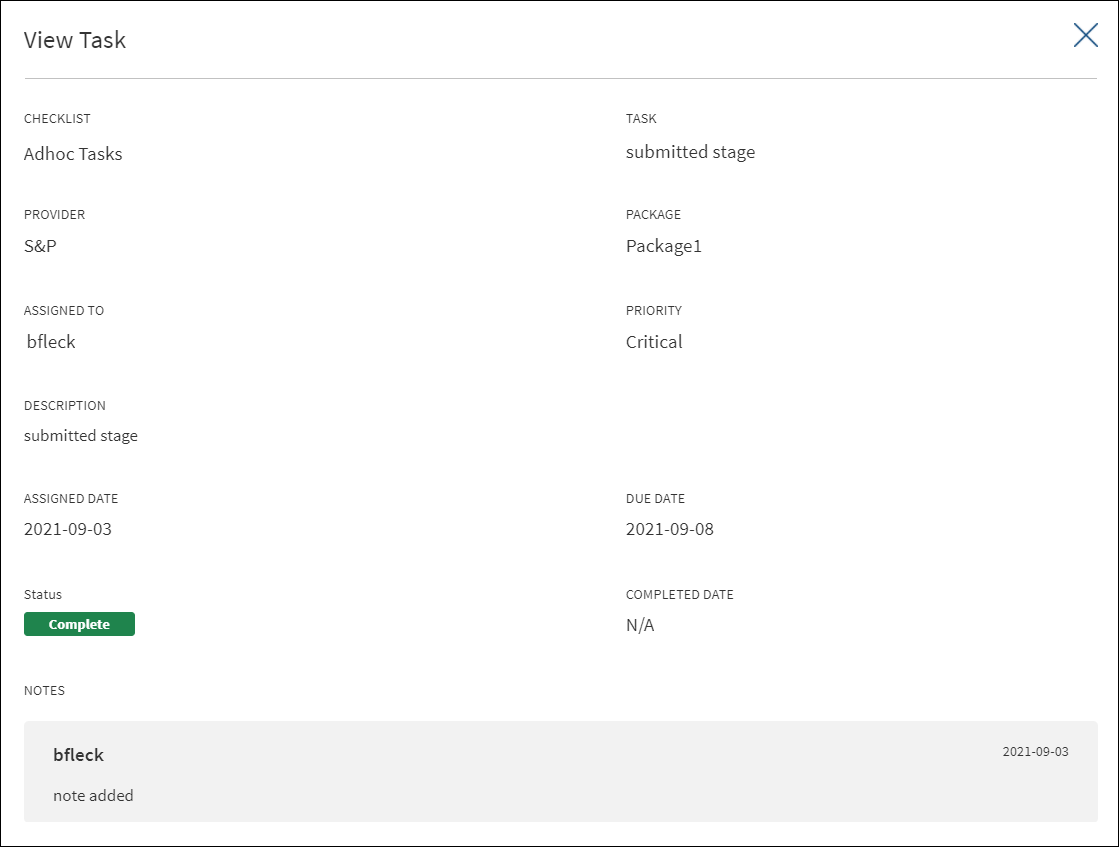
- The following details are shown: Checklist, Task, Provider - Optional, Package - Optional, Assigned to (shows auto task in case of auto tasks), Priority, Description, Assigned Date, Due Date, Status, Completed Date, and notes.
- The following details are shown: Checklist, Task, Provider - Optional, Package - Optional, Assigned to (shows auto task in case of auto tasks), Priority, Description, Assigned Date, Due Date, Status, Completed Date, and notes.
Task Sticky Footer
The task sticky footer is launched from the task list and appears on the footer of the entity and request details screens. It is used to manage a task efficiently from one-place.

To launch the task sticky footer and manage a task, do the following on the task list:
- Click the task name to manage the task on the request overview screen.
- Click the entity name to manage the task on the entity overview screen.
The task sticky footer is displayed on the bottom of the screen with the following details:
- Task name
- Task Description
- Entity name
- Due Date for the task to be completed.
- Task Status - Pending, In Process, or Failed. All the manual tasks created by the workflow (Red Hat PAM) will be created with Pending status. The status is changed to In Process after the first user clicks on the task either on the dashboard or on the stage indicator on the request and facility overview screens
- Action buttons
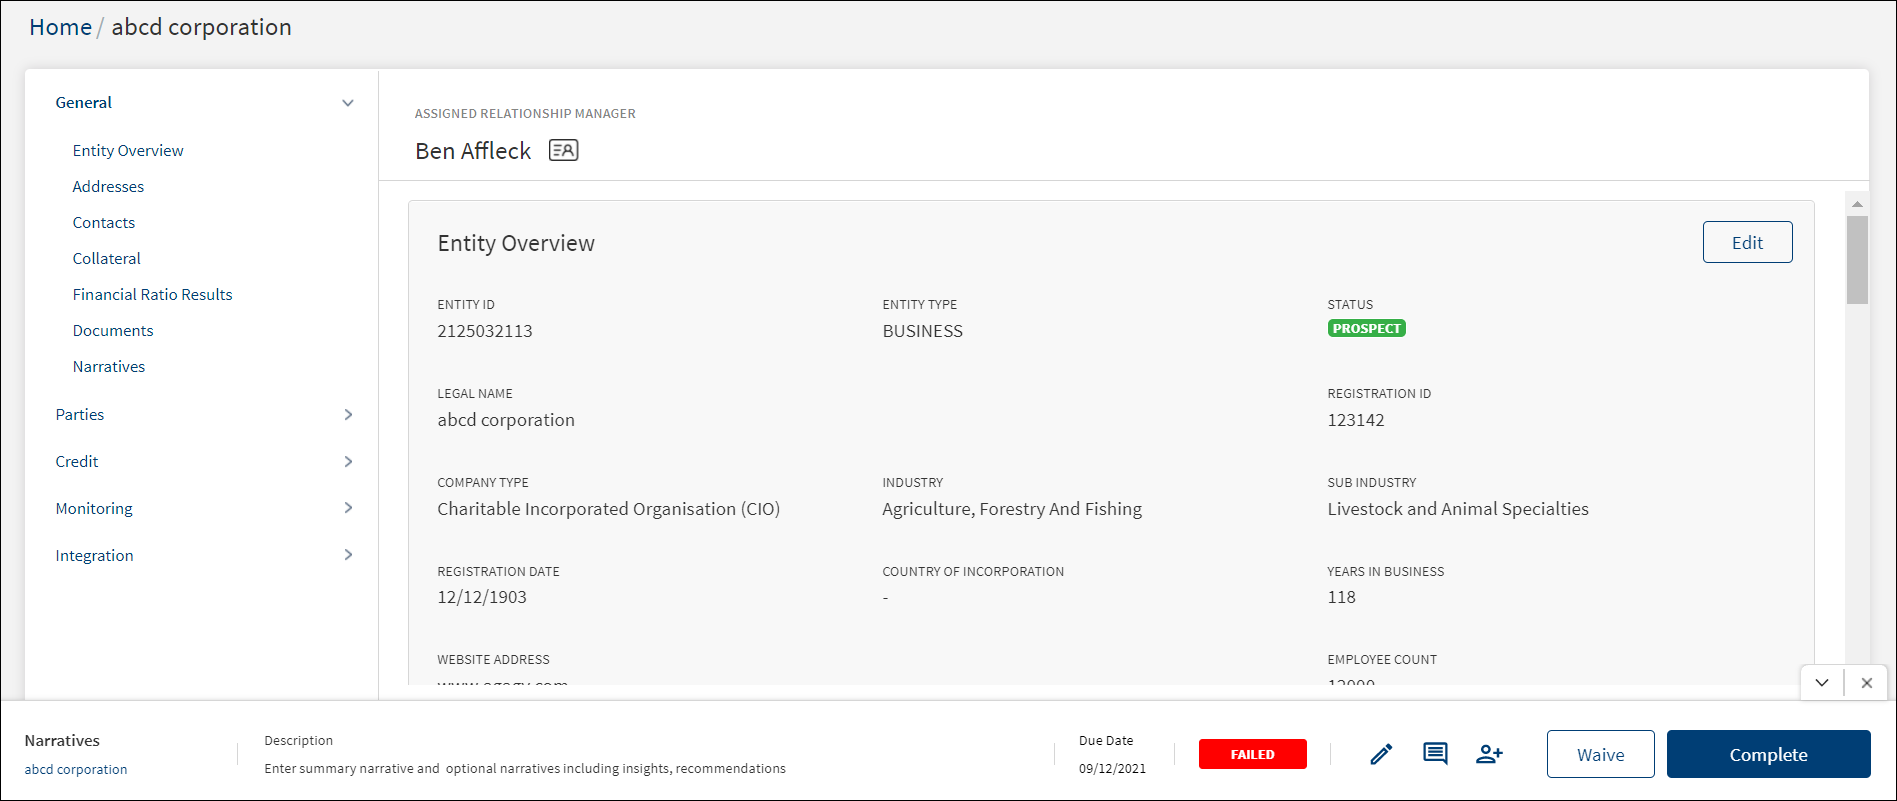
Do any of the following on the sticky footer:
- Click the
 down or up arrow to hide or show the task footer respectively. Click the x button to close the task footer. The footer is displayed only after the page loads again.
 - Click the Edit icon to edit the task details.
- Click the Reassign icon assign the task to another user.
- Click the note icon to view the task details and edit the task to add a note if required.
- Complete. Click to mark the task as completed. The application displays a message that the task is completed successfully. The status is changed to "Complete". The task is removed from the task list on the dashboard.
- Waive. Click to waive off the task as required. The application displays a message that the task is waived off successfully. The status is changed to "Waived". The task is removed from the task list on the dashboard.

Edit Task
Use the feature to edit a task. The tasks can be edited from the following sources:
- Contextual menu on the task list.
- Clicking the Edit icons on the task sticky footer of the request and facility details screens.
The application displays the Edit Task screen with the details that were already filled in while adding the task. This screen is like the add task screen.
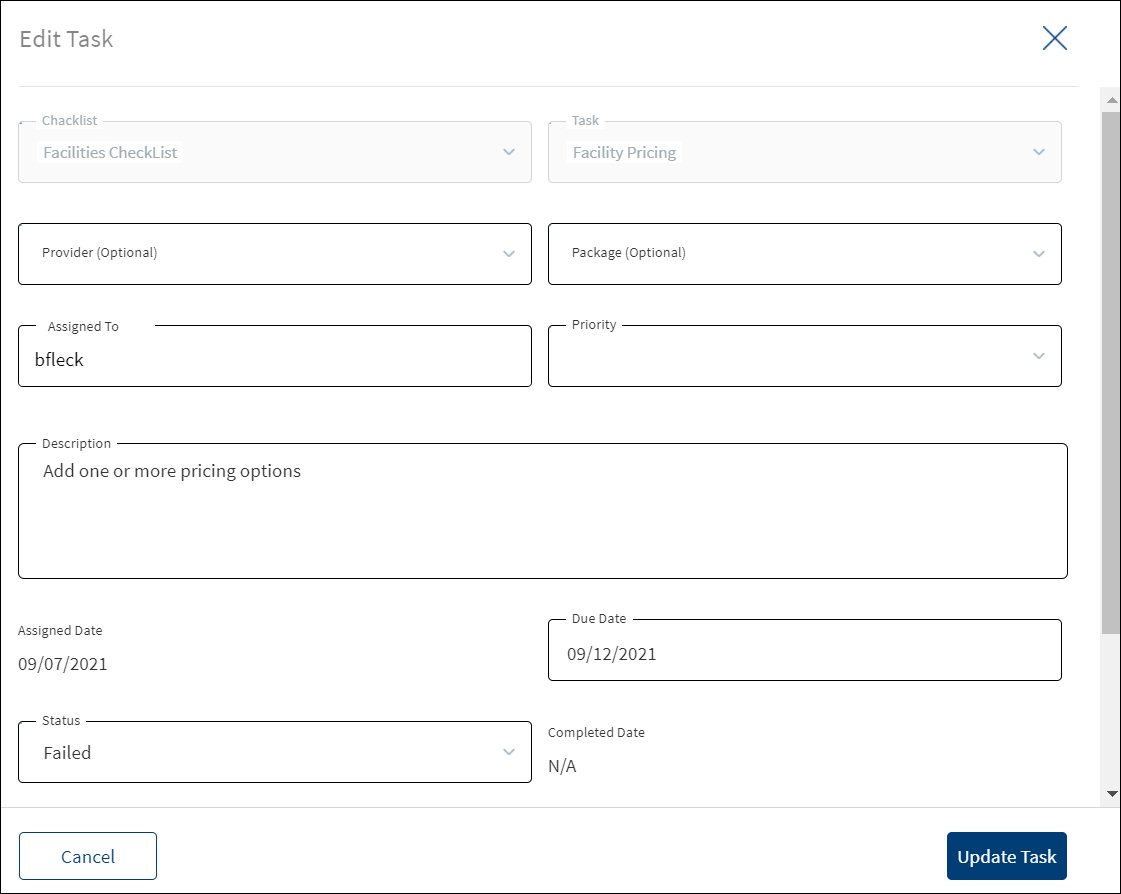
To edit the task, follow these steps as required:
- The Checklist name and Task name are already filled and read-only.
- Make the required changes. The following fields can be edited:
- Provider and Package. These are optional.
- Assigned To: Click and select the user from the list to reassign the task.
- Priority
- Description
- Assigned Date - auto filled
- Due Date
- Change the Status. The options are In-process, Failed, Complete, and Waived.
- Completed Date - auto filled
- Add a note in the notes section. It is a mandatory field.
- Click Update Task. The application displays a message that the task is updated successfully.
Click Cancel or X to cancel the action anytime. The application displays a confirmation screen. Click Yes to cancel the operation. The changes are not saved.
Add Task
Use the feature to add an adhoc task using the view all tasks link on the stage indicator of request and facility overview screens.
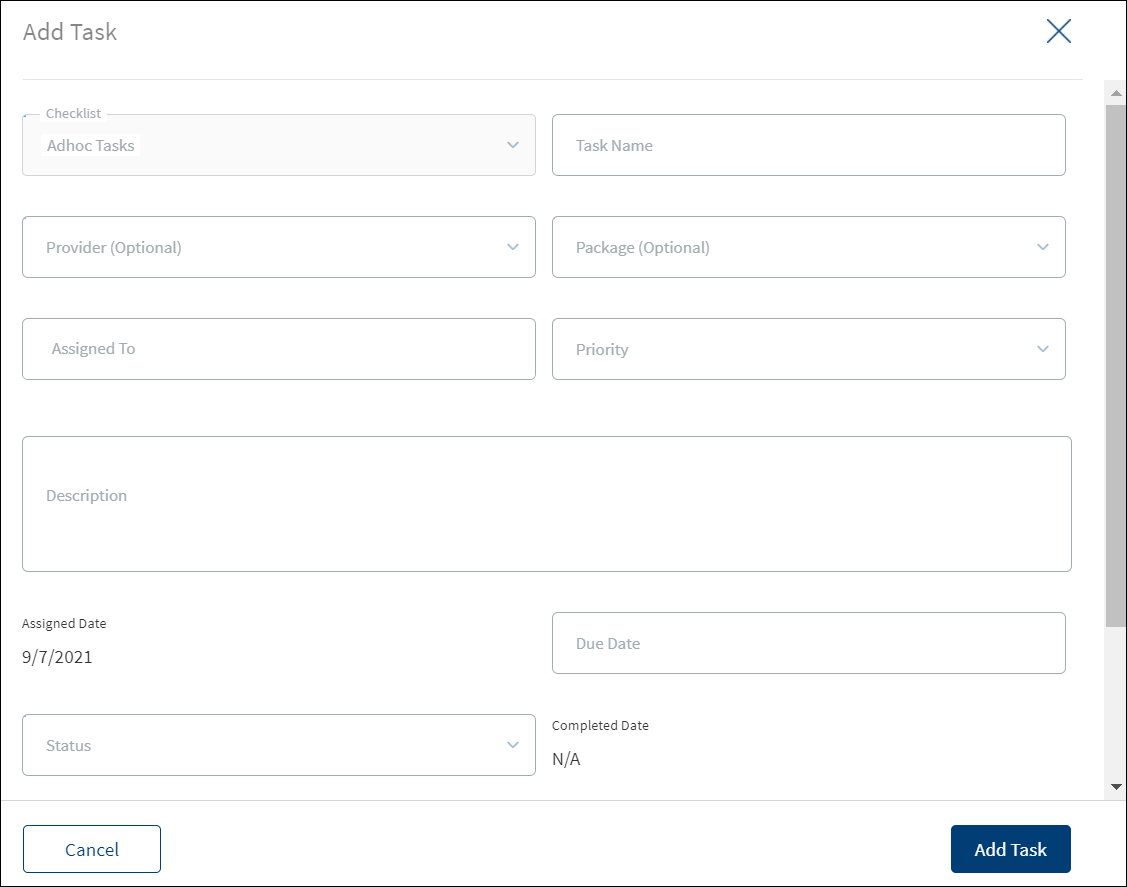
To add an adhoc task, follow these steps:
Until otherwise stated, information in all the fields is mandatory.
- On the request overview or facility overview screen, click the View All Related Tasks link on the stage indicator.
The application displays the all tasks screen. - Click Create New Task.
- The application displays the Add Task screen. All master data and list items for the drop-down lists come from the Loan Origination Service (LOS) Microservice.
- Checklist defaulted to adhoc task.
- Enter the Task Name.
- Select the Provider and Package from the respective lists. The fields are optional.
- Search and select the required person to assign in the Assigned To field. The application displays the users maintained in the user management system. Enter the name of the user in part or in full to whom the task is to be assigned. The application displays the matching names. Click the required name. The assigned user will see the task in their task list.
- Select the task Priority from the list. The options are: Critical, High, Medium, and Low.
- Enter the task Description.
- Enter the task Due Date in MM/DD/YYYY format.
- Select the task Status from the list. The options are: In-process, Complete, Pending, Failed, and Waived.
- Add a note in the notes section.
- Applies to. Lists all the facilities linked to the request. For a single or multi-facility request before submitting the task details, select the facilities for which the adhoc task is linked. Select one or many but select at least one facility. This field is applicable only if the task is created after the underwriting stage.
- Click Add Task.
On adding an adhoc task,
- The application displays a message that the task is added successfully.
- The task is listed in the view all related tasks list if the adhoc task is created in or before underwriting stage.
- After submission, the adhoc task is added as a task record to the respective facility section in the view all tasks screen if the task is created after underwriting stage.
- The task is added to the task list of the assigned user on the My Tasks tab.
Click Cancel or X to cancel the action anytime. The application displays a confirmation screen. Click Yes to cancel the operation. The changes are not saved.
In this topic