Create Lending Request (Onboarding an Entity)
Use the feature to start a new request application by selecting an existing customer (entity or borrower) or by adding a new customer. After receiving a request from a customer, the Relationship Manager (RM) initiates the onboarding process (create request) by capturing the following information of the borrower using the Temenos Digital Assist application.
For onboarding the deal there are specific task that will be manually or automatically triggered along with the changes to the existing tasks.
- Entity information
- Basic Information
- Primary Contact Information
- New Facility
- Modifications
- Summary and Submit

The dashboard displays the list of requests already created with the following details. The rows are sorted by the first column.
- Request ID
- Borrower or entity name
- Request created on date
- Requested amount
- Current stage of the request
Create a Request
To create a new request, follow these steps:
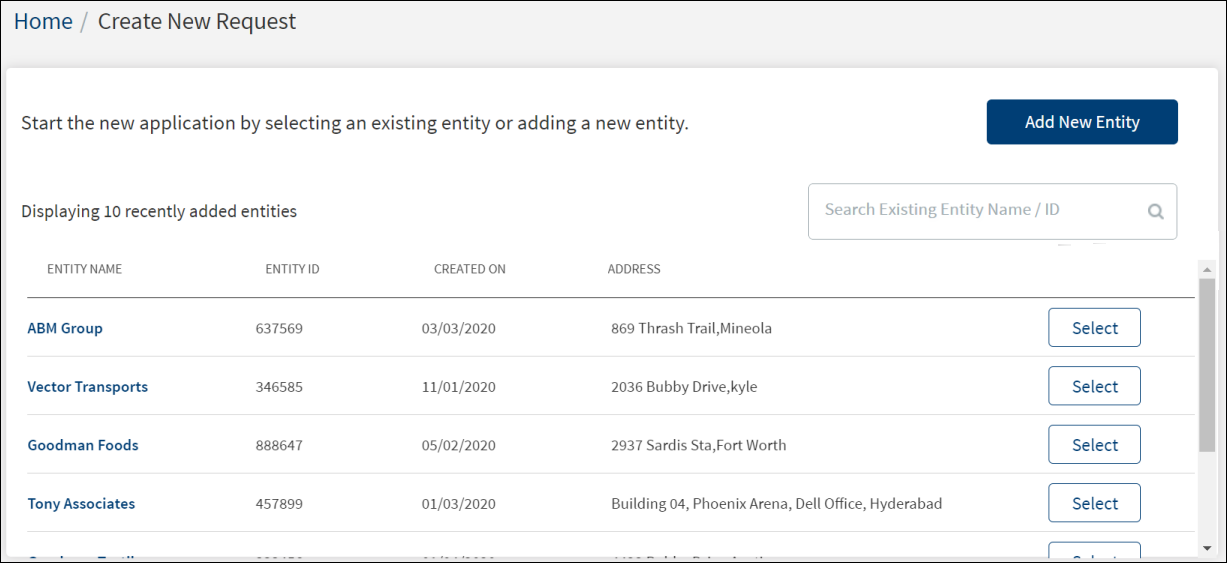
- On the dashboard, click Create New. The application displays a screen with the list of recently added 10 entities retrieved from Party Microservice with details such as entity name, entity ID, created on, and entity address, and a provision to add a new entity or select from the existing entities.
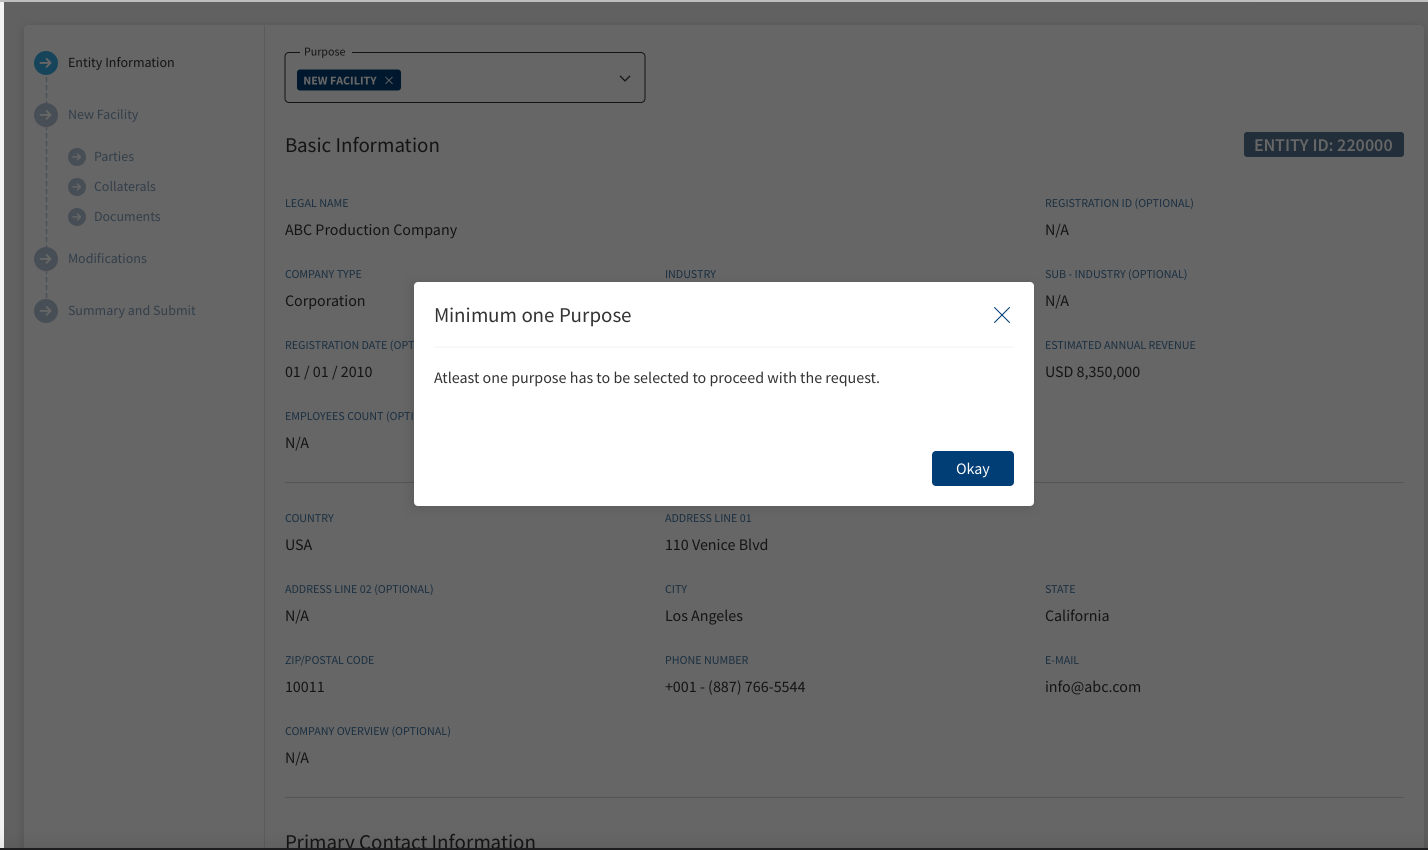
- Clicking the Add new Entity option navigates to the purpose screen. Two purpose options display and either of them needs to be selected:
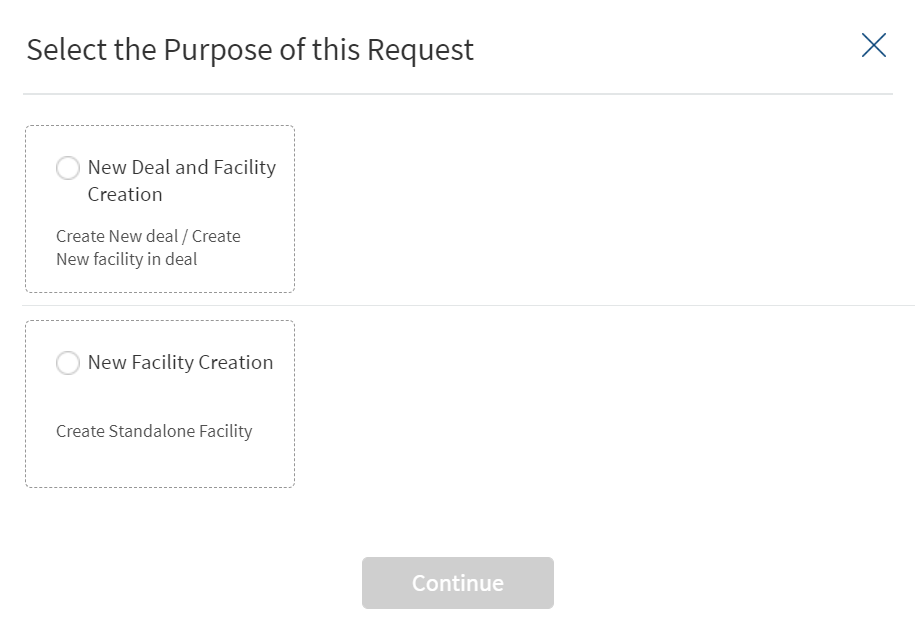
- New Deal and Facility Creation.
- New Facility Creation.
- Selecting an existing Entity from the list,displays three purpose options.
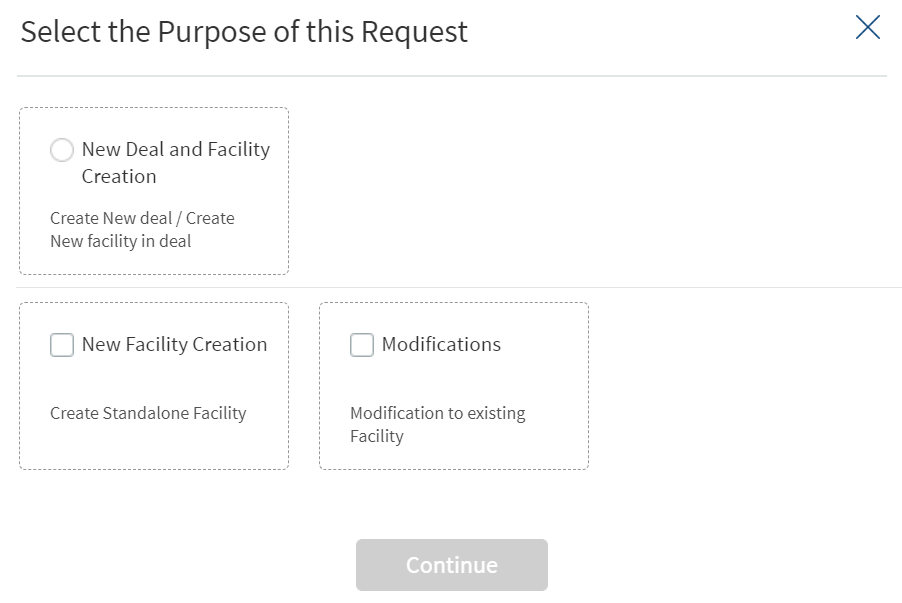
- New Deal and Facility Creation
- New Facility Creation
- Modifications
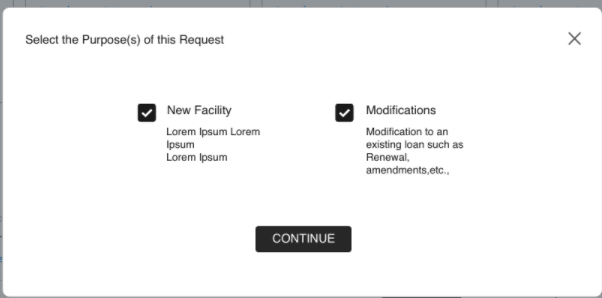
- A User can apply for a New Loan and Modification of an already Existing Loan at once by selecting both the check-boxes in the Purpose screen.
- When the check box for new purpose of request, ‘new deal and facility creation’ is clicked, new entity related mandatory and optional fields display.
- When the ‘new deal and facility creation’ is clicked, the other purpose of message ‘new facility creation’ gets greyed out and the user can fetch either of the one.
- Do any one of the following:
- Start a new application by selecting an existing business, individual, or group entity or adding a new entity. The application displays the Party Type on top of the screen, Basic Information, and Primary Contact Information.
- To narrow down the entity, use the search bar to search for a specific entity by entering the entity name or the entity ID. The search results display both business and individual entities.
- Click the Entity Name to view the entity details.
- Click Add New Entity. When a new entity option is selected, purpose option displays as New Facility. The application displays a screen to capture the customer/entity information.
- Start a new application by selecting an existing business, individual, or group entity or adding a new entity. The application displays the Party Type on top of the screen, Basic Information, and Primary Contact Information.
- If an existing entity is selected, the details are populated in the fields. Make changes as required.
The Requests where an entity is not selected does not get saved as draft requests. When a user selects Create new request and Add new Entity but closes the request without adding the entity details, the system prompts to enter the mandatory details.
When the user adds the mandatory details and closes the application or clicks the Temenos Digital Assist logo, the request gets created with entity details in the request dashboard.When clicked on this request again, the user navigates to the section where they had left and closed the application, this will display the entity that was added or selected for the user to proceed with the request again.
- Throughout the document, the following terms are used interchangeably:
- Customer, Entity and Borrower
- Facility and Product
- Deal and Request
- The application allots an Entity ID for a new entity and a temporary Request ID. These are displayed on top of the screen.
- Use the search bar to narrow down to specific record.
- The contextual menu
 is for editing and deleting the row.
 - The business and individual entity list is retrieved from Party Microservice.
- Master data for Entities comes from the Party Microservice and for Request and Facility from the Origination Processing Microservice.
- All collateral are fetched from Origination Processing Microservice.
- The uploaded documents are stored in Document Storage Microservice.
- While adding a new request, the RM can close the application to save as a draft and continue the activity later. The request is added to the requests list on the dashboard with the status as Draft. The application displays a confirmation pop-up to save and close the request. Click yes to save and close the request for completing the request later.
- The application flow is displayed on the left pane. A glance at the flow shows the step in which the application is currently being processed and the status of each step using color codes. Click any of the items on the left pane to navigate to the selected section.
- Gray
 denotes the future stage not started.
 - Blue
 denotes the current stage.
 - Green
 denotes the completed stage.
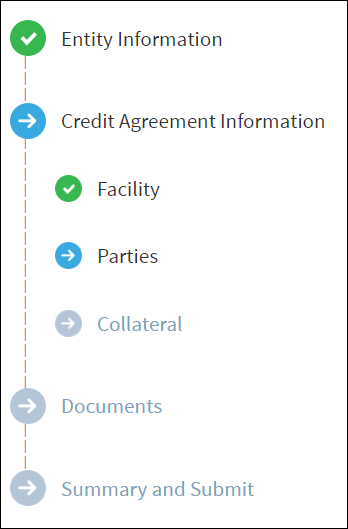
- Gray
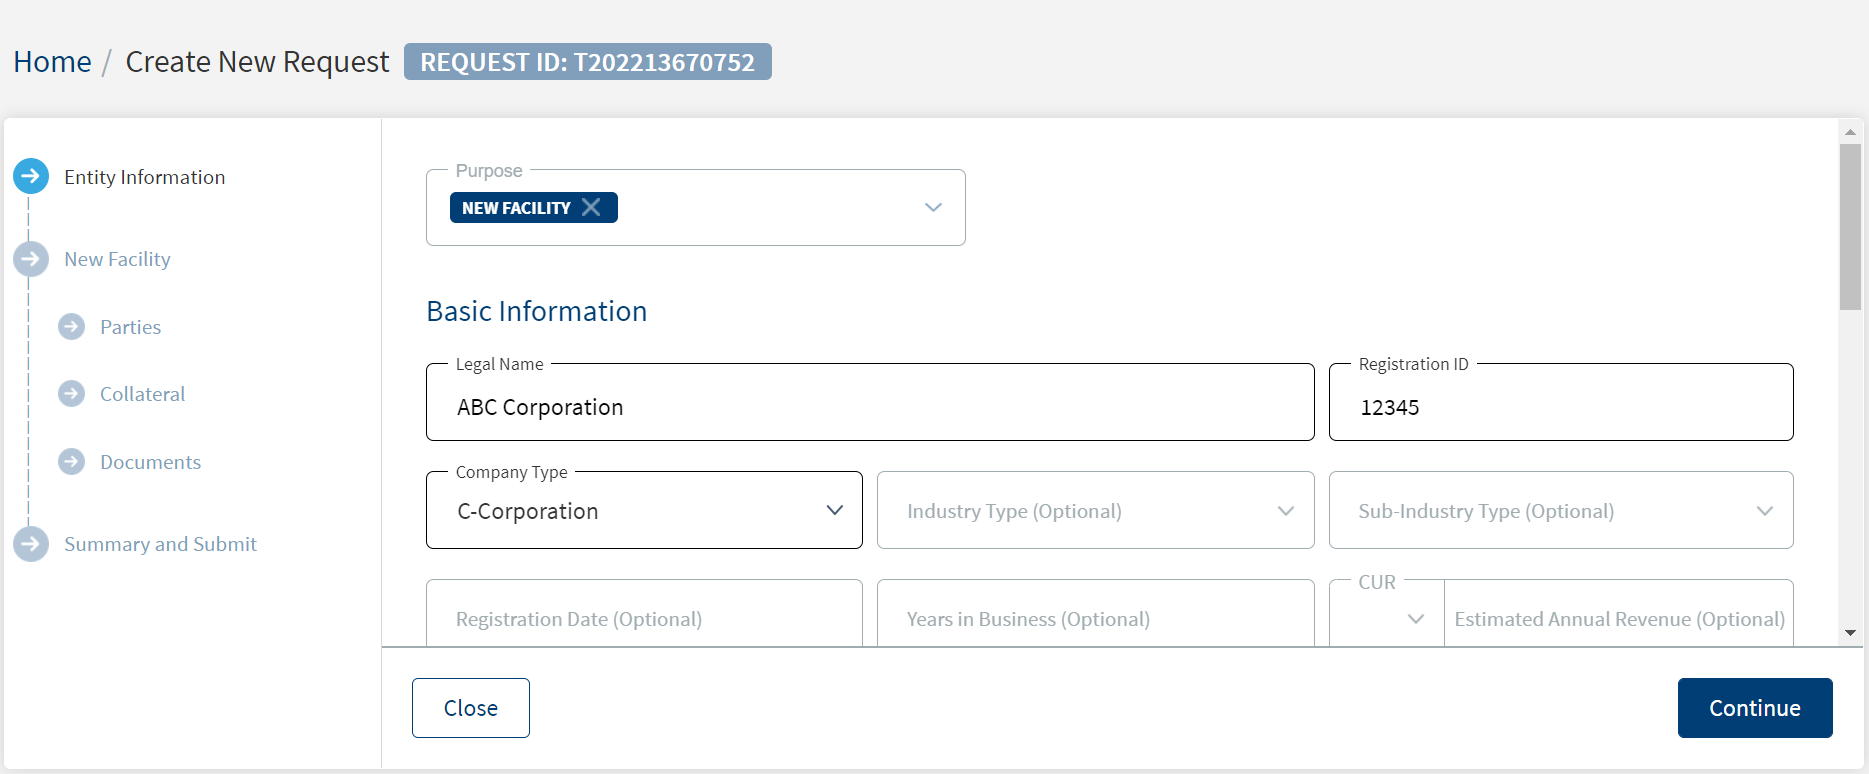
Entity Information
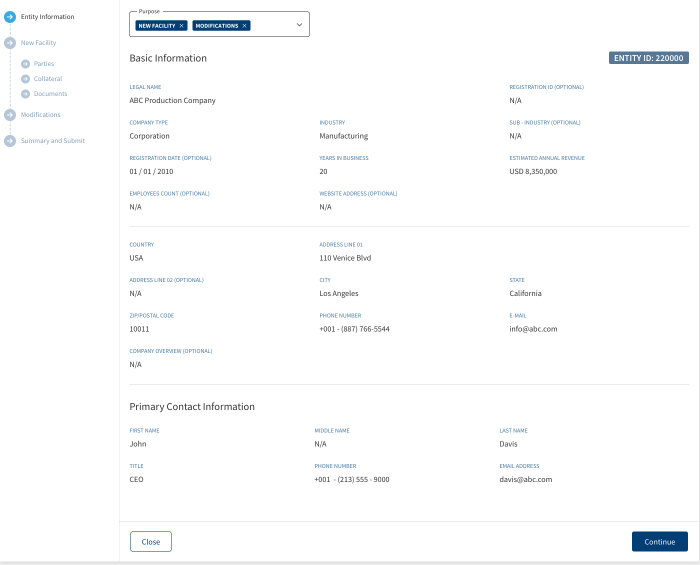
The application displays a screen to capture the basic and contact information. If an existing entity was selected in the previous step, the available entity details are populated in the fields.
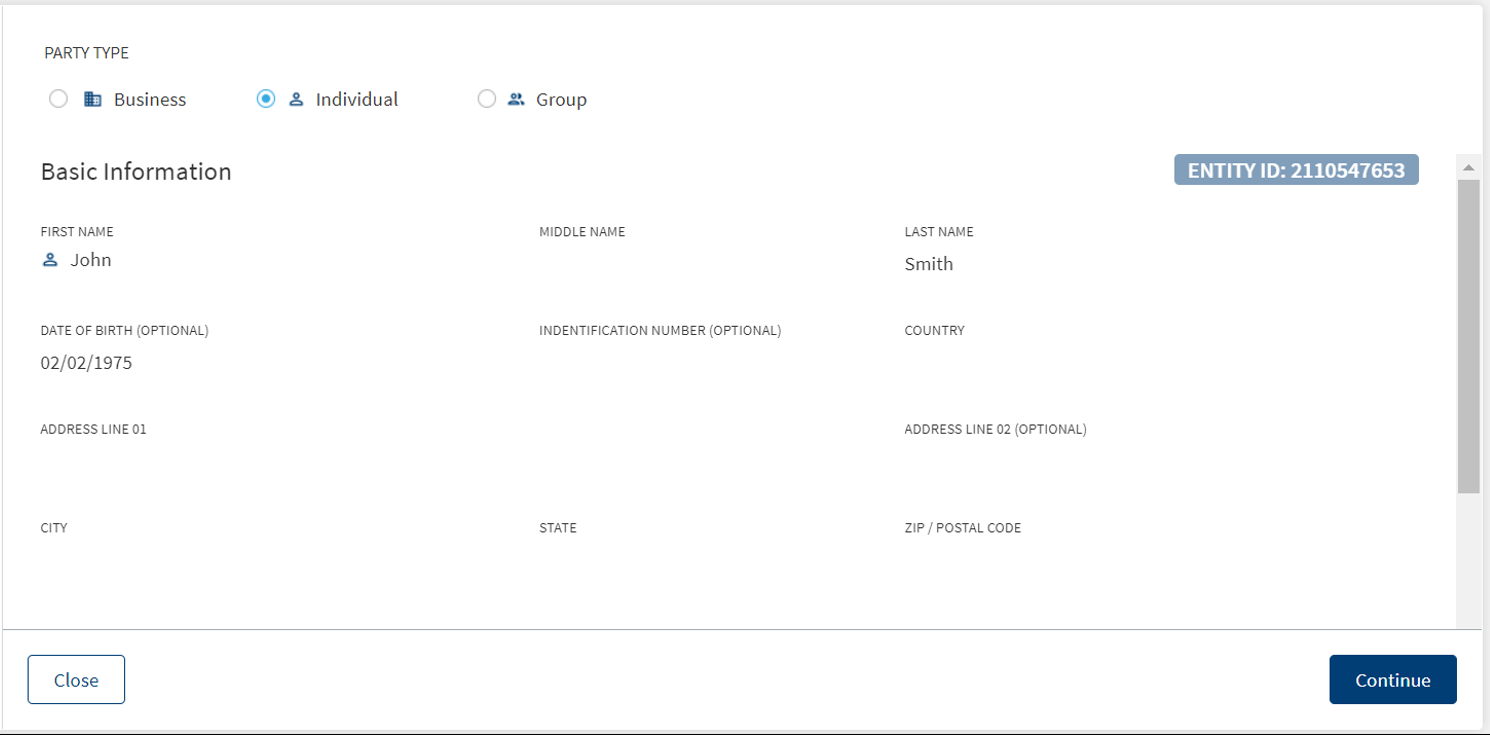
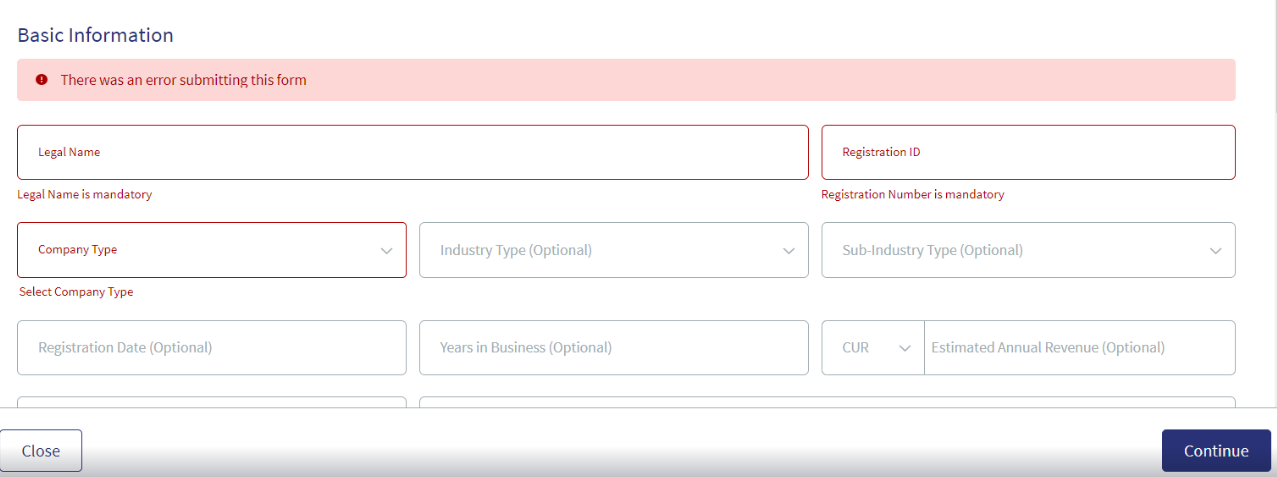
- Basic Information. Capture the following details. Until otherwise stated, information in all the fields are mandatory:
- Enter the legal name of the entity.
- Enter the registration ID of the entity.
- Select the company type from the list. For example, Limited Partnership (LP).
- Select the industry type from the list. For example, Mining.
- Select the corresponding sub-industry type from the list. For example, Metal Mining.
- Enter the company registration date in MM/DD/YYYY format. The information is optional.
- Enter the number of years in business. The information is optional.
- Select the currency from the list (for example - USD). This field has predictive search where you can enter your option in the box and select the required option from the matching result rather than scroll down the list to select a currency.
- Enter the estimated annual revenue amount.
- Select the employee count in company from the list. For example, Employees between 1 - 499. The information is optional.
- Enter the company website address. The information is optional.
- Select the country from the list.
- Enter the address details in line 1.
- Enter the address details in line 2. The information is optional.
- Enter the city and state. The information is optional.
- Enter the zip or postal code.
- Select the phone code and enter the phone number. The information is optional.
- Enter the email address. The information is optional.
- Enter a brief overview. The information is optional.
- Primary Contact Information. Capture the details of the primary contact for the company. This section is optional.
- Select the salutation from the list and enter the first name. The information is optional.
- Enter the middle name. The information is optional.
- Enter the last name. The information is optional.
- Select the job title from the list. The information is optional.
- Select the phone code and enter the phone number.
- Enter the email address. The information is optional.
- Click Continue. The application displays a screen to capture the facility details.
Close the request to save as a draft and continue the activity later. The request is added to the requests list on the dashboard with the status as Draft. The application displays a confirmation pop-up to save and close the request. Click yes to save and close the request. The RM can complete the request later by clicking the request on the dashboard screen.
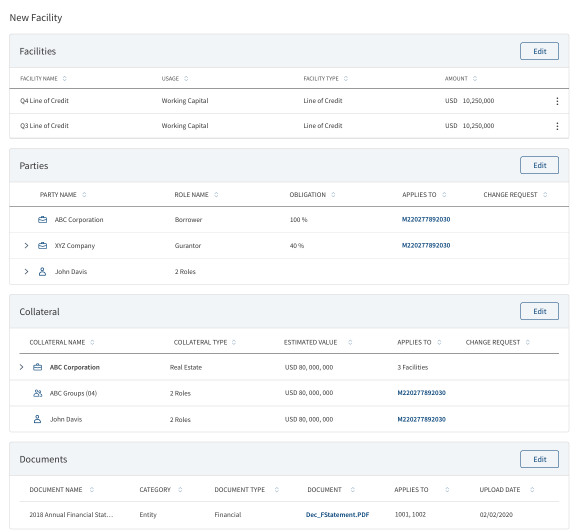
New Facility
The application displays a screen to capture the Parties, Collateral and Document details.
Facility
The application displays a screen to capture the facility or facility information, (for example - term loan or line of credit). It is mandatory to add a facility before continuing with the create request process. Only one facility can be added to a request. However, multiple facilities can be added to the facility.
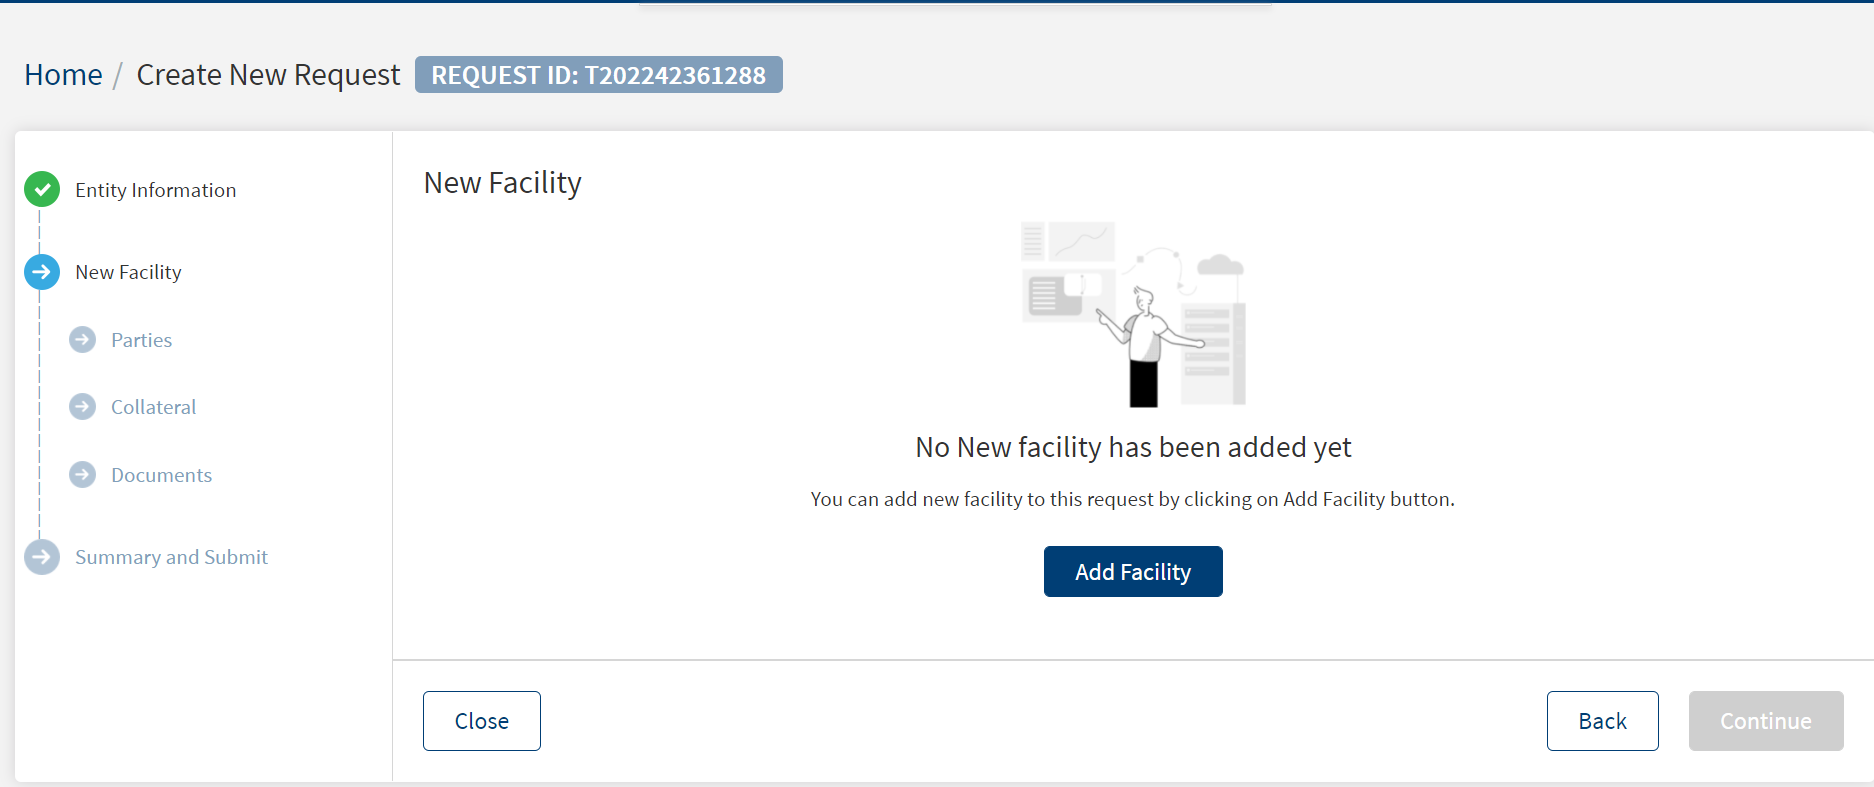
Follow these steps:
- Click Add facility to add a facility or product to the request application. Multiple facilities can be added under the facility. You can also edit or delete a facility.
- After adding the facility details, click Add facility.
- The application displays a confirmation message that the facility is added successfully.
- Click Continue to proceed to add parties to the request.
Add facility
Multiple facilities can be added to a request. To add a facility, follow these steps:
Until otherwise stated, information in all the fields are mandatory.
- Click Add facility to add a facility/product to the request application.

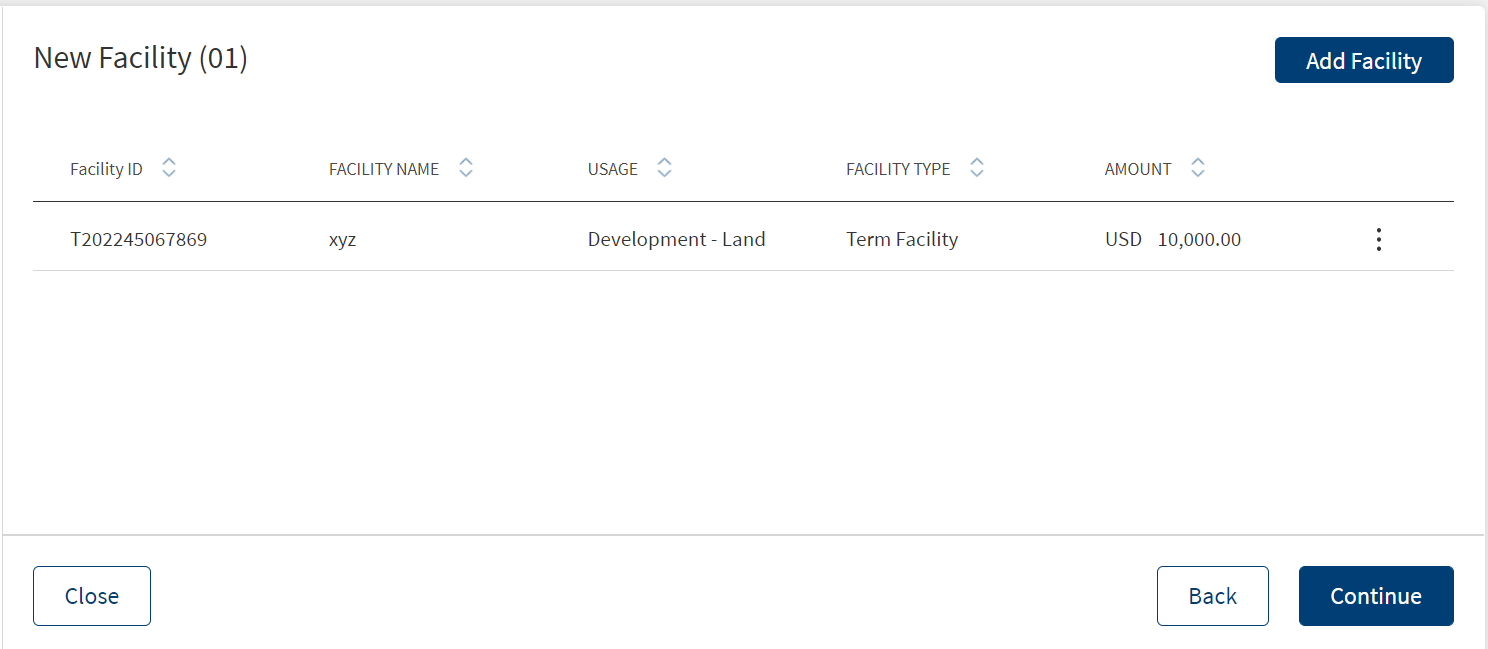
- On the Add facility screen, select the facility from the list. The options are New, Modify.
- Click Add Facility. The application displays the Add Facility screen.
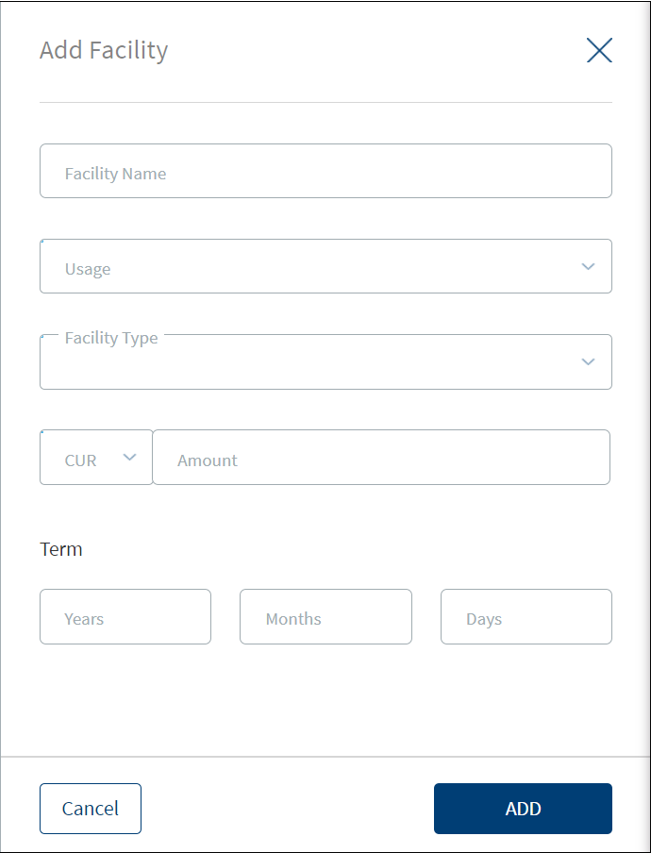
- Enter the Facility Name.
- Select the usage from the list. For example, Development - Land.
- Select the Facility Type from the list. For example, Term Facility. The facility or product types are fetched from the Marketing Catalog Microservice. The facility types available are:
- Term Facility
- Revolving Facility
- Line of Credit (Non revolving)
- Mortgage Loan
- Letter of Credit
- Letter of Guarantee
- Select the currency from the list (for example, USD). This field has predictive search where you can enter your option in the box and select the required option from the matching result rather than scroll down the list to select a currency.
- Enter the estimated amount.
- Enter the Term in Years, Months, and Days.
- Click Add. The facility is added to the Add facility screen with the following details: Facility ID, Facility Name, Usage, Facility Type, and Amount.
- Do any of the following as required:
- After adding the required facilities, click Add facility.
- The application displays a confirmation message that the facility is added successfully. The facility is added to the facility list with the following details: Facility ID, Facility Name, Usage, Facility Type and Amount.
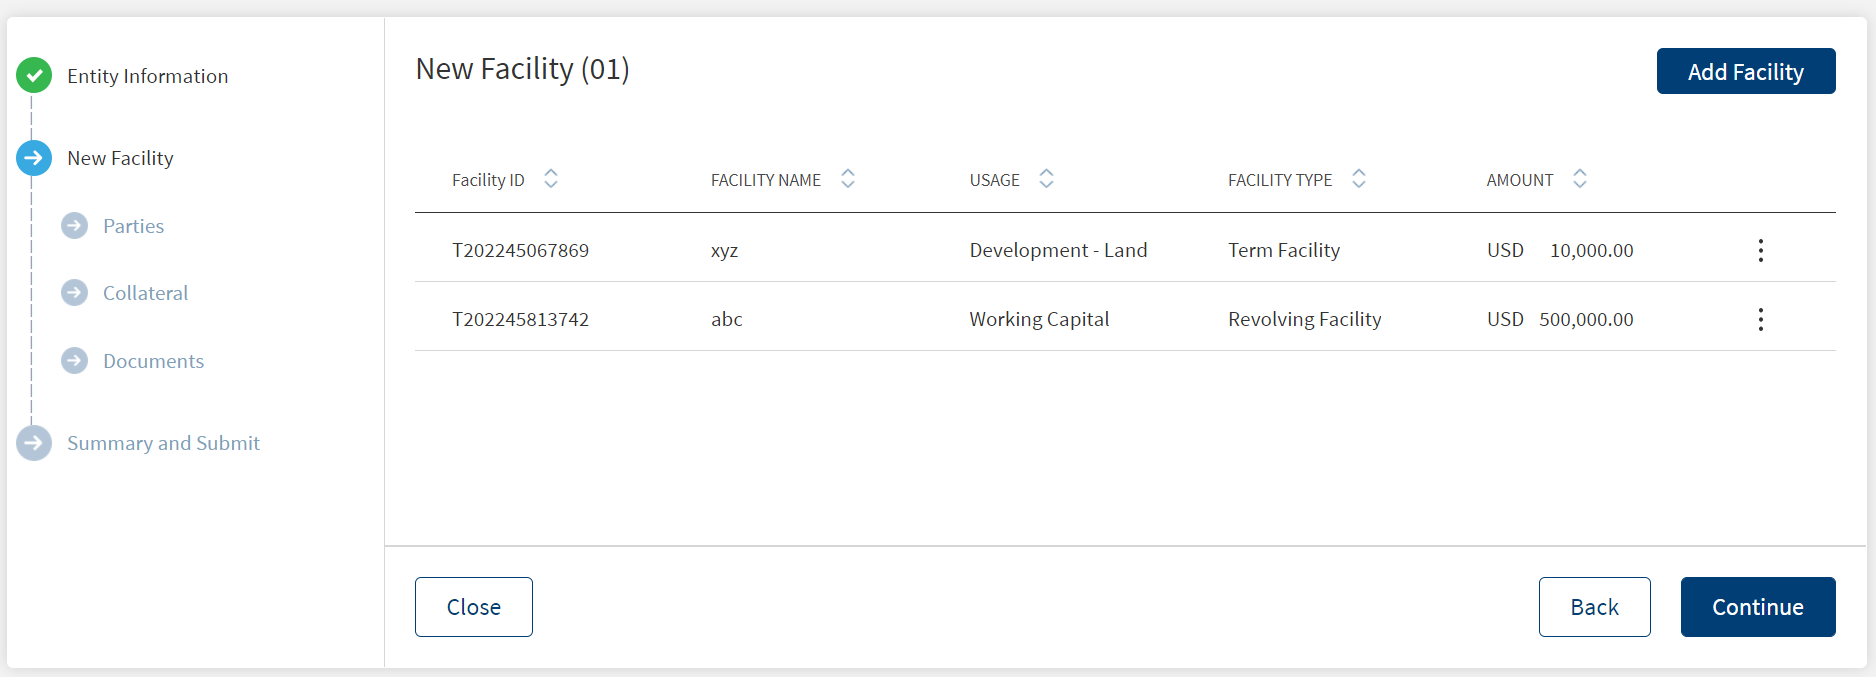
Click the arrow placed beside the facility name to expand or collapse the details.
View facility Details
Click the row to view the facility details. It displays the details of the facility as follows: Facility ID, Facility Name, Usage, Facility Type and Requested Amount, Term, Approved Amount.
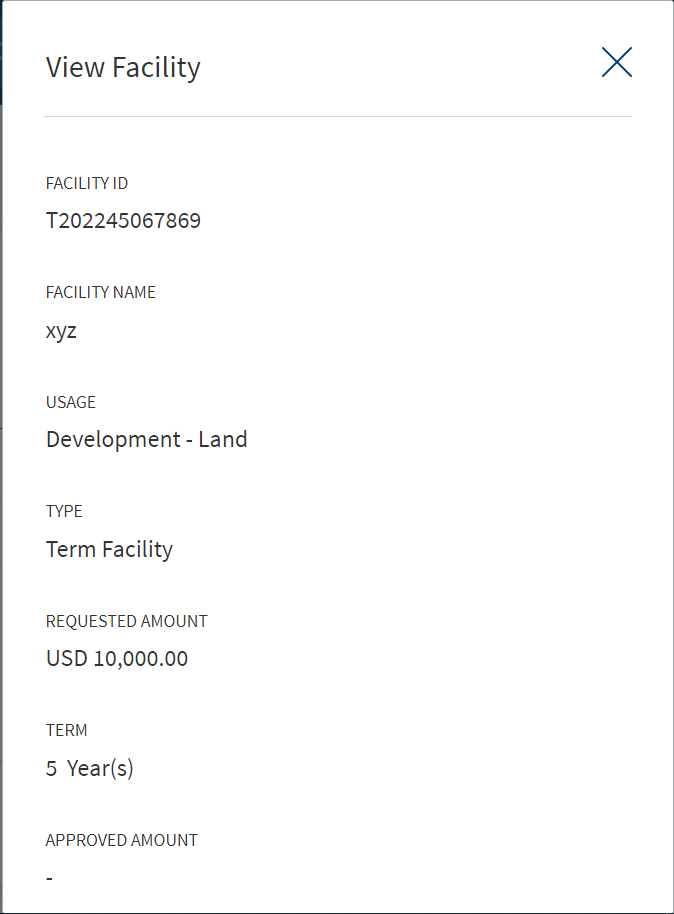
Click Edit to edit the details or click X to close the form.
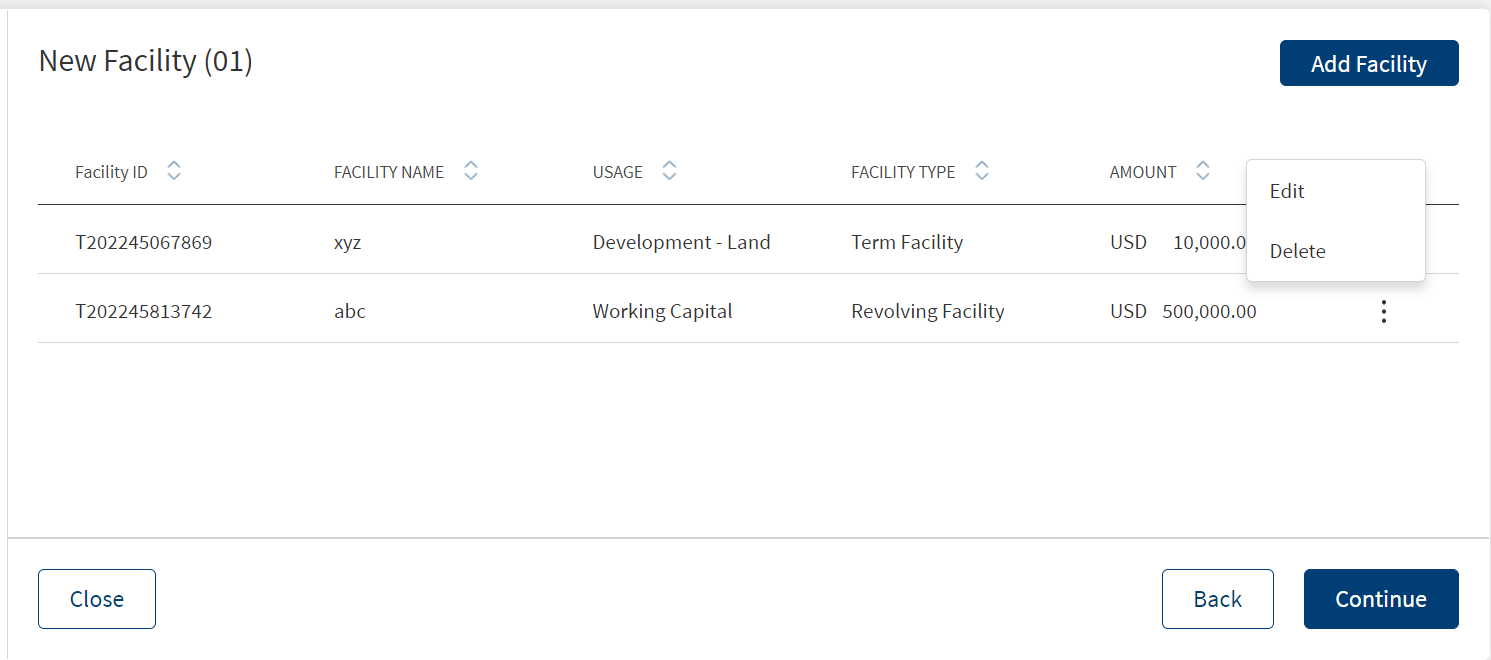
- On the facility list screen, click Edit on the context menu. The application displays the Edit facility screen.
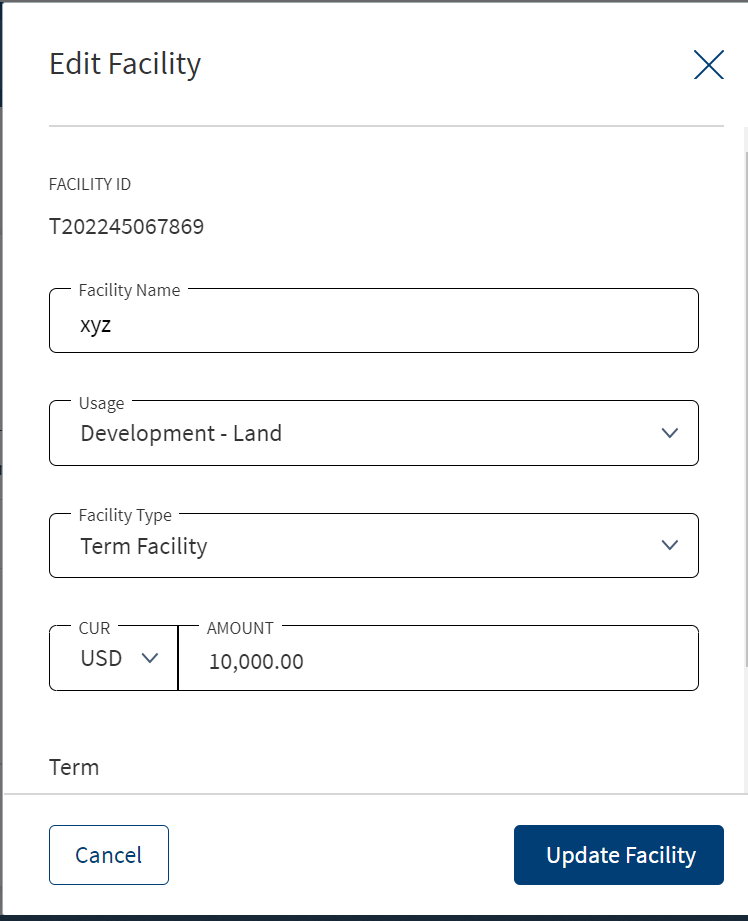
- Make the required changes. All the fields can be modified except the Facility Type field.
- Click Update.
- After making all the changes, click Update facility. The application displays a confirmation message that the record is updated successfully.
Delete facility
- On the facility list screen, on the context menu ,click Edit.
- On the context menu ,click Delete to remove the required facility.
- In the pop-up that appears, click Yes.
Parties
The application displays the party with the following details. This is the entity information that was added in the Customer Information section. The application displays the information by default and assigns the Borrower role.
- Party name
- Role
- Obligation by percentage or amount.
- Applies to
- Placeholder contextual menu to edit or delete the record.
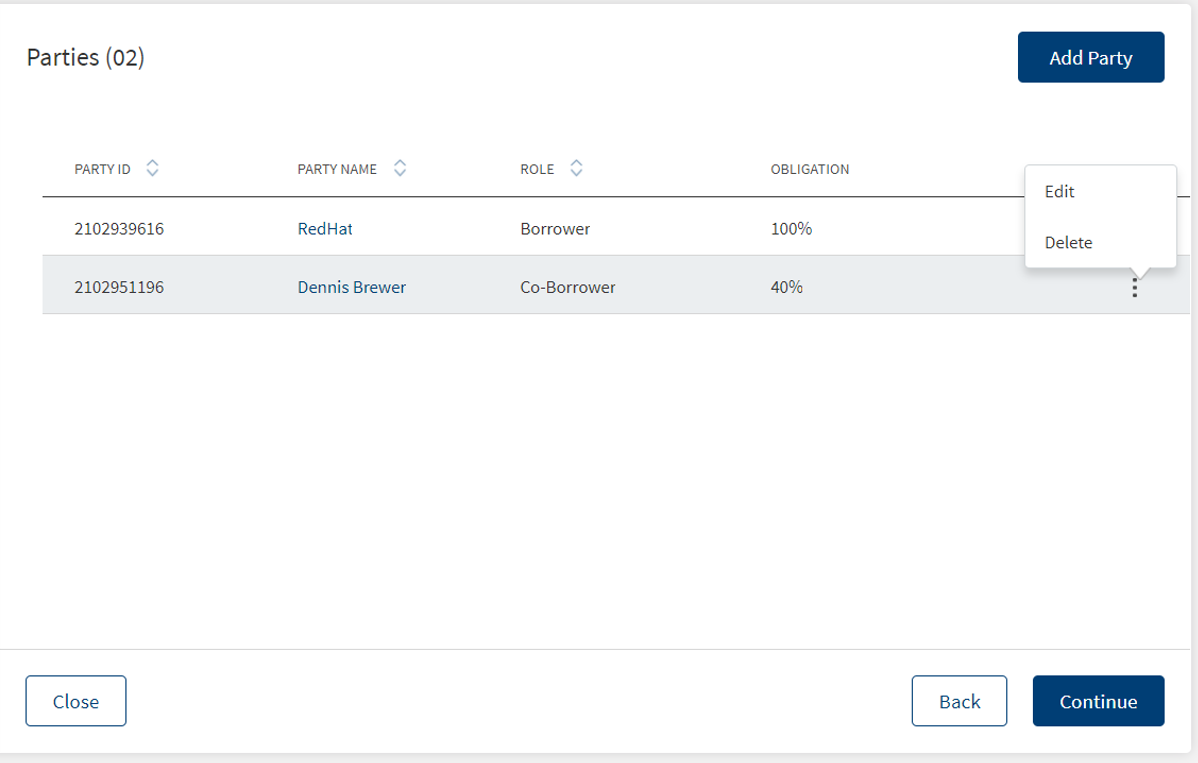
Do any one of the following:
- Click Add Party to add related party to the request (for example, co-borrower, guarantor).
- After adding the party details, click Add Party.
- The application displays a confirmation message that the party is added successfully.
- A facility cannot have a party as both borrower and co-borrower.
- If a party is already added to the facility, the check box in the applies to section will be greyed out and a prompt stating 'Party applied already' is displayed.
- Click Continue to proceed to add collateral to the request.
- Click the record to view the details.
- On the context menu,
- Click Edit to modify the details.
- A user can change any role of the Primary Borrower in this section.
- If the user deletes the role information in the Edit existing party screen, a new role to the party can be added.
- If after deleting the role information and not adding any role, the user clicks on done, the party should still remain in the parties section but the role name, obligation and applies to has to become blank, then user can click edit again and add any role.
- After deleting the role information,if the user does not add any role and clicks done, the party remains in the parties section however the role name, obligation and applies to become blank, the user can then click edit again and add any role.
- Click Delete to remove the record. On the confirmation pop-up that appears, click Yes to delete the record.
- Click Continue directly without adding a party to proceed to add collateral to the request.
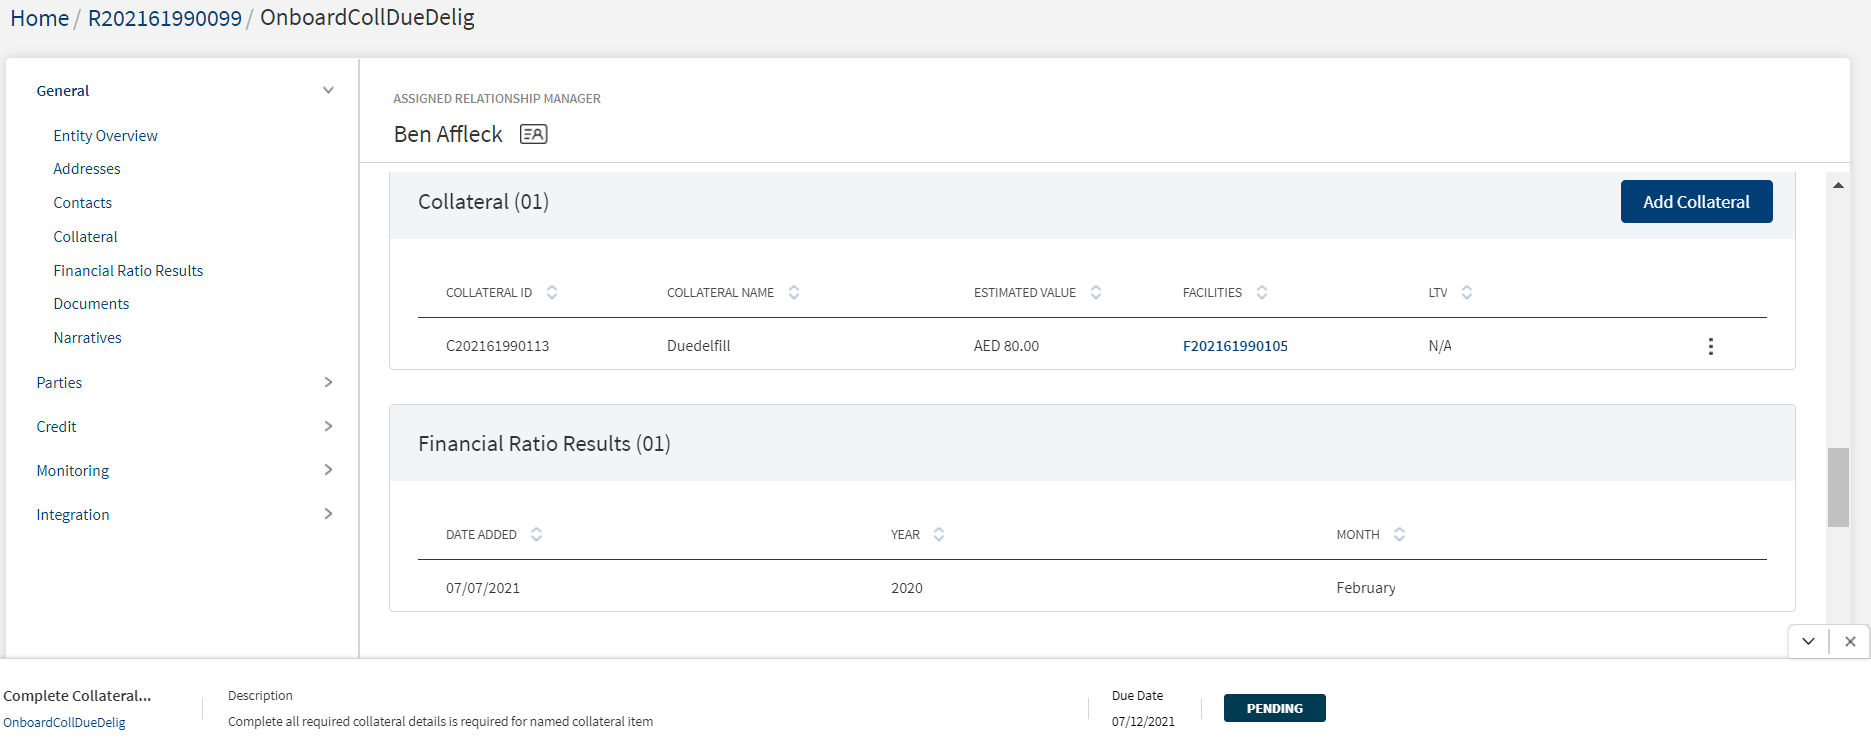
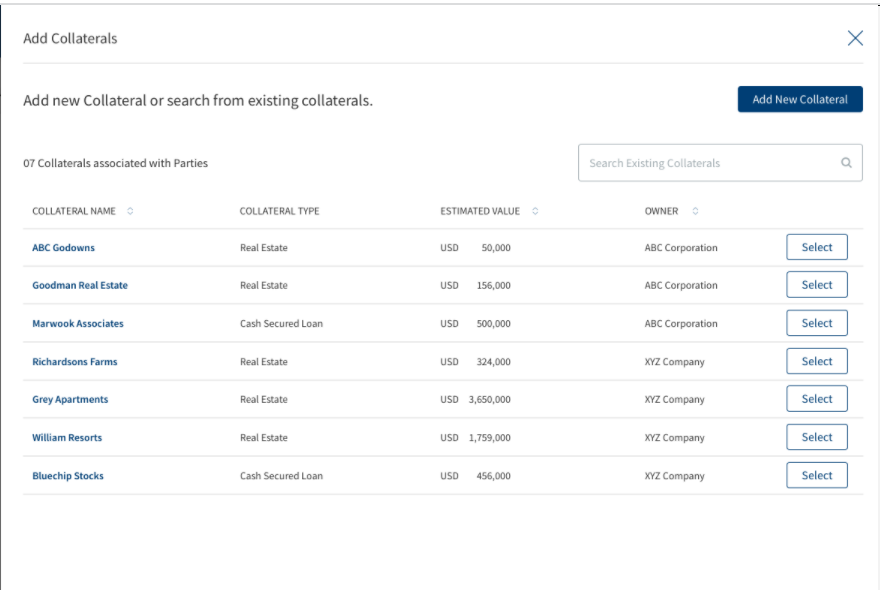
Collateral
The application displays a screen to capture the collateral details. By default the collateral list is empty. The RM can add a collateral or skip to add documents directly.
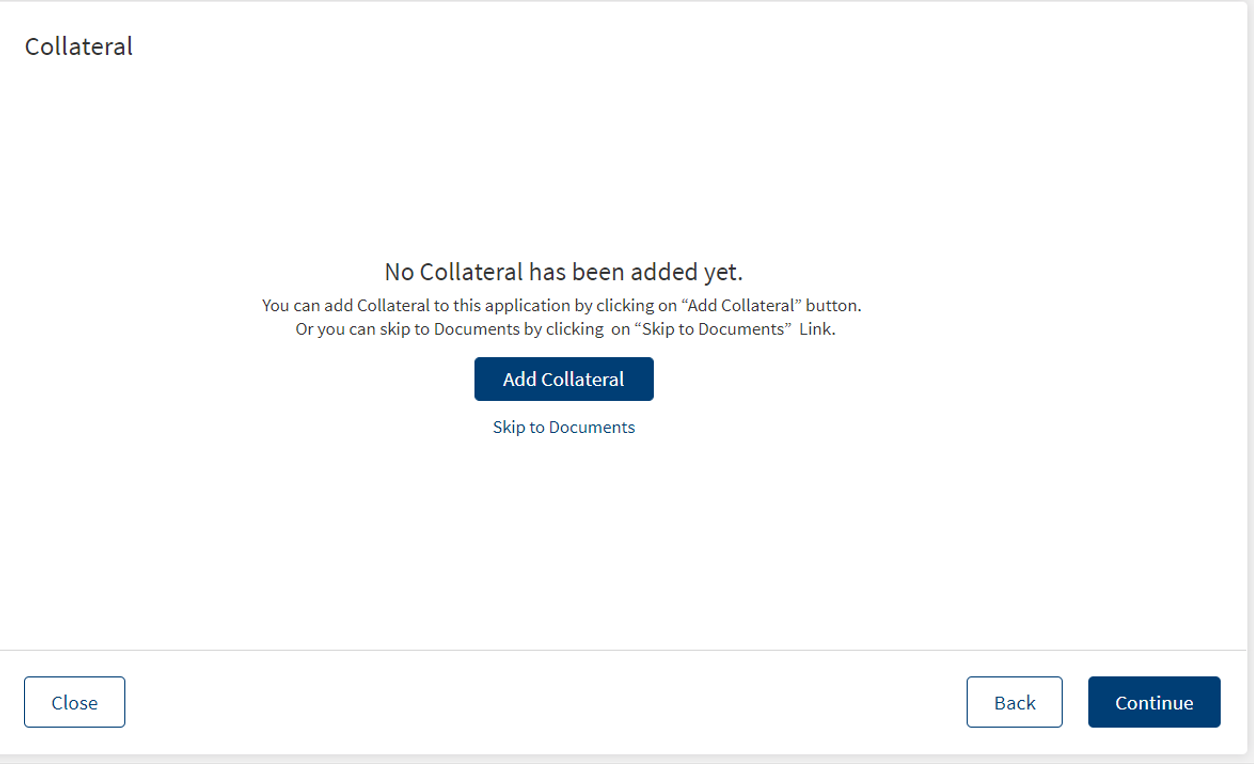
Do any one of the following:
- Click Add Collateral to add a collateral to the request.
- After adding the collateral details, click Add Collateral.
- The application displays a confirmation message that the collateral is added successfully.
- Click Continue to proceed to add documents to the request.
- Click the skip to documents link to proceed directly to add the documents in support of the request. Add the collateral later.
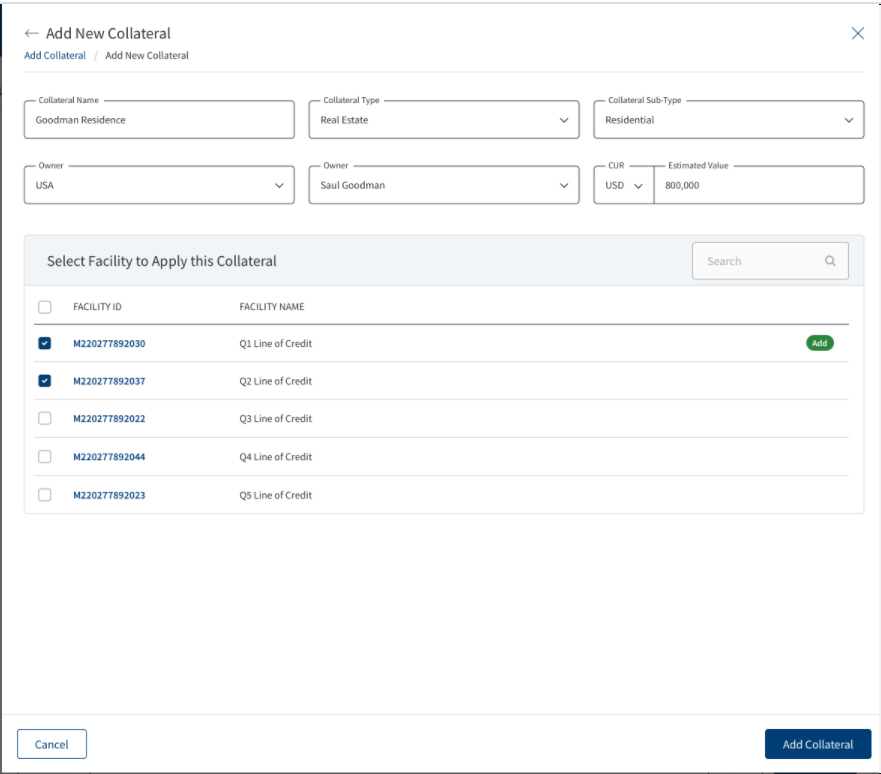
Add Collateral

To add a collateral, follow these steps:
Until otherwise stated, information in all the fields are mandatory.
- The application displays the list of collateral of the related parties with the following details: Collateral ID,Collateral Name, Estimated Value, Applies To and Loan To Value (LTV). Otherwise, the list will be empty. The collateral list is retrieved from Transact.
- Add any from the existing list. Use the search bar to search for a specific collateral.
- Alternatively, click Add New Collateral.
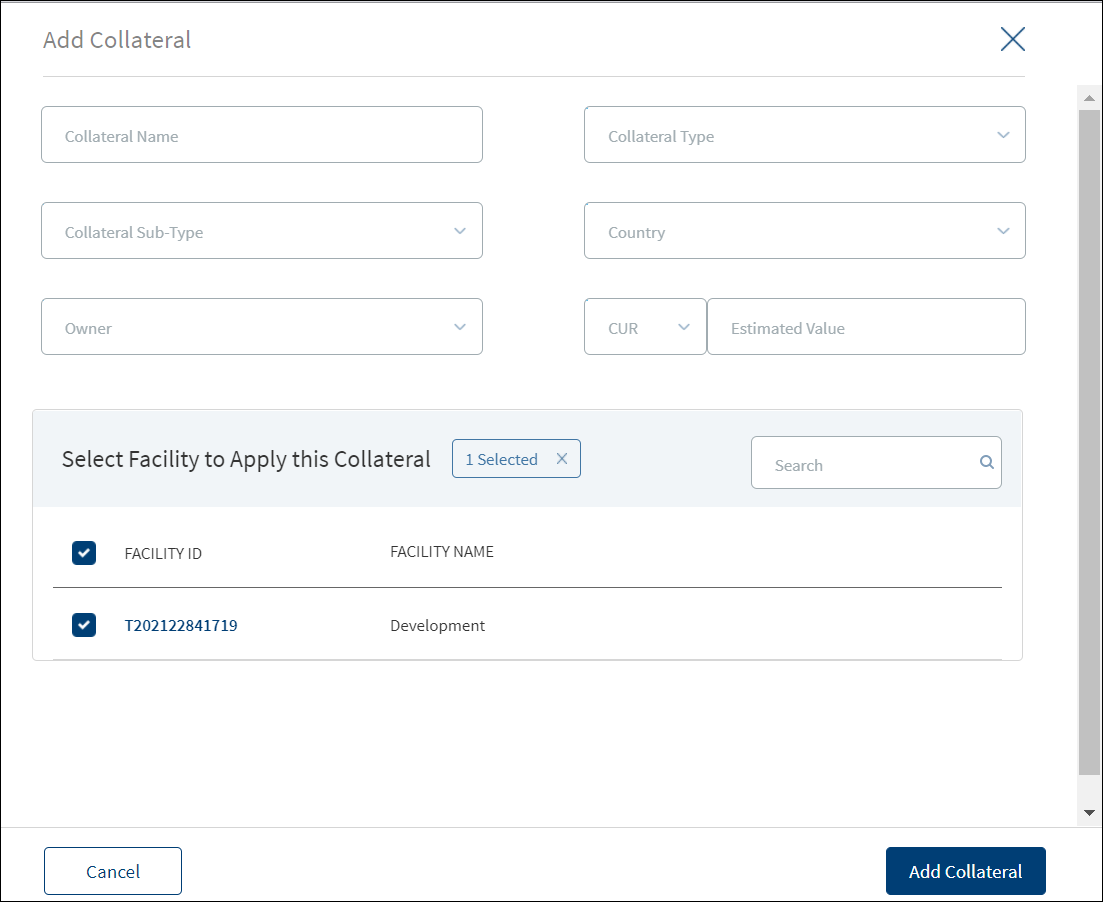
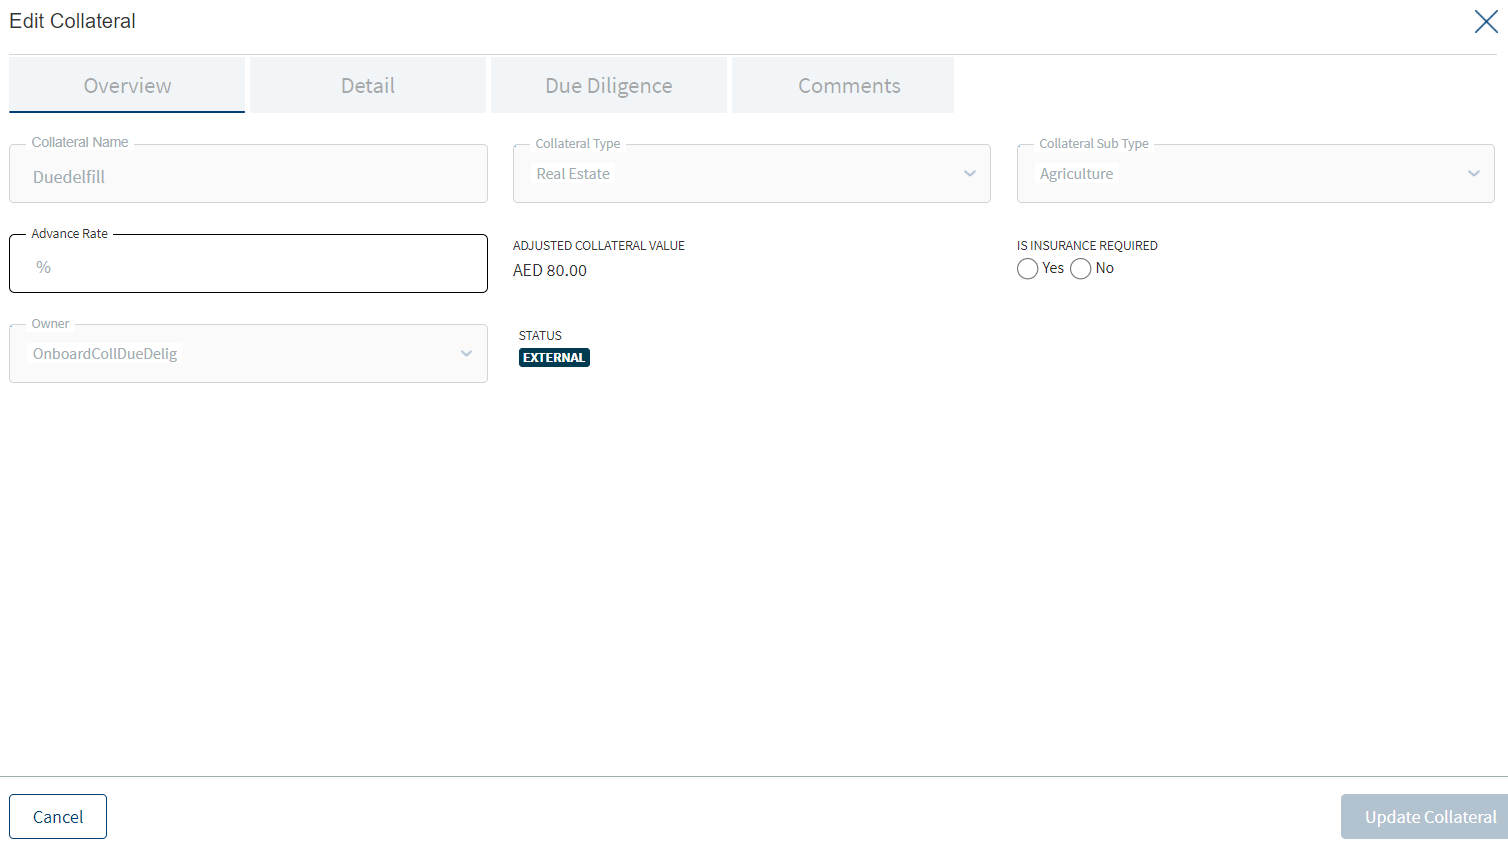
- In the Add New Collateral screen that appears, enter the Collateral Name.
- Select the Collateral Type from the list (for example - Real Estate).
- Select the Collateral Sub-Type from the list.
- Select the collateral Owner (party) from the list. The Owner field list will have the list of all members when a collateral group is selected.
- Select the Country where the collateral is located.
- Select the currency from the list (for example, USD). This field has predictive search where you can enter your option in the box and select the required option from the matching result rather than scroll down the list to select a currency.
- Enter the collateral Estimated Value.
- The application displays the list of facilities applicable to the request. Select the facility to apply for the collateral. You can apply the collateral to one, many, or all the facilities under the request.
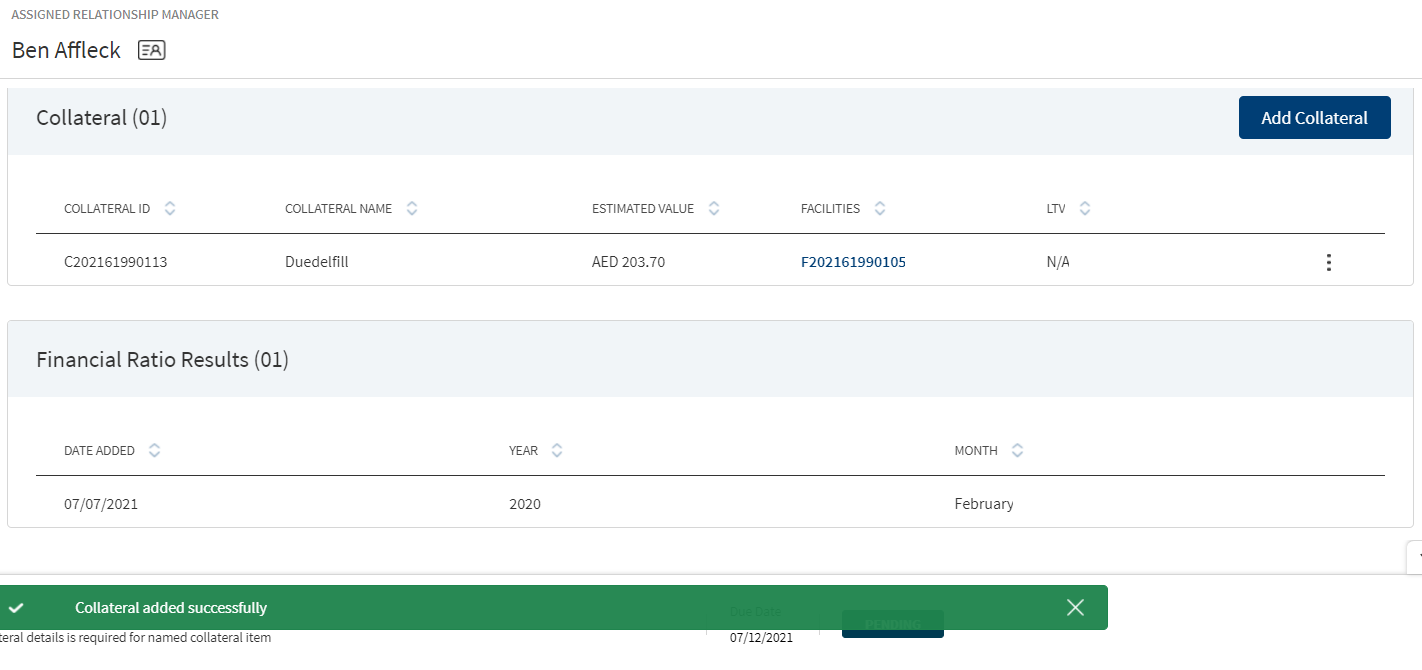
- Click Add Collateral.
- The application displays a confirmation message that the collateral is added successfully with the following details:
- Collateral ID
- Collateral Name
- Estimated Value
- Applies To
- LTV
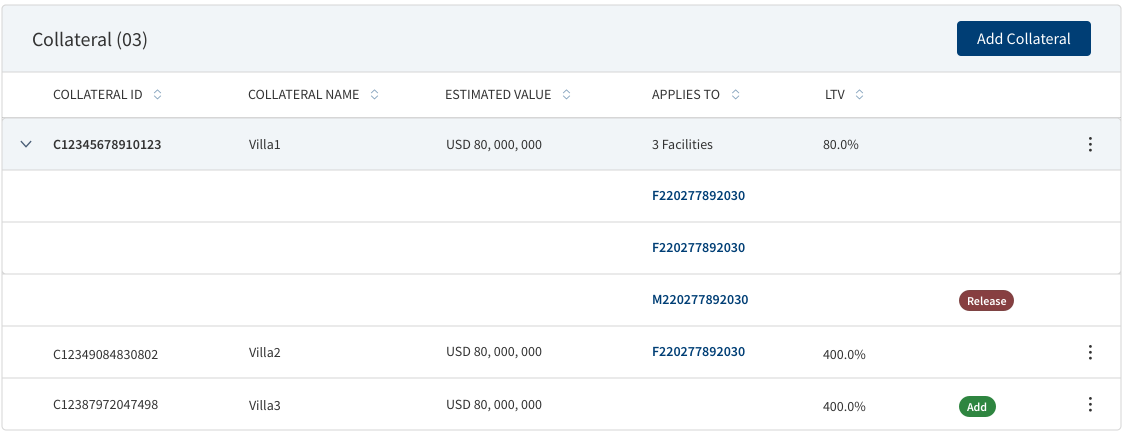
- The accordion view displays the details of all the facilities added in collateral summary screen. The Applies to column has sub rows, Title row has details for all other columns.
- Only the Title row has the Context Menu.
- By clicking the Title row, user can navigate to the view Collateral Screen.
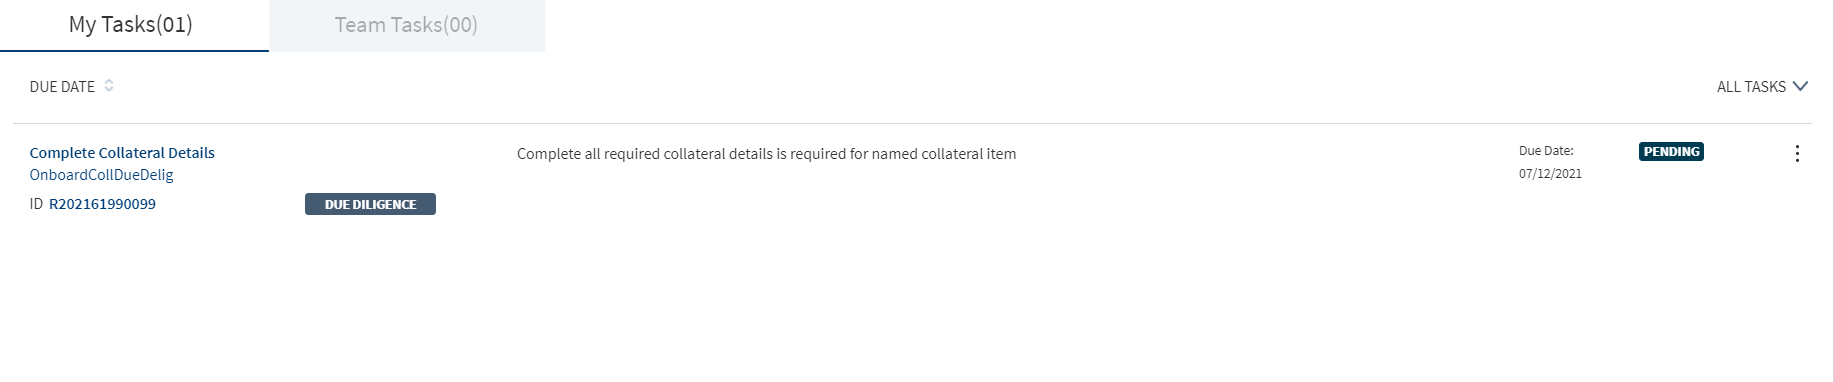
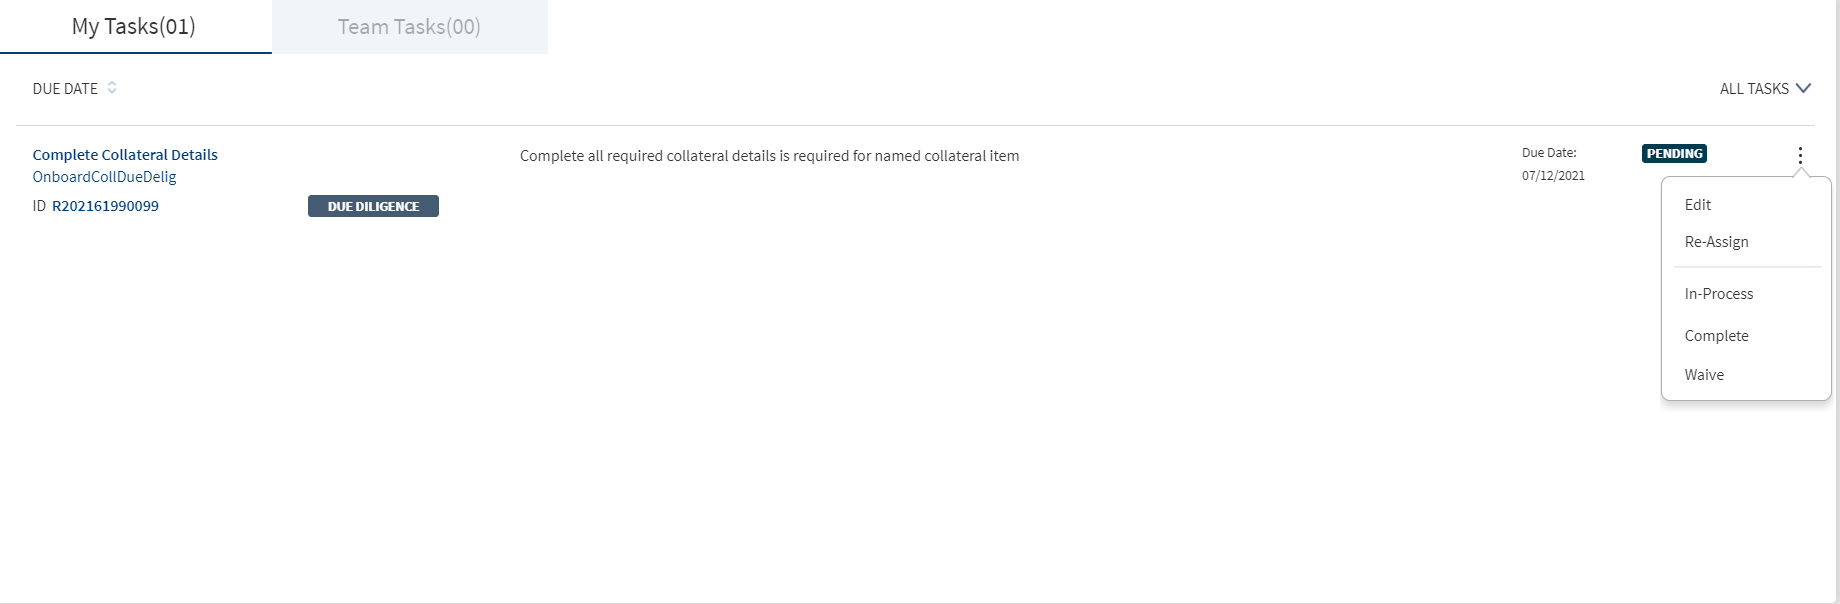
- After the request is complete, a manual task is created in Due Diligence stage. The responsible operations user to enter all the other mandatory details.
- When multiple facilities are tagged to a collateral, a task is generated in the Due Diligence stage of the facility. User can attend to the tasks in a sequential manner and can waive off or complete the similar or duplicate tasks.
- The generated tasks can be accessed from Entity Overview screen. Update the collateral by filling the mandatory and non-mandatory details.
- After the collateral is updated, the task can be closed.
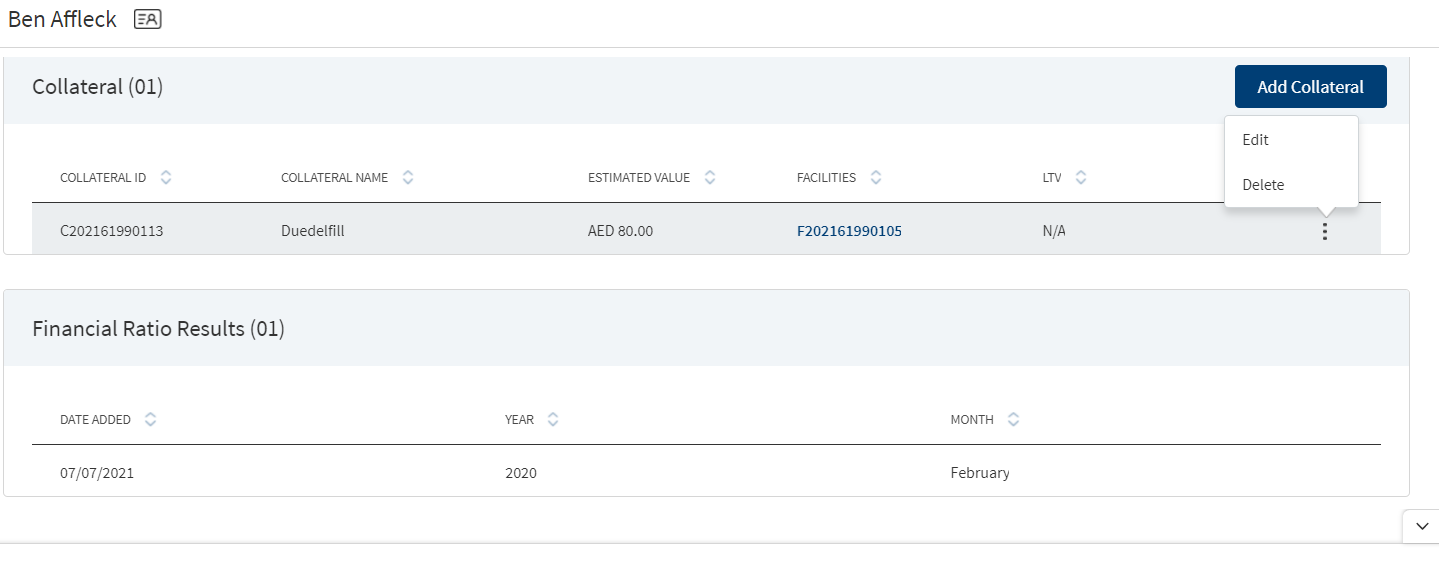
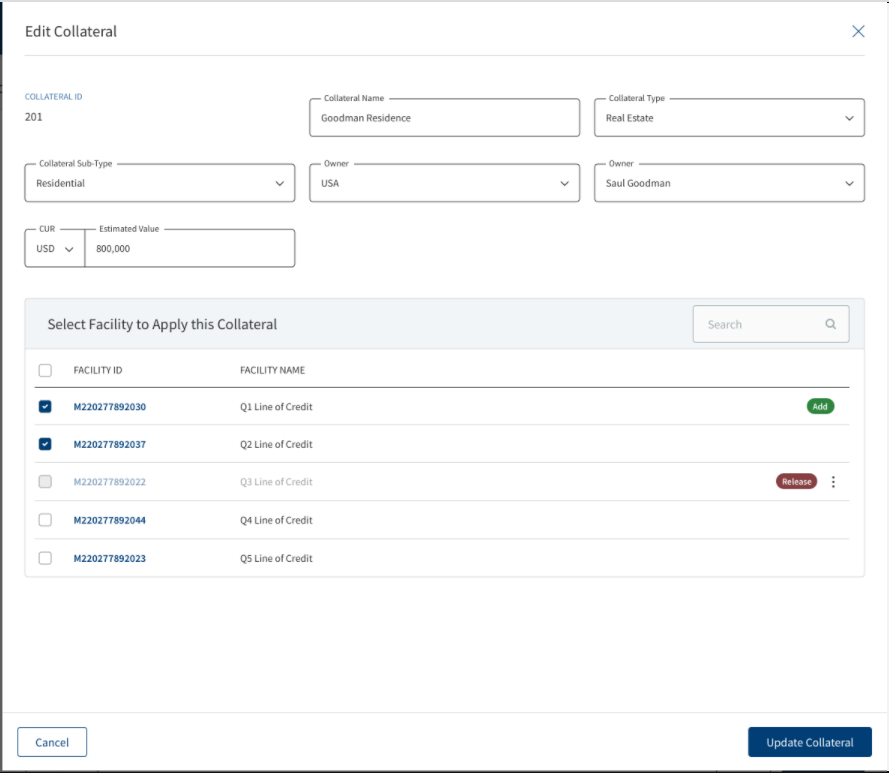
- Do any of the following:
- Click the row to view the details.
- On the context menu,
- Click Edit to modify the details.
- Only the linked facilities are editable for collateral received from Transact/core banking system.
- All the fields and linked facilities are editable for collateral created during onboarding process.
- Atleast one facility must be linked to a collateral.
- Click Delete to remove the record. On the confirmation pop-up that appears, click Yes to delete the record.
- Click Edit to modify the details.
The below Collateral information is specific to Mortgage journey.
Post submission in the Origination app, Collateral information in ODMS is mapped to data in LOS MS in Temenos Digital Assist as follows:
Collateral Screen Components: When Bank user clicks the Collateral Menu, Collateral screen displays the below options:
- Overview
- Value
- Details
- Documents
- Comments
Collateral Value:
Bank user must be able to view and update the data in Collateral Value Section. Collateral Values are mapped to Property Value filed in Origination App. Collateral Values have the following fields.
- Date: Date on which the Valuation is updated
- Currency amount: Valuation Amount with currency
- Source: Text field to update the source(Optional)
- Option to Upload Valuation document.
Collateral Overview:
Bank user must be able to view the Overview details of the collateral with the below fields which are mapped from the Origination App.
- Collateral Name: Optional Field to capture the Collateral Name.
- Collateral Type: Collateral Type is defaulted with Value Real Estate fetched from the Origination App.
- Collateral sub type: Collateral Sub Type is defaulted with Value, Residential fetched from the Origination App.
- Advance Rate: The value must be in percentage which accepts numerical values.
- Adjusted Collateral Value: This field will be Accepted mortgage amount calculated based on the % entered in Advance Rate field
- Property Cost: Market Value of the Property must be amount field defaulted from the Origination App.
- Source: Source indicates whether the collateral is created through Temenos Digital or was created in transact and retrieved. For mortgages Source will be Internal as the Collateral is created from Temenos Digital. Other Option can be External, when the collateral is retrieved from Transact.
- Status: Status Indicates whether the Collateral is linked to any facility or not. If the Collateral is linked to a facility, then it should be Active else it should Inactive. For mortgages as the Collateral is created from Temenos Digital it will be Inactive.
Collateral Details:
Bank user must be able to view the Collateral details with the below fields which are mapped from the Origination App.
- Property Type: Property Type must be a drop-down field with values Individual House, Flat/Apartment, Row House, Bungalow, Pent house. Mandatory Fields auto-populate from Origination App.
- Property Sub Type: Property Sub Type must be a drop-down field with values, Re-Sale, New. Mandatory Field auto- populates from Origination App.
- Furnished: Furnished values must be a drop-down field with values Fully furnished, Partially Furnished, Not Furnished. Mandatory Field auto-populates from Origination App.
- Property Age: Must be a date Picker Field. Mandatory Fields auto-populates from Origination App.
- Property Status: Must be a drop-down field with values Re-Sale, New. Mandatory Fields auto-populates from Origination App.
- Construction Completion Date: Must be Date picker field. Mandatory Field auto-populates from Origination App.
- Expected Construction Completion Date: Must be Date picker field. Mandatory Field auto-populatesd from Origination App.
- Property Usage: Property Usage field must be a drop-down field with values, Self-Occupancy, Investment. Mandatory Field auto-populates from Origination App.
- Plot Number: Plot Number field must be a alphanumeric field.
- Size(Sqft): Size field must be a numeric field accepting values with size in Sqft.
- No Of Floors: No of Floors should be a numeric field.
- Built-up Area(Sqft): Built-up Area must be a numeric field accepting values with size in Sqft.
- Seller Name: Must be a Text field able to enter the name of the property Seller
Documents:
Bank user must be able to add the Valuation related documents and the due diligence documents in the Documents section. Option to Add Next Valuation Date for Collateral.
- Date: System Date updated by the System
- Document Type: Drop-down field with the options Environment Report, Title Report, Flood Certification.
- Status - Drop-down field with options Pending, Completed, Failed.
Bank user must be able to upload Due Diligence report and add Multiple due diligence documents.
Comments:
Bank user must be able to Add comments and it should be stored in comments section. Apart from Comments, system must also store the Name of the User who updated the collateral details and also the date on which it was updated.
Storing Date in LOSMS:
System Administrator must be able to store the collateral related details updated in Temenos Digital Assist in LOS MS.
Adding New Collateral:
When the Collateral details are not updated by the customer in Origination App, then Bank user clicks Add Collateral button from the Entity Overview of main applicant only to update the Collateral details.
Amending Existing Collateral:
Bank User must be able to amend the existing Collateral details even if the Collateral details are already provided by the customer in Origination App. Bank User must be able to amend from the main applicant’s entity overview. Once the Bank user amends the collateral details, the user must be able to Save/Update the details amended. Bank User clicks the Edit button to amend the Collateral details from the Entity Overview.
Mapping Collateral to the respective Facility:
Bank user has the option to link the Collateral to the Facility. When the Collateral data is moved from client App to Temenos Digital Assist the Collateral must be already linked to the Facility for which it was captured.
Linking Collateral to Facility:
Bank user must be able to link the Collateral to the existing live Facility. System must filter the Facilities, where the customer is the Primary Applicant.
The following stages are opted out while filtering the Facilities:
- Complete
- Withdrawn
- Closing.
Bank user has the option to filter the facilities based on stages which is configurable by Bank.
When the collateral data moves from client App to Temenos Digital Assist, Collateral must already linked to parent Facility for which it was captured.
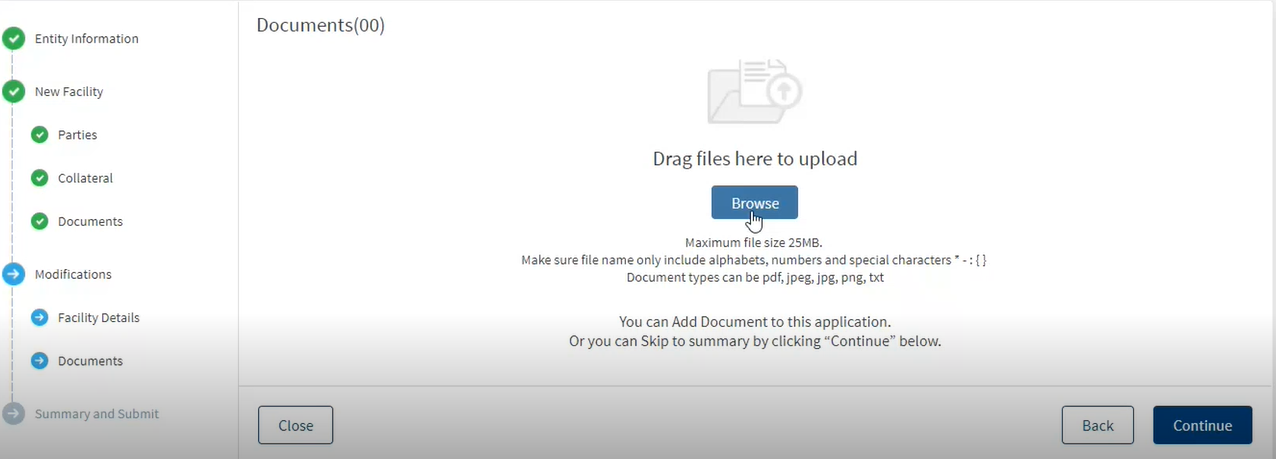
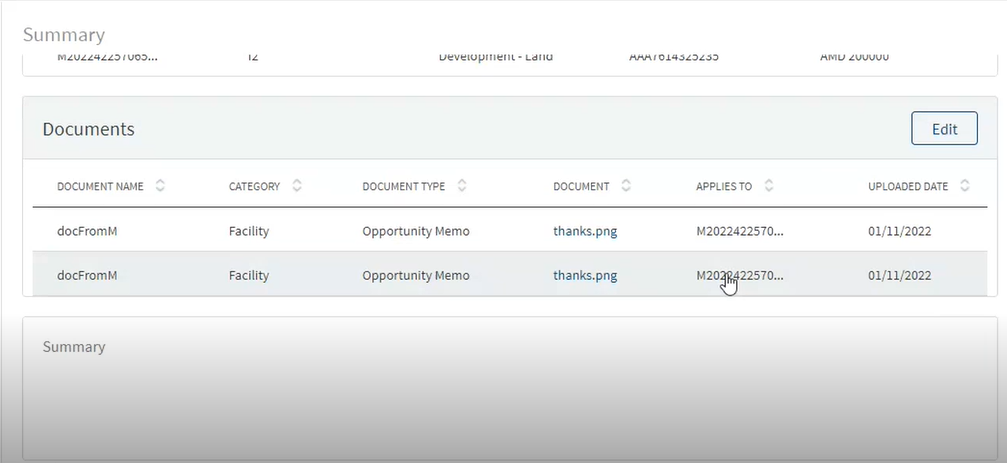
Documents
The application displays a screen to add documents to the request. By default, the list is empty. The documents can be evidence and finance related - proof of identity and address, balance sheet, cash flow statement among others. The RM can choose to add documents later and skip to summary and submit screen. The uploaded documents are stored in Document Microservice.
This section consists of two sub-sections:
Uploaded Documents - The Documents uploaded by Customer/Bank user.
System Generated Documents - The Documents generated by system.

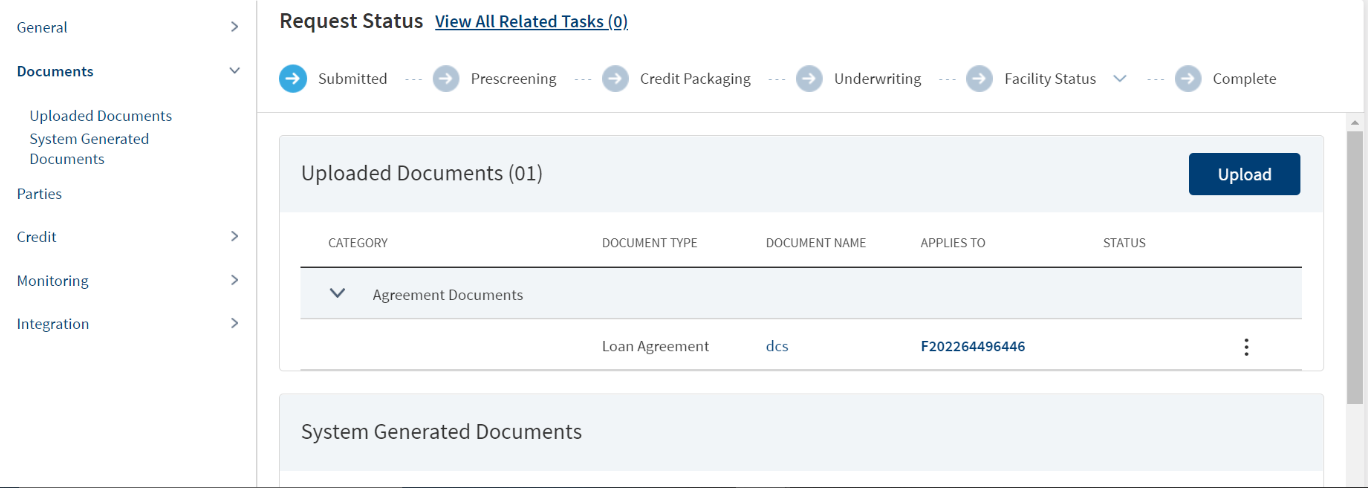
- The Upload button is available only under “Uploaded Document” sub section.
- In the Document section, the Bank user can add single/multiple documents as required.
- The documents are uploaded by choosing the category, document type, document name, status.
- The Applies to is by default the “Entity Name”.
- The “Linked To” field ,lists the active facility of the Entity. User can select single/multiple documents as per requirement.
- Linked to field is an optional field.
- The “Upload” option is available for the logged in user depending on the permissions of the role.
- Depending on the “Linked To” field , the documents uploaded in Entity Overview display in the Facility Overview and the checklist status is updated.
Do any one of the following:
- Add or upload a document.
- After adding the document details, click Upload Document.
- The application displays a confirmation message that the document is uploaded successfully.
- Click Continue to proceed to summary screen and submit the request.
- Click Continue directly without adding any document to proceed to the summary screen and submit the request.
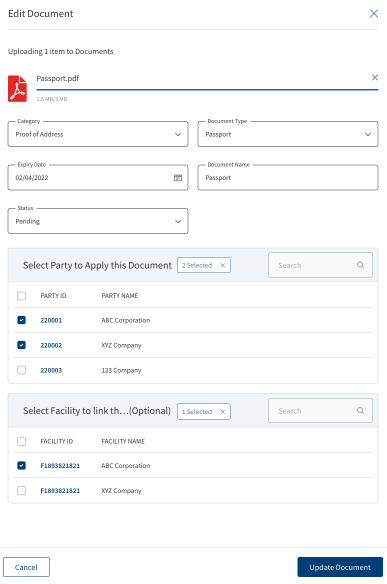
Add Document
To add or upload a document, follow these steps:
Until otherwise stated, information in all the fields are mandatory.
- Click Browse or drag files to add a document to the request. A screen to upload the document is displayed.
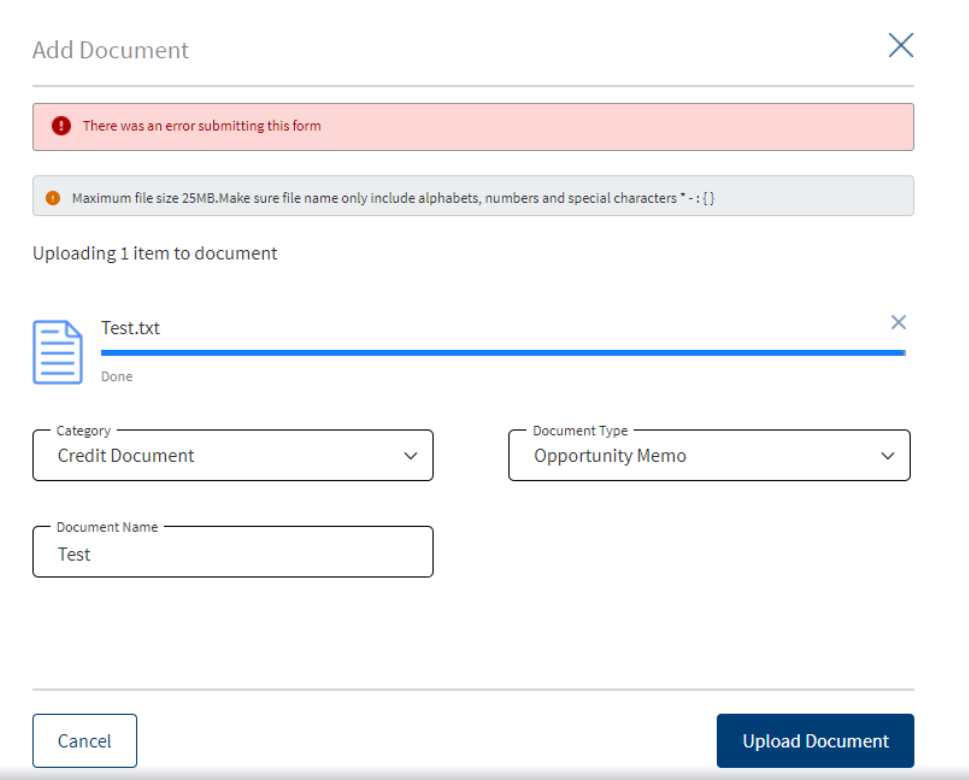
- Select the file to upload. The file name can contain alphanumeric characters and cannot contain spaces. The document types can be PDF, TXT, JPG, PNG, and JPEG. The maximum size allowed per document is 25 MB.
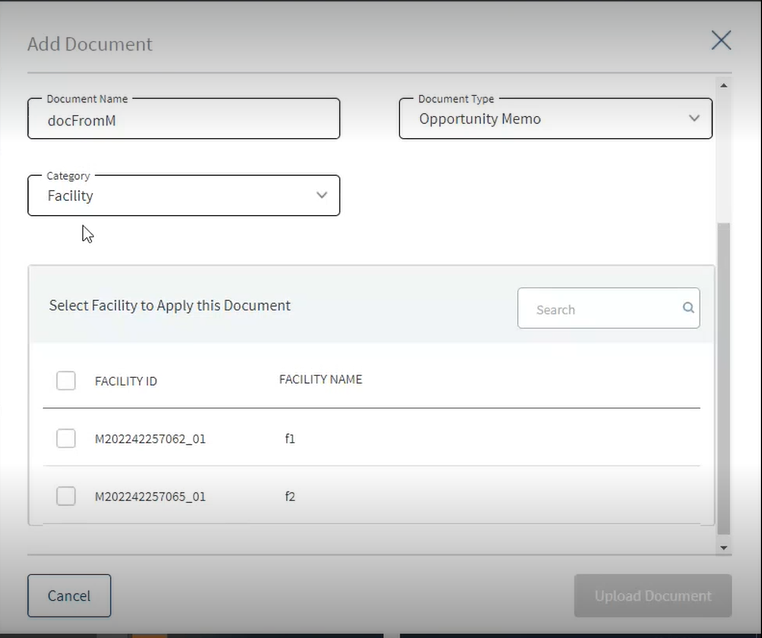
- The Add Document screen is displayed.
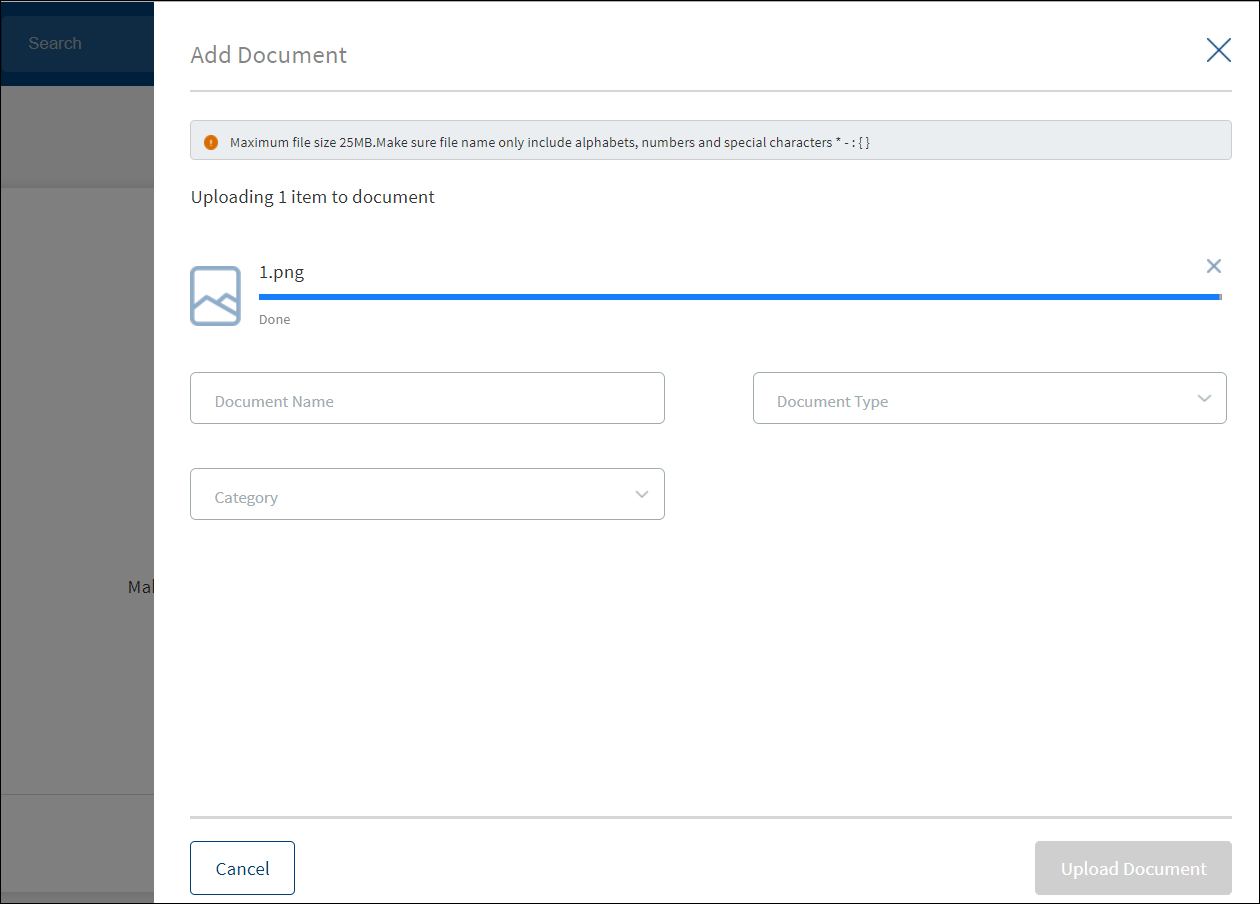
- Enter the Document Name.
- Select the Document Type.
- On selecting the category, the relevant document types display in the dropdown. Based on the selection of category, the Applies to section appears for the user to link the document.
- Document Category - Displays the document category - Facility, Entity, Request, or Collateral
- Document Type - Documents submitted before submission in the Origination app have the type as stored in Document MS. (They contain the information about type of document which has been uploaded during the origination)
- Document Name - The documents submitted before submission in the Origination app have the name File Information as given by the customer. If there is no File Information added, then the document name is added as file name.
- Linked To - This is a new field where the bank user will find which facility the particular document is linked to. If the same document is “Linked-To” more than 1 facility, all the facilities are listed by comma separation and if more documents are linked, it displays the number of facilities and by clicking on it we see the list of facilities. Based on the “Linked-To” field, the documents are displayed in the respective Facility overview.
- Status - Displays the status of the document in a different color depending on the status - Approved, Pending, Signed, Delivered, Reviewed or Rejected. All documents uploaded in the Origination app will be in Pending status.
- If an Entity related document is uploaded in the Entity Overview, Applies to display the entity by default and Link to displays Facilities linked to the entity, the document displays only in the Entity Overview.
- If the document is linked to a facility in the linked to section, it also displays in the Facility Overview. This document displays in the Request Overview of the request linked to the facilities.
- Facility level document categories do not display in the Entity Overview.
- If a Collateral related document is uploaded in Entity Overview, the system displays the applies to section, where the Collaterals linked to entity are selected, the linked to field displays all the active facilities of the Entity.
- If the document is linked to a facility in the linked to section, it also displays in the Facility Overview. This document displays in the Request Overview of the request linked to the facilities.
- Request related document category do not display here.
- The below attached table consists the document categories and types for the user to select from the drop down whenever they try to upload a document.
-
SL No Document Category LOB Documents Applies To System Generated (Y/N) 1 SME Onboarding. SME Lending Community Interest Company (CIC) Registration Certificate N Tax ID Entity Charitable Incorporated Organization (CIO) Registration Certificate N Tax ID C-Corporation Registration Certificate N Tax ID Articles of Incorporation S-Corporation Registration Certificate N Tax ID Articles of Incorporation Limited Liability Company (LLC) Registration Certificate N Proof of Business Tax ID Articles of Incorporation Limited Liability Partnership (LLP) Registration Certificate N Partnership Agreement Tax ID Limited Liability Limited Partnership (LLLP) Registration Certificate N Partnership Agreement Tax ID Limited Partnership (LP) Registration Certificate N Partnership Agreement Tax ID General Partnership Registration Certificate N Partnership Agreement Tax ID Private Limited Company Registration Certificate N Articles of Association Memorandum of Association Tax ID Professional Limited Liability Company (PLLC) Registration Certificate N Tax ID Articles of Incorporation Public Limited Company Registration Certificate N Articles of Association Memorandum of Association Tax ID Sole Proprietorship Registration Certificate N Tax ID Trust Registration Certificate N Trust Agreement Tax ID Unlimited Company Registration Certificate N Tax ID Articles of Incorporation Proof of Signing Authority SME Onboarding. SME Lending, Signing Authority Entity N Integration Reports SME Lending,Retail Lending Consumer Bureau Report Entity N Business Bureau Report 2 Loan Specific Documents -Vehicle loan ( then name to be displayed in the Document Category is “Vehicle Loan”) SME Lending, Retail Lending Vehicle Loan Proforma Invoice Facility N Insurance Quotation 3 Proof of Address- Business SME Onboarding,SME Lending Registration Certificate Entity N Factory establishment Certificate Shop establishment Certificate Trade License Certificate Utility bills 4 Proof of Identity Retail Onboarding, Retail Lending , SME Onboarding ,SME Lending National ID Entity N Tax ID Driving License Passport Employee ID Government ID 5 Proof of Address- Individual Retail Onboarding, Retail Lending , SME Onboarding ,SME Lending Driving License Entity N Passport Utility Bills Employer/HR letter House Rent Contract 6 Proof of Income SME Lending, Retail Lending Pay-slips Entity N Tax Return Statements Salary Account statements Account Statements 7 Financial Statement SME Lending Financial Statements Entity N Tax return statements Balance Sheet Profit & Loss Statement Cash flow statement Spreading Report 9 Agreement Documents SME Lending,Retail Lending Offer Letter Facility Y Loan Agreement Terms Sheet Security Agreement Guaranty Agreement Collateral Agreement Lien Registration Closing Fees/ Settlement Invoice Revolving Line Agreement Line of Credit Agreement Business Overdraft Agreement Irrevocable Letter of Credit Letter of Guarantee Modification Agreement Collateral Documents SME Lending, Retail Lending Appraisal/Valuation Collateral N Account statement Insurance certificate Instrument Environmental Flood Stock power Credit Document SME Lending Credit Memo Request Y Opportunity Memo Required Disclosures Updated Opportunity Memo - The application displays the list depending on the selected document category. Select the category to apply to the document. The selection can be one, many, or all.
- If the category is proof of business and document type is tax id, then all the linked parties of the new purpose display in the list.
- If the collateral document is selected as a category and Appraisal/validation is the document type, then all the linked collaterals for the new purpose display in the list.
- If the Agreement document is selected as a category and the Terms sheet is document type, then all the linked facilities for the new purpose display in the list.
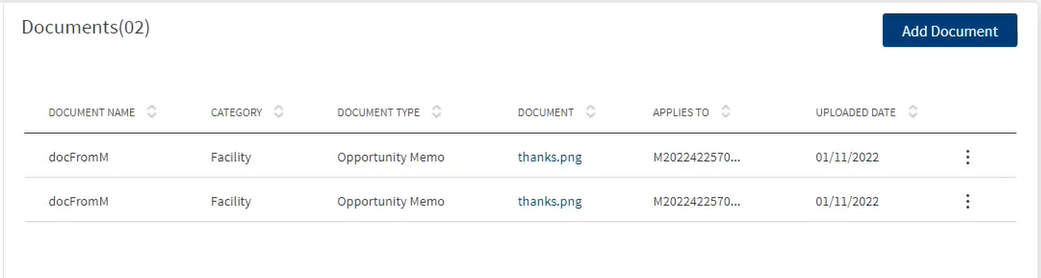
- Click Upload Document. The button is enabled only after all the fields are filled. The application displays a confirmation message that the document is uploaded successfully.
- The document is added to the list with the following details: Document Name, Category, Document Type, Document file name, Applies To which category, and Uploaded Date.
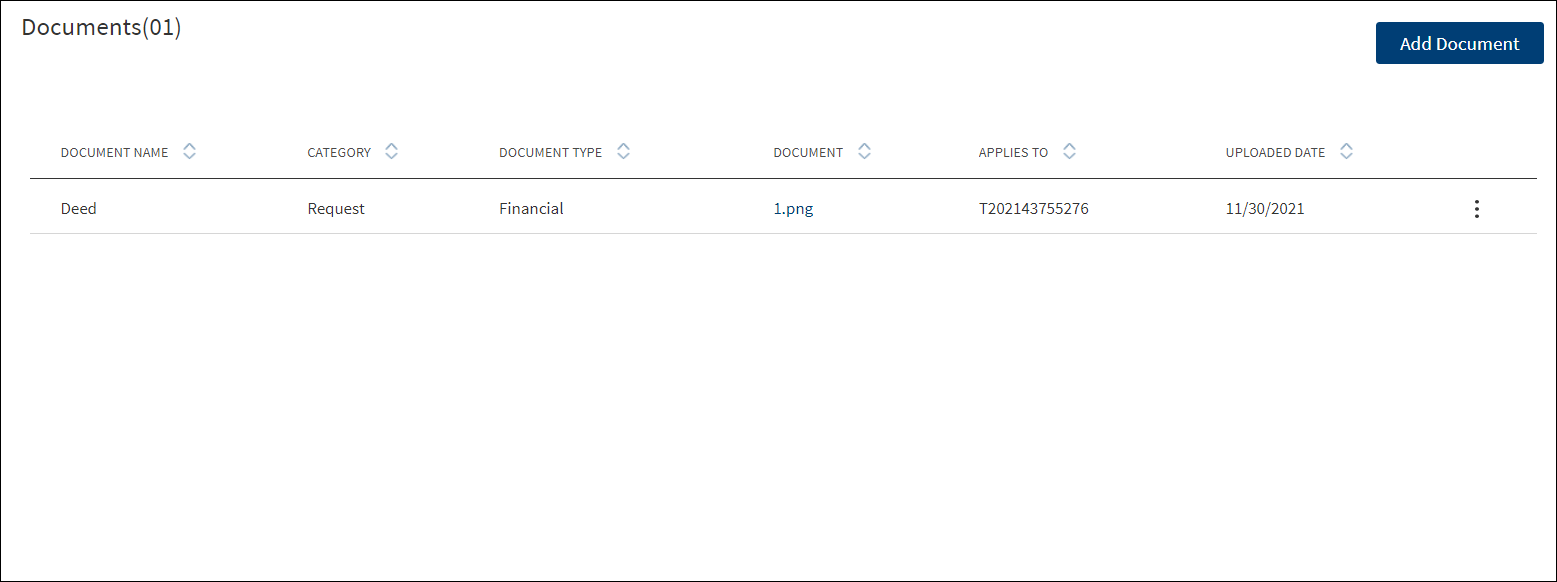
- The ID under the Applies To field can be:
- Request ID: A temporary Request ID is displayed till the application is submitted.
- Facility ID: A temporary Facility ID is displayed till the application is submitted.
- Entity ID: In case new Entity is added, then Temporary ID is displayed until the application is submitted.
- Collateral ID: In case new Collateral is added, then Temporary ID is displayed.
The uploaded documents in on-boarding display in the uploaded document section in the Entity Overview /Request Overview /Facility Overview. The status of the uploaded document in on-boarding remains pending by default in the EO/FO/RO and if the expiry date is not entered during onboarding it remains blank however when edited it changes as a mandatory field.
- If a related entity document is uploaded in on-boarding, the document displays in the Entity Overview, Request Overview and the Facility Overview of the facilities tagged to this entity in the request.
- If a related facility document is uploaded in on-boarding, the document displays in the Request and Facility overview.
- If a related collateral document is uploaded in on-boarding, the document displays in the owner’s Entity overview , Request Overview and the Facility overview of the facilities tagged to the collateral in the request.
- If a related request document is uploaded in on-boarding, it displays in the Request overview- uploaded document section.
Context Menu
Do any of the following as required:
- Click the document file name to download the document.
- On the context menu,
- Click Edit to modify the details.
- The Delete option is enabled only for the documents in pending status.
- When the document is deleted, it is removed from the Entity , Request and Facility Overview.
- Click Delete to remove the document. On the confirmation pop-up that appears, click Yes to delete the document.
- The Delete option for the logged in user depends on the permissions of the role.
- Only the Document Name can be edited.
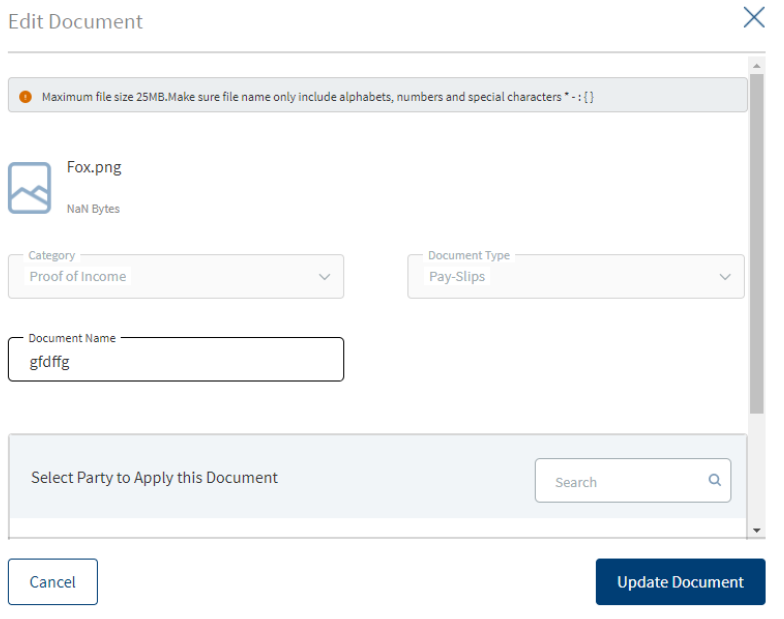
- Make the changes as required.
- Click Update Document to save the details.
- The application displays a confirmation message that the document details are updated successfully.
- The User can Edit the uploaded documents in the Uploaded Document Section.
- Status - Pending and Signed, Linked To are the editable fields.
- The Edit option for the logged in user depends on the permissions of the role.
The documents uploaded by the Customer / bank user or generated by the system, bank user in the Document Section can be viewed by clicking the View Document option. The uploaded Adoc Documents can also be viewed in this section.
The Document Category with an accordion view displays : Document Type, Document Name, Applies to, Status.
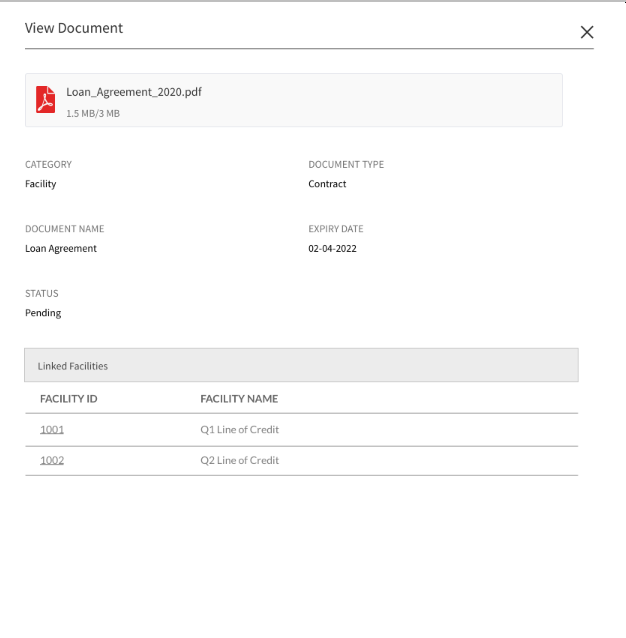
When clicked on the documents in the row the following fields display:
- Document Category
- Document Type
- Actual Document
- Document Name
- Applies To
- Linked To
- Document Expiry date
The view option for the logged in user depends on the permissions of the role.
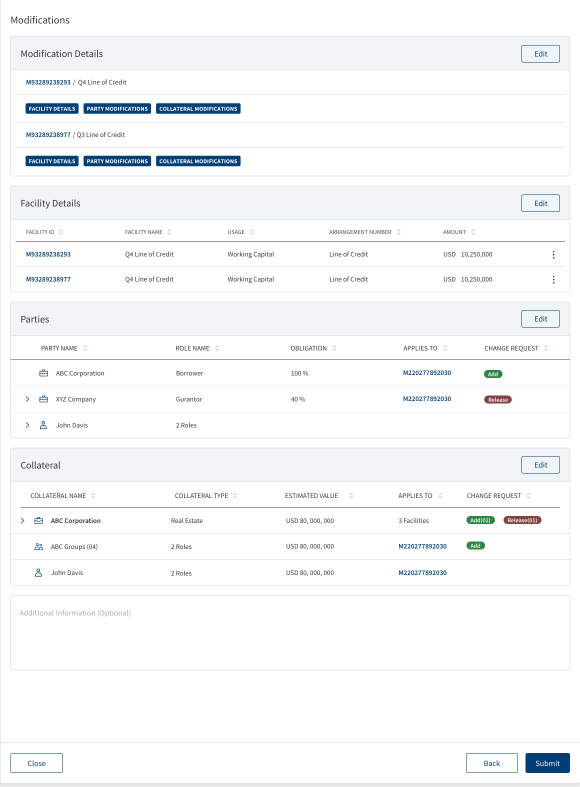
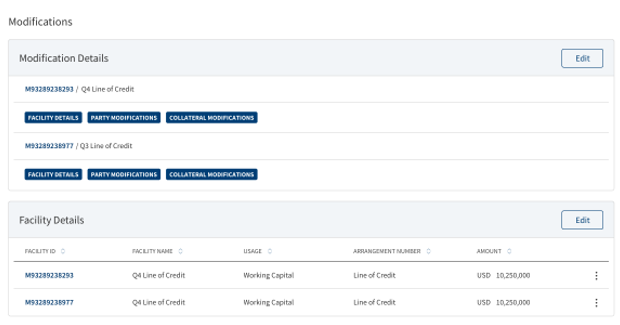
Modifications
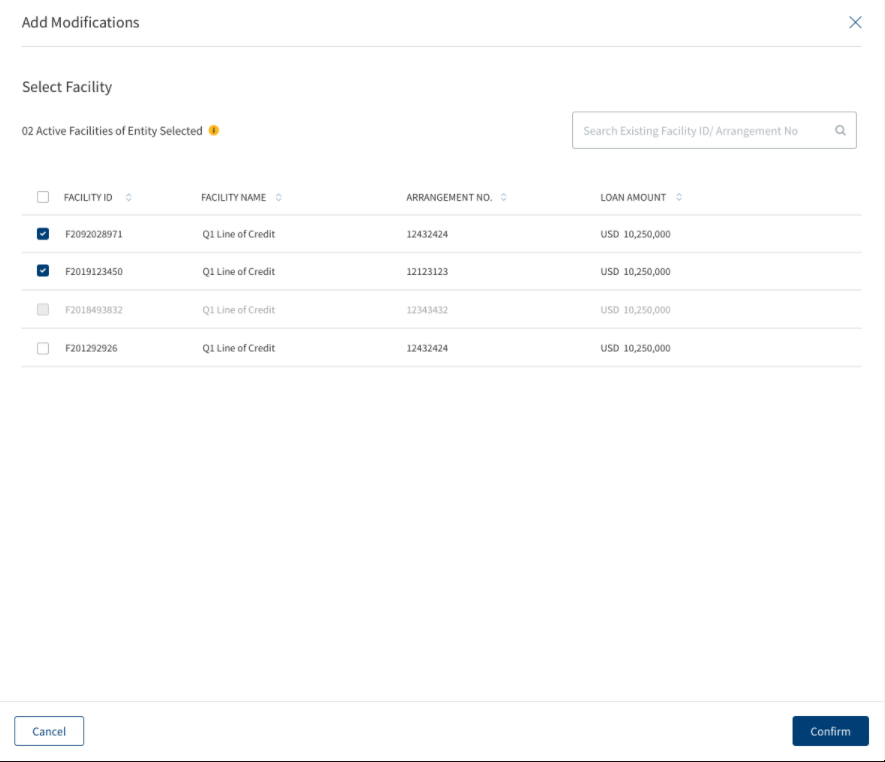
The application displays a screen to make modifications to the request. The modification option is available only if the purpose is selected as modification in the purpose screen. Click Add modification to view the list of facilities that are associated with the entity borrower or co-borrower that was selected earlier. If the facility status is withdrawn or if the approval status is denied or auto-denied, only the active facility ID is considered. The facility that is in a draft status or an incomplete status is considered as an Inflight facility.
Modification can be implemented to an existing Facility only if the task work-flow is processed until the Completed stage.


This screen consists of the following fields:
- Facility ID
- Facility Name
- Arrangement Number
- Amount
Add Modifications:
After clicking the Add Modification option, the list of all active facilities that are associated to the selected entity are displayed. For an Inflight facility(draft or incomplete status), the rows are disabled and display as the Request as in progress associated to the current Request ID. Modification has dynamic subsections based on the selected modification type.
Multiple modification types can be selected for every facility .You can view a list of modification types for every facility that was selected in the previous screen with a check box against every modification type.

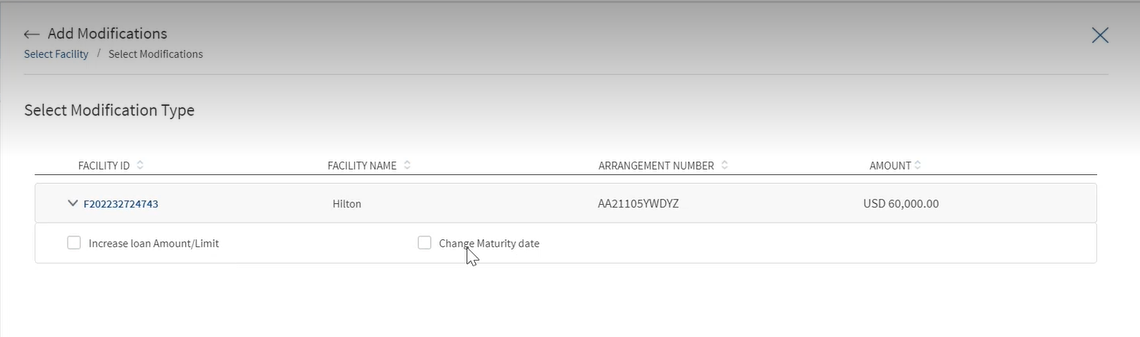
- Select the Modification Types
- Increase Loan Amount/Limit
- Change Maturity Date
- Party Modification
- Collateral Modifications
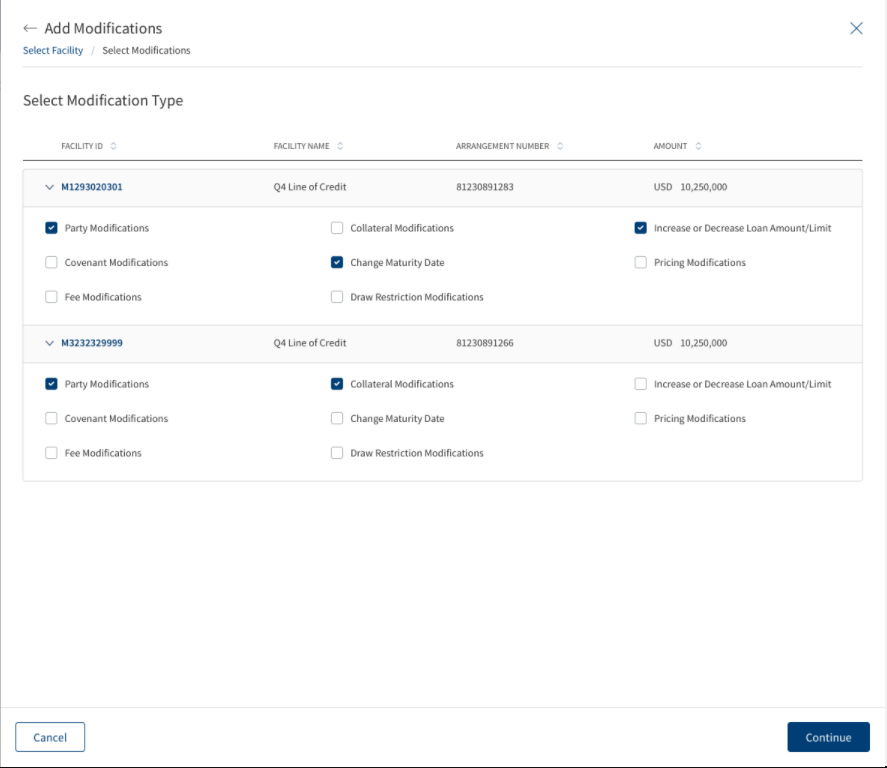

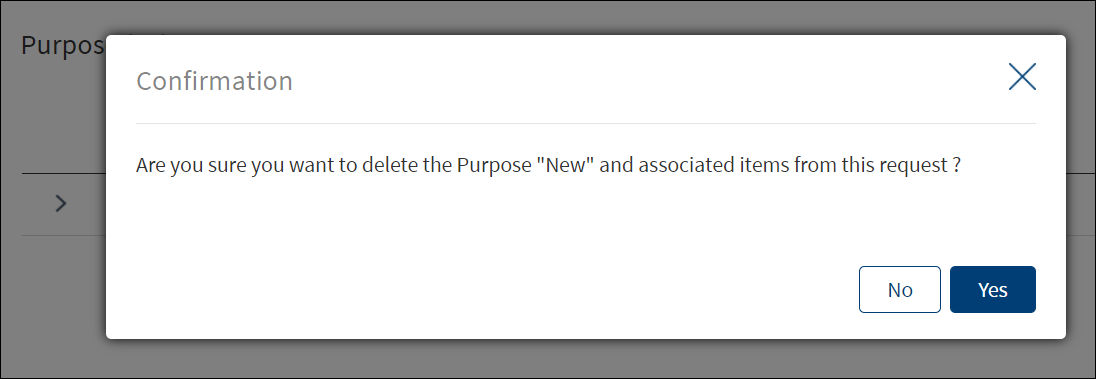
When the Add modification button is clicked, a New ID is generated after selection of the facility and the modification type. The Modification ID suffix is always based on the previous version ID of the Facility. An Extension is added to display the modification number. The Modified Facility ID starts with letter 'M' followed by the previous version ID of the Facility and the number of times modification was done to the particular facility(eg: M202232724743_01). The withdrawn and declined facilities are also considered for the Modification ID suffix.This screen also displays the Context Menu, User can delete any particular line item by clicking on the delete option which displays a confirmation popup - ‘Are you sure you want to unselect this facility for modification?'. If a line item is deleted, Modifications done as part of that facility is reverted (i.e,) loan amount, maturity date, party and collateral modifications done as party for the particular Facility.
User cannot view a Group party in the Modification (Parties Screen), In a non group Modification Request in Modifications - On boarding - Parties screen - Add party screen - Group parties are not listed for selection. If a group is selected as primary borrower, the purpose modification does not display.
View Facility
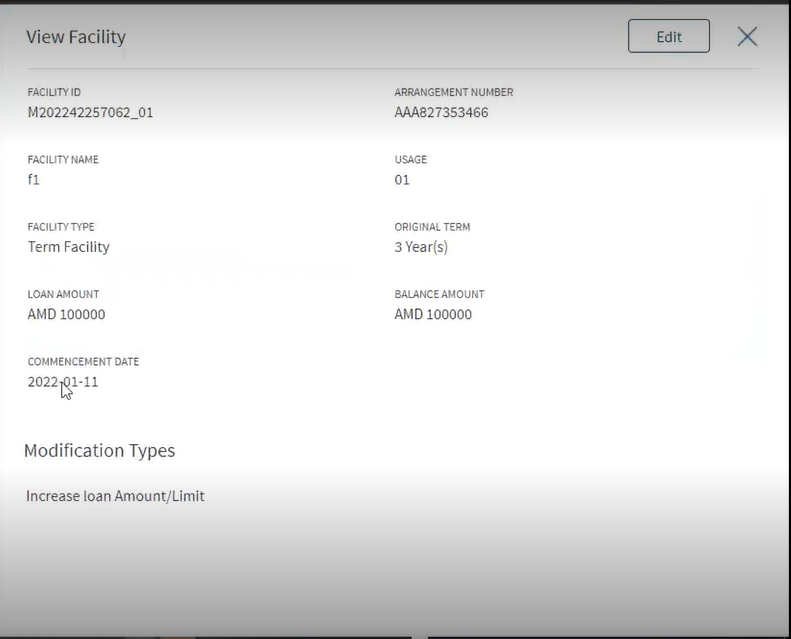
When you click the Modification ID, it displays the following fields on the facility screen.
- Facility ID
- Facility Name
- Arrangement Number
- Usage
- Facility Type
- Original Term
- Loan Amount
- Balance Amount
- Commencement Date
- Modification Types
Click Continue to proceed to the Facility Details screen.
Facility Details :
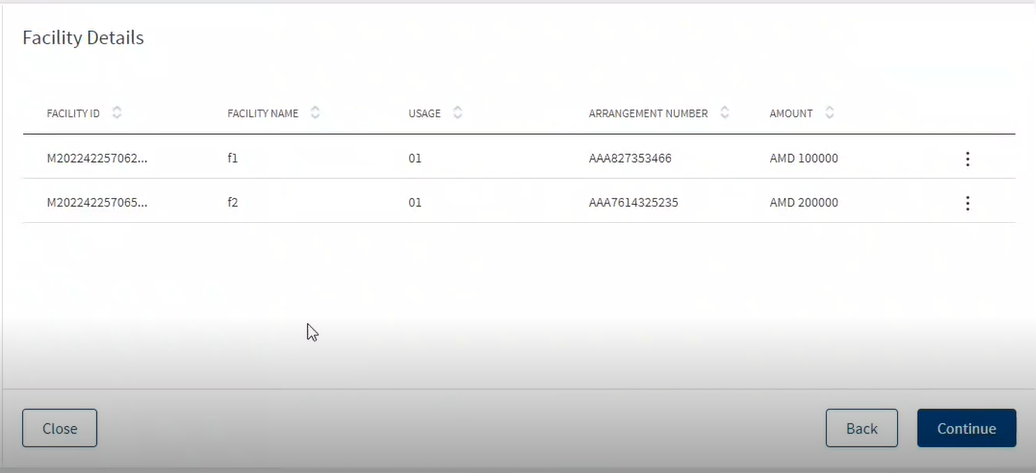
When you click the Facility Details , it displays the following fields.
- Title
- Previous Limits
- Modification
- New Values
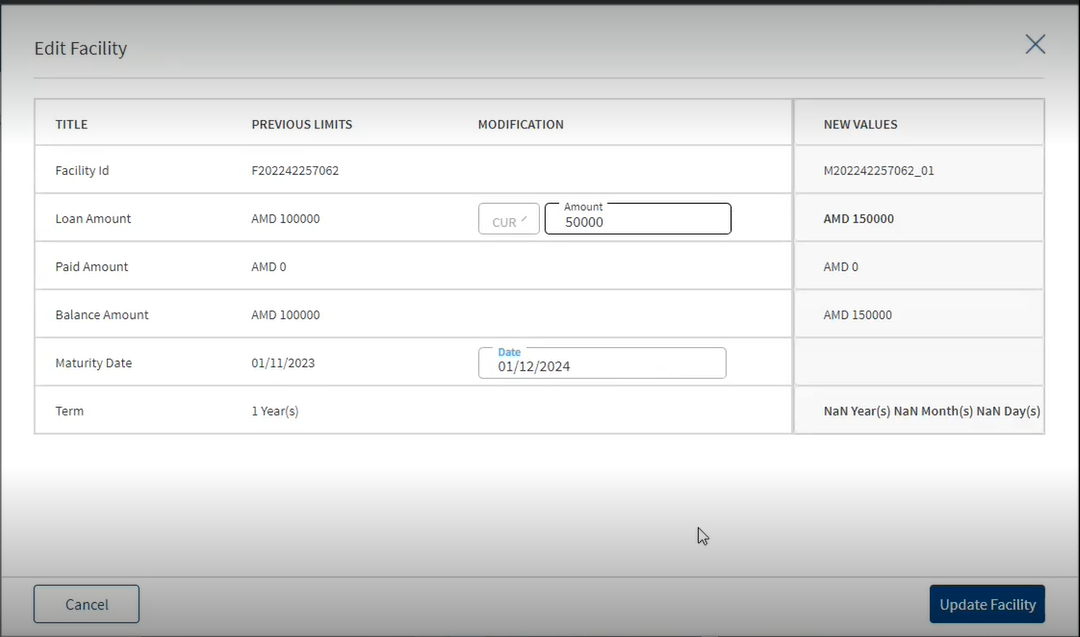
On the facility list screen, from the context menu, click Edit.
On the Edit Facility Screen when you click edit option, the previously opted options for the modification (eg:Loan Amount and Maturity Date) can be edited in the Modification section. When you click Update, the modified is field displayed in the Facility Details screen.
Click Continue option to proceed to the dynamic subsections based on the selected modification type. Every Sub-section has an Add option and an Edit option to make necessary changes.
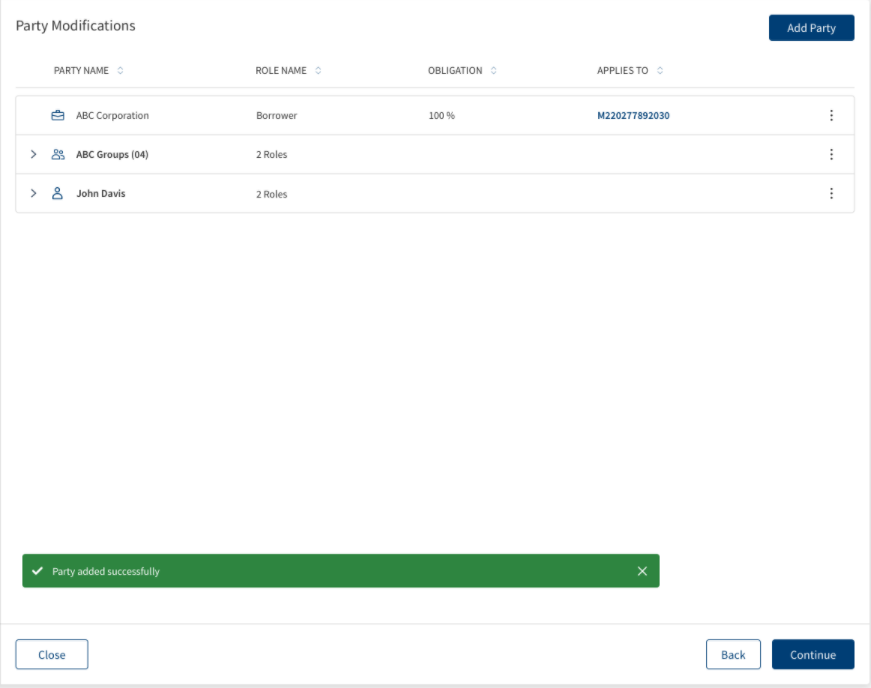
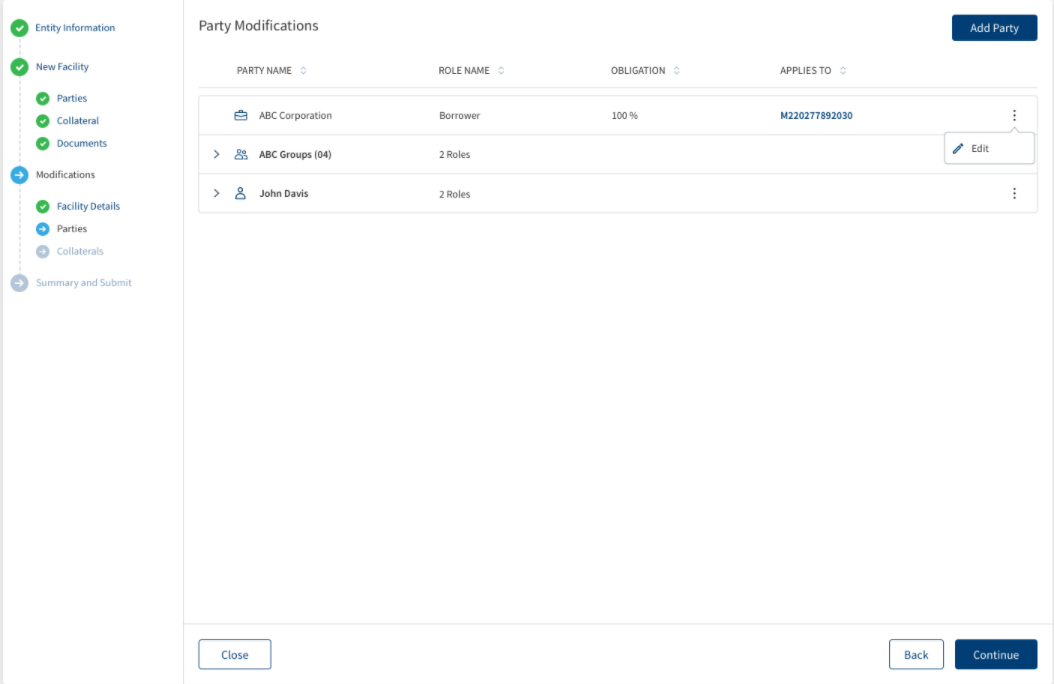
All the Parties related to the existing facility is displayed in the Parties screen and a modification request for the party can be done here.
This section consists of the following fields:
- Party Name
- Role Name
- Obligation
- Applies To
If Modification is requested for existing facility, all the parties linked to the facility (Borrower, co-Borrower, Guarantor, pledgor of collateral etc., of the selected facility)are prepopulated in the party screen. The newly generated ID for the existing facilities in applies to column is displayed, The existing facility is displayed as prefix m, current year and suffix _01,02.
Click ADD Party to add a new Party and follow the steps in the link. If modifications must be made to the existing Party, click the party name from the Party List. Click Edit and make the necessary changes, once all the changes are made, click Update to update all the changes. The Party can be deleted using the Delete option.
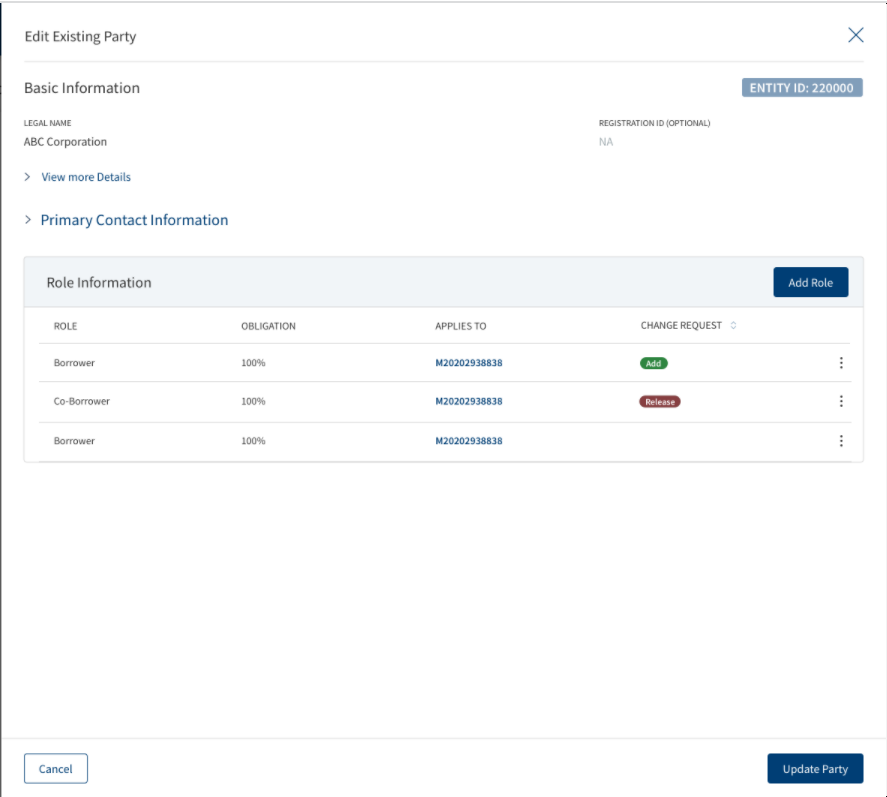
User can add new roles by clicking the Add Role button, After the Role is added the Add request icon displays. User can view the change request indication along with currently available columns in role information section, the Context menu is also displayed to all the new added roles.User cannot add multiple roles of the same party with the same facility.
- A party cannot be added as a borrower and co-borrower for the same facility.
- If a Facility already has a role prepopulated (or) a Role addition is requested, User cannot select a Facility in Applies to section, it displays a prompt stating ‘Party applied already'.
- A party can play only one role for a facility:
- If the party already has a Role linked with the existing facility(prepopulated) , User clicks on add role button and navigates to add role screen, selects same role (or) different role in the role drop down then the check box for the facility does not display only the Help text displays.
2. Only One Role addition of a party can be requested for an existing facility:
- If a role addition of the party is already requested for an existing facility, User clicks on add role button for the same party and navigates to add role screen, selects same role (or) different role in the role drop down then the check box for the facility does not display only the Help text displays.
3. Once the prepopulated role is release requested, Another Role addition can be requested:
- If a Role release of the party is already requested for an existing facility, User Clicks on add role button for the same party and navigates to add role screen, selects same role (or) different role in the role drop down then the check box for the facility is enabled.
The Role can be deleted using the Delete option. Clicking the Edit option navigates user to the Edit Role section. Once the user completes the addition/deletion and navigates to the previous screen by clicking on Add Party button, the Add Collateral request icon indication displays in the Summary view to the corresponding Party Facilities. User can click cancel and navigate away from the screen by clicking on the confirmation pop-up.
On the Add Party Role page, Select facility to apply this party Section displays, where the check boxes can be selected as per the requirement. If User selects the existing Facility in the Applies To section and navigates to the previous screen by clicking Add Role button the Add Request icon appears in the Role information section. This is same for Add role screen and Edit role screen when navigated from Add new party,Add existing party,Edit Party,Edit Existing Party.
A user can add only one borrower to a facility. If a Borrower is already added to the existing facility and the user navigates to the Add/Edit party screen of another party, clicks on the Add Role button and in the add role screen selects the Borrower dropdown then the check box for the particular facility will be disabled.
If the User clicks on Edit option in contextual menu for the particular facility where different role is linked to the facility, the Borrower role does not display in the drop down list.
The Edit and Delete option do not display for the Prepopulated Roles. The Release Option is applicable for all the roles except for Borrower. The Context menu is displayed for Borrower. If the Release option is selected, the Retain option is displayed to reverse the release request. By clicking the Retain option, the Release requested icon indication is removed and release option appears again. Once the user completes the selection and navigates to the parties screen by clicking on done, all the addition request and release request Icon indication reflected in Summary.
The User views a warning message in parties screen, if a collateral is linked to the facility and the user requests for release of the related party.
- If a collateral is linked to the facility and User has requested for release of the associated party in Parties screen, however the User has not requested for addition of the same party with Any other role of the same facility then a warning message is displayed in the Parties screen.
- If a collateral is linked to the facility and User has requested for release of the associated party in Parties screen, however the User has requested for addition of the same party with Any other role of the same facility then a warning message is displayed in the Parties screen.
A Warning is triggered once the user clicks add party to done button in Add/Edit party screens.
Warning Message : A collateral ‘Collateral name’ linked to the facility ‘xxxx’. if you wish to release the Party ‘Party Name’ from the facility ‘xxxx’, Kindly request for the Collateral Release (or) add the party with a different role for the same facility.
Click Cancel to navigate away from the page.
All the Parties linked to Modification facilities display along with the icon indication in the Party section. The Add/Release icon indication is viewed in the sub rows in Party summary as per the request.
If clicked on the sub rows , the Modification View Party screen displays, which also consists of icon indication and role information section.
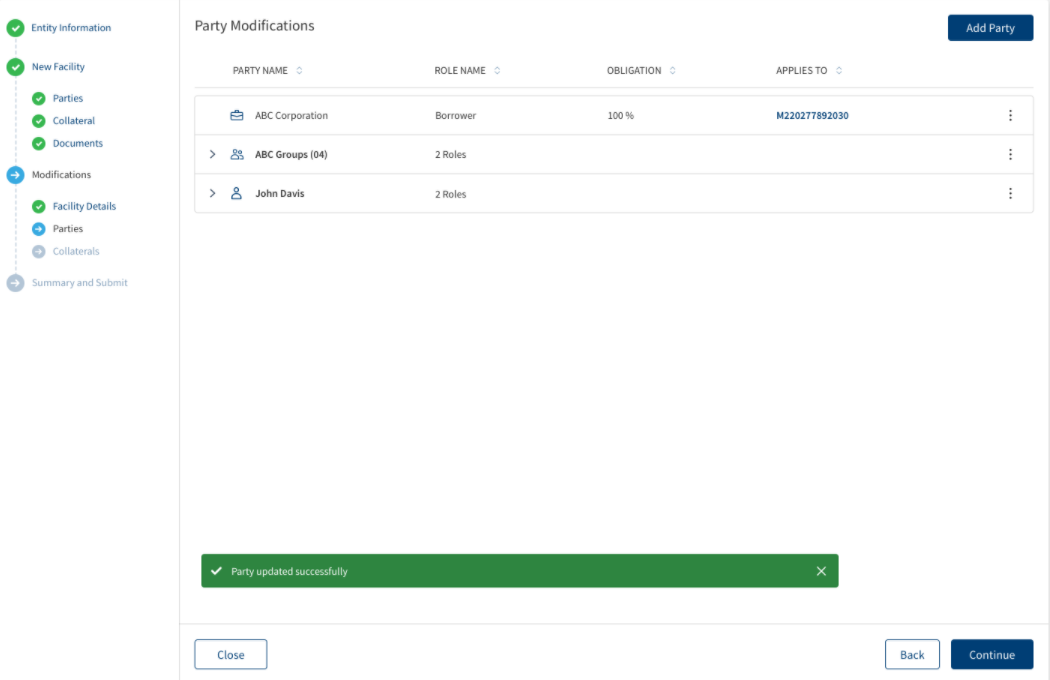
Only the Party Modification requests are recorded in this screen, the actual Modification does not happen until approved by the Underwriter.
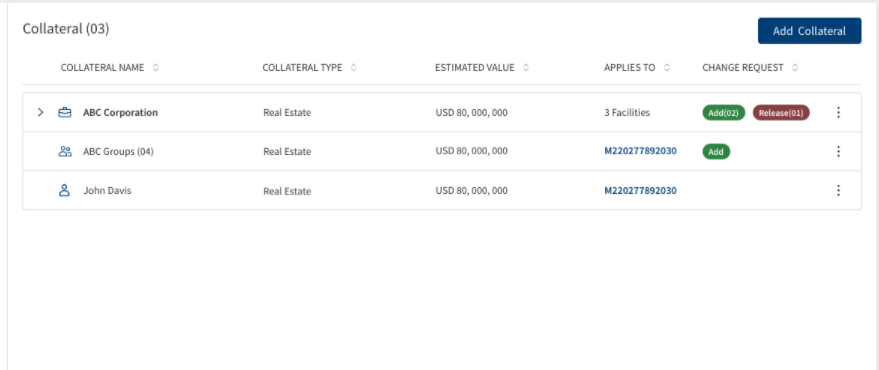


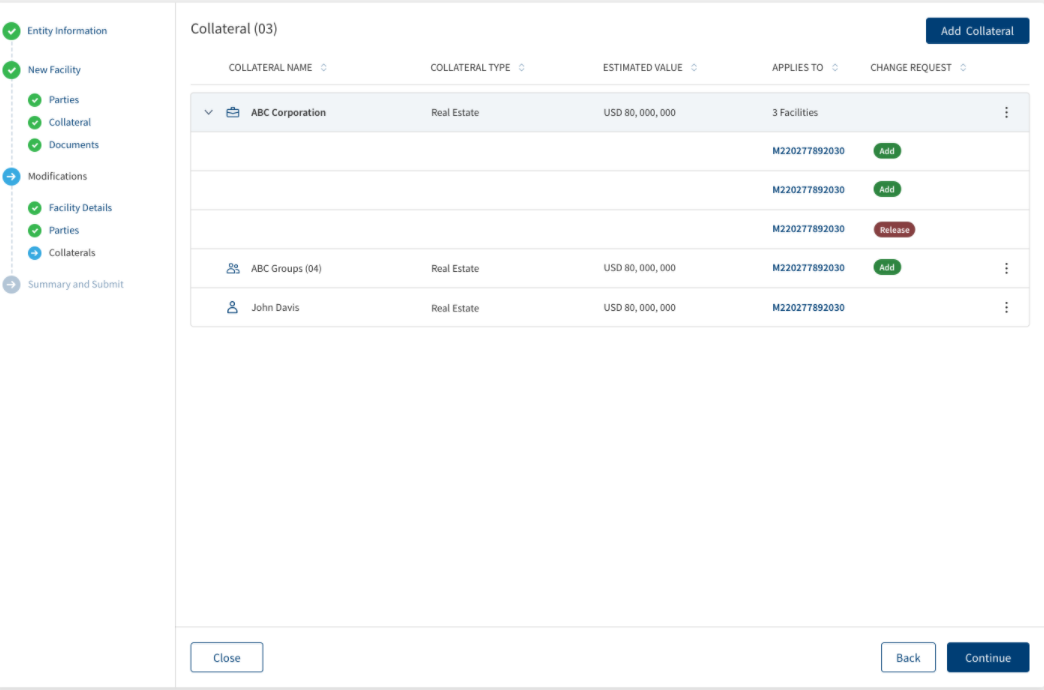
All the Collaterals related to the existing facility is displayed in the Collateral screen and a modification request for the Collateral can be done here.
This section consists of the following fields:
- Collateral Name
- Collateral Type
- Estimated value
- Applies to
- Change Request
If Modification is requested for existing facility, all the Collaterals linked to the facility are prepopulated in the Collateral screen. The newly generated ID for the existing facilities in applies to column is displayed, The existing facility is displayed as prefix m, current year and suffix _01,02.
The accordion view displays the Collateral details of the multiple Facilities linked to it, It shows only the Applies To Column in the sub rows. Only the Title Row displays the details of the other Columns.
ADD Collateral :
Click ADD Collateral to add a new Collateral and follow the steps in the link. If modification must be made to the existing Collateral , click on the Collateral name from the Collateral List. While adding a new collateral, the Owner drop down displays all the parties related to all the existing facilities selected for modification. On the Add Collateral page, Select facility to apply this collateral Section displays, where the check boxes can be selected as per the requirement. If User selects the existing Facility in this section, a new change request indication along with currently available columns in this section display , the Add Request icon appears. In case the User does not select the check box to reverse the addition, the Add request icon indication does not appear. Once the user completes the selection and navigates to the previous screen by clicking on add collateral button, the Add Collateral request icon indication displays in the Summary view to the corresponding Collateral Facilities.
Click Cancel to navigate away from the page.
Edit collateral :
Click Edit and make the necessary changes, After all the changes are made, click Update to update all the changes. In this page, Select facility to apply this collateral Section displays, where the check boxes can be selected/deselected as per the requirement. If an existing facility is selected the Add Request icon displays and if it is deselected, the Add Request icon does not display.
- If an existing Facility is already linked to the Collateral, the Check box does not display and shows message as Facility linked already,however it displays a Context Menu with the Release Option.
- If the Release option is selected, the Retain option is displayed to reverse the release request. By clicking the Retain option, the Release requested icon indication is removed and release option appears again.
- After Edit if the user navigates to the previous screen by clicking on Update collateral button, all the Release/Add Collateral requested icon indication reflect in the Summary. User can click cancel and navigate away from the screen by clicking on the confirmation pop-up.
- For Added Collaterals user cannot edit Collateral ID, however can edit - Collateral Name, Collateral Type, Collateral Sub-type, Country, Owner, Estimated Value and Applies to section.
- The Owner drop down displays the parties related to all the existing facilities selected for modifications.
- For Prepopulated Collaterals User can edit only the Applies to Section.
The Collateral can be deleted using the Delete option.
All the Collaterals linked to Modification facilities display along with the icon indication in the Collateral section. The Add/Release icon indication is viewed in the sub rows in collateral summary as per the request.
If clicked on the sub rows , the Modification View Collateral screen displays, which also consists of icon indication and role information section.
Only the Collateral Modification requests are recorded in this screen, the actual Modification does not happen until approved by the Underwriter.
Click ADD Document to add a new Document and follow the steps in the link. If modification must be made to the existing Document , click the Document name from the Document List. Click Edit and make the necessary changes, After all the changes are made click update to update all the changes.
Add Document
To add or upload a document, follow these steps:
Until otherwise stated, information in all the fields are mandatory.
- Click Browse or drag files to add a document to the request. A screen to upload the document is displayed.
- Select the file to upload. The file name can contain alphanumeric characters and cannot contain spaces. The document types can be PDF, TXT, JPG, PNG, and JPEG. The maximum size allowed per document is 25 MB.
- The Add Document screen is displayed.
- Enter the Document Name.
- Select the Document Type.
- On selecting the category, the relevant document types display in the dropdown. Based on the selection of category, the Applies to section appears for the user to link the document.
- The application displays the list depending on the selected document category. Select the category to apply to the document. The selection can be one, many, or all.
- If the category is proof of business and document type is tax id, then all the linked parties of the modification purpose display in the list.
- If the collateral document is selected as a category and Appraisal/validation is the document type, then all the linked collaterals for the modification purpose display in the list.
- If the Agreement document is selected as a category and the Terms sheet is document type, then all the linked facilities for the modification purpose display in the list.
- Click Upload Document. The button is enabled only after all the fields are filled. The application displays a confirmation message that the document is uploaded successfully.
- The document is added to the list with the following details: Document Name, Category, Document Type, Document file name, Applies To which category, and Uploaded Date.
- The ID under the Applies To field can be:
- Request ID: A temporary Request ID is displayed till the application is submitted.
- Facility ID: A temporary Facility ID is displayed till the application is submitted.
- Entity ID: In case new Entity is added, then Temporary ID is displayed until the application is submitted.
- Collateral ID: In case new Collateral is added, then Temporary ID is displayed.
Context Menu
Do any of the following as required:
- Click the document file name to download the document.
- On the context menu,
- Click Edit to modify the details.
- Click Delete to remove the document. On the confirmation pop-up that appears, click Yes to delete the document.
This section consists of the following fields: Document Name, Category, Document Type, Document, Applies To and Uploaded Date.
In Add document, the Applies to section screen displays only,
- Facility Category - Existing facilities selected for modifications.
- Entity Category - Parties associated with the selected existing facilities.
- Collateral category - Collaterals Associated with selected existing facilities.
After completing the modifications in required sub-sections,click continue to proceed to Summary and Submit.
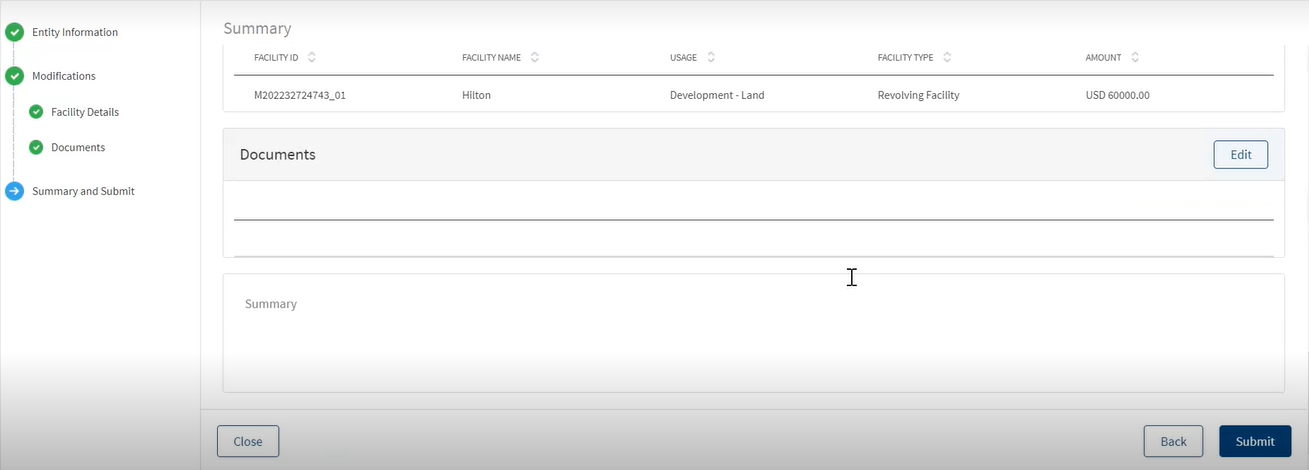
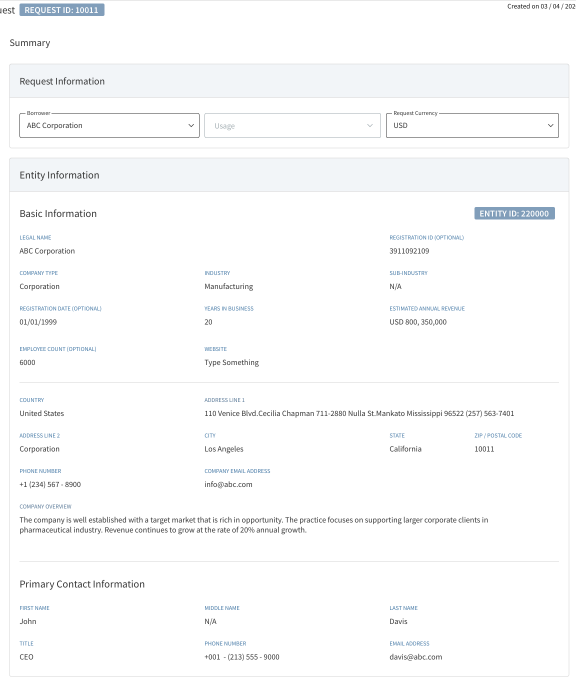
Summary and Submit
The application displays a summary of all the information collected so far in each of the steps in the request application. The information is stored and retrieved from the Origination Processing Microservice.
- Request Information
- Entity Information
- New Facility
- Parties
- Collateral
- Documents
- Modifications
- Facility Details
- Parties
- Collateral
- Documents
Do any of the following:
- Under Request Information,
- Select the Usage from the list if required (for example - Purchase - Land). It is an optional field.
- Select the Request Currency from the list. The request currency is different form facility currency. On submitting the request, the currency is mapped to Request Currency. It is a mandatory field.
- The request name and term display in the summary section during onboarding.
- The following information display in the Request information section of the summary screen
- Borrower
- Usage
- Request Currency
- Request Name
- Term - Only for the request created with the purpose deal and facility is visible
- Click Edit to make changes as required. The application displays the existing records to edit or delete the details. For example, on clicking the Edit button of Parties section, the application displays the list of parties already added to the request.
- On the context menu,
- Click Edit to modify the details.
- Click Delete to remove the record. On the confirmation pop-up that appears, click Yes to delete the record.
- After the updates, click Continue to proceed to the summary screen.
- On the context menu,
- Add additional information as required in the Summary box.
The summary or comments entered is stored as “summary” category in the Narratives list in the request overview. In case the comments are provided, the narrative related task is auto-generated by the workflow and auto-completed. If the comments are not entered, then the narrative task shows up as failed in the tasks list.
After reviewing the details, click Submit.
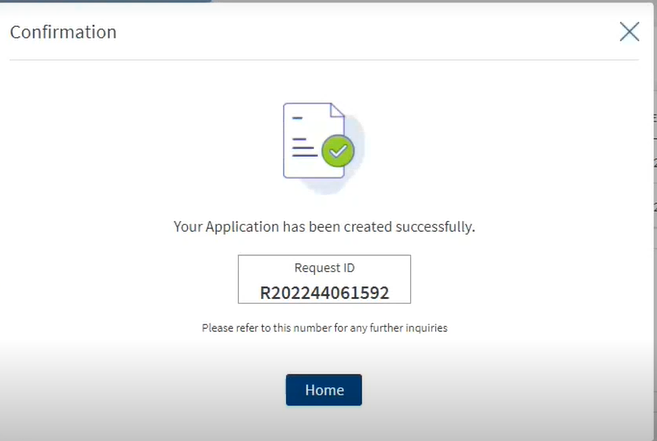
The application displays an acknowledgment screen with a unique Request ID and a message that the request is created successfully. Click Home to view the request on the dashboard screen.
On submitting the request,
- The request is added to the requests list on the dashboard with "Submitted" status.
- If the user clicks submit with no inputs in the mandatory field, the system navigates to the error fields for the details to be filled.
- On page load, the request list is sorted by the first column.
- The collected information is segregated and stored in the respective Microservices.
- Borrower related information is stored in Party Microservice.
- Other details are stored in Origination Processing Microservice.
- Uploaded documents in Document Portal Microservice.
- The collected data is arranged under the three objects - Entity, Request, and Facility.
- The Process Automation Manager (PAM) automatically creates applicable tasks (auto and manual) that are to be completed before moving to the next stage.
- The Process Automation Manager (PAM) makes sure that all the tasks in a specific stage are processed for completion before moving the request to the next stage.
The submitted request goes through a series of predefined origination journey stages before the fulfillment is sent to the back office system (Transact) for further processing. The request is part of the Relationship Manager's queue and other bank users receive tasks to be performed in each of the stages. Each stage has a set of tasks that are to be completed before the application can be moved to the next stage.


The stage indicator is displayed on top of the request and facility overview screens. A bank user can see the current stage of the request with status and view the tasks by clicking the View All Related Tasks link with the count of related tasks in parenthesis. The following color codes are used to indicate the status of tasks in the respective stages. Also see Retail lending, SME lending journeys for more information.
 The stage is yet to be visited.
 The tasks are in progress and one or more tasks are to be completed. The application is still in the stage.
 All tasks in the stage have been completed. The application is moved out of the stage.
APIs
For the complete list of APIs shipped as part of this feature, see Experience APIs documentation.
In this topic