Drawing Overview

Drawings
In Mortgages , the end customer avails the loan in single/ multiple parts. This single/multiple parts are within the main Mortgage loan Product which the customer applied for. The multi parts are called as Drawings. There is a clear distinction between Multi-Product and Drawings within a Product. The two different Products have independent life cycle,whereas the later is part of Product and only customer can avail the loan in multiple Drawings within the main Product.
Clicking the Drawing menu in the Product Overview navigates to the Drawing screen and the menu in the left pane changes corresponding to the selected option.
This section displays the details of the Drawings within the Product. The Drawings have the following fields:

- Number of Drawings : The total number of drawings display along with the heading of this section.
- Drawing ID : This is a click-able field and navigates to Drawing Overview.
- Drawing Type: To display the name as per Product Group in MCMS.
- Drawing Name : To display the name as per Product in MCMS.
- Requested Amount : The requested Drawing amount.
- Approved Amount: The approved Drawing amount.
When a Mortgage loan has drawings within a Product , the details of the drawings displays under Drawing Overview. When a Mortgage product is selected in the Origination screen, the application structure is Request >Product> Drawing in the Temenos DigitalAssist.
Clicking the Drawing row displays the below fields.

- Drawing ID
- Drawing Name
- Drawing Type
- Mortgage Type
- Date
- User
- Fixed Interest Term
- Term
- Requested Amount
- Approved Amount
All the fields displayed in the row click are read only and cannot be edited from the Request overview. If a Product does not have drawings, this entire section does not display.
Clicking the Drawing ID, navigates to the Drawing Overview from the Request Overview and Product Overview.The Drawing ID is an extension of Product ID with Suffix and number e.g F022303405-01.Currently this Overview is applicable only for Mortgage products in Retail.

The application displays the Product list.
- Click the row to view the Product details.
- The Product Summary Section contains both Modification Product and New Product depending on the purpose type selected by the user.
- The view Product screen displays all the modifications made in the Product. The Product details section, collateral section and Party section are displayed depending on the selected modification type.
- It displays add & release icon before approval.
- Does not display add & release icon post approval.
- The details are not editable from the view Product screen, it is only editable from the Product Overview screen.
All the fields displayed in the row click in the Product & Drawings are read only and not editable from the Request overview.
Clicking the Drawing ID in the Drawing section navigates to the Drawing Overview screen.

Left pane menu
The menu items displays on the left pane, and the corresponding details display on the right pane. Click any menu item on the left pane to view the corresponding details on the right pane.
General
The application displays the following menu items under the General menu on the left pane.
Request Overview
Click the down arrow to view the request overview details. In Drawing Overview screen,by default the Request Overview displays in collapsed mode, when expanded the details are viewed. The application displays the information that were collected during the on-boarding process (create request) and few information from the back-end system, for instance, the bank branch, portfolio, and profit center are mapped with the signed-in (relationship manager).

The following details display in the Request Overview:
- Borrower
- Requested Amount
- Approved Amount
- Request Name
- Usage
- Request Date
- Portfolio
- Branch
- Profit Center
- External Reference ID
- Assigned Relationship Manager
Click the Borrower link to view the Entity Overview details.
The Request details cannot be edited from this screen.
Product Overview
Click the down arrow to view the Product Overview details. In Drawing Overview screen,by default the Product Overview displays in collapsed mode, when expanded the details are viewed. The application displays the information that were collected during the on-boarding process (create request) and few information from the back-end system, for instance, the bank branch, portfolio, and profit center are mapped with the signed-in (relationship manager).

The following details display in the Product Overview:
- Borrower name
- Requested Amount
- Product Type
- Usage
- Product Name
- Term
- Commencement Date
- Maturity Date
- Decision Status
- Approved Amount
- Acceptance Status
- Account Number
- Cumulative DTI Ratio
- Anticipated Completion Date
- Calculated Unsecured Exposure (%)
- Facility Regulation
- Sale Made
- Facility Land Rights
- Sale Advised
- Regulatory Details
After the origination of loan accounts, the relevant details of the product are displayed on the Request overview screen and the account number is displayed on the Product overview screen after receiving from the core/backend on creation of the account.
Click the Borrower link to view the Entity Overview details.
The Product details cannot be edited from this screen.
Drawing Overview

The application displays the information that were collected during the on-boarding process (create request) and few information from the back-end system, for instance, the bank branch, portfolio, and profit center are mapped with the signed-in (relationship manager).
It displays the following fields.
- Borrower
- Requested Amount
- Drawing Type
- Drawing Name
- Mortgage Type
- Term
- Product sub-type
- Commencement Date
- Maturity Date
- Approved Amount
- Account Number
Edit Drawing Overview

- Click edit to make the required changes. Only the Term, Product sub-type, Requested Amount sections are editable in this screen.
- Click Update Request to save the details. The application displays a confirmation message that the details are updated.
Click Cancel to discard the changes. On the confirmation pop-up that appears, click Yes. The changes are not saved.
When the user edits/changes any of the below fields in the Drawing Overview it displays in the Re-Simulate Screen(Mortgage Composition Screen) as well.
- Requested Amount
- Tenure
- Product Sub Type
- Type of mortgage
Narratives

The application displays the list of narrative or comments entered for a Product/product with the following details: Category, Narratives, User name, Applies To Product or entity, and Date of narration.
The Drawings is applicable only for Mortgage.
The user can view the narrative section in the Drawings overview. Under the Narrative category , only the Product related Narrative category display. The Narrative added in the Drawings overview displays in the Drawings overview only. The document can be uploaded in the Request , Product and Drawing Overview.
Do any of the following
- Click Add Narrative.
- Use the context menu
 as required.
- Click Edit to modify the details.
- Click Delete to remove the record. In the confirmation pop-up that appears, click Yes. The record is removed. On deleting the narrative, the attached documents are also deleted.
- View details: Click any row to view the narrative details.
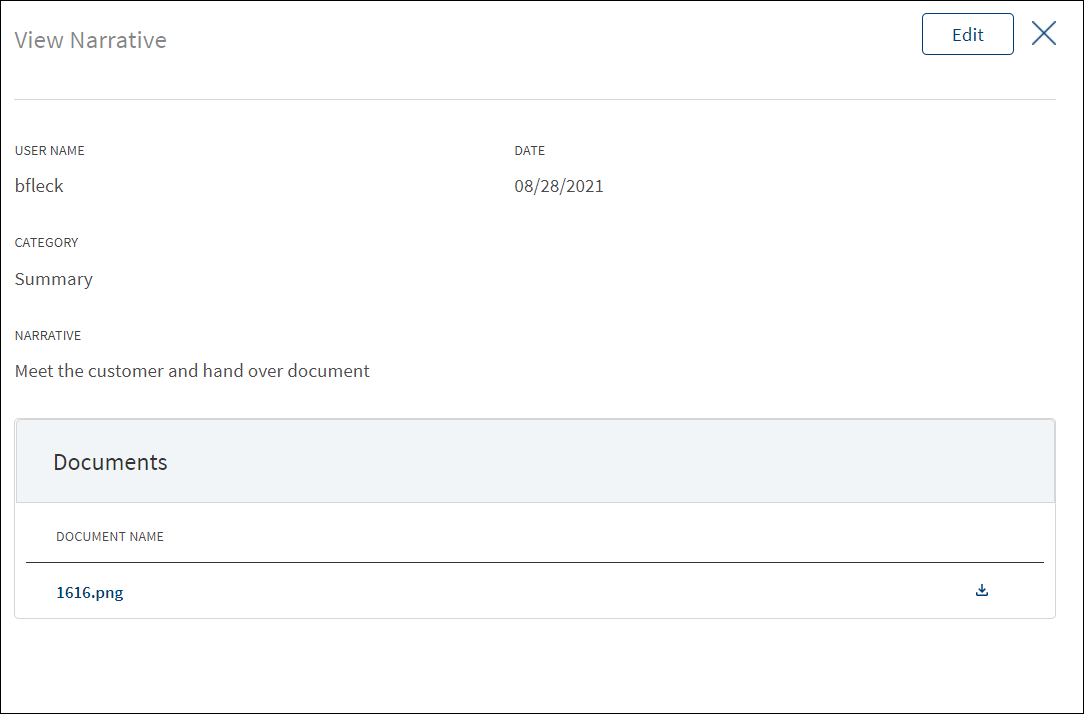
- Click Edit to modify the details or click X to close the form.
- Click the Document Name to view and download the document.

- Click Add Narrative to add a narrative.
- The application displays the signed-in user's user name and date of narration.
- Select the Category from the list (for example, Summary, Financial, Pricing).
- Enter Narrative description. It is a mandatory field. When a lengthy comment or description is entered which does not fit the field, then the content moves to the next line of the field. The field accepts up to 1000 characters.
- The application displays the list of parties, facilities, or collateral depending on the selected Category. For example, on selecting Under Recovery, the application displays the facilities to map the narrative. On selecting, Financial or Guarantor, the application displays the parties to which the narrative can be mapped. It is mandatory to select at least one item from the list. Selection can be one, many, or all the items.
- The application displays the list of parties or collateral under the section depending on the selected Category. It is mandatory to select at least one item from the list. Selection can be one, many, or all the items. By default, no item is selected. The following is the narrative mapping to the selected category:
- Party: On selecting Financial, Guarantor, Historical, Industry, Risks & Mitigation, Sources & Uses of Funds, or Management, the application displays the parties to which the narrative can be mapped. This is a multi-select option and can user select multiple parties to this narrative. By default, no party is selected. The party related narratives are displayed on the Request overview and the Product overview.
- Product: If the user is in a particular overview and try to add a related narrative, the user does not need to select the Applies to option.
- General: On selecting Summary, apply this narrative section does not appear. The added narratives are displayed on the respective overview screens. For example, a summary narrative added on the request overview is displayed only on the request overview screen.
- Click Upload Document to upload files to a narrative. A confirmation pop-up appears with maximum size and file name conditions. Click Okay to browse and upload the file. The uploaded document appears. This field is optional.
- Click the bin icon displayed beside each uploaded file to delete the file before adding a narrative.
- The document name can be alphanumeric and cannot contain spaces, and the maximum file size can be up to 25 MB.
- The following document types can be uploaded: jpeg, pdf, jpg, png, txt.
- Click Add Narrative. The application displays a confirmation message that the narrative is added successfully and adds the record to the Narratives list.

- Make the changes as required.
- A user who added the narrative can modify the following details. Other user can only view the details.
- Narrative text and Applies to in case of entity related narrative.
- Narrative text in case of Product related narrative.
- Click Download to download the existing files. If there are no existing files, click Upload to upload new files. On clicking Update, the uploaded files are successfully saved and updated in the summary screen. Upload the documents at once before updating the narrative.
- Click Update Narrative to save the details.
- The application displays a confirmation message that the narrative is updated successfully.
Click Cancel to discard the changes. On the confirmation pop-up that appears, click Yes. The changes are not saved.
Credit
This section explains the following:
Borrower Fees
A bank user of relationship manager and underwriter roles with the necessary permissions can view and manage (add, view, edit, delete) the feature.
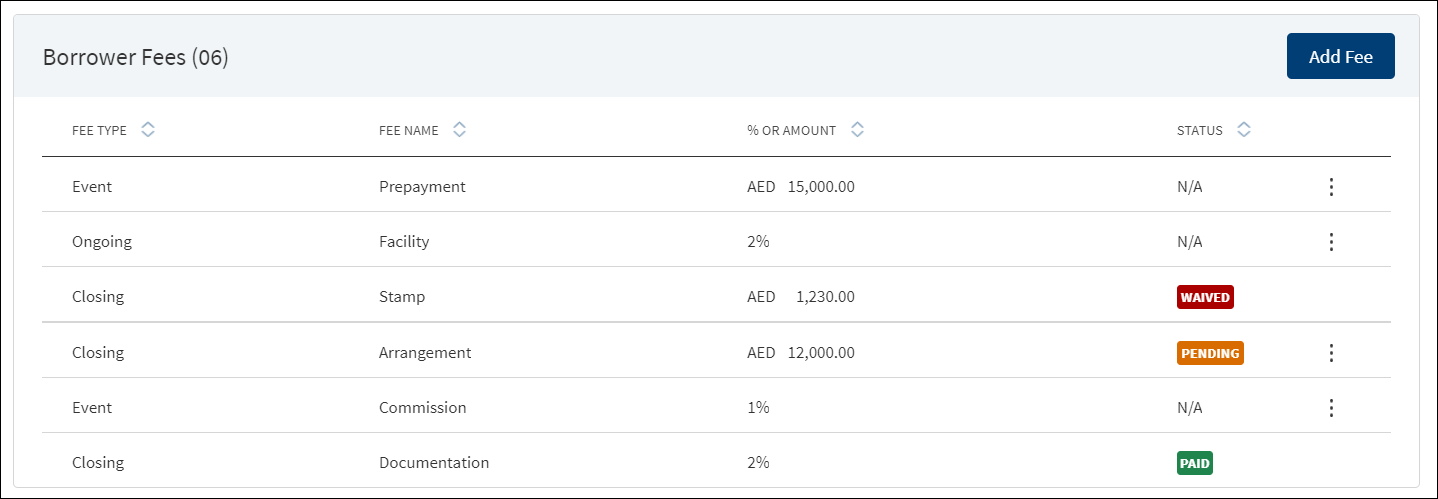
The application displays the borrower fees for the Product and modified Product with the following details: Fee Type, Fee Name, % Or Amount, and Status (only applicable for closing fees).
The Drawings is applicable only for Mortgages.
For Retail - The borrower fees can be added in the Drawings level, the Applies to section displays the following radio buttons:
- Product
- Drawings : If selected, it displays all the products.
When the borrower fees is added for Drawing, the Drawing ID displays in the Applies To section of the summary. The Fees added at the Drawing level from the Request Overview display in the Request, Product and Drawing Overview.
In case the Product/Drawing already has the Borrower fees in MCMS , the system displays the Applies To accordingly. The Applies To section displays the Product ID in the Product level and Drawing ID in the Drawing level.
The User can view and manage (add, view, edit, delete) borrower fees from Drawing Overview under the Borrower Fees Section.
- If a Product has Drawings the Borrower fees is added only at the Drawing level.
- When user adds fee from the Drawing overview , the Applies To tab automatically gets updated with the Drawing ID.
- The Borrower Fees added in the Drawing overview displays in the Request, Product and Drawing Overview.
- The row click , edit and delete functionality is applicable in the Drawing Overview.
Do any of the following:
- Context menu: Use the context menuas required:
- Click Edit to modify the details.
- Click Delete to remove the record. On the confirmation pop-up that appears, click Yes. The record is removed from the borrower fee list. Records with Paid and Waived status cannot be deleted.
- View Borrower Fee: Click the row to view the borrower fee details. For example, the fee name can be Penalty Interest, Commission, Stamp, Arrangement and more.
- Click Edit to modify the fee details. A fee with status as Paid or Waived cannot be edited
- Click X to close the screen.
- Click Add Fee to add a new borrower fee.
Use the feature to add borrower fee details. a fee added in Product overview is displayed in request overview as well.

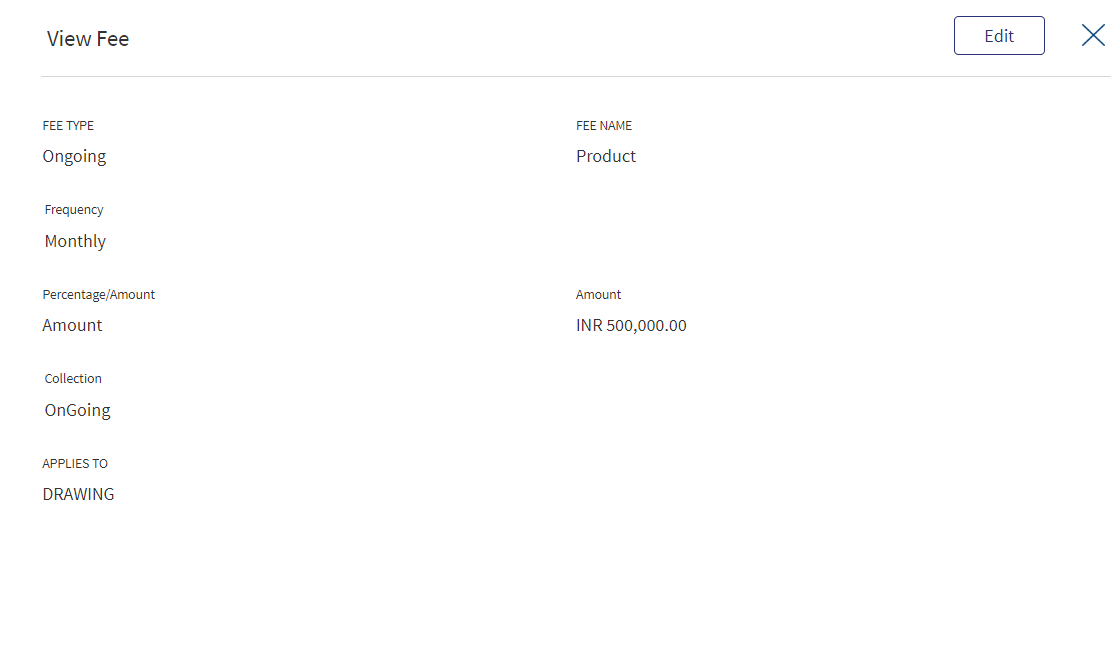
- Select the Fee Type from the list. The application displays various options depending on the selected fee type.
- Ongoing
- Select the Fee Name from the list (for example, Available, Product, Utilized).
- Select the Frequency from the list.
- Select fee as a Percentage or Amount. If Amount is selected, then select the currency from the list and enter the Amount. The currency field has predictive search where you can enter your option in the box and select the required option from the matching result rather than scroll down the list to select a currency.
- Rate Basis: Visible only if percentage is selected in percentage/amount.
- Balance Type: Visible only if percentage is selected in percentage/amount
- Rate Type: Default to Fixed, Visible only if percentage is selected in percentage/amount.
- By default, the application applies the Collection as Ongoing.
- Event
- Select the Fee Name from the list (for example, Documentation, Penalty Interest, Commission).
- Select fee as a Percentage or Amount. If Amount is selected, then select the currency from the list and enter the Amount. The currency field has predictive search where you can enter your option in the box and select the required option from the matching result rather than scroll down the list to select a currency.
- Basis: Visible only if percentage is selected in percentage/amount. The following list items are available - Product Amount and Prepayment Amount.
- Closing
- Select the Fee Name from the list (for example, Arrangement, Documentation, Stamp).
- Select fee as a Percentage or Amount. If Amount is selected, then select the currency from the list and enter the Amount. The currency field has predictive search where you can enter your option in the box and select the required option from the matching result rather than scroll down the list to select a currency.
- Basis: Visible only if percentage is selected in percentage/amount. The only list item available is Product Amount.
- Select the Collection Type from the list.
- Select the Status from the list - Pending, Paid, Waived, and N/A.
- Ongoing
- On changing the Fee Type, the application displays a confirmation pop-up for switching the fee type. On clicking Yes, the data entered so far will be lost.
- Click Add Fee. The application displays a confirmation message that the fee is added successfully and adds the record to the Borrower Fees list.
Click Cancel to discard the changes. On the confirmation pop-up that appears, click Yes. The changes are not saved.

Use the feature to edit the borrower fee details. A fee with status as Paid or Waived cannot be edited.
- Make the changes as required. The Fee Type and Fee Name cannot be edited.
- The following details can be edited depending on the fee type: Fees Percentage or Amount option, Basis request amount, Percentage, Amount, Collection, and Status.
- Click Update Fee to save the details.
- The application displays a confirmation message that the record is updated successfully. The updated borrower fee details are displayed on the view screen.
Click Cancel to discard the changes. On the confirmation pop-up that appears, click Yes. The changes are not saved.
Interest Pricing

A bank user of relationship manager, underwriter, and supervisor roles with the necessary permissions can view and manage (add, edit, delete) the feature.
The application displays the margin charged to the customer with the following details: Interest Type, Index, Spread or margin, Rate of interest, and Status.If the Pricing is taken for the Product from MCMS , then the Pricing record is created with accepted status. Only a Supervisor can modify the accepted pricing.
The Drawings is applicable only for Mortgages.
If a Product has a drawing, the user needs to select the Drawing first and then add the Pricing.
- In case the Product has Drawings the system does not allow to add Pricing at Product level.
- In case the product does not have Drawings, the Pricing is directly added to the Product.
- The Pricing instructions added from the Product Overview for a Drawing is displayed in the Pricing section of the Drawing Overview and vice versa.
- The Drawing Level Pricing displays in the Summary screen in an accordion view, which on expanding displays all the interest pricing records:
- Interest Type
- Index
- Spread
- Rate
- Status
The User can view and manage (add, view, edit, delete) interest pricing from Drawing Overview Section.
- The interest pricing added in the Drawing overview displays in the Product Overview and vice versa.
- If a Product has drawing the Pricing is added at the Drawing level.
Do any of the following:
- View Pricing:
- Click the row to view the pricing details. For the list of fields on the Structure and Schedule tabs for different interest types and Product types, see the attached document.
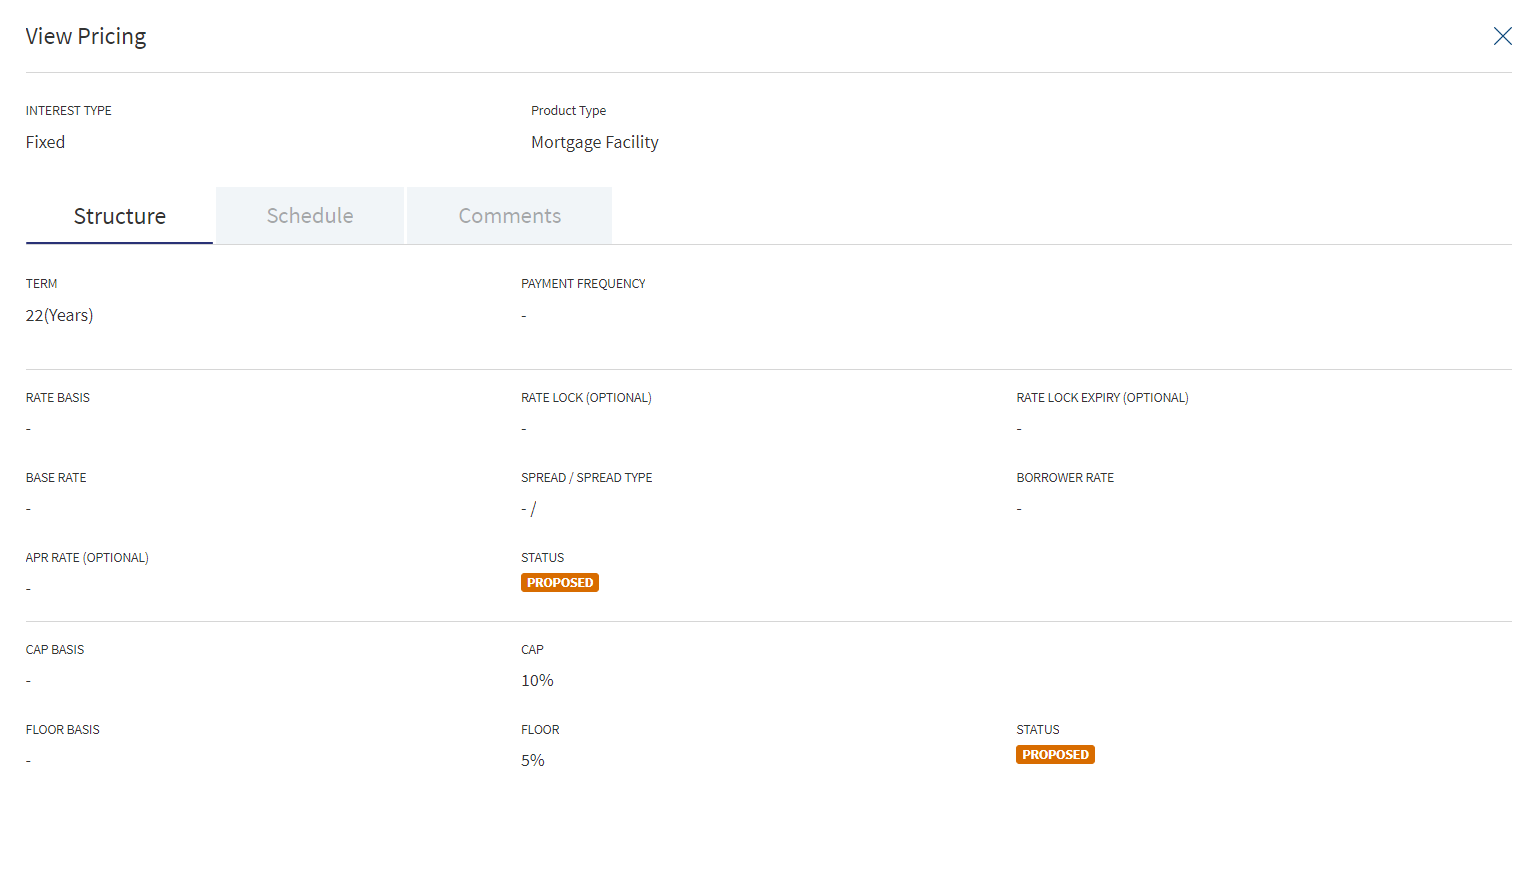
- If there is a document attached to repayment schedule (for term and mortgage loan), the document is displayed and can be downloaded on the Schedule tab.
- View the comments entered by the user on the Comments tab.
- Click Edit to modify the details. The Edit option is available only if the status is Proposed or Rejected.
- Click the row to view the pricing details. For the list of fields on the Structure and Schedule tabs for different interest types and Product types, see the attached document.
- Context menu: Use the context menu as required:
- Click Edit to modify the details. Records with Accepted status cannot be edited.
- Click Delete to remove the pricing details record. On the confirmation pop-up that appears, click Yes. The record is removed from the pricing list. Also, the document attached to the repayment schedule, if any is also deleted (applicable for term and mortgage loan). Records with Accepted status cannot be deleted.
- Context Menu is not applicable for Modified Product as all the fields are prepopulated and cannot be edited.
- Add Pricing: Click Add Pricing to add pricing details. Not applicable for Letter of Credit and Letter of Guarantee products.
When the user clicks Add Pricing the following fields display:

- Product ID
- Product Name
- Product Type
- List of Drawings of the Product display with following fields:
- Drawing ID
- Drawing Name
- Select Button
Clicking the Drawing displays the regular Pricing screen, Incase the Product does not have Drawing , click Add Pricing to directly add the pricing.
When a Drawing pricing with Accepted status is added, the system does not allow further addition of pricing and the Select button gets disabled.
When all the Drawings pricing are in accepted status, the Add Pricing button at the section level gets disabled. The Pricing added for Drawing level from Product Overview screen displays in the Drawing Overview Pricing section.
The Drawings is applicable only for Mortgages.
Use the feature to edit the pricing details if the status is Proposed or Rejected.

- On the context menu, click Edit. Alternatively, click the Edit button to modify the pricing details. The records with Proposed or Rejected status only can be edited.
- Make the changes as required on the Structure, Schedule, and Comments tabs.
- The fields are displayed on the Structure tab based on the interest type. The following details cannot be edited: Interest Type, Product Type, Borrower, and Indicative Borrower Rate.
For the list of fields on the Structure and Schedule tabs for different interest types and Product types, see the attached document.
- The fields are displayed on the Schedule tab based on the interest type and Product type.
- The following details cannot be edited: Interest Type and Product Type.
- If required, delete Repayment Schedule document, if any and upload a new document (applicable for term and mortgage loan). The procedure to upload a document and the validations are explained under Add Pricing section.
- Click Update Pricing to save the details. Make sure that all the mandatory fields are filled.
- The application displays a confirmation message that the record is updated successfully.
Click Cancel to discard the changes. On the confirmation pop-up that appears, click Yes. The changes are not saved.

A user with signed-in bank user with the necessary permissions can add pricing details for all the Product types except Letter of Credit and Letter of Guarantee products.
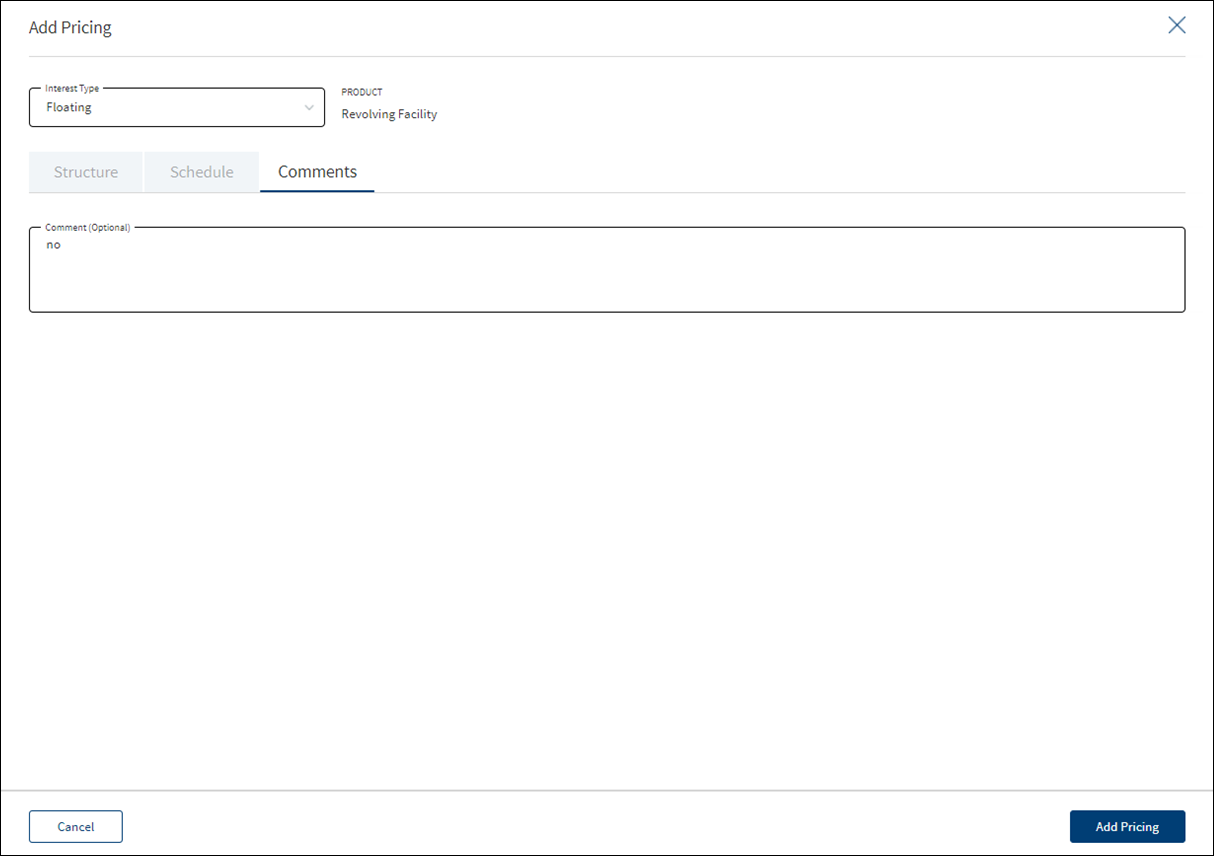
The application displays the following tabs to capture the pricing details:
- Structure
- Schedule
- Comments
To add pricing, follow these steps:
- On the Interest Pricing list screen, click Add Pricing.
- The application displays the following:
- Product Type or Product (for example, Revolving Product, Term Product) and the Interest Type list. The list items are based on the Product type or product.
- The following tabs: Structure, Schedule, and Comments.
- Select the Interest Type from the list. The list items are based on the Product type or product.
- For Term Loan and Mortgage Product, the following interest types are applicable: Fixed, Periodic, and Floating.
- For Revolving, Line of Credit (non revolving), and Overdraft, only Floating interest type is applicable.
- Provide the details based on the selected interest type on the Structure, Schedule, and Comments tabs.
- Structure tab: The List of fields appearing on the Structure tab is based on the selected interest type. For the list of fields on the Structure tab for the selected Interest Type, see the attached document.
- Schedule tab
- For Term and Mortgage Loan Product types, see the attached document for the list of fields on the Schedule tab.
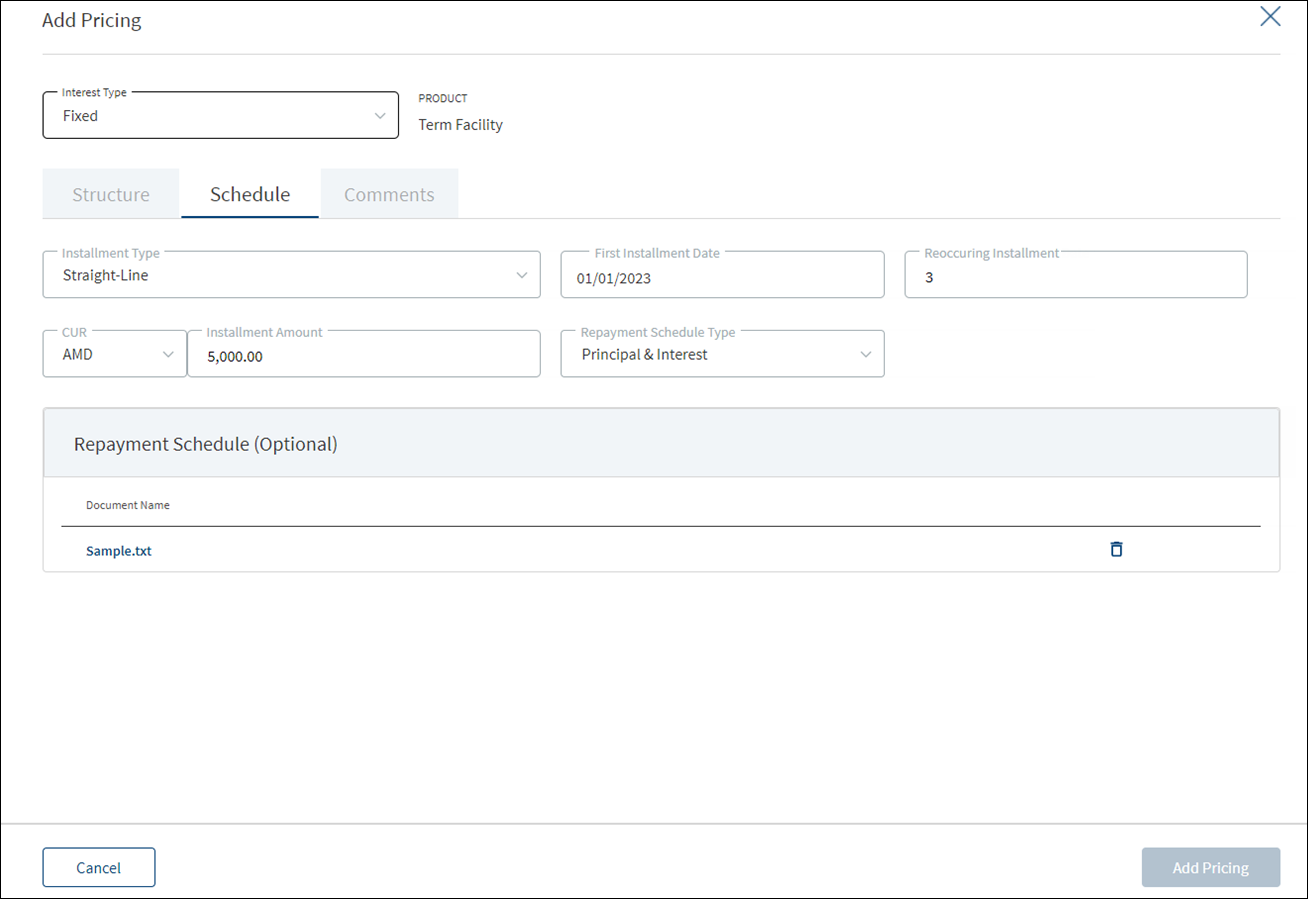
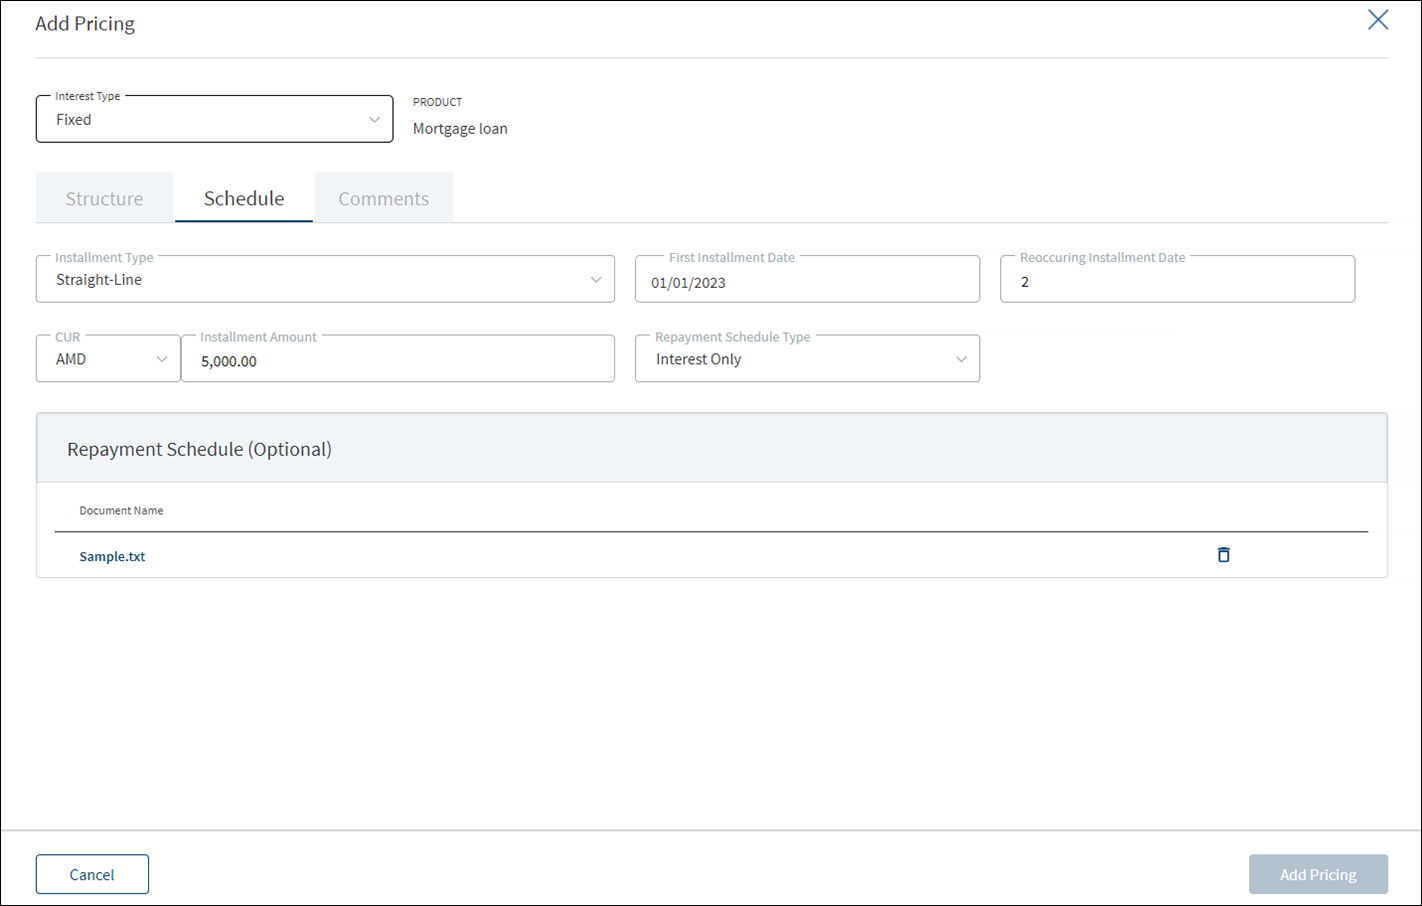
- For Repayment Schedule, click Upload to upload a document. A confirmation pop-up appears with file name conditions (alphanumeric characters without space), maximum file size (25 MB), and allowed document types (jpeg, jpg, png, pdf, txt) for uploading a document. Click Okay.
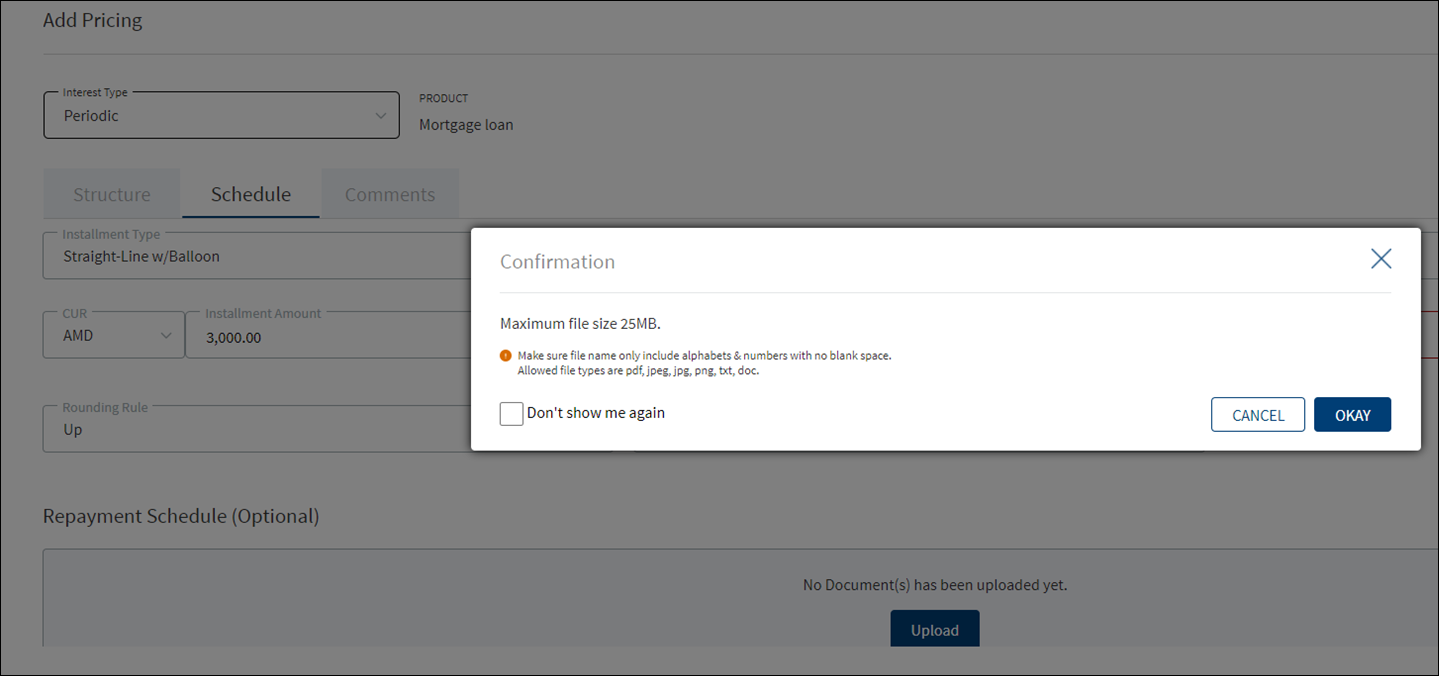
- Browse and upload a document. The application displays an error message if a wrong document type is uploaded. The uploaded document appears under Repayment Schedule section.
- Click the document name to download the document and delete the document if required.
- Only one document can be uploaded at a time. The document upload option is disabled after a document is uploaded.
- To upload another document, delete the existing document and then upload the new document.
- The document must be saved before adding the pricing details.
- For Term and Mortgage Loan Product types, see the attached document for the list of fields on the Schedule tab.
- Add comments on the Comments tab if required. It is optional. When a lengthy comment or description is entered which does not fit the field, then the content moves to the next line of the field. The field accepts up to 500 characters.
- Click Add Pricing. Make sure that all the mandatory fields are filled. The application displays a confirmation message that the pricing is added successfully. The details are added to the Interest Pricing list.
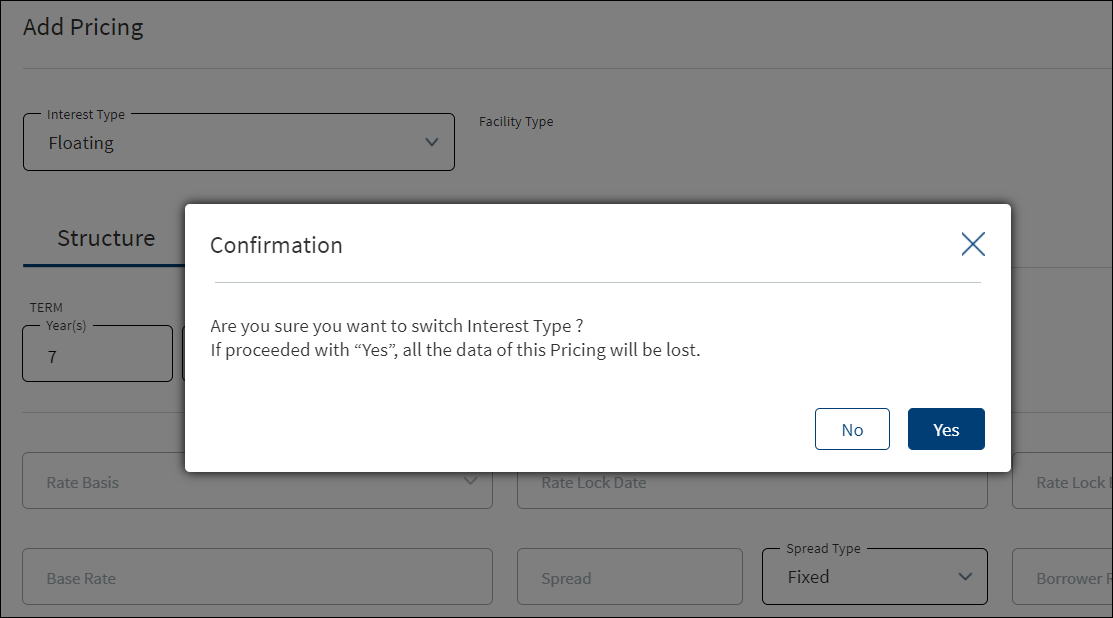
- After entering the details, the user can select a different interest type if required. The application displays a warning message. Click Yes to change the interest type. The saved data is lost. The fields change based on the new interest type.
- Click Cancel to discard the changes. On the confirmation pop-up that appears, click Yes. The changes are not saved.
Settlement
This section provides an overall view of the status of the following items:
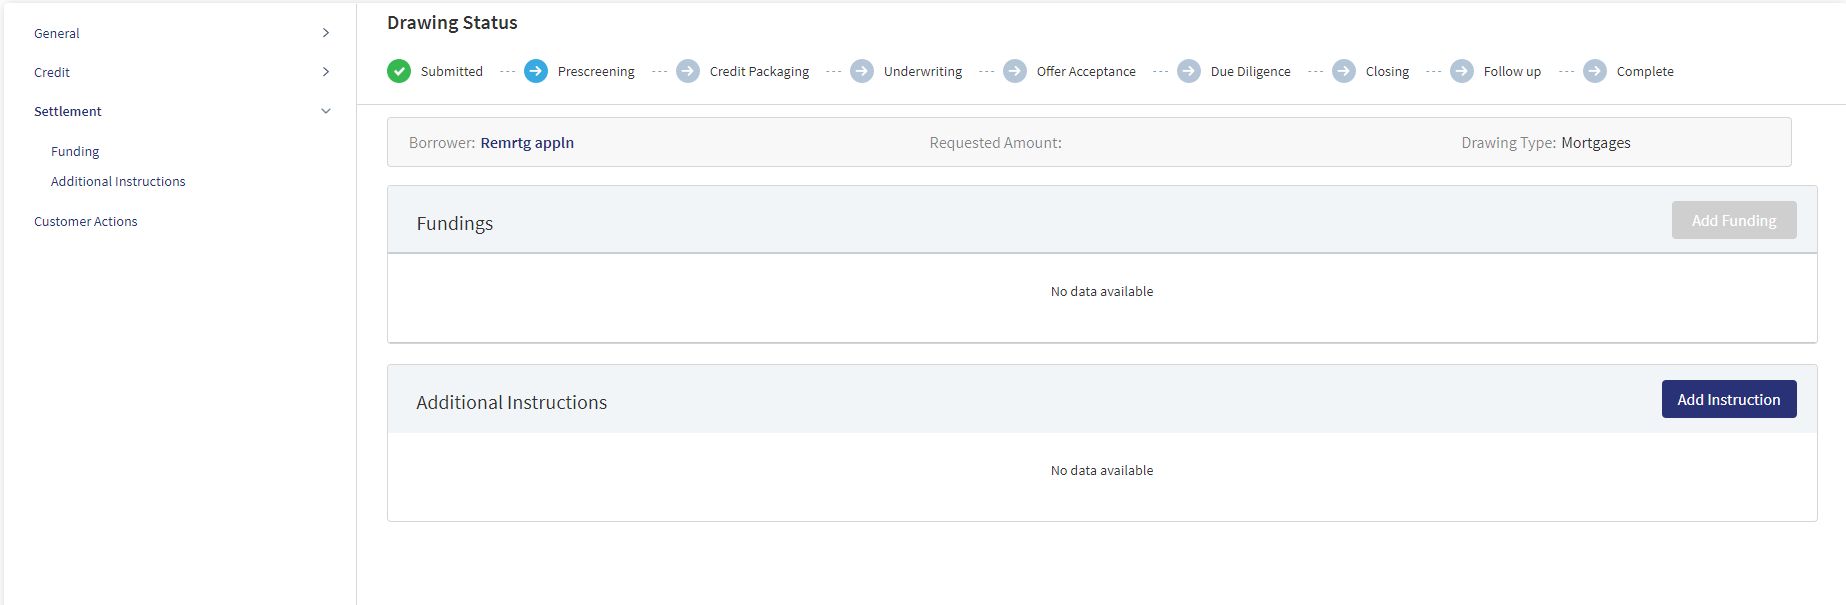
Funding

This can be added by Bank user and also directly by the customer through Customer Actions.The middle-office user creates the funding in this section. The application displays the actual loan draw-down amount with the following details: Entity name, Disbursement amount, Date, Status, Total Disbursement Amount, Product Approved Amount. The Funding position is available only after Approval of Amount for a Product is given.
The Drawings is applicable only for Mortgages.
Incase a Product has a drawing then the user needs to select the Drawing first then the Funding is added. If the Product has Drawings,the system does not allow to add Funding at the Product level. In case the product does not have Drawings, the Funding gets directly added to the Product. The Funding added from the Product Overview for a Drawing is displayed at the Funding section in the Drawing Overview and vice versa. The Funding entry for drawings created through Customer actions is displayed in the Product Overview and the Drawing Overview with Pending status. The Bank user can review Drawing wise Funding from the Product Overview and change the status from Pending to Approved.
Display of Funding record at Drawing Level in the Summary screen:
- The Drawing ID displays in an accordion view.
- Expanding the accordion, all the funding records in reference to the Drawing displays the below fields:
- Payee Name
- Disbursement Amount
- Date
- Status
- Total Disbursement amount : Displays the Sum of all the drawings disbursement amount.
- Approved amount : Displays the Product level approved amount.
The User can view and manage (add, view, edit, delete) Funding from the Drawing Overview Section.The Funding entry for drawings created through Customer actions is displayed in the Product Overview and the Drawing Overview with Pending status. The Bank user can review Drawing wise Funding from the Product Overview and change the status from Pending to Approved.
Perform any of the following actions:
- Click the row to view the details.
- Click Edit to modify the details or click X to close the form.
- Click Add Funding to add a new funding for the Product.
- Select any of the following options from the context menu.
- Click Edit to modify the details. Only the records with a Pending status can be edited.
- Click Delete to remove the record. Only the records with Pending status can be deleted. In the confirmation pop-up that appears, click Yes. The record is removed.
- An approved record can only be deleted by a Supervisor.

When the Add Funding option is clicked, the following fields display:
- Product ID
- Approved Amount: Displays the Approved Product amount.
- Remaining Available : Displays the remaining amount available at the Product level.
List of Drawings of the Product displays the following fields:
- Drawing ID
- Drawing Type
- Drawing Name
- Approved Amount
- Select Button
When a particular drawing is selected the regular Funding screen displays. If the Product does not have a Drawing, the user can directly add the funding by clicking the Add Funding option.
If the added funding is equal to the approved amount for a Drawing, the system does not allow to further add funding and the Select button in the Drawing is disabled.
When all the Drawings within the product has the funding disbursement amount equal to the approved amount , the Add Funding button is disabled in the section.
- Add the following details. Unless otherwise stated, all fields are mandatory:
- Enter the Disbursement Percentage.
- Select the currency and enter the Disbursement Amount. This field has predictive search where you can enter your option in the box and select the required option from the matching result rather than scroll down the list to select a currency.
- Select the Status from the list - Approved or pending.
- Enter the Disbursement Date.
- Choose whether the payee is a Third Party Payee. The default option is No.
- Select the Payee Name from the list.
- Select the Pay Type from the list. The Pay Type options are as follows: Intra Bank Transfer, Wire Transfer, SWIFT,Cheque. Every Pay Type displays different corresponding options.
- Enter the Account Number.
- Enter the Route Number.
- Enter the Bank Name
- Select the Address Type. After selecting the address type, all the corresponding details are prepopulated.
- Disbursement Amount is calculated as the difference between the Gross Amount and Hold Back.
- If the funding is for a third-party, then the user must capture the address details.
- If the funding is for the related parties, then the user must select the party from the list and the address corresponding to that party.
- The Add Funding option is enabled only if the Disbursement Amount is less than or equal to the Approved Amount.
- Click Add Funding. The application displays a confirmation message that the funding record is added successfully.
Only the records with Pending status can be edited.
- The application displays the Product ID, Authorized By, Date, and Time.
- Make the changes required based on the requirements.
- The Disbursement details and Payee details can be edited on the Edit funding screen.
- Click Update Funding to save the details.
- The application displays a confirmation message that the record is updated successfully.
Click Cancel to discard the changes. On the confirmation pop-up that appears, click Yes. The changes are discarded and not saved.
- If the entered or Calculated amount in the amount field is more than the Remaining Available amount, the Add/Update Funding button is disabled in Add/Edit Funding screen.
The View options displays the overview of the Funding page and has an Edit option available only if the status is still in Pending.

The Posting User adds the necessary additional Instructions whenever applicable. It displays the fields as follows: Type, Posting User, Date.
A bank user with the necessary permissions can view and manage (add, view, edit, delete) the feature. Incase a Product has a drawing, the user needs to select the Drawing first then the Additional Instruction is added. If the Product has Drawings the system does not allow to add Additional Information at the Product level. If the product does not have Drawings, the Additional Instruction can be directly added to the Product.The Additional Instruction for a Drawing added from the Product Overview display in the Additional Instruction section in the Drawing Overview and vice versa.The Additional Instruction entry for drawings added in the Product Overview displays in both the Product Overview and the Drawing Overview with Pending status. The Bank user can review Drawing wise Additional Information from the Product Overview and change the status from Pending to Approved.
Display of Additional Information record at Drawing Level in Summary screen:
- The Drawing ID displays in an accordion view.
- Expanding the accordion displays all the Additional Information records in reference to the particular Drawing:
- Type
- Posting User
- Date
The User can view and manage (add, view, edit, delete) Additional Information from the Drawing Overview Section. The Additional Information added in the Drawing overview displays in the Product Overview and vice versa.If a Product has drawing the Additional Information is added at the Drawing level.
Add Instruction:When user clicks Add Instruction the following fields display:

- Product ID
- Product Type
- List of Drawings of the Product display the following fields:
- Drawing ID
- Drawing Type
- Drawing Name
- Select Button
- When a drawing is selected the regular Additional Screen displays.
- If a Product does not have Drawing, user can directly add the Instruction by clicking the Add Instruction.
Select any of the following options from the context menu.
- Click Edit to modify the details. Only the records with a Pending status can be edited.
- Click Delete to remove the record. Only the records with a Pending status can be deleted. In the confirmation pop-up that appears, click Yes. The record is removed.
Click the Edit option from the Context Menu. This displays the Edit Instruction page where the Party Name and Bank Details can be edited, After the required changes are made click Update Instruction or Cancel to go back to the previous page.
After clicking the row from the list, the overview of the Updated Add Instruction section is displayed in the View Instruction page.

Customer Actions

A User can raise Customer Actions (Manual) at the Product level and not at the Drawing level. Automatic or system generated customer actions are generated at the Drawing level. Funding related customer actions are at the Drawing level and not at the Product level (in case the Product has drawings).Funding related customer actions are generated depending on the number of drawings the Product has. Each drawing has a separate customer action.
- Additional Information for repayment related customer actions display at the Drawing level and not at the Product level(in case the Product has drawings).
- Additional Information for repayment related customer actions is generated depending on the number of drawings for the Product.
- If the Product does not have drawings , then the funding related customer action is triggered at the Product Level.
The Applies To displays the Drawing ID, in the Funding customer action for Drawings .
The customer actions display in the Entity Overview/ Request overview/ Product Overview / Drawing Overview.
- The Applies To displays the Drawing ID, in the Additional Information customer actions for Drawings.
Please refer to the link for Permissions.
Please refer to the link for Detailed information regarding Customer Actions.
In this topic