Mortgage Disbursement Instructions- Additional Information
Disbursement instructions are captured at the penultimate stage in the post-submission workflow as part of Additional Information. The Additional Information (Pre-requirements module) is a feature that enables Financial Institutions (FI) to request additional information from the end-users (customers and prospects) before application submission.
UX Overview
This section provides an overview of the Additional Information screen.
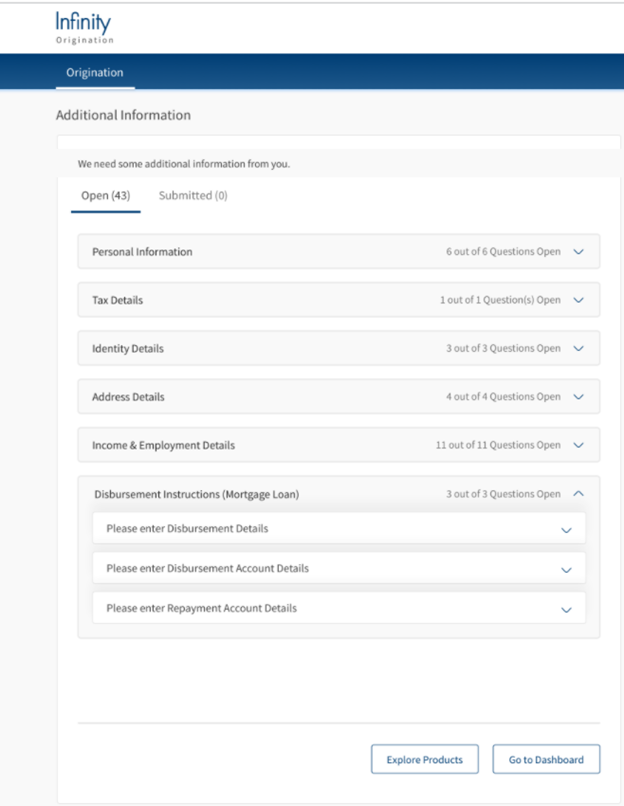
For instance, the Additional Information section contains questions belonging to each group in separate cards.
The applicant or co-applicant's name is added to the applicable questions which helps the user understand to which applicant the question is directed to. This section contains the following tabs:
- Open: This tab contains questions about additional details required from the user before application submission. The mandatory questions cannot be skipped. While, for all the optional questions, the user will have an option to skip the question.
- Submitted: This tab contains a list of questions for which the user has submitted responses. After the user submits the response to a question in the Open tab, the question will display in the Submitted tab.
- Skipped: This tab contains the optional questions that user has skipped.
Disbursement Instructions (Mortgage Facility)

The Disbursement instruction section explains the Disbursement and Repayment details.
Disbursement details and Disbursement Account Details
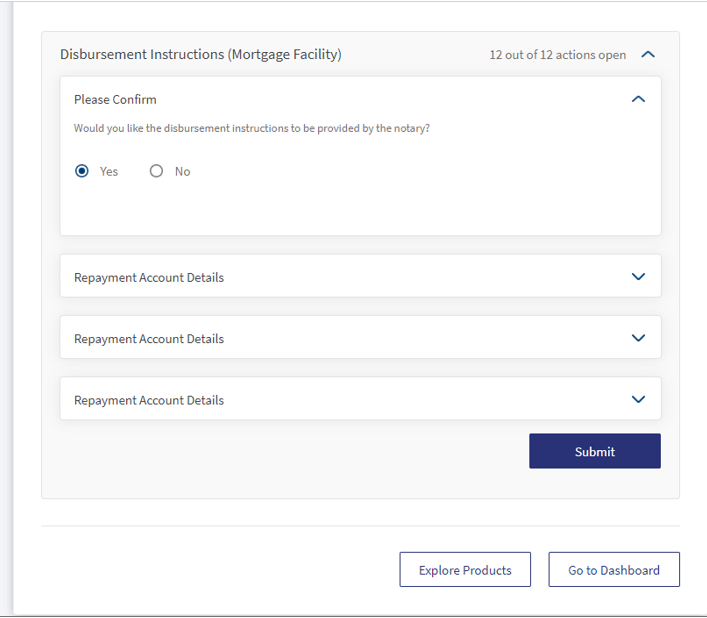
For Retail Lending applications, when disbursement customer action is raised, a new customer action field displays as:
- Disbursement Instruction to be provided by Notary? Select Yes or No from the radio button. This is a mandatory customer action. If the applicant selects Yes, then customer actions Disbursement details and Disbursement account details do not display.
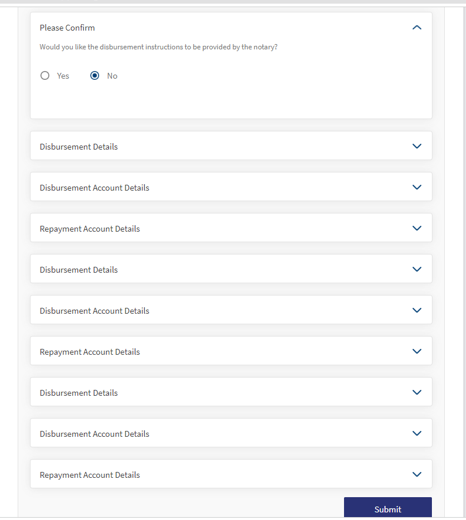
- If the applicant selects No, then Disbursement details, Disbursement account details, customer actions and all fields display.
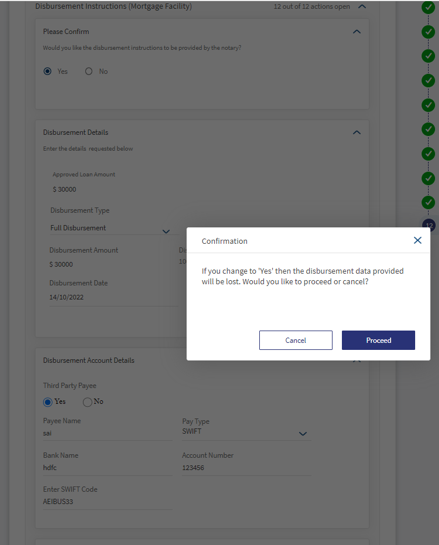
- If the applicant selects No and entered details in Disbursement details and Disbursement account details customer action. When the applicant selects Yes a pop-up displays as If you change to Yes then the Disbursement data provided will be lost. Would you like to proceed or cancel?. Click Yes to confirm, click No to go back.
- Automatic customer actions raised by the system are part of the workflow. You can view the customer actions section along with the status of the customer action listed under the Additional Information section in the Origination App.
- Automatic customer actions are raised for a Facility along with the Facility Name. When customer action is raised, e-mail is sent to customer stating that a customer action is raised, and when you respond to the customer action, that response is sent as a mail to the RM.
- The Relationship Manager (RM) can view the Automatic customer actions raised by the system.
Post acceptance of the final Offer Letter and ESIS online, system raises automatic mandatory customer action for each sub-facility in the mortgage loan, capturing the following details:

- Disbursement Details: You can view the Approved Loan Amount in the Disbursement details (Mortgage Loan) card. You must select only one value in Disbursement Type for the sub-facility from the drop-down.
- Full Disbursement: If you select this option, then provide the details as follows:
- Disbursement Amount: Disbursement amount value is defaulted to the Approved loan amount value. It is non- editable.
- Disbursement Percentage: Disbursement percentage value is calculated as Disbursement Amount/Approved Amount. It is non-editable.
- Disbursement Date: You must select the Disbursement date from the date picker, the approved amount will be disbursed to your account on the chosen date.
- Partial Disbursement: If you select this option, provide the details as follows:
- Disbursement Amount: You must enter the preferred Disbursement amount. System validates to check if the disbursement amount is less than the Approved Amount. If the Disbursement amount exceeds the Approved Amount, a notification message displays as Disbursement amount cannot be more than the approved loan amount.
- Disbursement Percentage: Disbursement percentage value is calculated as Disbursement Amount/Approved Amount. This is a dynamic field, it changes based on the value you modify in Disbursement Amount.
- Disbursement Date: You must select the Disbursement date from the date picker, the approved amount will be disbursed to your account on the chosen date.
- Disbursement Account Details: In the Disbursement account details card, select the following:
- Third Party Payee: Select Yes or No in Third Party Payee, by default it is Yes.
- If Third Party Payee is Yes, Pay Type as SWIFT, enter the Bank Name in alpha numeric with spaces permitted. Enter Account Number in numeric charecters without spaces and decimals. Enter SWIFT Code between 8 or 11 alphanumeric characters without spaces.
- If you select Pay Type as Wire Transfer, enter the Bank Name in alphanumeric characters and spaces permitted. Enter Account Numberonly numeric characters without spaces or decimals. Enter the IBAN/Routing Code in alphanumeric characters with a minimum length of 9 characters and a maximum length of 34 characters.
- If you select Pay Type as Cheque, enter Address Line 1 with special charecters and spaces permitted. Address Line 2 (Optional). Select Country and State from the drop-down option. Enter the City and Zip Code.
- If you select Pay Type as Intra-Bank Transfer, enter the Bank Name, Payee Bank Account Number. If the Account Number you entered does not exist, a notification prompts to re-enter the account number when you click Submit button.
- If Third Party is No, then by default, the Payee Name is that of the Primary Applicant(Borrower). You can modify the Primary Applicant's name if it is spelled differently in other bank accounts.
- If you select Pay Type as Intra-Bank Transfer in the Origination app, the Bank Name auto-populates, and you must select the Bank Account of the primary applicant from the list of accounts displayed. Disbursement amount will be credited to the preferred account based on the data selected through the date picker component.
- If you select Pay type as SWIFT, enter the Bank Name in alpha numerics with spaces. Enter Account Number in numeric charecters with spaces permitted. Enter SWIFT Code in eight or eleven alphanumeric characters without spaces.
- If you select Pay Type as Wire Transfer, the Bank Name in alphanumeric characters and spaces permitted. Enter Account Numberonly numeric characters without spaces or decimals. Enter the IBAN/Routing Code in alphanumeric characters with a minimum length of 9 characters and a maximum length of 34 characters.
- If you select Pay Type as Cheque, enter Address Line 1 with special charecters and spaces permitted. Address Line 2 is (Optional). Select Country and State from the drop-down option. Enter the City and Zip Code.
- Third Party Payee: Select Yes or No in Third Party Payee, by default it is Yes.
- Repayment Details: When Repayment details customer action is raised, then
- In case of multi-part, an option displays in Part 2 and Part 3 as Repayment account is same as above Part checkbox.
- When the applicant check marks Is repayment account same as captured in Part 1, then all details that are captured in Repayment account details of Part 1 must reflect in this section.
- After check marking, if the applicant unchecks Is repayment account same as captured in Part 1, then all the details captured must reflect and the applicant can edit or modify the details which are captured as required. After modifying the details, the applicant is not allowed to check mark Is repayment account same as captured in Part 1 checkbox again for this part.
- Repayment Account Details: In the Repayment Account details card, select the following:
- Select the Bank as External or Internal.
- If you select Bank as External, choose Pay Type from the drop-down options
- SWIFT: If you select SWIFT, then enter Bank Name in alphanumeric characters with spaces permitted. Enter the Account Name in numeric characters without spaces or decimals. Enter SWIFT Code between 8 or 11 alphanumeric characters without spaces.
- Wire Transfer: If you select Wire Transfer, enter Bank Name in alphanumeric characters with spaces. Enter Account Number if it is a different bank in numeric characters without spaces or decimals. Enter IBAN/Routing Code in alphanumeric characters with a minimum length of 9 characters and a maximum length of 34 characters.
- Wire Transfer with Intra- Bank Transfer: This option is enabled only if you select Bank value as Internal. Origination App displays a drop-down with the list of all the accounts held by the primary applicant so that you can choose the bank account and schedule the repayment for the loan taken.
Click Submit button, all the responses with the Disbursement Instructions, Disbursement Account Details, and the Repayment Account Details, data is transferred to Transact for Delivery and Fulfilment-related processing. Post submission, all the responses are saved in OPMS and are visible under the corresponding fields in the Sub-facility Overview of the Temenos Digital Assist app.
Configurations
The system administrator will have the capability to configure this module from the Spotlight app. For more information about configuring the Additional Information section, click here.
Extensibility
You can extend the Additional Information module to create a new customer action. For more information on creating a new customer action, click here.
In this topic