How to Extend the Existing Features
This page explains how to extend digital banking through various examples. Before reading this document, ensure you are familiar with the Temenos Digital Banking App architecture and can build them. The idea is that the core objects and components are protected, and any customization and extensions help to maintain the upgrade path. An effective "merge" of custom requirements is supported. The architecture has multiple layers, fully decoupling the UX/UI and integration layers, effectively abstracting away customization to the core product.
The Digital Banking reference architecture (MVC) provides extension points in the following layers:
- Presentation
- Business
- View
- Data Model
- Integration
This page shows the following examples of implementing the following customization using extensions.
- Display a New Form
- Modify a Form, Add New Widgets, and Hide a Widget
- Extend Presentation and Business Using Super Class Methods
- Extend Business Controller as a Pre / Post Implementation
See Extension Points and Extensibility in Quantum Fabric for more information.
Also, refer to the Extending Origination Functionality to extend the Temenos Digital Origination App and features.
Temenos Digital Fabric APIs Source Code (Java)
- Origination API source code: Origination_Src-vxxxx.x.x.zip
File Location: Origination_Src-vxxxx.0.0.zip\Origination\Fabric\java\
- Assist API source code: InfinityAssist_App-vxxx.x.x.zip
- Online Banking source code: DigitalBanking_Build_Aggregator-vxxxx.x.x.zip
File Location: InfinityAssist_App-vxxxx.x.x.zip\InfinityAssist_App-vxxxx.x.x\Fabric\InfinityAssist_Src_vxxxx.x.x.zip\InfinityAssist\Fabric\java\
File Location: DigitalBanking_Build_Aggregator-vxxxx.x.x.zip\DigitalBanking_Build_Aggregator-vxxxx.x.x\localservices\Fabric\java\
- Spotlight source code: Spotlight_App-vxxxx.x.x.zip
File Location: Spotlight_App-vxxxx.x.x.zip\Spotlight_App- vxxxx.x.x\MF\AdminConsoleAggregator\
The same is available in the distributed artifacts. This can be used as a reference for extending the code.
Display a New Form
This section provides an example of displaying a new form using extensions instead of an existing one.
Before understanding the steps for implementing the extensions, consider the following.
- The presentation layer is responsible for showing the forms. To display a new
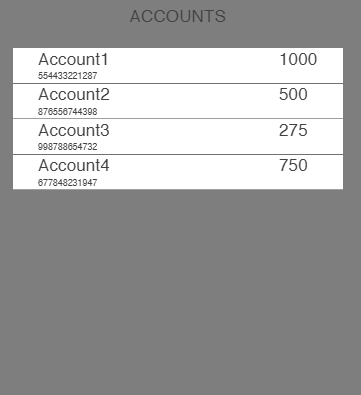
formNamein the application, you can use thepresentUserInterfaceAPI that uses theformNameas an input. - The following image shows the Account module.
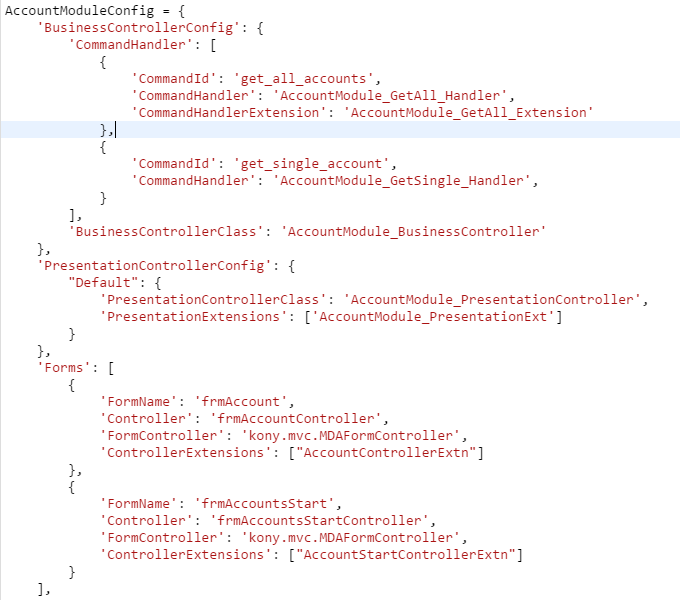
- The Account module has a business controller, two business implementations/ commands, and a presentation controller with two forms. Also, like every program or application, the Account module has an entry and exit point.
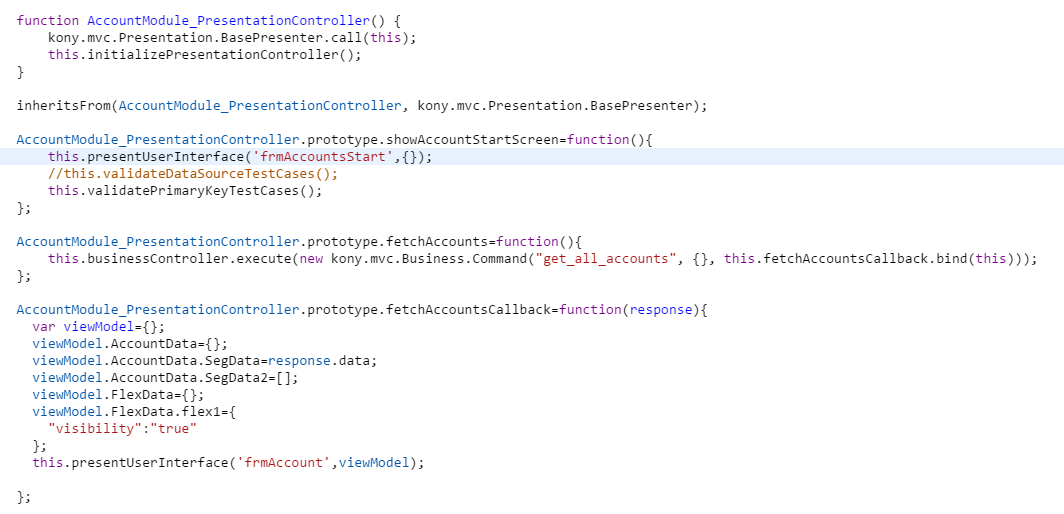
The showAccountStartScreen function is the entry point for the Account module. After the authentication process, the Auth module shifts to the Account module and calls the showAccountStartScreen function. The function in the image above shows the frmAccountsStart form. When the user clicks Get, the application executes the following.
- The application invokes the
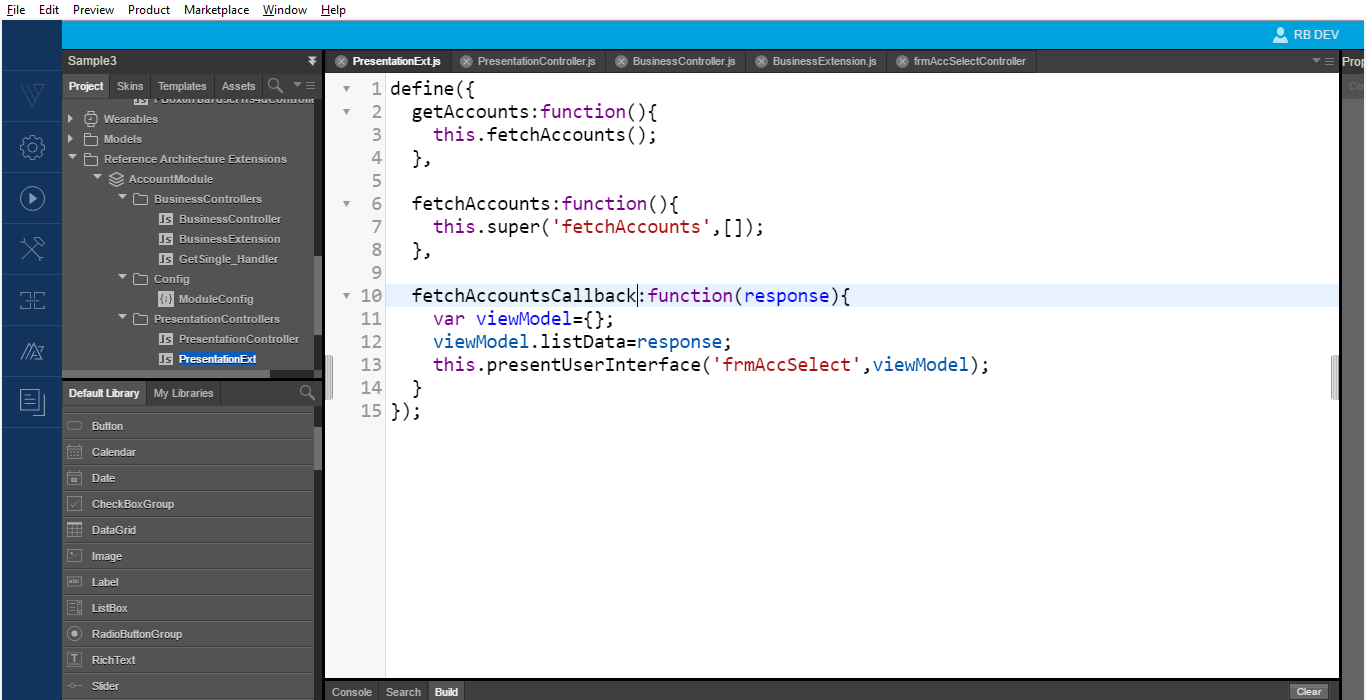
fetchAccountsfunction. This function makes the business call that returns with the list of accounts as the response. - The
fetchAccountsCallbackcallback function receives the list of accounts. - At this point, you must construct a view model with the response and present the
frmAccountform with this view model.
The following images display the application flow in the Account module.
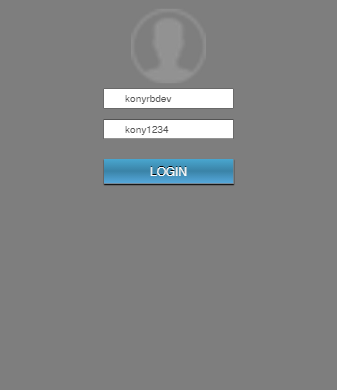
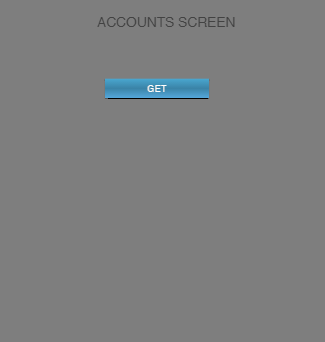
The first image displays the frmLogin form from the Auth module. After the login process, the application invokes the entry point function of the Account module that shows the frmAccountStart screen. After that, the app navigates to the frmAccounts screen to display the data.
After successful login, if the user wants to view the data directly on the accounts screen and does not want the intermediate screen frmAccountStart, and wants the third screen after that. To achieve this, you must use the presentation controller extensions. Presentation controller Extensions use the Presentation layer's capability to display screens. You can change the application's behavior using presentation extensions by keeping the same business/ model layer and modifying the presentation layer to achieve this new extension process. To get the correct results, you must ensure that you use the same business layer and the model layers.
Implementation
Here are the steps you must follow to create and add a Presentation Controller Extension.
- Create a new JS file,
AccountModule_PresentationExtn.js, and make an entry of the JS file in the module config in the presentation extensions array.
- Call the Accounts module entry point function after the Auth module processes. This entry point
showAccountStartfunction shows thefrmAccountStartform. But now, you must override this function with the function you defined earlier in your presentation controller extension.
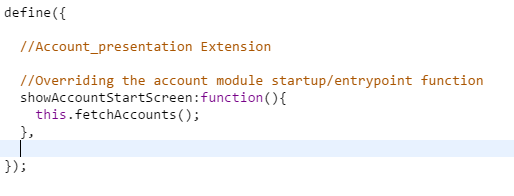
- Override the entry point, and make the changes as per requirement. To show the list of all accounts in the Account screen, you must retrieve the response from the service. For implementation, follow these steps.
- Invoke the function you created inside the
AccountModule_PresentationExtn.jsJS file in theshowAccountStartScreenmethod. The output of this function will be the list of all accounts. - After getting the data, invoke the
fetchAccountsCallbackfunction. This function shows thefrmAccountform with the accounts data.
You have now successfully modified the entry point of the Account module and changed the presentation flow without changing any piece of code of the original code base.
- Invoke the function you created inside the
The following images display the application flow:
Modify a Form, Add New Widgets, and Hide a Widget
This section provides an example of modifying a form, adding a new widget, and hiding an existing widget using extensions.
Before understanding the steps for implementing the extensions, consider the following.
- The Accounts form,
frmAccountscontains a segmentsegAccountthat shows the account number and the available balance on the top.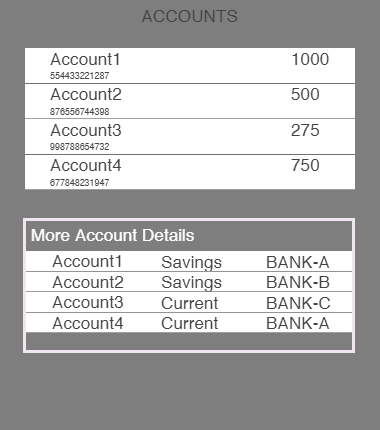
- The screen also displays a flex at the bottom, with another segment showing additional account details. In this example, you will learn how to achieve on / off behavior for the
flex1FlexContainer. To display the screen, you must provide the context information to the form through the view model. After this, you must handle the data from the presentation controller in the view controller as per the requirement.
Implementation
Perform these steps to modify the presentation controller:
- Construct the view model with all the necessary data in the presentation controller function,
fetchAccountsCallback. The code is as follows: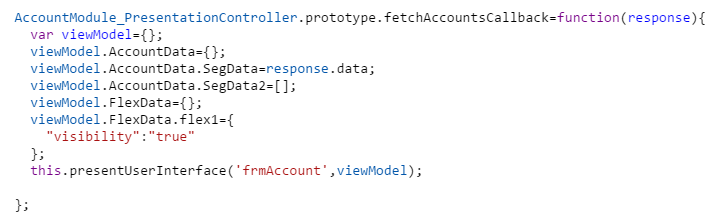
- This view model has
flex1context information and property with a Boolean valuetrue. When the Boolean value istrue, the presentation controller coordinates with the view controller to enable theflex1. - To disable the flex, you must write a new function in the presentation extension to override the
fetchAccountsCallbackfunction and give a unique view model. The image below displays a sample of this override function.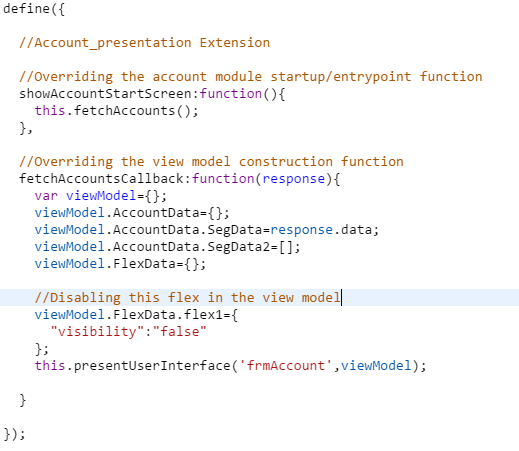
You have now modified the view model object passed from the presentation layer to the view layer.
See how to handle the new data at the view level. There are two ways to do this:
- The first method uses the formConfig and UIBinder. The input for the UIBinder will be in the viewModel format before the change. To change the input format, make changes to the formConfig.js file to map data with widgets according to the entries. The following is a sample of the formConfig.js file:
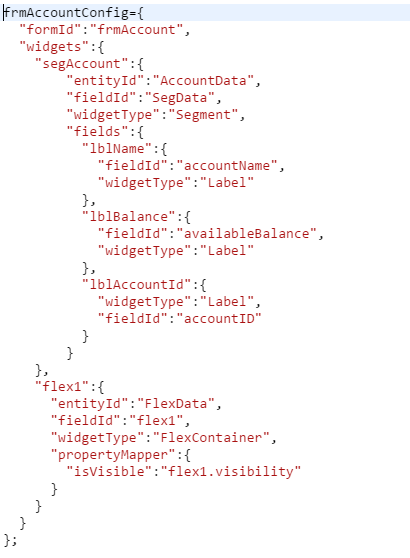
The formConfig file maps the data from the response to the widgets in the
segAccountswidget. The formConfig file also provides a widget entry forflex1and allows you to modify the widget properties per the view model. Based on the presentation's property values to the widgets, you can change the view using the formConfig. The UIBinder performs its operations according to the configurations in the formConfig.If you are using this method to add new widgets, you can add the entry for that widget in the formConfig and the handle in the UIBinder.
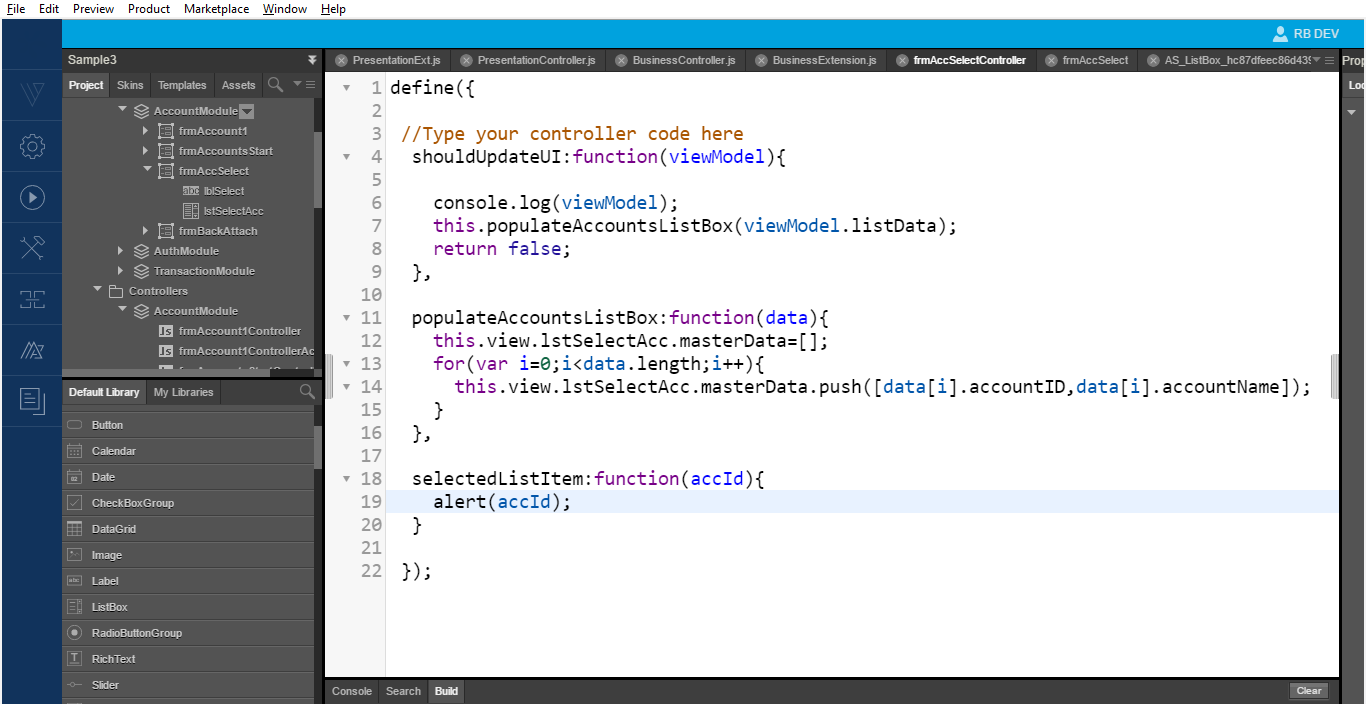
- The second method is to use the
shouldUpdateUIfunction in the view level. In theshouldUpdateUIfunction, check for the appropriateviewModelcontext, and then write your function of enabling or disabling in that function. The image given below shows how the view controller handles it.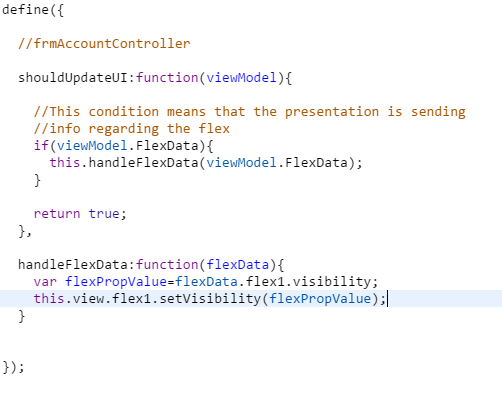
In the
shouldUpdateUIfunction, the application checks if the data sent to the view controller is correct using theFlexData. If the data is correct, the application invokes thehandleFlexDatafunction to modify the visibility offlex1.To use this method to add new widgets, the form controller must handle the new context in the
shouldUpdateUIlifecycle method. The form controller should also handle the context information in the conditionals and perform the necessary operations.
To modify an existing function containing the rendering logic, use a View Controller Extension to override the function and implement the new function in the extension.
Extend Presentation and Business Using SUPER Class Methods
Let's look at the flow to display transactions of a selected account. After a successful login, the application displays the accounts list. When the user selects an account, the application displays the transaction list for that account.
Implementation
In this example, let us add the UI for the user to display the transaction details of the account holder on the Account screen. This customization helps us understand how to use the existing business logic, modify the business, add a new view, and introduce a new business as part of customization.
Here are the steps of implementation.
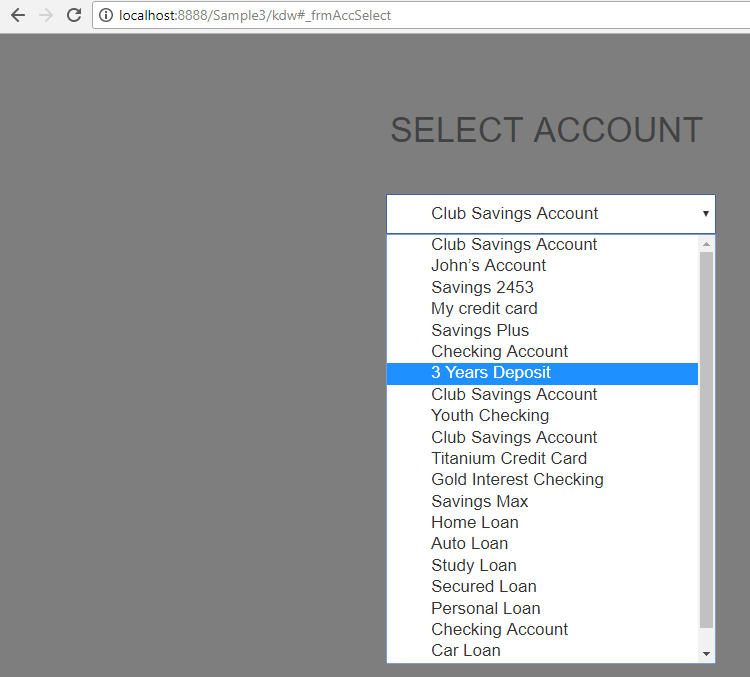
- Design the new screen that the application navigates to after the login. Following is the new screen in which the ListBox contains the account data.

- In the original flow, after authentication, the application invokes a business call to fetch the account list and displays it in the
frmAccountsscreen. You must use the same business logic in the new implementation but modify the presentation logic. In the presentation logic, send only the account name and theaccountIDto the view, and populate them in the list box. - The code in the image below helps you to extend the presentation layer. Here we use the base presentation class c, which gets all the accounts and sends the response to the
frmAccountform.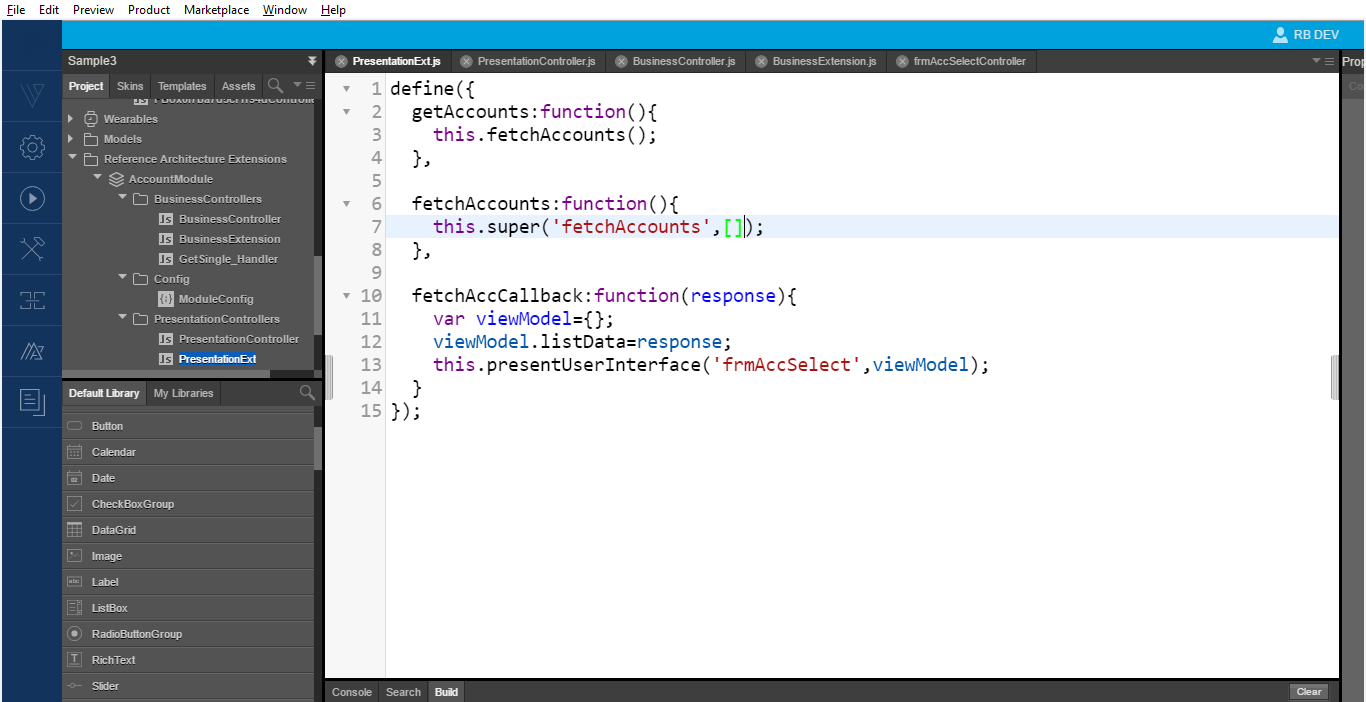
- To extend the business layer and modify the business logic in the
fetchAccountsmethod to fetch accounts data and return only the accountID and accountName. This means you must filter the data here and send only the data that the presentation layer requires. - No tooling support exists for creating a business extension, so you must create this file manually. To create a Business Controller Extension, follow these steps.
- Navigate to the resource location of the BusinessControllers folder in your machine.
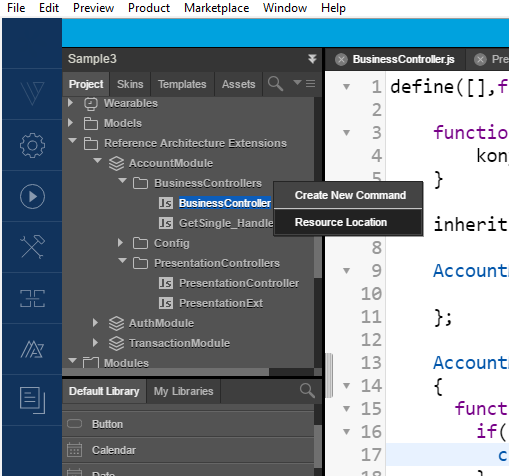
- Create a new JS file and rename it to the required business extension.
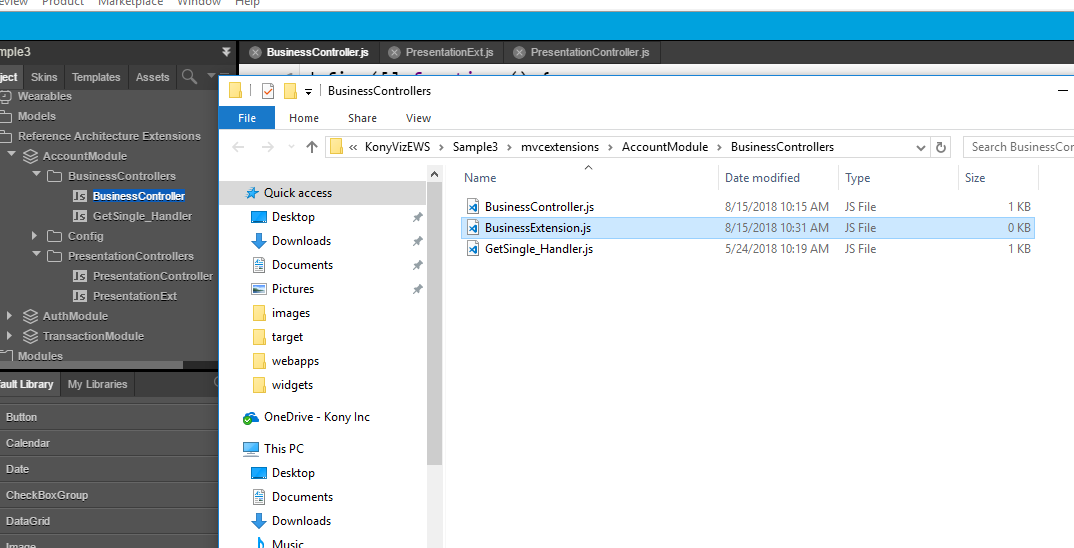
- From the Quantum Visualizer, refresh the project.
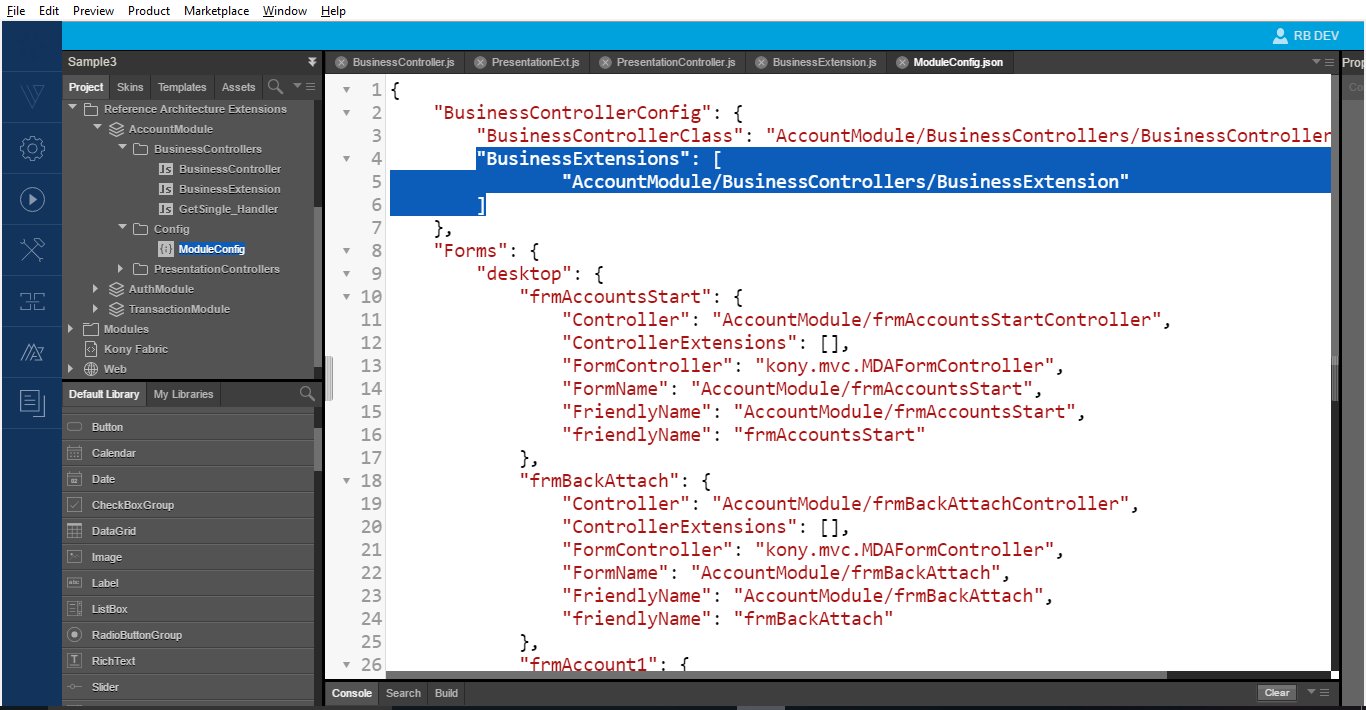
- Make an entry in the ModuleConfig.js file
You have successfully created a Business Controller extension and added it to your application.
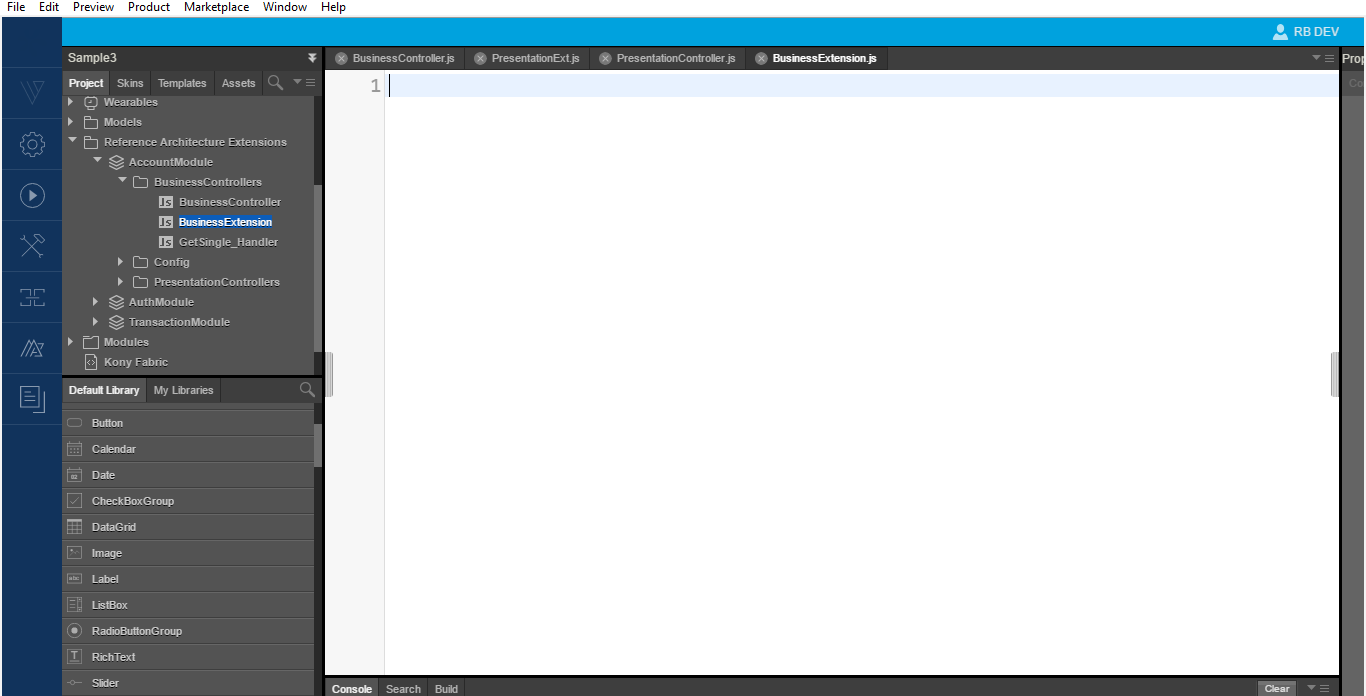
- Navigate to the resource location of the BusinessControllers folder in your machine.
- Define the syntax in our business extension file.
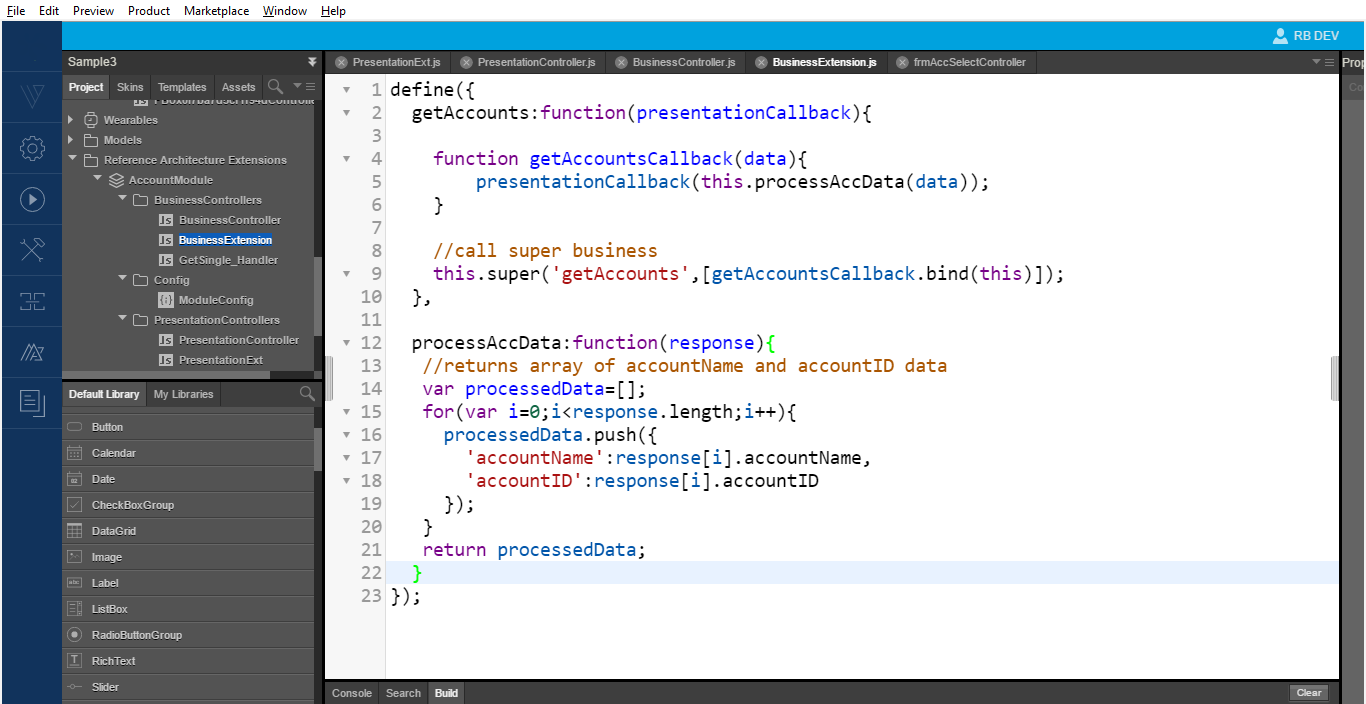
You can now start defining/ overriding the business function as per requirement. You can view the following output when you run the App.
The above output image shows the successful completion of the super implementation of the business and presentation layers. The business layer super method works as the business only sends two data properties:accountIDandaccountName.
To change the presentation extension to navigate to the frmAccSelect screen instead of the frmAccount screen, follow these steps.
- Re-write the implementation as the callback scope passed is different. You can also overwrite the whole callback.
In the above image, we call our super method and override the existing super method
fetchAccounts. The App now executes the new callback method and navigates to the new screen. - Write the binding logic in the view controller, which is as follows.
At this point, you can also define an event for the ListBox. This event then calls the presentation layer and passes the ID to the presentation layer. The Business call uses this ID to get the response.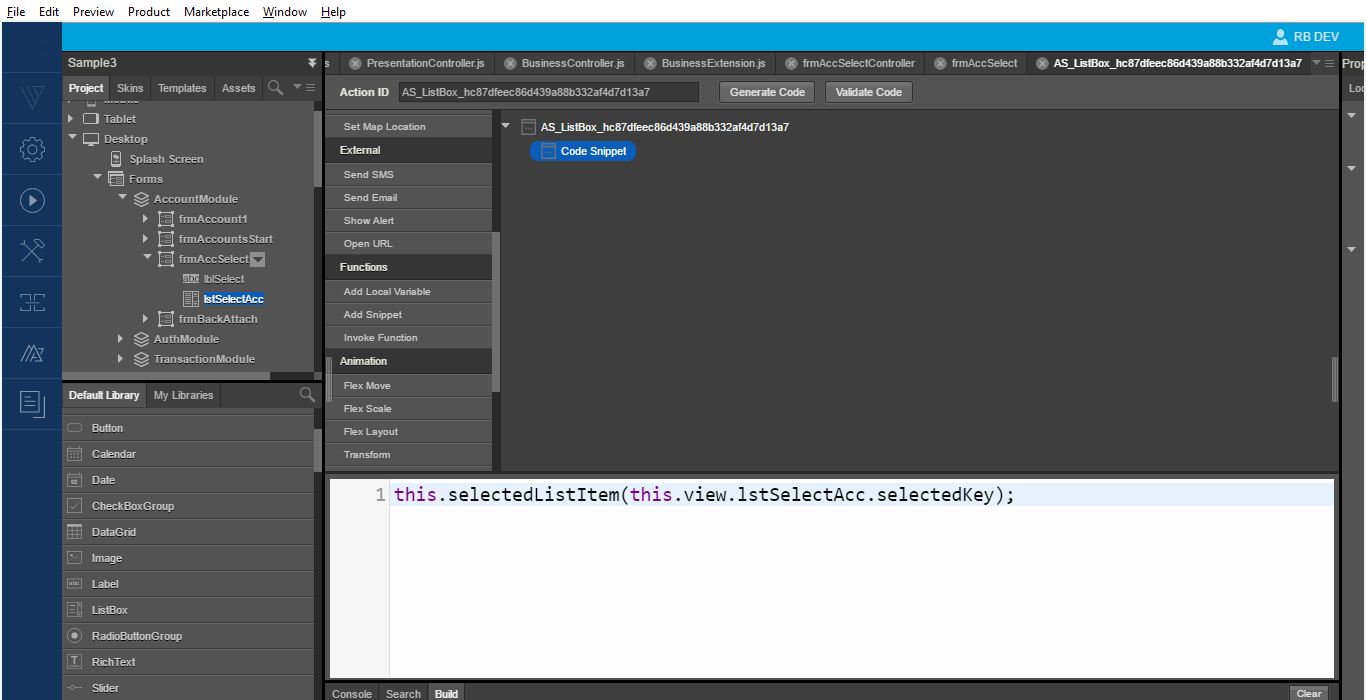
The ListBox now contains the account details.
- In the current implementation, when the user selects an account, the application only displays the selected key
accountID. To display the details, you can use the selected key to call a new business in the business extension.
The image below displays the business logic for retrieving and displaying a single account detail on the new formfrmAccountDetails.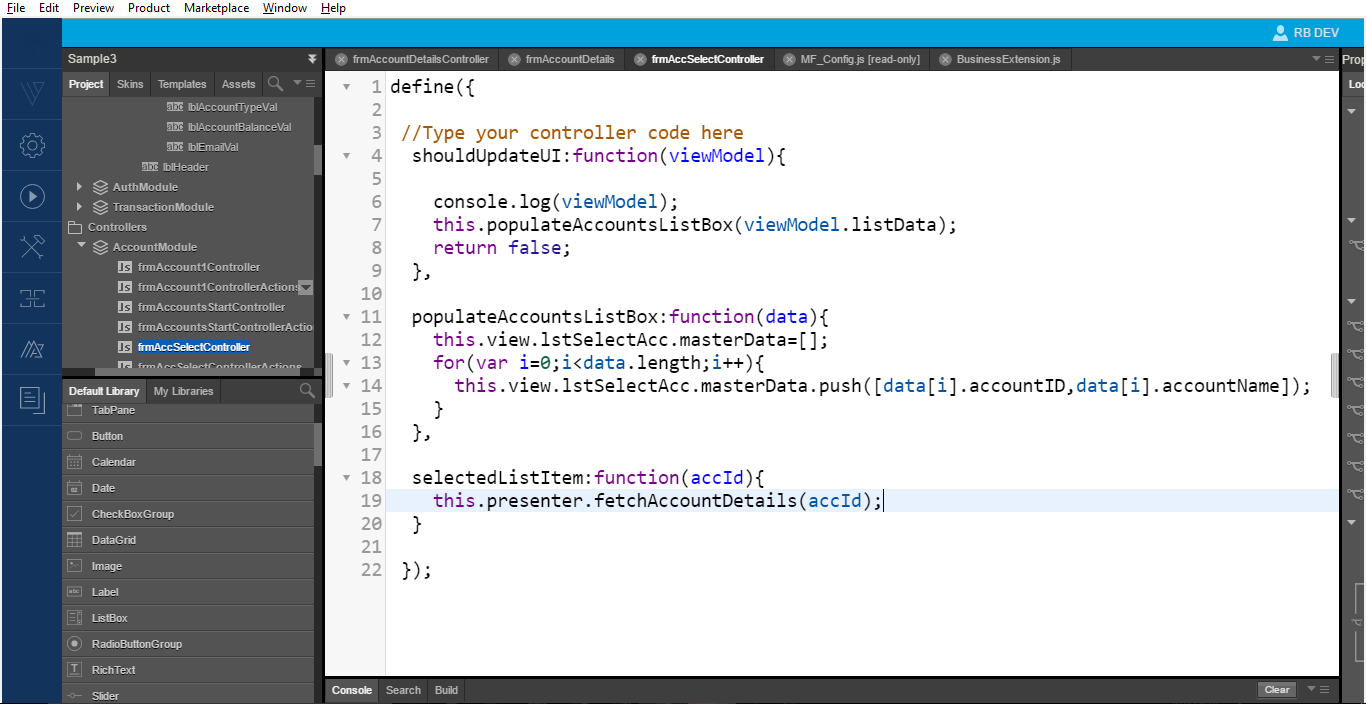
- Implement a presentation method
fetchAccountDetailsto fetch all accounts with a specificaccountID.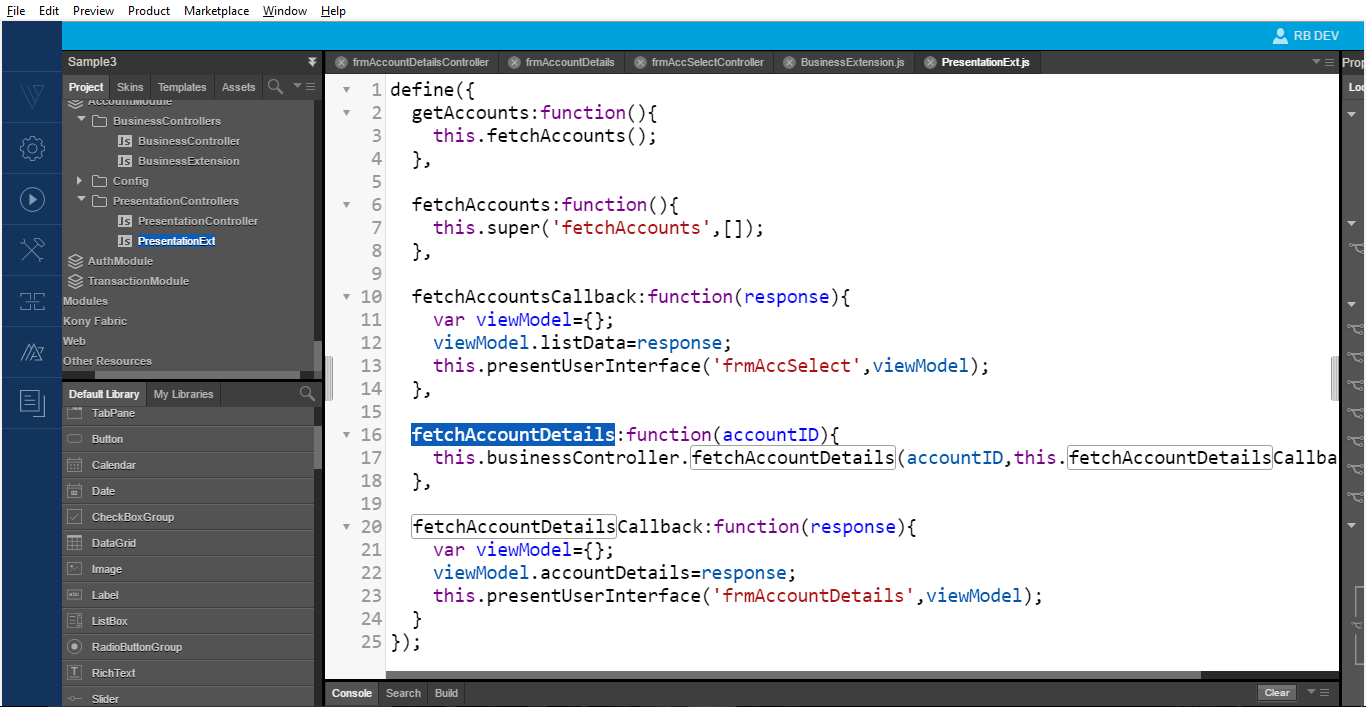
- From the presentation controller, call the business method to fetch the account details with an
accountID.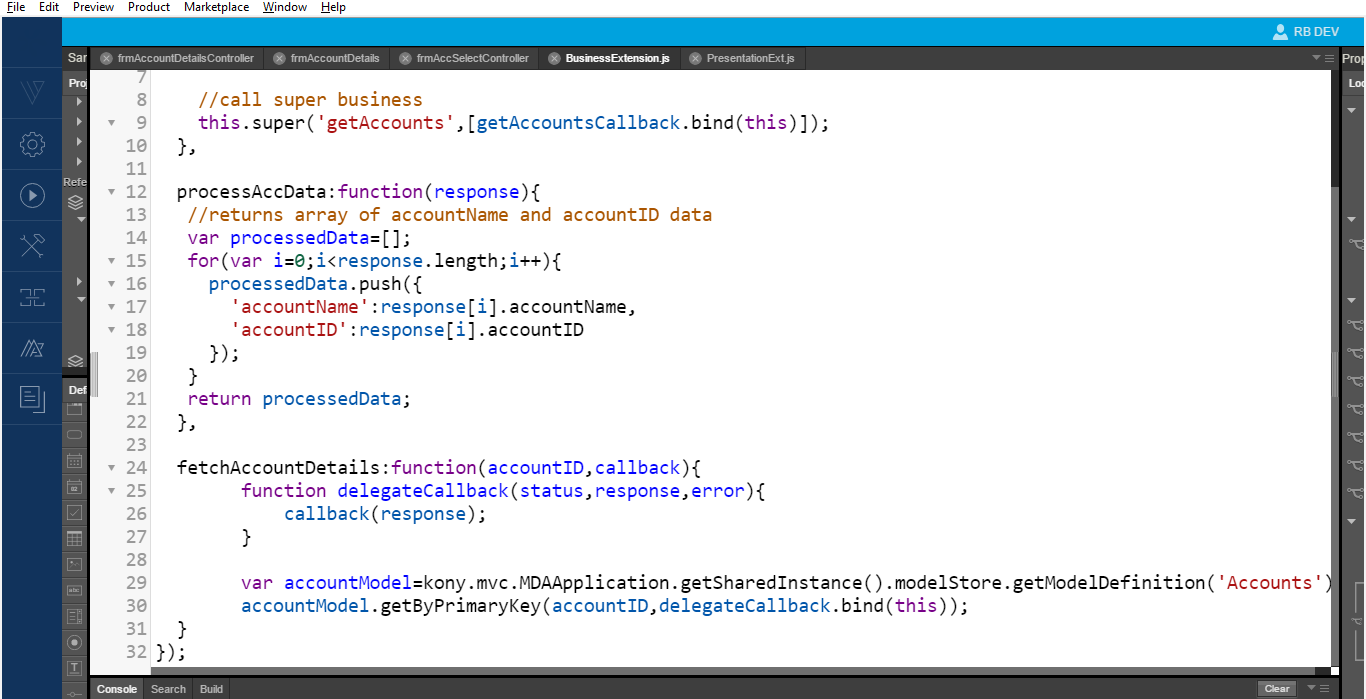
- Invoke the model layer based on a primary key
accountID. After receiving the data, pass the response back to the presentation layer and then to view.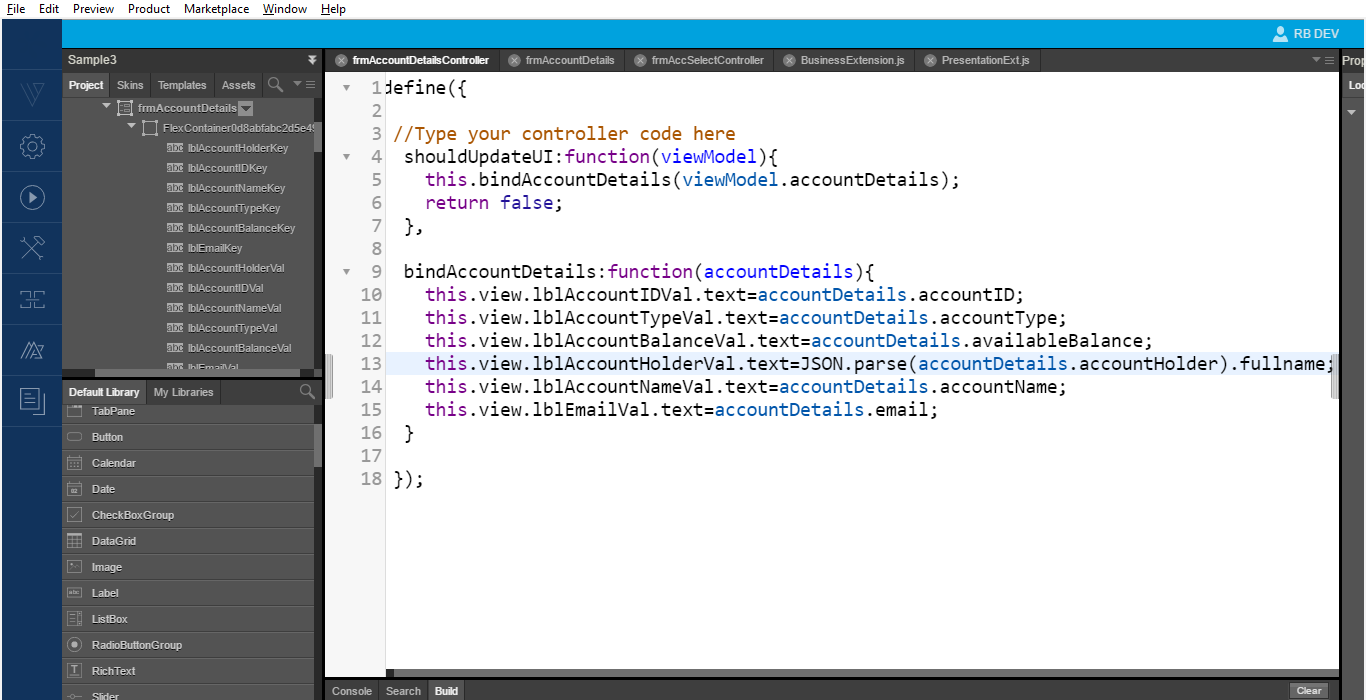
We have successfully used the presentation and business extensions to customize the application.
Now let us see how to attach the existing transactions screen to this flow.
- Drag and drop a button widget from the Default Library to the
frmAccountDetailsscreen. - From the Properties Panel, modify the text as GET TRANSACTIONS.
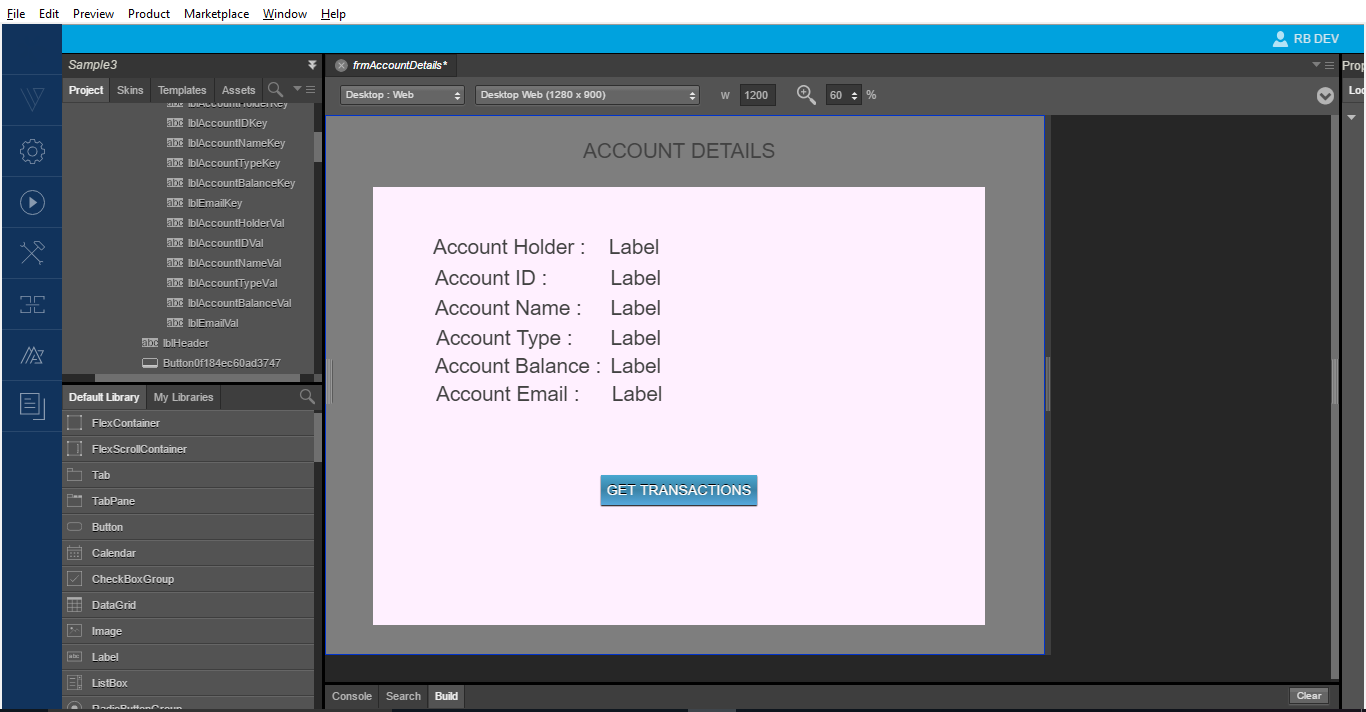
The existing logic in the Transactions module will work for retrieving the data - From the Properties Panel, under the Action tab, click Edit for the onClick event.
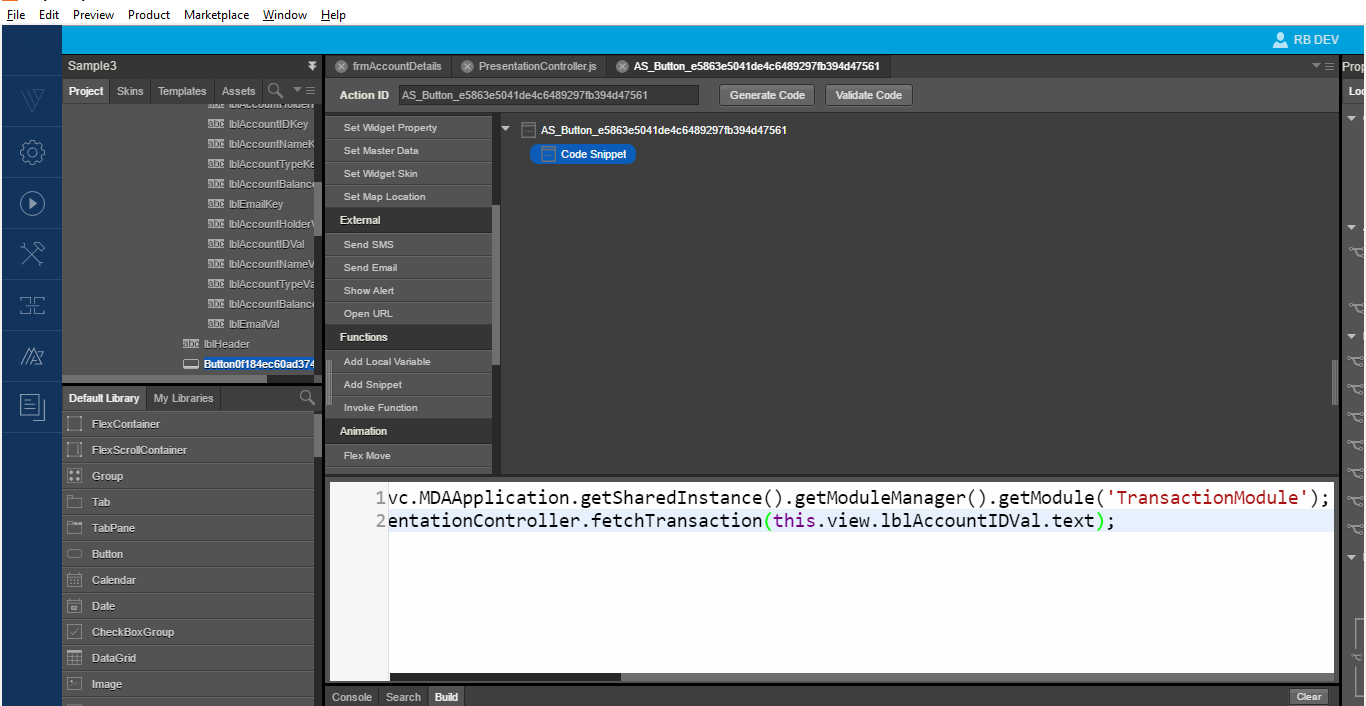
- In the Action Editor, from the right side, under Functions, click Add Snippet.
- Inside the code editor, call the transaction modules presentation method to load the transaction details.
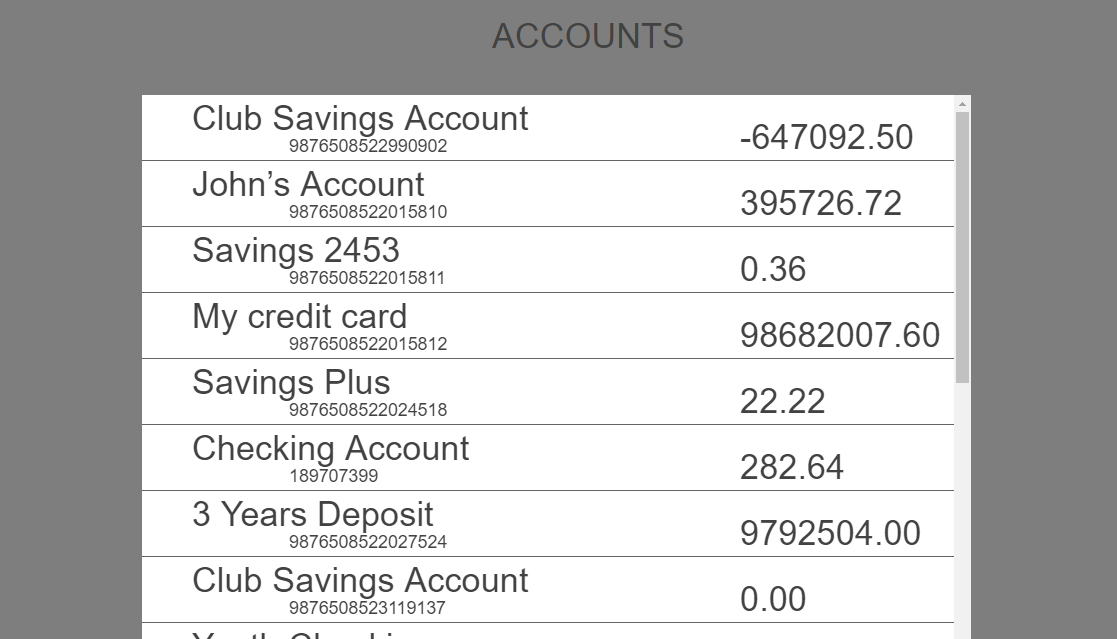
When you click the GET TRANSACTIONS button, the screen shows thefrmTransactionsform like the following image.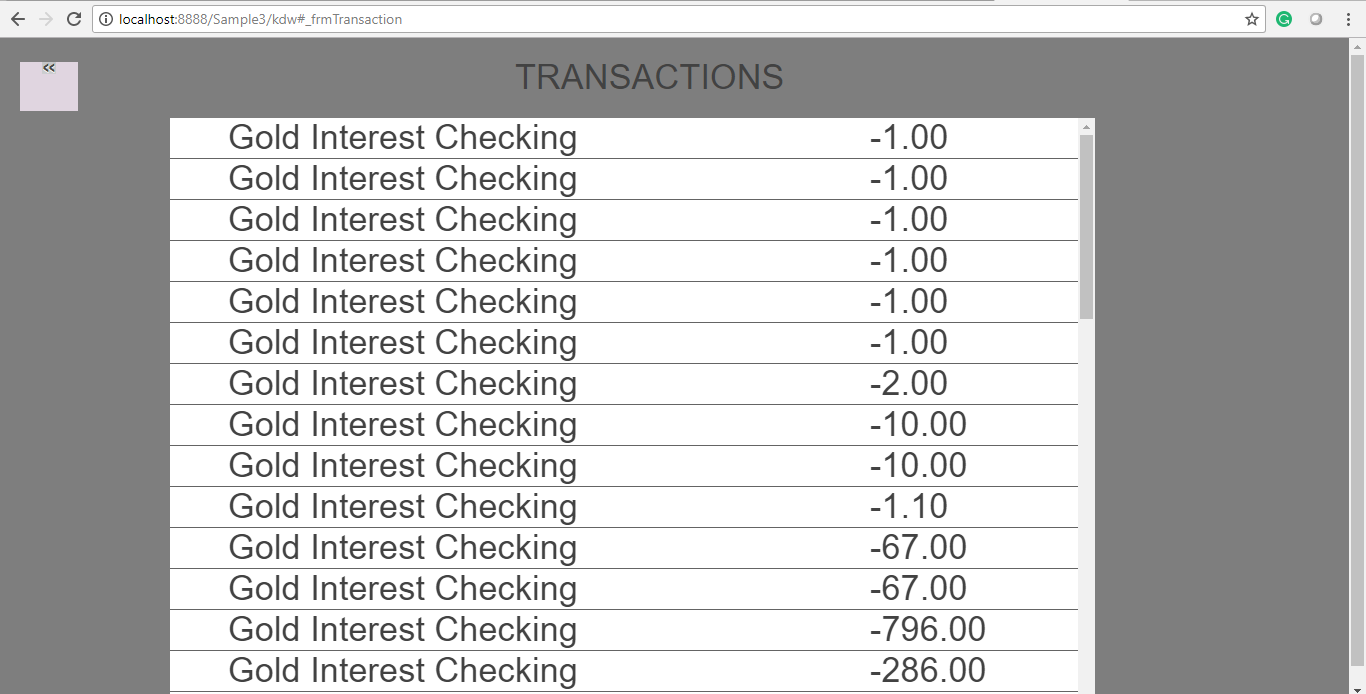
We have now achieved the flow using the presentation and business extensions. Let's take a look at what we have done.
- Base App:

- Customized App (using extensions):

Extend Business Controller as a Pre / Post Implementation
Let's take the customized application used earlier and have customization over it such that we process the business response and display them on the screen. For this to be possible, we make a business extension at the place where we get the response, then sort it, process it accordingly, give it to the presentation, and this data gets populated onto the view.
For now, we will display the data in a chronological or reverse chronological order and set it on the screen. We can sort this data in the business or presentation layers to achieve this. For now, let's do this sorting logic in the business layer.
Following is the business layer in the transactions module: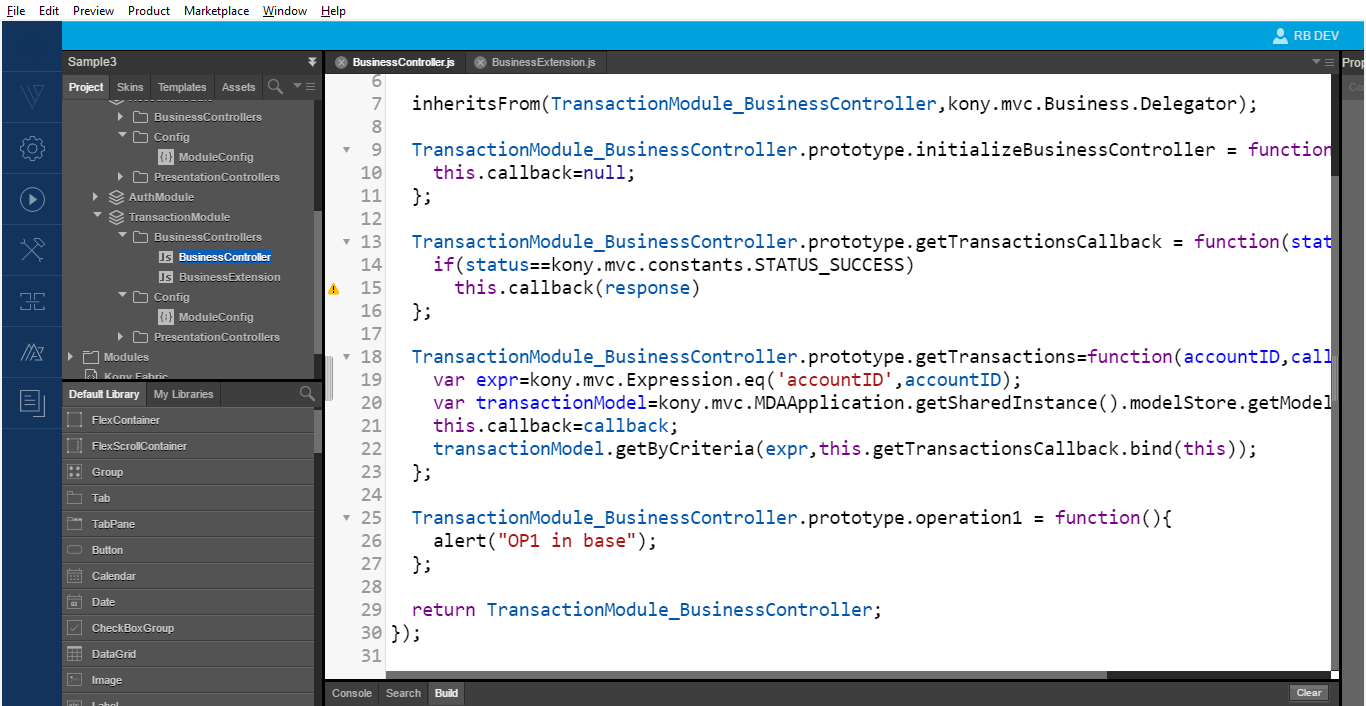
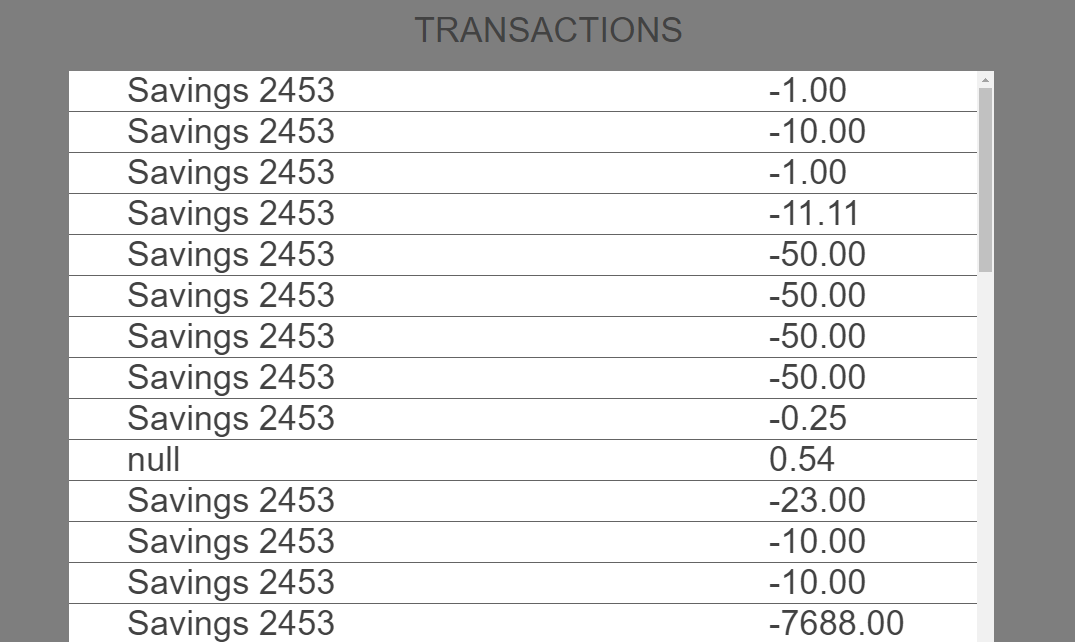
To process and sort the data, override the getTransactionsCallback function in the business extension. The sort logic in the image below is for an array in the extension and it works with the existing logic.
This logic gives the following response in reverse chronological order: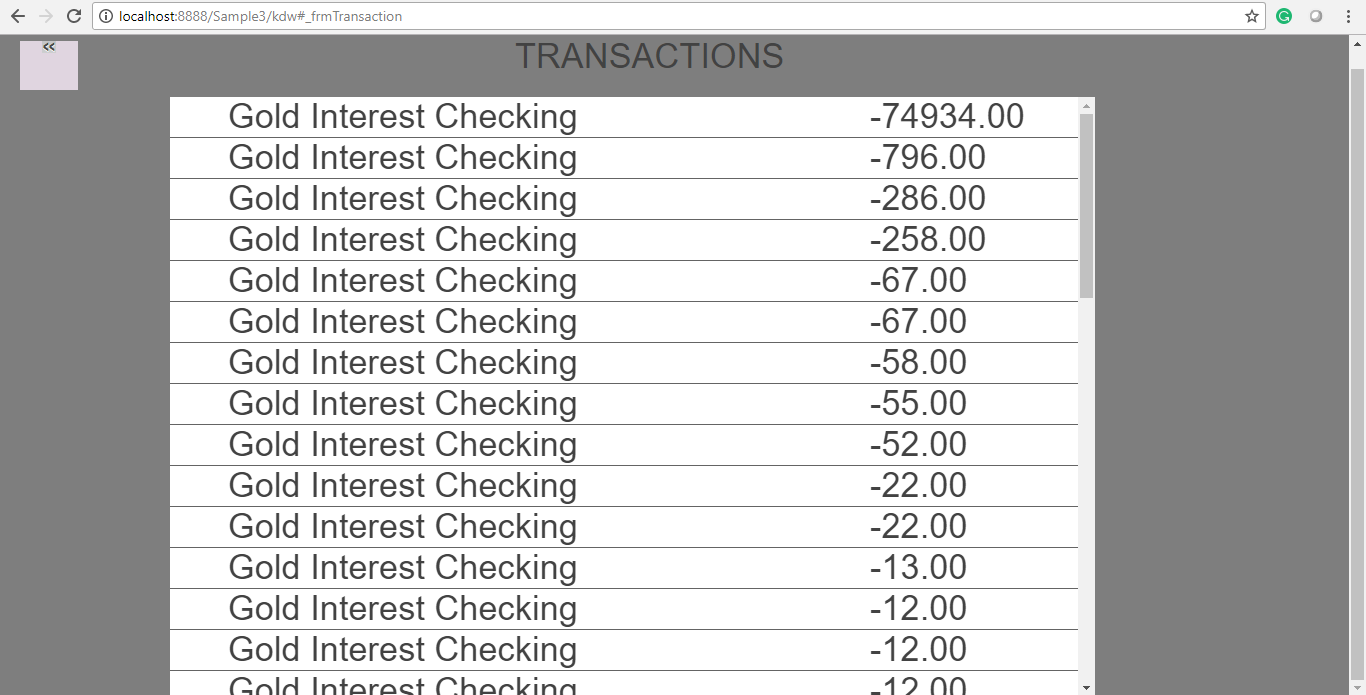
We can also change the logic in chronological order as follows: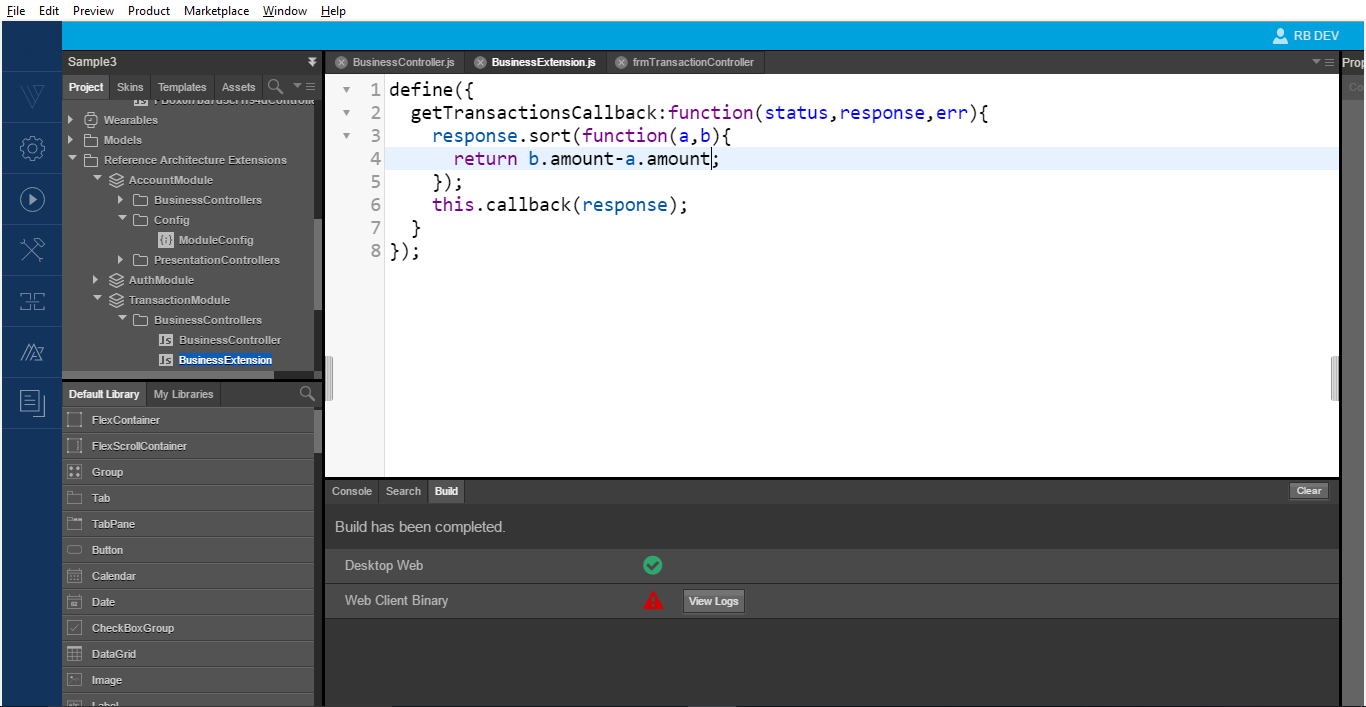
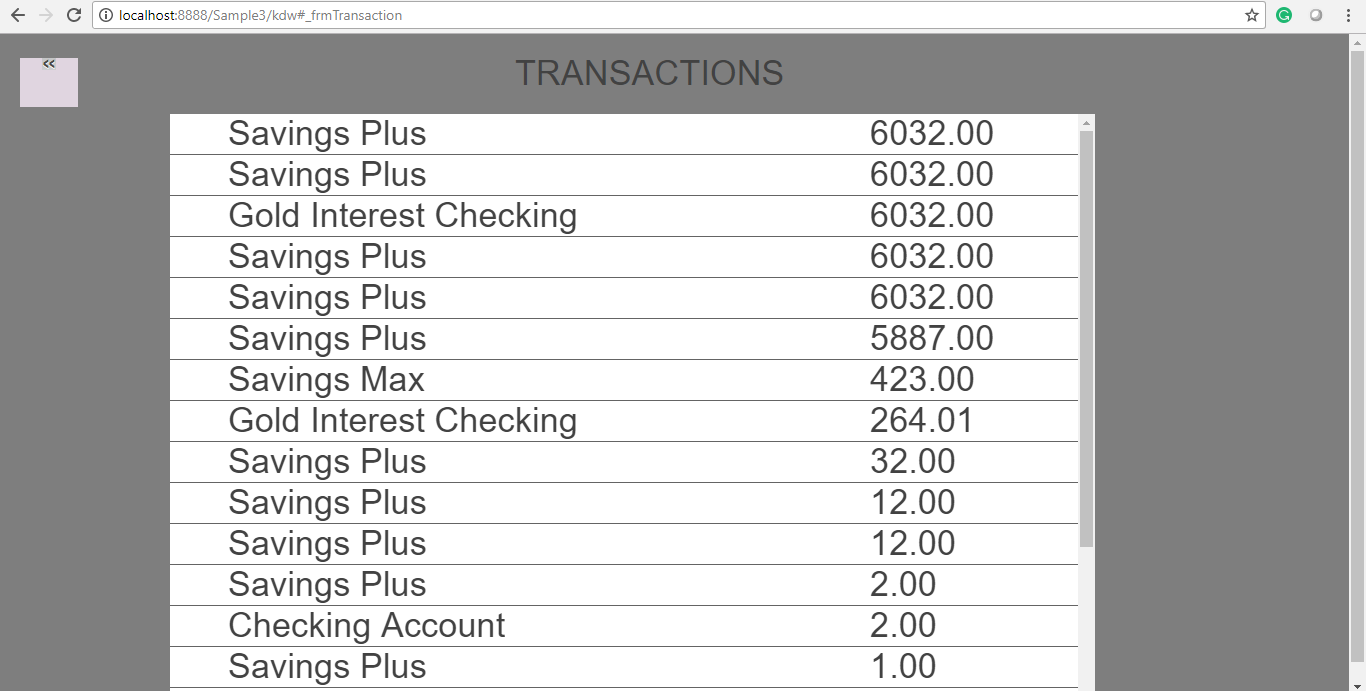
We have successfully created a Business Extension.
In this topic