Software
Install the following to deploy the Temenos Digital solution. Before installing the solution, make sure that your computer meets the requirements explained in the following sections:
Quantum Visualizer
Make sure you have the following:
- Quantum Visualizer Enterprise version 202404.0.1. Refer to Configuring your computer for installing Visualizer, and understanding the requirements for Visualizer. Refer to Quantum Visualizer User Guide for more information on the installation and configuration process.
- Latest iOS and Android plug-ins and OS. See Release Notes for details.
- MVC2.0 - 1.5.3 (Digital Banking Reference Architecture)
- Refer to Supported Platforms and Channels document. This document provides details of the supported device types, operating systems and browser versions supported by each Temenos Digital product and feature set.
- Credentials to the appropriate download site to download the release artifacts. Contact your Temenos representative for more information.
- Refer to the list of licensed software being used including the third-party licenses.
Quantum Fabric
Quantum Fabric can be set up on the cloud or on-premise. Choose any of the following installation paths based on your requirement:
- Cloud: Make sure that, the Quantum Fabric version 202404.0.0 instance is available on Temenos Cloud. If you have not created a cloud instance already, refer to Quantum Fabric User Guide for more information. You should also have a Quantum Fabric account with valid credentials. Refer to Creating Quantum Fabric Account for more information.On-premise: The equivalent version is closest installer version to 202404.0.0. To set up and configure the Quantum Fabric on-premise environment, refer to Quantum Fabric User Guide.
- Refer to Supported Platforms and Channels document. This document provides details of the operating systems, application servers, and databases supported by Quantum Fabric.
- Tomcat 9.0.33 (use the default Tomcat that comes along with Quantum Fabric installation).
- Credentials to the appropriate download site to download the release artifacts. Contact your Temenos representative for more information.
- Refer to the list of licensed software being used including third-party licenses.
- Adding DNS entries to access Temenos Digital product URL as public domain: This step is optional. If the Quantum Fabric URL or Temenos Digital product applications are to be accessed as public domain URL or to be accessed from anywhere through internet, then make sure to add necessary DNS entries for the Domain Name. This step is required before Fabric Installation as this domain name needs to be provided during Fabric installation. Moreover, SSL certificate is required in case https Fabric instance is used; make sure the certificate is compatible with the domain name.
Other Software Prerequisites
Customer must procure the service/software directly from the third-party vendors.
- JAVA Version 11
- iText: Customer needs to purchase iText license for commercial purposes.
- Temenos Digital apps are certified on the following databases:
- DBX Database
- MySQL 8.0.28
- MS SQL Server 17
- Azure SQL 12 (Equivalent of SQL Server 2019)
- Quantum Fabric Database
- MySQL 8.0.29
- DBX Database
- Microservice Database
- PostgreSQL 14.2 for NoSQL
- MySQL 8.0.29 for SQL
- Microservice Container for all Apps:
- Azure VM
- On-premise
- Minimum system requirements to run the mobile application:
- An Android device should have a minimum of 2 GB RAM. On devices with lower memory, the app will work but can be sluggish.
- For iOS devices, iPhone 5 and above are supported.
- DBXDB Schema Locking: Note that L3 customization is not allowed on DBXDB. If the product team locks the DBXDB, customer implementation teams will face issues while fixing the product bugs. To avoid that, the product team has extended all the privileges in DBXDB. However, the implementation teams/customersnote are advised not to modify or ALTER the DBXDB schema for L3 customization.
Transact
Make sure you that Temenos Transact is set up. Refer to the deployment instructions for more information.
Fabric Run-time Configuration
Fabric run-time configuration related to Transact IRIS URLs.
In Quantum Fabric, click Environments, then select Settings. In the Settings section, select the Configurable parameters, and then Settings. Under the Server properties, ensure that you have set the following key value pairs.
|
Variable Name |
Variable Value (Sample) |
Description |
|---|---|---|
| DBP_CORE_CUSTOMER_CREATE | http://temenosqainfinity.southindia.cloudapp.azure.com:9089/infinity-retail-api/api/v1.0.0/party/onboarding/customers | Map this variable with the active IRIS URL (infinity-retail-api) configured with JWT token |
| ONBOARDING_IRIS_APIS_BASE_URL | http://temenosqainfinity.southindia.cloudapp.azure.com:9089/irf-provider-container/api/v1.0.0 | Map this variable with the active IRIS URL (infinity-retail-api) configured with JWT token |
Microservices
Microservices is an architectural style that structures an application as a collection of small autonomous services, modeled around a business domain. Each service is self-contained and implements a single business capability.
To set up a microservice, see the deployment instructions section under the respective microservice.
Receipt Microservice is discontinued from 2022.04 release. The document generation capability is now handled by Formpipe, a third-party tool, through Document Storage Microservice.
Avoid Port Conflict Issues for Microservices
Make sure that there are no port conflicts if installing multiple microservices in the same system box. The overall default ports allotted for microservices across all verticals are given below for reference.
|
Vertical |
Microservice |
cache-service |
db-service |
API |
Ingester |
docs |
zookeeper |
Kafka |
schema-registry |
|---|---|---|---|---|---|---|---|---|---|
| Origination | Party | 1000 | 4000-4002 | API - 8000 Debug - 8001 |
Transact Ingester: Health Check - 12000 Debug - 12001 Binary Ingester: Health Check - 12002 Debug - 12003 |
17000 |
19000 |
23000, 23001 |
27000 |
|
Origination |
Marketing Catalog |
1001 |
4003-4005 |
API - 8002 |
Transact Ingester: Health Check - 12004 Debug - 12005 |
17001 |
19001 |
23002, 23003 |
27001 |
|
Origination |
Due Diligence |
1002 |
4006 - 4008 |
API - 8004 |
Ingester: |
17002 |
19002 |
23004, 23005 |
27002 |
|
Retail Banking |
Arrangement |
2100 |
4300 |
API- 8300 DEBUG- 8301
|
Transact Ingester: |
17100 |
N/A |
N/A |
N/A |
|
Retail Banking |
Holdings |
2101 |
4301-4303 |
API- 8302 DEBUG-8303 |
Transact Ingester: |
17101 |
N/A |
N/A |
N/A |
|
Retail Banking |
Consent |
2102 |
4304 |
API- 8304 DEBUG-8305 |
Transact Ingester: Health Check - 12508 Debug - 12509 Binary Ingester: Health Check - 12510 Debug - 12511 |
17102 |
N/A |
N/A |
N/A |
|
Retail Banking |
Account Aggregation |
2103 |
4305 |
API- 8306 DEBUG- 8307 |
Transact Ingester: |
17103 |
19300 |
23300 |
27100 |
|
Retail Banking |
Service Request |
2105 |
4306-4309 |
API- 8310 DEBUG- 8311 |
Transact Ingester: |
17105 |
N/A |
N/A |
N/A |
|
Spotlight |
Campaign |
2300 |
4900 - 4902 |
API - 8900 Debug - 8901 |
|
17300 |
N/A |
N/A |
27300 |
Fabric Run-time Configuration
In Quantum Fabric, click Environments, then select Settings. In the Settings section, select the Configurable parameters, and then Settings. Under the Server properties, make sure that the key value pairs are set as shown in the table below. Note that the The URLs shown in the table are IRIS war files of microservices and not the base Docker URLs.
Note: The URLs shown in the table are IRIS war files of microservices and not the base Docker URLs.
|
Variable Name |
Variable Value (Sample) |
Description |
|---|---|---|
| ARRANGEMENTS_HOST_URL | http://13.67.41.98:8087/ms-arrangement-api/api | Replace the host URL with your environment |
| HOLDINGS_HOST_URL | http://13.67.41.98:8090/ms-holdings-api/api | Replace the host URL with your environment |
| MARKETING_CATALOG_URL | http://temenosqainfinity.southindia.cloudapp.azure.com:9089/ms-marketingcatalog-docker-iris/api | Replace the host URL with your environment |
| MS_PRODUCT_MANAGEMENT | http://13.76.33.216:8095/ms-marketingcatalog-api/api | Replace the host URL with your environment |
| ONBOARDING_PARTY_MS_BASE_URL | http://temenosqainfinity.southindia.cloudapp.azure.com:9089/ms-party-docker-iris/api/v2.0.0 | Replace the host URL with your environment |
| PARTY_HOST_URL | http://temenosqainfinity.southindia.cloudapp.azure.com:9089/ms-party-docker-iris/api | Replace the host URL with your environment |
Application Permissions for Android Mobile Banking
| Permission | Description | Module |
|---|---|---|
| ACCESS_COARSE_LOCATION | Allows an app to access approximate location. | Locate Us |
| ACCESS_FINE_LOCATION | Allows an app to access precise location. | Locate Us |
| ACCESS_NETWORK_STATE | Allows applications to access information about networks. | Added by default |
| CAMERA | Required to be able to access the camera device. | RDC |
| INTERNET | Allows applications to open network sockets. | Added by default |
| READ_CONTACTS | Allows an application to read the user's contacts data. | Card-less cash Withdrawal (To select contacts from device) |
| WRITE_EXTERNAL_STORAGE | Allows an application to write to external storage. | Konympsocialshare component and wealth module (To download statements) |
Open Ports in VM instance
After the Azure or AWS virtual machine (VM) instance is allocated, open the ports on Azure or AWS portals.
After the Azure or AWS virtual machine (VM) instance is allocated, follow these steps to open the ports on Azure or AWS portals:
- Do any of the following:
- If it is Azure VM, go to the Azure portal.
- If it is AWS VM, go to the AWS portal.
- The person who has created the VM will have access to all the subscriptions.
- The list of VMs created are displayed on the home page. Alternatively, you can click the Virtual Machine icon displayed on the home page to view the list.
- From the displayed list, select the VM for which you want to open the ports.
- In the screen that appears, click the Networking tab on the left, and then click the Add Inbound Port Rule button. A pop-up appears.
- In the source and destination, select Any option from the list so all users can access.
- In the destination port ranges text box, enter the comma separated list of ports which you want to open.
No default ports of any application must be opened for security reasons.
- On the VM, open the Firewalls settings.
- Select the Inbound Rules from the left.
- Select New Rule option from the right panel. A dialog box appears.
- Select the Port option on the dialog box and click Next.
- Against the specific local ports option, specify the entire comma separated list of ports which you have opened through the portal. Click Next.
- After completing the Action, Profile, and Name tabs, click Finish.
- Repeat the steps for Outbound rules.
- On the VM site and the Azure portal, if the same set of ports is opened, then it will allow you to connect to the portal.
Ports must be opened for microservices deployment on Docker instance, MySQL installation, Fabric installation, and more. For example, Enabled Ports: 8090,8087,8085,9001,8097,8095,8077,7075,8080,443,8076,9088,9089,3307.
In the above ports list,
- MySQL installation uses 3307 port.
- The 8080 and 443 ports can be used for Fabric installation.
- Remaining ports can be used for microservices deployment. Each microservice will be deployed on respective port.
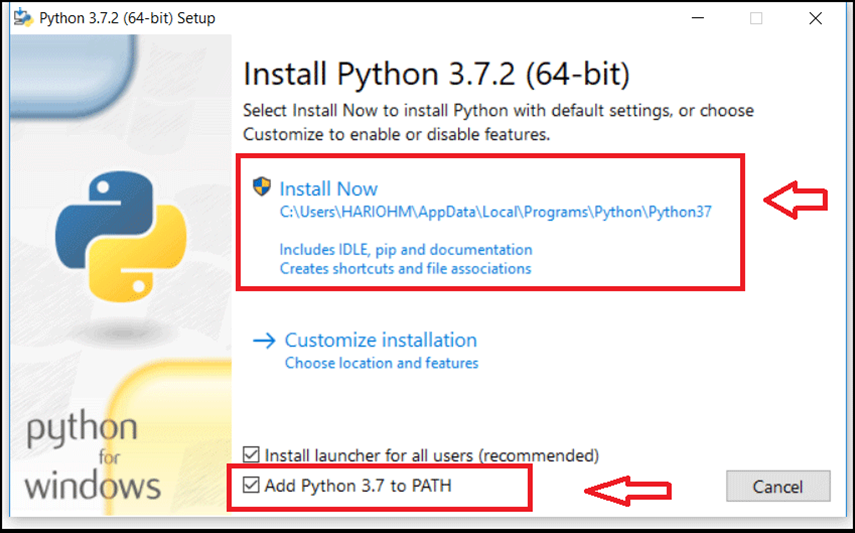
Install Python
Installing Python is a prerequisite because the Temenos Digital installer setup is created using Python.
Download Python 3.7.2
Download Python 3.7.2 for desktop from this link.
Install Python
- Select the Add Python 3.7 to PATH check box.
- Click Install Now to install Python with default settings.
It takes approximately five minutes for the installation to complete.
Install Apache Ant
Apache Ant is required for building client apps.
To install Ant, follow these steps:
- Make sure that Java Development Kit is installed and JAVA_HOME is configured as Windows environment variable.
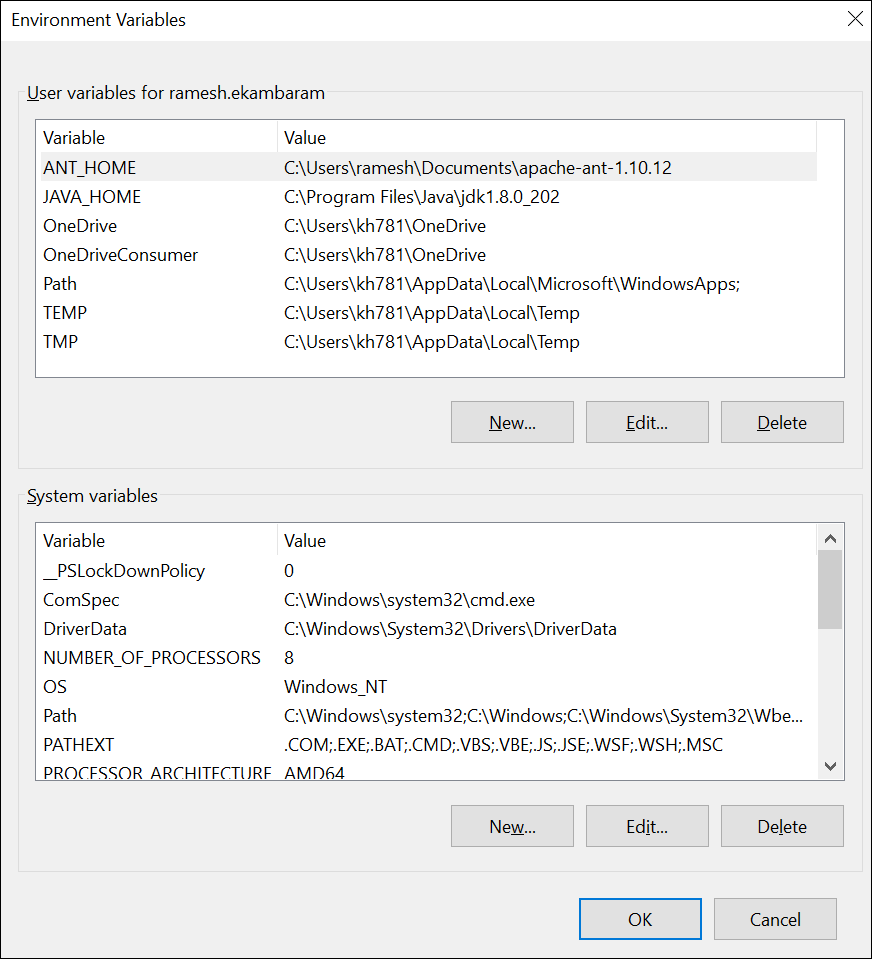
- Visit the Apache Ant website and download the Ant zip file.
- Unzip the downloaded file to the folder that you want to store Apache Ant.
- Add ANT HOME as the Windows environment variable.
- On the Command Prompt (cmd), enter ant -version to see the Ant version installed on the system.

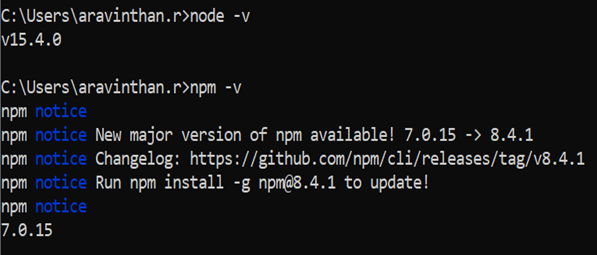
Install Node.js
Node.js is required for building client apps.
To install Node.js, follow these steps:
- Visit the Node.js website.
- Download the Node.js installer and install it.
- Do the following on
Command Prompt (cmd):
- Enter node -v to see the Node.js version installed on the system.
- Enter npm -v to see the Node Package Manager version and whether NPM is installed on the system.
In this topic