Onboarding Journey Dashboard
After a successful sign in, the application displays the dashboard screen which is the main page of the application.


A signed-in bank user can see a customized dashboard based on the user role and the permissions assigned to the bank user for accessing the features and actions in the Onboarding journey.
Retail Relationship Manager (RM)
Retail Operations User (Ops User)

SME Relationship Manager (RM)
SME Operations User (Ops User
Application Stages of Retail Onboarding and SME Onboarding in Temenos Digital Assist
Retail Onboarding
Retail Onboarding applications (Savings Account, Cheque Account and Certificate of Deposit) have the following stages and for each application, the corresponding stage displays on the screen.
- Submitted : A Retail Onboarding application is in Submitted stage when the application has been submitted through the Origination App and until Verification stage related tasks are created.
- Verification: A Retail Onboarding application is in Verification stage until the Application Review task has been claimed and completed successfully. Thereafter, it progresses to the Decision stage.
- Decision: A Retail Onboarding application is in Decision stage until all the Add Decision task(s) have been claimed and completed successfully. Thereafter, it progresses to the Closing stage.
- Closing: A Retail Onboarding application is in Closing stage until the Delivery and Fulfilment related activities have been completed successfully. Thereafter, it progresses to the Completed stage.
- Completed: A Retail Onboarding application is in Completed stage if it has been
- Auto-approved (STP flow)
- Auto-denied (STP flow)
- Approved (after Manual Review)
- Denied (after Manual Review)
- Withdrawn (if application has been withdrawn)
SME Onboarding
SME Onboarding applications (Current Account) have the following stages and for each application, the corresponding stage displays on the screen.
- Submitted : A SME Onboarding application is in Submitted stage when the application has been submitted through the Origination App and until Verification stage related tasks are created.
- Verification: A SME Onboarding application is in Verification stage until the Application Review task has been claimed and completed successfully. Thereafter, it progresses to the Decision stage.
- Decision: A SME Onboarding application is in Decision stage until all the Add Decision task(s) have been claimed and completed successfully. Thereafter, it progresses to the Closing stage.
- Closing: A SME Onboarding application is in Closing stage until the Delivery and Fulfilment related activities have been completed successfully. Thereafter, it progresses to the Completed stage.
- Completed: A SME Onboarding application is in Completed stage if it has been
- Approved (after Manual Review)
- Denied (after Manual Review)
In case of denials (auto-denial as well as manual denial), the application will progress directly from Decision stage to Completed Stage as Delivery and Fulfilment related activities are not applicable.
The following elements appear on the dashboard:
- Profile details and notifications. View the notification details on the header.
- Global search: Search for a request or an entity name or ID using the search box on the header.
- Applications and Tasks toggle: Applicable only for Relationship Manager, Supervisors, and System admins to shift from the applications dashboard to the task dashboard. By default, the Applications tab is selected. A user with the role as Operations User, signing in to the application, can see only the tasks dashboard. The Applications and Tasks dashboard toggle is not be available for this role.
 View image
- Applications dashboard: Applicable only for Relationship Manager, Supervisor roles, and System Administrator.
- Tasks dashboard
Profile Details

Profile details
The signed-in user details are displayed on the header.
Notification
Provision to receive and read notifications. If there are any new or unread alerts in the Notification Center, the application displays the number in a circle on top of the notifications bell icon on the upper-right corner of the screen. Click the notifications bell icon to view the unread messages.
Notifications will be available for lending products.
The messages are displayed in the descending order. The recent message on top display the following details: Request ID, message details, and time. The read messages are cleared off on opening the notifications widget.
Application Logo
Clicking the logo on the header refreshes the Request and Task lists.
Sign out
Sign out of the application. The application displays a message prompting you to confirm, and on confirmation, navigates to the sign in screen. The user name is retained but masked if you had selected the Remember Me check box during the earlier login.
Global Search
The global search bar is placed on the header and a user can search for a request or an entity name or ID. Enter the search keyword in full.

- The search results display the value starting with, ending with, or contains the search value.
- The search result is grouped into Request and Entity.
- The search string is cleared when the user navigates away from the dashboard and the result drop-down goes off when the user clicks outside the search result drop-down.
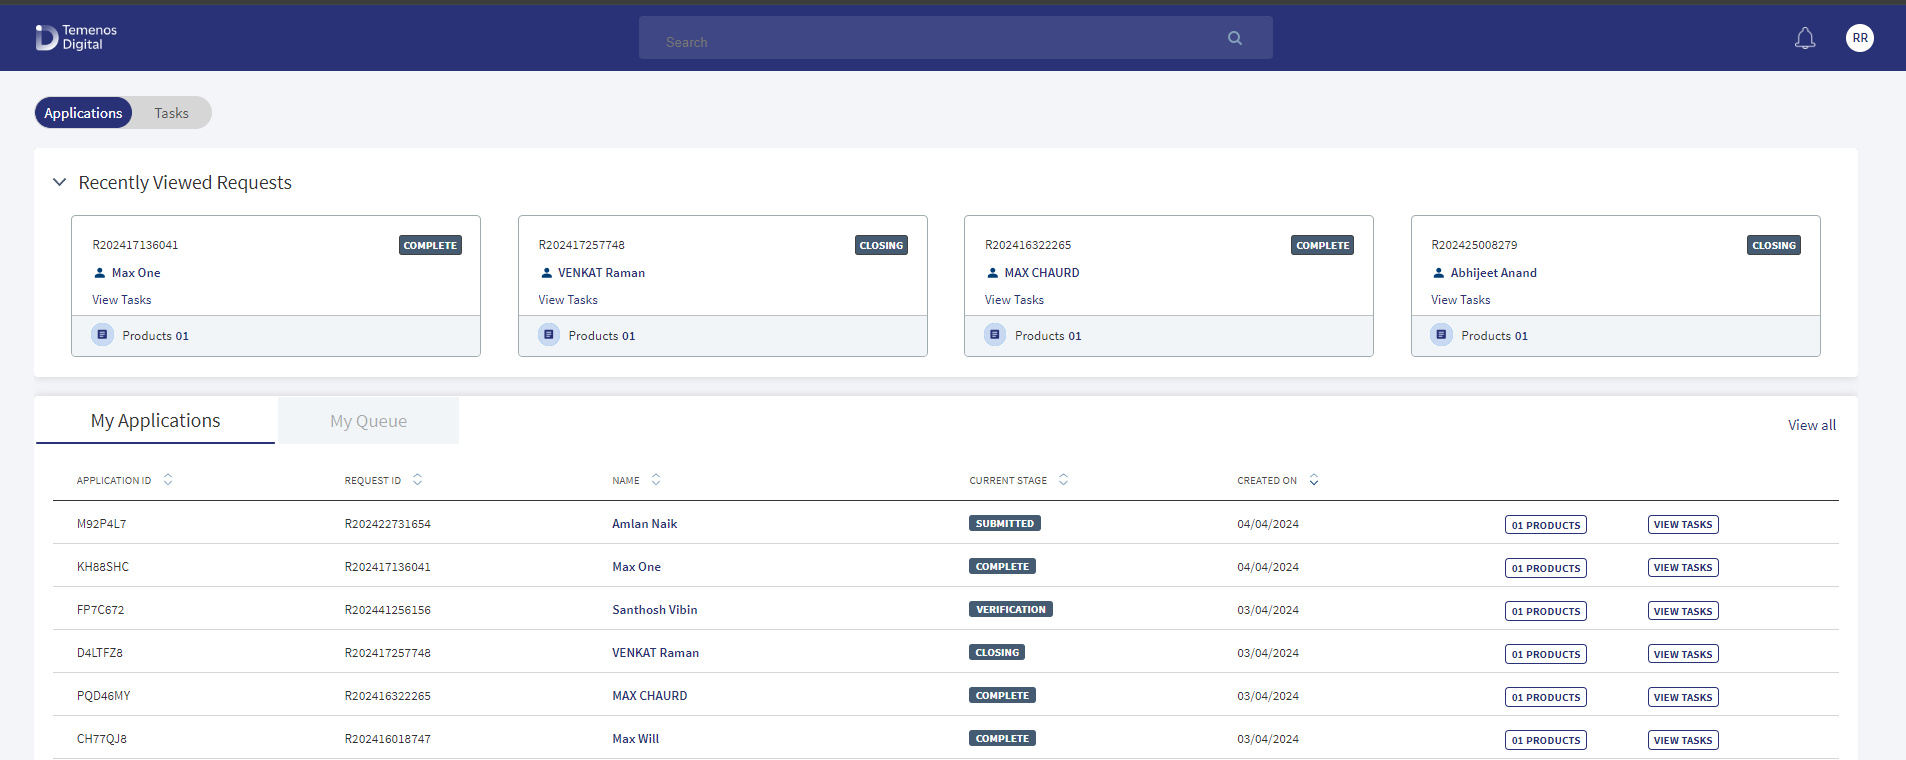
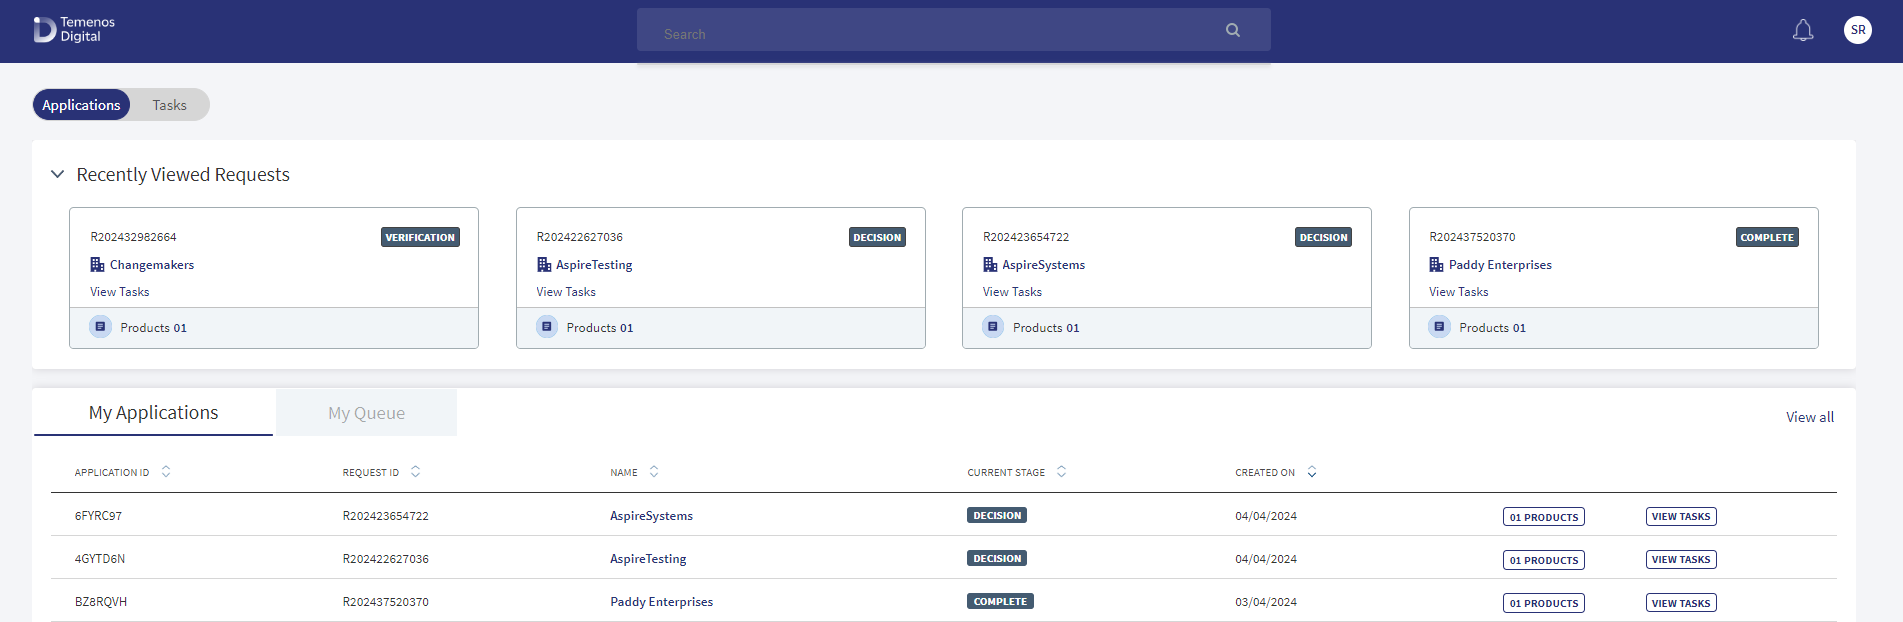
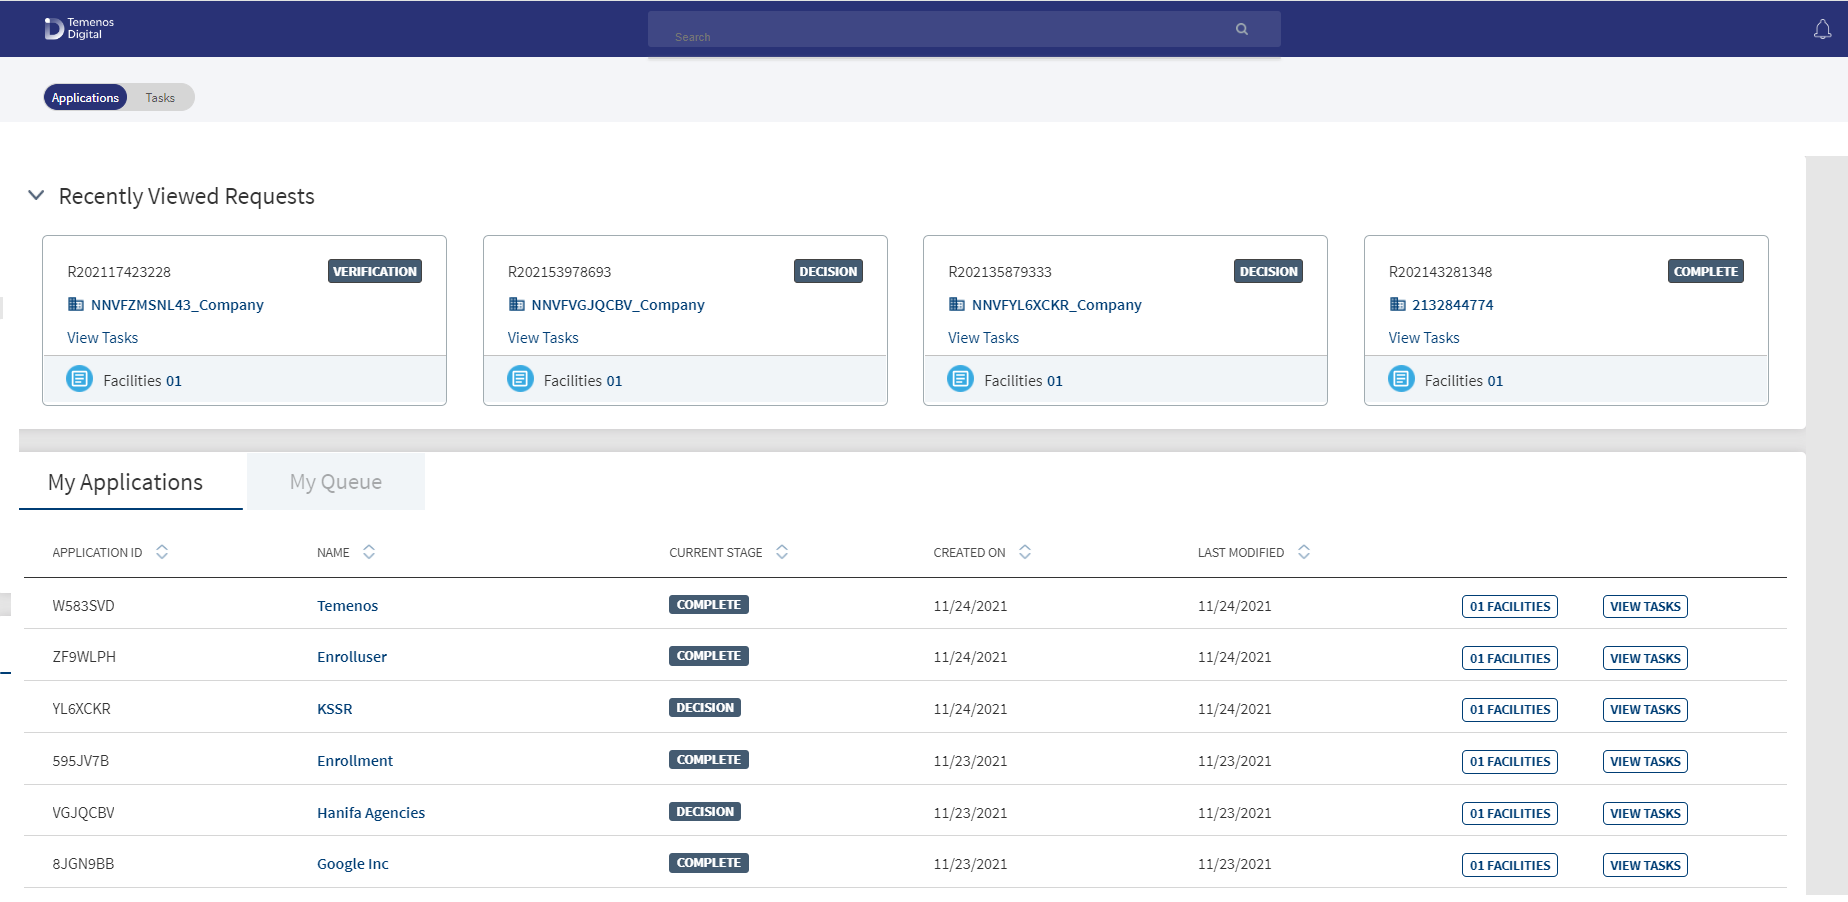
Recently Viewed Requests
Navigation: Dashboard > Requests tab
Applicable to Roles: Relationship Manager, Supervisor, and System Administrator
A signed user can see the recently viewed request as cards on top of the request dashboard.
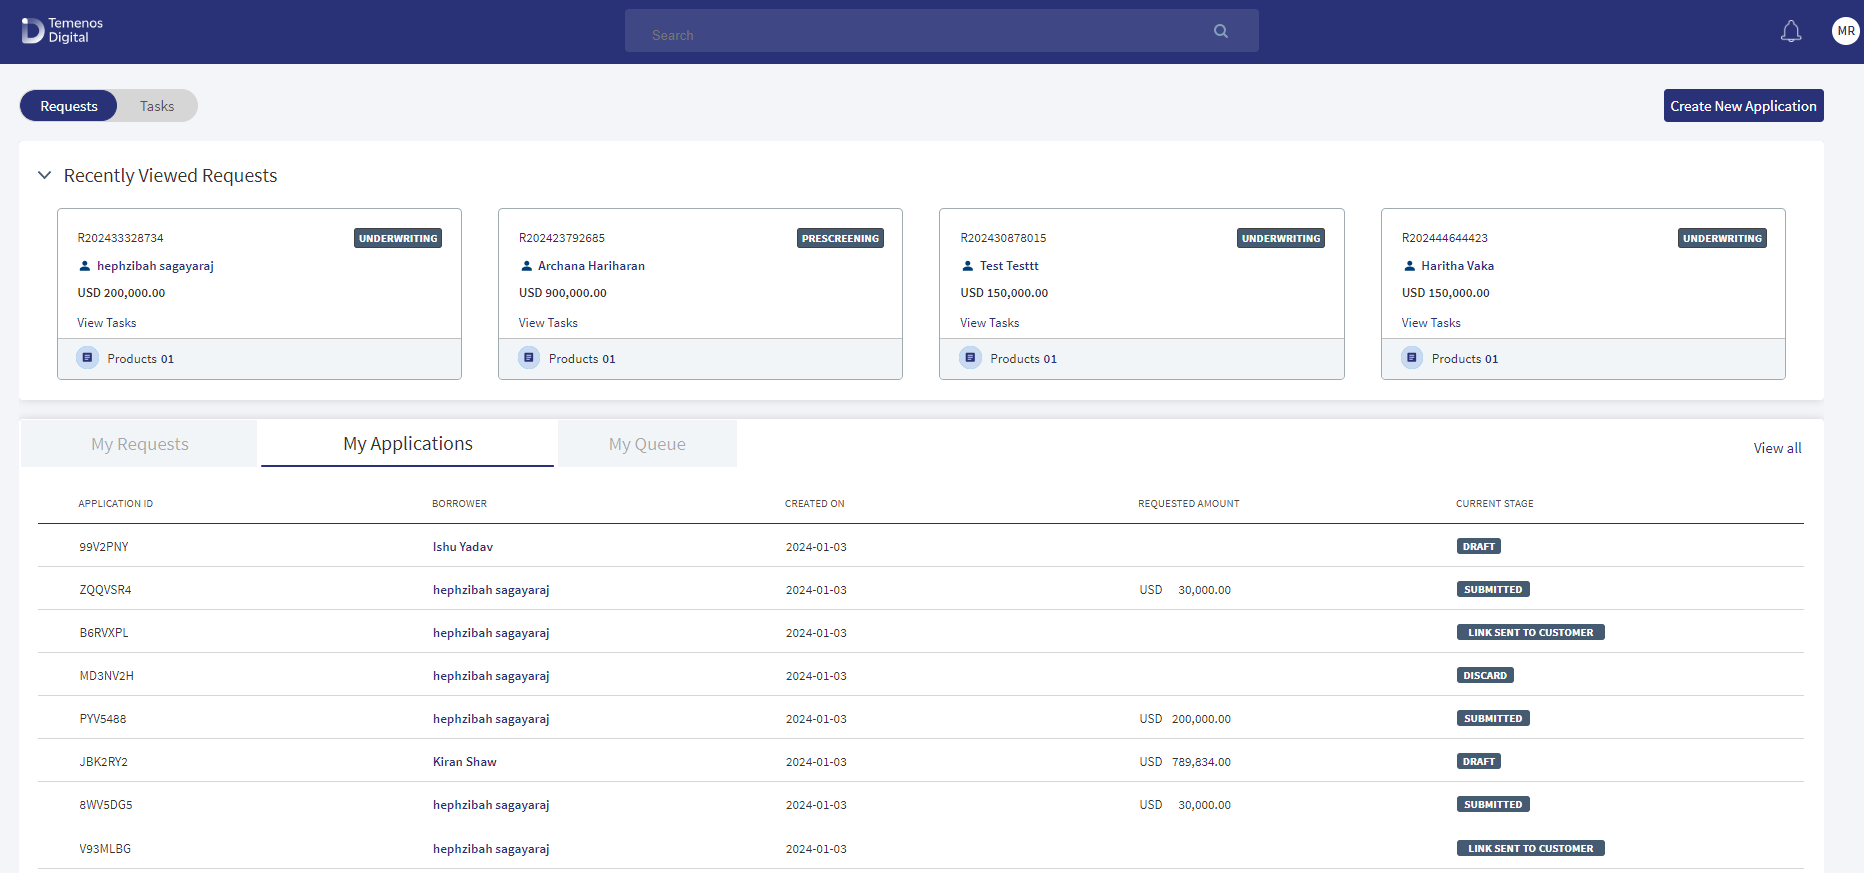
The following details appear in the recently viewed request card. Do as required:
- Request ID
- Applicant's Name. Click to navigate to the entity overview screen.
- Current Stage
- Application Creation Date
- Application Last Modified Date
- Facilities. Number of facilities associated with the request. Click to navigate to the facilities list screen.
- Application stage
- Click anywhere on the card other than the links to navigate to the request overview screen.
- Use the accordion to collapse or expand the Recently Viewed Requests section.
- Whenever a user opens a request and reaches the request overview screen, the application stores the time stamp of when the request overview was opened by the user.
- Based on the time stamp, the four recently viewed requests are the displayed as request cards.
- If there are no recently viewed requests, the section is displayed in collapsed mode (without any accordion) displaying no recently viewed requests message. The My Requests section below is displayed as-is.
- The draft requests are not displayed in the recently viewed requests. Only viewed submitted requests are shown in the recently viewed requests section.
- If the user views the requests through global search, those requests are also shown in the recently viewed requests section.
Requests List - My Requests
Navigation: Dashboard > Requests tab > My Requests tab
Applicable to Roles: Relationship Manager of all Onboarding journeys, System Admin, and Supervisors of Retail and SME Onboarding
The application displays the list of Retail and SME Onboarding requests created by the signed-in user (for example - Retail RM can see only the retail onboarding requests list). The requests are listed depending on the onboarding user accessing the application. For example, the Retail RM and Retail Supervisor can view only retail onboarding requests (savings or current accounts). Similarly, the SME users can view only SME onboarding requests (SME current accounts).
The Retail and SME Onboarding request applications are created using the Temenos Digital Origination (Self Service) application and on submitting the request, the request is displayed in the Temenos Digital Assist application.
The My Requests tab always shows the latest nine requests based on the request created date even if there are no recently viewed requests. The number of requests is displayed in parenthesis. The newly added request is displayed on top of the list. On page load, the requests list is sorted by the first column. The onboarding requests (represented as rows) are displayed with the following details:
- Request ID: The unique ID of that specific application.
- Name: Applicant's name
- Current Stage: The current stage of the application.
- Created On: The date the application was created.
- Last Modified: The date the application was last modified.
- Facilities/Products: The facilities/products associated with the application.
- View Tasks: The tasks associated with the application.
Do any of the following:
- Sort: Sort the records by using the ascending or descending sort icon. The sorted column is denoted by highlighted sort icon.
- View Details
- Click on any row to view the request details.
- Click the applicant (entity) name to view the customer or entity details.
- Click on any row to view the request details.
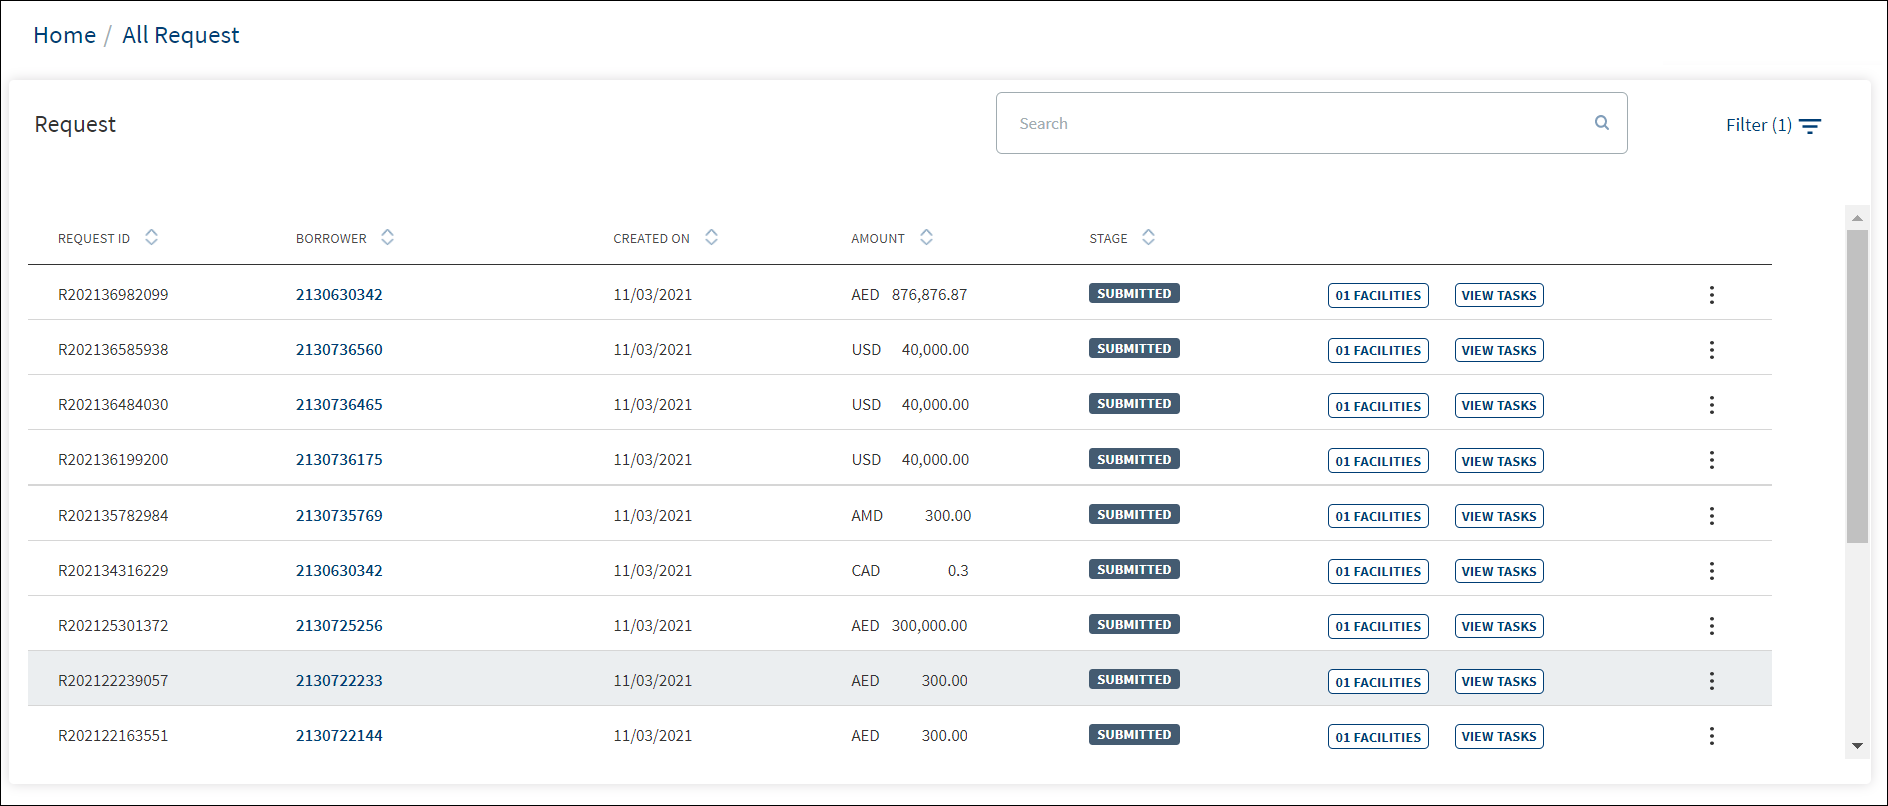
- View All: In case there are more requests, click View All to view all requests. The application redirects to another screen displaying all the requests and provision to search and filter requests. Use the search and filter options to narrow down the search.
- View Tasks: Click View Tasks button to view all related tasks in the request overview screen.
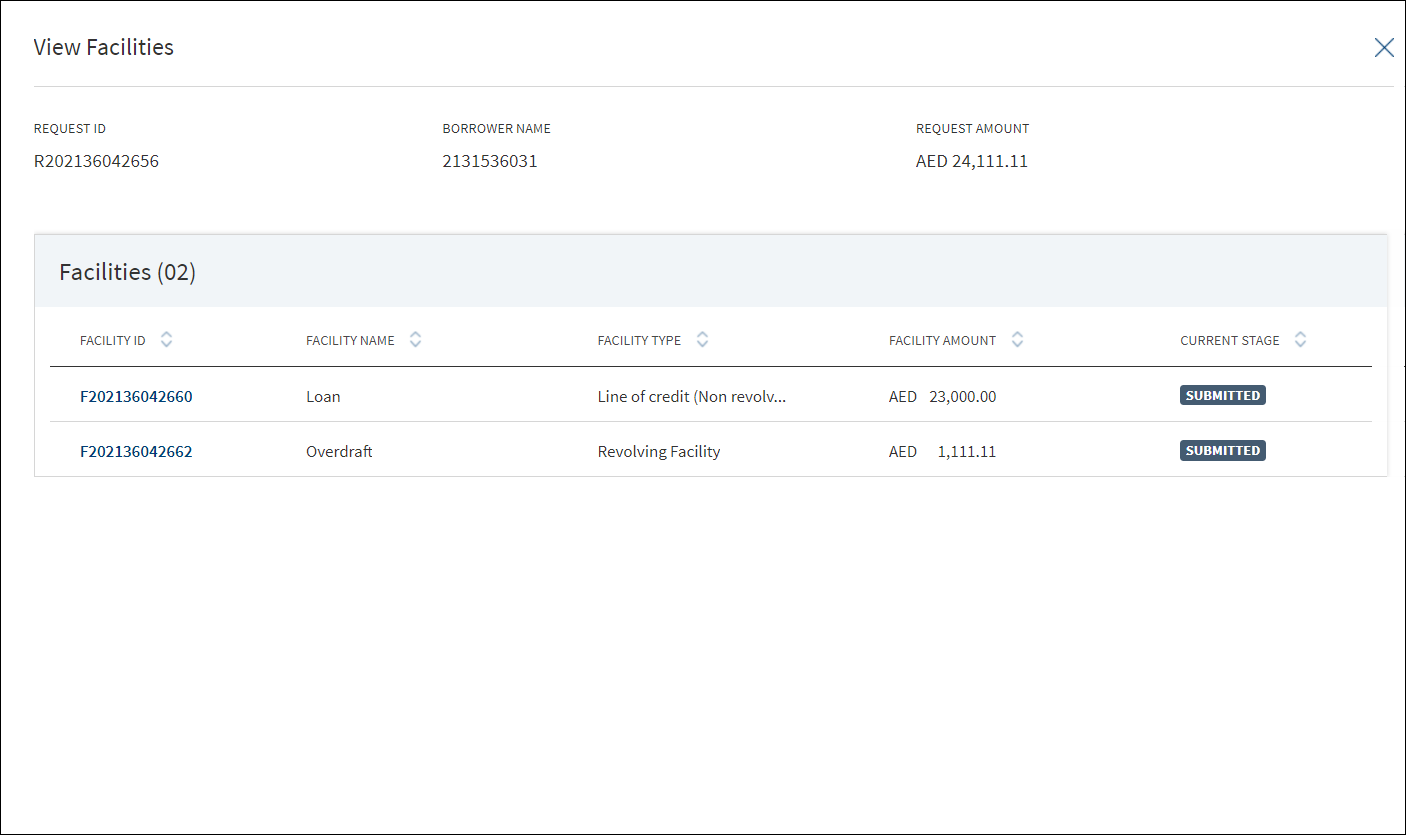
- Porduct: Click Product button to the view the products associated with the request in a modal form with the following details: Application ID, Applicant name, and the facilities list with Product ID, Product Name, Product Type, and the Current Stage. The icon displays the number of facilities associated with the request. Click the Product ID link to view the product overview details.
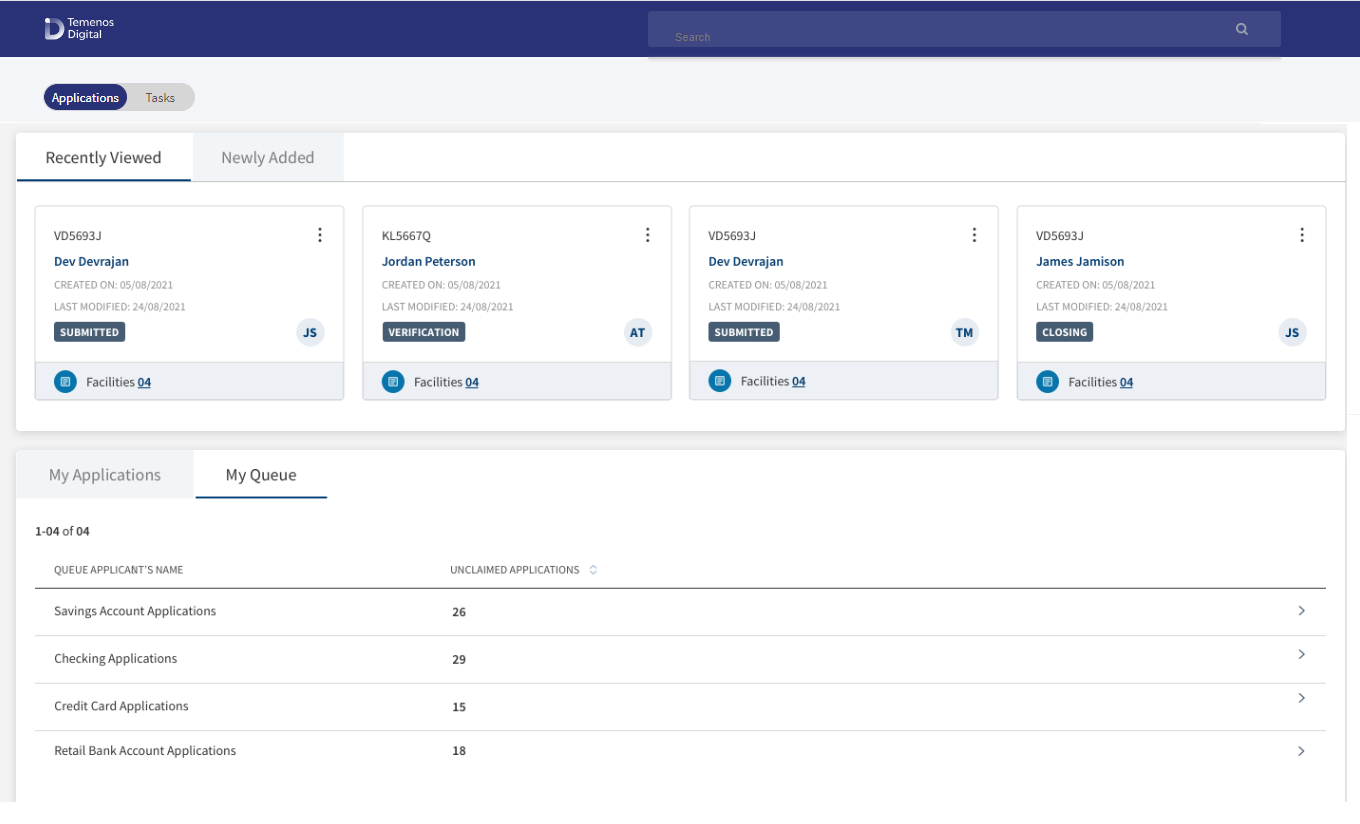
My Queue - Requests
Navigation: Dashboard > Requests tab > My Queue tab
Applicable to Roles: Relationship Manager, Supervisors, and System admins of Retail and SME onboarding journeys
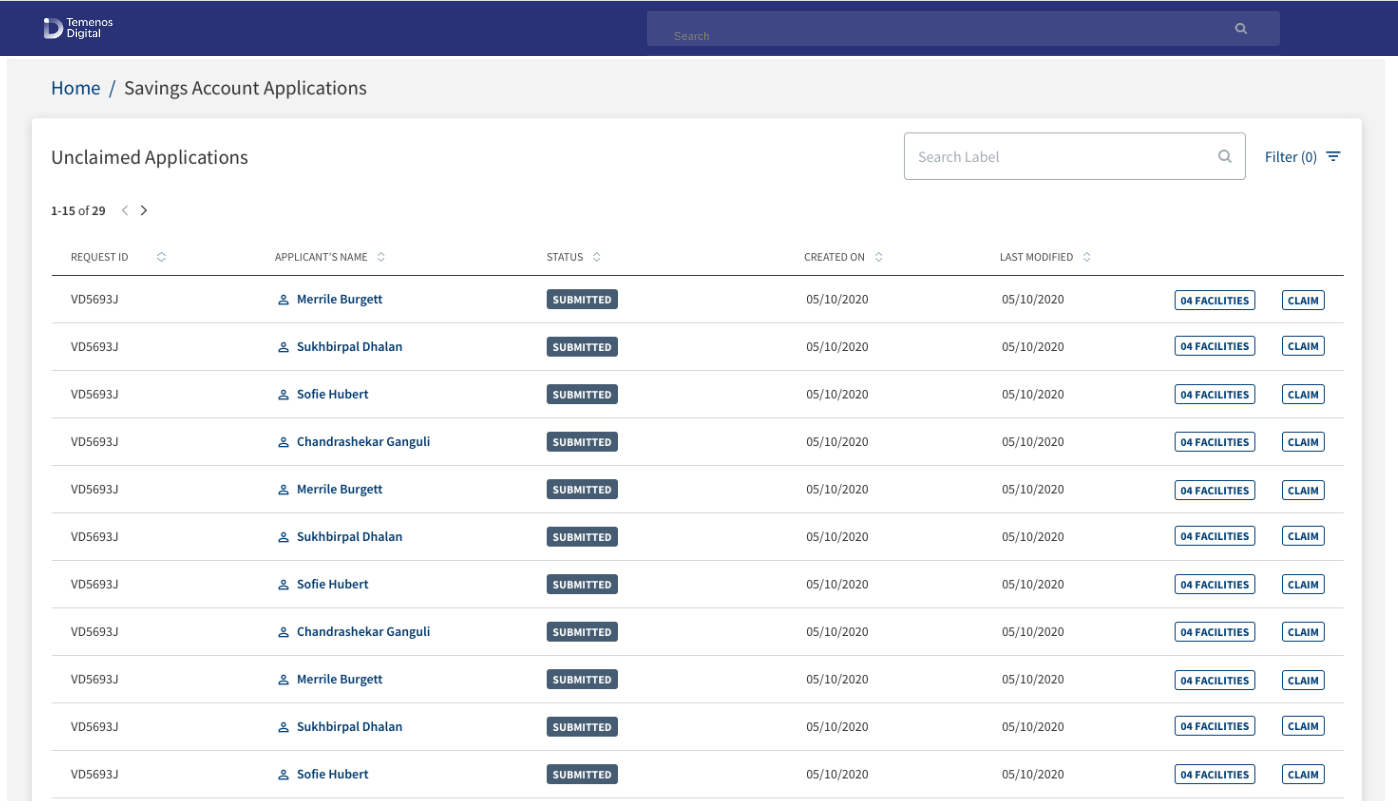
After an application requesting for a Retail or SME Onboarding product is submitted using the Temenos Digital Origination (Self Service) application, the submitted request is received in the Temenos Digital solution and processed by the bank users. The submitted applications are placed in various queues until a signed-in user claims the applications. After claiming, the application moves out of the unclaimed application queue and is available on the My Requests tab of the relationship manager who claimed the request. For more information, see Queue Management.
- Open the My Queue tab on the requests dashboard.
- The My Queue tab displays the list of queues applicable to the Retail and SME Onboarding journeys.
- Click on the required queue.
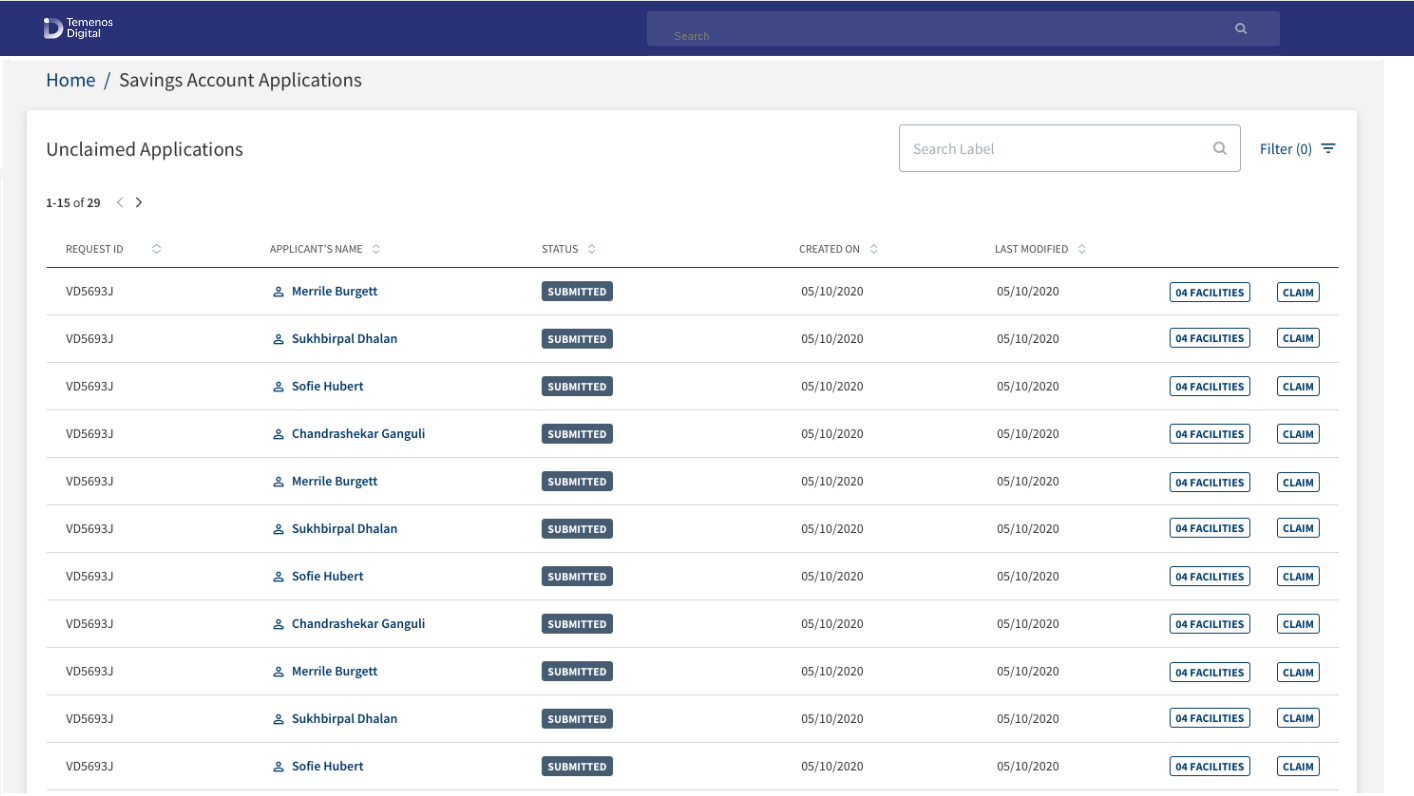
- The application displays the list of unclaimed applications with the following details:
- Request ID: The actual Application ID.
- Applicant's Name: Name of the applicant
- Status: The current stage of the request in the Onboarding journey. All the applications will have Submitted status.
- Created On: The date the request application was created.
- Last Modified: The date on which the request application is last modified.
- Facilities: The facilities associated with the request. Click Product to the view the facilities associated with the request in a modal form with the following details: Request ID, Applicant's name, Created On, and the facilities list with Product ID, Product Name, Product Type, and the Current Stage. The icon displays the number of facilities associated with the request. Click the Product ID link to view the product overview details.
- Claim button. Click to claim the request application.
My Queue - Unclaimed Applications
Navigation: Dashboard > Requests tab > My Queue tab > Select a queue
Applicable to Roles: Relationship Manager, System admin, and Supervisors of Retail and SME Onboarding journeys
After an application requesting for a Retail or SME onboarding product is submitted using the Temenos Digital Origination (Self Service) application, the submitted request is received in the Temenos Digital Assist solution and processed by the bank users. The submitted application is not assigned to any bank user and therefore, is placed in the unclaimed applications queue. A signed-in bank user can claim the request as required. The application moves out of the unclaimed application queue and is available on the My Requests tab of the relationship manager who claimed the request.
- Open the My Queue tab on the requests dashboard.
- The queues applicable to the onboarding journey appear.
- Click on the required queue.
- The application displays the list of unclaimed applications.
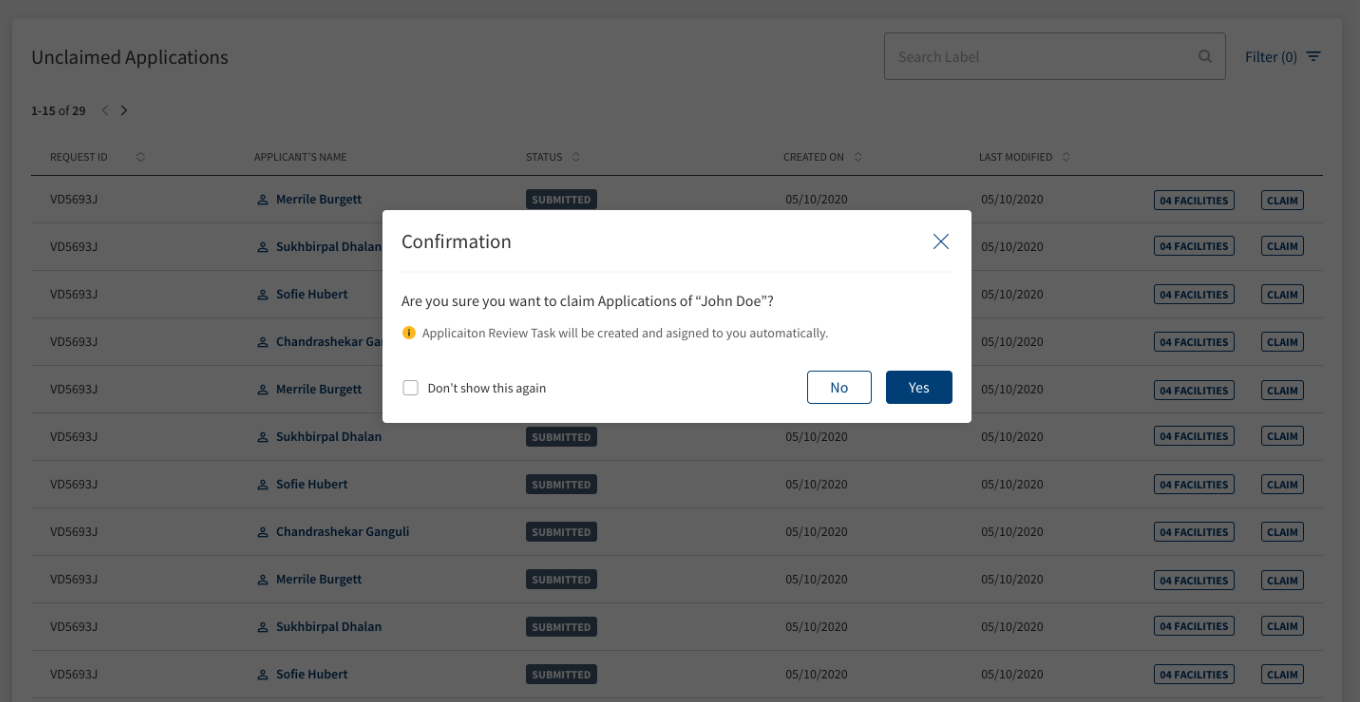
- Click the Claim button.
.png)
- The application asks for a confirmation to claim the selected application displaying the applicant's name. Click Yes to confirm.
- The application displays a confirmation message that the request is claimed successfully.
The request moves out of the unclaimed application queue and is available on the My Requests tab of the relationship manager who claimed the request.Enter the search keyword in full or in part (Application ID, Applicant, and Created On date) in the Search bar to narrow down the required requests. Sort the requests by column names.
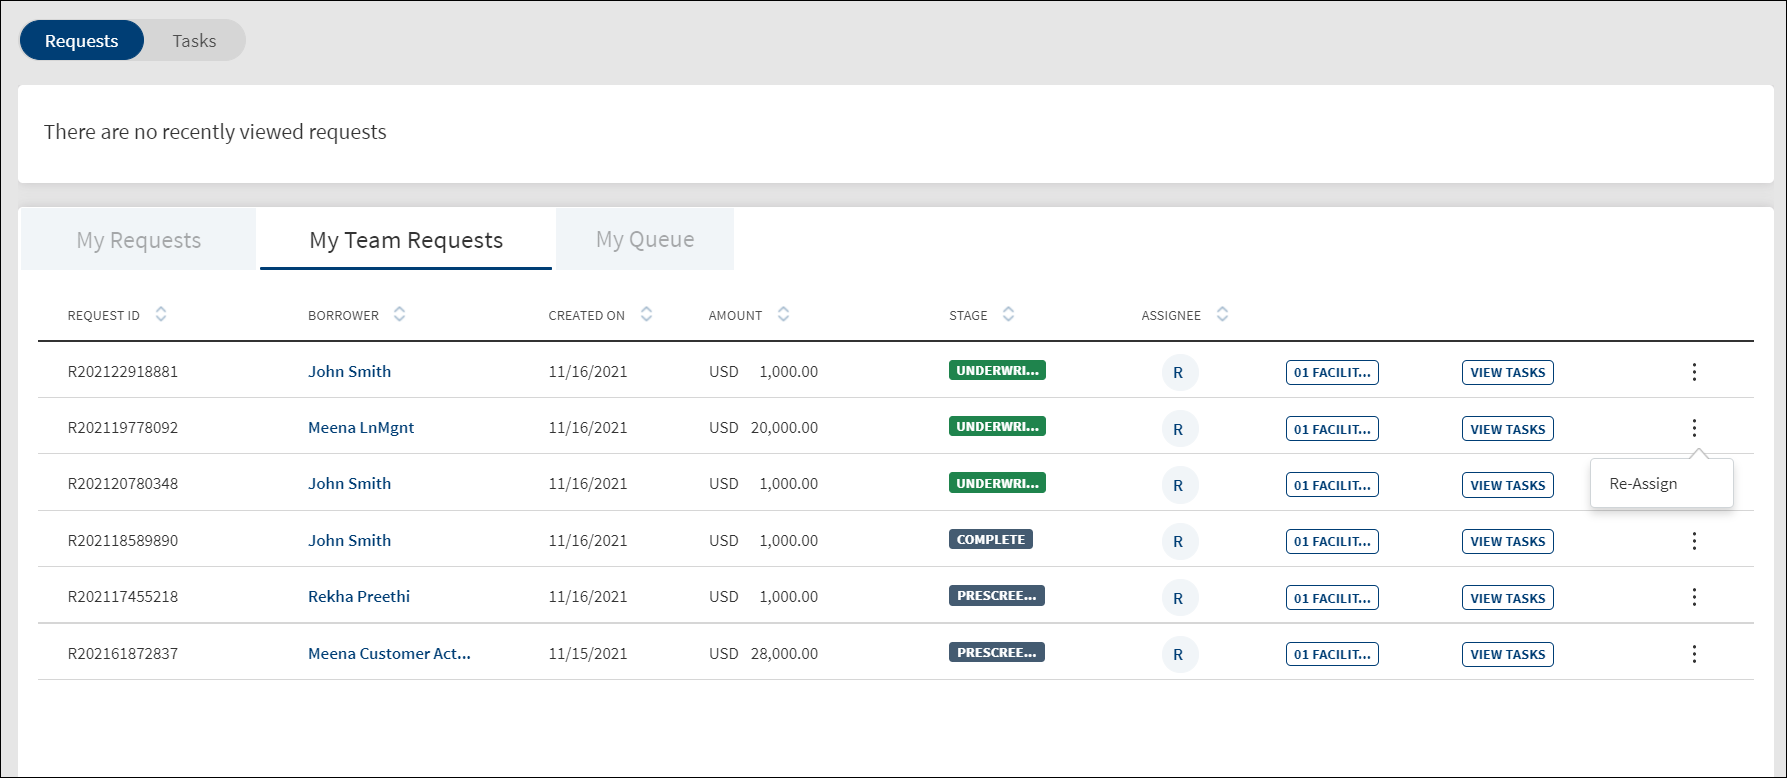
My Team Applications
Navigation: Dashboard > Requests tab > My Team Requests tab
Applicable to Roles: Supervisors of all onboarding journeys

The Applications dashboard shows the list of Retail and SME applications created by all the RMs with the user name of the RM showing under the Assignee column on the request record. Using the context menu, a Supervisor can reassign a request to another relationship manager. See Relationship Manager dashboard for more information.
Do any of the following:
- Sort: Sort the records by using the ascending or descending sort icon. The sorted column is denoted by highlighted sort icon.
- View Details
- Click on any row to view the request details.
- Click the applicant (entity) name to view the applicant or entity details.
- Click on any row to view the request details.
- View Tasks: Click View Tasks button to view all related tasks in the request overview screen.
- Product: Click Product button to the view the facilities associated with the request in a modal form with the following details: Application ID, Applicant name, and the facilities list with Product ID, Product Name, Product Type, and the Current Stage. The icon displays the number of facilities associated with the request. Click the Product ID link to view the product overview details.
- On the context menu, click Re-Assign to assign the request to another user Relationship manager (RM). This feature is applicable only to Retail Onboarding Supervisor and SME Onboarding Supervisor.
.png)
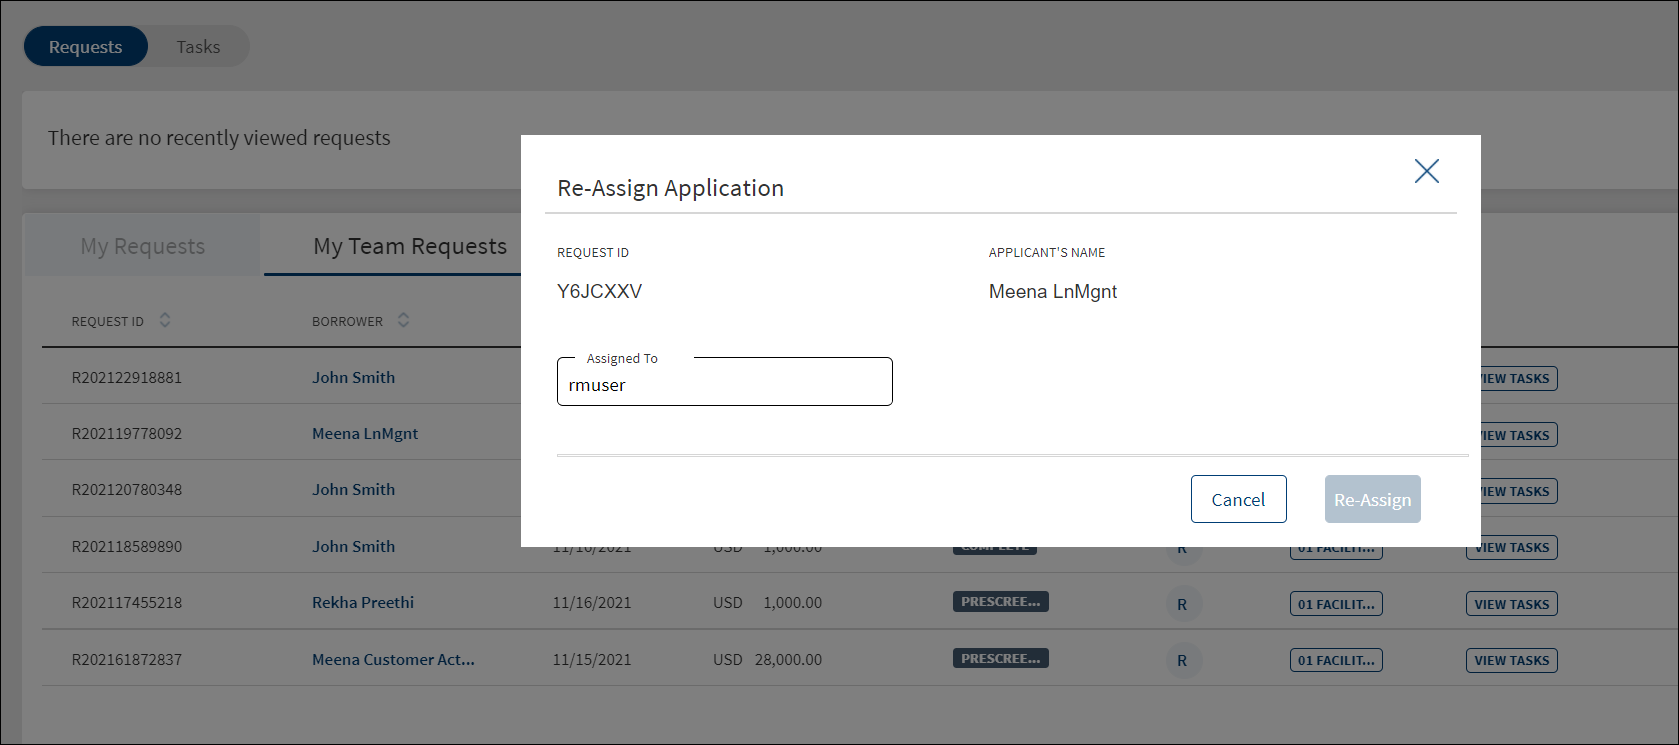
Reassign Request
Use the feature to assign the request to another user (RM).
- Open the Team Requests tab on the requests dashboard.
- On the context menu, click Re-Assign. The Re-Assign Application screen is displayed with Request ID and Applicant's Name.
- Select the user from the Assigned To list.
- Click Re-Assign.
- The application displays a message that the request is reassigned successfully. The request will appear on the My Requests tab of the Relationship Manager to whom the request was assigned.
Filter and Sort Requests
Navigation: Dashboard > Requests tab
Applicable to Roles: Relationship Manager and Supervisors of all onboarding journeys
The filter is placed above the request list. A user can filter the requests.
- On the request dashboard, click View All to view the complete list of requests.
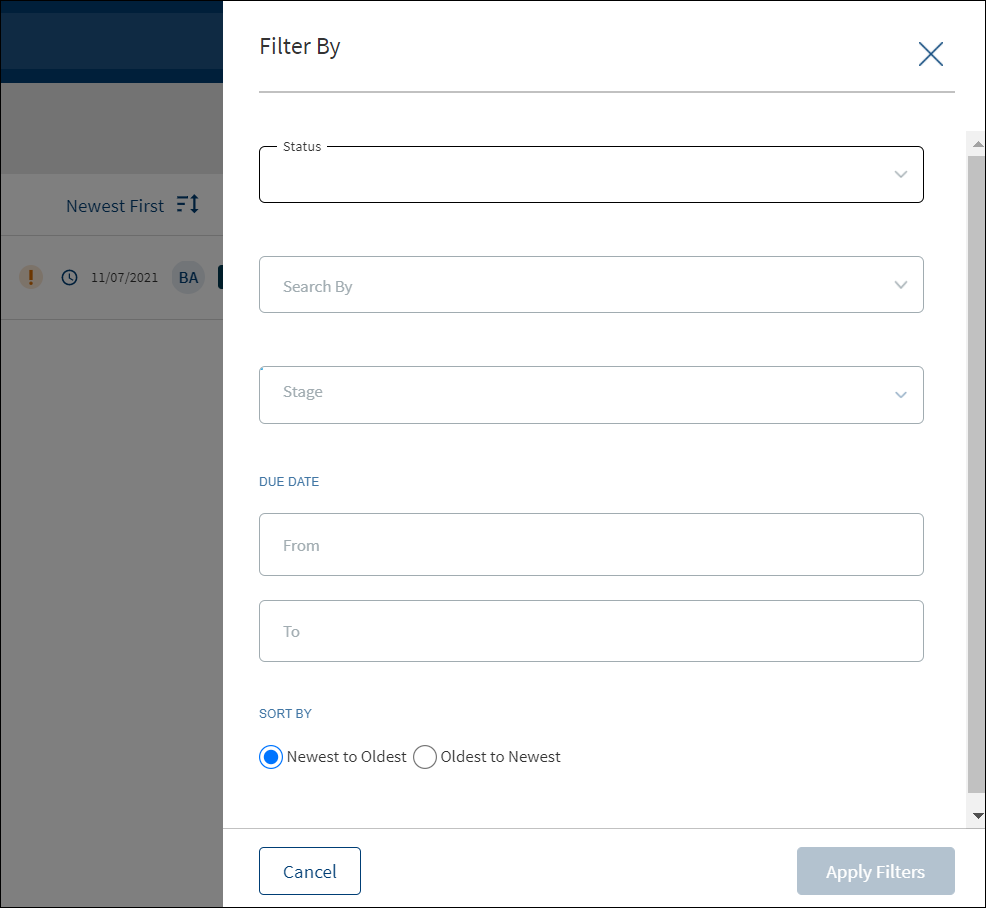
- Click the Filter option. The Filter By screen is displayed.
- Application Stage: Select the request application stage from the list.
- Sort By: Sort the filtered tasks by Newest to Oldest or Oldest to Newest. By default, Newest to Oldest is selected. This selection replicates the sort by option outside the filter button.
- Click Apply Filters.
- Click reset to remove the filter selection and start all over again.
- User can apply the filters one-by-one and filter the tasks based on the selection combination.
- The application displays the number of filters applied in parenthesis.
- Click Cancel to cancel the operation. Click Reset discard the filters and start all over again.
- After the session is complete, the filters does not persist and is reset.
Sort Requests
On the tasks list, use the sort button to sort by Oldest First or Newest First. By default, the sort is from Newest to Oldest.On selecting the Oldest to Newest (Oldest First), the tasks are sorted accordingly and the latest modified task appears at the bottom. After the session is complete, the sort is back to the default state.
Search Requests
Navigation: Dashboard > Requests tab
Applicable to Roles: Relationship Manager, Supervisors, and System Admins of all Onboarding journeys
The search bar is placed above the request list. A user can search the requests.

On the request dashboard, click View All to view the complete list of requests.
Enter the search keyword in full or in part (Application ID, Applicant's Name and Created On date) in the Search bar to narrow down the required requests.
Sort the records across columns.
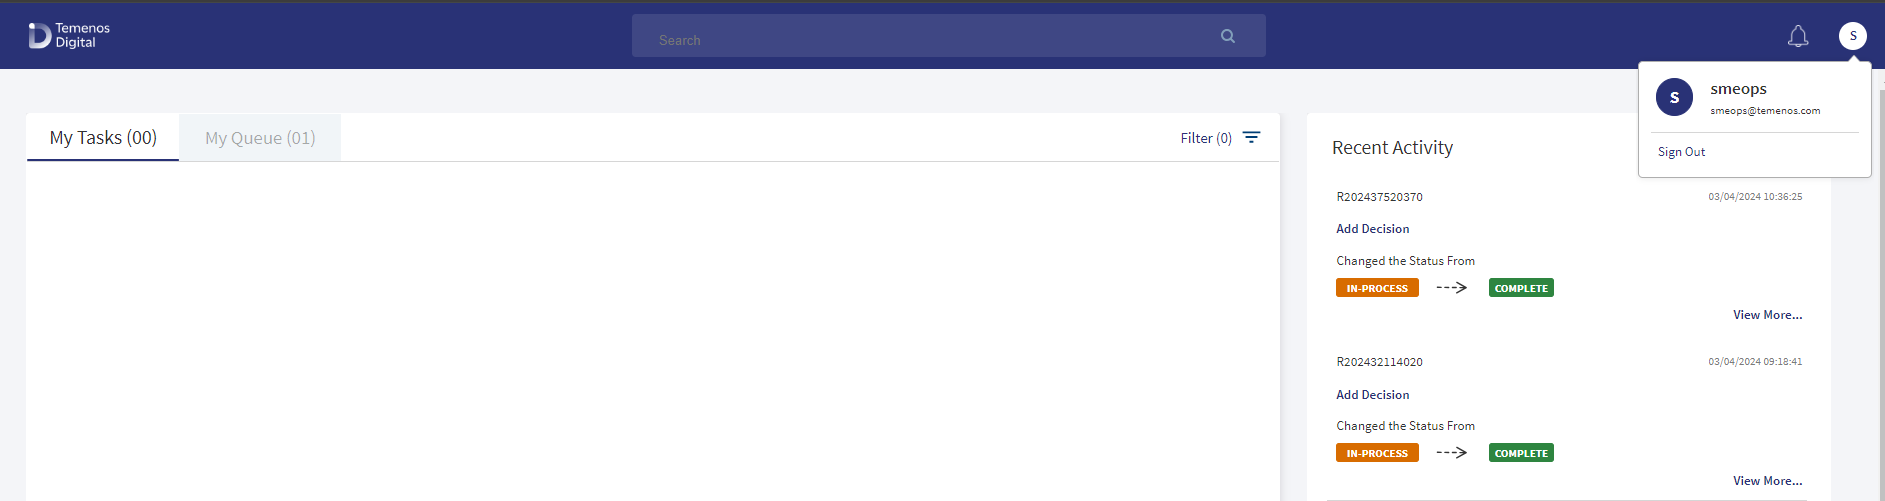
Tasks List - My Tasks
Navigation: Dashboard > Tasks tab (only if applicable) > My Tasks tab
Applicable to Roles: Onboarding Ops User journey roles
The application displays the list of Retail and SME Onboarding tasks claimed by the signed-in user or assigned to the user (by the Supervisor) in My Tasks list (for example - Retail RM can see only the retail onboarding requests list). The tasks are listed depending on the onboarding user accessing the application. For example, the Retail RM and Retail Supervisor can view only retail onboarding tasks (savings or current accounts). Similarly, the SME users can view only SME onboarding tasks (SME current accounts).
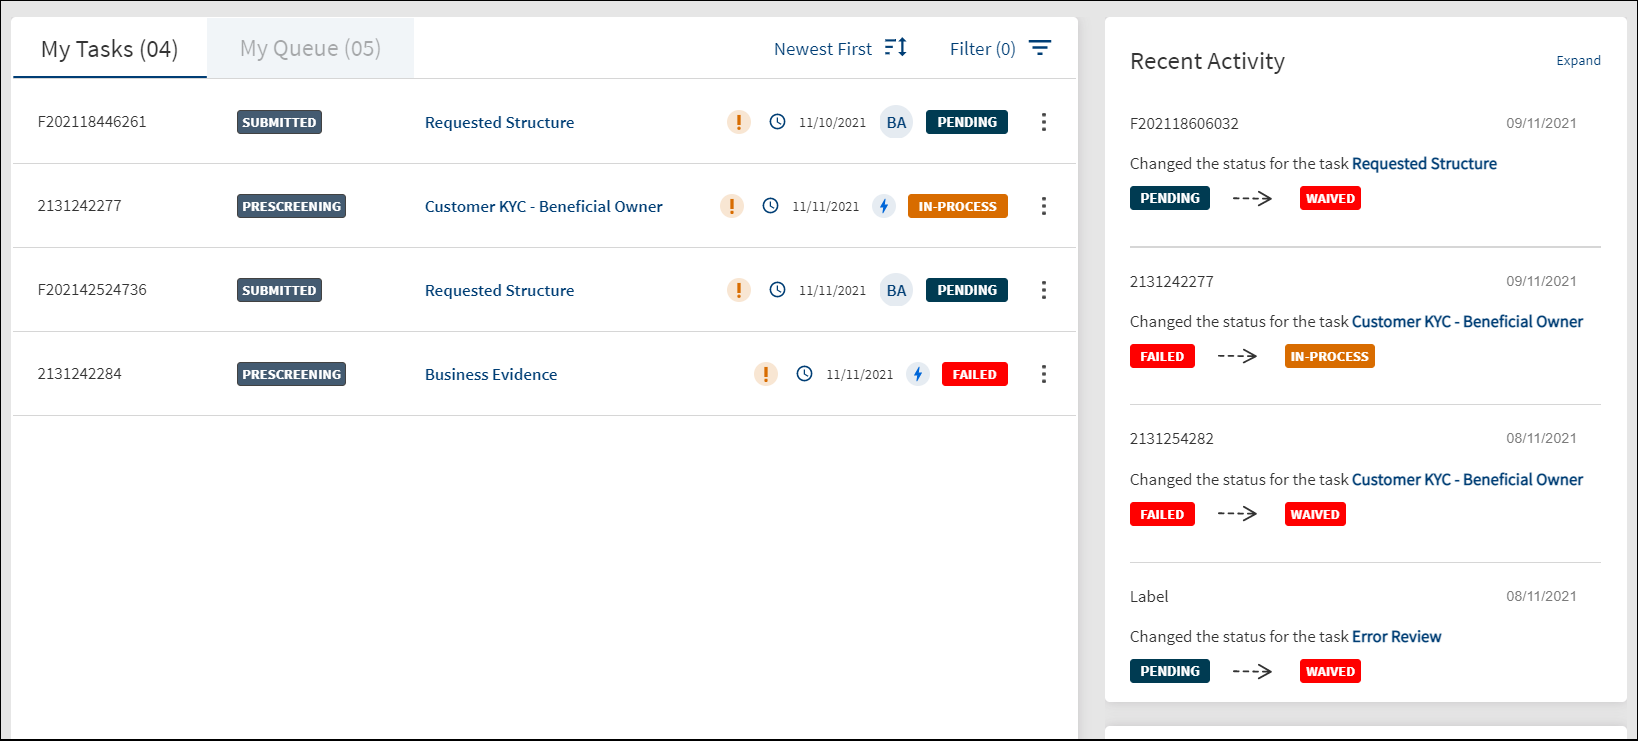
The My Tasks tab always shows the latest nine tasks based on the associated application created date. The number of tasks is displayed in parenthesis. The newly created task is displayed on top of the list. On page load, the requests list is sorted by the first column. The onboarding tasks (represented as rows) are displayed with the following details:
- Application ID. The unique ID of that specific application.
- Current Stage. The current stage of the application.
- Task name. On clicking, navigates to the corresponding task completion screen.
- Displays the Due Date of the task.
- Task status. The current task status - In Process, Failed, Pending, and Completed. The completed tasks are not displayed in the task list.
- Contextual menu to perform actions such as Edit, In-process, Complete, Waive and Release.
Do any of the following:
- Sort: Sort the records by using the ascending or descending sort icon. The sorted column is denoted by highlighted sort icon.
- View Details
- Click on any row to view the request details.
- Click on any row to view the request details.
- View All: In case there are more requests, click View All to view all requests. The application redirects to another screen displaying all the requests and provision to search and filter requests. Use the search and filter options to narrow down the search.
Team Tasks
Navigation: Dashboard > Tasks tab > Team Tasks tab
Applicable to Roles: Supervisor of all Onboarding journeys
The Tasks dashboard shows the list of Retail and SME tasks created. On the Team Tasks Tab, click Claim to assign the task to self and work on the task for completion. On the confirmation screen, click Yes. The task is moved to the My Tasks tab.
Using the contextual menu, a Supervisor can reassign a request to another relationship manager. Do any of the following:
- Sort: Sort the records by using the ascending or descending sort icon. The sorted column is denoted by highlighted sort icon.
- View Details
- Click on any row to view the request details.
- View All: In case there are more requests, click View All to view all requests. The application redirects to another screen displaying all the requests and provision to search and filter requests. Use the search and filter options to narrow down the search. The View All requests feature is applicable only for Lending Supervisor.
- View Tasks: Click View Tasks button to view all related tasks in the request overview screen.
- Products : Click Product button to the view the Products associated with the request in a modal form with the following details: Application ID, Applicant name, and the facilities list with Product ID, Product Name, Product Type, and the Current Stage. The icon displays the number of facilities associated with the request. Click the Product ID link to view the product overview details.
- Click the context menu, to release or re-assign tasks. Click Re-Assign to assign the task to another user Relationship manager (RM). This feature is applicable only to Retail Onboarding Supervisor and SME Onboarding Supervisor.
Reassign
Use the feature to assign the task to another user (RM).
- Open the Team Tasks tab on the Tasks dashboard.
- On the context menu, click Re-Assign. The Re-Assign Application screen is displayed with Request ID and Task Name.
- Select the user from the Assigned To list.
- Click Re-Assign.
- The application displays a message that the task is reassigned successfully. The task will appear on the My Tasks tab of the Relationship Manager to whom the task was assigned.
- Click the context menu to do any of the following:
- Edit the task.
- Reassign the task to other users.
- Change the status of the pending task to In Process.
- Mark the task as completed.
- Waive off the task if required.
My Queue - Tasks
Navigation: Dashboard > Tasks tab (only if applicable) > My Queue tab
Applicable to Roles: Relationship Manager, Supervisors, and System admins of Retail and SME onboarding journeys
Before any task is created, the group assigned is decided based on the rules configured in RHPAM. The Team tasks will be displayed under various queues as attached to the user’s profile in keycloak, until the tasks are claimed. After claiming, the task moves out of the unclaimed task queue and is available on the My Tasks tab of the relationship manager who claimed the request. For more information, see Queue Management.
- Open the My Queue tab on the Tasks dashboard.
- The My Queue tab displays the list of queues applicable to the Retail and SME Onboarding journeys.
- Click on the required queue.
- The application displays the list of unclaimed tasks with the following details:
- Request ID. The actual Application ID.
- Status. The current stage of the request in the Onboarding journey.
- Task name. On clicking, navigates to the corresponding task completion screen.
- Displays the Due Date of the task.
- Task status. The current task status - In Process, Failed, Pending, and Completed. The completed tasks are not displayed in the task list.
- Contextual menu to perform actions such as Edit, In-process, Complete, Waive and Release.
My Queue - Unclaimed Applications
Navigation: Dashboard > Requests tab > My Queue tab > Select a queue
Applicable to Roles: System admin, and Supervisors of Retail and SME Onboarding journeys
The task is not assigned to any bank user and therefore, is placed in the unclaimed applications queue. A signed-in bank user can claim the task as required. The application moves out of the unclaimed application queue and is available on the My Tasks tab of the relationship manager who claimed the task.
- Open the My Queue tab on the Tasks dashboard.
- The queues applicable to the onboarding journey appear.
- Click on the required queue.
- The application displays the list of unclaimed tasks.
- Click the Claim button.
- The application asks for a confirmation to claim the selected application displaying the applicant's name. Click Yes to confirm.
- The application displays a confirmation message that the request is claimed successfully.
- The request moves out of the unclaimed application queue and is available on the My Requests tab of the relationship manager who claimed the request.
- Enter the search keyword in full or in part (Application ID, Applicant, and Created On date) in the Search bar to narrow down the required requests.
- Sort the requests by column names.
Filter and Sort Tasks
A user can filter the tasks using the filter options and sort the tasks by newest to oldest tasks on the My tasks and Team Tasks tabs on the task dashboard.
Filter Tasks
- On the tasks dashboard, click the Filter option.
- On the Filter By screen, use the following filters:
- Status: Select the task status. The options are Pending, In-process, and Failed. If the filter is accessed from My Team Tasks, then this field is not displayed as task status is not applicable for My Team Tasks that are not claimed.
- Search By: Select Request ID, Product ID, or Entity ID.
- ID: Enter the corresponding Request ID, Product ID, or Entity ID based on the selection in the Search By field.
- Stage: Select the request stage (multiple select) to view the tasks related to the selected request stages. Use the Select All option to select all the stages.
- Due Date From and Due Date To: Provide the from and to date in dd-mm-yyyy format to view the tasks which have due date in between the from and to date.
- Sort By: Sort the filtered tasks by Newest to Oldest or Oldest to Newest. By default, Newest to Oldest is selected. This selection replicates the sort by option outside the filter button.
- Click Apply Filters.
- User can apply the filters one-by-one and filter the tasks based on the selection combination.
- The application displays the number of filters applied in parenthesis.
- Click Cancel to cancel the operation. Click Reset discard the filters and start all over again.
- After the session is complete, the filters does not persist and is reset.
Sort Tasks
On the tasks list, use the sort button to sort by Oldest First or Newest First. By default, the sort is from Newest to Oldest.On selecting the Oldest to Newest (Oldest First), the tasks are sorted accordingly and the latest modified task appears at the bottom. After the session is complete, the sort is back to the default state.
Hover over Request/Product/Entity ID
When a user hovers over the Request ID, Product ID, or the Entity ID on the tasks dashboard (My Tasks, Team Tasks, and My Queue tabs), the application displays a window showing a brief information about the request, Product, or entity respectively.
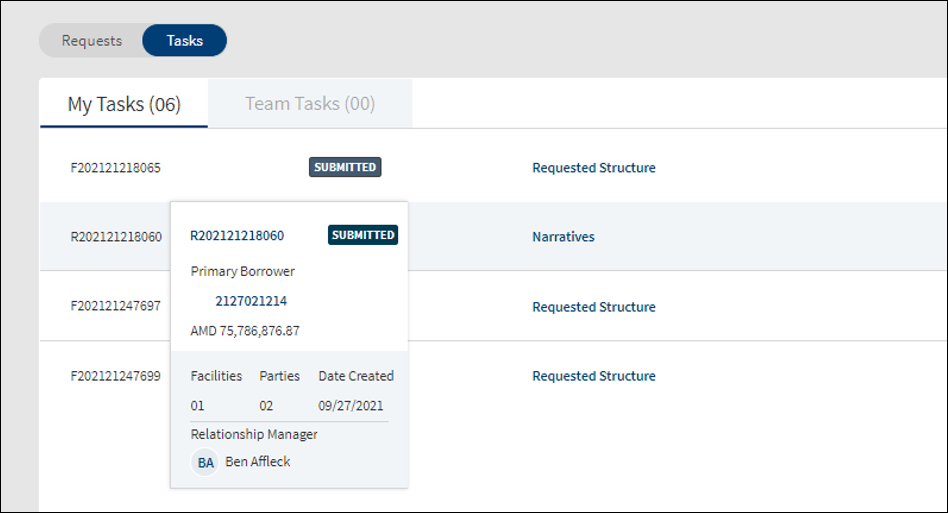
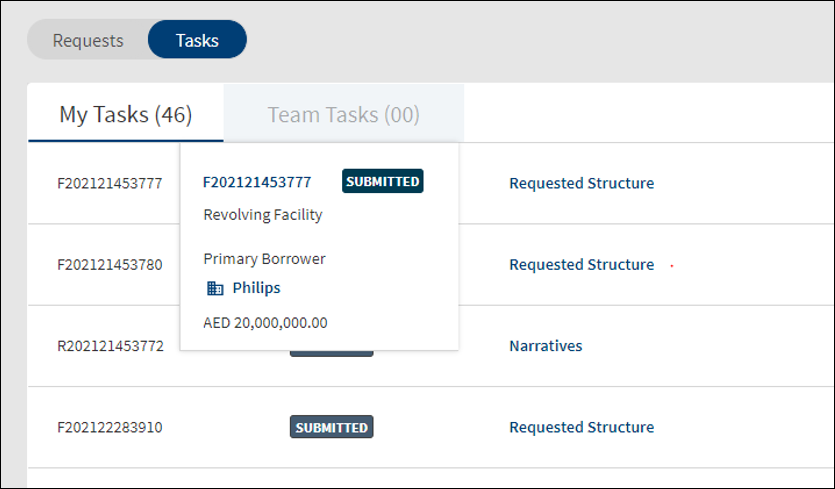
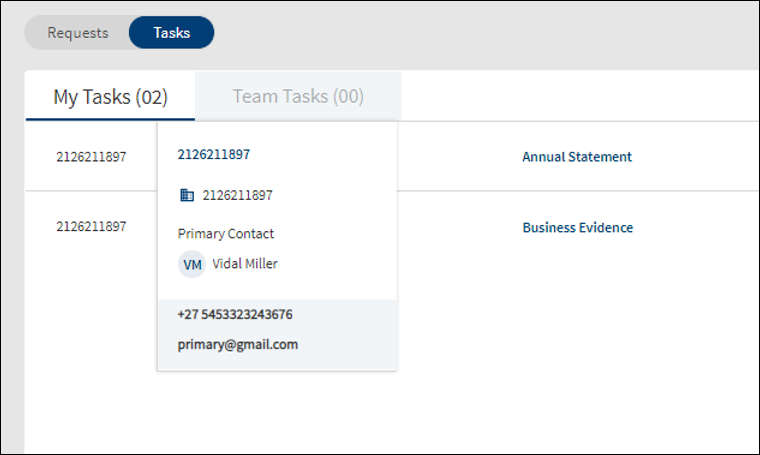
The following details appear on hover:
- Request ID: Request ID, Stage, Primary Borrower, Request amount, number of Facilities, number of Parties, request created date, Relationship Manager name.
- Product ID: Product ID, Product name, Product Stage, Primary Borrower, Currency, and Amount.
- Entity ID: Entity ID, entity name, icon denoting Individual/Business/Group, and Primary Contact name with communication details (email and phone number).
The changes made to the number of facilities, number of parties, or the request stage reflect in the hover window as well.
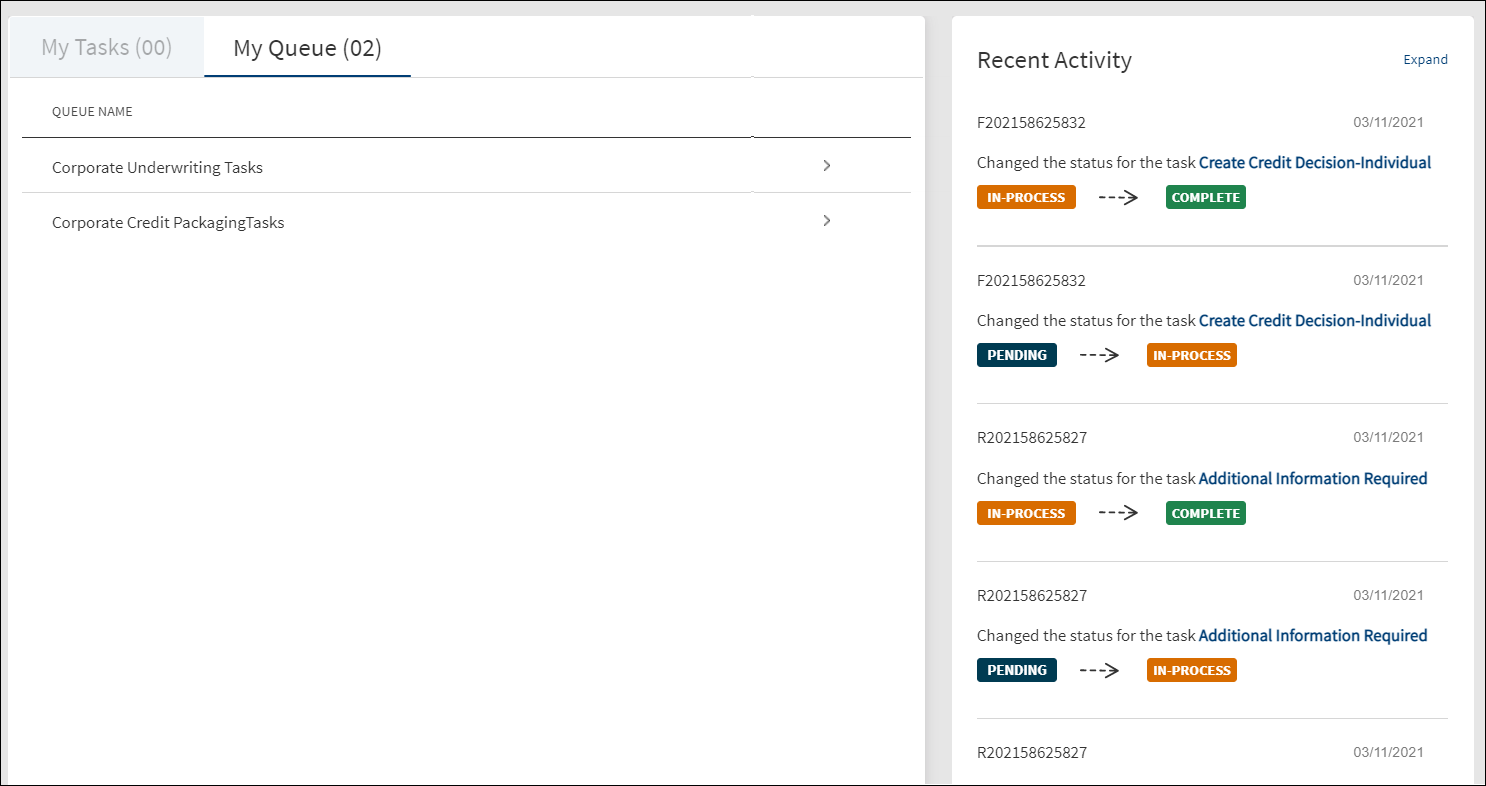
Recent Task Activity
Navigation: Dashboard > Tasks tab (only if applicable) > All tasks related tabs
Applicable to Roles: All onboarding journey roles
The Recent Activity widget displays the list of four recent task status changes that the user performed on the tasks tab. The Recent Activity widget is placed to the right of the tasks list. Whenever a task status is changed, the recent activity list is updated accordingly. This information will be view-only data. The following details appear:
- Request ID, Product ID, or Entity ID based on the type of task.
- Description: Changed the status for the task <Task name>.
- Display of <Previous task status> to <New task status>.
- Date on which the task status was changed.

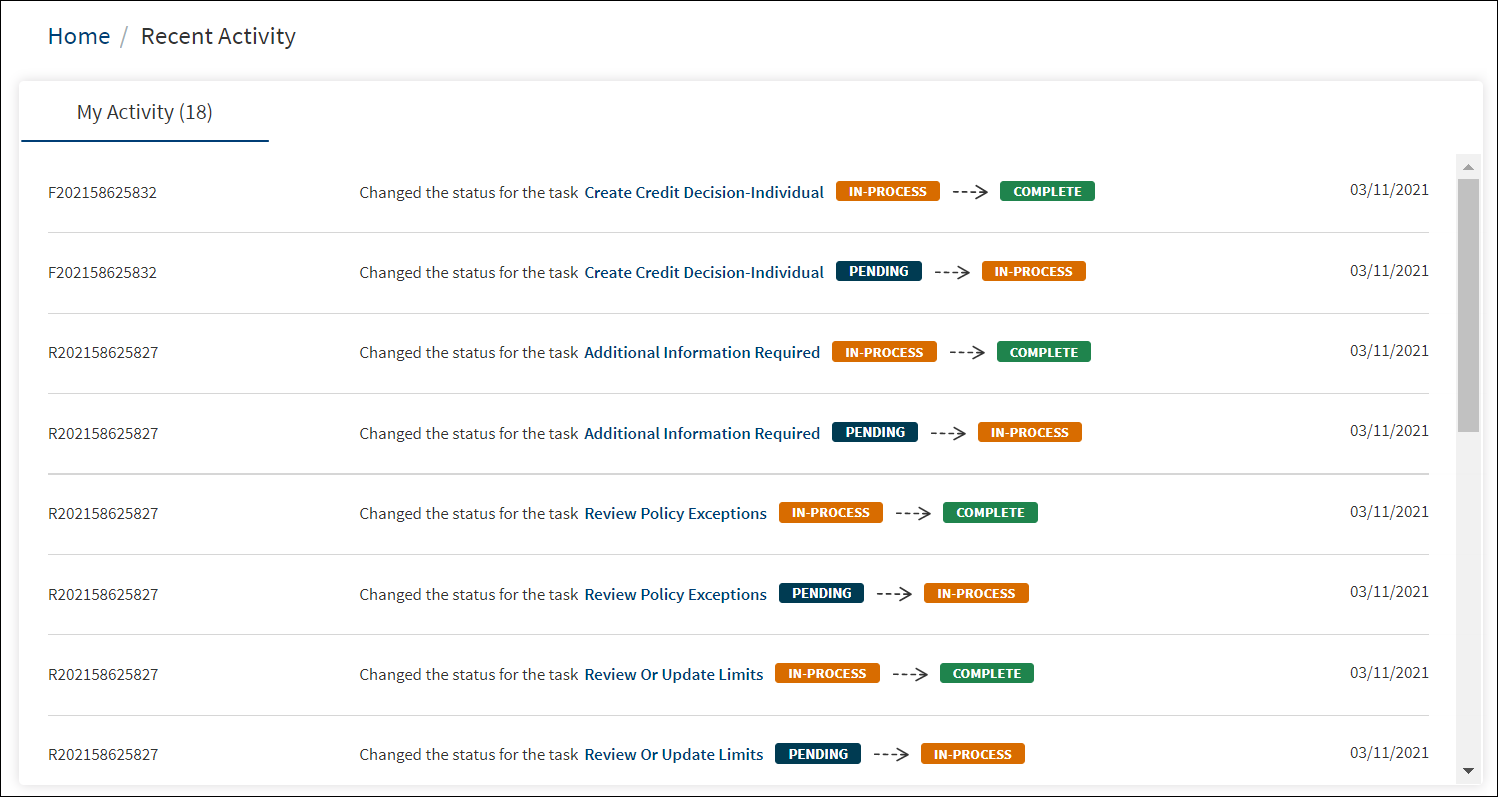
Clicking Expand opens the recent activities as a list spanning across the screen. In the expanded view, list of the latest 50 recent activities appear by default, and the number is a configurable parameter. To view more tasks, a user can click the Load More button. Additional 10 activities are displayed. Vertical scroll is available for the user to navigate through the tasks.
In this topic