Area
This screen adds area of bank entities. This screen is used to maintain list of area in a particular geographic location/Country/Region and also helps to segregate city area-wise. Bank user can use Area for capturing address of customers/ vendors/Banks and to initiate credit application in an entity/branch associated to specific City.
View
After selecting Area from the Organization Structure module, User will land in a screen where user can view already existing/add area (if any) along with add area button and search option.
Clicking the reset button erases the given search criteria.
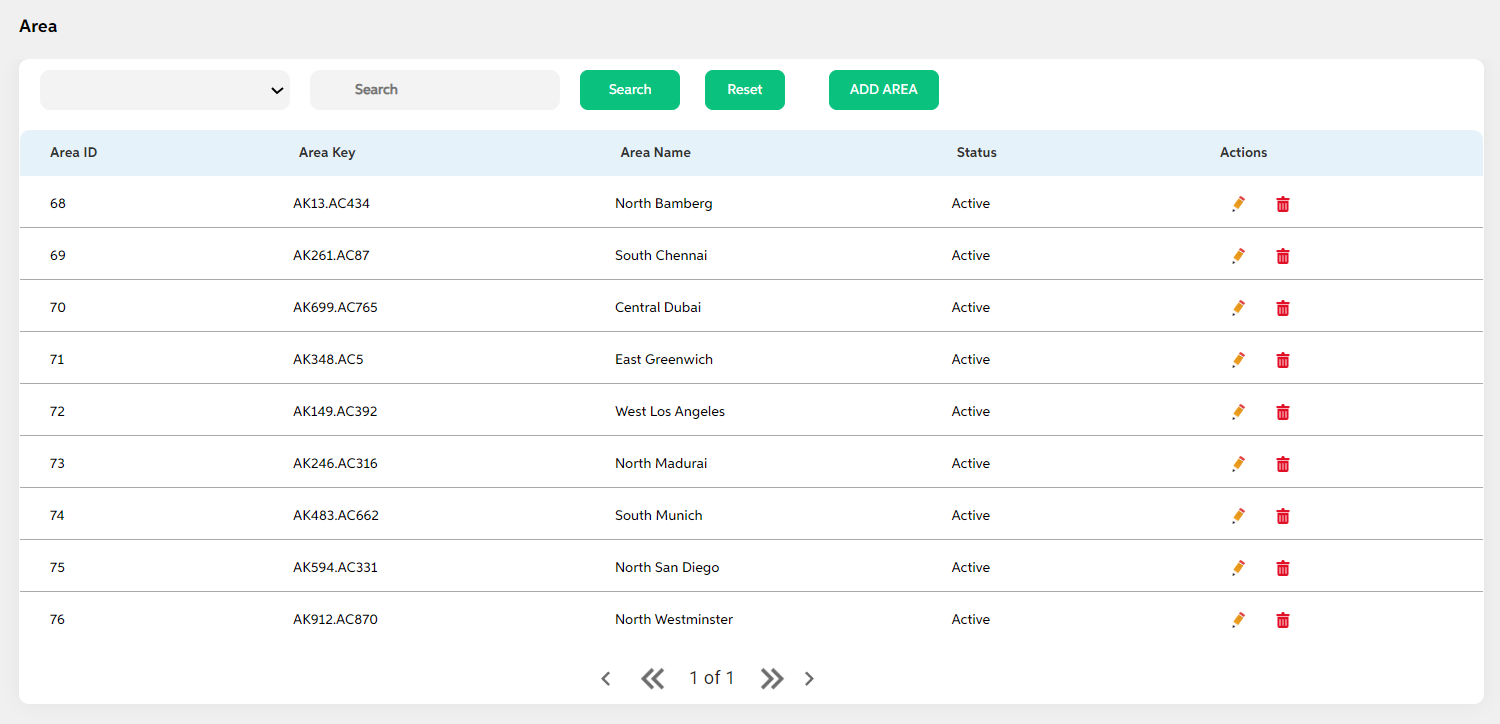
User can view the below details of already added cities in view screen:
- Area ID
- Area Key
- Area Name
- Status
- Action (Edit, Delete)
The search criteria for bank entity are as follows:
- Area Key
- Area Name
- Status
Add
To add a new area, User can click on the green “Add Area” button on the right, after which they will be redirected to the main screen where the following fields will need to be filled. User clicks on save. As clicked on save, added area is displayed in view page. If the user wants to cancel adding an area, user can click on cancel. User views a pop-up saying “Are you sure you want to cancel. All unsaved data gets discarded” with yes/no option.
| Field names | Description | Mandatory/non mandatory | Field type |
|---|---|---|---|
| Area name | Area name | Mandatory | Text |
| Geographic location | This refers to geographic location that the area belongs to | Mandatory | Dropdown |
| Country | This refers to country that the area belongs to | Mandatory | Dropdown |
| Region | This refers to region that the area belongs to | Mandatory | Dropdown |
| Status | Status is to mention if this is active or inactive. If this is marked as inactive, then it will not appear in the respective screens. | Mandatory | Dropdown |
Edit/Update
Clicking on the Edit icon (Action Column) as highlighted in the above screenshot which will redirect user to the screen where the user can make changes to relevant area data. On the editing screen, all the previous data as entered will be shown. After making relevant changes, user can Save the updated record. User can cancel the changes made by clicking on cancel button. User views a pop-up saying “Are you sure you want to cancel. All unsaved data gets discarded” with yes/no option.
Delete
User can click on the Delete icon (Action Column) as highlighted in the above screenshot will open a pop-up prompt asking for confirmation if the user is sure about deleting the record.User can press “Yes” if they wish to delete the area, and if they don’t want to delete then they can press on “No”.
| Screens to Configure (as Pre-requisite) | Screen name | Reflection in user panel | Reflection in admin panel |
|---|---|---|---|
The above screens should be configured to configure country screen. |
Area |
No impact in the user panel |
This screen acts as prerequisite screen for the below admin screens. Organizational structure:
|
In this topic