Retail Origination Application Overview
The Retail Origination application allows retail users to open a demand deposit account, a term deposit, or a loan.
The Retail Origination application enhances the applicant’s experience by requesting minimal information. It leverages multiple Fintech services, provides bank staff with the capability to process submitted applications, integrates with Transact for immediate account activation, and connects to Online Banking to enroll new customers .
The applicant, who may be an existing customer or new to the bank, can:
- Nominate one or more co-applicants.
- Save the application to finish later, which can be helpful when more time is needed to gather information or documents.
- Add additional accounts to the application.
- Choose options like overdraft protection.
- Review and accept disclosures.
- Explore and compare options for lending products like repayment period and payment frequency.
Make initial deposits into the newly opened accounts by way of a transfer from an existing account at another bank.
The Retail Origination application contains the following pre-configured retail journey workflows:
- Retail Account Origination
- Retail Loan Origination
Retail Account Origination
The Retail Account Origination application provides the applicant, whether a new or existing customer, the ability to apply for deposit products such as:
These products are currently pre-configured in the application, however they can be customised to match the bank’s product offerings.
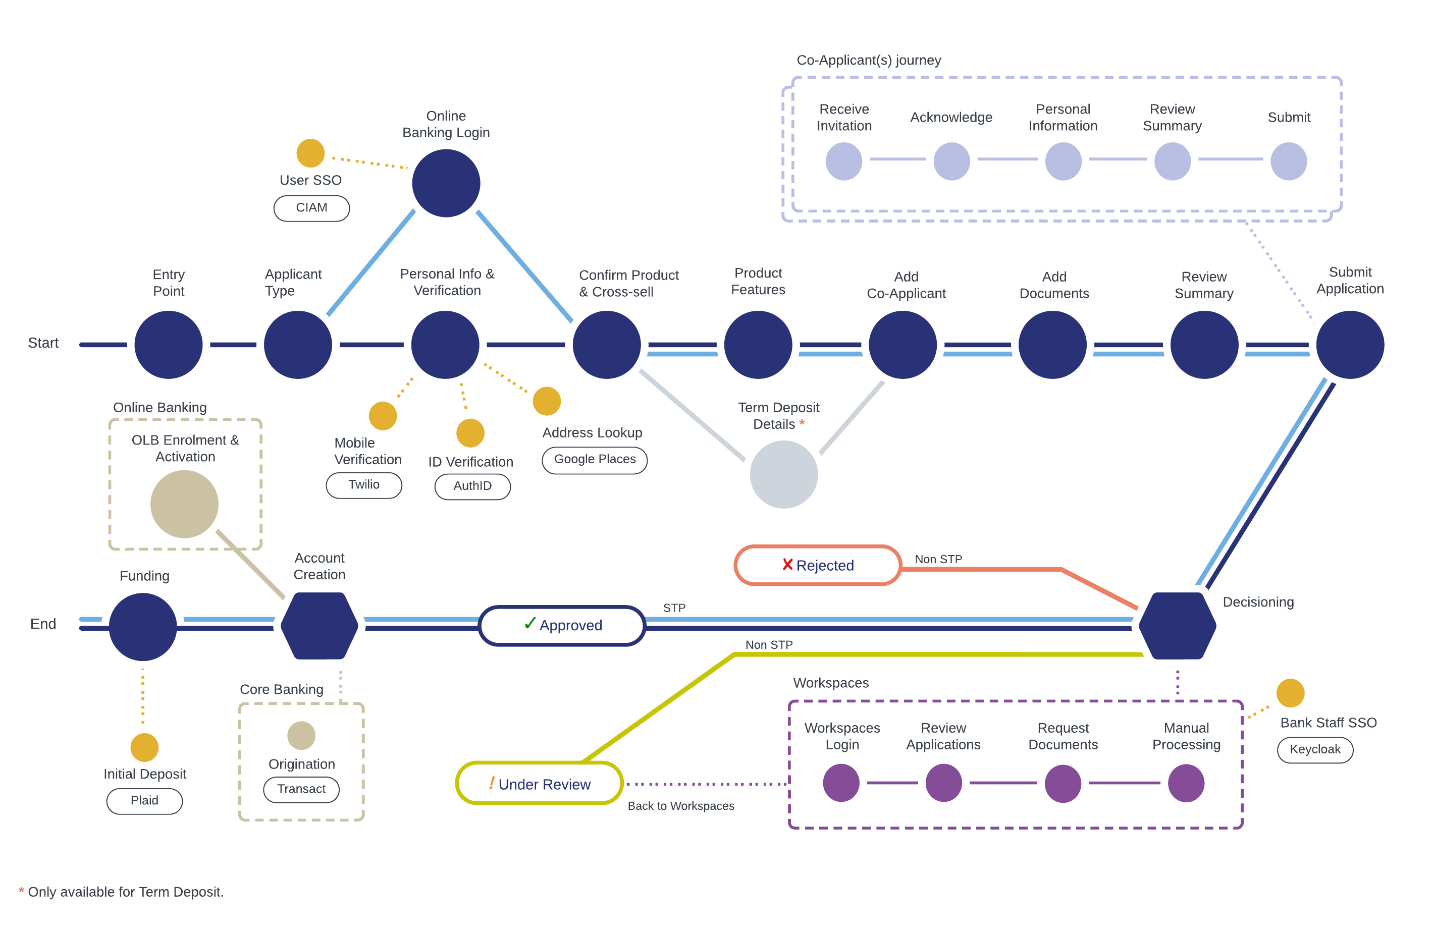
The Origination journey typically involves the following multiple stages, for new and existing customers, with or without co-applicants. These stages are:
Pre-submission
- Origination (TJM): The Retail Account Origination module runs on Temenos Journey Manager (TJM). TJM manages the account application created by the retail user, from initial login and product selection, to using identity verification services, nominating co-applicants, and all other steps until the user ultimately submits the application.
- Third-party integrations: Integrations with third-party services, such as Twilio mobile phone verification, AuthID identity verification, GooglePlaces address lookup, and Plaid for initial deposit funding are already pre-configured in the solution. Integrations with Transact and Online Banking are also pre-configured.
Single Sign-on (SSO): SSO capabilities are provided by CIAM and Keycloak.
Post-submission
- Workspaces (TJM): The Workspaces module is used by bank staff to process the submitted account applications. A Customer Service Representative can manually process each application under Manual Review, view the Approved and Rejected applications, and interact with the applicant using Workspaces.
- Core Banking (Transact): Integration with Transact automatically creates the new account. Transact creates the new account and sends notification to the Online Banking system. The user then receives an email and an SMS to enroll in Online Banking (OLB) and activate their OLB digital profile.
- Online Banking: Integration with Online Banking (OLB) is used to enroll the new customer in the Online Banking system, activate the new account, and make the initial deposit into the new account.
Journey Analytics: Future plans are in place to include the Journey Analytics module to obtain behavioural statistics on the applications submitted through the Retail Origination application. These statistics can then be used to incrementally improve the user journey to improve complete rates and reduce application abandonment.
Create a Savings or Current Account
Savings Accounts or Current Accounts are the most common type of bank accounts that allow account holders to deposit money and withdraw funds, all the while earning interest on the money deposited.
Users can view the key benefits of a product, learn more, and select the required product from the Savings Account product group.
The following Savings Account products are available:
- Prime Saving Account
- Salary Saving Account
- Standard Saving Account
The following Current Account products are available:
- Current Accounts
- Advanced Checking Account
- Basic Checking Account
- Preferred Checking Account
These products are currently pre-configured in the application, however they can be customised to match the bank’s product offerings.
Savings or Current Account Workflows
Process Flow
The Savings or Current Account journey for a new or existing customer, with or without co-applicants, typically moves through the following workflow:
Applicant
- Entry Point - Select Product Type
- Select Applicant Type
- Personal Information & Verification
- Confirm Product & Add Additional Products
- Product Features
- Add Co-Applicants
- Upload Documents
- Review Application
- Submit Application
- Resume Application
- Enroll in Online Banking
Bank staff workflow in Workspaces
- Observe Approved, Rejected applications if required.
- Review the Manual Review applications to determine whether they are successful or not.
UX Flow
Create a Term Deposit
Term Deposits are products offered by banks that provide interest rate in exchange for customers agreeing to leave a lump-sum of money with the bank for a fixed period of time. The Term Deposits section allows users to view key benefits of a product, learn more, and select the required product from various cards under the Term Deposits product group.
The following products are available:
- Short Term Auto Rollover Deposit
- Short Term Manual Rollover Deposit
- Long Term Flexi Payment Deposit
- Term High Earning Deposit
These products are currently pre-configured in the application, however they can be customised to match the bank’s product offerings.
Term Deposits Workflows
Process Flow
The Term Deposit journey for a new or existing customer, with or without co-applicants, typically moves through the following workflow:
Applicant
- Entry Point - Select Product Type
- Select Applicant Type
- Personal Information & Verification
- Confirm Product & Add Additional Products
- Compare Term Deposit Plans
- Add Co-Applicants
- Upload Documents
- Review Application
- Submit Application
- Resume Application
- Enroll in Online Banking
Bank staff workflow in Workspaces
- Observe Approved, Rejected applications if required.
- Review the Manual Review applications to determine whether they are successful or not.
UX Flow
Retail Loan Origination
The Retail Loan Origination application provides applicants, whether a new or existing customer, the ability to apply for loan products such as:
These products are currently pre-configured in the application, however they can be customised to match the bank’s product offerings.
The Origination journey typically involves the following multiple stages, for new and existing customers, with or without co-applicants. These stages are:
Pre-submission
- Origination (TJM): The Retail Loan Origination module runs on Temenos Journey Manager (TJM). TJM manages the loan application created by the retail user, from initial login and product selection, to using identity verification services, nominating co-applicants, and all other steps until the user ultimately submits the application.
- Third-party integrations: Integrations with third-party services, such as Twilio mobile phone verification, AuthID identity verification, and GooglePlaces address lookup are already pre-configured in the solution. Integrations with Transact and Online Banking are also pre-configured.
Single Sign-on (SSO): SSO capabilities are provided by CIAM and Keycloak.
Post-submission
- Workspaces (TJM): The Workspaces module is used by bank staff to process the submitted loan applications. A Customer Service Representative can manually process each application under Manual Review, view the Approved and Rejected applications, and interact with the customer using Workspaces.
- Core Banking (Transact): Integration with Transact automatically creates the new loan account. Transact creates the new loan account and sends notification to the Online Banking system. The user then receives an email and an SMS to enroll in Online Banking (OLB) and activate their OLB digital profile.
- Online Banking: Integration with Online Banking (OLB) is used to enroll the new customer in the Online Banking system and activate the new loan account.

Journey Analytics: Future plans are in place to include the Journey Analytics module to obtain behavioural statistics on the applications submitted through the Retail Origination application. These statistics can then be used to incrementally improve the user journey to improve complete rates and reduce application abandonment.
Apply for a Consumer or Line of Credit Loan
Consumer or Line of Credit Loans are regular loan products that help applicants, whether a new or existing customer, obtain funds for a variety of reasons. The Consumer Loan section allows users to view the key benefits of a product, learn more, create a simulation, choose a plan, and apply for the loan.
Consumer or Line of Credit Loan Workflows
Process Flow
The Consumer or Line of Credit Loan journey for a new or existing customer, with or without co-applicants, typically moves through the following workflow:
Applicant
- Entry Point - Select Product Type
- Select Applicant Type
- Personal Information & Verification
- Calculate Loan & Repayment Details
- Add Co-Applicants
- Complete Financial Information
- Upload Documents
- Review Application
- Submit Application
- Resume Application
- Enroll in Online Banking
Bank staff workflow in Workspaces
- Observe Approved, Rejected applications if required.
- Review the Manual Review applications to determine whether they are successful or not.
UX Flow
UX
Entry Point – Select Product Type
Step applicable to all accounts and lending journeys
The Select Product Type step is the landing page for the Retail Origination application.
Click on the tile to select the product you want to apply for.
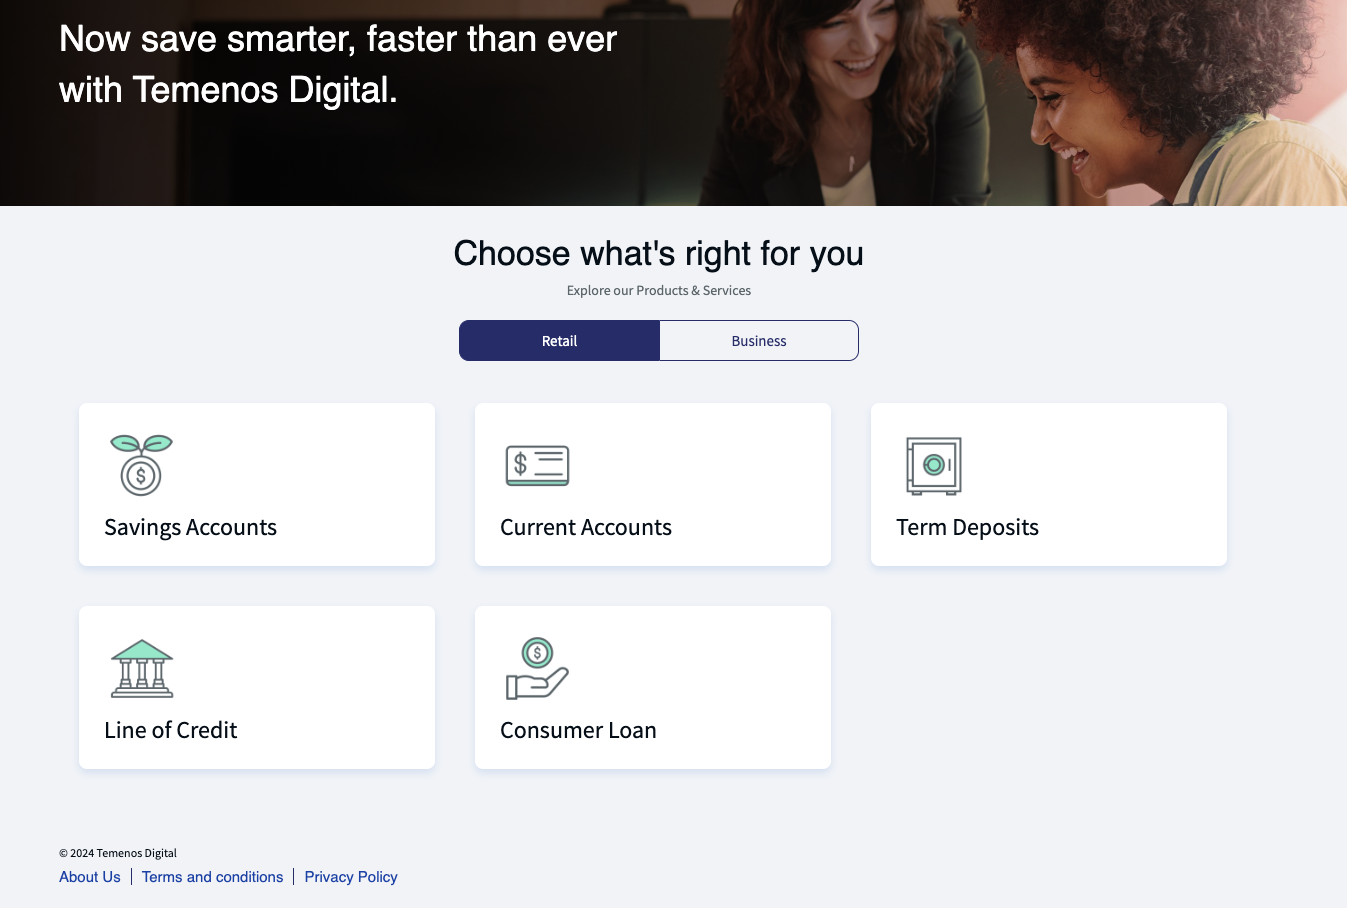
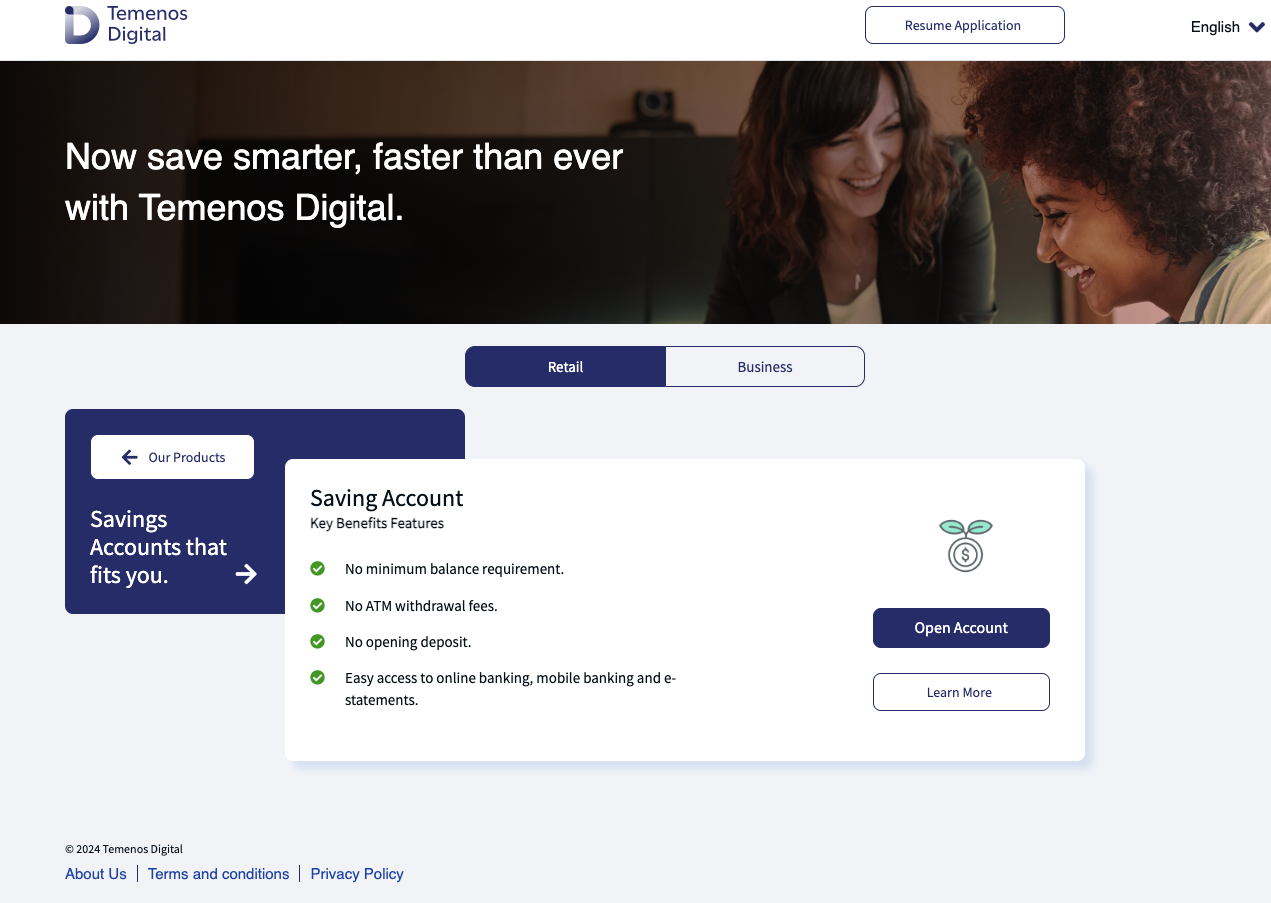
The second screen shows you your options to select from.
Review the features and click Learn More for more details.
Click Open Account to proceed with the application to open your selected account or loan.
Select Applicant Type
Step applicable to all accounts and lending journeys
This step contains the consent and selection of the applicant type as either a new or existing user.
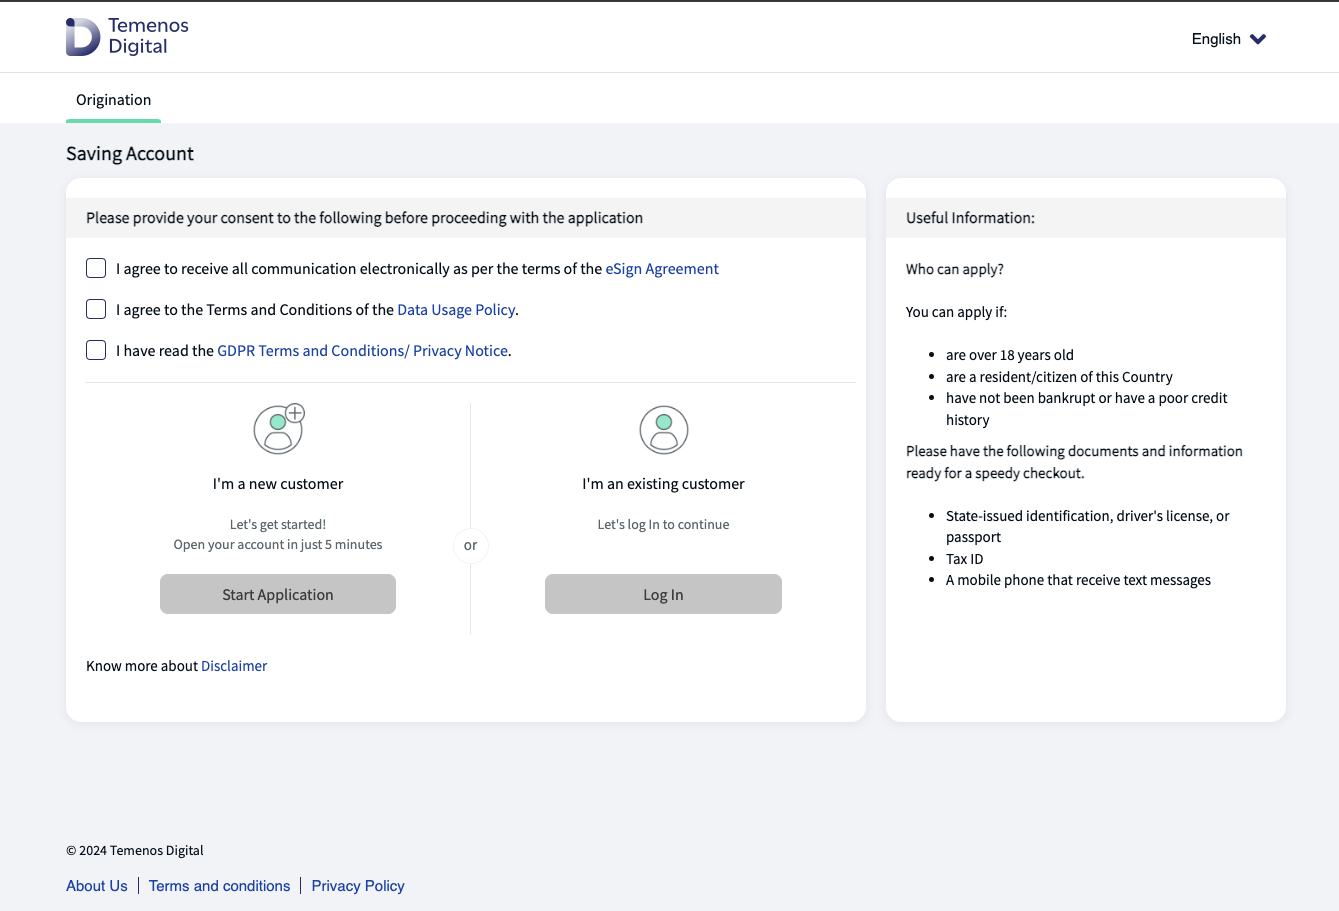
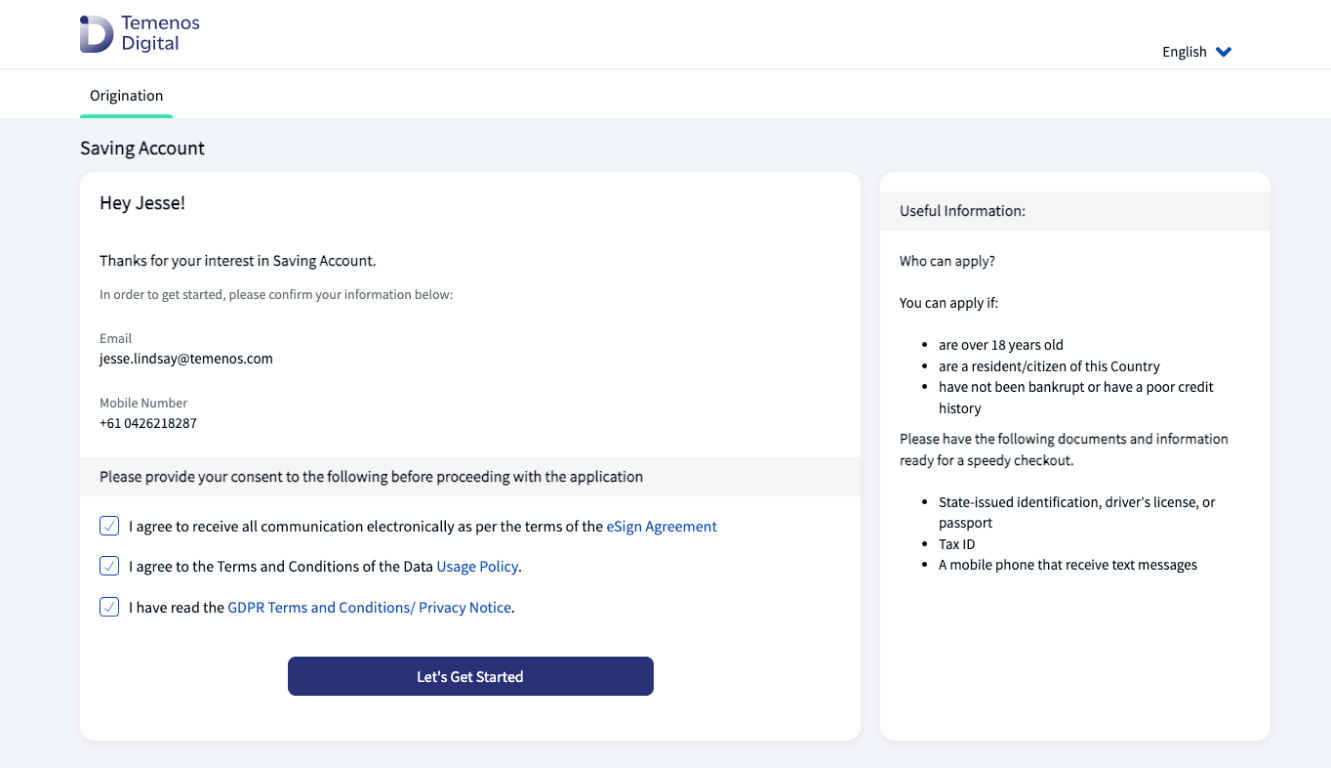
Consent
Read the Useful Information and the following policies:
- eSign Agreement
- Data Usage Policy
- GDPR Terms and Conditions.
Then:
- Tick each checkbox to consent to all policies before proceeding with the application.
Start the application as a new customer
Click Start Application to start applying.
The Personal Information & Verification step then displays to obtain all the details required to onboard a new customer and apply for a new loan or account.
Login as an existing customer
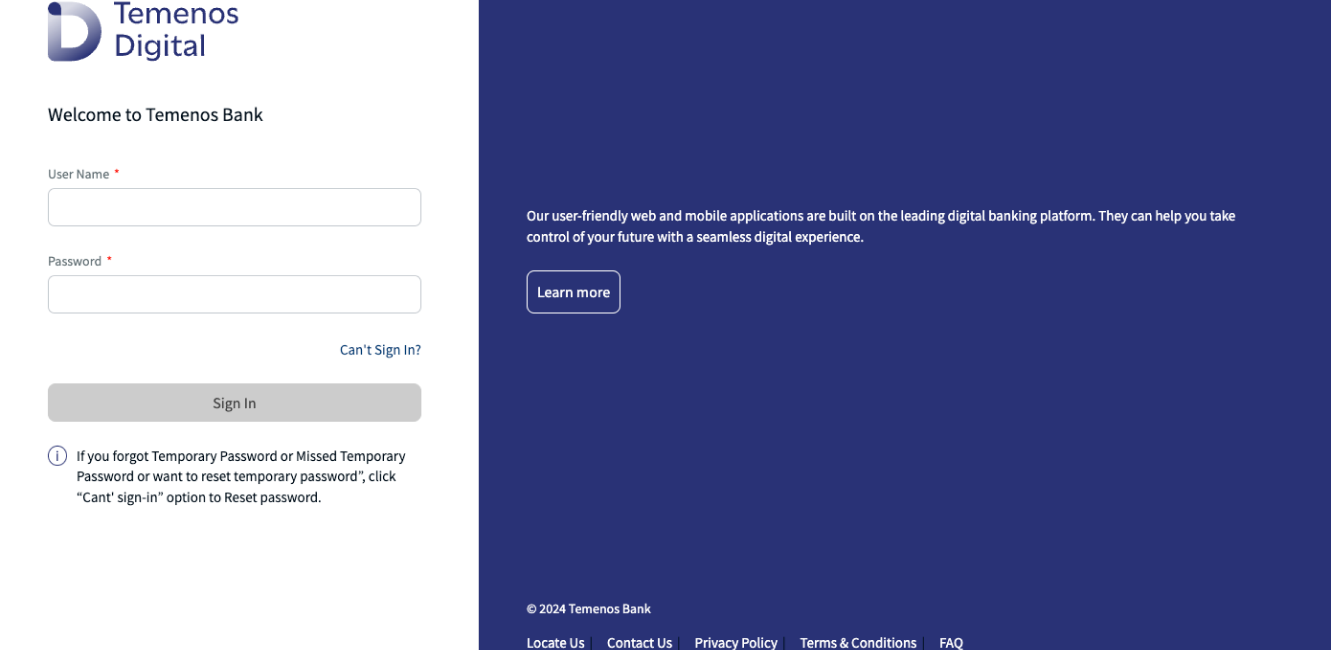
- Click Log In.
The Temenos Digital login screen displays.
Enter your login credentials and click Sign In.
Click Can't Sign In? if you have forgotten your password and want to reset it.
The Consent screen displays, and you are welcomed as an existing customer.
The Personal Information & Verification step is automatically pre-populated from your existing customer details held at the bank.
Enter Personal Information & Verification
Step applicable to all accounts and lending journeys
For existing customers, the Personal Information step is skipped as this personal information is already pre-populated, and the customer has already gone through the bank’s identity verification steps.
For new customers, the Personal Information step contains the following:
- Personal details of the applicant, such as first name, last name, date of birth, email address, country code and phone number details.
- Tax, identity and address details, such as tax file number, passport ID number, expiry date and home address.
- Twilio mobile phone number verification process.
- AuthID identity verification process.
- Google Places address lookup process.

Personal Information
The Personal Information screen contains the following details:
- First Name and Last Name.
- Date of Birth: Enter the date of birth in the MM/DD/YYYY format or select from the date picker. Note: Applicants must be at least 18 years old.
- Email Address: Type the email address to use to link to your account.
- Country Code: Select the country-code.
- Mobile Number: Enter the mobile phone number.
Verification Code: Enter the SMS verification code sent to your phone by the Twilio mobile phone verification process, then click Verify.
After providing all these details, click Continue.
Tax, ID and Home Address details
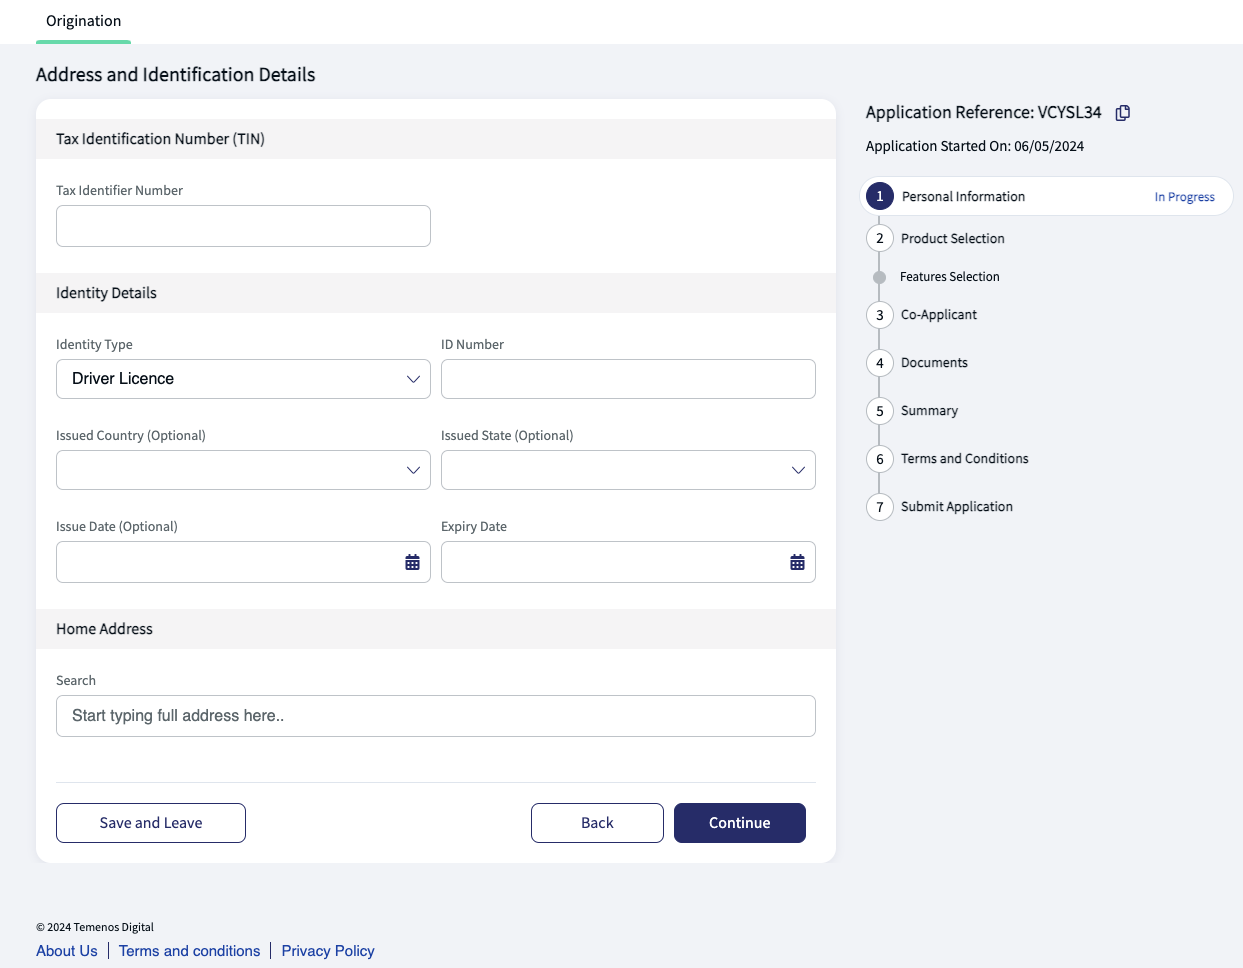
The Tax, ID and Home Address screen contains the following details:
Tax Identification Number (TIN): Enter your tax file number.
Identity Details: Select the Identity Type of the document you want to use to confirm your identity.
For example, for a Passport document, enter your passport ID Number, and Expiry Date as a minimum.
Home Address: Enter your home address and Google Places with help to populate the field using Address Lookup functionality.
Click Continue to proceed with the application.
Twilio mobile phone number verification process
The Twilio mobile phone number verification verifies the mobile number provided in the Personal Information section, using SMS, to minimize the possibility of users registering with fake mobile phone numbers.
The applicant will receive a six-digit secure access code on the registered phone number after entering it in the Personal Information section.
- In the Verification Code field, the applicant types the code they received, then clicks Verify to proceed with the application.
Note: If the applicant does not receive the secure access code, they should click Resend. The security code will be re-sent to their phone.
AuthID identity verification process
AuthID is a third-party identity verification service that integrates with the Retail Origination application to verify and authenticate users based on an identity document scan and selfie photos.
This capability has been configured for mobile devices only, but after customisation, can be used across all devices.
- This is an optional step, and the applicant has the option to scan their license or passport.
- AuthID also enables the applicant to capture static and liveness selfies and then proceed with the verification of their identity by matching the d759180ata extracted from the ID with the data on the selfie.
- The score threshold is set as 45% by default to minimize the risk of false positives, however the bank can always increase or decrease this score based on their business strategy.
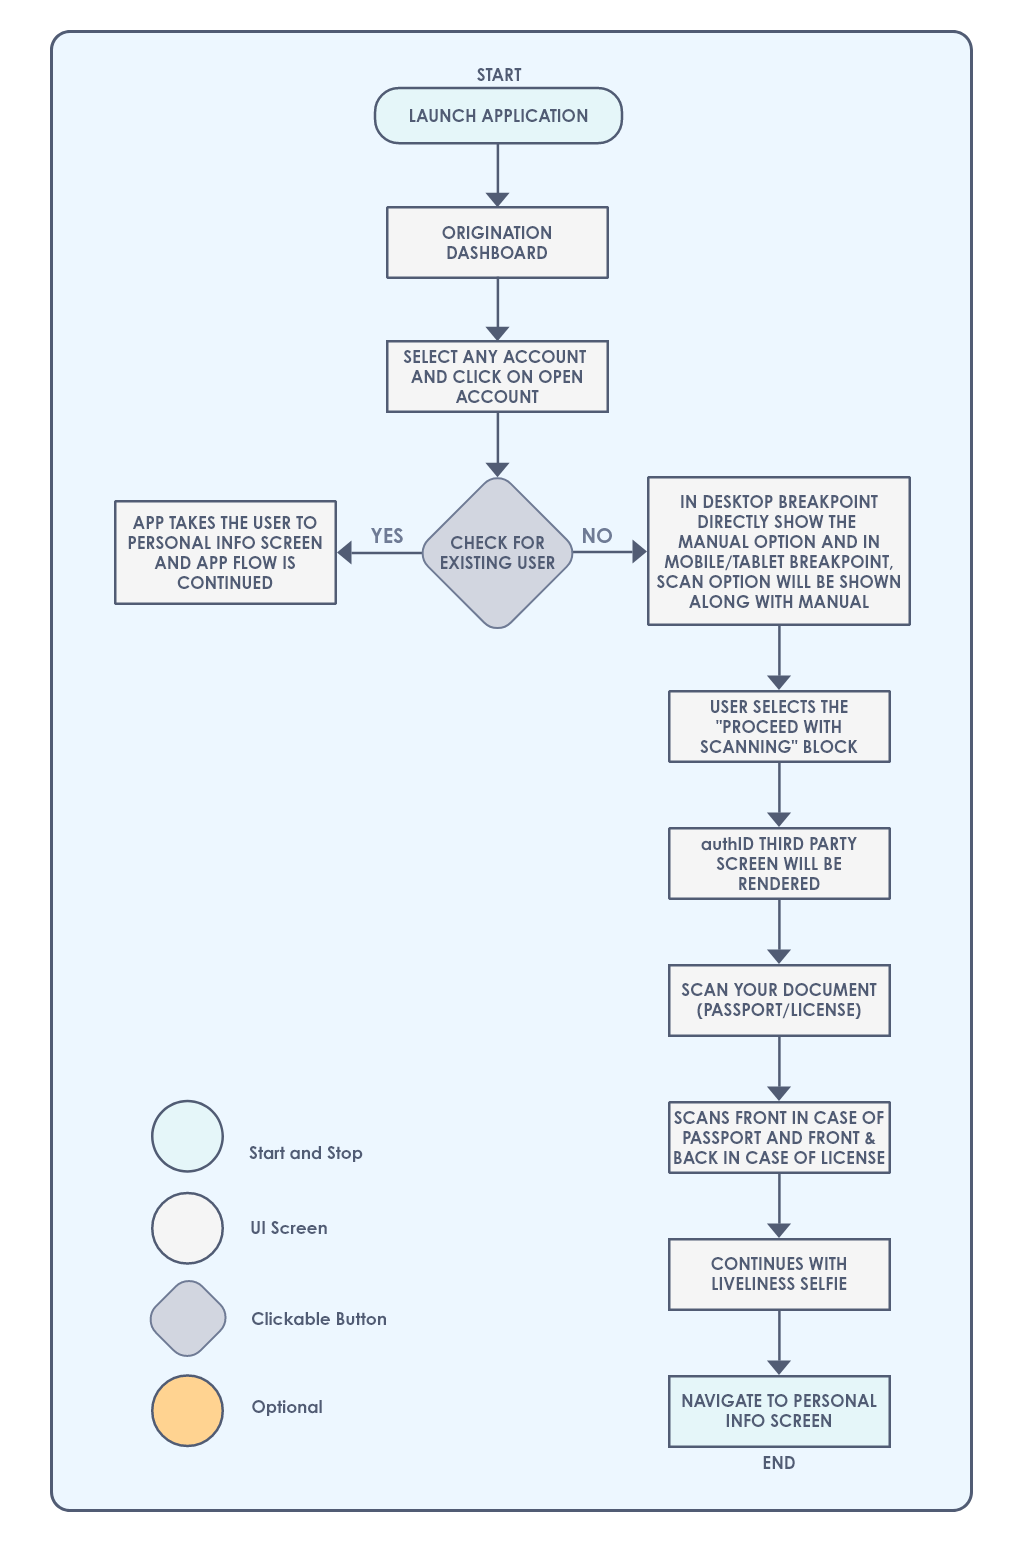
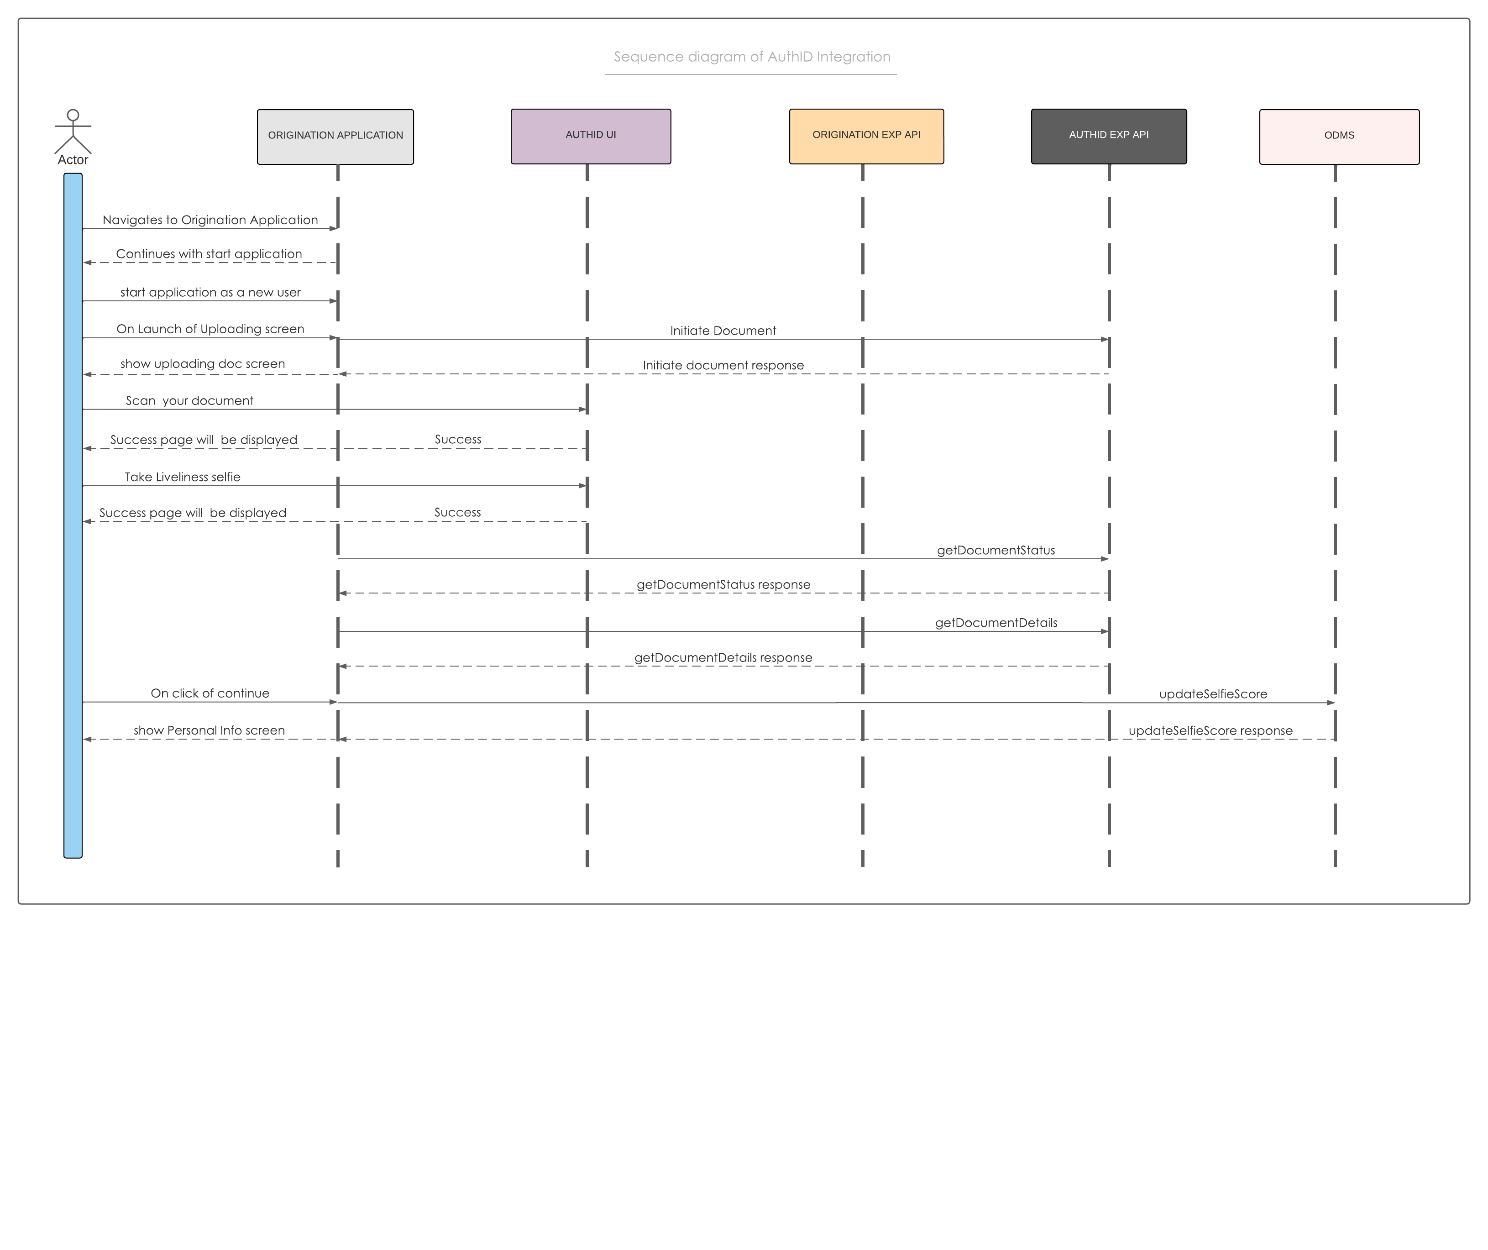
AuthID functional workflow
The applicant is asked to scan their document (License or Passport) or enter the details manually. The AuthID functional work flow is:
AuthID sequence diagram
Products Supported
AuthID supports the following products:
- ID Scan: Scans, verifies and extracts data via OCR (Optical Character Recognition) from a long list of supported identity documents across multiple countries.
Refer to the list of supported documents for multiple countries.
- Selfie Liveness Verification: Executes selfie camera-based ID and V by verifying the selfie photo with the photo extracted from the ID document to validate the applicant's identity.
ID verification process
The applicant can skip the ID and V process and proceed with the application manually. The ID and V step is configuration driven, so this step can be mandatory or optional based on the applicant's device.
If the applicant opts to skip the ID and V process, the control navigates to the Personal Information screen.
If the applicant opts for the ID and V process, the first step is to scan the document.
Currently as part of the ID and V process, only Driving License and Passport are supported.
For Driving License, the applicant must be able to scan both sides of the ID.
For Passport, the applicant must be able to scan one side of the Passport.
After successful scanning of the document, the applicant is directed to the Selfie capture screen.
If the applicant faces any issues in the selfie capture screen, the applicant can retry or skip the process and navigate to the Personal Information screen.
After the applicant successfully captures the selfie, the score results are updated in the Decision Framework.
After the score result is updated and post validation of the applicant's authenticity, the extracted data from the scanned documents is used to pre-fill the data in the Personal Information screen.
The applicant can edit or modify the pre-filled information and click Continue button to navigate forward with the application.
The ID &V scores will be used with the Decision Framework rules to make a decision.
During the whole ID&V process, the applicant has the option to skip the process at any stage and move to the Personal Information screen.
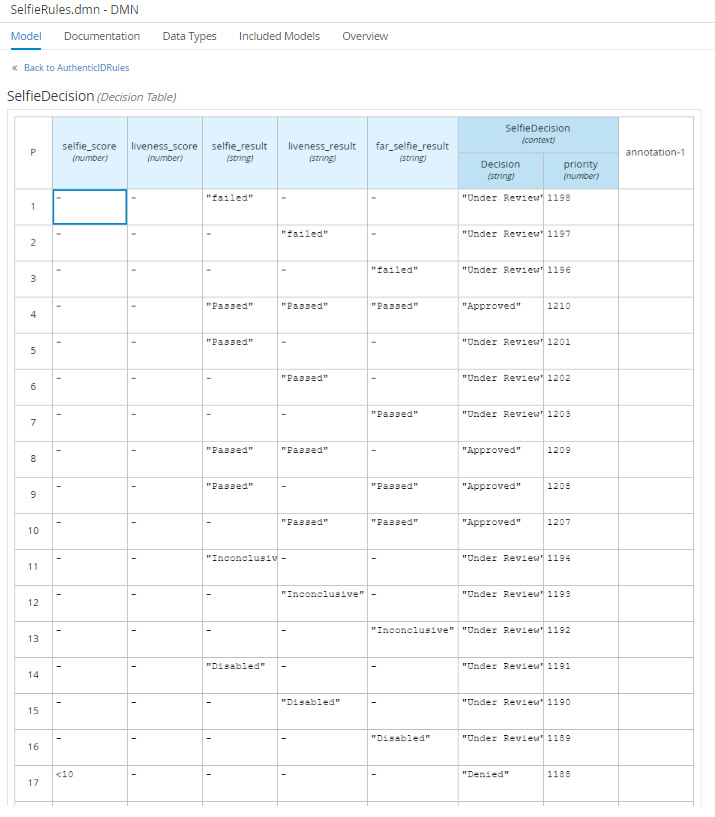
Selfie decision
The input data that contributes to the Selfie decision includes:
- selfie_score
liveness_score
selfie_result
liveness_result
far_selfie_result
The values of the Selfie score, liveness score, selfie result, liveness result, and far selfie result are obtained from authID, and these parameters are used to make the final selfie decision.
In this case, the decision table is as follows: (CAN remove as provider and account configuration is customer specified - see Bill )
Confirm Product & Add Additional Product(s)
Step applicable to accounts only
The Product Selection step allows the applicant to:
- Confirm the product they already selected on the landing page, and
- Select more products if required. This is a cross-sell feature.
These products are currently pre-configured in the application, however they can be customised to match the bank’s product offerings.
Importantly, confirm that the product you selected is displayed in the You are Applying for… section.
Click Back if you want to go back to the previous step.
The additional products are displayed in a card format for the applicant to choose from.
Add more to your application
Each available product card contains the name of the product, a description, a Know More details pop-up dialog, and the checkbox to select the product.
- Simply select the product, or products, you want to add to your application.
- Click Continue.
Next step
If any Term Deposits product is selected, the Compare Term Deposit Plans step appears.
Otherwise, the Select Product Features step appears.
Compare Term Deposit Plans
Step applicable to term deposits only
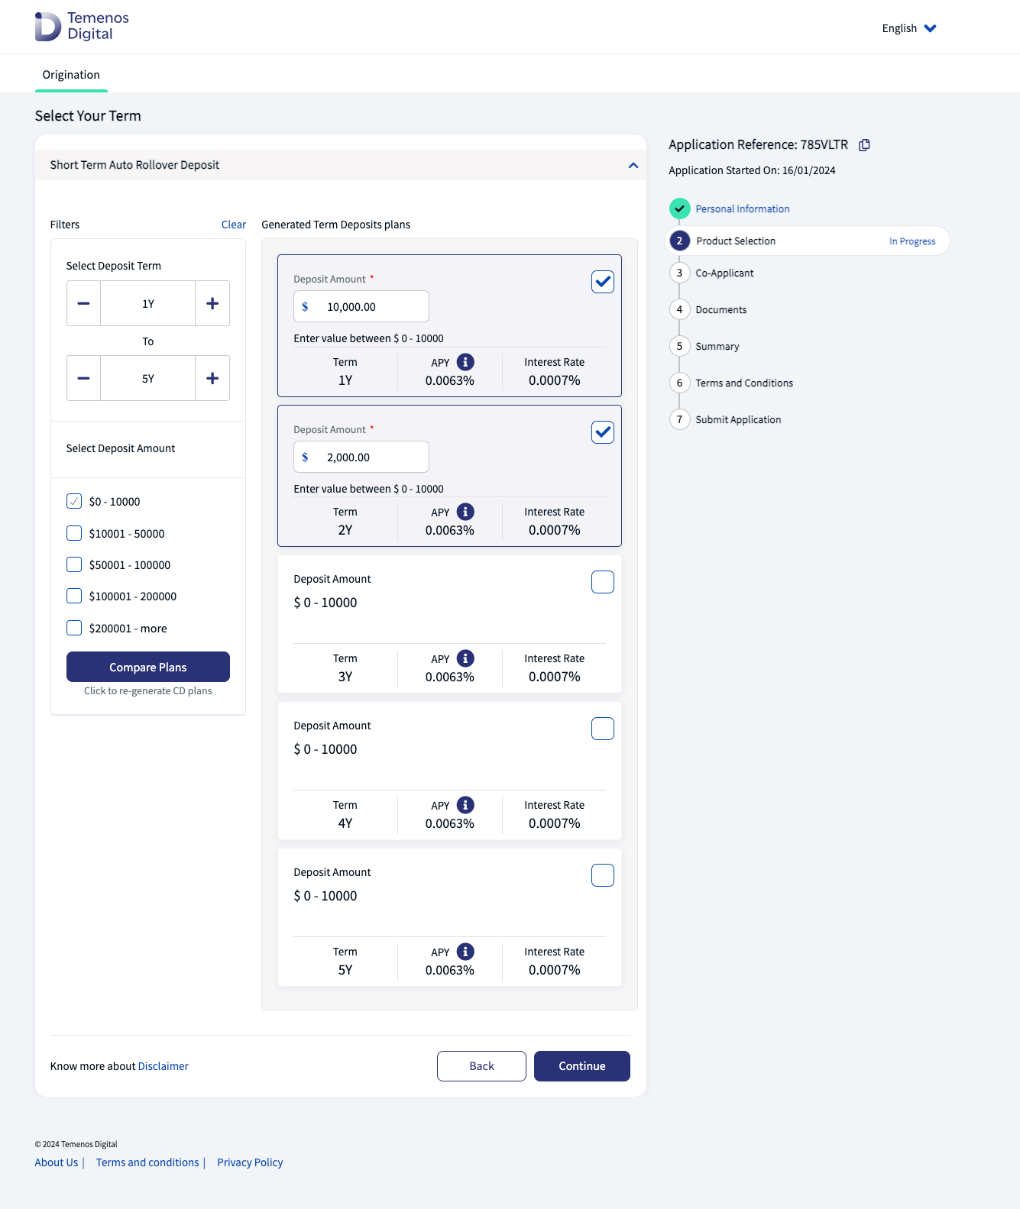
The Term Deposit Plans step is used to compare and select the term of one or more Term Deposits accounts.
In the Select Deposit Term fields (from and to), use the + and – symbols to specify the terms you would like to compare.
Tick to select the term Deposit Amount.
Click Compare Plans.
The term deposit plans for each year you selected are displayed as cards under Generated Term Deposits Plans.
Tick to select the term deposit plans of your choice. You can select more than one.
Click Continue to proceed with the application.
Term Deposit Calculations
Calculations
The Retail Origination journey relies on a reference data to manage Term deposit plans. The Transact team is working on building an API to display the available plans on the screen to select the required term deposit plan.
API specification
Endpoint: <Transact API endpoint>/api/v5.0.0/product/{productId}/interestRates/simulations
Request type: GET
Response Example: attached: termdeposit.json
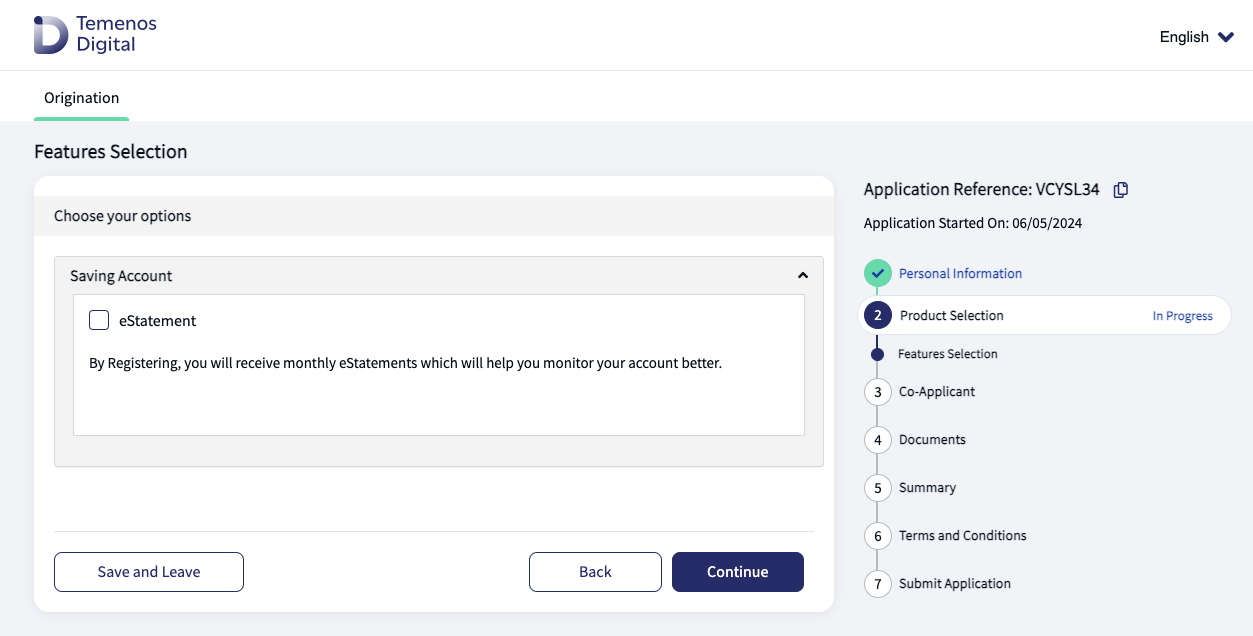
Select Product Features
Step applicable to accounts only
The Features Selection step is applicable when Savings, Current and Term Deposits Accounts are selected.
Each account may have multiple features or options, so on this screen the applicant can select their options.
Select the required options, then click Continue.
Calculate Loan & Repayment Details
Step applicable to lending only
The Calculate Loan & Repayment Details step is used to calculate the applicant’s loan amount, term, and frequency of repayment for the following loans:
Consumer Loan
Line of Credit
Choose Your Plan
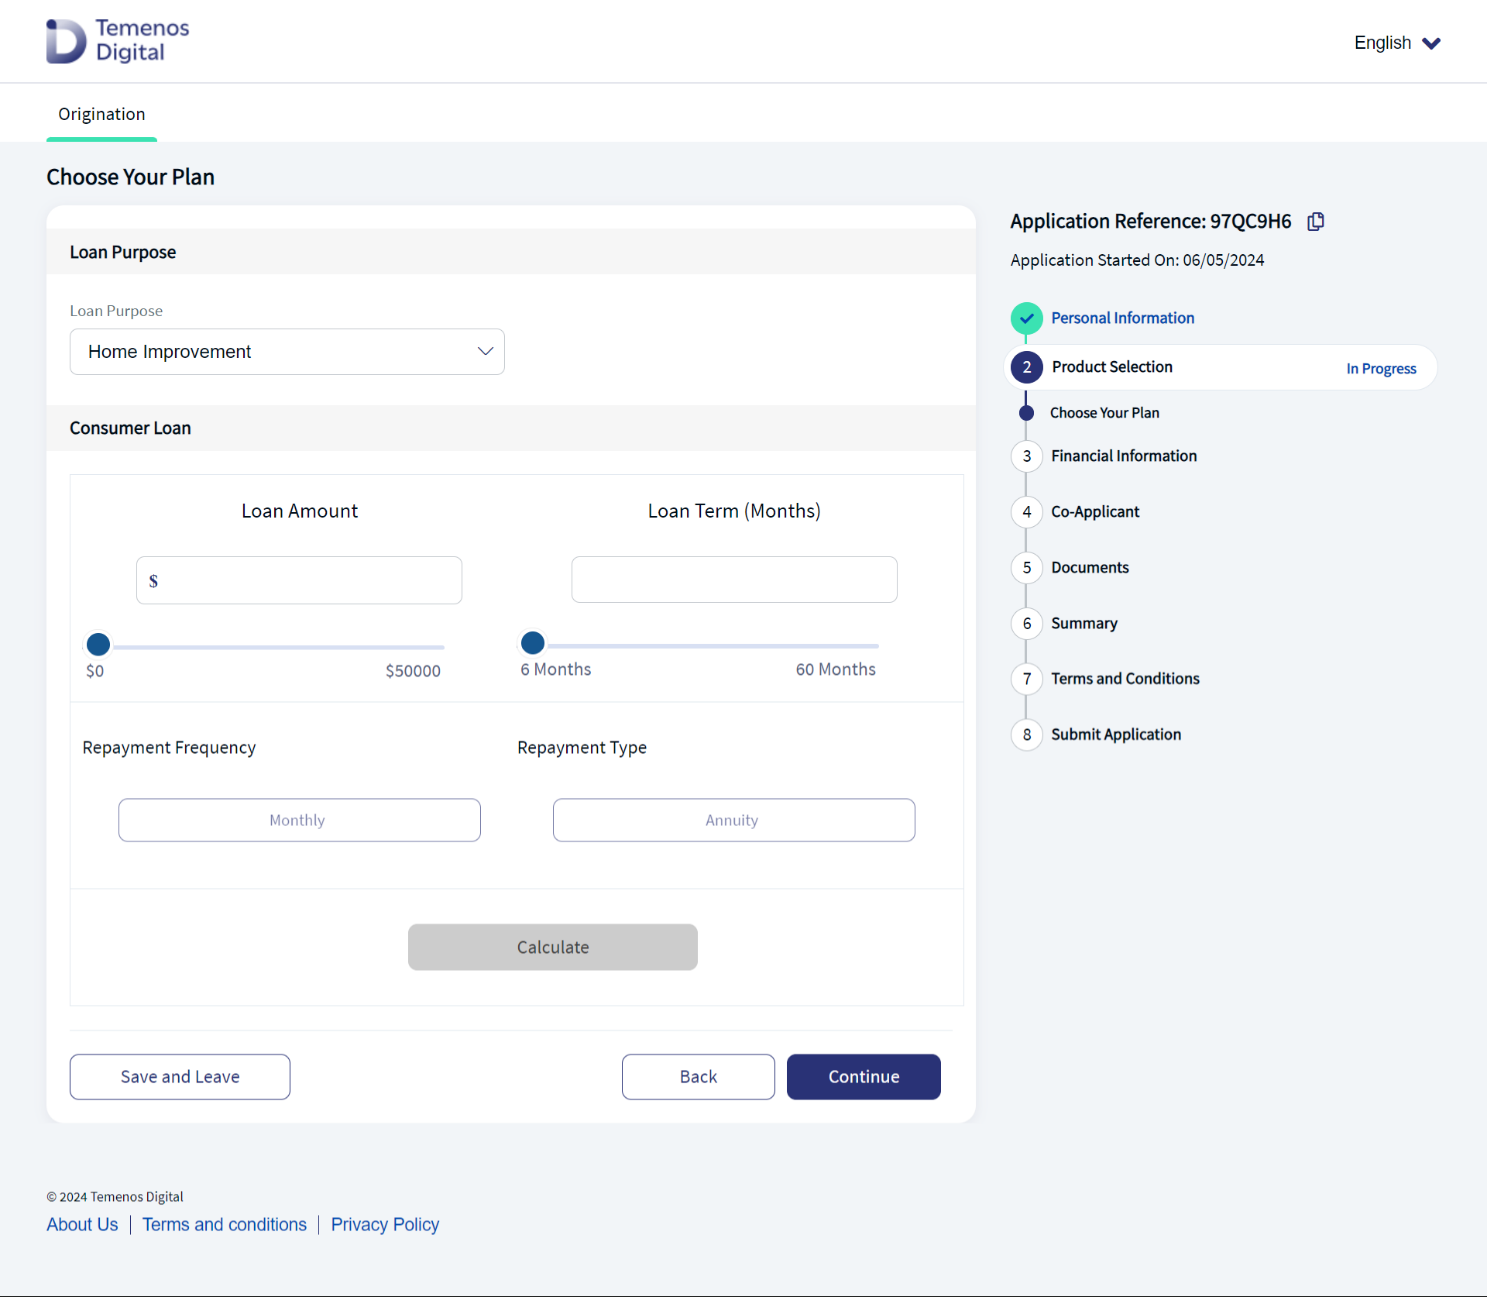
This section allows you to calculate and select a plan for the loan product selected.
- Enter the desired Loan Amount and Loan Term from the ranges displayed.
- The default minimum and maximum values have been pre-configured in the Retail Origination application, and can be customised to match the bank’s product offerings.
- The Repayment Frequency of Monthly is pre-selected, based on the configuration of the application.
- Click on Calculate to generate the loan plan based on your requirements.
- The loan plan and repayments are displayed based on your requirements.
- Click Continue to proceed with the loan plan.
The Repayment Type of Annuity is pre-selected, based on the configuration of the application.
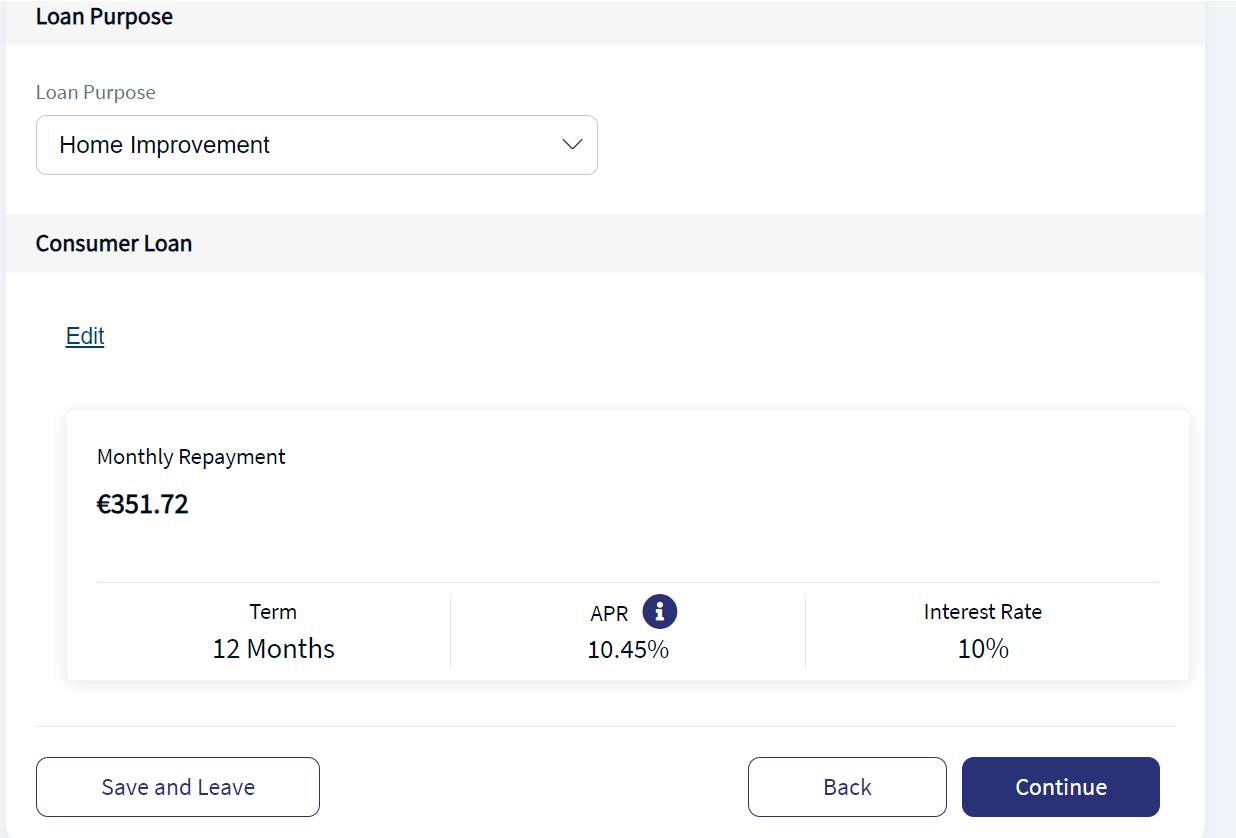
Loan Details
This section provides a summary of the loan plan and your repayments based on what was entered in the previous section.
Select the Loan Purpose from the dropdown, then click Continue to proceed with the application.
Complete Financial Information
Step applicable to lending only
Use the Financial Information step to complete all the required details for a retail loan application. This step is only applicable to:
Consumer Loans
Line of Credit loans.
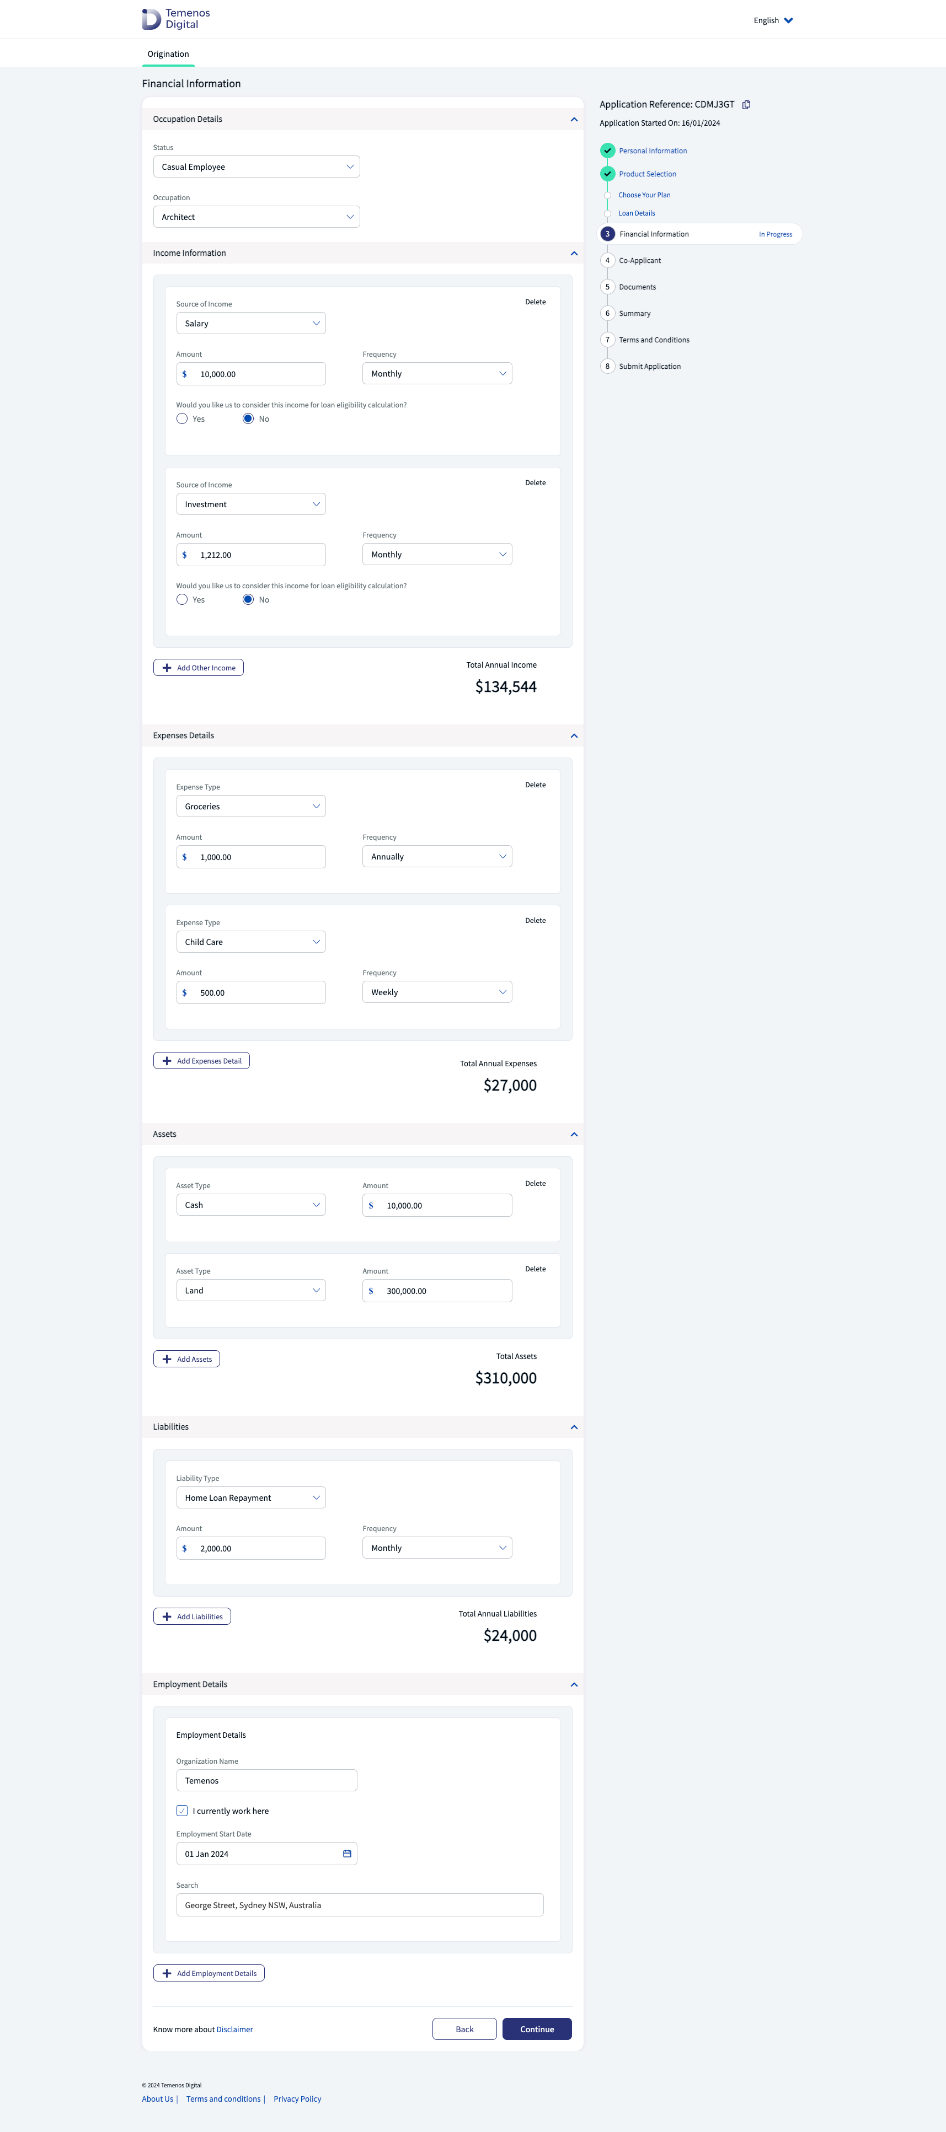
The Financial Information step is used to gather information on the applicant’s financial position, which includes the following:
Occupation details, income, expenses, assets, liabilities, and employment details.
If the applicant is also a business owner, they need to include:
Business details.
Once complete, click Continue to proceed with the application.
Calculation capabilities
The Retail Origination application is pre-configured with calculation capabilities, specifically in the case of income frequency, which will be annualized automatically for the applicant.
This means that all other income frequencies, such as daily, weekly and monthly, will be annualized, and a total income for the year will be calculated automatically.
Calculations
The Retail Origination journey relies on reference data to manage Consumer Loan plans. The Transact team is working on building an API to display the available Consumer Loan plans on the screen to help select the correct loan.
API Specification
- Endpoint: <Transact Endpoint>/api/v3.6.0/product/${productID}/commitment/${loanamount}/period/${term}
- Example: https://restko-dev-bsg.pre.temenos.cloud/irf-provider-container/api/v3.6.0/product/RES.CONSUMER.LOAN/commitment/10000/period/1Y
- Request Type: GET
Add Co-Applicant(s)
Step applicable to all accounts and lending journeys
The Co-Applicant step is used to add one or more co-applicants to the application.
- To proceed with the application, without any co-applicants, click No, then click Continue.
- To add one or more co-applicants, click Yes.
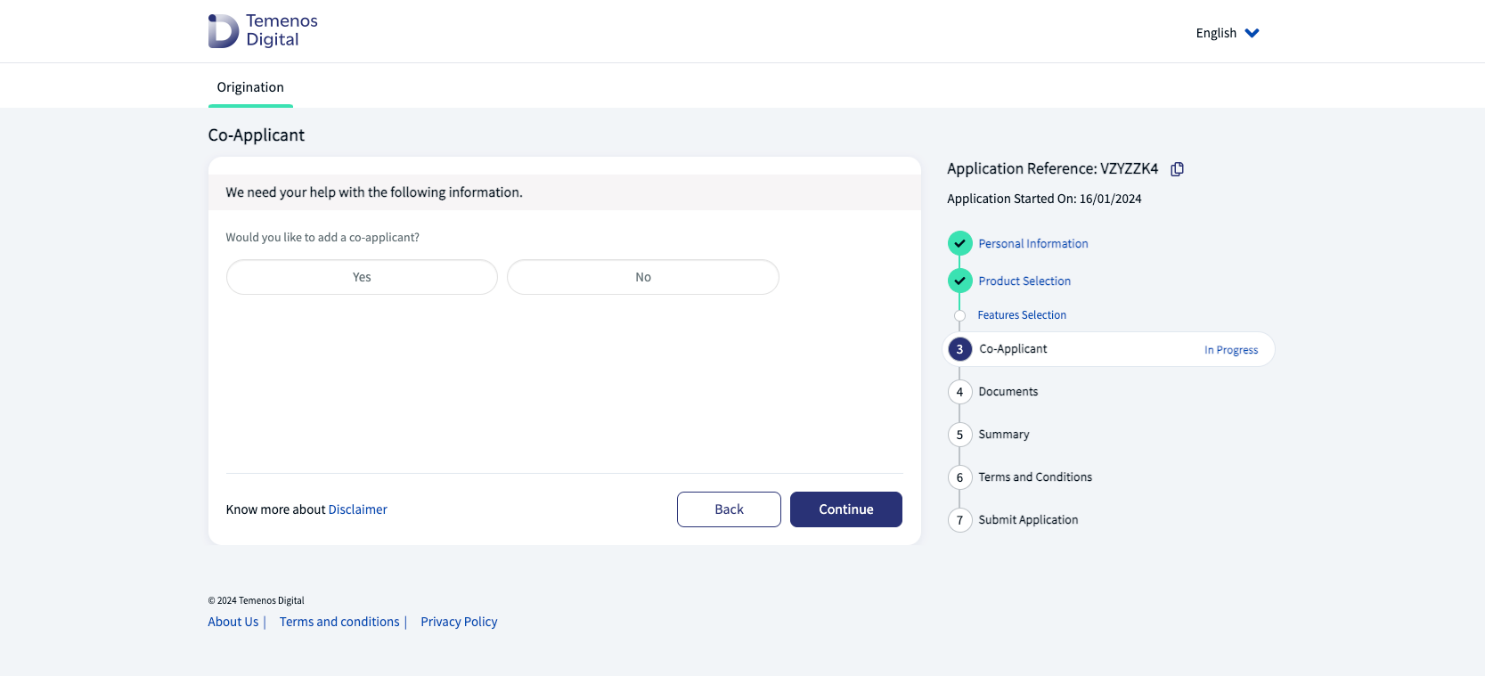
- If you want to add more co-applicants, click Add Co-Applicant Information. A new co-applicant card is displayed.
- Repeat until all the required co-applicants are added. Click Continue to proceed with the application.
If Yes, the Co-Applicant Information section displays.
Enter the co-applicant details and click Continue, to save the details and proceed to the next step in the application.
The Retail Origination application has been pre-configured to accept up to four co-applicants per application.

Co-applicant
The co-applicant will then receive an email invitation to complete the required information and add it to the application.
Note that if the co-applicant is already an existing customer, they will follow the same journey as the primary or main applicant.
Upload Documents
Step dependent on customer and journey type
The Documents step is where applicants, whether a new or existing customer, must upload their documents as evidence in the Retail Origination application.
The document list presented varies depending on the type of journey and the product selected.
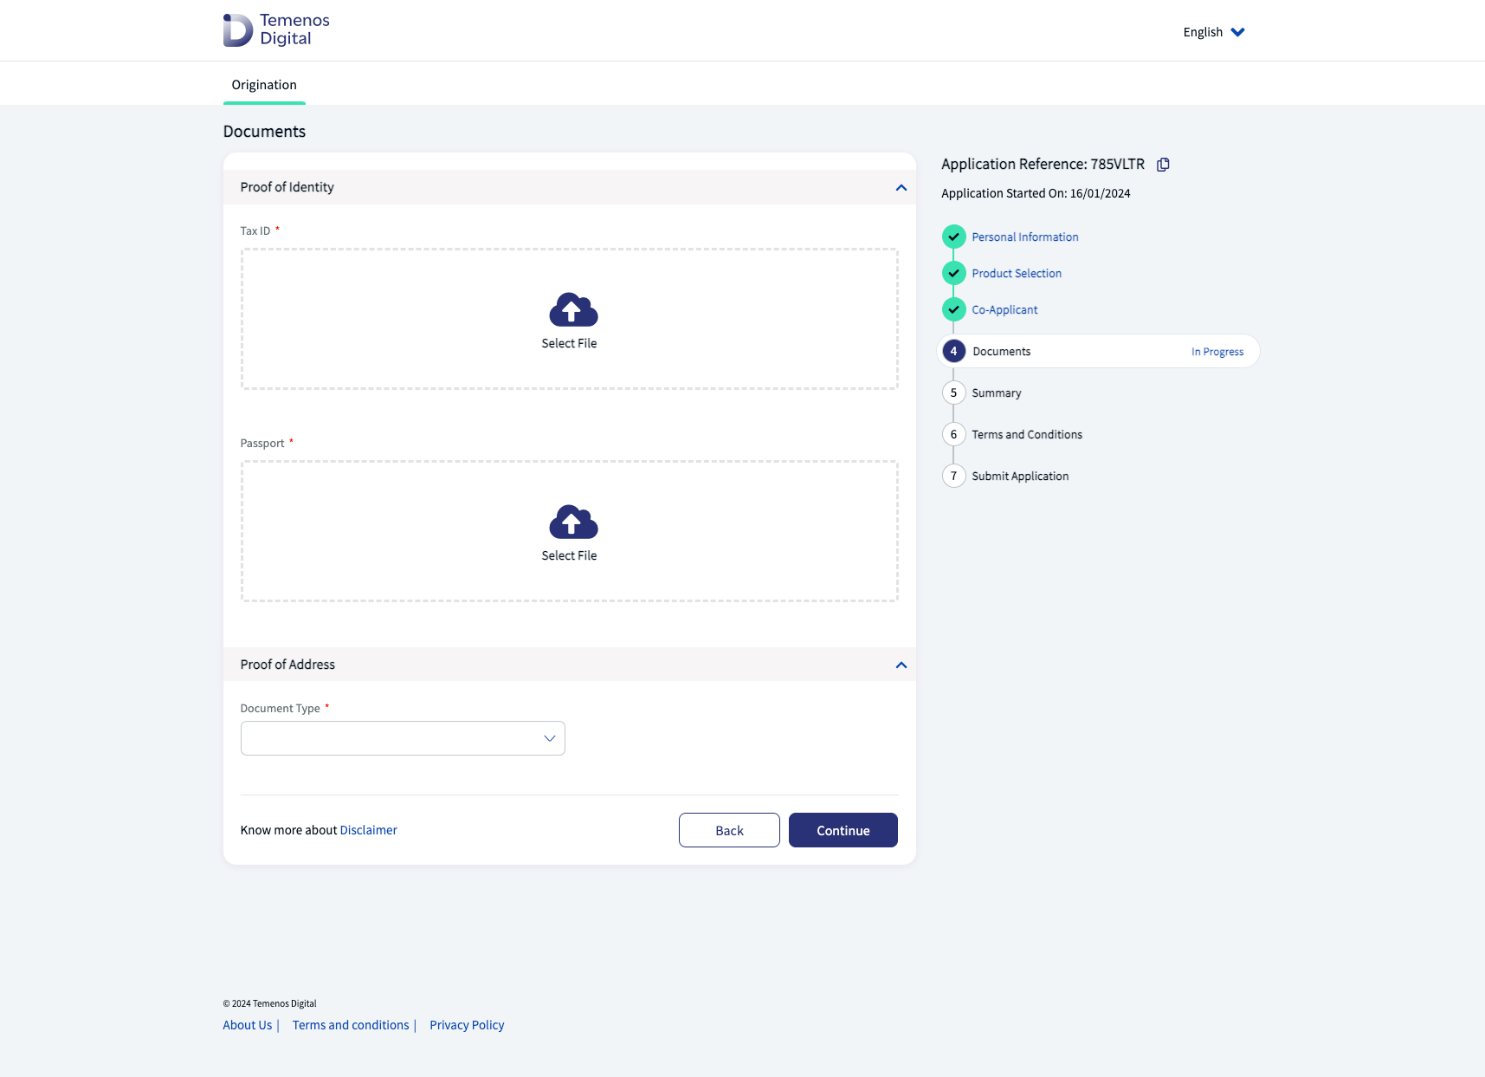
Upload a document
Click the Select File icon to upload a document.
Delete uploaded document
Click on the trash can icon then upload a replacement document, if required.
Note that applicants cannot upload documents in the Summary step, therefore all documents need to be uploaded during this step.
Review Application
Step applicable to all accounts and lending journeys
The Summary step is a review step, so the applicant can review all the information they have entered, for both applicant and co-applicant, prior to submitting the application.
Note that the Summary step is read-only, so if the applicant needs to upload more documents, they will need to go back to the Documents step.
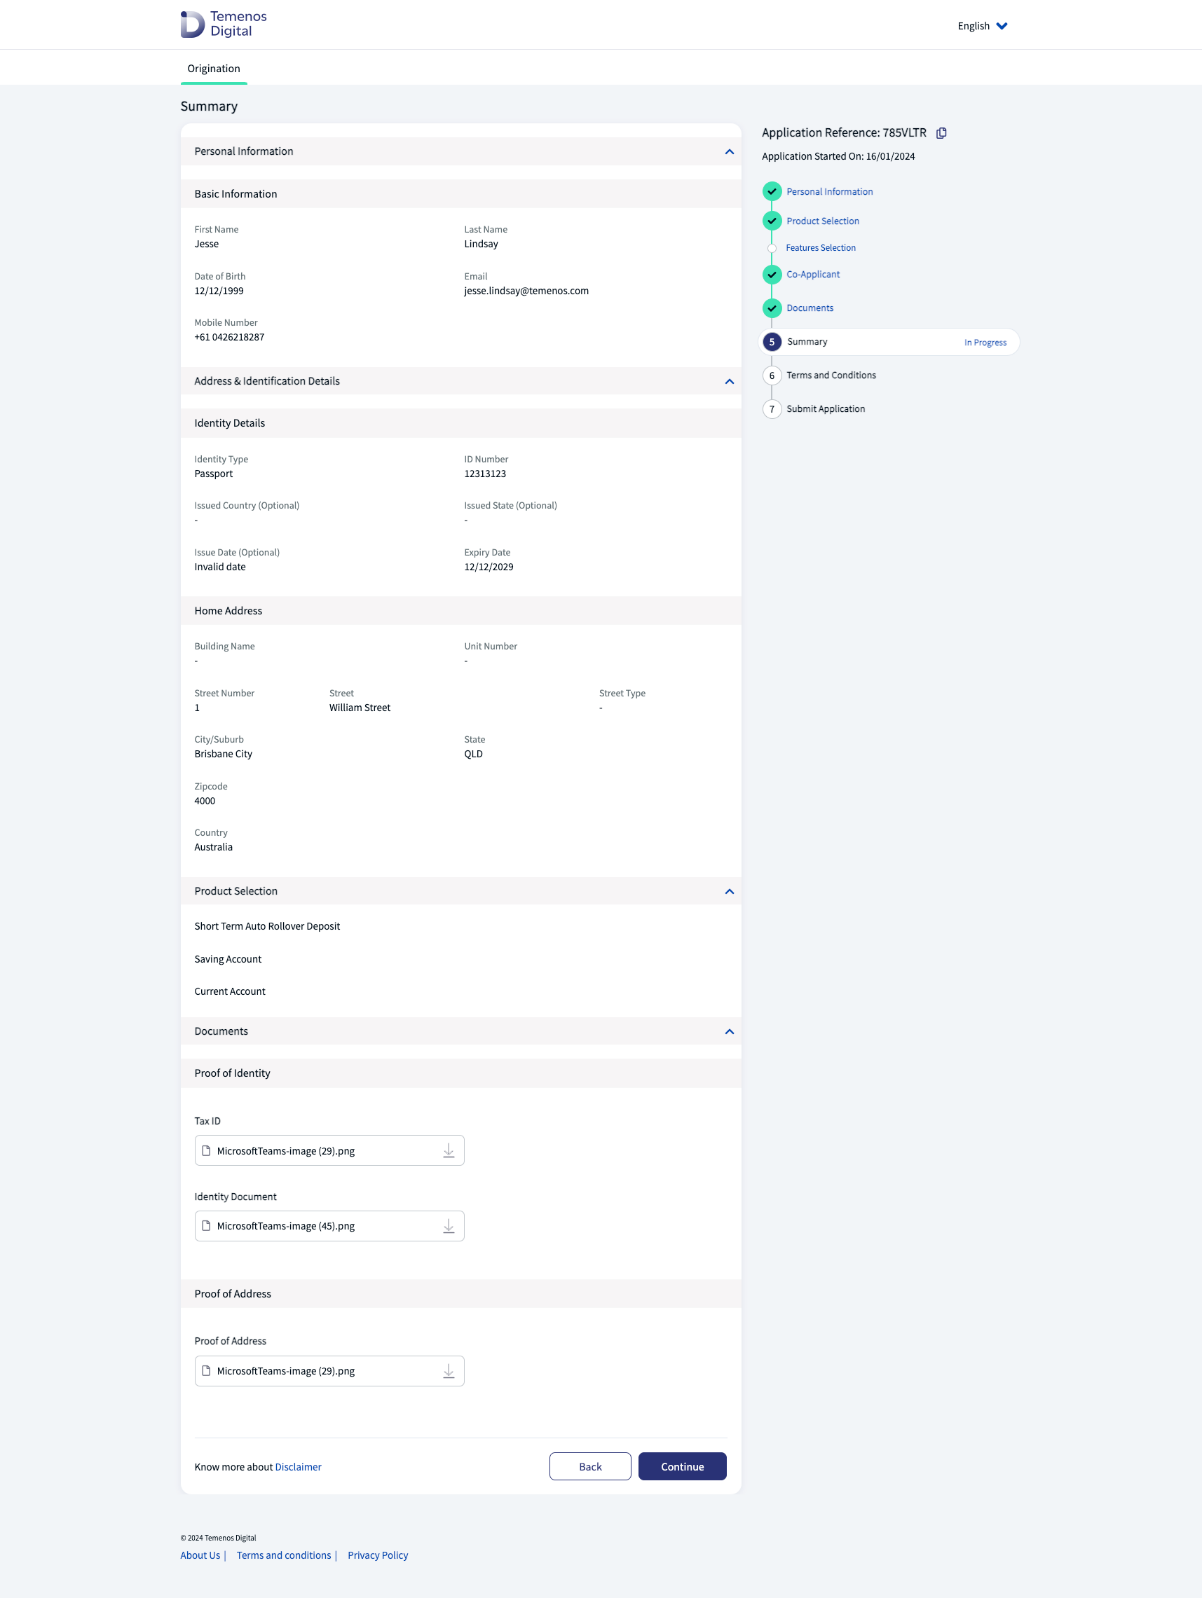
Applicants can expand the dropdowns to review and confirm the details they have already provided.
The applicant can also view the documents uploaded in the Documents step.
The applicant can add a new document, replace an existing document, or delete an existing document.
Click Back to navigate to previous sections to make any required changes. Any changes made at this point will be reflected in the Summary screen.
Once all details are correct, click Continue to proceed.
Submit Application
Step applicable to all accounts and lending journeys
The Submit Application step contains the following sections:
- Applicant acceptance and acknowledgement of the Terms and Conditions.
- Reading any important disclosures from the bank.
- The action of clicking the Submit button.
- Submission of the application to the decisioning process.
- As well as the option to make an initial deposit into the new account, or not.
Agree Terms and Conditions
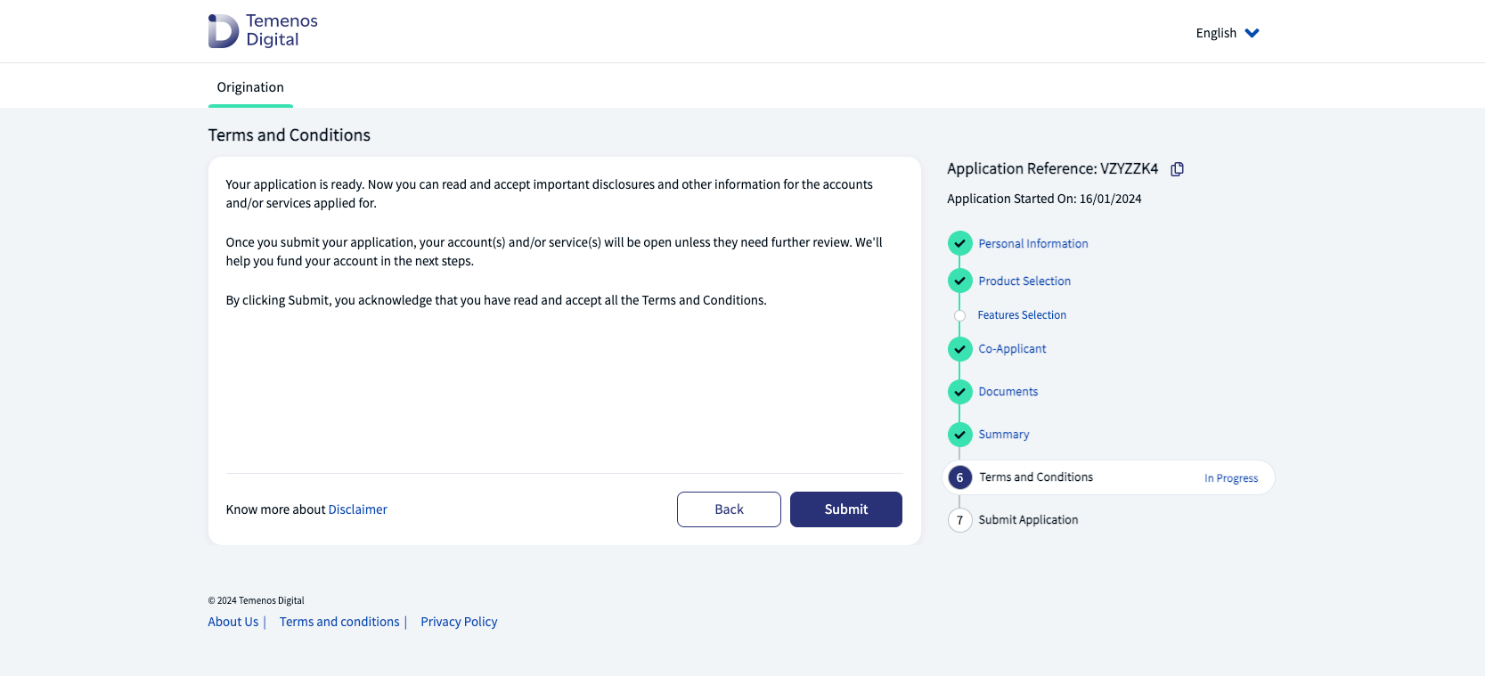
Click Submit to agree with the Terms & Conditions and proceed with the application’s processing and decisioning.
Decisioning process
The Retail Origination application uses the Temenos Journey Manager Decision Framework to decide the status of the application.
The bank’s business strategy and rules inform the Decision Framework, which then decides whether each application submitted should be Approved, Rejected or go into the Manual Review queue in Workspaces for bank staff to review and assess manually.
The Decision Framework is a dynamic decision service driven by configuration rather than code. It allows for easy modification of the rules that lead to application decisions, without the need to write or deploy code.
This service is currently driven by JSON configuration files, with future plans for an editor user interface (UI).
The following components drive the Decision Framework:
Configuration drives the decisioning engine.
JsonLogic drives the logic of decision paths.
Data is available to JsonLogic to help make decisions.
Refer to the Temenos Journey Manager Decision Framework for more information.
Submit application
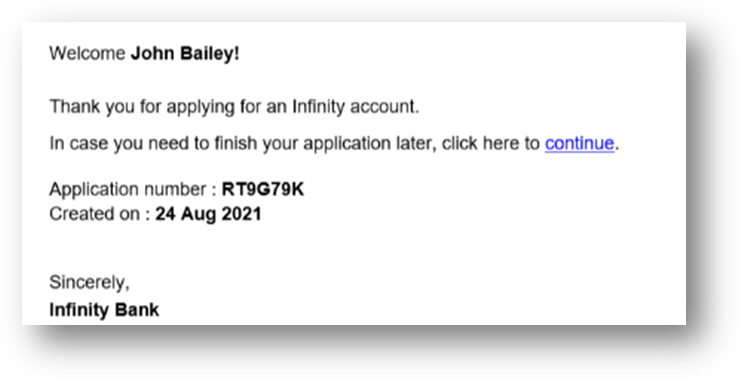
When the application is submitted successfully, the applicant receives the Congratulations dialog.
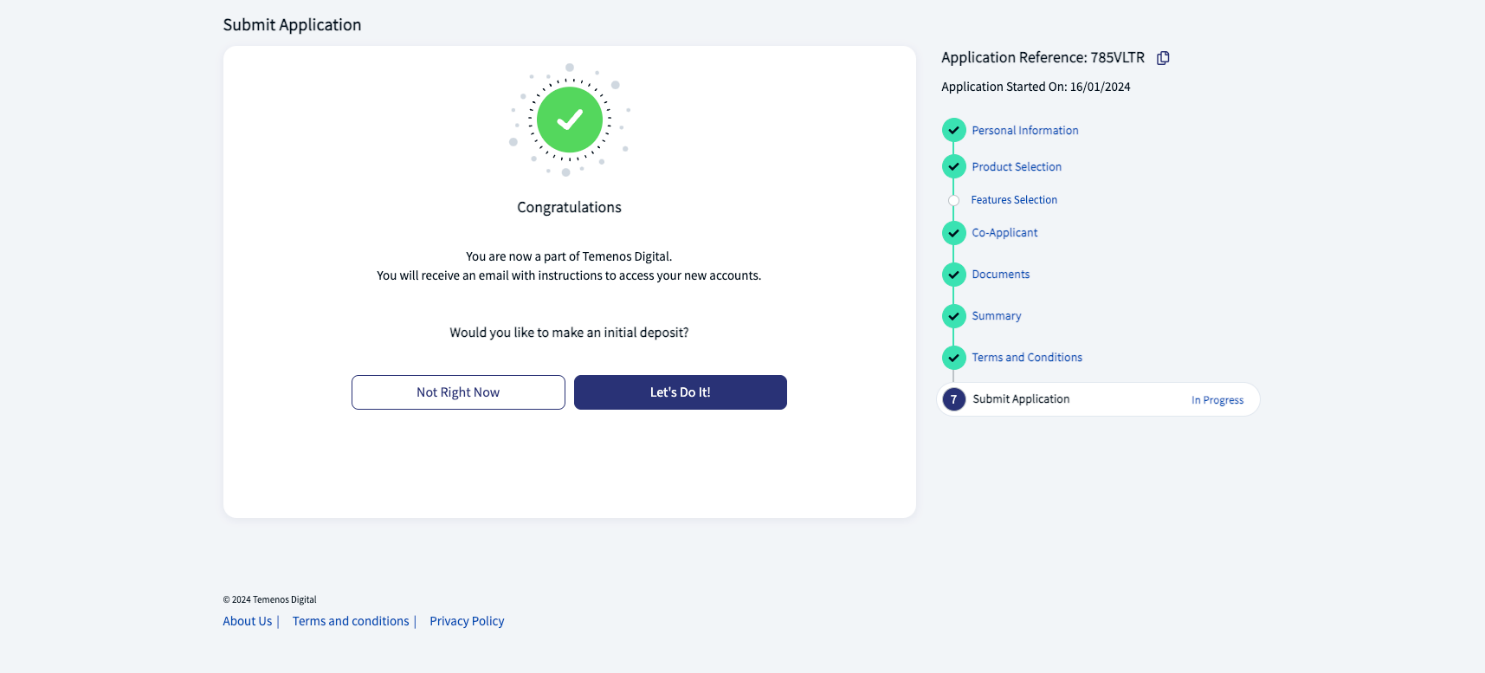
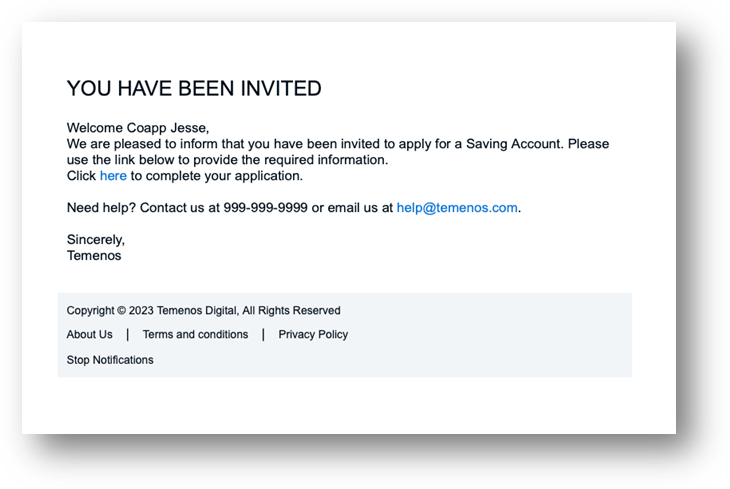
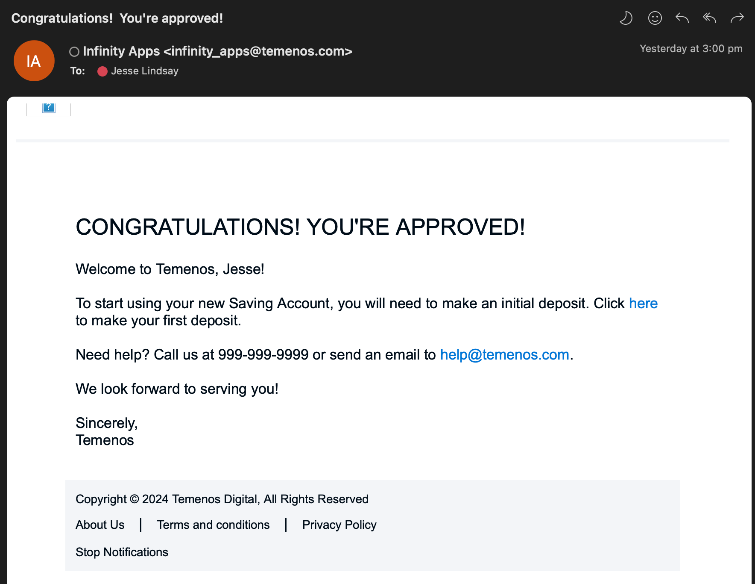
The applicant also receives the following email notification.
The applicant can now choose to either stop at this point, and click Not Right Now.
Or choose to make an initial deposit into their new account, and click Let’s Do It!.
Funding (initial deposit)
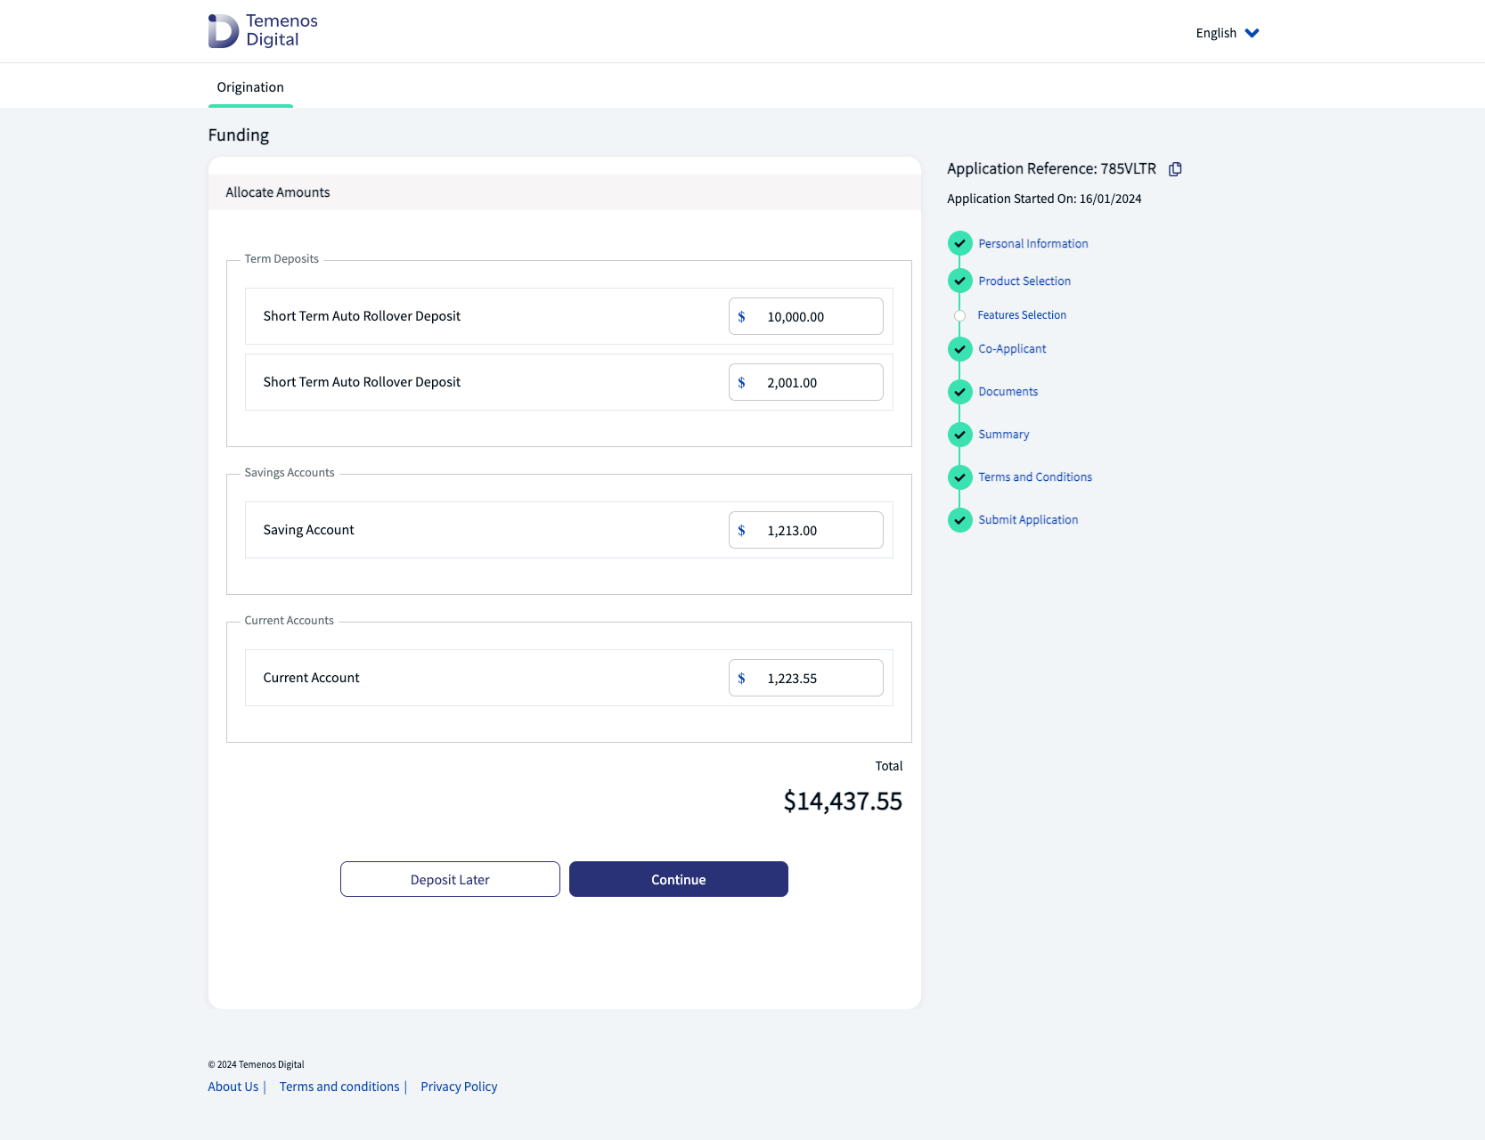
Click Continue to continue with the initial deposit.
Or click Deposit Later to cancel the Funding step.
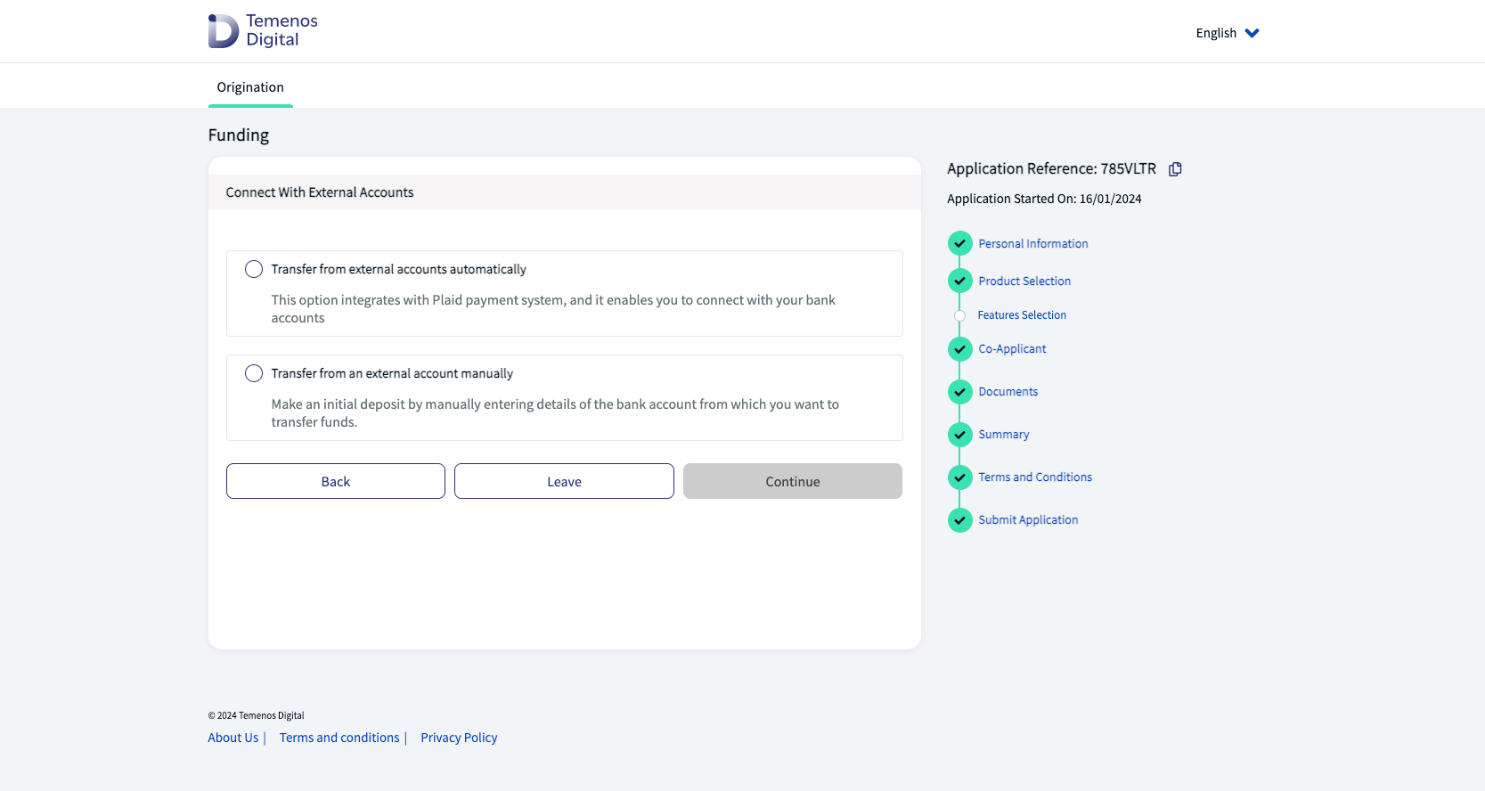
Select a manual or automatic transfer, then click Continue.
Or click Leave to cancel the Funding step.
The Funding section displays.
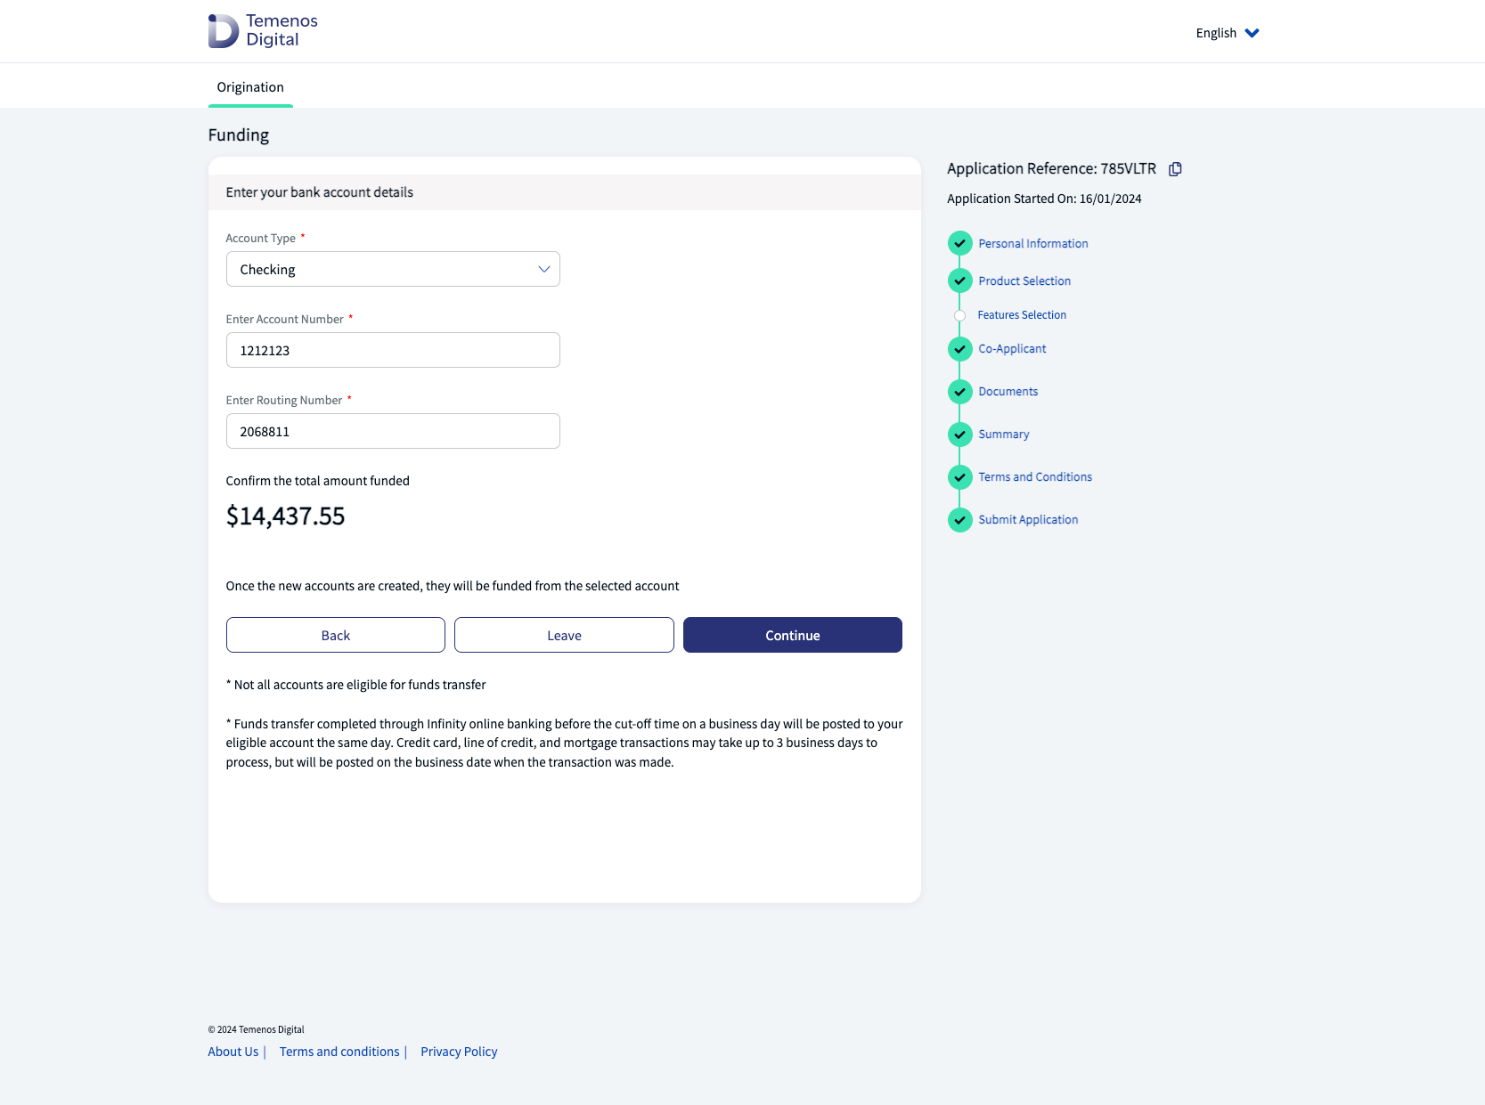
Enter your bank account type and number, then click Continue.
Or click Leave to cancel the Funding step.
The Plaid dialog displays. Click Continue, or X to cancel.
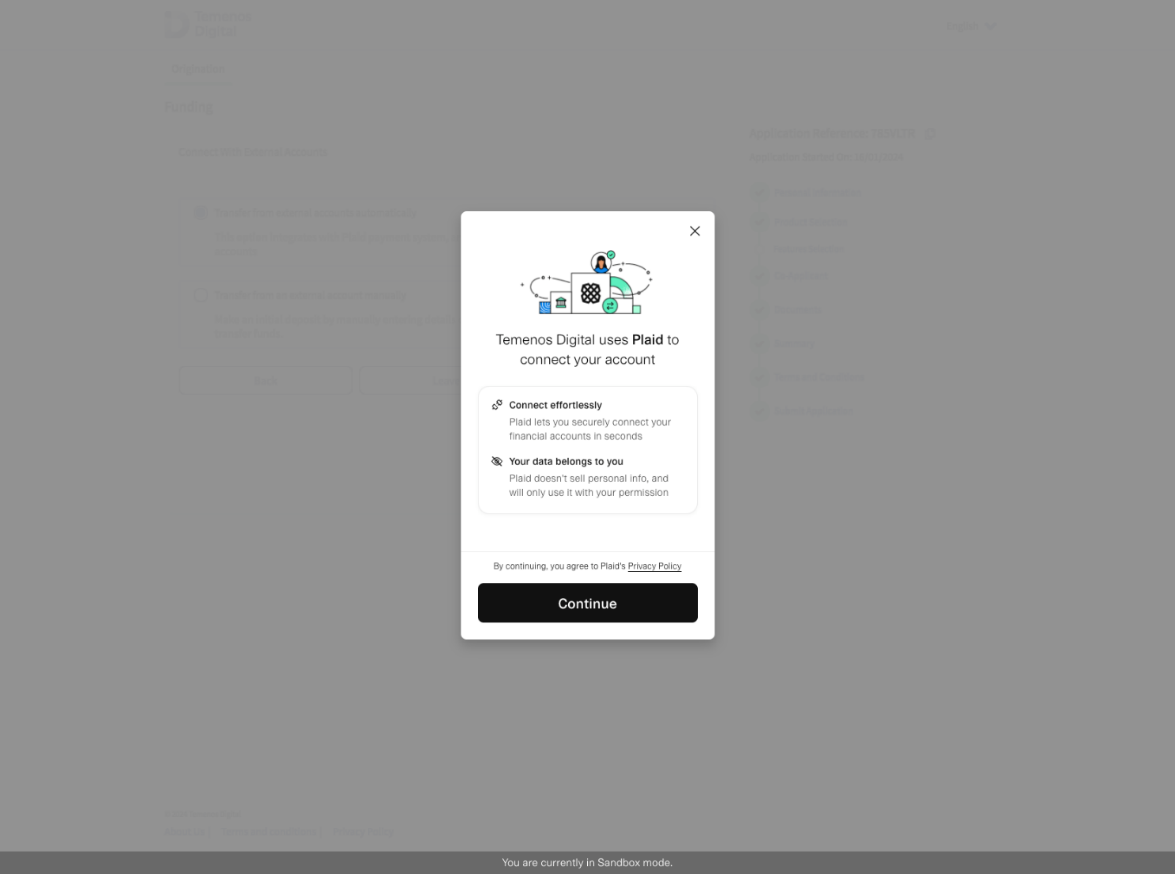
The Select your institution dialog displays.

The deposit will be made to your new account.
Resume an application
Step applicable to all accounts and lending journeys
The resume functionality in the Retail Origination application can be used at any point during the process, up until the application is submitted.
Reasons
There are many reasons why an applicant would create an application, provide a few details, then quit the application without completing the process.
- If the applicant quits the application, the application automatically saves the details provided so far, so they can continue the process later.
- If the browser crashes, or the session times out, the application is saved automatically.
- In both these cases, the application provides an option to resume the application from where the applicant left.
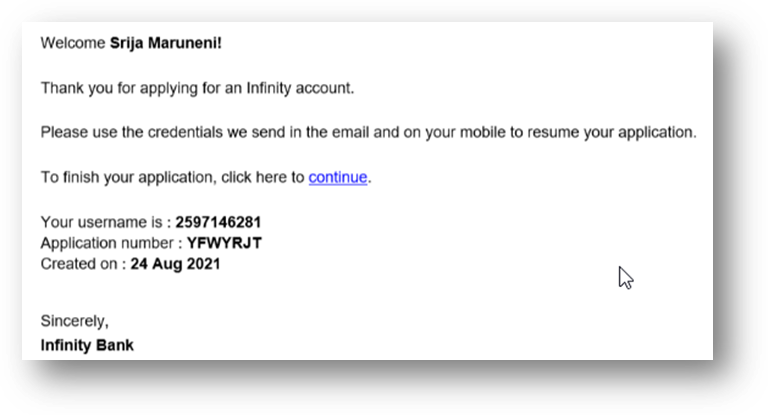
New customer
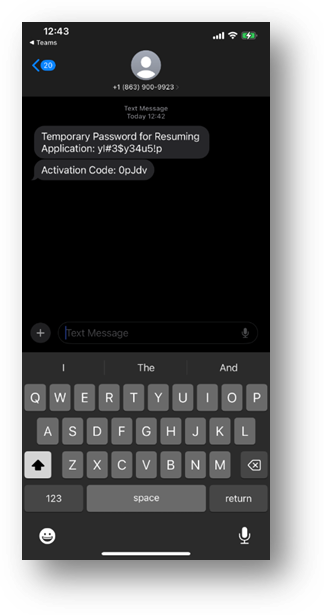
If you are a new customer, you will receive the following email with an application resume link, username, and application number. A temporary password is sent to the applicant’s mobile phone number.
Mobile phone notification
Existing customer
If you are existing user, you will receive the following email with an application resume link and application number. You can login to the application using your login credentials.
Third-party Integrations
Third-party integrations have been pre-configured for the Retail Origination application.
These include:
- Twilio for mobile phone verification.
- AuthID for personal ID verification.
- GooglePlaces for address lookup.
- Plaid for initial deposit funding once an account is created.
Depending on the region or regions where the applicants are located, you can customize the solution and swap the integrations out with the Exchange packages applicable for those regions.
Exchange packages are pre-integrated third-party Maestro FinTech services used to extend the capabilities of a Temenos Journey Manager solution like Retail Origination.
Core Banking (Transact) Integration
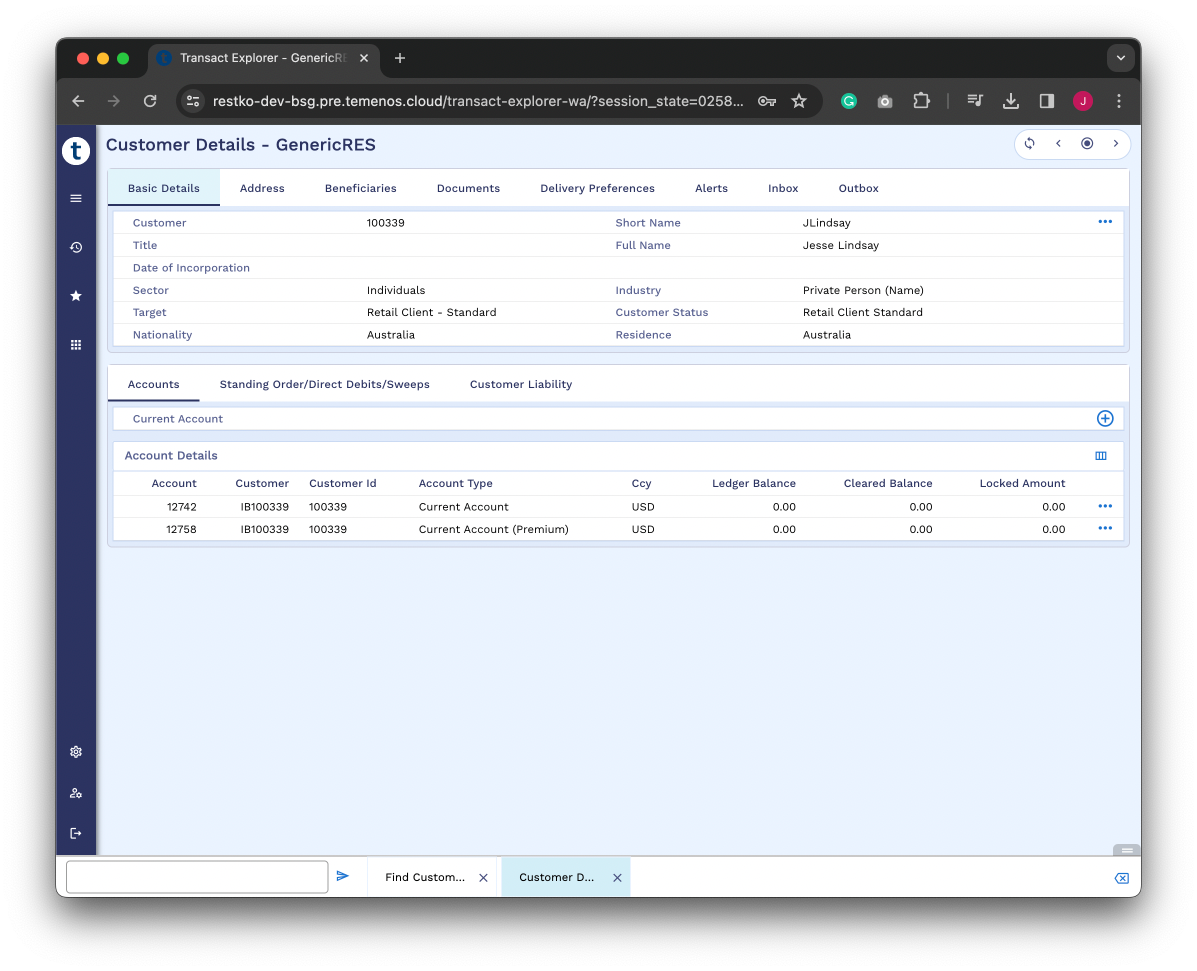
Use Transact Explorer to view the new customer and account created in the Core Banking application (Transact), as a result of a successful Retail Origination application.
Use the following steps:
- Login to Transact Explorer using your credentials.
- The new customer account is now visible in the Customer Details screen.
- Click on Basic Details to view the new customer details.
- Click on Accounts to view the new account created using the Retail Origination application.
Online Banking Integration
Online Banking
The Online Banking application is used for all retail and business banking solutions. It is a typical digital banking application that helps customers perform their everyday banking activities.
When a new or existing customer successfully applies for a loan, or opens a new account via the Retail Origination application, they are automatically notified via email, and an SMS message is sent to their mobile phone, so they can enroll in Online Banking and activate their digital profile.

Enroll in Online Banking
To activate your digital profile and enroll in Online Banking, follow these steps:
- In the online banking sign in page, click Enroll / Activate.
- Click Enroll now.
- Select Entity from the dropdowns.
- Enter your Personal Identity Number (National ID) and click Continue.
- Enter your Date of Birth as per bank records and click Continue.
- Check and Confirm the supplied details. Note if the supplied details do not match, click Cancel to return to the previous page.
- Enter the Captcha and click Verify.
- You should get a notification Successfully Enrolled to personal banking.
- Click Activate your profile to activate your digital profile.
Activate your digital profile
The username and activation code are automatically sent to the customer’s email address and mobile phone.
The enrolling in Online Banking, the customer then needs to activate the profile in the mobile banking application and set the password to the Online Banking system.
To activate your profile through online banking, follow these steps:
- In the online banking sign in page, click Enroll / Activate.
- Click Activate your profile.
- The application displays a Playstore and App Store QR code.
- Scan the QR code and install the banking app to activate the profile.
Sign in to Online Banking
The customer can now sign in to Online Banking using a web browser, but only after activating the profile and setting the password. Use the following steps to sign in to Online Banking:
- In the sign in page, enter Username and Password and click Sign In.
- The registered mobile app receives a push notification for approval.
- After a successful approval, the user can sign in to the Online Banking application.
In this topic