Common Framework
A Common Framework supports all Retail, Business and Wealth Origination Applications running on Temenos Journey Manager.
The framework consists of the following components:
- The Narrator (link below)
- Narratives (link below)
- Decision Framework (link below)
- The Dispatcher (link below)
- Originations Setup Tool (link below)
The Narrator
The Narrator is responsible for executing the Narrative.
It handles requests from the application, loads the appropriate Narrative JSON file and processes the actions. It also handles reporting and storing an application's current state.
Narration Controller
The Narration Controller is a Transact Function that acts like a Controller in a Model-View-Controller architecture. It does this by handling requests from the View and executing the Narrator. The Narrator is a Class specifically designed to execute a Narrative.
Narratives
Narratives define the application flow, which is enforced and controlled by the Narrator.
The Narrative consists of one or more pages, each of which contains zero or more preActions and postActions. A preAction is anything that needs to occur before a user is allowed to access that page. A postAction is anything that needs to occur in order for a user to be allowed to leave the page. Finally, each page has a set of nextPages which define where a user can go, from the current page.
Using these controls, along with numerous other properties supported by the Narrative, you gain reliable and fine-grained control over how users interact with your form.
The Narrator Controller
The Narrator Controller component is responsible for enforcing the Narrative and controlling the form behavior on the client-side. It simplifies the task of using a Journey Narrative.
Decision Framework
The Decision Framework is a dynamic decision service driven by configuration rather than code. It allows for easy modification of the rules that lead to application decisions, without the need to write or deploy code.
This service is currently driven by JSON configuration files, with future plans for an editor user interface (UI), and the service has the following components:
- Configuration drives the decision engine.
- JsonLogic drives the logic of decision paths.
- Data and TXN property map are available to JsonLogic to help make decisions.
The Decision Framework is intended for use with Journey Narratives, however, it can be used with any application that has Fluent Functions enabled.
Inputs and outputs
There are two primary inputs to the Decision Framework, the configuration that defines all of the decision rules and outcomes, and the data that is combined with the rules to determine results.
The results of the Decision Framework are called Destinations. Destinations act like flags, indicating which decision rules evaluated to true and what should be done with the application as a result.
For more information on the Decision Framework, refer to the following topics:
|
Topic |
Link |
|
Configuration - Destinations |
https://journey.temenos.com/docs/decision-framework/configuration.htm |
|
Configuration - Paths
|
https://journey.temenos.com/docs/decision-/configuration.htm
|
|
Configuring the Data Function |
https://journey.temenos.com/docs/decision-framework/data.htm |
|
Accessing data |
https://journey.temenos.com/docs/decision-framework/data.htm |
|
Result |
https://journey.temenos.com/docs/decision-framework/result.htm |
|
Rules Logic – Retrieving data |
https://journey.temenos.com/docs/decision-framework/rules-logic.htm |
|
Rules Logic – Logic operators |
https://journey.temenos.com/docs/decision-framework/rules-logic.htm |
|
Example – approved_by_default |
https://journey.temenos.com/docs/decision-framework/example-approved_by_default.htm |
|
Example – denied_by_hardfail |
https://journey.temenos.com/docs/decision-framework/example-denied_by_hardfail.htm |
|
Example – declined_by_idv_verify_status. |
https://journey.temenos.com/docs/decision-framework/example-declined_by_idv_verify_status.htm |
|
Example – decline_by_qualifile_account_acceptance |
https://journey.temenos.com/docs/decision-framework/example-decline_by_qualifile_account_acceptance.htm |
|
Example – control_application_review |
https://journey.temenos.com/docs/decision-framework/example-control_application_review.ht |
|
Example – control_application_decline |
https://journey.temenos.com/docs/decision-framework/example-control_application_decline.htm |
|
Example – data_access |
https://journey.temenos.com/docs/decision-framework/example-data_access.htm |
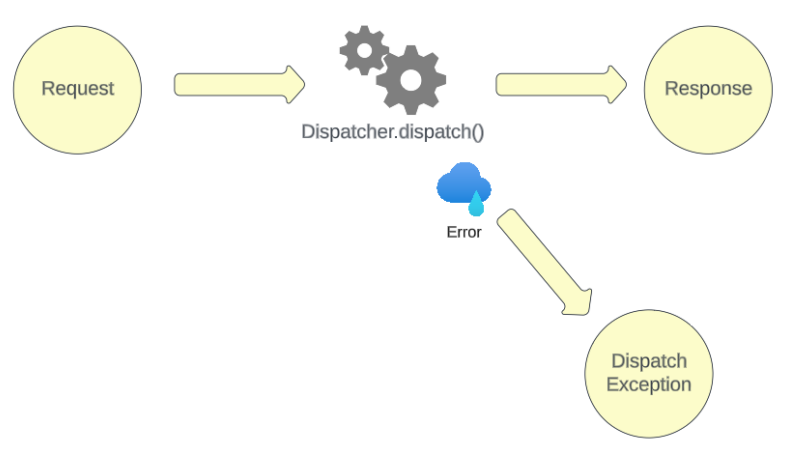
The Dispatcher
The Dispatcher is a Groovy library that you can include in your Journey Manager projects and use to implement a dispatcher pattern for invoking REST endpoints.
Any Groovy service that invokes a web service endpoint over HTTP can use this pattern to encapsulate many of the details of constructing the request, invoking the endpoint, and parsing and validating the response.
The core of the Dispatcher is the dispatch() method, which takes an object that extends com.avoka.taf.dispatcher.BaseRequest and returns an object that extends com.avoka.taf.dispatcher.BaseResponse.
The Request
Before invoking the dispatch method, your service must instantiate a Request object of a class that extends BaseRequest. This class defines four methods that your class must override and two that your class may override. These are:
String contextPath()
The base path and context path are elements of a web service’s URL that help define the location of the API or resource being accessed. The base path is the portion of the URL that remains constant for all endpoints within a particular API. It typically represents the root or main entry point of the API. The context path is a part of the URL that follows the base path and provides additional information about the specific context or resource within the API. For example:
Base Path: https://api.example.com
Context Path: /users
Complete URL: https://api.example.com/users
When you implement the contextPath() method for your Request object, you return the context path as a String. Often, this is as simple as:
@Override
	String contextPath() {

		return “outcome/v1”
}
If needed, you can write code to construct the contextPath dynamically. Let’s say we want to retrieve data for a customer with ID 24601. Our Request code might look like:
class GetCustomerRequest extends BaseRequest {

				String customerId;

				GetCustomerRequest withCustomerId(String s){
				this.customerId = s;
				return this;
				}

				@Override
				String contextPath() {
				return “customer/${customerId}”
				}
				…
		}
When you construct your GetCustomerRequest object, you would do so like:
GetCustomerRequest myRequest = new GetCustomerRequest()
          .withCustomerId(“24601”)
ContentType contentType()
This method, which you must override in your request class, returns a com.avoka.taf.dispatcher.ContentType, which is an Enum. For example:
@Override
        ContentType contentType() {
          return ContentType.xml
        }
HttpMethod httpMethod()
This method, which you must override in your request class, returns a com.avoka.taf.dispatcher.HttpMethod, which is an Enum. For example:
@Override
        HttpMethod httpMethod() {
          return HttpMethod.POST
        }
void validate() throws RuntimeException
You must override this validate method as well. It should be set up to throw an Exception if the request is invalid. For example:
@Override
        void validate() throws RuntimeException {
          Contract.notBlank(this.customerId, “Customer ID”)
        }
When invoked with this request object, the dispatcher will execute the validation rules before making the HTTP request. If the validate() method throws an exception, your dispatcher will not invoke the endpoint, and will throw the exception instead. For this reason, you must wrap your calls to Dispatcher.dispatch() in a try block and handle the exceptions gracefully.
Map httpHeaders()
You may override this method, which returns all the HTTP headers needed for your request in a Map. To ensure that you get predictable results, you should use a Map<String, String> where the keys and values are both of type String. If you don’t override this method, it will default to an empty Map, which is often all you need. The content type will be included regardless. For example:
@Override
        Map httpHeaders() {
        Map headers = [:]
        headers.put(“adminUserName”, “admin”)
        headers.put(“adminPassword”, “bananas”)
        return headers
        }
String message()
This method returns a String that contains the payload for your request. Usually this would be JSON or maybe XML depending on what the web service expects. If you’re making a GET request, you don’t need to override this at all, and it will simply return null, since a GET request requires no body. You can choose how you want to construct your payload. The following example constructs a JSON payload that uses a groovy.json.JsonOutput.
@Override
        String message() {
        Map<String, Object> mpPayload = [:] as Map<String, Object>
        mpPayload.put(“customerId”, “24601”)
        mpPayload.put(“firstName”, “George”)
        mpPayload.put(“lastName”, “Banks”)
        List<Object> lstChildren = [] as List<Object>
        lstChildren.add([“firstName”: “Michael”, “lastName”: “Banks”])
        lstChildren.add([“firstName”: “Jane”, “lastName”: “Banks”])
        mpPayload.put(“children”, lstChildren)
        return new JsonOutput().toJson(mpPayload)
        }
The above code returns the following JSON (formatting added for readability):
{
          “customerId”: “24601”,
          “firstName”: “George”,
          “lastName”: “Banks”,
          “children”: [
            {
              “firstName”: “Michael”,
              “lastName”: “Banks”
            },
            {
              “firstName”: “Jane”,
              “lastName”: “Banks”
            }
          ]
        }
The above example illustrates a tidy way in which we can construct an object with maps and lists and then use the groovy.Json.JsonOutput object to convert it to valid JSON. You can use a different approach to parse the JSON if you prefer. This message() method encapsulates the details of how the payload is to be constructed.
The Response
We are not ready to invoke the Dispatcher yet. First, your service must instantiate a Response object of a class that extends BaseResponse. This object should include properties in which you can store the information your service needs to get back from the API you’re invoking.
BaseResponse defines one method that your class must override and one that your class may override. These are:
void validate() throws RuntimeException
Much like BaseRequest, BaseResponse defines a validate() method, which you must override. Your code should inspect the parsed response and throw a RunTimeException if the response isn’t what you’re expecting. Even if you don’t want to validate anything, you must override the method, which you can do as follows:
@Override
        void validate() throws RuntimeException {}
BaseResponse deserialize(HttpResponse response)
This method parses the payload received from the service, extracting the information you need and writing that information into properties of your Response object so that they can be used by your service. For example, let’s say your service returns a JSON structure like this:
{
          “time”: “10:00 p.m.”,
          “status”: “success”,
          “fruits”: [
            {
              “name”: “apple”,
              “color”: “red”
            },
            {
              “name”: “banana”,
              “color”: “yellow”
            },
            {
              “name”: “lime”,
              “color”: “yellow”
            }
          ],
          “moreInformation”: {
            “country”: “US”,
            “accountNumber”: “31415927”,
            “accountType”: “SAV”
          }
        }
Here we have the time, status, some information about various fruits, the account number, and some other stuff. Now let’s say you’re only interested in the account number and status. In that case, your Response class might look something like:
import com.avoka.tm.util.Path

        class CreateAccountResponse extends BaseRequest {

        String accountNumber
        String status

        @Override
        CreateAccountResponse deserialize(HttpResponse response) {
          Path path = new Path(response.textContent)
          this.accountNumber = path.val(‘$.moreInformation.accountNumber’)
          this.status = path.val(‘$.status’)
          return this
        }

        @Override
        void validate() throws RuntimeException {}
        }
Here we’re using the Path object to parse the values out of the JSON. You can use a different method if you prefer. The purpose of the deserialize method is to pull from the HTTP response the data elements that we want to make available to our service. This method encapsulates the details of the response payload’s structure.
void validate() revisited
Now that you have an understanding of the deserialize method, let’s revisit validate(). It’s important to understand that validation runs after the HTTP response has been parsed with deserialize(). Let’s say we want to throw an exception if the status is anything other than “success” or if the account number returned is fewer than five characters in length.
@Override
        void validate() throws RuntimeException {
        if (this.status != “success”)
          throw new RuntimeException(“Status returned was not success.  It was ” + this.status)
        if (this.accountNumber?.length() < 5)
          throw new RuntimeException(“Invalid account number: ” + this.accountNumber)
        }
Instantiating the Dispatcher
Now that you have defined the request in a Request object and the response in a Response object, you are ready to instantiate and run the dispatcher. Below is an example that gets information about a customer where we construct and supply a GetCustomerRequest object and expect a GetCustomerResponse in return:
String baseEndpoint = https://api.example.com
        GetCustomerRequest myRequest = new GetCustomerRequest()
          .withCustomerId(“24601”)
        try {
          GetCustomerResponse myResponse = new Dispatcher(baseEndpoint, logger)
        .dispatch(myRequest, GetCustomerResponse)
          //If we got here, it means that the validate() methods on the request and response ran without throwing an exception
          logger.debug(“Got this customer name: ” + myResponse.customerName)
          logger.debug(“Got this customer date of birth: ” + myResponse.customerDOB)
        }
        catch (Exception e) {
              //Handle exceptions
        }
There are a few things to notice here:
- When you instantiate the Request object, you pass to it whatever variables it needs. In this case, that’s the customer ID. It can use values like this in the message() method to construct the request payload. It can also use such values in constructing the context path (as we’ve seen) or the request headers.
- When you instantiate your Dispatcher object, you pass it the base endpoint and a logger, which Dispatcher can use to log errors.
- The call to dispatch() passes an instance of the request class along with the response class itself. You don’t instantiate a response class. That’s done by the dispatcher. It will instantiate the appropriate type of response based on the class you pass in the second parameter.
- In this example, we assume that the GetCustomerResponse object has public member variables for customerName and customerDOB. These values would have been pulled from the raw response payload and set in the GetCustomerResponse.deserialize() method.
- Our service code doesn’t care about the details of the HTTP request structure, HTTP headers, content type, HTTP method to be used, or what constitutes a valid request. All those details are encapsulated in the Request class.
- Our service doesn’t care about the details of the response structure or what constitutes a valid response. Our Response class encapsulates the logic for pulling from that response the elements that we care about, which in this case are customer name and ID.
- We wrap the call to dispatch() in a try-catch block so that we can handle any errors including any raised by the validate() methods of our Request and Response objects.
Using Dispatcher with Mutual TLS
Often, your calls to web services will require a means of proving that your application is authorized to use them. You can accommodate such requirements by passing an app key and secret in the payload or the headers, which you can do using the Request object described already. However, some APIs require a more sophisticated approach.
Mutual Transport Layer Security (MTLS), also known as Mutual TLS or mTLS, is a security protocol that extends the TLS (Transport Layer Security) protocol to provide authentication and secure communication between both the client and the server in a networked application. In a typical TLS (or SSL) communication, only the server is authenticated to the client, and the client’s identity remains private. In a mutual TLS setup, both the client and the server authenticate each other, adding an extra layer of security. The process involves a handshake between JM and the web service being invoked, in which there is a mutual exchange and validation of certificates. Dispatcher can encapsulate the details of MTLS.
To use MTLS, you must have the JM certificate stored in a Java Keystore file (.jks) on the JM server. Getting this set up in a SaaS implementation will require the help of the Temenos cloud team. You’ll need to know the path to the JKS file as well as its password and the password for the entry within the keystore that contains your certificate. Here’s our GetCustomer example with MTLS:
String baseEndpoint = https://api.example.com
        String jksFilePath = “/data/avoka/transact/manager/keystores/mykeystore.jks”
        String jksKeystorePass = “open_sesame”
        String jksKeyPass = “open_this_too”
        GetCustomerRequest myRequest = new GetCustomerRequest()
          .withMutualTLS(new File(jksFilePath), jksKeystorePass, jksKeypass)
          .withCustomerId(“24601”)
        try {
        GetCustomerResponse myResponse = new Dispatcher(baseEndpoint, logger)
        .dispatch(myRequest, GetCustomerResponse)
        //If we got here, it means that the validate() method on the request and response ran without throwing an exception
        logger.debug(“Got this customer name: ” + myResponse.customerName)
        logger.debug(“Got this customer date of birth: ” + myResponse.customerDOB)
        }
        catch (Exception e) {
              //Handle exceptions
        }
Client Handled Errors
By default, if a web service returns an HTTP status code that isn’t in the 200-299 range, Dispatcher will throw an exception. Sometimes however, you are interested in such responses, an want to handle them yourself in your Response object. In such cases, you should construct your Dispatcher as follows:
GetCustomerResponse myResponse = new Dispatcher(baseEndpoint, logger)
              .withClientHandledErrors(true)
              .dispatch(myRequest, GetCustomerResponse)
Verbose Output
You can optionally ask the Dispatcher to include additional information in the Response object including the raw request, the raw response, and the date and time when the request was executed. These will be included in a com.avoko.taf.dispatcher.VerboseOutput object as the verboseObject property of your response. You don’t need to define this member variable, since it is inherited from BaseResponse. To call Dispatcher with verbose output:
GetCustomerResponse myResponse = new Dispatcher(baseEndpoint, logger)
              .withVerboseOutput()
              .dispatch(myRequest, GetCustomerResponse)
Including the Dispatcher in your Project
To include dispatcher, simply add this import to your pom-imports.xml.
<taf-dispatcher-version>2.2.0</taf-dispatcher-version>Journey Setup Tool for Originations
The Journey Setup Tool for Originations is used to configure the branding and languages used in the solution. It drives the multi-brand and multi-language capability of the solution.
You can configure multiple Retail Origination applications with different branding and different languages.
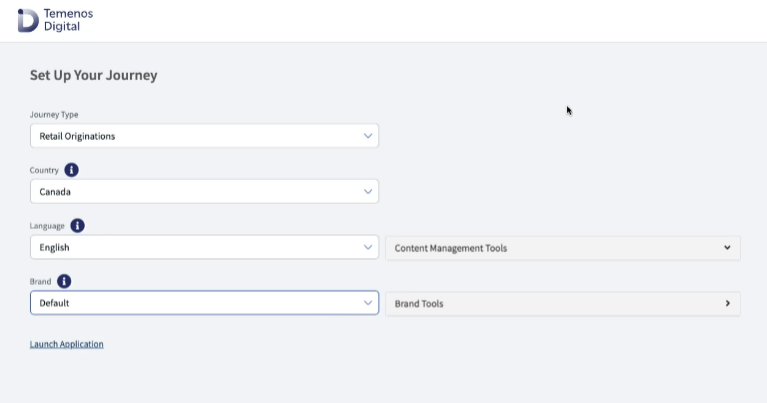
This is the configuration tool provided for the Retail Origination application to specify your branding and language of choice.
This means that multiple versions or brands of the Retail Origination application can exist at the same time.
For more information see
- To configure the language for the Product Selection stage and using the configuration tool, refer to the Journey Setup Tool documentation.
- To configure the language used in the other stages of the in the workflow, use ing the multi-branding and multi-language capability of Temenos Journey Manager solutions, refer to the Translation files documentation in Maestro and Manager.
In this topic